Lumbar Orthopaedic Tests
Palpation
Descriptive Anatomy
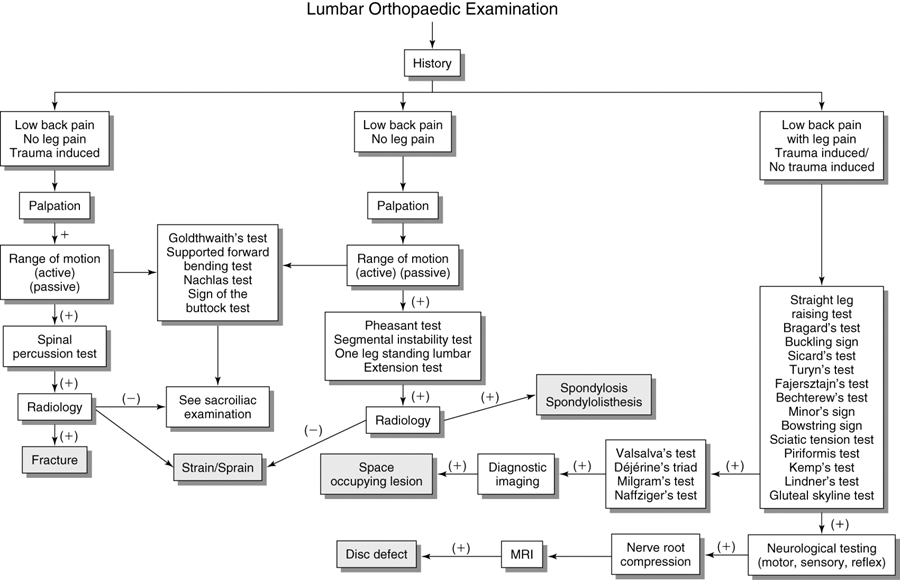
The five lumbar spinous processes are large and easily palpable with the spinal column in the flexed position (Fig. 10-1). The fifth lumbar vertebra is the lowest movable segment. In 5% of the population, the fifth lumbar vertebra is congenitally fused to the sacrum, a condition called sacralization. The person with this condition has only four palpable lumbar spinous processes. In other people, the first sacral segment is not fused to the other segments. This condition is called lumbarization, and six spinous processes may be palpable in the lumbar spine. A common abnormality in the lumbar spinous processes is spina bifida, a congenital defect found in 10% of the population. Spina bifida results from a failure of the vertebral arches to grow together and ossify. It is prevalent in the L5 or S1 segment. Another common abnormality in the L4 to L5 or L5 to S1 interval is spondylolisthesis. This is a fracture of the pars interarticularis that can cause forward movement of one vertebra on another.
Procedure
With the patient seated and flexed forward, palpate each spinous process with your index finger and forefinger (Fig. 10-2). First look for any irregularities, such as spondylolisthesis, spina bifida, lumbarization, or sacralization. Next, place anterior pressure on each process with your thumb (Fig. 10-3) and note any rigidity or springing. Rigidity may indicate hypomobility and springing may indicate hypermobility.
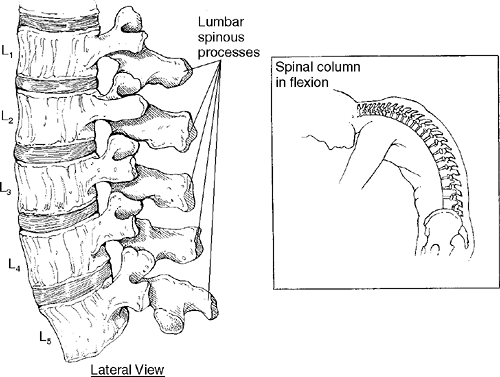 Figure 10-1 |
 Figure 10-2 |
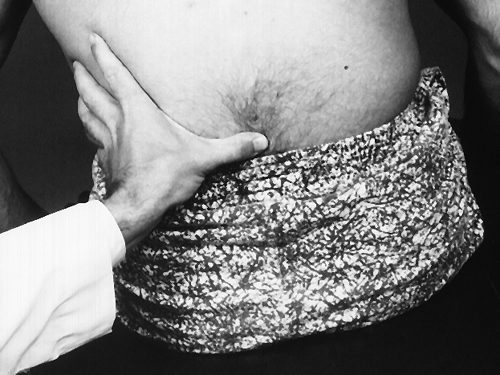 Figure 10-3 |
Descriptive Anatomy
The intrinsic muscles in the lumbar spine are the erector spinae group (spinalis, longissimus, and iliocostalis). In the lower spine, these muscles come together to form the sacrospinalis group (Fig. 10-4).
Procedure
With the patient prone, palpate the lumbar portions of the erector spine group diagonally from medial to lateral (Fig. 10-5). Note any tenderness, inflammation, muscle spasm, or palpable bands, which may indicate muscle strain, myofascitis, fibromyalgia, or active trigger points.
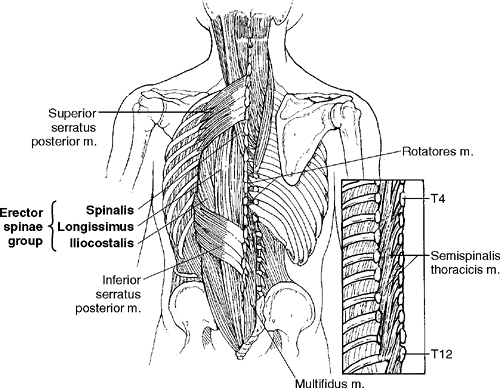 Figure 10-4 |
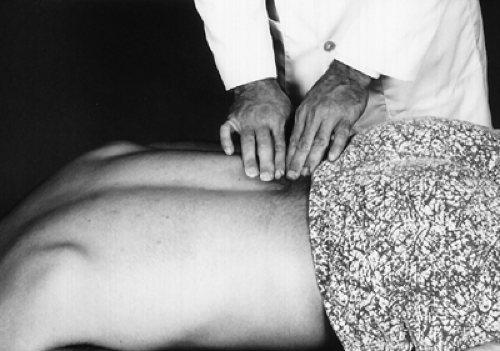 Figure 10-5 |
Descriptive Anatomy
The quadratus lumborum is lateral to the thoracolumbar fascia. It is attached to the transverse processes of the lumbar vertebra, the iliac crest, and the 12th rib (Fig. 10-6). It is a common site for myofascial lower back pain.
Procedure
With the patient prone, palpate the quadratus lumborum from the 12th rib to the iliac crest (Fig. 10-7). This muscle is lateral to the erector spinae group. Note any tenderness, inflammation, muscle spasm, or palpable bands, which may indicate a muscle strain, myofascitis, fibromyalgia, or active trigger points.
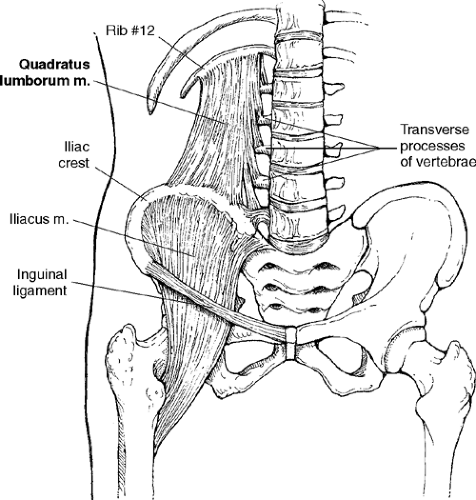 Figure 10-6 |
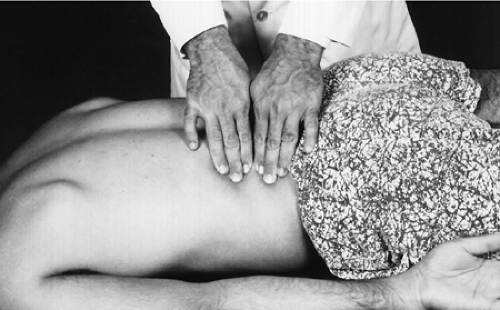 Figure 10-7 |
Descriptive Anatomy
The gluteal muscles consist of the gluteus maximus, gluteus medius, and gluteus minimus. These muscles extend, abduct, and rotate the thigh. They all originate from the ilium and insert into the femur (Fig. 10-8). They can be tender and spastic secondary to trauma. Pain can be referred to the gluteal muscles from a defect in an intervertebral disc, and they can lose muscle tone because of nerve root involvement. The gluteal muscles may have active myofascial trigger points that can refer pain to the posterior thigh, similar to a sciatic pain pattern from an L5–S1 disc defect with nerve root compression.
Procedure
With the patient prone, palpate using strong pressure, starting just lateral to the sacrum and moving toward the greater trochanter of the femur (Fig. 10-9). Note any tenderness, spasm, loss of muscle tone, and tender trigger points. Tenderness and spasm secondary to trauma may indicate a muscle strain. A herniated intervertebral disc with nerve root compression may also cause tenderness and spasm to the area. An active myofascial trigger point may cause local tenderness with a referred component to the posterior thigh.
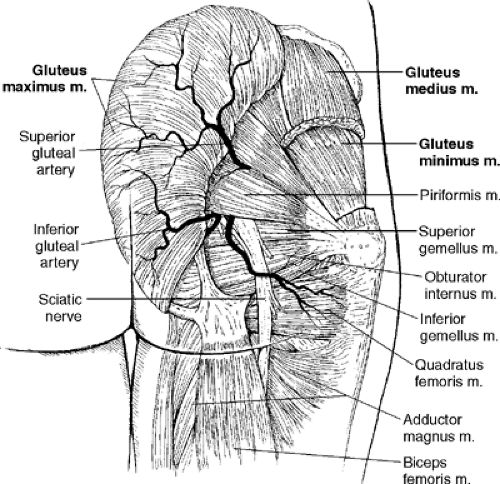 Figure 10-8 |
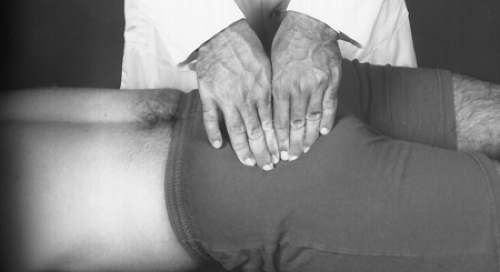 Figure 10-9 |
Descriptive Anatomy
The piriformis muscle is clinically significant because of its proximity to the sciatic nerve (Fig. 10-8). It may become inflamed and spastic and compress the sciatic nerve, causing pain along the entire course of the nerve. It originates from the sacrum and inserts into the greater trochanter of the femur.
Procedure
To locate the piriformis, bisect the tip of the coccyx and the posterior superior iliac spine (Fig. 10-10). This is the inferior border of the piriformis. Palpate the muscle, noting any tenderness or spasm (Fig. 10-11). If the patient has lower extremity radicular pain, note whether palpation of the piriformis increases that pain. Tenderness and spasm in the piriformis may indicate muscle strain caused by overuse. Because of the proximity of the sciatic nerve to this muscle, a radicular component to the posterior thigh may also be involved. A local tender area may indicate an active myofascial trigger point, which may also cause a radicular pain to the posterior thigh.
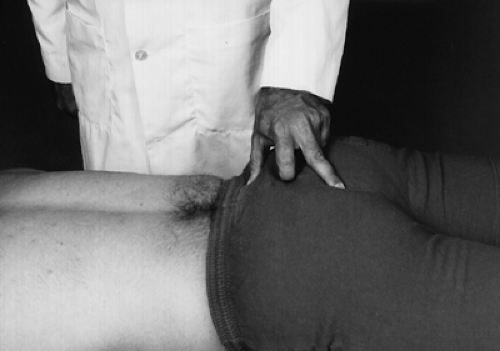 Figure 10-10 |
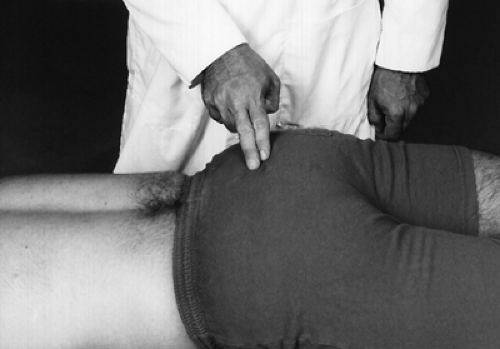 Figure 10-11 |
Descriptive Anatomy
The sciatic nerve is composed of the nerve roots from L4 to S3. The nerve runs through the greater sciatic foramen of the pelvis through the gluteal muscles and below the piriformis (see Fig. 10-8). Once it passes the piriformis, it runs deep to the gluteus maximus midway between the greater trochanter and the ischial tuberosity. In some cases, the sciatic nerve pierces the piriformis muscle rather than passing below it.
Procedure
Starting midway between the greater trochanter and the ischial tuberosity, palpate the sciatic nerve and follow the nerve as far down the lower extremity as possible (Fig. 10-12). Note any tenderness, burning, or inflammation. If the patient has any tenderness, burning, or referred pain into the extremity, suspect an irritation of the sciatic nerve.
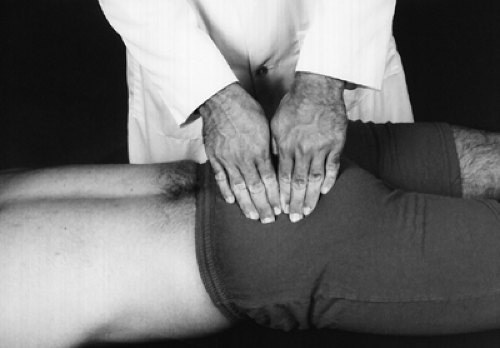 Figure 10-12 |
Lumbar Range of Motion
With the patient standing and the lumbar spine in the neutral position, place one inclinometer over the T12 spinous process in the sagittal plane. Place the second inclinometer at the level of the sacrum, also in the sagittal plane (Fig. 10-13). Zero out both inclinometers. Instruct the patient to flex the trunk forward. Record the inclinations of both inclinometers (Fig. 10-14). Subtract the sacral inclination from the T12 inclination to obtain the lumbar flexion angle.
| Normal Range (2) | |||
|---|---|---|---|
| Male aged 15–30 | 66° | Female aged 15–30 | 67° |
| Male aged 31–60 | 58° | Female aged 31–60 | 60° |
| Male aged > 61 | 49° | Female aged > 61 | 44° |
| Muscles | Nerve Supply |
|---|---|
| Psoas major | L1–L3 |
| Rectus abdominis | T6–T12 |
| External abdominal oblique | T7–T12 |
| Internal abdominal oblique | T7–T12, L1 |
| Transversus abdominis | T7–T12, L1 |
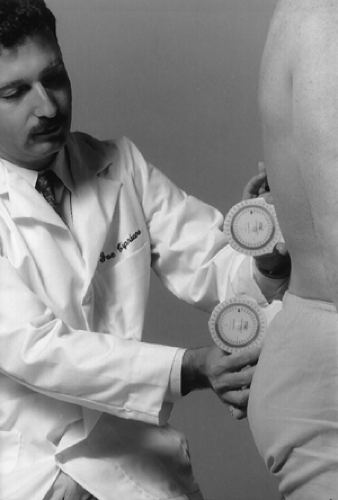 Figure 10-13 |
 Figure 10-14 |
With the patient standing and the lumbar spine in the neutral position, place one inclinometer slightly lateral to the T12 spinous process in the sagittal plane. Place the second inclinometer at the sacrum, also in the sagittal plane (Fig. 10-15). Zero out both inclinometers. Instruct the patient to extend the trunk backward. Record the inclination of both inclinometers (Fig. 10-16). Subtract the sacral inclination from the T12 inclination to obtain the lumbar extension angle.
| Normal Range (2) | |||
|---|---|---|---|
| Male aged 15–30 | 38° | Female aged 15–30 | 42° |
| Male aged 31–60 | 35° | Female aged 31–60 | 40° |
| Male aged > 61 | 33° | Female aged > 61 | 36° |
| Muscles | Nerve Supply |
|---|---|
| Latissimus dorsi | C6–C8 |
| Erector spinae | L1–L3 |
| Transversospinalis | L1–L5 |
| Interspinalis | L1–L5 |
| Quadratus lumborum | T12, L1–L4 |
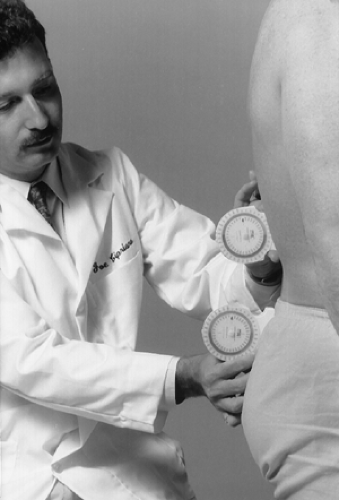 Figure 10-15 |
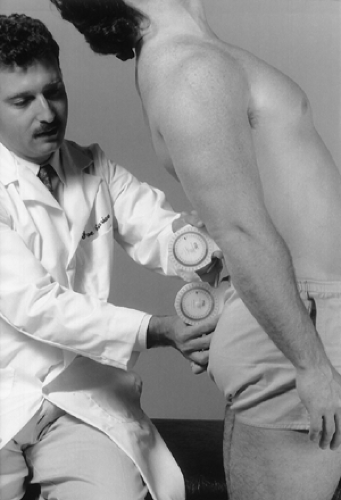 Figure 10-16 |
With the patient standing and the lumbar spine in the neutral position, place one inclinometer flat at the T12 spinous process in the coronal plane. Place the second inclinometer at the superior aspect of the sacrum, also in the coronal plane (Fig. 10-17). Zero out both inclinometers. Instruct the patient to flex the trunk to one side. Record the inclination of both inclinometers (Fig. 10-18). Subtract the sacral inclination from the T12 inclination to obtain the lumbar lateral flexion angle. Perform measurements for both right and left lateral flexion.
| Male aged 20–29 | 38° ±5.8 | Female aged 15–30 | 35° ±6.4 |
| Male aged 31–60 | 29° ±6.5 | Female aged 31–60 | 30° ±5.8 |
| Male aged > 61 | 19° ±4.8 | Female aged > 61 | 23° ±5.4 |
| Muscles | Nerve Supply |
|---|---|
| Latissimus dorsi | C6–C8 |
| Erector spinae | L1–L3 |
| Transversospinalis | L1–L5 |
| Intertransversarii | L1–L5 |
| Quadratus lumborum | T12, L1–L4 |
| Psoas major | L1–L3 |
| External abdominal oblique | T7–T12 |
 Figure 10-17 |
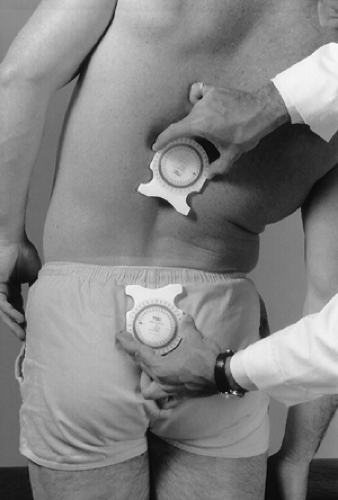 Figure 10-18 |
Joint Dysfunction Tests
Clinical Description
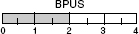
Joint dysfunction may involve the forward displacement of one vertebra on another. These defects may be congenital or traumatic. A defect with no forward movement of one vertebra on another is a spondylolysis (Fig. 10-19). A defect with forward movement is a spondylolisthesis (Fig. 10-20). A spondylolisthesis is graded according to the amount of forward movement of one vertebra on another (Box 10-1). Spondylolisthesis is more common in males than in females and occurs 85% to 90% of the time at the L5–S1 level. There are five recognizable clinical groups of spondylolisthesis (Box 10-2). The most common is the type II lesion, called isthmic. This defect of the pars interarticularis allows for forward migration of one vertebra on another.
Clinical Signs and Symptoms
Asymptomatic
Lower back pain (mild to acute disabling)
Rigid lumbar spine
Functional scoliosis
Lower extremity radicular pain (rare)
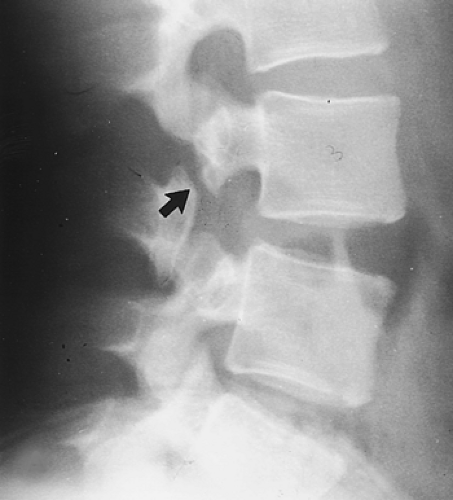 Figure 10-19. Reprinted with permission from Yochum TR, Rowe LJ. Essentials of Skeletal Radiology. Vol 1. ed 2. Baltimore: Williams & Wilkins, 1996;244. |
 Figure 10-20. Reprinted with permission from Yochum TR, Rowe LJ. Essentials of Skeletal Radiology. Vol 1. ed 2. Baltimore: Williams & Wilkins, 1996;244. |
Box 10-2 Clinical Groups of Spondylolisthesis
| Type | Description | |
|---|---|---|
| I. | Dysplastic | Congenital malformations of primarily the superior sacral facets or the arch of L5 vertebra, which allows spondylolisthesis. |
| II. | Isthmic | Common in both children and adults, this lesion or defect in the pars interarticularis allows anterior vertebral migration, typically of L5. Three types are described: |
| 1. | Lytic: resulting from a fatigue of the pars interarticularis | |
| 2. | Elongated pars interarticularis: The pars interarticularis is intact | |
| 3. | Fracture | |
| III. | Degenerative | Secondary to longstanding segmental instability with joint degeneration. Occurs most frequently at L4–L5. |
| IV. | Traumatic | Secondary to fractures not involving the pars interarticularis. |
| V. | Pathological | Local or general structural weakness secondary to bone disease. |
Modified with permission from Wiltse LL, Newman PH, MacNab I. Classification of spondylolysis and spondylolisthesis. Clin Orthop Rel Res 1976;117–123.
Segmental Instability Test (5)
 |
Procedure
Place the patient prone with the legs over the examination table and the feet resting on the floor. Press down on the lumbar spine (Fig. 10-21). Next, instruct the patient to lift the legs off the floor, and again press down on the lumbar spine (Fig. 10-22).
Rationale
When the patient lifts the legs off the floor, the lumbar paravertebral muscle tightens, causing muscle guarding in the lumbar spine. The test is positive if pain is elicited when pressure is applied to the lumbar spine with the feet on the floor and the pain disappears when the feet are off the floor and the paravertebral muscles are tightened. Raising the feet off the floor allows the mechanical muscle guarding to protect the underlying lumbar instability, such as a spondylolisthesis.
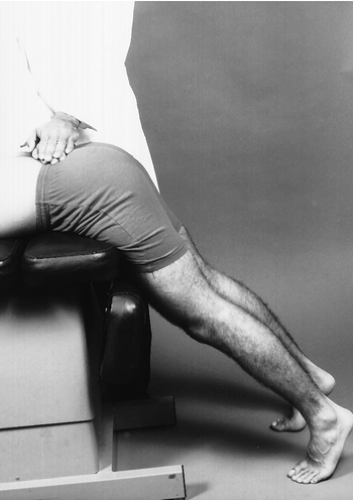 Figure 10-21 |
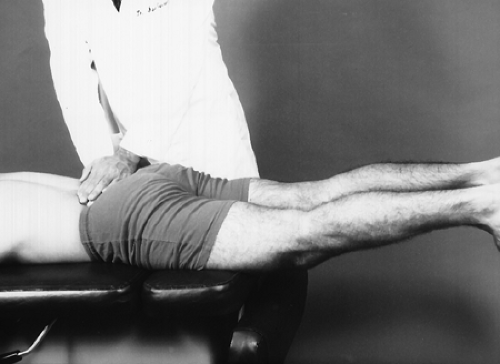 Figure 10-22 |
 |
Procedure
Instruct the patient to stand on one leg (Fig. 10-23)and extend the lumbar spine. Be close to the patient to provide support if the patient loses balance (Fig. 10-24). Repeat the test with the opposite leg.
Rationale
Standing on one leg with lumbar extension increases the pressure to the pars interarticularis. If the pars interarticularis is fractured, lumbar pain will be produced or increased. This indicates spondylolysis or spondylolisthesis.
Suggested Diagnostic Imaging
Plain film radiography
AP lumbar view
Lateral lumbar view
Lumbar oblique views
Sacral base view
Computed tomography (CT)
Single proton emission computed tomography (SPECT)
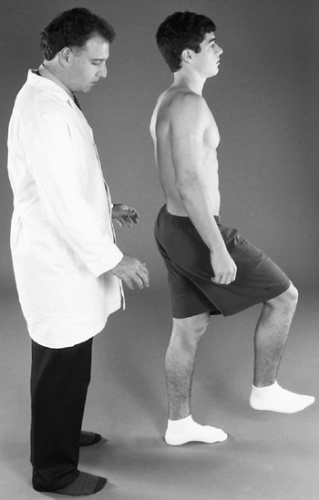 Figure 10-23 |
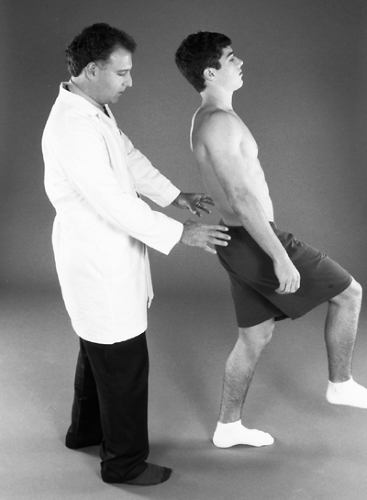 Figure 10-24 |
Lumbar Fractures
Clinical Description
Fractures of the lumbar spine can be caused by trauma or deterioration of osteoporotic bone. The two most common types of fracture in the lumbar spine are the compression, or burst, fracture and the fracture–dislocation. The compression fracture, which can be traumatic or osteoporotic, may be stable or unstable. The stable fracture involves only the vertebral bodies; the posterior elements are intact. An unstable compression fracture involves both the vertebral bodies and the posterior elements of the vertebra. The degree of neurological damage depends on the size of the bone fragment and degree of displacement of the spinal canal.
Fracture–dislocations are a result of severe forces in flexion and rotation and are associated with multiple other traumatic injuries, such as severe abdominal or spinal trauma, in which the posterior elements are affected. This usually causes a high percentage of severe neurological compromise.
Clinical Signs and Symptoms
Lower back pain
Lower extremity neurological compromise
 |
Procedure
With the patient seated and slightly bent forward, tap the spinous process (Fig. 10-25) and associated musculature (Fig. 10-26) of each of the lumbar vertebrae with a neurological reflex hammer.
Rationale
Local pain may indicate a fractured vertebra with no neurological compromise. Radicular pain may indicate a fractured vertebra with neurological compromise or possibly a disc defect with neurological compromise.
Note
This test is not specific, so other conditions also elicit a positive pain response. A ligamentous sprain will cause a positive sign on percussion of the spinous processes. Percussion on the paraspinal musculature will elicit a positive sign for muscular strain.
Suggested Diagnostic Imaging
Plain film radiography
AP lumbar view
Lateral lumbar view
CT
Bone scan
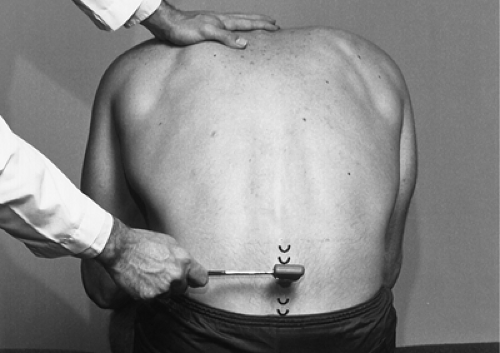 Figure 10-25 |
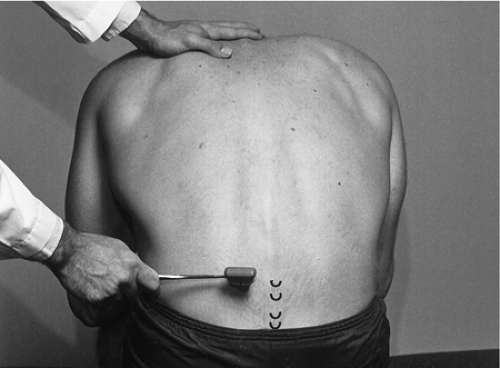 Figure 10-26 |
Lumbar Nerve Root and Sciatic Nerve Irritation/Compression Tests
Clinical Description
Lower extremity pain may be referred from lumbopelvic tissues or viscera or radicular pain from the nerve root complex of the spine. One of the features distinguishing between referred pain and radicular pain is that in referred pain patterns, the spinal pain is more aggravating than the lower extremity pain. In radicular pain patterns the leg pain is more aggravating than the spinal pain. Also, referred pain is poorly localized and dull, but radicular pain is sharp and well localized. One of the most important functions the clinician must perform is determination of the cause of lower extremity pain. Is the pain referred or radicular? This section will deal only with neurogenic radicular pain patterns.
Neurogenic radicular lower extremity pain may be caused by any of several factors. The most common is tension, irritation, or compression of a lumbar nerve root or roots. The irritation or compression may occur within or outside of the spinal canal. Intraspinal canal compressions may be caused by disc lesions, spinal stenosis, degenerative disc disease, hypertrophic changes, or spinal malignancy. Extraspinal canal compression may be caused by muscle dysfunction or extradural defects or masses.
Clinical Signs and Symptoms
Lower back pain
Lower extremity radicular pain
Loss of lower extremity reflexes
Loss of lower extremity muscle strength
Loss of lower extremity sensation


