Fig. 50.1
Bone and soft-tissue changes before revision surgery. As the implants fail and migrate into the supporting bone, the capsule, ligaments, and quadriceps mechanism all adapt and develop permanent changes (Reprinted with permission Whiteside [19])
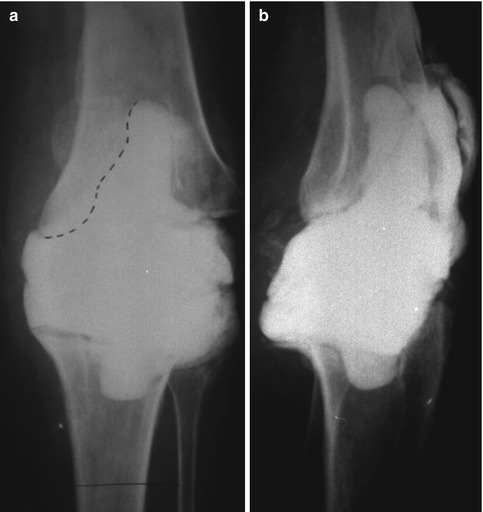
Fig. 50.2
(a) Preoperative AP radiograph of a TKR with history of two previous infections. The dotted line indicates the interface between the cement spacer and bone. The medial and lateral femoral condyles are severely deficient; the medial and lateral tibial plateaus, the upper half of the fibular head, and the tibiofibular joint have been destroyed. (b) Preoperative lateral radiograph of the same knee. The anterior femoral bone stock and posterior femoral condyles have been destroyed (Reprinted with permission Whiteside [17])
50.1 Surgical Technique
The first steps made during exposure for revision TKR will determine whether the surgeon can balance the knee correctly in flexion and extension. Meticulously maintaining the quadriceps tendon, patellar tendon, and ligament attachment to bone and avoiding procedures that gain exposure by releasing ligaments from their bone attachments will determine whether a stable and flexible knee is finally achieved. If exposure is difficult, the surgeon should avoid epicondylar osteotomy, soft-tissue stripping from the tibial metaphysis, and transection of the quadriceps mechanism. Instead, tibial tubercle osteotomy combined with quadriceps splitting between the vastus intermedius and vastus medialis offers the broadest exposure with the least damage to the muscles and ligaments of the knee (Fig. 50.3a) [6, 15, 18, 20].
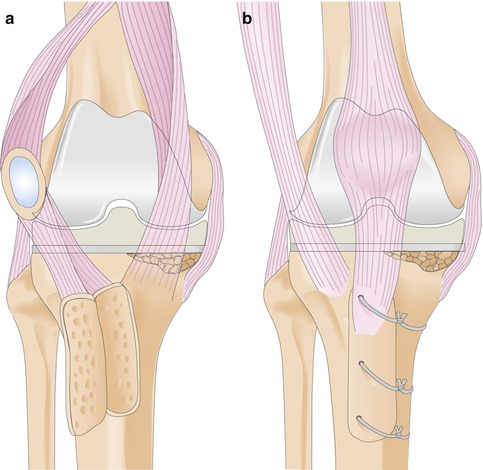
Fig. 50.3
(a) Exposure of the knee with minimal stripping of soft tissues. The tibial tubercle has been elevated, leaving its lateral soft-tissue attachments intact, and the interval between the vastus medialis and vastus intermedius has been split. (b). Reattached tibial tubercle. Three 1/8-in. holes are drilled along the lateral edge of the bone segment, staggering their alignment to avoid splitting the segment. The drill bit is passed through the medial tibial metaphyseal cortex, aimed distally 30–45°. The wires are twisted down to hold the tubercle firmly in place. The lateral soft-tissue attachments augment this fixation (Reprinted with permission Whiteside [19])
Tibial tubercle osteotomy must be done with care to preserve the lateral soft-tissue and quadriceps attachments to the tubercle to ensure both reliable reattachment at the end of the procedure and viability of the bone and soft-tissue flap. The osteotomy should be started medially, entering the cortex of the tibial crest distally with an oscillating saw and continuing proximally through the medial cortex. Then a ½-inch curved osteotome is passed through the proximal cortex just above the bone attachment of the patellar tendon, angled so as to fashion a proximal step cut. Next, the curved osteotome is passed through the medial tibial saw cut to cut the lateral cortex, leaving the muscular and periosteal attachments to the tubercle intact. Metaphyseal bone stock may be deficient, making later reattachment difficult, so the length of the tibial tubercle should be adjusted to accommodate weak bone. A small segment is more likely to split, and a large one may weaken the tibia and cause a diaphyseal fracture. Because patellar tendon avulsion and loss of the quadriceps mechanism are so catastrophic, longer osteotomy segments are recommended, and they should be protected with two-handed support until visible healing is seen on the radiograph. An 8-cm osteotomy is reasonably safe from fracture and is readily attached to the tibia with cables.
After the bone cuts have been made, a knife or sharp osteotome is used to elevate the adherent fat pad and scar from the anterior surface of the tibia as the quadriceps mechanism is turned laterally. Proximally the interval between the main conjoined tendon (of the rectus femoris and vastus intermedius) and the vastus medialis is split to allow the patella and quadriceps muscle to be turned laterally. This interval can be split as far proximally as necessary to expose the knee and distal femur. Exposure is achieved with minimal stripping of soft tissues from the bone. The broad attachment of the medial quadriceps retinaculum and capsular ligaments to the medial tibial flare and the epicondylar areas of the femur are left intact so the soft-tissue sleeve can be tensioned adequately with the spacer effect of the implants.
Reattachment of the tibial tubercle with cables generally is more secure than with screws. The thin metaphyseal and diaphyseal shells, which are filled with a metal stem, do not provide adequate purchase for screws, but low-profile cables passed between the stem and bone almost always provide stable reattachment. Three cables should be passed under the cortex and traverse anterior to the stem, angling distally 30–40° (Fig. 50.3b). When the lateral soft tissues have been left attached to the tubercle, fixation is secure enough with three cables to allow early mobilization.
Another benefit of leaving the soft tissues intact is that the knee can be stabilized both in flexion and extension with the spacer effect of the implants. The entire capsular sleeve stabilizes the knee in extension, and the soft-tissue attachments to the epicondyles of the femur and metaphyseal flare of the tibia stabilize in flexion (Figs. 50.4a, b).

Fig. 50.4
Soft-tissue envelope in extension and flexion after removal of the prostheses. (a) If minimal soft-tissue stripping has been done, the capsular envelope provides stability to the knee in extension despite massive bone loss. The ligaments and capsular attachments extend from above the femoral epicondyles to well below the tibial tubercle and fibular head. (b). The ligaments and capsular attachments extending from the femoral epicondylar areas to the tibial and fibular metaphyses stabilize the knee in flexion as well as in extension (Reprinted with permission Whiteside [19])
1.
Expose the knee with minimal disturbance of ligament attachments to the femur and tibia so that the reconstructed knee is stable and flexible.
2.
Remove minimal bone while preparing the bone surfaces for implants to ensure reliable seating. Large defects can be filled with graft and treated with protected weight bearing. Restore knee alignment.
50.2 Diaphyseal Bone Preparation
The prostheses are extracted and the cement and soft-tissue membrane are removed completely down to viable bone. Often no cancellous bone is left in the metaphysis of either bone, but the diaphyseal medullary canals are available for stem fixation. The cortical rim of the femur just distal to the epicondyle usually is available for seating the prosthesis. This bone serves as a reliable and durable support for the femoral component and provides axial weight-bearing capacity for the implant, while the diaphyseal cortex provides toggle control for the stem.
The tibial rim often is deficient except for a small remnant, but this remaining bit of rim, usually with the remains of the fibular head, supports the tibial tray effectively. Tight fit of the stem in the diaphyseal medullary canal provides toggle control and prevents the tibial component from tilting even when it is supported on only one side.
Usually the first step in preparing the bone for fixation is reaming of the medullary canal of the femur and tibia. For alignment purposes, the bones are reamed to a depth of more than 200 mm, and the reamer is used as a guide for bone resection. Once the reamer is firmly fixed in the medullary canal, the cutting guide is applied over the shaft of the reamer, and the cortical metaphyseal rims are trimmed, taking minimal amounts of the rim of the femur and tibia. The femoral surface is resected at an angle of 4–5° valgus to the long axis of the bone, and the tibial surface is resected perpendicular to the long axis of the tibia. This technique places the supporting bone surface as closely as possible to the reconstructed joint surface and allows the spacer effect of the implant to be as small as possible.
This bone preparation technique often leaves a major bone deficit that requires grafting and may require extended weight-bearing protection. However, this technique of maintaining as much metaphyseal shell as possible ensures maximum preservation of bone and soft-tissue attachments and also allows reconstruction of the knee without resorting to constrained hinges. Likewise, the stem offers control of tilt and toggle, so that large bone defects do not require block allograft or augmentation devices.
Reaming technique requires special consideration. As the femur is reamed, care is taken to avoid penetration of the anterior cortex. Although a long reamer that engages the diaphyseal cortex is used for alignment of the femoral bone surface cuts, a shorter reamer of larger diameter may be used, following the same track as the longer reamer, to achieve fixation without engaging the bone of the mid-diaphysis. The advantage of this technique is that it allows the reaming to be done with slight flexion so that the femoral component will seat against the anterior cortex of the femur and provide adequate posterior offset of the femoral condyles relative to the posterior cortex of the femur. As the femur is reamed, care is taken to avoid penetration of the anterior cortex. Often the bone is soft, and holding the reamer posteriorly to position the final component correctly relative to the posterior femoral condyles and the anterior femoral cortex can damage the anterior femoral cortex. When a 200-mm stem is desired, the reamer should be allowed to follow the track of the femur to a depth of 200 mm. This depth places the stem well into the curvature of the femur, and in some instances, the final prosthesis position will be too far anterior unless special measures are used to avoid this problem. Curved stems are available, but they dictate the rotational positioning of the prosthesis, can lead to internal rotational malposition of the femoral component, and thus can cause ligament balancing and patellar tracking problems. A module that places the femoral component posteriorly can allow the surgeon to use a straight stem and thus take advantage of its universal rotational alignment characteristics while placing the femoral component in its correct anteroposterior position (Fig. 50.5).
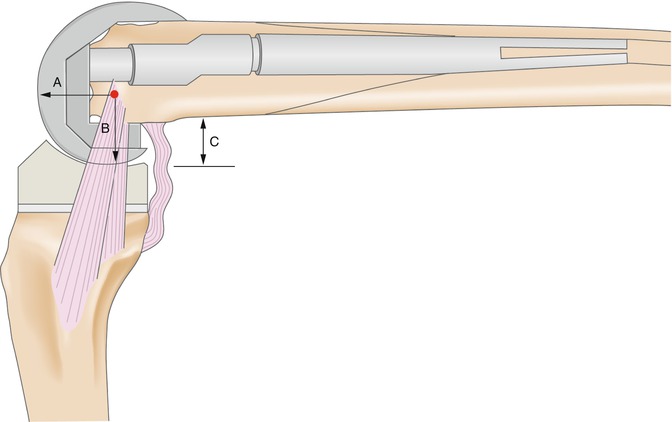
Fig. 50.5
Lateral view of a revision femoral component using a posterior-offset module for the femoral stem. The anterior femoral flange lies in line with the anterior femoral cortex, and the diaphyseal stem engages the femoral isthmus. The component size has been chosen to restore posterior offset and to cover the medial-to-lateral extent of the distal femoral surfaces. The distal and posterior surfaces are placed approximately equidistant from the epicondylar ligament attachments (arrows A and B). Posterior offset (arrow C) has been reestablished to ensure maximum flexion without impingement (Reprinted with permission Whiteside [19])
1.
Medullary reamers provide convenient and accurate alignment landmarks during bone preparation for implant placement.
2.
Long reamers at a length of 200 mm should be used to engage the diaphysis of the bone.
3.
Short reamers may be used to place the femoral component in slight flexion and thus position it correctly with the anterior femoral cortex.
50.3 Metaphyseal Bone Preparation
In some instances reliable cutting guides are available for revision TKR (Fig. 50.6a), but in many cases the trial implants are more convenient and more accurate for the femoral resection. The trial femoral component with the stem attached is rotationally aligned with the epicondylar axis and positioned so that its anterior flange surface will lie along the anterior cortex of the femur. The posterior edge of the trial femoral component is impacted slightly into the bone surface to indicate the correct resection line for the posterior femoral surfaces. The trial component then is removed and the posterior surface is cut with a saw blade tilted to cut a surface that diverges proximally to improve press fit of the final component. As long as secure rim seating and tight stem fixation can be achieved, major bone deficit can be ignored at this stage of the operation and filled later with combined allograft and autograft material to encourage bone regrowth into the cavitary defects that remain. The trial components are placed against the distal femoral surface and tapped firmly with a hammer to compact the distal femoral weight-bearing bone. Because compacted bone surfaces are stronger and heal more quickly than do cut bone surfaces [4], they are desirable in revision TKR.
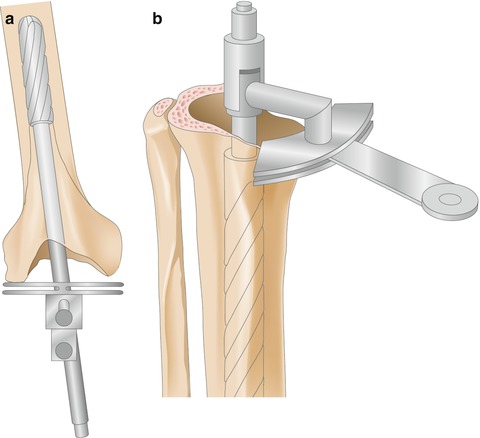
Fig. 50.6
Intramedullary alignment of the distal femoral and proximal tibial surface resections. (a) The reamer is aligned with the isthmus of the femoral medullary canal, and a small amount of bone is resected from the distal metaphyseal rim at a 5° valgus angle. If one side is severely deficient, the intact rim provides sufficient distal fixation if tight fit in the medullary canal is achieved. (b) The reamer is aligned with the isthmus of the tibial medullary canal, and a small amount of bone is resected from the proximal metaphyseal rim perpendicular to the long axis of the tibia (Reprinted with permission Whiteside [19])
The tibial surface is not as amenable to compaction as the femoral surface, so a small rim of bone may be resected with an oscillating saw before the tibial trial component is inserted (Fig. 50.6b). Often the lateral tibial cortex and fibular head are the only remaining proximal tibial bone. Even when the entire medial metaphyseal wall has been destroyed by osteolysis and cement debris, stable fixation can be achieved if the stem has been fixed tightly in the diaphyseal cortical bone.
50.4 Component Sizing and Positioning
Once the medullary canals are reamed and the metaphyseal surfaces are resected, the next step is choosing the sizes of the femoral and tibial components and choosing the size and shape of the femoral augments to correctly position the distal and posterior surfaces of the joint. It is worth mentioning again that the rims of the remaining bone stock should be resected minimally, and as little soft tissue as possible should be stripped from the bone when exposing the knee. Maintaining attachment of ligaments (even if compromised) to the epicondylar areas of the femur is especially important (Figs. 50.4 and 50.7). This procedure leaves a soft-tissue envelope that is attached securely to bone, and the surgeon can tension this soft-tissue envelope by choosing sizes of prostheses and augmentation modules that impart stability to the knee in flexion and extension. Only after careful assessment of the ligament balance in flexion and extension should the surgeon release ligaments to correct imbalance. The correct size of the femoral component can be estimated by choosing a component that covers the medial and lateral dimensions of the remaining femoral bone stock. In most patients, some posterior bone remains in the femoral condyles, and minimal posterior resection will allow the posterior surfaces of the femoral implant to engage posterior bone. During this crucial stage of the procedure, the surgeon must ensure that the final implant will seat firmly on distal and posterior femoral bone stock and that the femoral stem will fit tightly in the diaphyseal medullary canal. The anterior flange must seat near the anterior cortex of the femur, the femoral component must be located in the center of the remaining femoral metaphysis from side-to-side, and adequate posterior offset must be achieved by the size of the implant (Fig. 50.5).

 Diagnosis of Periprosthetic Joint Infection After Total Knee Replacement
How Can Preoperative Planning Prevent Occurrence of a Painful Total Knee Replacement?
Causes and Diagnosis of Aseptic Loosening After Total Knee Replacement
Discussion to Chap. 16: Mid-Flexion Instability After TKR Due to Femoral Malrotation
Specific Orthopaedic Imaging Analysis Software: Clinical Benefit for TKR Revision Surgeon
Constrained Condylar Total Knee Replacement
Diagnosis of Periprosthetic Joint Infection After Total Knee Replacement
How Can Preoperative Planning Prevent Occurrence of a Painful Total Knee Replacement?
Causes and Diagnosis of Aseptic Loosening After Total Knee Replacement
Discussion to Chap. 16: Mid-Flexion Instability After TKR Due to Femoral Malrotation
Specific Orthopaedic Imaging Analysis Software: Clinical Benefit for TKR Revision Surgeon
Constrained Condylar Total Knee Replacement


Related posts:
Diagnosis of Periprosthetic Joint Infection After Total Knee Replacement
How Can Preoperative Planning Prevent Occurrence of a Painful Total Knee Replacement?
Causes and Diagnosis of Aseptic Loosening After Total Knee Replacement
Discussion to Chap. 16: Mid-Flexion Instability After TKR Due to Femoral Malrotation
Specific Orthopaedic Imaging Analysis Software: Clinical Benefit for TKR Revision Surgeon
Constrained Condylar Total Knee Replacement
Stay updated, free articles. Join our Telegram channel
Full access? Get Clinical Tree
