Chapter 22 International Experience With Autologous Chondrocyte Implantation With Periosteum (Autologous Chondrocyte Implantation), Including Scaffold Guided Techniques and Tissue Engineered Matrix Support
Chondral injuries that penetrate down to subchondral bone will not heal but may progress to osteoarthritis over time by enzymatic degradation and mechanical wear. Osteochondral injuries that penetrate subchondral bone into trabecular bone with bleeding will result in inflammatory repair tissue filling the lesion with fibrocartilage produced by mesenchymal stem cells or fibroblasts. Unfortunately, fibrocartilage repair tissue has been shown to be unable to withstand mechanical wear over time; fibrocartilage may degenerate and the lesion may progress to osteoarthritis.6,18
Good results can be achieved with treatment of severe osteoarthritis of the knee by total joint replacement in elderly patients. However, this treatment exposes patients to increasing risk of potentially serious complications, and it has a limited duration of life, finally demanding a revision surgery. Total knee arthroplasty burns the bridges to any other treatment options and is considered the last treatment option, indicated only for severe cases in older patients. In young and middle-aged patients, however, no optimal treatment is available for chondral injuries. The spectrum of treatment alternatives for articular cartilage defects in young and middle-aged patients can range from simple lavage and débridement, drilling, microfracturing, and abrasion to osteochondral grafting and autologous chondrocyte implantation (ACI).36
Optimal healing of an articular cartilage injury should consist of regeneration with tissue identical to hyaline cartilage; however, repair of chondral injury involves filling with tissue not identical to hyaline cartilage (i.e., fibrocartilage). The repair tissue should be able to fill and seal off the defective area with good adhesion to subchondral bone and complete integration to surrounding cartilage. It should be able to withstand mechanical wear over time and should gradually be included in the natural turnover of normal cartilage, thus providing longer symptom relief.6
Techniques that affect the subchondral bone plate include abrasion arthroplasty, multiple drilling, and microfracture. All these techniques may result in stiffening of subchondral and trabecular bone, leading to osteophyte formation underneath the repair tissue.20,35 Osteochondral grafting may affect subchondral and trabecular bone function because the osseous part of the plug has to undergo resorption, revascularization, remodeling, and healing to the surrounding bone. Periosteal and perichondrial grafting also affects subchondral bone by drilling and abrading the subchondral bone plate.
Chondrocyte implantation does not violate subchondral or trabecular bone. On the contrary, for success with this technique, bleeding from subchondral bone should be avoided so that fibroblasts or stem cells are not introduced, resulting in fibroblastic repair tissue.5
Historical Background of Autologous Chondrocyte Implantation (Transplantation)
In 1965, Smith was successful in isolating and growing chondrocytes in culture for the first time.11 Epiphyseal chondrocytes grown in culture were injected into tibial articular defects in the rabbit knee but did not show any significant repair.
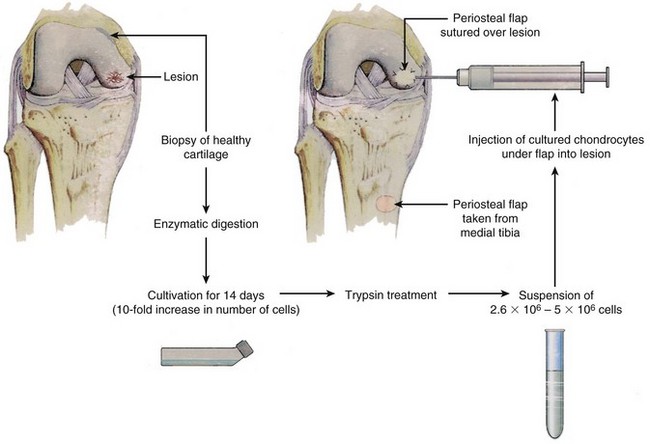
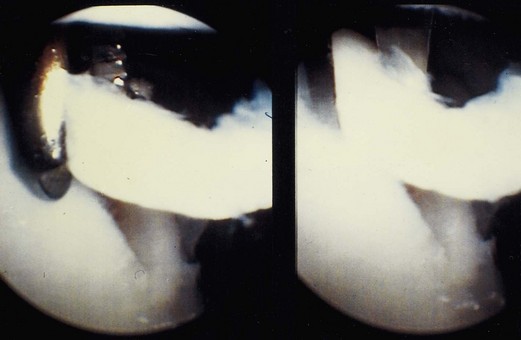
In 1985, work started on transferring the cell-culturing technique to human chondrocytes, and in 1987 the first ACI (or transplantation, as first named) was performed in the human knee at the Department of Orthopaedics, University of Göteborg, after approval by the Ethical Committee of the Medical Faculty of the University of Göteborg (Fig. 22-1).
A pilot study of 23 patients with 39 months’ follow-up reported in the New England Journal of Medicine in October 1994 showed that of 16 patients who underwent femoral condyle procedures, 14 had a good or excellent result. Eleven of 15 biopsy specimens showed hyaline-like cartilage. Among seven patients who underwent ACI of the patella, however, only two good or excellent results were achieved, and one biopsy specimen showed hyaline-like cartilage.5
Clinical results from Sweden were reported at the American Academy of Orthopaedic Surgeons in 1996, 1997, 1998, 2000, 2001, 2002, 2003, and 2004, and long-term results obtained 10 to 20 years after the ACI were first presented at the International Cartilage Research Society meeting in 2009.29,34
Indications for Autologous Chondrocyte Implantation
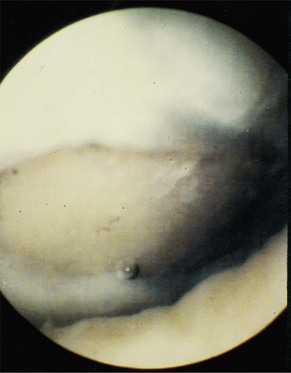
Autologous chondrocyte implantation is indicated in patients between 15 and 55 years old with symptomatic, full-thickness Outerbridge or International Cartilage Repair Society (ICRS) grade III to IV cartilage injuries of the knee with a diameter larger than 10 mm up to an area of 10 to 16 cm2 (Fig. 22-2). The defect should be located on the femoral or patellar articular surface and should be accessible for implantation via open arthrotomy. Only grade I to II Outerbridge or ICRS classification changes on the reciprocal articular surface should be included.
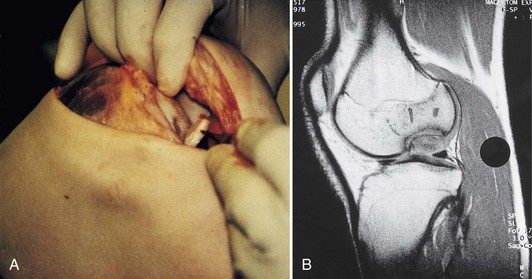
Osteochondritis dissecans of the medial or lateral femoral condyles with an unstable fragment, a separated but attached flap, or an empty bed is another indication for ACI (Fig. 22-3).
Bipolar chondral injuries (i.e., osteoarthritis) are undergoing investigational study and at present could be considered as requiring a salvage procedure or as a relative indication. A recent long-term follow-up study described very good results 10 to 20 years after implantation, even for large bipolar lesions, for which ACI had been performed as a salvage procedure.29,34 Evidence supports that ACI is indicated even for large bipolar lesions, delaying total knee arthroplasty. A definite decision regarding the indication is made during arthroscopic evaluation.
Arthroscopic Evaluation—Cartilage Retrieval
Under general or spinal anesthesia, complete stability testing of the knee is performed, and results are compared with those on the healthy side. Complete examination of the knee joint should be performed, including visualization and probing of articular cartilage surfaces, synovial lining, menisci, and cruciate ligaments, and the presence of any fragment or loose body should be identified. Undiagnosed pathology may be critical to the outcome of surgery. The cartilage injury is visualized, probed, and assessed for depth, size, and location. The opposing articular surface should be assessed and should be normal or should have only fibrillation or superficial fissuring, Outerbridge or ICRS grade I to grade II. The defect should be evaluated regarding containment and shouldering. An uncontained lesion extends into the synovial lining of the joint. It may be unilateral or bilateral, for example, extending from the synovial lining of the articular surface of the medial femoral condyle into the synovial lining of the intercondylar notch (Fig. 22-4).
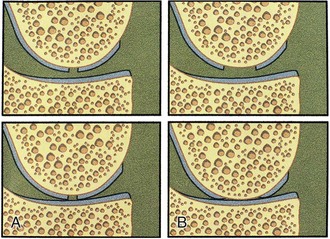
A shouldered defect is a defect surrounded by normal cartilage in which the bone in the center of the defect is not in contact with the opposing articular surface. An unshouldered defect is so large that in a weight-bearing position, the subchondral bone in the center of the defect is in contact with the opposing articular surface (Fig. 22-5). During arthroscopy, the proposed implantation is evaluated regarding different possibilities for the surgical approach, the intended amount of débridement, the extent of shouldering, containment of the defect, and so forth.
Only gentle or no débridement of the injury should be performed at this time. When the specifics of the indication have been fulfilled, cartilage is harvested from the upper medial or upper lateral femoral condyle on minor weight-bearing areas (Fig. 22-6). It can also be harvested from the intercondylar notch. In 98% of our cases, cartilage is harvested from the upper medial femoral condyle. With a curette, three to four slices of cartilage 3 to 4 mm wide by 10 mm long should be taken down to subchondral bone on the upper medial femoral condyle.6 Approximately 200 to 300 mg of articular cartilage is required for enzymatic digestion and cell culturing. The harvesting area should extend to the synovial lining to allow fibrous and synovial ingrowth to cover the harvest area. In more than 1600 patients who have had cartilage removed for cell culturing, no complications or late symptoms from the donor site have occurred. Optimal harvesting of cartilage is of greatest importance for the success of cell culturing, and optimal cell quality is necessary for the best possible result of this procedure.
Surgical Procedure—Chondrocyte Implantation
Chondral Lesions
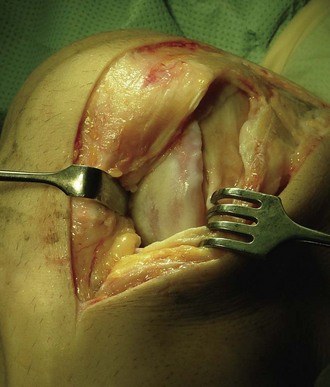
The patient is placed under general or spinal anesthesia. With a tourniquet-controlled bloodless field, a minor parapatellar incision is made. The joint is opened and the injury assessed. For good surgical technique, it is important to obtain good access to the defect, and the arthrotomy might need to be adjusted accordingly (Fig. 22-7). The patella may have to be dislocated in the case of implantation to multiple femoral or patellar lesions.
Excision and Débridement of the Lesion
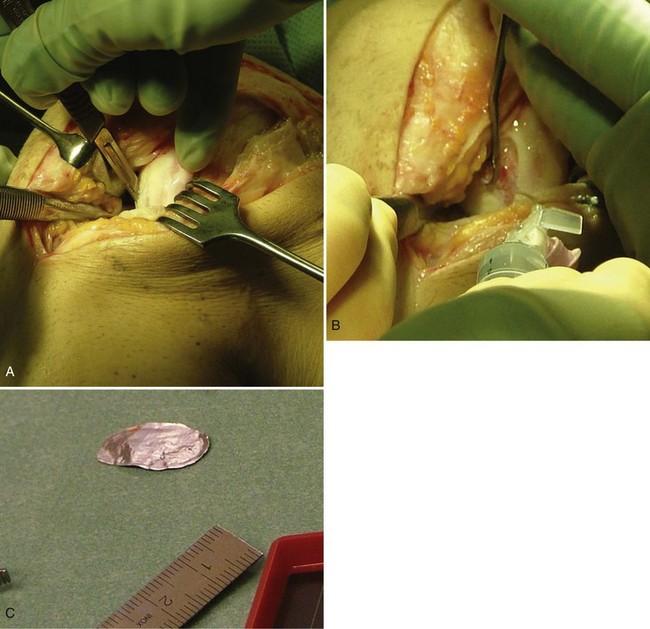
The cartilage lesion area is assessed, incised, and débrided with a curette down to the subchondral bone and until healthy cartilage is reached in the periphery of the defect. Radical excision is the key to success. Resulting lesions should be as circular or as oval as possible. If the lesion is not contained by healthy cartilage, it is better to leave a 3- to 4-mm rim of acceptable cartilage than to have the lesion border bone or synovium. Gentle débridement of the excised area is performed down to subchondral bone without causing any bleeding. If bleeding occurs, an epinephrine sponge or a drop of fibrin glue can stop it. The excised defect is then measured in its longest diameter and longest perpendicular diameter. The defect should be shaped as geometrically as possible. A template of sterile aluminum foil or paper is used to model the exact size of the defect (Fig. 22-8).
Harvesting of the Periosteal Flap
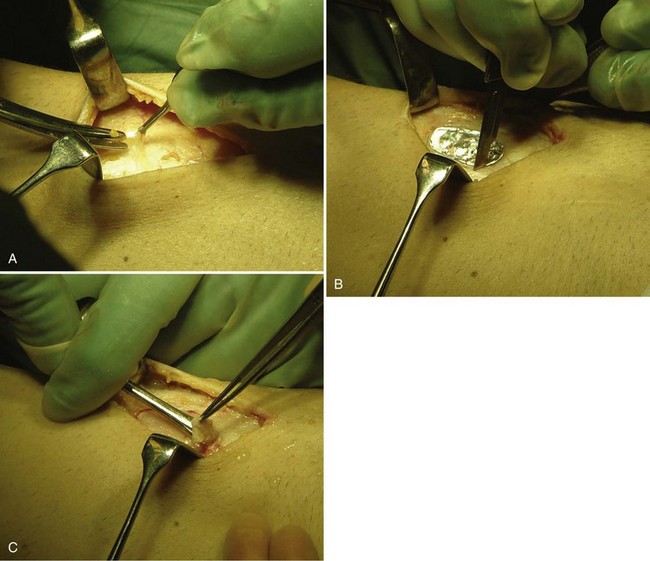
Through a separate incision on the upper medial aspect of the tibia, the periosteum is dissected free of fascia, fat, and fibrous tissue. Even passing vessels should be dissected off the flap. Measure the intended periosteal flap, or use the template to create the exact size and form. Oversize the periosteal flap by adding 1 to 2 mm to the periphery of the intended flap. Incise the periosteum and use a sharp elevator to remove the periosteal flap. Use small movements to avoid rifts in the periosteum (Fig. 22-9). Mark the side of the periosteum to allow identification of the cambium layer. Saline is used to keep the periosteal flap moist. The periosteal flap should be as thin as possible and transparent to achieve more volume in the defect and to allow the cells to spread and expand. The thinner the periosteal flap, the less is the risk for hypertrophy, fibrillation, or other complications.
Suturing of the Periosteal Flap
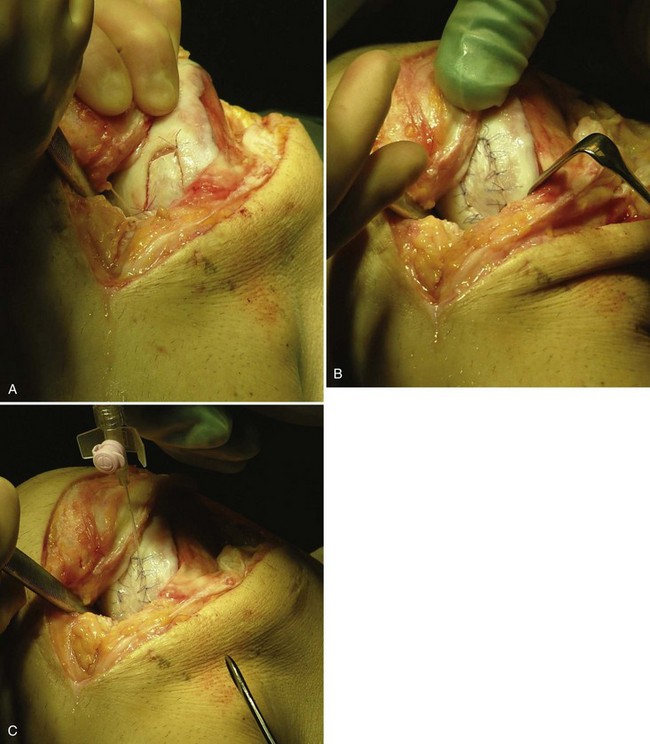
Before injecting the cells, check that there is no leakage by introducing a soft catheter with a syringe into the defect. Inject saline slowly into the defect and check for any leakage. Then aspirate the saline and inject the cells into the defect, starting distally and withdrawing the syringe proximally as the cells are injected. Close the injection site with suture and fibrin glue (Fig. 22-10).
Osteochondral Lesions (Osteochondritis Dissecans)
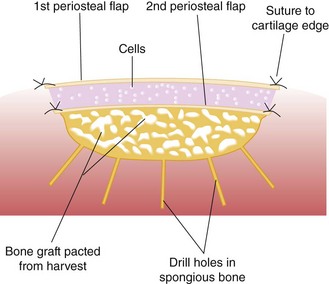
Harvest a periosteal flap to cover the bone graft at the level of subchondral bone, with the cambium layer facing the joint. Anchor it with horizontal or mattress sutures placed into the cartilage or through small drill holes in the subchondral bone plate, and use fibrin glue under the flap for fixation to the bone graft. This technique will avoid bleeding into the cartilage defect. Another periosteal flap is harvested and sutured to the cartilage edges, with the cambium layer facing the defect. Use fibrin glue to seal the intervals between sutures. Test for a watertight seal with a gentle saline injection. If no leakage is present, aspirate the saline and inject the chondrocytes. Close the last opening and seal with fibrin glue (Fig. 22-11).
The Concept of Optimal Environmental Conditions for the Short- and Long-Term Survival of Repair Tissue
Stay updated, free articles. Join our Telegram channel

Full access? Get Clinical Tree


