9
Implantation of Fresh Osteochondral Allografts of the Knee
Indications
- Localized, unipolar symptomatic chondral lesion of femoral condyle, trochlea, or patella1
- Young, high-demand patient in whom joint replacement is poor option
- Moderate-size to large cartilage lesion, about 1.5 to 3.5 cm in diameter
- Pain and symptoms should correspond to the location of the cartilage lesion.
Contraindications
- Inflammatory and systemic arthritis
- Morbid obesity
- Other medical problems, such as insulin-dependent diabetes, that may affect incorporation of allograft tissue
Other Treatment Options
- For smaller lesions, other cartilage restoration procedures, such as microfracture or autologous chondrocyte implantation, may be an option.
- For older, low-demand patients, unicompartmental or total knee arthroplasty is a better option.
Preoperative Planning
- Preoperative evaluation generally includes physical examination, radiographs, magnetic resonance imaging, and prior diagnostic arthroscopy. In addition, many candidates will have failed a previous attempt at cartilage restoration.
- Associated knee pathology must be thoroughly evaluated and addressed. Issues such as knee ligament instability, malalignment, or meniscal deficiency are not absolute contraindications to performing an osteochondral allograft. However, these lesions must be addressed prior to implantation or at the time of surgeryt.2, 3
- Preoperative radiographs are generally used to match the size of the recipient with the donor.
- Precise matching of the geometry of the donor and recipient articular surface is necessary to ensure long-term survival.4
Obtaining Allograft Tissue
- Several tissue banks are available for obtaining allograft tissue.
- Osteochondral allografts harvested within 24 hours of donor death are 100% viable and can be preserved for up to 4 days at 4°C. The decline in cell viability that begins after 5 days is the subject of ongoing research, but prolonged storage of fresh grafts up to 14 to 21 days is currently acceptable. Freezing of chondral grafts leads to chondrocyte death and is not acceptable for the preservation of grafts.
- Tissue matching and immunologic suppression are unnecessary.
- Donors are screened with a multifactorial process promoted by the American Association of Tissue Banks to minimize the risk of disease transmission.
Special Instruments, Positions, and Anesthesia
- A tourniquet is applied to the proximal thigh and inflated at the beginning of the case for hemostasis.
- The patient is in the supine position, with a standard prepping and draping for a total knee type arthrotomy.
- Widely available instrumentation (Arthrex, Inc., Naples, FL) allows for reliable and precise preparation of allograft plugs.
- Anesthetic options include general anesthesia, spinal or epidural anesthesia, and femoral nerve block.
Surgical Procedure
Exposure and Preparation of Cartilage Lesion
- Diagnostic arthroscopy is usually unnecessary, because this was usually performed as part of the preoperative planning. If this has not been performed, a diagnostic arthroscopy is appropriate to confirm that the lesion is amenable to an osteochondral allograft.
- Exposure of the lesion is performed with a standard knee arthrotomy. In many cases, a medial or lateral peripatellar miniarthrotomy can be performed to expose the lesion.
- The goal of the preparation of the lesion is to create a cylindrical socket. All fibrous tissue and sclerotic bone are removed from the lesion to provide a viable bed for the donor tissue to incorporate.
- A guide pin is placed in the center of the lesion to a depth of 2 to 3 cm. The lesion is sized in diameter, and an appropriately sized counterbore is drilled to create a cylindrical defect to a depth of 8 to 10 mm (Fig. 9-1).
- A marking pen is used to mark the 12 o’clock position of the lesion, and the corresponding position on the donor condyle is marked.
- Precise measurements of the depth of the recipient lesion are recorded in four quadrants. For example, the defect may measure 8 mm in the 12 o’clock position, 8 mm in the 3 o’clock position, 9 mm in the 6 o’clock position, and 8 mm in the 9 o’clock position. Ideally, the depth is equal in all four quadrants. These measurements are recorded and then used in the final preparation of the donor graft (Fig. 9-2).
Allograft Preparation
- Allograft size is predetermined by preoperative radiographs corrected for magnification, and matched for medial or lateral femoral condyles.
- The donor condyle is secured in the allograft workstation, and the bushing of corresponding size is placed over the graft. The bushing is secured such that the site of donor harvest matches the location and size of the recipient site. The 12 o’clock position of the donor graft is marked. The housing should be secured so that the graft is harvested in a completely perpendicular fashion (Fig. 9-3).
- The graft is drilled through its entire depth, and the graft is extracted from the donor harvester, with care taken not to damage the articular surface.
- The depth measurement guide is used to mark the graft equal to the recipient depth in all four quadrants. The allograft is secured in the holding forceps and trimmed with a saw to the exact depth.
- The corners of the allograft may be slightly rounded to ease insertion of the graft into the recipient socket (Fig. 9-4).
Graft Implantation
- A calibrated dilator is inserted in the recipient socket to dilate the socket an additional 0.5 mm.
- The graft is press fit into the socket, while paying careful attention to lining up the 12 o’clock marks on the donor and recipient sites (Fig. 9-5).
- The graft can usually be press fit by hand to avoid injury to the cartilage surface. However, if the graft needs to be impacted to create a flush surface, a tamp oversized by several millimeters should be used.
- Additional fixation is typically unnecessary. However, if the graft is particularly large, fixation can be achieved with bioabsorbable or metal pins or screws. The advantage of bioabsorbable devices for fixation is that it is unnecessary to remove the fixation device at a later date.
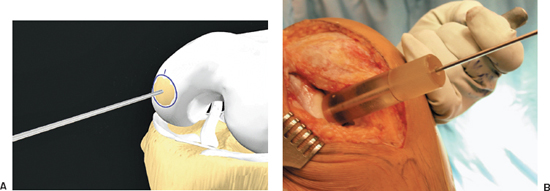
Figure 9-1 (A, B) Guide pin for reamer placed in the center of the lesion and perpendicular in all planes.
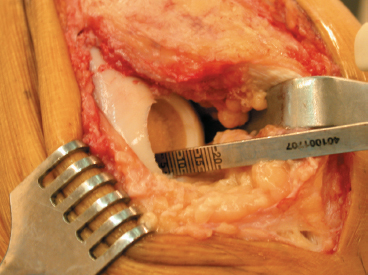
Figure 9-2 A caliper is used to measure the depth of the prepared lesion in all four quadrants.
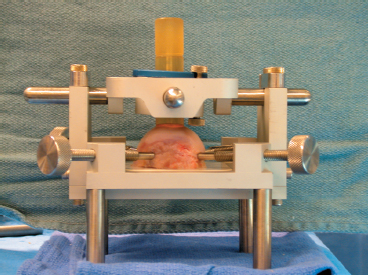
Figure 9-3 The donor graft placed in the cutting jig, with the guide aligned perpendicular to the graft in all planes.
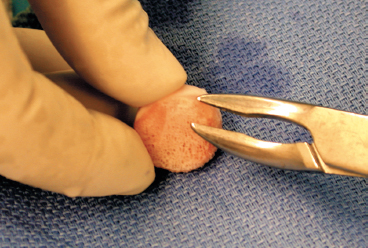
Figure 9-4 A rongeur is used to round the corners of the graft to ease insertion.
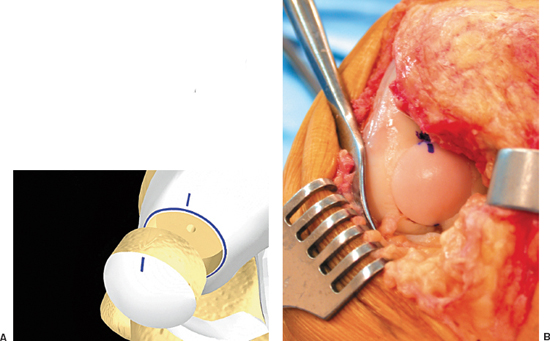
Figure 9-5 (A, B) The marks are aligned at the 12 o’clock position for proper orientation of the graft during insertion.
Closure and Postoperative Care
- A standard arthrotomy closure is performed, including a No. 1 Vicryl or No. 2 Ethibond suture for the arthrotomy, a No. 2 Vicryl suture for the subcutaneous tissue, and standard skin closure. A Hemovac drain is usually unnecessary.
- A continuous passive motion machine is used in the postoperative period to achieve immediate range of motion. There are no range-of-motion restrictions.
- Weight bearing is restricted for 6 to 8 weeks postoperatively to protect the cartilage surface.
- Light recreational activities are permitted at 16 to 24 weeks.
- In general, high-impact sports are not recommended after osteochondral allografting for large articular cartilage lesions to improve the long-term survival of the graft.
Pearls and Pitfalls
- Full-length limb alignment films must be obtained during the preoperative planning for the procedure. If malalignment exists, it must be corrected prior to surgery or at the time of osteochondral allografting. Overload of the affected compartment due to malalignment may lead to early graft failure.
- When preparing both the recipient defect and the donor graft, it is essential to insert the guide pin perpendicular to the articular surface to optimize the graft fit. For the recipient site, careful attention should be paid to placing the guide pin in the center of the lesion and perpendicular to the location of the defect in all planes (Fig. 9-1). For the donor graft, the gig should be set and then checked with the plastic sizing tube to be sure that the cut will be perpendicular to the articular surface of the donor graft (Fig. 9-3).
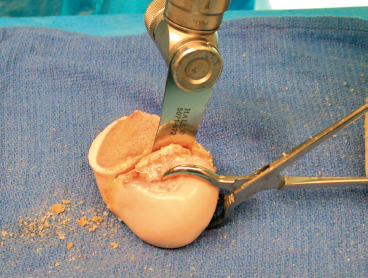
Figure 9-6 The excess bone is removed from the donor condyle with a power saw to facilitate insertion in the cutting gig.
- A 12 o’clock line should be marked on both the recipient site and donor graft to be sure that the graft is inserted in the proper orientation (Fig. 9-5).
- The donor condyle is usually provided en bloc and is difficult to fit into the cutting gig. It should be cut with a power saw to remove the gross excess bone to allow the graft to fit more securely into the cutting gig (Fig. 9-6).
- The donor graft should be power-washed with pulse lavage to remove all marrow elements from the bone. This minimizes any immune response of the surrounding bone to the allograft plug.
- The edges of the donor plug should be rounded with a rongeur in final preparation for implantation. This enables the plug to be inserted more easily into the recipient site (Fig. 9-4).
References
1 Convery FR, Akeson WH, Meyers MH. The operative technique of fresh osteochondral allografting of the knee. Oper Tech Orthop 1997;4:340–344
2 Garrett J. Fresh osteochondral allografts for the treatment of articular cartilage defects in osteochondritis dissecans of the lateral femoral condyle in adults. Clin Orthop Relat Res 1994;303:33–37
3 Garrett J, Wyman J. The operative technique of fresh osteochondral allografting of the knee. Op Tech Orthop 2001;11:132–137
4 Gross AE. Fresh osteochondral allografts for posttraumatic knee defects: surgical technique. Oper Tech Orthop 1997;4:334–339
< div class='tao-gold-member'>
Related posts:
 Multiligament Injuries
 Osteochondritis Dissecans Repair
 Posterolateral Corner Hamstring Figure-Eight Reconstruction
 Arthroscopic Lateral Retinacular Release
 Proximal/Distal Realignment for Patellar Instability
 Posterior Cruciate Ligament Reconstruction: All-Inside Arthroscopic Technique and Tibial Inlay Technique with Two-Strand Quadriceps Tendon-Patellar Bone Graft


