*Mahler DA, Weinberg DH, Wells CK et al, 1984. The measurement of dyspnea: Contents, interobserver agreement, and physiologic correlates of two new clinical indexes. Chest 85, 751–758.
Box 7.2B Transition Dyspnoea Index*
Change in functional impairment
| Grade | Symptoms |
| –3 | Major deterioration. Formerly working and has had to stop working and has completely abandoned some of usual activities due to shortness of breath. |
| –2 | Moderate deterioration. Formerly working and has had to stop working or has completely abandoned some of usual activities due to shortness of breath. |
| –1 | Minor deterioration. Has changed to a lighter job and/or has reduced activities in number or duration due to shortness of breath. Any deterioration less than preceding categories. |
| 0 | No change. No change in functional status due to shortness of breath. |
| + 1 | Minor improvement. Able to return to work at reduced pace or has resumed some customary activities with more vigour than previously due to improvement in shortness of breath. |
| + 2 | Moderate improvement. Able to return to work at nearly usual pace and/or able to return to most activities with moderate restriction only. |
| + 3 | Major improvement. Able to return to work at former pace and able to return to full activities with only mild restriction due to improvement of shortness of breath. |
| Z | Further impairment for reasons other than shortness of breath. Patient has stopped working, reduced work, or has given up or reduced other activities for other reasons. For example, other medical problems, being ‘laid off’ work, etc. |
| Grade | Symptoms |
| –3 | Major deterioration. Has deteriorated two grades or greater from baseline status. |
| –2 | Moderate deterioration. Has deteriorated at least one grade but fewer than two grades from baseline status. |
| –1 | Minor deterioration. Has deteriorated less than one grade from baseline. Patient with distinct deterioration within grade, but has not changed grades. |
| 0 | No change. No change from baseline. |
| + 1 | Minor improvement. Has improved less than one grade from baseline. Patient with distinct improvement within grade, but has not changed grades. |
| + 2 | Moderate improvement. Able to return to work at nearly usual pace and/or able to return to most activities with moderate restriction only. |
| + 3 | Major improvement. Has improved two grades or greater from baseline. |
| Z | Further impairment for reasons other than shortness of breath. Patient has reduced exertional capacity, but not related to shortness of breath. For example, musculoskeletal problem or chest pain. |
| Grade | Symptoms |
| –3 | Major deterioration. Severe decrease in effort from baseline to avoid shortness of breath. Activities now take 50–100% longer to complete than required at baseline. |
| –2 | Moderate deterioration. Some decrease in effort to avoid shortness of breath, although not as great as preceding category. There is great pausing with some activities. |
| –1 | Minor deterioration. Does not require more pauses to avoid shortness of breath, but does things with distinctly less effort than previously to avoid breathlessness. |
| 0 | No change. No change in effort to avoid shortness of breath. |
| + 1 | Minor improvement. Able to do things with distinctly greater effort without shortness of breath. For example, may be able to carry out tasks somewhat more rapidly than previously. |
| + 2 | Moderate improvement. Able to do things with fewer pauses and distinctly greater effort without shortness of breath. Improvement is greater than preceding category, but not of major proportion. |
| + 3 | Major improvement. Able to do things with much greater effort than previously with few, if any, pauses. For example, activities may be performed 50–100% more rapidly than at baseline. |
| Z | Further impairment for reasons other than shortness of breath. Patient has reduced exertional capacity, but not related to shortness of breath. For example, musculoskeletal problem or chest pain. |
*Mahler DA, Weinberg DH, Wells CK, Feinstein AR, 1984. The measurement of dyspnea: Contents, interobserver agreement, and physiologic correlates of two new clinical indexes. Chest 85, 751–758.
In addition, patients can be quizzed regarding the specific movements and tasks that elicit dyspnoea, since this information will provide a guide to the type of functional exercises that address these deficits. For example, if patients identify hair brushing / washing as a task that specifically elicits dyspnoea, exercises that simulate this challenge can be selected. If, on the other hand, the patient reports feeling unsteady or off balance when they get out of breath, this may suggest that they have lumbopelvic dysfunction that can be addressed with specific exercises. The following is a list of suggested questions, which is by no means exhaustive:
Assessment of dyspnoea during exercise
The most commonly used and well-validated scale for the assessment of dyspnoea during exercise is the Category Ratio scale created by Borg (1982, 1998). This is a general intensity scale with ratio properties that can be used to quantify either breathing or limb effort independently, as well as concurrently within the same exercise test (Borg et al, 2010). A copy of the instrument and instructions for its use can be found in Boxes 7.3 and 7.4 respectively. Typically, the scale is presented to the participant periodically during exercise, and they report their perception verbally or by pointing at the scale. This enables symptom profiles to be generated, as well as isolated ratings at specified intensities of exercise. Furthermore, participants can be asked to exercise to a specified level of perceived effort for the purposes of exercise training, or to compare physical capacity between individuals.

Box 7.4 Borg CR-10 scale instructions*
Basic instruction: 10, ‘Extremely strong – Max P’, is the main anchor. It is the strongest perception (P) you have ever experienced. It may be possible, however, to experience or to imagine something even stronger. Therefore, ‘Absolute maximum’ is placed somewhat further down the scale without a fixed number and marked with a dot ‘•‘. If you perceive an intensity stronger than 10, you may use a higher number.
Start with a verbal expression and then choose a number. If your perception is ‘Very weak’, say 1; if ‘Moderate’, say 3; and so on. You are welcome to use half values (such as 1.5, or 3.5 or decimals, for example, 0.3, 0.8, or 2.3). It is very important that you answer what you perceive and not what you believe you ought to answer. Be as honest as possible and try not to overestimate or underestimate the intensities.
Scaling perceived exertion: We want you to rate your perceived (P) exertion, that is, how heavy and strenuous the exercise feels to you. This depends mainly on the strain and fatigue in your muscles and on your feeling of breathlessness or aches in the chest. But you must only attend to your subjective feelings and not to the physiological cues or what the actual physical load is.
| 1 | is ‘very light’ like walking slowly at your own pace for several minutes. |
| 3 | is not especially hard; it feels fine, and it is no problem to continue. |
| 5 | you are tired, but you don’t have any great difficulties. |
| 7 | you can still go on but have to push yourself very much. You are very tired. |
| 10 | this is as hard as most people have ever experienced before in their lives. |
| • | this is ‘Absolute maximum’, for example, 11 or 12 or higher. |
*Borg G, 1998. Borg’s Perceived Exertion and Pain Scales. Human Kinetics, Champaign, IL, pp. 44–52.
Assessment of dyspnoea during loaded breathing
The Borg CR-10 can also be used during a loaded breathing task to assess breathing effort perception and its response to training (Weiner et al, 2000; Magadle et al, 2002; Weiner et al, 2003; Beckerman et al, 2005). Typically, participants breathe against a series of fixed-pressure threshold loads corresponding to unloaded breathing, and 5, 10, 20 and 30 cmH2O. After breathing against each load for 1 minute, participants provide an intensity rating using the Borg CR-10. Ideally, the test should be discontinuous such that each rating is discrete, independent of other ratings and unaffected by accumulated inspiratory muscle fatigue; randomization of load presentation is also recommended. The test is susceptible to differences in breathing pattern, so use of a breathing pacer is advisable (a breathing pacer App can be obtained at www.physiobreathe.com/apps).
No published data are currently available to define normal ranges for this test, but ratings of effort are inversely proportional to inspiratory muscle strength (MIP), and the test also exhibits excellent sensitivity to changes in MIP following IMT (Weiner et al, 2000; Magadle et al, 2002; Weiner et al, 2003; Beckerman et al, 2005). Since no normative data exist currently, it is recommended that practitioners / clinics develop their own methods and normative data for identifying patients with abnormally high ratings of dyspnoea. Notwithstanding the lack of published normative data, a look-up chart can be found in Figure 7.1 (see also section ‘Assessment of load / capacity imbalance’, below). It should also be noted that some patients with asthma may have abnormally low ratings (Kikuchi et al, 1994), which is a contraindication for IMT (see Ch. 6, section ‘Contraindications’).
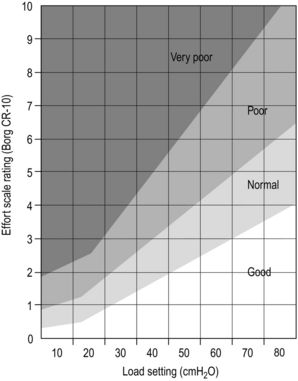
Figure 7.1 Load / capacity imbalance chart. Chart for assessing the extent of functional imbalance between the combined intrinsic and extrinsic loading of the inspiratory muscles, and the capacity of the inspiratory muscles to deliver inspiratory pressure. After breathing against a given load for 60 seconds, the participant rates their effort using the Borg CR-10 scale. Good = no imbalance and above average inspiratory muscle function.
Normal = no imbalance with normal inspiratory muscle function.
Poor = imbalance such that intrinsic and extrinsic inspiratory loading exceeds inspiratory muscle capacity.
Very poor = large imbalance such that intrinsic and extrinsic inspiratory loading exceeds inspiratory muscle capacity considerably. (The chart is based on unpublished data from McConnell and colleagues.)
Assessment of load / capacity imbalance
The look-up chart in Figure 7.1 can be used to assess the extent to which there is a functional imbalance between the combined, intrinsic and extrinsic loading of the inspiratory muscles and the capacity of the inspiratory muscles to deliver inspiratory pressure. The chart is based upon unpublished data collected from normal individuals and those with respiratory disease by McConnell and colleagues over the course of two decades. To undertake the test, the participant breathes against one to three inspiratory loads using the methods described in the section ‘Assessment of dyspnoea during loaded breathing’, above. The resulting Borg CR-10 rating can then be compared with the rating classifications on the chart.
FUNCTIONAL TRAINING EXERCISES
The remainder of this chapter is devoted to a description of a range of functional inspiratory muscle training (IMT) exercises. Two approaches can be taken to the selection of exercises for a particular patient: (1) use a generic set of around 10 exercises that provides a holistic set of benefits (some suggested workout protocols are provided at the end of this chapter), and (2) create a bespoke set of exercises based upon specific patient weaknesses, e.g., situations and tasks that are particularly challenging for the patient. A combination of these two approaches probably represents an optimal solution.
Underlying principles
Functional IMT should be preceded by a 6-week period of Foundation IMT, and the development of good diaphragm breathing technique (see Ch. 6). When embarking upon the Functional phase of training, it is important to ensure that patients have good technique and exercise form, before adding any resistances. Start patients off by performing each exercise with nothing more than a focus on maintaining slow, deep diaphragmatic breathing throughout. Using an external breathing pacer that provides an auditory cue (obtainable via www.physiobreathe.com/apps) can be very helpful for supporting this process, as well as during the functional exercises themselves. Next add an external resistance to inhalation using an inspiratory muscle-training device (IMTD) set on its minimum load. Gradually increase the load on the IMTD over a period of a few weeks until it reaches the prescribed level for the exercise. See Box 7.5 for guidance regarding abdominal bracing and achieving a neutral spine position, as well as the sections on breath control and load setting in Chapter 6. In addition, consider incorporating IMT into interval training, drills or circuits; the IMT can be introduced into the recovery phase of interval training, or it can be a separate station during a drill or circuit.
Box 7.5 Tips for bracing and posture
Many of the exercises in this chapter involve an abdominal bracing. Bracing requires co-contraction of muscles that bring about opposing movements. For example, co-contraction of the arm muscles involves simultaneous, forceful contraction of the elbow flexor (biceps) and extensor (triceps) such that the muscles are contracted but the arm neither flexes nor extends (i.e., there is a static contraction of both muscles). This same principle can be applied to the muscles of the abdomen such that they form a stiff, stabilizing corset around the abdomen. The muscle fibres in the multiple layers of the abdominal wall run obliquely across one another, like plywood, forming an extremely strong, yet flexible, cylinder.
Correct bracing requires some practice, and the best place to start is learning how to activate the main compressive muscle, the transversus abdominis. The failure to automatically activate the transversus abdominis is associated with low back pain, but learning how to activate this muscle voluntarily has been shown to restore its automatic function in stabilizing the spine. Reconnecting with the transversus abdominis can be achieved by practising drawing in the anterior abdominal wall toward the spine. The objective is to maximize the reduction in waist girth during this manoeuvre, when this occurs correctly the rectus abdominis and pelvic floor inevitably become involved. Once patients can draw in successfully, they need to practise activating the transversus abdominis and accompanying abdominal muscles using a bracing contraction – one in which the trunk volume changes very little, yet the muscles are contracted forcefully.
Initially, this should be practised with maximal effort, but as patients become more adept at activating the muscles involved the intensity can be reduced, and they will be able to feel (literally) the supportive corset that the manoeuvre creates around the abdomen.
Keep in mind that the use of the term bracing in this book is not intended to imply the adoption of a rigid, inflexible trunk. Instead, it implies a focus on the core muscles as a seat of strength and stability. Moderate co-contraction of the abdominal-stabilizing muscles is the objective, and not inflexible rigidity of the abdominal compartment. The only exceptions to this are static exercises that specifically require trunk rigidity (e.g., planking).
Breathing during abdominal bracing
Inhaling will feel more difficult during abdominal bracing because the downward movement of the diaphragm is opposed by the raised pressure and increased stiffness of the abdominal compartment. Patients will need to work hard to overcome this extra resistance without releasing the brace, but this resistance is providing a very potent training stimulus – not only to the diaphragm but also to the muscles of the abdominal wall. This is because the diaphragm movement increases the pressure inside the abdominal compartment, requiring all of the muscles to contract more forcefully to maintain the brace. In fact, when bracing is performed with maximal effort, this is an excellent exercise in its own right. Diaphragm breathing should be practised during abdominal bracing in the seated or standing position before incorporating it into other exercises. For exercises that involve bracing, add the IMTD only when the patient is able to force their diaphragm into the braced abdominal compartment without losing control of the brace.
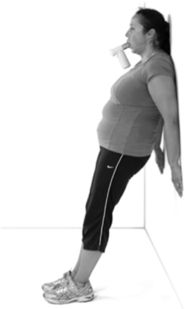
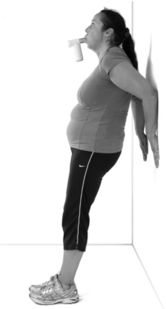
A neutral spine position is also referred to throughout this chapter; this describes a position in which the pelvis is level, with neither a forward nor a backward tilt (Fig. 7.2). Forward tilt accentuates lumbar lordosis, and backward tilt does the opposite. Both of these produce undesirable loading on the spine.
You can get a feel for this by standing with your back against a wall. If your heels, buttocks, and shoulder blades (upper portion, not the tips) are touching the wall, your pelvis should be in a neutral position.
Before using these exercises, be sure to note the following principles:
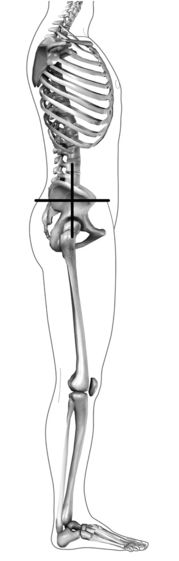
Figure 7.2 Neutral spine position; the pelvis is level. (From McConnell AK, 2011. Breathe strong, perform better. Human Kinetics, Champaign, IL, with permission.)
The exercises have been designed specifically to minimize the requirement for special equipment. Below is a list of the equipment used, as well as potential alternatives:
| Ideal equipment | Alternative equipment |
| Inspiratory muscle training device | Pursed lips with braced trunk |
| Swiss ball | Chair with balance cushion |
| Balance cushion | Close foot stance |
| Dumbbells (1–10 kg) | Canned food, small sand bags |
| Small medicine ball (2–10 kg) | Canned food, medium sand bags |
| Step | Stairs |
| Elastic resistance band or cord | |
| Exercise mat | Carpeted area |
| Bounceable ball | |
| Small shopping bag | |
| Chair with and without arms |
Where an IMTD is used during an exercise, the loads to be used will be graded as ‘light’ or ‘moderate’. These correspond to the following ‘repetition maximum’ and maximal inspiratory pressure (MIP) percentage settings:
The exercises are grouped into four sections: (1) trunk strength and lumbopelvic stabilization exercises, (2) dynamic trunk activation exercises, (3) postural control exercises, and (4) pushing and pulling exercises. Each section is subdivided into exercises with ‘Easy’, ‘Moderate’ and ‘Difficult’ classifications. Within each of these classifications, the challenge can be increased progressively, and this is described as appropriate. It is essential that clinical judgement is applied at all times in relation to the suitability of any given exercise for any given patient. For example, the ‘Difficult’ stretches shown below would be entirely unsuitable for a patient with osteoporotic kyphosis.
During most exercises that involve rhythmic movements, there is a requirement to swap breathing phases halfway through a set, i.e., to switch from inhaling whilst overcoming a resistance (concentric phase) to exhaling. This can be achieved easily by pausing between repetitions and adding half a breath cycle. For example, for a bicep curl, at the end of a series of repetitions where inhalation occurs during the concentric phase, pause with the hands raised, exhale and then inhale as the resistance is lowered (eccentric phase). In this way, the inhalation is switched from the concentric to the eccentric phase of the movement.
Individual workouts should be preceded by stretching and mobilizing exercises (see below). An individual workout should consist of around 10 exercises, with an even mix from each of the four sections. Patients should undertake these functional workouts at least three times per week. On other days, Foundation IMT should be undertaken once daily (at least 3 days per week). The difficulty of the exercises should be increased progressively; firstly by adding resistances, and then by progressing through moderate and difficult classifications. It is also good to vary the exercises from time to time to introduce new challenges.
Some suggested workout protocols are provided at the end of this chapter, and video clips of all exercises are available at www.physiobreathe.com.
Stretching and mobilizing
Developing range of movement is as important for the thorax as it is for any other part of the body. However, the trunk and rib cage are often overlooked when it comes to these activities, despite the fact that these areas include numerous muscles, their attachments, and associated connective tissue (e.g., the rib cage). The rib cage is potentially a huge source of resistance to inhalation, especially in restrictive diseases such as kyphoscoliosis. Any resistance to thoracic expansion increases the work of breathing and the associated perception of breathing effort. The exercises below are grouped into sets of ‘Easy’, ‘Moderate’ and ‘Difficult’ exercises that stretch the trunk in the anterior, posterior and lateral planes, as well as during rotation. Easy and moderate stretches are based on those of Minoguchi et al (2002). These sets can be used to stretch and mobilize the rib cage in order to free-up rib expansion and reduce breathing effort. Each movement should be sustained at maximum range of movement for around 30 seconds.
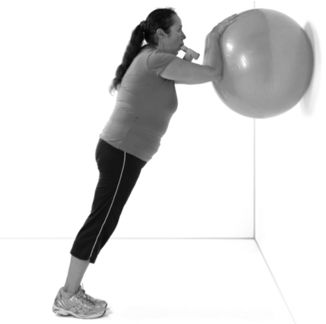
Diaphragm breathing can be practised during the stretches. In particular, the tension in the trunk muscles that is created during the anterior stretch over a Swiss ball provides a useful resistance for the diaphragm to work against.
Easy
Easy stretching and mobilizing exercises are performed seated on a chair, in the sequence:
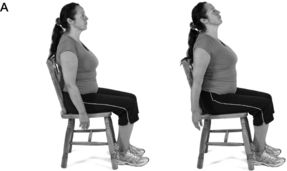
(A) anterior trunk stretch
(B) posterior trunk stretch

(C) lateral stretch (perform on both sides)
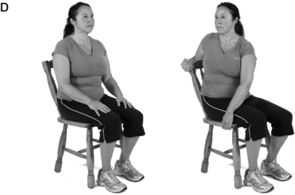
(D) seated rotation (perform in both directions).
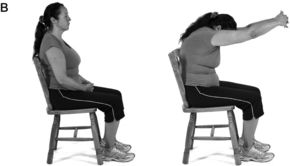
Moderate
Moderate stretches and mobilizing exercises are performed standing on both feet, in the sequence:
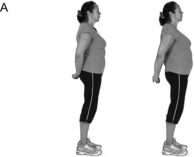
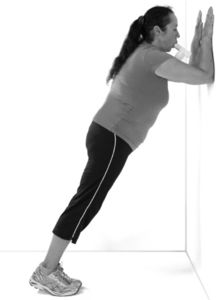
(A) upper trunk anterior stretch
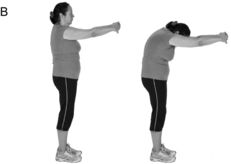
(B) standing posterior stretch
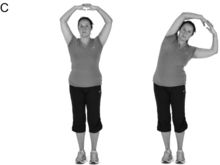
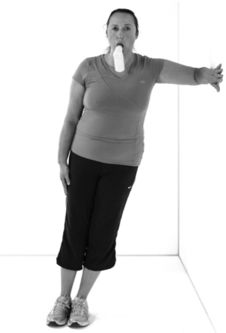
(C) standing lateral stretch (perform on both sides)

(D) standing rotation (perform in both directions).
Difficult
Difficult stretches and mobilizing exercises are performed over a Swiss ball, on hands and knees, then lying down, in the sequence:
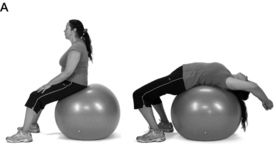
(A) anterior stretch over Swiss ball
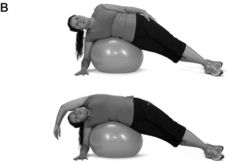
(B) lateral stretch over Swiss ball (perform on both sides)
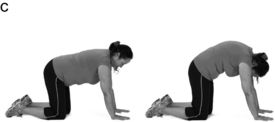
(C) posterior ‘cat’ stretch
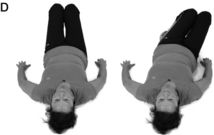
(D) supine rotation (perform in both directions).
Breath control
As was described in Chapter 6, developing breath control is a skill that can and should be practised, because it maximizes breathing efficiency and minimizes the distracting influence of dyspnoea. This can be practised in situations where breathing demand / distress is high; under these conditions, patients should be encouraged to practise deep, slow breath control, and to slow their breathing frequency as much as they can tolerate (a breathing pacer App can be obtained at www.physiobreathe.com/apps). Keeping breathing calm and relaxed under stressful conditions can help to minimize stress and anxiety, and build a sense of mastery.
In addition, below are three further exercises that can help overcome the urge to synchronize breathing with the cadence of movement, which is almost always too high. The exercises involve high-cadence body movements, during which the patient should practise deep, slow, controlled breathing that is deliberately not synchronized with movement (a breathing pacer App can be obtained at www.physiobreathe.com/apps).
Marching on the spot
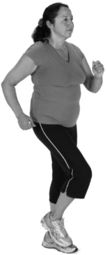
Procedure:: The patient should march on the spot at a challenging but manageable pace. This exercise will also increase breathing demand, and is therefore more difficult than the Swiss ball bounce. The natural urge will be to synchronize breathing to the cadence of the movement, but this should be replaced by a deep, slow breathing pattern that is deliberately slower than the movement, and asynchronous.
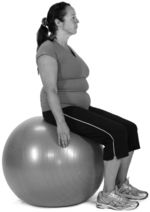
Ball bounce on the spot
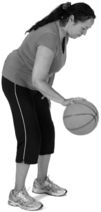
Procedure:: The patient should bounce the ball on the spot. This exercise will increase breathing demand slightly, but will also challenge postural control and stabilization. The natural urge will be to synchronize breathing to the cadence of the bouncing, but this should be replaced by a deep, slow breathing pattern that is deliberately slower than the movement, and asynchronous.
Trunk strength and lumbopelvic stability exercises
As was described in Chapter 3, an association has been found between respiratory problems and low back pain. For example, epidemiological data suggest that back pain is more prevalent in women with disorders of continence and respiration than in those without (Smith et al, 2006). Furthermore, physiological data show that the postural function of the diaphragm, abdominal and pelvic floor muscles is reduced by incontinence (Deindl et al, 1994) and respiratory disease (Hodges et al, 2000). Accordingly, it is reasonable to suggest that lumbopelvic stability is impaired in people with respiratory problems, and that correcting this deficit will be beneficial for patients’ back pain as well as their dyspnoea. Typical responses in people who are unable to accommodate the simultaneous demands of both stabilization and breathing are either to suspend breathing or to seek stability from an external support, e.g., wall, furniture or walking aid. Thus, training patients so that they are able to accommodate the demands of stabilization and breathing simultaneously should enhance their functional capacity during a wide range of daily activities.
The exercises below are graded, but in all instances training should commence without any resistance to breathing. During the initial phase of training, the focus should be upon maintaining, deep, slow, controlled breathing throughout. Once this can be achieved, the IMTD can be added to the exercise.
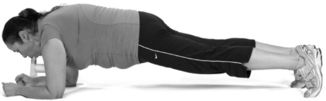
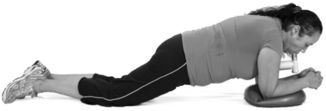
Plank
Benefits:: This is a ‘bread-and-butter’ core exercise for developing trunk strength and lumbopelvic stability. It engages the entire trunk- and pelvic-stabilizing musculature including the diaphragm. This exercise builds ‘inner strength’, facilitating the ability to maintain pelvic stability in the face of large posturally challenging movements of the legs, such as walking and stair climbing. Combining this stabilizing exercise with a breathing challenge ensures that both functions can be performed without compromise to either.
Procedure:: Adopt the starting position shown above for the selected level of difficulty. If using an IMTD, this should be held in the mouth, without using the hands. Once in position, brace the abdominal muscles (maximally) and breathe slowly and deeply at around 12 breaths per minute throughout the exercise. If using an IMTD, inhale forcefully through the IMTD before exhaling slowly and fully for about 4 seconds (breathing rate should be around 12 per minute). Ensure maintenance of a completely straight bodyline and do not allow flexion at the hip or abdomen.
Variations:: To add difficulty, do any of the following: raise one straight leg off the floor and move it toward the ceiling, bring one knee toward the elbow on the same side of the body (as if climbing a rock face), or bring one knee in and underneath the body toward the opposite elbow. As the leg is raised, inhale forcefully through the IMTD before exhaling slowly as it is lowered. Repeat using the opposite leg. Swap breathing phases between sets so that the exhalation occurs as the leg is lifted.
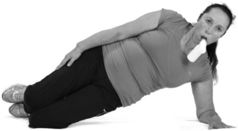
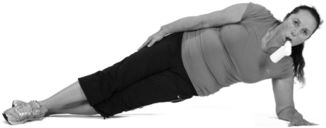
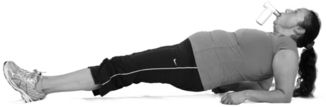
Side bridge
Benefits:: This is another ‘bread-and-butter’ core exercise for developing trunk strength and lumbopelvic stability. It engages the entire trunk- and pelvic-stabilizing musculature including the diaphragm, as well as the back extensors. Superimposing the requirement for increased breathing effort onto this exercise helps ensure that the challenge of keeping the trunk stiff does not lead to a failure to maintain deep, controlled breathing.
Procedure:: Adopt the starting position shown for the selected level of difficulty. If using an IMTD, this should be held in the mouth without using the hands. Once in position, brace the abdominal muscles (maximally) and breathe slowly and deeply at around 12 breaths per minute throughout the exercise. If using an IMTD, inhale forcefully through the IMTD before exhaling slowly and fully for about 4 seconds (breathing rate should be around 12 per minute). Ensure maintenance of a completely straight bodyline and do not allow flexion at the hip or abdomen.
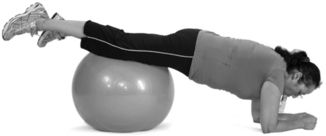
Bridge
Benefits:: This exercise helps to develop balance between the posterior and anterior muscles of the trunk. When undertaken with a leg lift, the exercise challenges the ability to maintain pelvic alignment (if the unsupported hip drops towards the floor, the deep stabilizers are weak).
Procedure:: Adopt the starting position shown for the selected level of difficulty. If using an IMTD, this should be held in the mouth without using the hands. Once in position, brace the abdominal muscles (maximally) and breathe slowly and deeply at around 12 breaths per minute throughout the exercise. If using an IMTD, inhale forcefully through the IMTD before exhaling slowly and fully for about 4 seconds (breathing rate should be around 12 per minute). Ensure maintenance of a completely straight bodyline and do not allow flexion at the hip or abdomen.
Variations:: To add difficulty, raise a straightened leg as high as possible (there is a tendency to sag in the middle or tilt to one side). As the leg is raised, inhale forcefully through the IMTD before exhaling slowly as it is lowered. Repeat using the opposite leg. Swap breathing phases between sets so the exhalation occurs as the leg is lifted.
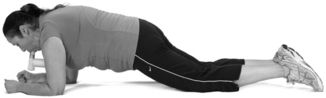
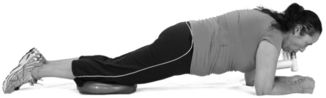
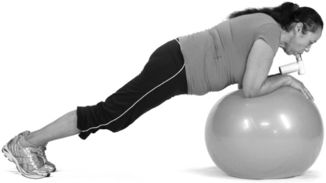
Plank with lower body instability
Benefits:: This is a slightly more advanced version of the plank in which a postural control dimension is added to the exercise so that trunk stabilization must be maintained under conditions of instability. Because the lower body is the unstable section, the emphasis is on the pelvic stabilizers. This exercise helps to develop control over the linkage between movements of the upper and lower body.
Procedure:: Adopt the starting position shown above for the selected level of difficulty. If using an IMTD, this should be held in the mouth, without using the hands. Once in position, brace the abdominal muscles (maximally) and breathe slowly and deeply at around 12 breaths per minute throughout the exercise. If using an IMTD, inhale forcefully through the IMTD before exhaling slowly and fully for about 4 seconds (breathing rate should be around 12 per minute). Ensure maintenance of a completely straight bodyline and do not allow flexion at the hip or abdomen.
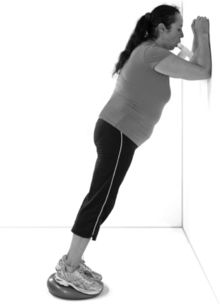
Plank with upper body instability
Benefits:: This is a slightly more advanced version of the plank in which a postural control dimension is added to the exercise so that trunk stabilization must be maintained under conditions of instability. Because the upper body is the unstable section, the emphasis is on the trunk stabilizers. This exercise helps to develop control over the linkage between movements of the upper and lower body.
Procedure:: Adopt the starting position shown for the selected level of difficulty. If using an IMTD, this should be held in the mouth, without using the hands. Once in position, brace the abdominal muscles (maximally) and breathe slowly and deeply at around 12 breaths per minute throughout the exercise. If using an IMTD, inhale forcefully through the IMTD before exhaling slowly and fully for about 4 seconds (breathing rate should be around 12 per minute). Ensure maintenance of a completely straight bodyline and do not allow flexion at the hip or abdomen.
Gluteal bridge
Benefits:: This is a good exercise for the gluteals and hamstrings, as well as the trunk and deep pelvic stabilizers. It challenges the ability to breathe effectively during hip extension.
Procedure:: Adopt the starting position shown for the selected level of difficulty. If using an IMTD, this should be held in the mouth without using the hands. Once in position, brace the abdominal muscles (maximally) and breathe slowly and deeply at around 12 breaths per minute throughout the exercise. If using an IMTD, inhale forcefully through the IMTD before exhaling slowly and fully for about 4 seconds (breathing rate should be around 12 per minute). In the Easy and Difficult versions, ensure maintenance of a completely straight bodyline and do not allow flexion at the hip or abdomen.
Related posts:

Stay updated, free articles. Join our Telegram channel

Full access? Get Clinical Tree


