Femoral Revision
Uncemented Tapered Fluted Modular Implants
Christopher R. Gooding, Clive P. Duncan, Bassam A. Masri and Donald S. Garbuz
Key Points
Introduction
The objective of revising a loose femoral prosthesis is to restore the hip joint to a condition as close to “normal” as possible, that is, to one that is painless and stable and enables the patient to resume a good quality of life. Several concepts have been described for revision of femoral components of a failed hip arthroplasty. Stem stability in the revision setting can be achieved by cemented or cementless fixation. The disadvantage of a cemented revision, in the absence of impacted allograft, lies in the difficulties involved in achieving adequate interdigitation of cement into host bone, because loosening of the primary implant results in enlargement of the femoral canal and causes the cortices to become thinner and sclerotic.
Broadly speaking, cementless revision stems can be divided into stems that are designed to gain fixation in the proximal or in the distal femur. The advantage of achieving fixation in the distal femur is that the bone stock of the proximal femur in the revision setting is often poor. Long-term uncemented fixation in the diaphysis can be achieved by different methods, including extensively porous-coated stems and fluted, tapered grit-blasted stems. Uncemented, extensively porous-coated stems have long been considered the gold standard of uncemented revision femoral stems in North America1–13 and are able to gain rotational stability from a scratch fit in the diaphysis. Although this stem design has been successful in the revision setting,2,5,7 stress shielding remains a concern because of the relative stiffness of the implant.
An alternative method of uncemented diaphyseal stem fixation, used frequently in Europe, requires the use of fluted, tapered, grit-blasted stems. These stems are tapered to gain axial and rotational stability in the diaphysis of the femur. The femur is reamed to a tapered cone. Then a fluted, tapered implant is impacted into the tapered cone of the prepared diaphysis. Essentially, the distal part of the implant, which is cone shaped, is wedged into the diaphysis to achieve primary stability. The purpose of this chapter is to discuss use of these implants, so-called uncemented modular fluted implants, in femoral revision during revision total hip arthroplasty.
Design Rationale
For fluted, tapered revision femoral stems, Wagner14 proposed that the contact zone between the implant and the bone needed to measure between 70 and 100 mm for primary stability. However, Beguec and associates15 believed that a good press fit depends on the quality of the wedging and a contact zone of just 30 mm in excellent bone, but 40 to 50 mm if bone quality is poor. The contact zone between implant and bone can be limited in other ways to help reduce stiffness. Blaimont16 demonstrated that during hip flexion, tensile forces at the level of the diaphysis occur in the anterior half of the femur and compressive forces in the posterior half. As one moves through the femur in the diaphyseal region from anterior to posterior, these forces gradually become less tensile and more compressive. At a point in this plane, forces are neither compressive nor tensile, and this “zone” is termed the neutral zone. An implant that establishes contact with bone in this neutral zone should allow the bone to react and remodel as it would normally, at least partially and theoretically. This can be achieved by using a quadrangular stem or a stem with flutes that contact the femur in the coronal plane, that is, in the neutral zone.
The cross-sectional shape of a press-fit, uncemented stem is also important for rotational stability. A circular cross-section would create a large contact surface while offering little resistance to rotational loading. An implant with a quadrangular cross-section (such as a tapered stem) has been shown to be very successful in resisting rotational torque and achieving good primary fixation.17,18 A stem with cutting flutes offers further advantages not only in neutralizing any rotational forces but also in preserving a space between implant and bone, which may aid revascularization and subsequent bone regeneration. This also allows the use of a less stiff implant and reduces the stress shielding seen with fully porous-coated cylindrical implants.
These theoretical advantages have been shown in clinical practice using the Wagner stem (a monoblock fluted, tapered titanium stem), as has been reported by several authors.19–21
Because these stems depend on a tapered geometry, it is often difficult to predict when they will stabilize as they are being wedged into the femur. For this reason, modularity of the stem, whereby proximal bodies of different lengths to accommodate for the lack of predictability of the exact wedging location of the distal implant, has been developed and is now considered the standard of care for tapered, fluted revision stems. This modularity allows the surgeon to implant the distal segment in the diaphysis for optimal stem rotational stability, with different options for the proximal body that optimize leg length, femoral offset, femoral version, and ultimate stability. However, this poses certain engineering challenges because these stems require a modular junction at a high-stress location of the femoral component. Postak and associates22 examined the modular junction and found that the structural endurance limit was compatible with good long-term performance.
Preoperative Planning
Before embarking on a revision of the femoral component, the surgeon should evaluate the existing bone stock and anticipate the quality of remaining bone after the implants and cement, if present, are removed. Paprosky23 described a useful classification system for evaluating femoral bone stock in revision total hip arthroplasty. This classification enables an algorithmic approach as a guide to femoral reconstruction. Although this topic is covered in greater detail elsewhere, a brief summary is provided here:
• Type 1: a well-preserved metaphyseal cancellous bone with an intact diaphysis
• Type 2: considerable loss of metaphyseal cancellous bone but with an intact diaphysis
When it comes to revising this group, extensively porous-coated implants tend to fail because they are unable to achieve a sufficient scratch fit.23 However, the modular, cementless, tapered stem with flutes is able to attain a good initial press-fit even in a relatively short isthmus and can also achieve good rotational stability. Good results have been achieved with this stem in this type of revision setting.24–29
Preoperative Templating
The aim of preoperative templating in the revision scenario is to determine the following:
The templates are used to identify the diameter and stem required to achieve fixation and to bypass bony defects. At the same time, the length of the osteotomy is determined as the longest possible osteotomy that will allow safe removal of the implants and will also allow an intact femoral tube to achieve at least 5 to 7 cm of fixation into intact bone. The approximate length of the proximal body is then templated, but it has to be kept in mind that this process is fairly inaccurate because the exact length of the proximal body will depend on the ultimate intraoperative seating of the distal stem.
Surgical Technique
Two methods may be used to implant a modular femoral stem. The surgeon can construct the implant as a two-step procedure or can assemble the implant on the operating room table before final implantation. Whether the surgeon chooses to assemble the implant in situ or on the back table depends on how confident he is about where the final implant will seat based on the use of intraoperative trials. It is much easier to assemble the implant in situ if an ETO had been performed, and this is indeed the case for most of these revisions.
Assembly In Situ With Extended Trochanteric Osteotomy
Wagner was the first to popularize the technique of performing a proximal osteotomy14 during a revision total hip arthroplasty, although his technique involved creating an osteotomy fragment in the coronal plane consisting of the anterior third of the circumference of the upper femur. This technique has been modified slightly to create an osteotomy fragment in the sagittal plane that consists of the lateral third of the upper femur, including the greater trochanter with attached abductors.
Situations that may require an ETO include revision of a well-fixed uncemented or cemented femoral implant, removal of a loose femoral stem with a well-bonded cement mantle, and correction of a proximal femoral deformity to gain additional acetabular exposure or to assist in dislocation of a failed hip arthroplasty in patients with extensive scarring or heterotopic bone formation.
Potential advantages of this technique include direct access to the distal part of the femoral canal for reaming and removal of distal cement (avoiding the impingement of reamers on the greater trochanter, with inherent risk of fracture), with the added advantages of being able to tension the abductors by trochanteric advancement and reducing the operating time for revisions in which exposure is a problem.30
For a tapered stem to function successfully, surface contact between bone and implant must be sufficient, resulting in stable wedging of the prosthesis that eliminates motion to allow sufficient bone ongrowth. If a straight stem is implanted into a femur that is curved in the coronal plane, the areas of contact will be at three points only and will have little capacity to prevent subsidence of the implant or to resist rotational forces, particularly in weak bone. Because conical reamers cannot convert a curved femur into a straight one, this is another indication for performing an osteotomy.
After the osteotomy is performed, the femoral canal is prepared. The first step involves diaphyseal reaming until firm endosteal cortical contact is achieved (Figs. 98-1 through 98-4). The width of the final reamer should be the same as the diameter of the chosen stem. If an osteotomy has been performed, reamers can be placed into the distal bone fragment through the osteotomy site to a depth that matches the final stem placement. In general, with most modular revision systems, it is possible to complete a trial before insertion of the definitive stem (Fig. 98-5). This is particularly important if one anticipates using the smallest proximal body because with tapered stems, the real prosthesis may not advance as far as the trial implants. Alternatively, the definitive stem can be implanted without a trial, ensuring that it is at least two diaphyseal diameters below a bony defect or the exit site of an osteotomy (Fig. 98-6). With some stem designs, the flutes are not circumferential and are designed to make endosteal contact only in the coronal plane, as was described earlier; therefore, the “bare area” of the stem (area without flutes) is located in the sagittal plane (anteriorly and posteriorly) (Fig. 98-7). Care must be taken at this stage to confirm good “press-fit” or wedging in the diaphysis (Fig. 98-8). If this is not observed, the definitive implant may subside and subsequently fail. Once the definitive distal stem has been implanted, the surgeon has the choice of a number of proximal bodies of different lengths to restore leg length, depending on the particular system the surgeon is using (Figs. 98-9 through 98-11). Most systems offer the additional option of being able to “dial-in” the appropriate anteversion of ±30 degrees (Fig. 98-12A through C). The trial proximal prosthesis is then secured to the definitive distal component, usually by means of a nut or screw, of the threaded part of the Morse taper but without direct contact with the Morse taper because of the risk of possibly damaging it. Once the trial body has been secured to the definitive distal implant and a femoral head of appropriate size has been selected, the hip can be reduced and examined for stability, as well as leg lengths. If the hip is not stable at this stage, a proximal component of a different size can be selected to address leg length issues or anteversion changes if the hip is unstable. Once the definitive proximal body is selected, it is secured to the distal segment (Fig. 98-13).
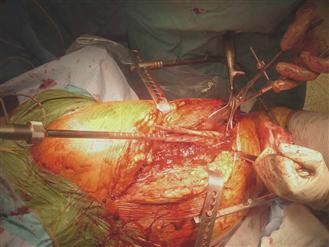
Figure 98-1 Intraoperative photograph of a Vancouver B2 periprosthetic fracture. Reaming of the femoral canal.
Related posts:

Stay updated, free articles. Join our Telegram channel

Full access? Get Clinical Tree


