13
Endoscopic Anterior Cruciate Ligament Reconstruction Using Bone-Patellar Tendon-Bone Grafts: Autograft and Allograft Techniques
Indications
- A patient with an acute or chronic anterior cruciate ligament (ACL) insufficiency involved in high-risk sports activity or with symptomatic instability
- Patient with multiligament instability, even in low-demand setting
- Patient with high-demand work activity, such as heavy labor
Other Treatment Options
- In patients with ACL insufficiency and low demands, rehabilitation with an emphasis on hamstring strengthening can be attempted.
- Functional bracing is an option for patients performing only occasional high-demand activities.
- Patients who opt for nonoperative treatment must understand the risk of articular and meniscal cartilage injury with recurrent instability episodes.
Advantages of Patellar Tendon Autograft
- Strength of graft and fixation
- Biologic advantage of autograft tissue
- Easy graft accessibility
Disadvantage of Patellar Tendon Autograft
- Extensor mechanism dysfunction, including patellofemoral pain (12 to 50%) and patellar fracture (0.3%)
Preoperative Planning and Timing of Surgery
- Surgery should not be performed until full range of motion of the knee is achieved, to minimize the risk of postoperative arthrofibrosis. In most cases, this requires 2 to 3 weeks following injury.
- The advantages and disadvantages of each graft choice for surgical reconstruction should be thoroughly discussed with the patient.
Special Instruments, Positions, and Anesthesia
- A tourniquet is applied to the proximal thigh and inflated at the beginning of the procedure for graft harvest. It can be deflated for the arthroscopic portion of the procedure.
- The patient is in the supine position with either a leg holder or lateral post. For the endoscopic technique, it must be ensured that 110 degrees of knee flexion can be achieved comfortably with either position to facilitate femoral screw placement.
- The contralateral limb should be placed in a padded foot holder, paying careful attention to protect the peroneal nerve.
- Anesthesia options include general anesthesia, spinal or epidural anesthesia, and femoral nerve block.
Surgical Procedure for Patellar Tendon Autograft
Examination Under Anesthesia
- An examination under anesthesia should be performed prior to surgery to confirm the diagnosis of an ACL tear.
- Lachman testing, anterior and posterior drawer, varus/valgus stress, and pivot shift testing should be performed and graded, with comparison to the contralateral extremity.
- In the circumstance of clear ACL insufficiency, the ACL graft can be harvested prior to diagnostic arthroscopy. This enables the inferolateral and inferomedial portals to be placed through the operative wound and for the graft to be prepared by an assistant during the diagnostic arthroscopy.
- Beware of ACL pseudo-laxity in the case of posterior cruciate ligament (PCL) insufficiency.
Diagnostic Arthroscopy
- Establish a superomedial or superolateral outflow portal.
- The use of an arthroscopic pump has nearly eliminated the need for inflating the tourniquet for intraarticular hemostasis.
- A thorough diagnostic arthroscopy should be performed, including the suprapatellar pouch, patellofemoral joint, medial and lateral gutters, medial and lateral compartments, and intercondylar notch.
- Particular attention is paid to the meniscus, and all attempts should be made to repair meniscus tears.
- Visualize the notch and probe the ACL for laxity, noting the injury location, the presence of a vertical strut, and the empty lateral wall sign.
- Make the incision from the tip of the patella to 2 cm below the tibial tubercle, slightly medial to the midline so the tibial tunnel can be placed through the incision. A smaller, more cosmetic incision can be used if adequate skin mobility is present.
- Carry the incision down sharply to the peritenon, and then incise it with a No. 15 scalpel blade. The peritenon incision should be extended proximally and distally to fully expose the patellar tendon.
- Measure the width of the tendon, and mark the midline with a sterile marking pen.
- Plan a 10 mm wide tendon harvest, with 10 mm × 25 mm bone plugs.
- Use a No. 10 scalpel blade to incise the tendon on one side of the graft, and then incise the other side of the graft, paying careful attention to remain parallel with the graft fibers.
- Outline the patellar and tibial bone plugs using a ruler and then a scalpel, to clear the periosteum over the bone plug. Then use an oscillating saw with a No. 238 saw blade to create the tibial and patellar bone plugs.
- The tibial bone plug should be an equilateral triangle on profile, and the patellar bone plug should be trapezoidal (to avoid penetrating the articular cartilage) (Fig. 13-1).
- Use 1/2-inch and 1/4-inch curved osteotomes to gently lift the tibial and patellar bone plugs out of their bed without levering.
- .Remove the fat pad from the underside of the graft with a Metzenbaum scissors.
- Personally carry the graft to the back table for preparation to reduce the potential of dropping the graft.
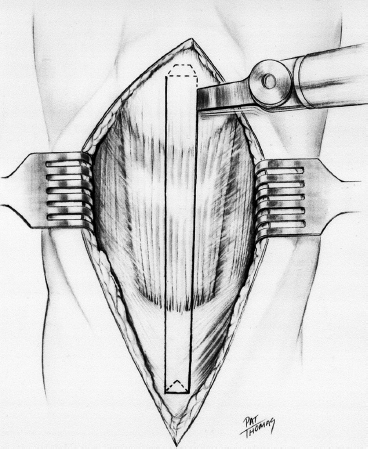
Figure 13-1 Geometric configuration of the trapezoidal patellar and triangular tibial bone plugs used for patellar tendon harvest.
Graft Preparation
- Ideally, one has harvested 10 mm * 25 mm bone plugs, and little preparation is needed.
- If one bone plug is longer, use it on the femoral side to decrease length construct mismatch between the tibial tunnel and the graft.
- A small rongeur may be used to contour the bone plugs and should be sized to 10 mm in diameter.
- Use a 0.062-inch Kirschner wire (K-wire) to make two drill holes in the bone plug, placed parallel to the cortical surface through the cancellous portion of the graft. Place a No. 5 Ticron suture in each hole. The suture holes are placed parallel to the cortex to reduce the risk of lacerating the sutures as the interference screw is placed.
- Because we use a push-up rather than a pull-through technique for placing the femoral bone plug, we do not place sutures in the femoral bone plug. If a pull-through technique with a passing pin is being used, sutures should be placed in the femoral bone plug in an identical manner, using one No. 5 Ticron and one No. 2 Ticron.3
Notch Preparation
- Remove the remaining ACL tissue with a motorized 5.5 mm full-radius resector, and all soft tissue should be removed from the lateral wall of the notch.
- A bony notchplasty is performed to promote visualization of the “over-the-top” position and accurate placement of the femoral tunnel. In addition, it helps prevent impingement of the graft with the knee in full extension in cases of notch stenosis.
- Initiate the notchplasty with a 1/4-inch osteotome through the inferomedial portal, and remove the osteocartilaginous fragments with a grasper.
- The notchplasty can be completed with a motorized 5.5 mm round burr, with careful attention to avoid misinterpreting a vertical ridge two-thirds posteriorly as the true posterior outlet.
- Hook a probe over the posterior edge to confirm the proper “over-the-top” position (Fig. 13-2).
Tunnel Placement
- The tibial tunnel entrance is generally 1.5 cm medial to the tubercle and 1 cm proximal to the pes anserine tendons.
- A more posteromedial starting position is desirable in the endoscopic technique to allow straighter access to the correct femoral tunnel position.
- A tibial aiming guide is used to position the intraarticular position of the guide pin. Several parameters can be used to determine accurate pin placement, including the center of the ACL footprint, the level of the posterior edge of the anterior horn of the lateral meniscus, and positioning 7 mm anterior to the PCL.
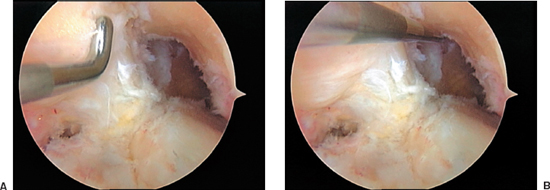
Figure 13-2 Arthroscopic view of a left knee. (A) All soft tissue has been removed, and a bony notchplasty has been performed to ensure visualization of the posterior edge of the notch. (B) A probe is placed in the “over-the-top” position at the posterior aspect of the notch.
- In the coronal plane, the tunnel should be midline in the notch. Erring slightly medially helps prevent impingement from the lateral femoral condyle.
- After the pin penetrates the joint, check the pin placement, and extend the patient’s leg to ensure impingement-free extension.
- The guidewire is then overdrilled with the appropriate-size reamer, based on the graft diameter (usually 10 or 11 mm).
- Attempt to collect all bone reamings for grafting of the patellar and tibial bone defects.
- Plug the tunnel, and remove all loose bone and cartilage around the tunnel entrance with the shaver. Smooth the posterior edge of the tunnel with a hand rasp.
- The goal of femoral socket placement is to prepare a tunnel that originates in the 1 o’clock position in the left knee and the 11 o’clock position in the right knee, and has a 1 to 2 mm posterior cortical shell.
- A femoral offset guide is placed through the tibial tunnel that positions the guide pin 7 mm anterior to the posterior cortex. This will leave a 2 mm back wall when a 10 mm reamer is used to make the socket (Fig. 13-3).
- If the surgeon is unable to place the pin in the 11 o’clock position (right knee) or the 1 o’clock position (left knee), consider placement of the guide pin through an accessory inferomedial portal with the patient’s knee hyperflexed (Fig. 13-4).
- .The guidewire is drilled transtibial through the femoral offset guide. The guidewire is drilled through the anterolateral femoral cortex and brought out through the skin for the pull-through technique. For the pushup technique, the guidewire needs to be drilled about 40 mm, with no need to penetrate the anterolateral femoral cortex.
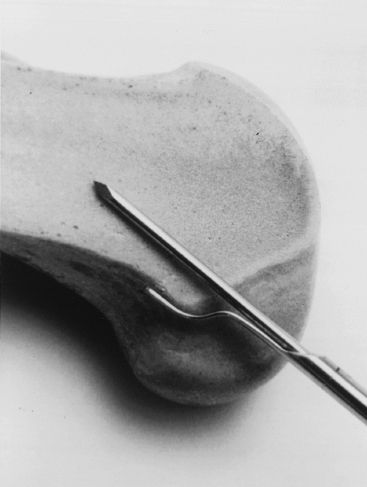
Figure 13-3 Sagittal cross section of a femur demonstrating a 7 mm over-the-top guide placed over the posterior edge of the notch with a guide pin in place. Overreaming with a 10 mm reamer leaves a 2 mm posterior wall in the femoral socket.
- .Ream with the appropriate-size reamer for the femoral tunnel (usually 10 mm) 1 cm into the femur to make an endoscopic footprint. Back it out and probe for posterior cortical integrity and proper tunnel orientation. When this is confirmed, ream to a depth 5 to 7 mm greater than the length of the bone plug, so that the femoral plug can be recessed to minimize graft-tunnel mismatch.
Graft Passage and Fixation
- For the push-up technique, the guidewire is removed. Place a two-pronged pusher at the base of the femoral bone plug, and push the graft through the tibial tunnel. A curved hemostat can be used through the inferomedial portal to help position the graft4.
- Remove the pusher, and guide the graft up into the femoral socket. Orient the cortical surface of the graft posteriorly.
- Alternatively, the graft can be passed using a passing pin (Beath pin) with a suture islet. When using this technique, pass the sutures for the femoral bone plug through the suture islet. Pull the pin out the anterolateral thigh, and securely grasp the sutures with a clamp. Pulling on the sutures then advances the graft into the femoral tunnel.
- Before fully seating the femoral bone plug, place the flexible guide pin for interference screw fixation on the anterior aspect of the bone plug. Hyperflex the knee and advance the flexible guide pin until it “bottoms out” within the femoral socket. Once the pin is positioned, fully seat the graft into the femoral socket.
- The tibial bone plug should be checked at this time, to make sure it is not protruding excessively from the tunnel. If there is marked graft-tunnel mismatch at this time, the graft can be recessed to accommodate the mismatch.
- Use a 7 mm × 25 mm titanium, fully threaded, cannulated interference screw for femoral fixation.
- To maximize the potential for parallel placement of the femoral interference screw, hyperflex the patient’s knee to 100 to 110 degrees. This additional knee flexion compensates for the difference between the tibial tunnel angle and the angle created by the guide pin placed through the inferomedial portal (Fig. 13-5).
- When the screw is halfway secured, remove the guide pin, or it may be difficult to remove the wire when the screw is fully seated.
- Cycle the knee several times with tension placed on the tibial sutures to assess graft fixation, and check the graft for gross isometry by placing your index finger at the extraosseous entrance of the tibial tunnel. Lastly, view the graft arthroscopically in full extension and ensure that it is impingement free.
- Before tibial fixation, externally rotate the graft (toward the lateral side) 180 degrees, which will shorten the graft length and place the tibial bone plug cortical surface anterior.
- For fixation on the tibial side, position the knee in full extension and firmly tension the tibial plug sutures. Place a flexible guidewire anterior to the tibial bone plug (on the cortical surface) and secure the graft with a 9 mm × 20 mm screw. Recess the screw just below the cortical surface of the tibial so it is less likely to become symptomatic but not difficult to remove if necessary in the future.
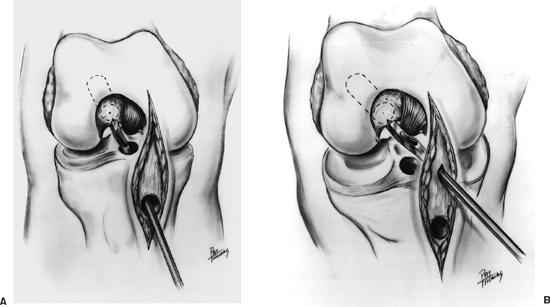
Figure 13-4 (A) Right knee with the over-the-top guide placed through the tibial tunnel. (B) Alternatively, the over-the-top guide is placed through a low inferomedial portal. This method creates a femoral tunnel that is not dependent on the position of the tibial tunnel.
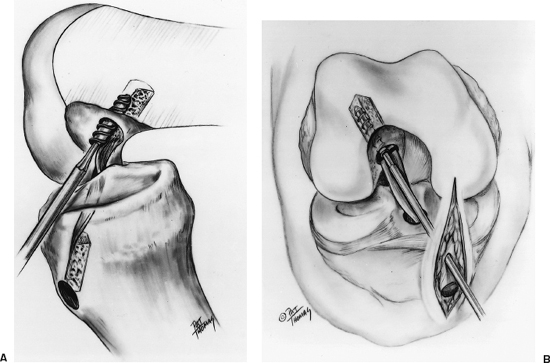
Figure 13-5 (A) Lateral view of right knee depicting the interference screw being placed over the guidewire. Hyperflexion of the knee facilitates parallel screw placement to the femoral tunnel. The tibial plug has been externally rotated 180 degrees so that the cortical surface is facing anteriorly. (B) Anteroposterior (AP) view of a right knee with an interference screw being placed.
Closure and Postoperative Care
- Loosely reapproximate the patellar tendon defect with several interrupted No. 1 Vicryl sutures while the patient’s knee is flexed to 70 degrees, to avoid shortening of the tendon.
- Graft the patellar bone defect with the collected bone reamings.
- The peritenon should be closed with a running 2–0 Vicryl suture, the subcutaneous layer with an interrupted 2–0 Vicryl, and the skin with a running subcuticular suture.
- A hinged knee brace is placed locked in full extension for immediate full weight bearing, with motion beginning the next postoperative day.
- Marcaine 0.5% is injected in the surgical wounds as well as intraarticularly.
- Hemovac drains are not necessary.
- A dressing change is performed at postoperative day 1 to assess for hemarthrosis, change the Steri-Strips to prevent traction blisters, assess range of motion, and reinforce motion goals.
Pearls and Pitfalls
- When harvesting the patellar tendon graft, angle the saw blade at a 45-degree angle to complete the crosscuts. This will decrease the likelihood of creating a stress riser on the patella, which could lead to a postoperative patella fracture.
- Appropriately placed retractors can greatly facilitate patellar tendon harvesting and decrease the size of the incision. Extending the knee facilitates incising the patellar tendon and tibial bone block edges, and flexing the knee places the tendon on tension, which helps guide the scalpel down the longitudinal axis of the tendon fibers. Placing a retractor distally during tibial bone block harvest can prevent inadvertent extension of the incision when outlining the tibial bone block with a scalpel.
- Strict attention should be paid to the placement of the tibial tunnel. The tibial tunnel’s position will dictate the position of the femoral tunnel, because the femoral tunnel guide is place through the tibial tunnel.
- If the femoral tunnel is difficult to place in the correct position through the tibial tunnel (usually too vertical), make an accessory portal inferior to the inferomedial portal to place the guide. This enables the femoral tunnel to be made in the appropriate over-the-top position (Fig. 13-4).
- For tibial graft fixation, ensure that the tibial plug is moving freely within the tibial tunnel before distal fixation. Occasionally, the distal tip of the plug can get caught inside the tunnel on the inferior cortical edge of the tibial, preventing appropriate tensioning. If the bone plug is fixed in this position, the graft will be lax.
- There are several methods for addressing graft construct mismatch, with protrusion of the tibial bone plug outside the tunnel. Small mismatches may be reduced by recessing the femoral bone plug deeper within its socket. The graft can be externally rotated from 180 to even 540 degrees to reduce mismatch. If 15 mm of tibial bone is within the tunnel, interference screw fixation is used. Additional methods for addressing graft construct mismatch include using a free bone block with interference screw fixation, or using alternative fixation methods such as tying sutures over a post or recessing the tibial tunnel bed to accommodate a staple.
Surgical Procedure for Patellar Tendon Allograft
- The technique of using BTB allograft differs little from that of BTB autograft. The preparation of the notch and tunnel placement is identical.
- Perform the arthroscopic evaluation, and preparation for tibial tunnel placement as previously described.
- The only incision necessary, other than the arthroscopic portals, is a 1.5 to 2.0 cm incision about two fingerbreadths down and two fingerbreadths medial from the top of the tibial tubercle, for tibial tunnel placement.
- Appropriate placement of this incision should be confirmed by aligning the tibial tunnel guide over the incision.
- After incising the skin, a small periosteal flap should be raised for placement of the tibial tunnel, to ensure that soft tissue does not impede the passage of the graft.
- Graft passage and fixation can occur in the same manner as previously described.
- An accessory inferomedial portal may be necessary to place the femoral interference screw.
- The donor hemipatellar graft is frequently longer than reported and may require any of the methods mentioned above for addressing graft construct mismatch.
- If an alternative allograft tissue is used, preparation must be made for appropriate fixation of the soft tissue portion of the graft. A variety of techniques exist for fixation of soft tissue grafts.
Rehabilitation and Return to Sports
- Standard aggressive rehabilitation guidelines are followed after ACL reconstruction.
- We use a postoperative hinged knee brace for 6 weeks following BPB autograft to protect the extensor mechanism.
References
1 Bach BR, Jr. ACL surgical techniques. In: Wojyts E ed. The ACL Deficient Knee. American Academy of Orthopaedic Surgeons (AAOS) monograph series. Rosemont, IL: AAOS; 1994: 46–63
2 Bach BR, Jr, Levy ME, Bojchuk J, Tradonsky S, Bush-Joseph CA, Khan NH. Single incision endoscopic anterior cruciate ligament reconstruction using patellar tendon autograft—minimum two year follow-up evaluation. Am J Sports Med 1998;26:30–40
3 Ferrari JD, Bush-Joseph CA, Bach BR, Jr. Arthroscopically assisted ACL reconstruction using patellar tendon substitution via endoscopic technique. In: Bach BR, Jr ed. ACL Surgical Techniques: Techniques in Orthopaedics, vol. 13. New York: Lippincott-Raven; 1998: 262–274
4 Hardin GT, Bach BR, Jr, Bush-Joseph CA, Farr J. Endoscopic single-incision anterior cruciate ligament reconstruction using patellar tendon autograft: surgical technique. J Knee Surg 2003;16:135–147
< div class='tao-gold-member'>
Related posts:
 Multiligament Injuries
 Osteochondritis Dissecans Repair
 Posterolateral Corner Hamstring Figure-Eight Reconstruction
 Arthroscopic Lateral Retinacular Release
 Proximal/Distal Realignment for Patellar Instability
 Posterior Cruciate Ligament Reconstruction: All-Inside Arthroscopic Technique and Tibial Inlay Technique with Two-Strand Quadriceps Tendon-Patellar Bone Graft


