Emergency Sports Assessment
This chapter will enable the health care professional to immediately assess a patient before applying first aid or transportation to the hospital. This assessment should be divided into two parts. The first part concerns the primary evaluation or survey, which usually takes place at the location in which the patient is found to ensure that life-threatening situations are handled immediately. The second part of the assessment is performed when the examiner has more time and the patient is not under immediate threat of death or permanent disability.
Pre-Event Preparation
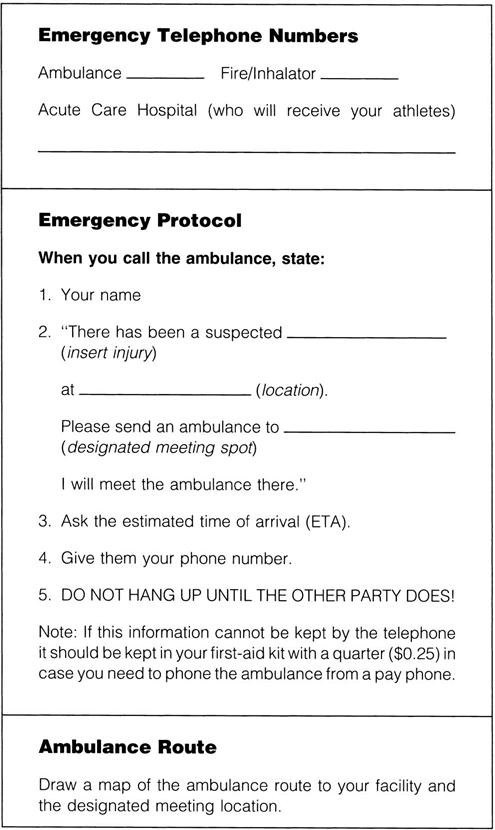
Before any sporting event, the examiner should establish and practice emergency protocols and review sideline preparedness.1–3 This preparation includes designating personnel for specific tasks and establishing emergency vehicle routes and entrances. The examiner and the assistants should know the location of additional medical assistance, emergency equipment (e.g., spinal board, neck supports, sandbags, stretchers, blankets, emergency first-aid kit), and a telephone. The equipment must be compatible with the needs, size, and age of the athletes, and with the equipment of other health care professionals. Near the telephone, the examiner should post emergency telephone numbers (e.g., ambulance, physician, dentist), identify the name and address of the sports facility, specify the entrance to be used, and note any obvious landmarks, because the person making the emergency call may forget information or give inappropriate information when under stress (Figure 18-1). Included in the preparation is a communication plan for on-field or at-site injuries. This plan may involve pre-established hand signals (e.g., crossed arms may mean “send a physician out,” whereas a hand on top of one’s head may signify “send ambulance or emergency medical services [EMS] personnel”) or walkie-talkies to communicate with other professionals working on the sideline.4
The examiner should take the time to give the facility a safety check by looking for potential hazards. Visiting teams should also be informed of emergency protocols. In addition, emergency situations and protocols must be practiced repeatedly to ensure that proper care will be given in an emergency.
Primary Assessment
After an injury occurs, the examiner must first take control of the situation and ensure that no additional harm comes to the patient. The primary survey, which takes 30 seconds to 2 minutes with the maximum on-scene time being 10 minutes, is carried out with little or no movement of the patient.5 It is used to determine whether injuries are life threatening, the severity of injury, and how the patient can be moved. With severe injuries, the longer the assessment takes, the higher the mortality rate is likely to be. If, at any time, the examiner finds that a major injury has occurred (Table 18-1), he or she may terminate the assessment process and ensure the patient receives higher levels of care by calling for the ambulance or EMS. The examiner is designated as the charge person, or person in control. The examiner takes control by not allowing the patient to be moved until some type of assessment is made, the spine is supported as much as possible, and, if required, assistance is obtained.
TABLE 18-1
Priorities in the Management of Injuries: Beware of Injury to the Cervical Spine!
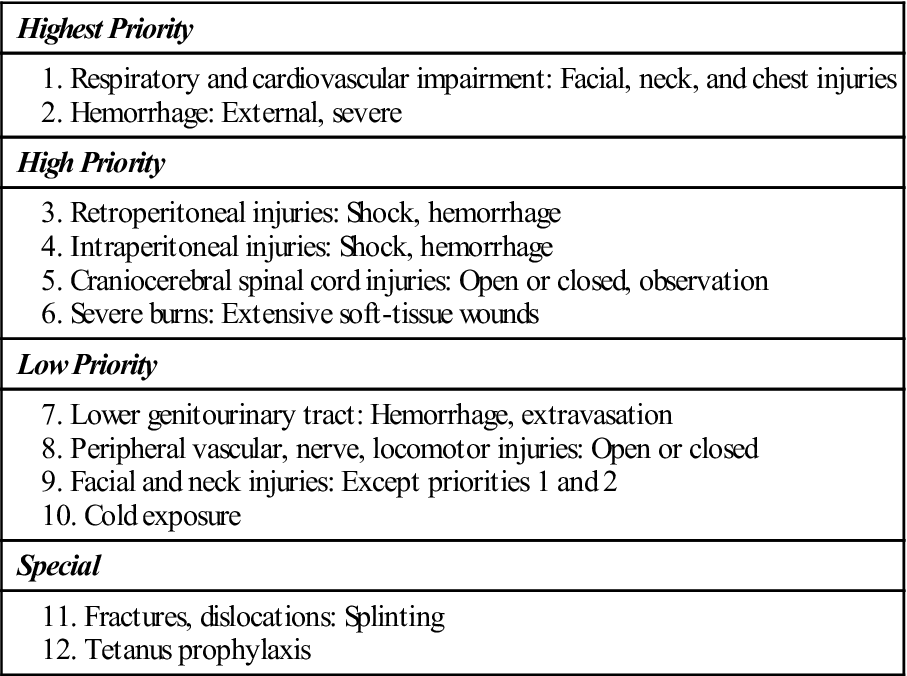
From Steichen FM: The emergency management of the severely injured. J Trauma 12:787, 1972.
For the primary emergency assessment, the examiner should call at least one person to provide immediate assistance, relay messages, and obtain additional help, if necessary. This person is designated the call person, and he or she should know the location of the closest telephone (a cell phone would be ideal) and what telephone numbers to call in specific emergencies. This information can be posted on or by the telephone (see Figure 18-1). When telephoning, the call person should state the caller’s name, the number of the telephone being used, the exact emergency (type of injury), the degree of urgency, and the exact location of the facility; ask for an estimated time of arrival; and explain the location of the best entrance to the facility for responding emergency personnel. Other individuals (as many as six or seven) may be called as necessary to act as transporters or help move the patient.
While performing the initial assessment, the examiner must keep in mind that six situations can immediately threaten the life of a patient: airway obstruction, respiratory failure, cardiac arrest, severe heat injury, head (craniocerebral) injury, and cervical spine injury.6 It is for these situations, along with severe bleeding, that the examiner must be most prepared, because they are the most common emergency life-threatening situations. Only practice can ensure proper care in an emergency.
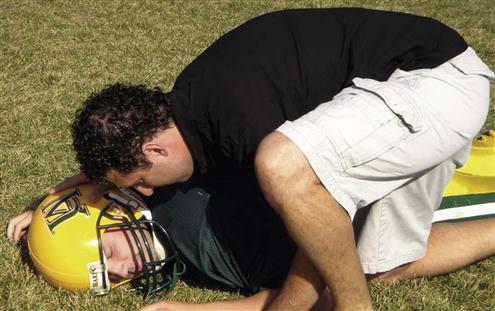
Initially, the examiner stabilizes and immobilizes the patient’s head and cervical spine in case the patient has suffered a cervical spine injury (Figure 18-2).7 If the patient has suffered trauma above the clavicles, he or she should be considered to have suffered a spinal injury to the cervical spine until proven otherwise.8 Simultaneously, the examiner talks to the patient. If the patient replies in a normal voice and gives logical answers to questions, the examiner can assume that the airway is patent and the brain is receiving adequate perfusion. The examiner asks the patient what happened to determine how the injury occurred (mechanism of injury). The patient is asked to describe the symptoms (e.g., pain, numbness) and how severe he or she thinks the injury is. The examiner then explains what he or she is going to do and reassures the patient.9 If the patient is unable to speak or is unconscious, the examiner must ask witnesses what happened. If the patient is unconscious (“collapsed athlete”), the examiner must work with the assumption that a neck (cervical spine) injury has occurred until proven otherwise.10
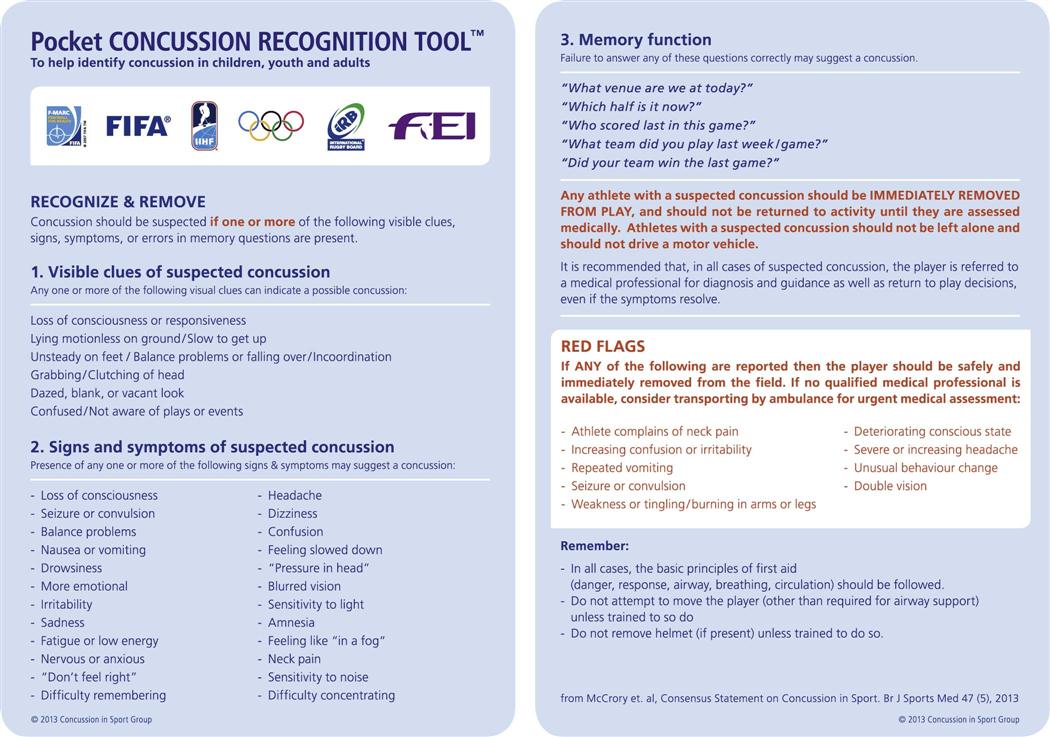
While the examiner is talking to the patient, he or she should be observing whether the patient moves, is still, or is having a seizure. If the patient moves, it means he or she is at least partially conscious, has no apparent neurological dysfunction, and has some cardiopulmonary function. If the patient is still, it means he or she is unconscious, has some neurological dysfunction, or has some other major system failure. A seizure indicates neurological, systemic, or psychological dysfunction. The examiner should also observe the position of the patient (e.g., normal, deformity) and look for altered joint alignment (e.g., fracture, dislocation), swelling, or discoloration.4 In case there is a spinal cord injury, the patient should be left in the original position until the nature and severity of the injury have been determined, except in cases of respiratory or cardiac distress. If the athlete is suspected of having a head injury and is mobile, the examiner can use a Pocket Concussion Recognition Tool™ (Figure 18-3) on the sideline to determine if a concussion has occurred.11 A rapid assessment of the brain and spinal cord can be accomplished by asking the patient to do simple movements, such as sticking out the tongue12 (see the “Assessment for Spinal Cord Injury” section, presented later). If a concussion is suspected, the procedures in the following box should be followed.13
Level of Consciousness
The examiner must quickly determine whether the patient is conscious. At no time during the initial assessment should ammonia inhalants be used to arouse the patient. Inhalants should be used only after the examiner is absolutely sure there is no spinal injury, because the fumes may cause a reflex head jerk, complicating the possible neck injury.8 At this early stage, the examiner simply determines whether the patient is alert (fully conscious), confused (drowsy), in delirium, in obtundation (dulled sensations, especially pain and touch), in a stupor, or in a coma. A patient is classified as alert if he or she is able to carry on an appropriate conversation with no delays and is aware of time, place, and identity. See Chapter 2 for an explanation of the levels of consciousness.
The examiner determines the level of consciousness or arousal by talking to the patient, not by moving the patient. This stage is sometimes referred to as the “shake and shout” stage, in which the examiner tries to arouse the unconscious individual by gentle shaking (without allowing movement of the head and neck) and by shouting into each ear. If the patient does not respond to this verbal stimulus, the examiner can, at least initially, assume that the patient is unconscious or not fully conscious and proceed under that assumption. Further neurological assessment is left until the examiner is sure that the patient has a patent airway, is breathing normally, and has a heartbeat. If the patient is conscious, the examiner should reassure the patient that help has arrived. The patient should be informed of what the examiner is doing and proposes to do in terms of examining and moving the patient. Regardless of the patient’s state of consciousness, he or she should not move or be moved until the examination has been completed.
On the sideline, the examiner can perform a Sideline Concussion Assessment Tool—3rd edition (SCAT3) exam (see Chapter 2) and begin a Neural Watch to provide serial monitoring (see later discussion) for the possibility of an increasingly severe head injury (i.e., progressive deterioration of signs and symptoms). In addition, balance testing may be performed using the Balance Error Scoring System (BESS).14 This is a quantifiable low technology test that uses only a stopwatch and a piece of medium density foam. The athlete is asked to do three different stances (double, single and tandem) twice on two different surfaces (the ground and the foam) (see Figure 2-37) for a total of six trials. The athlete begins in the required stance with the hands on the iliac crests and, while standing quiet and motionless, is asked to close both eyes for 20 seconds. During the single leg stance, the athlete stands on the non-dominant foot and is asked to hold the opposite non–weight-bearing limb in 20o to 30o of hip flexion and 40o to 50o of knee flexion. For tandem stance, the non-dominant foot is placed behind the dominant foot. If the athlete is losing his or her balance, he or she can make any necessary adjustments and returns to the test position as quickly as possible. The athlete is scored by adding one error point for each committed error (see Table 2-22). If the athlete cannot maintain the desired stance for at least 5 seconds of the 20 second test period, the athlete has failed the test. The maximum error score for normal athletes is 10.
Establishing the Airway
While waiting for assistance, the examiner can immediately begin to check for abnormal or arrested breathing, abnormal or arrested pulse, internal and external bleeding, and shock. This initial assessment is called the airway, breathing, and circulation (ABCs) of cardiopulmonary resuscitation (CPR). New guidelines also include the use of automated defibrillators if required.15 The first priority is to maintain an adequate airway, normal ventilation, and hemodynamic stability (see Table 18-1).16,17 Also, obvious bleeding should be controlled by compression.
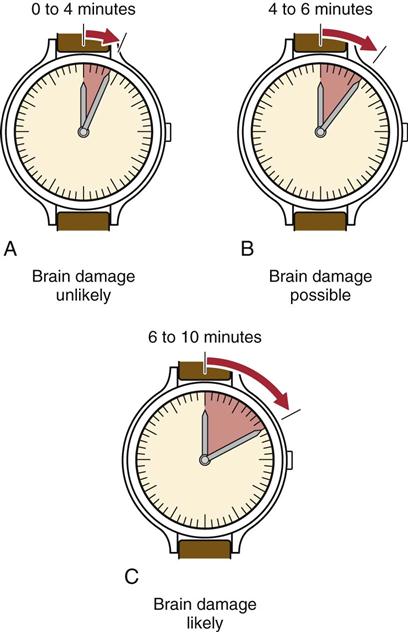
While the cervical spine is protected and immobilized, the examiner quickly assesses the airway for patency by looking, listening, and feeling for spontaneous respirations.5,8 Respirations can be determined by watching for movement of the chest, feeling the breath on the examiner’s cheek, or hearing the air move in and out (Figure 18-4). The normal resting ranges of respirations are 10 to 25 breaths per minute for adults and 20 to 25 breaths per minute for children. An athlete or someone who has been exerting before injury may show a higher rate. If a patient is not breathing and has no heartbeat, clinical death occurs between 0 and 4 minutes (Figure 18-5). If breathing and heartbeat are not restored within 4 to 6 minutes, brain damage is probable. If there is no breathing and no heartbeat for 6 to 10 minutes, biological death occurs, and brain damage is likely.18
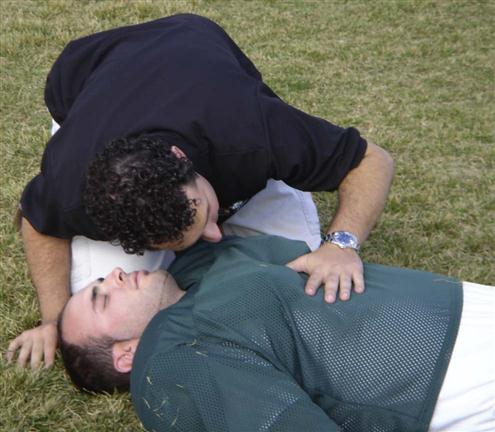
The examiner can feel the breath on the cheek, hear the breath, and watch the chest move.
If the patient is breathing without difficulty, the rate and rhythm of the respirations and their characteristics should be noted. Cheyne-Stokes and ataxic respirations are often associated with head injuries.19 Table 18-2 indicates some of the abnormal breathing patterns that may occur in a patient in an emergency situation.
TABLE 18-2
| Term | Description | Location of Possible Neurological Lesions |
| Hyperpnea | Abnormal increase in the depth and rate of the respiratory movements | |
| Apnea | Periods of non-breathing | Pons |
| Ataxic breathing (Biot respiration) | Irregular breathing pattern, with deep and shallow breaths occurring randomly | Medulla |
| Hyperventilation | Prolonged, rapid hyperpnea, resulting in decreased carbon dioxide blood levels | Midbrain, pons |
| Cheyne-Stokes respirations | Periods of hyperpnea regularly alternating with periods of apnea, characterized by regular acceleration and deceleration in depth | Cerebrum, cerebellum, midbrain, pons |
| Cluster breathing | Breaths follow each other in disorderly sequence with irregular pauses between them | Pons, medulla |
Adapted from Hickey JV: The clinical practice of neurological and neurosurgical nursing, Philadelphia, 1986, JB Lippincott, p. 138.
If the conscious patient exhibits abnormal or arrested breathing (asphyxia), the examiner should look for possible causes.20 Causes include compression of the trachea; tongue falling back, blocking the airway; foreign bodies (e.g., mouthguard, gum, chewing tobacco); swelling of the tissues (e.g., anaphylactic shock after a bee sting); fluid in the air passages; presence of harmful gases or fumes; pulmonary and chest wall trauma; and suffocation.20,21
Falling back of the tongue is the most common cause of airway obstruction after a sport injury, especially in the unconscious patient. Normally, the tone of the tongue muscles ensures airway patency. However, the unconscious person, especially one in the supine position, loses muscle tone and the tongue falls back, potentially leading to an obstruction. If the tongue is the cause of obstruction, the examiner can simply pull the chin forward in a chin lift or jaw thrust maneuver to restore the airway, being careful to keep movement of the cervical spine to a minimum. The chin lift maneuver is less likely to compromise the cervical spine.22,23 Either maneuver pulls the retropharyngeal musculature forward, thus opening the airway.20
If the examiner can see an object obstructing the airway, an oral screw and tongue forceps can be used to remove the object. The mouth should be held open with the oral screw or something similar, and the examiner can use a finger to sweep the mouth clear of debris (e.g., broken teeth, dentures, mouthguard, chewing gum, tobacco). If the jaw is not held open and blocked from closing, the examiner should put fingers in the patient’s mouth only with caution. If the cause of the blockage is something other than the tongue (e.g., foreign body), the patient, if conscious, should be asked to cough. If this does not expel the object, the Heimlich maneuver should be performed until the patient expels the object. If the patient loses consciousness, he or she should be placed supine and ventilation attempted. If it is unsuccessful, six to ten subdiaphragmatic abdominal thrusts are applied. This sequence of ventilation and subdiaphragmatic abdominal thrusts is repeated until a physician or EMS personnel arrive to perform a laryngoscopy.24 Other causes of asphyxia may be treated by epinephrine (anaphylaxis) or intubation.24 If the examiner is concerned about maintaining a patent airway, an oropharyngeal airway may be used. As a last resort, a wide-bore needle (18-gauge or larger) may be inserted into the trachea to ensure an airway.20
If the patient is not breathing, artificial ventilation (mouth-to-mouth resuscitation) must be initiated immediately, by using the breathing portion of the CPR techniques or by using a similar artificial breathing method.
If the patient is conscious but obviously in respiratory or cardiac distress, the examiner must deal with the presenting situation immediately (Table 18-3). If the patient does not have a patent airway, an airway must be established, as has been described. If the patient is moving in an attempt to get air into the lungs, the examiner may assume that a severe cervical injury is less likely to have occurred. However, movement of the head in relation to the cervical spine should be kept to a minimum. Keeping in mind the possibility of a cervical injury, the examiner should position the patient so that airway clearance and resuscitation can easily be accomplished. This change in position must be performed carefully to ensure that movement of the cervical spine is kept to a minimum. If the patient is reasonably comfortable in the side-lying or prone position and there is no problem with cardiac function or breathing, it is not necessary to move the patient to the supine position.
TABLE 18-3
| Conscious Athlete | Unconscious Athlete |

Adapted from American Academy of Orthopaedic Surgeons: Athletic training and sports medicine, Park Ridge, IL, 1984, AAOS, p. 454.
After the airway has been established, whether by the use of an airway device, by proper head or jaw positioning, by the use of tongue forceps, or by a tracheotomy, the examiner must ensure that the airway is maintained and that the patient continues breathing. If respiration is not spontaneous, assisted ventilation (e.g., mouth-to-mouth, bagging) should be instituted. Ventilation can be compromised by a flail chest or pneumothorax (tension or open).8,21 Endotracheal intubation is necessary if nasopharangeal bleeding, laryngeal trauma, secretions, or aspirations prevent maintenance of an adequate airway or end-ventilation.16,20,25 Transtracheal ventilation is the treatment of choice for patients with breathing problems caused by brain, cervical spine, or maxillofacial injuries. An endotracheal tube may cause straining and venous hypertension, leading to increased brain edema, and extension of the head and neck to open upper airways may aggravate cervical spine injuries. Also, hemorrhage in maxillofacial injuries prevents the effective use of a breathing mask and does not allow adequate visualization.17
Establishing Circulation
While the examiner is determining whether breathing is normal, the patient’s circulation should be checked for 10 or 15 seconds using the carotid (preferred), brachial, radial, or femoral pulse (Figure 18-6). For a sedentary adult, the normal heart rate is 60 to 90 beats per minute. For children, the rate is 80 to 100 beats per minute. In the highly trained athlete of either sex, the rate may be as low as 40 beats per minute. With activity, the heart rate will be above these levels, and the examiner should take this fact into account when taking the pulse. Depending on the type and level of the individual’s activity, the heart rate for a fit person should decrease to slightly above normal values within 5 minutes. The examiner should note whether the pulse is absent, rapid and rebounding, or weak and diminishing.
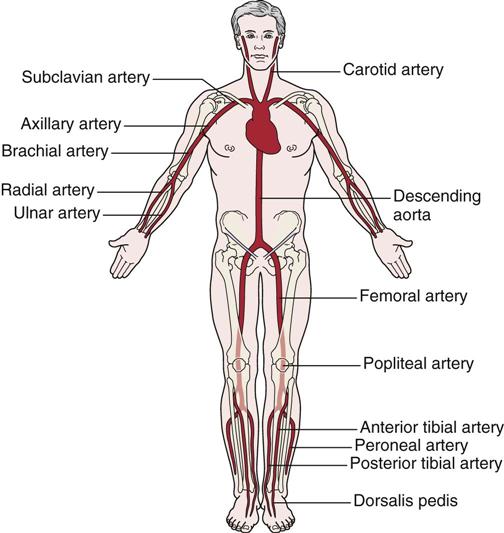
Pressure applied to any of the arteries (pressure points) can decrease bleeding if applied proximal to the bleeding.
The pulse is most often checked at the carotid artery, because this artery is large and easy to locate. Therefore, the examiner has less chance of missing the pulse and does not have to move from the area of the patient’s head to perform palpation. If a pulse cannot be detected, it should be assumed that the patient does not have a heartbeat, and CPR should be initiated using either manual methods or an automated external defibrillator. The use of the defibrillator increases the chance of survival in cardiac arrest.26 Although cardiac arrest is rare in athletes, sudden death or commotio cordis resulting from low-impact blunt trauma is always a possibility in sports.27 When the pulse is assessed, the examiner should estimate its rate, strength, and rhythm to obtain an indication of the cardiac output. Circulatory sufficiency may also be determined by squeezing the nail bed or hypothenar eminence. Capillary refill is delayed if the pink color does not return to the nail bed or hypothenar eminence within 2 seconds after release of the pressure.28 Squeezing the hypothenar eminence is a better indicator if the patient is hypothermic.
The pulse may also be used to determine the patient’s blood pressure. If a carotid pulse can be palpated, systolic blood pressure is 60 mm Hg or higher. If the femoral pulse is palpable, systolic blood pressure is 70 mm Hg or higher. If the radial pulse can be palpated, the systolic blood pressure is 80 mm Hg or higher.12,19,28 Like heart rate, blood pressure should drop to almost normal levels within 5 minutes following termination of exercise.
A weak or rapid pulse usually indicates shock, heat exhaustion, hypoglycemia, fainting, or hyperventilation. A slowing pulse is sometimes seen when there is a large increase in intracranial pressure, which usually indicates a severe lower brain stem compression.29 A pulse that is rebounding and rapid is often the result of hypertension, fright, heat stroke, or hyperglycemia.
If the pulse rate is beginning to weaken, the patient may be going into shock (Figure 18-7). Shock is characterized by signs and symptoms that occur when the cardiac output is insufficient to fill the arterial tree and the blood is under insufficient pressure to provide organs and tissues with adequate blood flow. It should be noted, however, that patients who maintain pink skin, especially in the face and extremities, are seldom hypovolemic after injury. If the skin of the face or extremities turns ash-gray or white, this usually indicates blood loss of at least 30%.8 Common types of shock and their causes are shown in Table 18-4. A patient going into shock becomes restless and anxious. The pulse slowly becomes weak and rapid, and the skin becomes cold and wet, often clammy. Sweating may be profuse, and the face is initially pale and later cyanotic (blue) around the mouth. Respirations may be shallow, labored, rapid, or possibly irregular and gasping, especially if a chest injury has occurred. The eyes usually become dull and lusterless, and the pupils become increasingly dilated. The patient may complain of thirst and feel nauseated or vomit. If shock develops quickly, the patient may lose consciousness. To prevent or delay the onset of shock, the examiner may cover the patient, elevate the patient’s legs, or attempt to eliminate the cause of the problem.
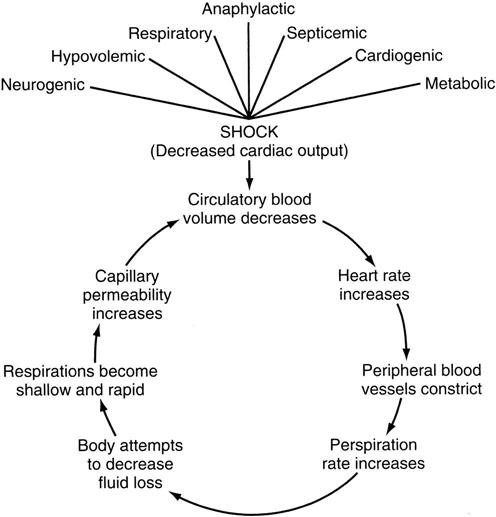
TABLE 18-4
Types of Shock and Their Causes
| Type | Cause |
| Hemorrhagic (hypovolemic) | Blood loss |
| Respiratory | Inadequate blood supply |
| Neurogenic | Loss of vascular control by nervous system |
| Psychogenic | Common fainting |
| Cardiogenic | Insufficient pumping of blood by the heart |
| Septic | Severe infection and blood vessel damage |
| Anaphylactic | Allergic reaction |
| Metabolic | Loss of body fluid |
Circulatory collapse in trauma patients is caused primarily by blood loss from vascular damage or fracture, or hypovolemic shock, but the examiner must remember that shock in trauma may also be caused by tension pneumothorax, central nervous system injury, or pericardial tamponade (heart compression resulting from blood in the pericardium)—all emergency conditions that require physician intervention.30 By the time hypovolemic shock becomes evident, blood loss may be as high as 20% to 25%. The normal range of blood pressure is 100 to 120 mm Hg for systolic pressure and 60 to 80 mm Hg for diastolic pressure. With shock, the blood pressure gradually decreases. If the blood pressure can be measured, it is best to assume that shock is developing in any injured adult whose systolic blood pressure is 100 mm Hg or less.
If the examiner is caring for a dark-skinned person, it may be difficult to determine from observation whether the patient is going into shock. A healthy person with dark skin usually has a red undertone and shows a healthy pink color in the nail beds, lips, and mucous membranes of the mouth and tongue. A dark-skinned patient in shock, however, has a gray cast to the skin around the nose and mouth, especially if experiencing respiratory shock. The mucous membranes of the mouth and tongue, the lips, and the nail beds have a blue tinge. If the shock is caused by hypovolemia, the mucous membranes of the mouth and tongue will not be blue; rather they will have a pale, graying, waxy pallor.31
If no pulse is present, then the cardiac portion of CPR techniques should be initiated. Sports equipment (such as, shoulder pads or rib pads) should be removed, at least anteriorly, to give the examiner clear access to the anterior chest wall. CPR provides only approximately 25% of normal cardiac output, so it is imperative that it is performed properly by knowledgeable persons.32 CPR is maintained until the patient recovers or EMS personnel arrive. If a cervical spine injury is suspected, CPR must be done with care, because compression to the heart can cause repeated flexion-extension of the cervical spine.17
Assessment for Bleeding, Fluid Loss, and Shock
The examiner should look for any signs of external bleeding or hemorrhage (Table 18-5). The types of wounds in which external bleeding or hemorrhage may be seen are incisions, which are clean cuts, or lacerations that have jagged edges. A contusion may produce internal bleeding, whereas a puncture or abrasion may also show bleeding or oozing on the surface. Major traumatic injuries, such as fractures (e.g., pelvis, femur), can cause a great deal of internal bleeding. Of the five types of wounds, the puncture wound is probably the most difficult to treat, because it has the highest probability of infection. The examiner should watch for bleeding from the lungs, the stomach, the upper bowel, the lower bowel, the kidneys, or the bladder. If the liver, spleen, or kidney is injured, serious internal bleeding may result; the blood will not be visible because it is contained within the abdominal cavity. In this case, the patient may experience abdominal rigidity, pain, and difficulty breathing (pressure on diaphragm).
TABLE 18-5
Bleeding Characteristics and Their Source
| Source | Bleeding Characteristics |
| Artery | Bright red, spurting or pulsating flow |
| Vein | Dark red, steady flow |
| Capillary | Slow, even flow |
| Lungs | Bright red, frothy |
| Stomach | “Coffee grounds” vomitus |
| Upper bowel | Tarry black stools |
| Kidneys |
