Chapter 28 Common Office Procedures
For a brief history of surgery, see the online discussion at www.expertconsult.com.
Basic Skills
Skin Preparation
Bites
Human bites on the hands and specifically overlying the metacarpophalangeal joints are problematic because of potential damage to underlying tissue, tendons, and joint spaces. Hand injuries may therefore lead to aggressive secondary infections of these structures. Profuse flushing of human hand bites or lacerations, prophylactic antibiotics, and consultation are advised. These wounds may need to be surgically opened under anesthesia to flush adequately.
Procedure Room
Equipment
There are three primary scalpel blade styles used in the outpatient setting. A #10 blade has a large, rounded cutting surface and may be used for longer, straight incisions on larger areas with thicker skin, such as the trunk or limbs. A #15 blade has a smaller, rounded cutting surface to allow more mobility and may be used on most skin procedures, particularly those with nonlinear incisions. A #11 blade has a pointed blade without a curve and is better used for paring superficial lesions, such as warts or calluses, or puncturing skin abscesses. The Adson forceps with teeth has one side with one tooth and the other side with two teeth. Less tissue trauma occurs using the single tooth on the external tissue while everting the skin edges or using a skin hook (Fig. 28-1).
Anesthesia
Topical Anesthesia
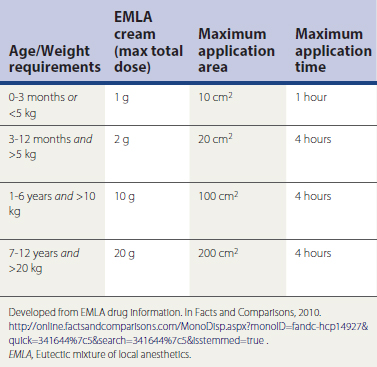
An equal mixture of prilocaine 2.5% and lidocaine 2.5%, EMLA cream may be used as a topical anesthetic. EMLA works best if applied to the dermal site at least 1 hour before the procedure and covered with an occlusive dressing. It is not used more often because of the time needed for onset of anesthesia, increased expense, and risk of methemoglobinemia in susceptible individuals such as those with congenital disease, pyruvate kinase–deficient and glucose-6-phosphate dehydrogenase (G6PD)–deficient patients, and those with rare, acquired forms resulting from medications (e.g., prilocaine, antimalarials, sulfonamides). Patients under 3 months of age are vulnerable to developing methemoglobin because the breakdown product ortho-toluidine can produce methemoglobinemia following systemic doses of prilocaine approximating 8 mg/kg. A rectangle measuring 1.5 × 0.2 inches is about 1 g of EMLA or 25 mg of prilocaine. The maximal area of application is age and weight dependent (Table 28-1).
Other topical anesthetics are used in some circumstances. Ethyl chloride cools the skin superficially and works well for needle punctures. Unfortunately, it is flammable and has a brief action, limiting its usefulness. A 30% lidocaine cream must be applied with an occlusive patch at least 45 minutes before any procedure. Liposomal encapsulation forms of topical tetracaine and lidocaine are as efficacious as EMLA (Eidelman et al., 2005). Lidoderm patches are a 5% concentration and are not potent enough for surgical skin anesthesia. (See Tuggy Video: Topical Anesthesia.)
Local Anesthesia
There are two groups of local anesthetics: amides and esters. Allergies are more common to the esters. Allergy to an amide is usually caused by the preservative methylparaben. If a patient has an ester allergy, use an amide; no cross-reactivity occurs between classes (Archar an Kundar, 2002) (Box 28-1).
Box 28-1 Local Anesthetic Classifications
Expanded from Archar S, Kundar S. Principles of office anesthesia. Part I. Infiltrative anesthesia. Am Fam Physician 2002;6:91-94.
Digital Block
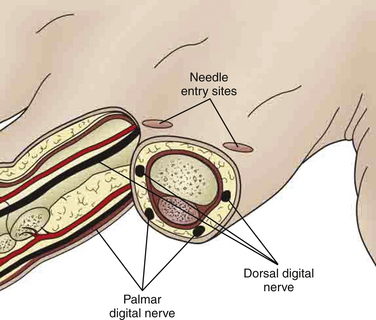
A digital block can be an effective method for providing anesthesia for fingers and toes. A dorsal or interdigital approach is used to provide anesthesia to the digit. The digital nerves are 3 to 5 mm under the skin at the 2, 4, 8, and 10 o’clock positions around the digit. Each location can be infiltrated with 1 to 2 cc (mL) of 1% lidocaine without epinephrine. It may take 5 to 30 minutes for distal anesthesia to develop after injection. Occasionally, local anesthesia is needed at the base of the digit circumferentially if achieving complete anesthesia becomes difficult (Fig. 28-2). Patients may continue to feel pressure and motion but should not feel sharp pain when the anesthesia is effective. (See Tuggy Video: Digital Block.)
Complications with Local Anesthesia
Recognizing the various side effects and reactions to local anesthesia is critical to prevent serious complications. The most common complication with the use of local infiltrative anesthesia is a vasovagal episode. The patient may look pale, begin to sweat, and then feel faint or even fall unconscious. Although accompanied by one or two tonic-clonic beats in some cases, this is not considered a seizure. Lying the patient down in reverse Trendelenburg positioning with both legs elevated can increase blood return to the heart and improve vagally depressed cardiac output. Atropine can reverse vagal bradycardia but is rarely needed. Recovery occurs spontaneously within minutes, but the queasiness may persist for 30 to 60 minutes.
Principles of Healing
Stages of Healing
Exudative or Inflammatory Phase
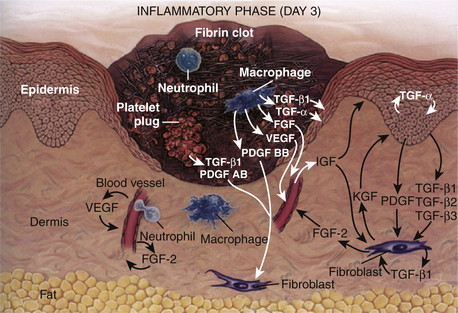
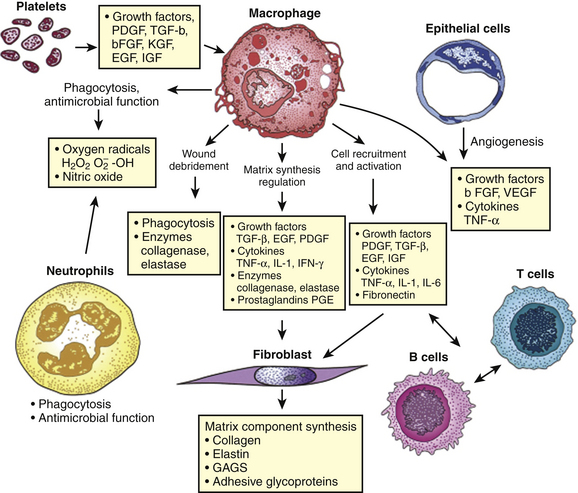
Immediately after a laceration, fibrin deposits with an influx of platelets, forming a visible clot. The platelets secrete various wound-healing growth factors that activate macrophages and fibroblasts. These growth factors and more then 30 cytokines cause an influx of cellular structures. This phase occurs from 0 to 72 hours (Fig. 28-3).
Proliferative Phase
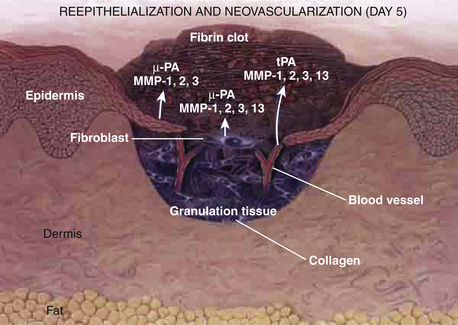
Between 72 hours and day 7, fibroblasts migrate into the wound, and vascular proliferation occurs. Granulation tissue formation marks the proliferative phase. Epidermal cells begin to grow at the edges of the wound. A delicate balance of cytokine systems leads to new capillary formation to feed and oxygenate the budding granulation tissue. Extracellular matrices form and act as struts to support the new tissue. The primary clots are broken down by naturally developing fibrinolytic compounds (Fig. 28-4).
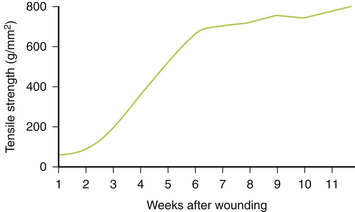
Regenerative or Remodeling Phase
The remodeling stage is a continuation of the proliferative phase, with ongoing maturation of collagen. The thickening collagen leads to an increased resistance to shearing and tearing forces. The regenerative phase is characterized by epithelialization and scar formation. This last phase may take up to 1 year. Collagen type III is converted into the mature type I collagen (Fig. 28-5). The extracellular matrix and cells within the wound are regulated by cytokines and integrins (transmembrane cell receptors) (Fig. 28-6).
Keloids
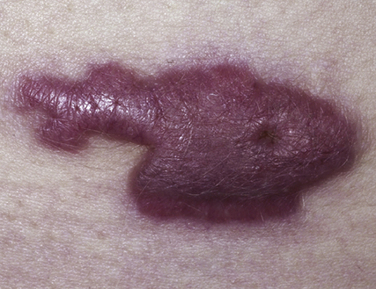
Keloids are fibrous elevated scars that extend outside wound margins. Keloids are unlikely to regress, are likely to recur if excised, and are most likely to occur in patients with darker skin (relative risk [RR] 15-20). Keloids are frequently located over the midline chest, cheeks, and earlobes, and peak incidence is age 10 to 20 years. Wounds that heal by secondary intention and burn wounds are high risks for developing keloids. Keloids may be painful as well as cosmetically unacceptable (Juckett and Hartman-Adams, 2009) (Fig. 28-7).
Principles of Skin Closure
Closure techniques should minimize skin trauma, result in good skin-edge approximation without undue tension, and result in a cosmetically pleasing appearance (Fig. 28-8). The best cosmetic results can be achieved by using the finest suture possible, depending on skin thickness and tension. Generally a 3-0 (000) or 4-0 (0000) suture is appropriate on the trunk, 4-0 or 5-0 on the extremities and scalp, and 5-0 or 6-0 on the face. Forceps with teeth and skin hooks should be used to reduce crush injury to wound edges. Use the least amount of sutures to close the skin with good approximation and without deep, open space. Sutures on the face should be removed about day 3 to day 5, wounds not under tension on day 7 to 10, and wounds under tension, on the hands, or over joints on day 10 to 14. If you remove a suture and the wound opens up, cease removing the other sutures and place a sterile strip while asking the patient to return in 2 days.
Sutures are an option along with staples, tissue adhesives, and use of hair to tie edges together on some scalp wounds. Avoid staples in the scalp if computed tomography (CT) or magnetic resonance imaging (MRI) is planned. Expedient cleaning, debridement, and closure with the least trauma to the wound and patient should be the goal.
Skin Tension Orientation
Superior results in scar revision arise from making incisions parallel or nearly parallel to RSTLs. The Borges RSTLs and Kraissl lines may be the best guides for elective incisions of the face and body and are often mislabeled “Langer lines.” Cosmetic appearance is best if RSTLs are used on the face. The face can be divided into parallel variations of the four main facial lines: the facial median, nasolabial, facial marginal, and palpebral lines. When doing punch biopsies, stretch the skin 90 degrees perpendicular to follow the RSTLs so that the resulting ellipse-shaped wound and closure are parallel. This also improves cosmesis (Fig. 28-9).
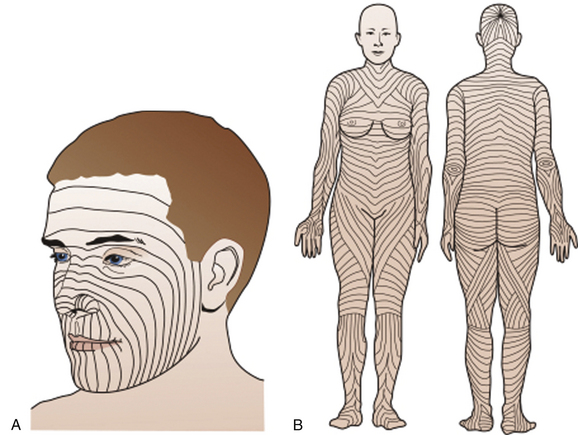
Figure 28-9 A, Facial relaxed skin tension lines (RSTLs). B, RSTLs of the entire body.
(From Trott A. Wounds and Lacerations: Emergency Care and Closure, 2nd ed. St Louis, Mosby, 1997; and Burns JL, Blackwell SJ. Plastic surgery. In Townsend CM, Beauchamp RD, Evers BM, Mattox KL [eds]. Sabiston Textbook of Surgery, 18th ed. Saunders-Elsevier, Philadelphia, 2008.)
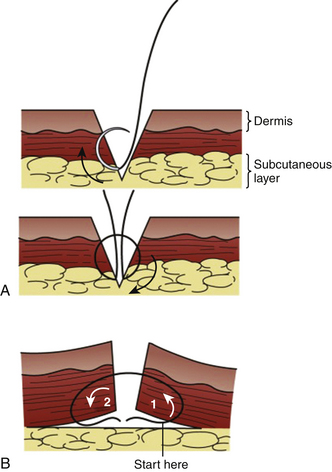
Skin Tension on Closure
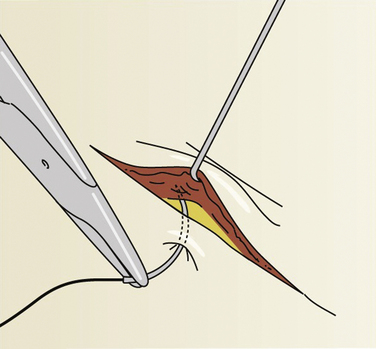
Tips and beveled lacerations are challenges because too much tension on the narrowest edges may contribute to necrosis or wound breakdown. Ideally, the skin sutures are used to approximate slightly everted edges and not to pull primary deep tissue under high tension. If the wound or excision has a clean approximation under minimal tension, a single-layer repair is preferred. If not, consider deep interrupted sutures to close the potential space (Fig. 28-10). The goal is also to avoid deep pockets where hematomas, infection, or abscesses could develop. (See Tuggy Video: Inverted Subcuticular Stitches.)
Suture Placement
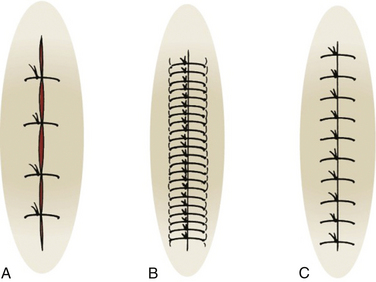
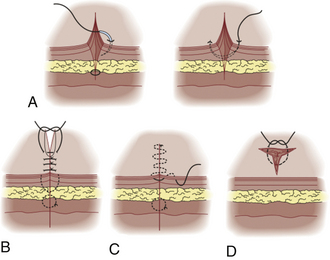
Interrupted Sutures
Individually placed single sutures are the most common form of closure. Although slower than using a running suture, single sutures usually appear better cosmetically and have a reduced risk for dehiscence. Slightly everting skin edges will result in the best wound appearance. Enter the skin 2 to 3 mm from the skin edge with the needle perpendicular to the skin plane, and rotate the wrist smoothly. Go an equal distance in depth as the horizontal distance from the wound edge. If unable to obtain an equidistant bite on the opposite side in one step, use an additional step. Bring the needle out through the laceration, then enter at the same level within the laceration, and come out through the skin at a symmetric distance from the wound’s edge (Fig. 28-11). (See Tuggy Video: Instrument Tie.)
Planning excision of an ellipse with a 3:1 to 4:1 length/width ratio has been the standard recommendation, but recent data suggest less tissue removal and better healing if a round excision is used, with adequate margins and repair of any subsequent dog-ears that develop. With this technique, 59% of the repairs required dog-ear repair (Seo et al., 2008).


Stay updated, free articles. Join our Telegram channel

Full access? Get Clinical Tree


