Arthroscopic Shoulder Evaluation: Normal Anatomy and How to Thoroughly Evaluate It
Joseph P. Burns
David W. Wang
Although initial arthroscopies were quite primitive, Burman described using an arthroscope to evaluate a cadaver shoulder in 1931. Few further advances in shoulder arthroscopy were made until 1959 when Watanabe introduced an illuminated arthroscope with an offset tungsten bulb at the tip, the No. 21 arthroscope (1). Innovations in the 1970s included improved arthroscopic illumination and magnification, and it was during this period that the rapid expansion of arthroscopic applications occurred. In 1978, Watanabe described the anterior and posterior shoulder portals and the next year reported his arthroscopic findings of shoulder pathology. In 1979, Conti used an anterior arthroscopic cannula to perform a capsular release on 18 patients with adhesive capsulitis, but it appears he did this without joint visualization (2).
Johnson (3) is one of the pioneers of shoulder arthroscopy. He authored the classic textbook on the subject Diagnostic and Surgical Arthroscopy of the Shoulder. Perhaps his greatest contribution was the introduction of the motorized shaver in 1980. Many subsequent advances in knowledge and techniques have expanded the field of shoulder arthroscopy and helped revolutionize the diagnosis and management of shoulder pathology that was previously difficult or impossible to treat.
In contrast to open surgery, arthroscopy allows the direct, magnified visualization of the structures of the shoulder without the morbidity of a muscle or tendon splitting dissection, resulting in decreased postoperative pain and a more rapid rehabilitation. Because of the advances in recent years, shoulder arthroscopy has become a popular and common procedure for the examination and treatment of shoulder problems. This chapter reviews the equipment required, the setup and positioning of the patient, basic technique for diagnostic arthroscopy, and review of normal shoulder anatomy.
EQUIPMENT NEEDED
Personnel
The first requirement for shoulder arthroscopy is an effective team that will assist the surgeon. Attention to detail from all members of the team is necessary to make the procedure run smoothly without unnecessary problems. The anesthesiologist must have a basic understanding of the technical procedure to be performed in order to plan for a regional nerve blockade and/or general anesthesia. He must also be comfortable with maintaining the blood pressure at a lower level, ideally around 90 mm Hg systolic or mean arterial pressure of 50 mm Hg in order to diminish bleeding from the synovium and subacromial bursa (4). The scrub technician should be familiar with all of the arthroscopic equipment, utilize an efficient instrument setup and be able to troubleshoot any problems that may arise with the equipment. A good circulating nurse will be able to assist in positioning the patient correctly. They must know how to set up the equipment and maintain the arthroscopy fluid and pump, as well as be familiar with any medication needed for the irrigation bags (e.g., epinephrine or glycine). It may be prudent to perform a “dry run” or hold an in-service with the entire team before undertaking your first shoulder arthroscopy.
Operating Room
The optimal operating room should be at least 30 × 30 ft (9.1 × 9.1 m) in size, with adequate overhead lighting for the scrub table, nurse, and anesthesiologist (Fig. 2.1). If additional light sources, that is, windows or light boxes, cause glare on the video monitor, they should be covered or turned off. The operating table should be placed in the center of the room, and the video tower placed directly across from the primary surgeon. A Mayo stand should be placed anterior to the patient with the equipment most commonly used, such as the motorized
shaver, electrosurgical pencil or radiofrequency ablator, the remote control to the pump, and the various cannulas, sheaths, and guide rods that will be used (Fig. 2.2). Another Mayo stand will be placed behind the surgeons that will hold the instruments needed to begin the procedure and introduce the arthroscope camera into the joint.
shaver, electrosurgical pencil or radiofrequency ablator, the remote control to the pump, and the various cannulas, sheaths, and guide rods that will be used (Fig. 2.2). Another Mayo stand will be placed behind the surgeons that will hold the instruments needed to begin the procedure and introduce the arthroscope camera into the joint.
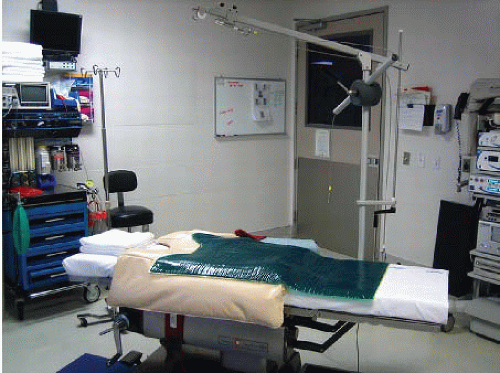 FIGURE 2.1. The operating room should have adequate overhead lighting and space. |
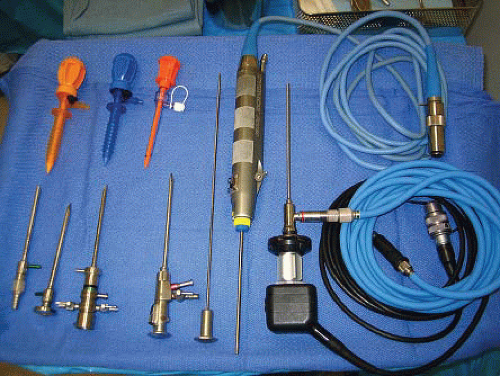 FIGURE 2.2. The Mayo stand should contain the equipment most commonly used. |
Tower Equipment
Most of the important electronic equipment will be placed onto a tower, which allows a more convenient way to connect the equipment and move it around the room as one unit. This includes the video monitor, camera box, light source, shaver/burr power unit, printer, and CD/DVD burner with a USB type connection. (Fig. 2.3). Several commercially available products are on the market. In recent years, high-definition cameras and monitors have become available, as have digital recordings of intraoperative pictures and videos. The arthroscopic pump system is placed next to the video tower. It is an essential part of shoulder arthroscopy. Many systems allow the surgeon to control the inflow rate, the pressure maintained in the joint, as well as the outflow rate. The surgeon should be familiar with the nuances of the system. Because of the propensity for fluid under pressure to be forced into the surrounding soft tissue, an accurate and sensitive pressure reading from inside of the joint or bursa is necessary.
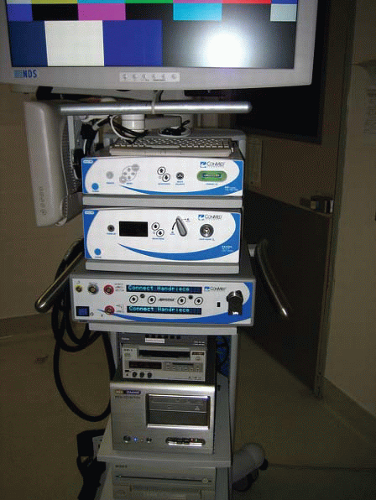 FIGURE 2.3. The equipment tower allows a convenient way to store and move needed equipment. |
Hand Equipment
Various cannulas exist for use in shoulder arthroscopy. Depending on the arthroscopic system chosen, interchangeable metal cannulas may be available, which can make switching portals easier. Some surgeons prefer to use slightly larger plastic cannulas, which allow fluid outflow through the cannula instead of exclusively through the shaver or burr. A shaver or burr can provide inconsistent outflow if it clogs during heavy use. Larger cannulas must be used when larger, more intricate instruments are used to pass or shuttle sutures through tissue. Electrosurgical probes can be used to cauterize small bleeders and to perform precise soft tissue releases. Radiofrequency ablators are commonly used to ablate tissue and achieve hemostasis, which in turn helps shorten procedure times. They can also cauterize bleeders using the coagulation setting. Many different arthroscopic instruments exist including probes, graspers, scissors, rasps, hooks, suture passers, and shuttling devices of all shapes and sizes. We prefer to use a simple grasper, crochet hook, switching sticks, and a curved shuttling device for most of our procedures. In addition, suture anchors of differing materials
and sizes exist for rotator cuff, labrum, instability, and biceps tendon procedures. It is important for the surgeon to intimately know the equipment before using it on a patient. This requires lots of practice either in a dry lab on a shoulder model or on cadavers.
and sizes exist for rotator cuff, labrum, instability, and biceps tendon procedures. It is important for the surgeon to intimately know the equipment before using it on a patient. This requires lots of practice either in a dry lab on a shoulder model or on cadavers.
Exam Under Anesthesia
A good time to perform a thorough examination under anesthesia is after induction of the general anesthesia while the patient is lying supine on the operating table. Shoulder ranges of motion along with laxity or stiffness can be assessed and compared with the preoperative exam findings. Many times the office examination can be complicated by significant pain or the patient’s body habitus. Important physical exam findings consistent with adhesive capsulitis or instability can be clarified during an exam under anesthesia. A comparison with the normal nonoperative shoulder can be helpful.
Beach-Chair Position
The beach-chair position is often preferred for shoulder arthroscopy. The patient is first aligned so that the operative shoulder is slightly off the table while the remaining torso, hips, and lower extremities remain on the table (Fig. 2.4). The hips should be placed at the break in the table to make positioning easier once the patient is moved upright. The head is placed into a cushioned rest. The upper body is then flexed at the hips to about 45°. The knees are then flexed approximately 20° to prevent the patient from sliding down the table. Make sure the knees and heels are well padded with pillows or other cushioning devices to avoid pressure points. The upper table and torso are then flexed completely into a sitting position, which typically positions the acromion 60° relative to the floor. A padded side post is placed against the patient’s pelvis to prevent sideways sliding. The neck and endotracheal tube positioning is checked by the anesthesiologist. Standard prepping and draping protocols are then followed. The operative arm can be left free and placed across the patient’s lap at rest. Any positioning in abduction, internal, or external rotation must be done by an assistant during the procedure. Various commercially available armholding devices exist, which can facilitate arm positioning without an assistant.
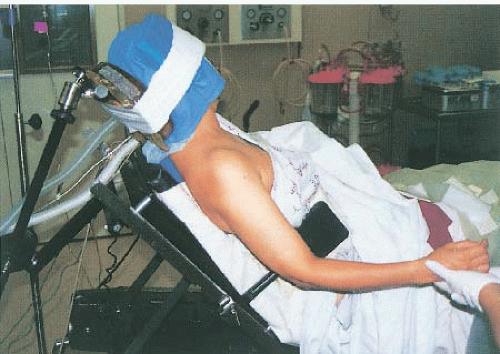 FIGURE 2.4. Beach-chair position. |
Advantages of the beach-chair position include the upright position which allows the surgeon to operate “right side up.” This is particularly helpful when working in the subacromial space so that the camera does not have to be rotated to make the image appear correct. The weight of the arm also provides some traction to open up the subacromial space to make instrumentation somewhat easier. The beach-chair position may be a disadvantage when working in the glenohumeral joint. It can be quite cumbersome to achieve and hold lateral traction to the arm while working in the joint. Access to some anterior and inferior locations is difficult to achieve without an assistant. Newer devices such as the Spider limb positioner (Tenet Medical, Calgary, Canada) have helped offset this limitation. The Spider is a pneumatically powered unit that allows the surgeon to place the arm in the desired position and hold it without assistance.
Lateral Decubitus Position
The lateral decubitus position for shoulder arthroscopy is another common position (Fig. 2.5). A 3-ft (0.91 m) vacuum beanbag is placed with the U side at the level of the patient’s scapula. An axillary roll is prepared prior to moving the patient. It can be a gel roll or simply a liter bag of intravenous saline solution wrapped with a cotton cloth. Four people are needed to safely position the patient. While the anesthesiologist controls the head and neck, the surgeon and assistant stand anterior and posterior to the trunk with a nurse holding the legs. After induction of general anesthesia and securing of the endotracheal tube, a draw sheet is used to lift the patient and move him laterally several inches to the posterior side of the operative table before tilting him to the lateral decubitus position. Next, the axillary roll is placed in the U portion of the beanbag to support the chest and prevent pressure on the dependent shoulder and axillary structures. Adequate
foam padding is placed at the dependent elbow, knee, and ankle, and pillows are placed between the legs. The hips and knees are flexed into a balanced position; usually around 30° is adequate. Finally, the beanbag is molded around the patient with the torso slightly tilted posteriorly about 20°, and the nurse applies the suction to deflate the bag. The table is then unlocked and rotated 45° posteriorly to allow the surgeon to step around the head and access the superior shoulder. The primary surgeon stands behind the patient closer to the axilla, whereas the assistant stands at the head. The patient’s arm is then prepped and draped in the preferred manner.
foam padding is placed at the dependent elbow, knee, and ankle, and pillows are placed between the legs. The hips and knees are flexed into a balanced position; usually around 30° is adequate. Finally, the beanbag is molded around the patient with the torso slightly tilted posteriorly about 20°, and the nurse applies the suction to deflate the bag. The table is then unlocked and rotated 45° posteriorly to allow the surgeon to step around the head and access the superior shoulder. The primary surgeon stands behind the patient closer to the axilla, whereas the assistant stands at the head. The patient’s arm is then prepped and draped in the preferred manner.
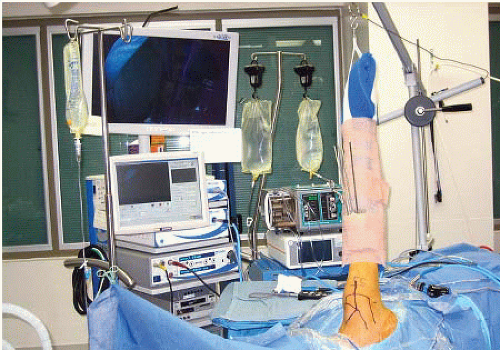 FIGURE 2.5. Patient in lateral position fully prepped and draped. |
In the lateral decubitus position, the arm is placed into a commercially available arm holder, usually a foam or silicone sleeve that is then connected by an S-hook to the cable system of a 3-point traction system. Approximately 10 lb (4.5 kg) attached to the upper cable (pulley at the end of the boom) is needed to suspend the average-sized arm in 70° of abduction and 15° of forward flexion.
The advantage of the lateral decubitus position is that it allows for slight traction to be placed onto the arm to open up the joint for instruments. This is achieved by placing the correct amount of weight on the cable establishing a balanced suspension. This allows the surgeon to gain better access to the entire glenohumeral joint without the need of an assistant. The abduction of the arm is also easily changed by moving the pulley down the boom (partially adducting) or by simply moving the weights to the inferior cable to completely adduct the arm down to the patient’s side (the so-called bursal position). If external or internal rotation is needed, an assistant or scrub tech can hold the arm in a satisfactory position while the surgeon works. In the lateral position, the glenohumeral joint is viewed with the glenoid being the floor of the screen and the humeral head being the roof. This view, in combination with the extra room from the distraction, allows one to easily work on the glenoid and capsule and lends itself to instability repair. One potential disadvantage of this position is working in the subacromial space. In order for the acromion to appear as the “roof” on the monitor, the camera-arthroscope must be rotated approximately 90°. Without some practice, this can be disorienting for the surgeon.
ARTHROSCOPIC EVALUATION OF NORMAL ANATOMY
Surface Anatomy
The first part of any successful shoulder arthroscopy is accurately marking out the bony landmarks of the shoulder (Fig. 2.6). It is important to first identify the posterolateral edge of the acromion. It is necessary to mark the inferior edge of the bone because that is the portion that will interfere with the instruments. Next, the remaining acromion is marked posteriorly and laterally. The anterior edge of the clavicle is then found and marked. Then the junction between the posterior clavicle and the acromion is marked along with the posterior clavicle and the anterior scapular spine. The posterior aspect of the AC joint is located anterior to this V-shaped mark and is usually palpable in line with the coracoid process. Finally, an orientation line is marked starting at the posterior clavicle and extending laterally in line with the humerus and continuing 4 cm lateral to the acromion. This line represents the posterior aspect of the subacromial bursa and is the limit of safe incision extension laterally to avoid iatrogenic injury to the axillary nerve.
Related posts:

Stay updated, free articles. Join our Telegram channel

Full access? Get Clinical Tree


