Ankle and Subtalar Arthroscopy
Jeffrey D. Jackson
Richard D. Ferkel
Ellis K. Nam
13.1 ANKLE ARTHROSCOPY
The first arthroscopic inspection of a cadaveric knee joint was performed by Takagi in Japan in 1918. In 1939, he reported on an arthroscopic examination of an ankle joint in a human patient. With the advent of fiber-optic light transmission, video cameras, instruments for small joints, and distraction devices, arthroscopy has become an important diagnostic and therapeutic modality for disorders of the ankle. Arthroscopic examination of the ankle joint allows direct visualization and stress testing of intra-articular structures and ligaments about the ankle joint. Various arthroscopic procedures have been developed and proven to be successful and will be discussed in this chapter.
PATIENT SELECTION
Indications
Patients undergoing ankle arthroscopy frequently present with pain, swelling, stiffness, instability, hemarthrosis, locking, or abnormal snapping or popping. Operative indications for ankle arthroscopy include the following:
Loose body removal
Chondral or osteochondral injury
Soft-tissue impingement
Osteophyte removal
Biopsy
Synovectomy
Arthrodesis
Ankle fracture intra-articular evaluation and treatment
Ankle instability
Hardware removal
Contraindications
Absolute contraindications for ankle arthroscopy include localized soft-tissue or systemic infection and severe, rigid degenerative joint disease. With end-stage degenerative joint disease and joint narrowing, successful distraction may not be possible, precluding visualization of the ankle joint. Relative contraindications for ankle arthroscopy include moderate degenerative joint disease with restricted range of motion (ROM), severe edema, reflex sympathetic dystrophy, and tenuous vascular supply.
Patient Evaluation
Successful outcome of ankle arthroscopy depends on accurate diagnosis and preoperative planning.
Patient evaluation includes a thorough history, physical examination, and radiologic evaluation.
The chief complaint should be carefully sought, with emphasis on the duration, severity, and provocative events.
A careful inquiry of pain, swelling, stiffness, instability, snapping, popping, or locking should be performed.
A general medical history should be obtained, with special attention to rheumatologic disorders.
Physical examination should include inspection and palpation of localized areas of tenderness.
ROM as well as stability of the ankle joint should be assessed and compared with that of the uninvolved side.
The subtalar joint should also be tested for instability.
Often, a local anesthetic agent can be injected into a specific joint to aid in diagnosis.
Routine blood tests to check for systemic and rheumatologic conditions and infection should be performed.
Aspiration of the ankle joint and analysis of the joint fluid can be helpful in distinguishing inflammatory from septic conditions of the ankle joint.
Routine radiographs (anteroposterior [AP], lateral, and mortise view) should be obtained for all patients.
Stress radiographs can be obtained when instability is suspected.
Advanced imaging modalities such as CT or MRI are often helpful in evaluating osteochondral lesions or soft-tissue lesions about the ankle.
Three-phase bone scans can also aid in distinguishing soft tissue from bony pathology.
OPERATING ROOM SETUP
Equipment
Arthroscopes are available in various sizes, ranging from the 1.9-mm to the 4.0-mm diameter scope (Fig. 13.1.1). The 2.7-mm arthroscope is preferred by the authors, particularly in tighter areas such as the medial and lateral gutters and the posterior aspect of the ankle. In the past, the 4.0-mm arthroscope afforded an improved picture quality to that of the smaller arthroscopes; however, with the advent of improved technology, the picture quality is now almost equivalent. As opposed to traditional knee arthroscopes, small joint arthroscopes that are shorter are preferred (67-mm long) to prevent chondral injury and instrument breakage. Another important variable is the inclination of view, defined as the angle of projection at the objective end of the arthroscope. Because of the rotational ability of the arthroscope, a 30° arthroscope increases the field of view compared with a 0° arthroscope. The 30° view, the most practical and the most commonly used, permits excellent visualization within the ankle and subtalar joints. The 70° arthroscope is also valuable in the ankle joint as it allows the surgeon to see around corners (i.e., the medial and lateral gutters). The 70° scope requires more experience because it is less commonly used and a central blind spot is present (Fig. 13.1.2).
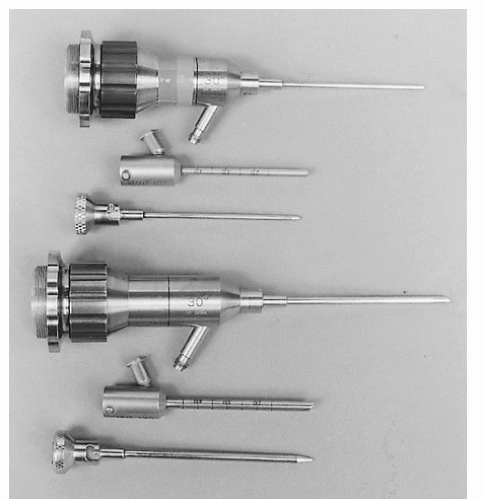 Figure 13.1.1 Small joint arthroscope with interchangeable cannulae is helpful in ankle and foot arthroscopy. A 1.9-mm 30° oblique arthroscope is pictured at top, and a 2.7-mm 30° oblique arthroscope is pictured below. (From Ferkel RD. Instrumentation. In: Arthroscopic surgery: the foot and ankle. Philadelphia: Lippincott-Raven, 1996:51.) |
Various instruments, specifically designed for the ankle, are needed to perform effective arthroscopy, including probes, dissectors, graspers, basket forceps, knives, curettes, osteotomes, rongeurs, and suction baskets (Fig. 13.1.3). In addition, small-joint motorized shaver and burr systems are available to perform different tasks quickly and efficiently. These instruments are shorter than those used in the knee and shoulder, and smaller in diameter. Various tip designs are available, and run at speeds between 1,500 and 6,000 rpm. In tight spaces, smaller 2.0-and 2.9-mm tips are used; where more space is available, larger 3.5- and 4-mm tips are utilized to lessen clogging and to perform the task more efficiently.
A high inflow and outflow system can be achieved by gravity drainage from a third portal (i.e., posterolaterally). Occasionally, if the posterior portal is difficult to obtain or a high hydrostatic pressure is desired, an arthroscopic pump can be used. However, care must be taken not to extravasate excess fluid into the surrounding soft tissues, leading to increased compartment pressure.
Particularly important in performing ankle arthroscopy is achieving adequate distraction. Inadequate distraction will preclude complete inspection of the central and posterior aspects of the ankle. The ankle can be distracted by noninvasive and invasive techniques. Guhl popularized the use of an invasive distraction device with pins in the distal tibia and calcaneus. This affords a large amount of distraction force. However, the disadvantages are the risk of neurovascular damage, infection, scarring, and fracture. In recent years, noninvasive techniques have replaced invasive devices almost completely. Yet, noninvasive distraction can also result in neurovascular compromise caused by excessive and prolonged pressure; thus periodic relaxation of the distraction strap is recommended to prevent potential complications. The authors use a noninvasive disposable soft-tissue distraction strap that grips around the posterior aspect of the heel and the dorsum of the foot. This attaches to a sterile device that grips the table (Fig. 13.1.4).
Positioning
Ankle arthroscopy is usually performed either in the lateral decubitus or in the supine position. Newer techniques for prone arthroscopy will be discussed at the end of the chapter. At our institution, we prefer the supine position with a padded thigh support, as it allows “hands-free” positioning of the ankle without having to hold the extremity. In addition, this position allows the surgeon to be more readily oriented with the video monitor as well as affording easy access to the anterior and posterior portals.
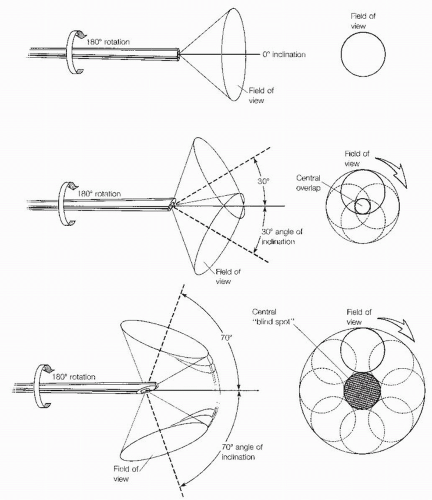 Figure 13.1.2 Rotating the arthroscopic field of view enhances viewing by creating overlapping circular images with a 30° arthroscope (center). With a 0° arthroscope (top), the field of view is unchanged with rotation. With a 70° arthroscope (bottom), rotation occurs around a central blind spot. (From Ferkel RD. Instrumentation. In: Arthroscopic surgery: the foot and ankle. Philadelphia: Lippincott-Raven, 1996:53.) |
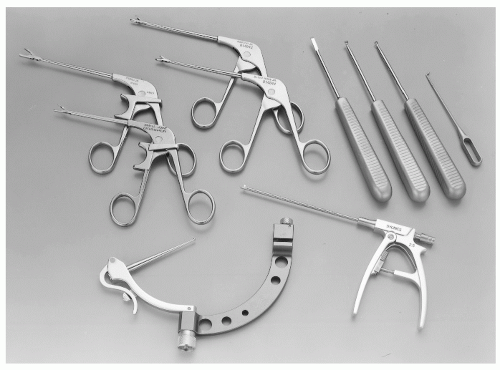 Figure 13.1.3 Small-joint instrumentation, including a drill guide (MicroVector), graspers, basket forceps, suction punch, elevator, curettes, and probe, can facilitate ankle arthroscopy. |
After the tourniquet is secured on the upper thigh, the leg is placed onto a thigh support and positioned with the hip flexed 45° to 50°.
The thigh support is placed proximal to the popliteal fossa and is well padded to avoid injury to the sciatic nerve.
The patient is then rotated so the knee and ankle point directly to the ceiling.
The pad is removed from the end of the table to facilitate posterior ankle access.
The patient is prepped and draped so that good access is available posteriorly.
The tourniquet is inflated at the surgeon’s discretion.
The noninvasive distraction strap is then placed onto the foot and attached to a sterile holder.
If subtalar arthroscopy is being performed, the posterior strap should be placed below the tip of the fibula.
This foot holder is secured to the operating table over the surgical drape by a sterile clamp.
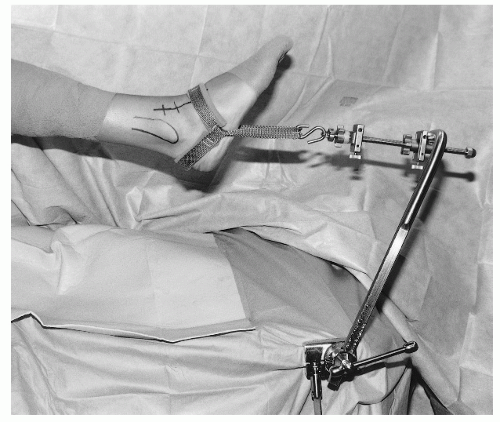 Figure 13.1.4 Patient positioning using a thigh support with a noninvasive strap attached to a distraction device. |
SURGICAL TECHNIQUE
Arthroscopic Portals
As in arthroscopy involving other joints, ankle arthroscopy mandates proper portal placement for adequate visualization. Therefore, a thorough knowledge of ankle anatomy is required to avoid potential complications. It is very important to mark out potential structures at risk before performing ankle arthroscopy.
Before applying the distraction strap, the dorsalis pedis artery, deep peroneal nerve, greater saphenous vein, anterior tibial tendon, peroneus tertius tendon, and superficial peroneal nerve and its branches (intermediate and medial dorsal cutaneous nerves) should be identified and outlined on the surface of the ankle using a marking pen.
By inverting and plantarflexing the foot, branches of the superficial peroneal nerve can be readily visualized.
Similarly, the joint line is identified by dorsiflexing and plantarflexing the ankle.
Anterior Portals
The anteromedial and anterolateral portals are the most commonly used anterior portals.
The anteromedial portal is placed first just medial to the anterior tibial tendon at the joint line.
Proper technique is mandatory in creating the anteromedial portal as the greater saphenous vein and saphenous nerve traverse the joint line along the anterior edge of the medial malleolus. After incising the skin, the soft tissues and joint capsule are bluntly divided.
The anterolateral portal is placed just lateral to the peroneus tertius tendon at or slightly proximal to the joint line.
A branch of the superficial peroneal nerve (the most commonly injured nerve in ankle arthroscopy) can be disrupted in creating this portal if care is not taken.
The anterocentral portal is established between the tendons of the extensor digitorum communis, but we do not recommend this portal because of the increased risk of damage to the deep peroneal nerve and the dorsalis pedis artery and vein, which traverse between the extensor hallucis longus and the medial border of the extensor digitorum communis (Fig. 13.1.5).
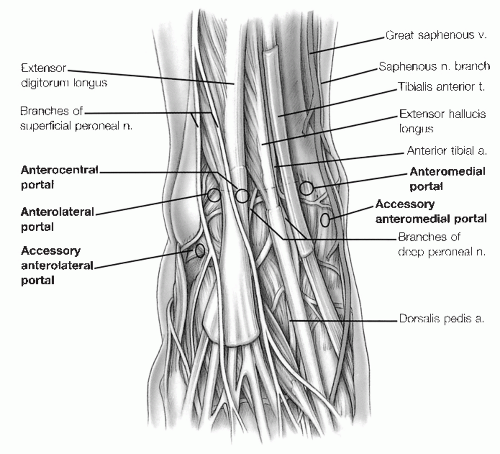 Figure 13.1.5 Anterior anatomy. Three anterior and two accessory anterior portals are used in ankle arthroscopy. (From Ferkel RD. Diagnostic arthroscopic examination. In: Arthroscopic surgery: the foot and ankle. Philadelphia: Lippincott-Raven, 1996:104.) |
Accessory Anterior Portals
The accessory anterior portals are used in addition to the usual anteromedial and anterolateral portals when working in the tight confines of the medial and lateral gutters for instrumentation or excision of soft tissue or bony lesions. Two accessory anterior portals are most commonly used, the anterolateral and the anteromedial (Fig. 13.1.5).
The accessory anteromedial portal is established 0.5 to 1 cm inferior and 1 cm anterior to the anterior border of the medial malleolus.
It is especially useful in facilitating the evaluation of the medial gutter and deltoid ligament, particularly for the removal of ossicles adherent to the deep portion of the deltoid ligament while visualizing from the anteromedial portal.
The accessory anterolateral portal is established 1 cm anterior to and at or just below the tip of the anterior
border of the lateral malleolus, in the area of the anterior talofibular ligament.
When visualizing ossicles from the anterolateral portal, an instrument can be inserted through the accessory anterolateral portal to facilitate removal as well as probing of the anterior talofibular ligament, the posterior talofibular ligament, and surrounding bony architecture.
Posterior Portals
The three described posterior portals are the posterolateral, trans-Achilles, and the posteromedial portal.
The posterolateral portal, the most commonly used and safest portal, is located directly adjacent to the lateral edge of the Achilles tendon, in the soft spot, about 1.2 cm above the tip of the fibula; the exact level depends on the type of distraction used.
This portal is usually at or slightly below the joint line. Branches of the sural nerve and the lesser saphenous vein must be avoided with this portal which is why it is made adjacent to the Achilles tendon (Fig. 13.1.6).
The trans-Achilles portal is established at the same level as the posterolateral but through the center of the Achilles tendon.
In our experience, this portal does not allow easy mobility of the instruments and may lead to increased iatrogenic damage of the Achilles tendon. For these reasons, we do not recommend this portal.
The posteromedial portal is created just medial to the Achilles tendon at the joint line. The posterior tibial artery and the tibial nerve must be avoided, and the tendons of the flexor hallucis longus (FHL) and flexor digitorum longus must also be protected.
The calcaneal nerve and its branches may separate from the tibial nerve proximal to the ankle joint and traverse in an interval between the tibial nerve and the medial border of the Achilles tendon.
It is critical that this portal be made lateral to the FHL to avoid neurovascular injury.
Because of the potential for serious complications, the posteromedial portal is seldom made in the supine position, but it is routinely used with prone positioning.
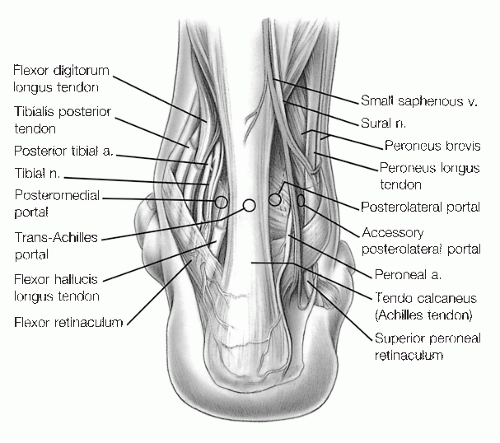 Figure 13.1.6 Posterior anatomy. There are three posterior portals and one accessory posterior portal in the ankle. Usually only the posterolateral portal is used. (From Ferkel RD. Diagnostic arthroscopic examination. In: Arthroscopic surgery: the foot and ankle. Philadelphia: Lippincott-Raven, 1996:106.) |
Accessory Posterior Portal
The accessory posterolateral portal is made at the same level as or slightly higher than the posterolateral portal.
It is established posterior to the fibula and lateral to the FHL. This is 1 to 1.5 cm lateral to the posterolateral portal, and extreme caution must be exercised to avoid injury to the sural nerve and small saphenous vein.
This portal is particularly useful for the removal of posterior loose bodies when posterior visualization is necessary, and for the debridement and drilling of extremely posterior osteochondral lesions of the talus (OLT).
Portal Placement Technique
The anteromedial portal is created first. While palpating the anterior tibial tendon, a 22G needle is used to find the correct trajectory medial to the tendon. Sterile lactated Ringer’s solution is then infused into the ankle joint.
Backflow from the needle confirms entry into the ankle joint.
A “nick-and-spread” technique is used to establish the portal. A no. 11 scalpel is used to cut through the skin just medial to the tibialis anterior tendon in a vertical fashion. This is done with the index
finger on the anterior tibial tendon to avoid injury to it. A mosquito clamp is then used to bluntly dissect through the subcutaneous tissue down to the capsule and puncture through it (Fig. 13.1.7).
A blunt trocar with attached arthroscopic cannula is placed into the ankle joint and the trocar is exchanged for the arthroscope.
The joint is then examined from the anteromedial portal.
Continued joint distension is accomplished by manually injecting fluid through the arthroscopic cannula with a 50-mL syringe.
Using a technique similar to that for the anteromedial portal, the anterolateral portal is established. Under direct arthroscopic vision, a 25G needle is carefully inserted into the ankle joint to locate the position of the anterolateral portal.
Location of the anterolateral portal varies depending on the pathology.
Sequential examination of intra-articular anatomy can then be performed.
The posterolateral portal is established under direct visualization by taking the arthroscope from the anteromedial portal and maneuvering it through the notch of Harty from anterior to posterior (Fig. 13.1.8).
The tip of the fibula is then palpated, and approximately 1.2 cm above it, an 18G spinal needle is inserted directly adjacent to the Achilles tendon, in line with the ankle joint and angled 45° toward the medial malleolus (Fig. 13.1.9).
Arthroscopically, the needle should be seen medial to the posteroinferior tibiofibular and transverse tibiofibular ligaments.
The cannula should be inserted with care to avoid injury to the branches of the sural nerve and the lesser saphenous vein.
The posterolateral portal is primarily used as an inflow portal, and may also be used for visualization or instrumentation through an interchangeable cannulae system.
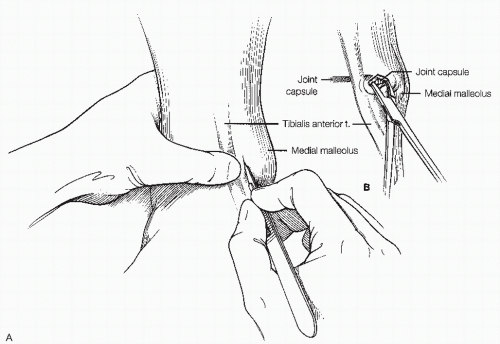 Figure 13.1.7 Establishing the anteromedial portal. (A) An incision is made medial to the anterior tibial tendon while the tendon is palpated with the thumb. (B) Blunt dissection is performed with a clamp through the skin to the capsule. (From Ferkel RD. Diagnostic arthroscopic examination. In: Arthroscopic surgery: the foot and ankle. Philadelphia: Lippincott-Raven, 1996:108.) |
 Figure 13.1.8 To establish the posterolateral portal, the arthroscope is placed in the anteromedial portal and brought through the notch of Hardy to visualize the posterior stuctures. |
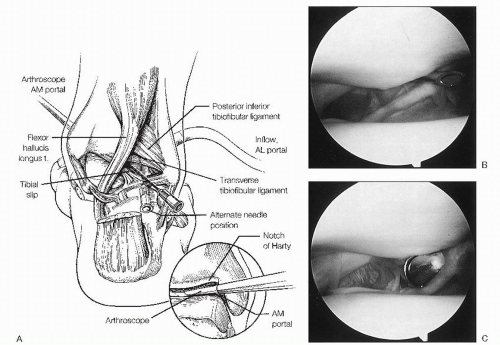 Figure 13.1.9 Establishing the posterolateral portal. (A) Posterior view. Inflow is placed through the AL portal and the arthroscope is inserted through the AM portal. Inset: The arthroscope is maneuvered through the notch of Harty to visualize the posterior structures. A spinal needle is then inserted to determine the appropriate direction for the posterolateral portal. (B) Arthroscopic view from the anteromedial portal, demonstrating the spinal needle penetrating the joint capsule medial to the transverse tibiofibular ligament. (C) After the spinal needle determines the appropriate direction, an interchangeable cannula is inserted through the posterolateral portal under direct vision, medial to the transverse tibiofibular ligament. AL, anterolateral; AM, anteromedial. (From Ferkel RD. Diagnostic arthroscopic examination. In: Arthroscopic surgery: the foot and ankle. Philadelphia: Lippincott-Raven, 1996:109.) |
Arthroscopic Examination
The normal intra-articular anatomic structures of the ankle have been well described.
A 21-point arthroscopic examination of the ankle is recommended to ensure a systematic evaluation of the ankle.
The eight-point anterior examination includes the deltoid ligament, medial gutter, medial talus, central talus, lateral talus, talofibular articulation, lateral gutter, and anterior gutter (Fig. 13.1.10).
The six-point central examination includes the medial, central, and lateral portions of the tibiotalar articulation. By maneuvering the arthroscope from the anteromedial portal to view the posterior structures, three additional points can be seen, including the posteroinferior tibiofibular ligament, transverse tibiofibular ligament, and capsular reflection of the flexor hallucis tendon (Fig. 13.1.11).
The seven-point posterior examination includes the medial gutter and deltoid ligament, posteromedial talar dome and tibial plafond, central talus, lateral talus,
talofibular posterior articulation, lateral gutter, and posterior gutter (Fig. 13.1.12).
In general, the anteromedial, anterolateral, and posterolateral portals provide excellent visualization of the entire joint.
With the three-portal system, adequate inflow can be maintained with gravity drainage so that there is no need for an arthroscopic pump.
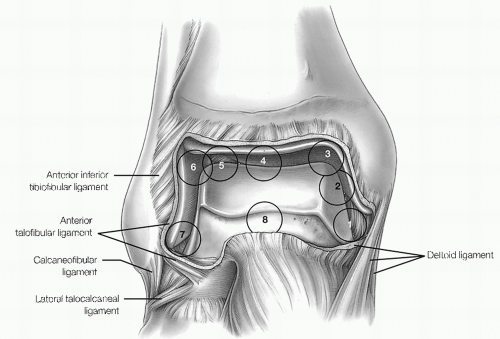 Figure 13.1.10 Eight-point anterior examination viewed from the anteromedial portal. The anterior ankle is examined starting at the tip of the medial malleolus and making a circle within the ankle joint. (From Ferkel RD. Diagnostic arthroscopic examination. In: Arthroscopic surgery: the foot and ankle. Philadelphia: Lippincott-Raven, 1996:110.) |
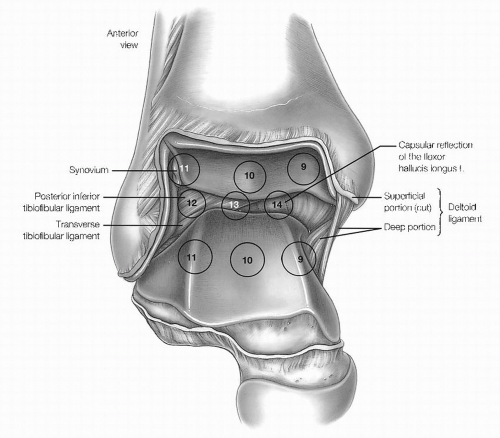 Figure 13.1.11 Six-point central examination, viewed from the anteromedial portal. It is performed by maneuvering the arthroscope into the center of the ankle and examining the tibiotalar articulation. The arthroscope is then placed more posteriorly to examine the posterior capsular structures. (From Ferkel RD. Diagnostic arthroscopic examination. In: Arthroscopic surgery: the foot and ankle. Philadelphia: Lippincott-Raven, 1996:112.) |
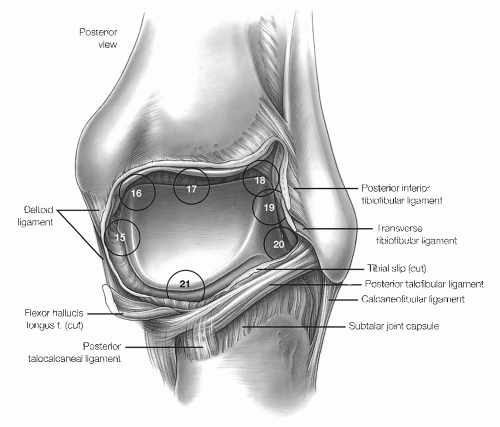 Figure 13.1.12 Seven-point posterior examination viewed from the posterolateral portal. The examination is initiated along the posteromedial malleolar—talar articulation and is carried clockwise to end in the posterior recess. (From Ferkel RD. Diagnostic arthroscopic examination. In: Arthroscopic surgery: the foot and ankle. Philadelphia: Lippincott-Raven, 1996:114.) |
LOOSE BODIES
The presence of loose bodies is an indicator of an underlying pathologic disorder involving the synovium, cartilage, or underlying bone. Thus, to effectively treat this entity, the underlying pathology must be addressed as well.
PATHOGENESIS
Loose bodies may be either chondral or osteochondral and may arise from defects in the talus or tibia, osteophytes, or degenerative joint disease. They may result from major trauma to the ankle joint or from a relatively innocuous injury such as a lateral ligament sprain. Multiple loose cartilaginous or osteocartilaginous bodies may also form in synovial chondromatosis. This disorder is more common in larger joints, but it may also occur in the ankle. In this disorder, metaplastic mesenchymal cells in the joint capsule develop into chondroblasts, which produce small clusters of cartilage. These nodules of cartilage can protrude into the joint and break off to form small loose bodies. As the cartilage mass grows, the central portion may become necrotic and calcify. The loose bodies then become visible on routine radiographs (Fig. 13.1.13).
DIAGNOSIS
History and Physical Examination
A small loose body may cause catching symptoms with joint motion along with pain, swelling, and decreased ROM.
Symptoms of internal derangement may resolve if a small loose body becomes fixed to the synovial lining, ceasing to cause joint irritation.
A loose body may grow by proliferation of chondroblasts/osteoblasts, or may shrink owing to the action of chondroclasts/osteoclasts.
The physical examination may not be very revealing, with vague areas of tenderness, possible limitation of motion, and catching.
Seldom is a loose body palpable.
As with all ankle pathology, a careful physical examination must rule out extra-articular entities that can cause symptoms similar to intra-articular lesions.
Peroneal tendon subluxation, posterior tibial tendon attrition or rupture, tarsal tunnel syndrome, sinus tarsi syndrome, stress fracture, and tendinitis must be carefully excluded by both physical examination and ancillary studies.
 Figure 13.1.13 (A) Lateral radiograph shows numerous loose bodies in the anterior and posterior recesses of the ankle joint. (B) Arthroscopic view shows removal of the loose body with a grasper. (From Ferkel RD. Articular surface defects, loose bodies, and osteophytes. In: Arthroscopic surgery: the foot and ankle. Philadelphia: Lippincott-Raven, 1996:173.) |
Radiologic Features
Plain radiographs can reveal an osseous loose body unless it is superimposed on other bony structures, but chondral loose bodies are not visible on routine radiographic studies.
Arthrography, especially a CT arthrogram, usually reveals the loose bodies.
Bone scans are seldom informative, although MRI holds promise for showing chondral lesions not seen on other types of studies.
The plain radiographs, arthrogram, CT scan, and/or MRI scan should be scrutinized to discover the origin of the loose body, such as a defect of the talar dome, tibial plafond, or osteophyte.
Lesions that appear on routine radiographs to be loose bodies may actually be intra-articular, intracapsular, or extra-articular in location, particularly in the posterior ankle joint.
The location of the lesions should be carefully determined preoperatively to avoid performing an arthroscopic examination for loose body removal, only to find the joint free of any abnormality.
An arthrogram, an arthrogram—CT scan, or an MRI study is best suited to make the distinction between an intra-articular and an extra-articular abnormality.
TREATMENT
Loose bodies localized to the anterior compartment, particularly in patients with ligamentous laxity, can be approached with a routine setup using anteromedial, anterolateral, and posterolateral portals. However, the posterior joint should also be examined for the presence of loose bodies, which can be hidden in the posterior recess of the joint. Joint distraction is helpful to visualize this area. In the case of an ankle with tight ligamentous support, joint distraction may be mandatory.
Loose bodies in the anterior joint can generally be retrieved from anterior portals.
However, if there is instrument crowding, then the arthroscope can be placed in the posterolateral portal and the loose bodies removed using the anteromedial or anterolateral portal.
Retrieval of loose bodies in the posterior aspect of the joint can be more problematic.
Rarely, a carefully placed anterocentral portal may be used to triangulate into the posterior joint.
This portal should be placed directly through the common digitorum extensor longus tendon sheath.
With the arthroscope placed in either of the anterior portals, removal may be best accomplished with a loose body clamp placed in the posterolateral portal.
After removal of the loose bodies, a careful evaluation of the joint surfaces should be performed to find the source.
If a chondral or osteochondral defect is found, it should be debrided (see OLT).
If an osteophyte is responsible for the loose body, it should be debrided with an arthroscopic burr, an osteotome, or a pituitary rongeur.
The wounds are closed with a 4-0 nylon suture.
Postoperative Management
Postoperatively, a bulky compressive dressing with a posterior splint is applied.
The sutures and splint are removed 5 to 7 days postoperatively and exercises to regain ROM are begun.
The exercise regimen then advances to include strengthening and proprioceptive training.
Results
The clinical results after loose body removal are quite good in patients who do not have associated abnormalities. When degenerative or posttraumatic arthritic changes or significant chondral defects are present, the results are less predictable.
SOFT-TISSUE IMPINGEMENT
PATHOGENESIS
Epidemiology
Ankle sprains are one of the most common injuries in sports. One inversion ankle sprain occurs per 10,000 persons per day. In a study at West Point, 30% of cadets suffered an ankle sprain in their 4 years at the school. Furthermore, it has been estimated that 10% to 50% of patients will have some degree of chronic ankle. The differential diagnosis of chronic pain after an ankle sprain include the following:
OLT
Calcific ossicles at the medial or lateral malleolus
Peroneal tendon tears or subluxation
Tarsal coalition
Degenerative joint disease
Nerve entrapment
Occult fractures of the talus or calcaneus
Subtalar dysfunction
Reflex sympathetic dystrophy/complex regional pain syndrome
Soft-tissue impingement
The primary cause of chronic pain after an ankle sprain is soft-tissue impingement. This can occur along the syndesmosis, medial and/or lateral gutters, the syndesmotic interval between the tibia and the fibula, or posteriorly in the syndesmosis and posterior gutter.
Pathophysiology
Soft-tissue impingement is most commonly seen anterolaterally because of the inversion mechanism of most ankle sprains. In 1950, Wolin et al. first described a meniscoid band of hyalinized tissue between the talus and the fibula as a source of ankle pain. They thought that impingement of this meniscal tissue led to pain and that removal would result in symptomatic relief. Waller, in 1982, termed this pathology anterolateral corner compression syndrome and noted pain localized along the anteroinferior border of the fibula and the anterolateral talus. These findings, confirmed arthroscopically by Ferkel and others, are thought to reflect a chronic synovitis and fibrosis. Adjacent talar or fibular chondromalacia may also be associated with this lesion.
Anterolateral soft-tissue impingement (ASTI) usually occurs in the superior portion of the anterior talofibular ligament but can also be localized to the distal portion of the anterior inferior tibiofibular (syndesmotic) ligament (Fig. 13.1.14). A separate or accessory fascicle of the anteroinferior tibiofibular ligament has been reported as a source of soft-tissue impingement. Furthermore, soft-tissue impingement can occur along the entire lateral gutter.
Syndesmotic impingement may involve any or all of the following structures: the anterior inferior tibiofibular
ligament and its fascicle; the posterior inferior tibiofibular ligament, including its distal and deep component, the transverse ligament; and the interosseous membrane (Fig. 13.1.14). Injuries to the syndesmosis are vastly underestimated and often occur with sprains and fractures that go undetected. Syndesmotic sprains have been estimated to occur in 10% of all ankle injuries, and tend to be most common in collision sports such as ice hockey, football, and soccer.
ligament and its fascicle; the posterior inferior tibiofibular ligament, including its distal and deep component, the transverse ligament; and the interosseous membrane (Fig. 13.1.14). Injuries to the syndesmosis are vastly underestimated and often occur with sprains and fractures that go undetected. Syndesmotic sprains have been estimated to occur in 10% of all ankle injuries, and tend to be most common in collision sports such as ice hockey, football, and soccer.
 Figure 13.1.14 Anterolateral ankle anatomy: soft-tissue impingement sites. Note the accessory fascicle of the anterior inferior tibiofibular ligament, which can impinge across the lateral talar dome. (From Ferkel RD. Soft-tissue lesions of the ankle. In: Arthroscopic surgery: the foot and ankle. Philadelphia: Lippincott-Raven, 1996:125.) |
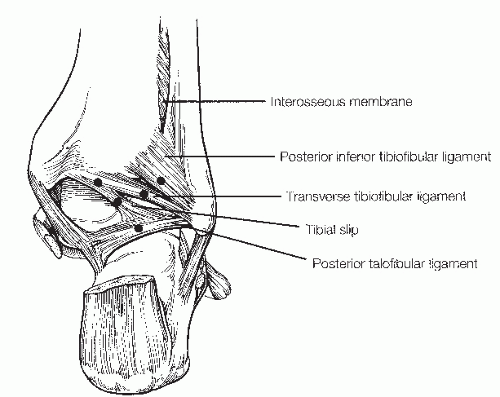 Figure 13.1.15 Posterior impingement sites. The tibial slip (posterior intermalleolar ligament) can also be an area of soft-tissue impingement. (From Ferkel RD. Soft-tissue lesions of the ankle. In: Arthroscopic surgery: the foot and ankle. Philadelphia: Lippincott-Raven, 1996:134.) |
Posterior soft-tissue impingement usually occurs along the posterolateral or posterocentral portion of the ankle and involves the posterior tibiofibular ligament, including the transverse tibiofibular ligament, and occasionally the tibial slip (also known as the posterior intermalleolar ligament, Fig. 13.1.15). This impingement can occur alone or in combination with anterolateral and syndesmosis impingement. However, usually a more generalized posterolateral impingement occurs with fibrosis, capsulitis, and synovial swelling along the posterior portions of the ankle.
Medial soft-tissue impingement has been less frequently described in the literature compared with anterolateral impingement. It has been hypothesized that medial impingement involving the deltoid ligament may occur secondary to either direct trauma, scarring from a twisting injury, prior surgery, or increased anterior to posterior laxity from a tear of the ATFL. Patients with medial impingement can be treated with arthroscopic debridement in a similar fashion to anterolateral impingement.
DIAGNOSIS
History and Physical Examination
Typically, in ASTI, the patient complains of vague anterior pain, usually along the anterior and anterolateral aspect of the ankle, sometimes involving the syndesmosis and sinus tarsi regions.
Pain is usually absent at rest and present with most activities, limiting the patient’s ability to participate in a given sport.
Physical examination may reveal tenderness along the syndesmosis, anterior gutter, including the anterior talofibular ligament and the calcaneofibular ligament, and many times also the posterior subtalar joint or sinus tarsi. It is important to differentiate lateral gutter pain from subtalar pain, especially in the sinus tarsi.
In syndesmotic impingement, the patients have exquisite tenderness along the syndesmosis and more proximally on the interosseous membrane.
A positive squeeze test can be seen with this injury besides a positive external rotation stress test.
Because posterior impingement may occur with anterior and syndesmotic impingement, the physical findings may be similar, with the addition of pain located posteriorly between the distal tibia and the fibula.
Radiologic Features
Radiologic evaluation may reveal calcification or heterotopic bone in the interosseous space, which suggests previous injury to the distal tibiofibular syndesmosis, with ossicles along the tip of the fibula and the lateral talar dome consistent with injuries of the anterior talofibular ligament.
Ossicles can also be seen medially indicative of a deltoid ligament injury.
X-rays are often normal, as are bone scans and CT scans.
In approximately 30% of cases, MRI may indicate pathology in the lateral gutter.
Stress X-rays in this group are usually negative, ruling out ankle instability.
Recently, Ferkel et al. reported on the efficacy and reliability of MRI in detecting ASTI of the ankle. The
diagnosis was generally made using the sagittal T1 and Short Tau Inversion Recovery images. Twenty-four patients with an arthroscopically and clinically confirmed diagnosis of anterolateral impingement of the ankle were compared with 16 controls. MRI was found to have an accuracy of 78.9%, a sensitivity of 83.3%, and a specificity of 78.6%. We believe MRI is an excellent modality to evaluate the ankle for possible soft-tissue impingement (Fig. 13.1.16).
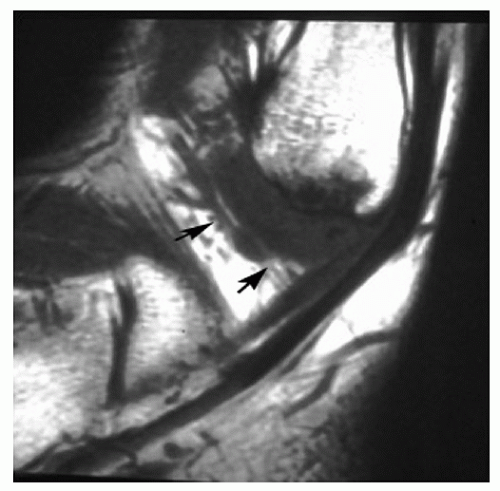 Figure 13.1.16 Sagittal T1 MRI of the ankle showing a low-signal intensity mass in the anterolateral gutter. This is consistent with ASTI of the ankle. |
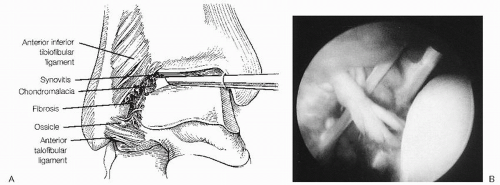 Figure 13.1.17 Soft-tissue impingement. (A) Viewed through the anteromedial portal, ASTI with synovitis and fibrosis and chondromalacia in the anterolateral gutter. (B) Arthroscopic view of the anterolateral impingement lesion. Note the hemosiderin staining of the lateral gutter and associated scar bands and synovitis. (From Ferkel RD. Soft-tissue lesions of the ankle. In: Arthroscopic surgery: the foot and ankle. Philadelphia: Lippincott-Raven, 1996:127.) |
TREATMENT
At arthroscopy, the medial malleolar—talar articulation and the central portion of the ankle and anterior gutter are usually normal. In ASTI, pathology is generally limited to the syndesmosis and the lateral gutter. Synovitis surrounding the anterior inferior tibiofibular ligament, both in front and behind as well as synovitis of the anterior talofibular ligament is usually present. Fibrosis of the lateral gutter and chondromalacia of the talus and fibula may be present in some cases. In addition, a small ossicle or loose body may be hidden in the soft tissues at the tip of the fibula (Fig. 13.1.17). In syndesmotic impingement, inflamed synovitis involves the anterior and posterior aspects of the syndesmotic ligament, and sometimes the ligament is torn and frayed. It is important to note that posterior impingement may be easily missed if careful anterior and posterior viewing is not done. Without some type of distraction device, it can be difficult to see some of the synovial pathology involving the posterolateral corner of the ankle. Using motorized shavers, burrs, graspers, and baskets, the inflamed synovium, thickened adhesive bands, osteophytes, and loose bodies are debrided (Fig. 13.1.18). Care must be taken not to excise the anterior talofibular ligament remnant. Previous cadaver studies indicate that approximately 20% of the anterior inferior tibiofibular ligament is viewed intra-articulary, and no instability has been produced at the syndesmostic joint by resecting this intra-articular portion.
Postoperative Management
After surgery, patients are placed in a posterior splint for 1 week.
They are then put in a controlled active motion (CAM) walker boot for an additional 2 to 3 weeks.
Subsequently, they are given a small ankle brace to wear inside a tennis shoe and begin formal physiotherapy.
Patients can return to full activity, including sports, when all the goals of rehabilitation have been achieved.
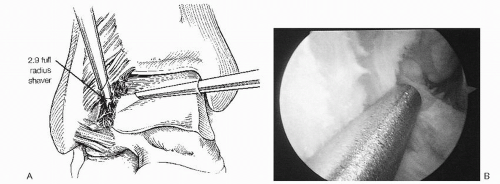 Figure 13.1.18 Debridement of the lateral gutter. (A) Debridement is performed with a small-joint shaver and includes removing inflamed synovium, thickened adhesive bands, osteophytes, and loose bodies. (B) Arthroscopic view through the anteromedial portal. A full-radius shaver is debriding the lateral gutter while avoiding injury to the anterior talofibular ligament. (From Ferkel RD. Soft-tissue lesions of the ankle. In: Arthroscopic surgery: the foot and ankle. Philadelphia: Lippincott-Raven, 1996:129.) |
Results
Arthroscopic treatment of ASTI of the ankle has proven successful, alleviating chronic ankle pain that patients exhibit after an inversion ankle sprain. Between 1983 and 2011, the senior author has treated more than 350 patients arthroscopically for ASTI. Our initial group of 31 patients with more than 2 years of follow-up has been reported, with 26 of 31 (84%) rated as excellent/good, subjectively and objectively; 4 of 31 (13%) fair, and 1 poor. In subsequent cases, the results have remained similar. Numerous other authors have reported a high percentage of the good/excellent results after arthroscopic treatment for anterolateral impingement.
Medial impingement of ankle, a less common entity, has received much less attention in the literature than anterolateral impingement. Egol and Parisien described a case of medial impingement of the ankle following a hypothesized eversion injury to the deep deltoid ligament that was relieved with arthroscopic debridement. Liu and Mirzayan reported a case of chronic posteromedial impingement following an ankle injury that resulted in soft-tissue impingement between the medial talus and the tibial plafond. Open treatment has also been reported as successful in small case series. Arthroscopic debridement seems to be effective as well, but larger case series are needed to evaluate this further.
SYNOVIAL DISORDERS
The arthroscopic surgeon must understand certain points to diagnose and treat these problems correctly. Our discussion will focus on rheumatoid arthritis (RA), pigmented villonodular synovitis (PVNS), synovial chondromatosis, and hemophilia.
PATHOGENESIS
RA is a chronic systemic inflammatory condition characterized by the method in which it affects joints. Although the etiology is unknown and various causes have been postulated, including a cell-mediated immune response (T cell), no consensus exists as to its exact cause.
PVNS is thought by some to be a benign neoplasm involving the synovium. It occurs most commonly in the knee, but it can involve the ankle. Both generalized and localized forms occur. The localized solitary lesion is more common in the ankle than the former type.
Synovial chondromatosis is seldom seen in the ankle and is almost always monoarticular. This entity involves multiple foci of cartilage metaplasia within the synovium. As these masses grow, they form nodules within the synovial tissue and then become excrescences. These nodules can calcify or ossify.
Hemophilia is a bleeding disorder caused by a factor VIII deficiency (hemophilia A) or factor IX deficiency (hemophilia B). This disorder, which commonly affects the ankle, manifests in repeated hemarthroses owing to minor trauma, which in turn leads into eventual cartilage destruction and joint deformity.
DIAGNOSIS
The clinical presentation in RA is highly inconsistent, ranging from pauciarticular illness of brief duration to progressive destruction with polyarthritis and vasculitis.
Although RA can affect any diarthrodial joint, it initially involves the small joints of the hands, wrists, knees, and feet.
The disease may progress to affect the elbow, shoulder, ankle, talonavicular, and subtalar regions.
Radiographs are characteristic for RA, often demonstrating periarticular erosions and osteopenia.
Preoperatively, it is important to aspirate the ankle or subtalar region.
A CT scan or MRI may be useful to look for synovitis, effusion, articular damage, and other unsuspected abnormalities.
In PVNS, physical examination reveals a warm, swollen, and tender ankle with decreased ROM.
Aspiration of the joint reveals dark, serosanguinous fluid, and X-rays are occasionally helpful in the diagnosis.
The arthrogram may show nodular masses and MRI can demonstrate swollen synovial tissue and cartilage erosions (Fig. 13.1.19).
Diagnosis of synovial chondromatosis is made by noting limited ROM, locking, swelling, and visualization of multiple calcifications on X-rays of the ankle.
Synovial biopsy will often make the diagnosis.
Hemophilia should always involve consultation with a hematologist for diagnosis and treatment.
Acutely the joint is swollen, red, and tender, and extensive loss of joint space can occur.
On X-ray, effusion with spurs and sclerosis can be seen.
Infection should always be included in the differential diagnosis.
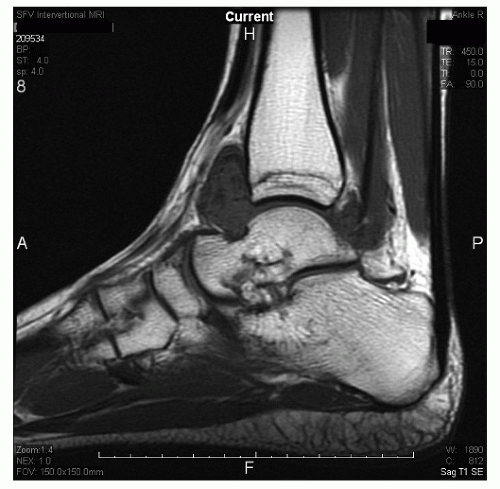 Figure 13.1.19 Sagittal T1-weighted MRI of the ankle showing a nodular soft-tissue mass in the anterior and posterior gutters of ankle. This MRI is consistent with PVNS. |
TREATMENT
Indications and Contraindications
Surgery in RA is based on correct timing, with careful assessment of the region and estimation of the patient’s general condition. In the ankle, chondromalacia and synovitis may be seen, depending on the severity of the disease. In some situations, areas of articular cartilage necrosis on the tibial plafond or the talar dome may be the primary pathology. If the conservative treatment fails, ankle arthroscopy should be considered after consultation with a rheumatologist. The main indications for surgery are pain, swelling, and locking/catching sensations. Arthroscopic synovectomy should be reserved for early joint involvement, as extensive degenerative changes will preclude a good result. Synovectomy may be performed using 2.9-, 3.5-, or 4.5-mm full-radius shaver blades. As always, careful attention should be paid to the neurovascular structures adjacent to the capsule, and use of distraction is helpful in performing a complete synovectomy. Although some investigators have questioned the benefit of synovectomy, in general, the results are improved if minimal cartilage involvement is seen. Thus, if on preoperative X-ray films, significant joint disruption has occurred, synovectomy should be avoided. Even under the best circumstances, debridement and synovectomy slow down but do not prevent articular destruction, and they provide only temporary relief (Fig. 13.1.20).
In PVNS, arthroscopy is helpful to confirm the diagnosis when synovitis, papillary formation, and hemosiderin deposits are seen. In addition, brownish-red or yellow components may be visible on the surface of the lesion. As in RA, treatment includes total synovectomy aided by a distractor. With the localized form of PVNS, arthroscopic excision of the lesion is usually curative. However, with the generalized form, synovectomy may not give lasting results, as recurrences are more common (Fig. 13.1.21).
Arthroscopic treatment of synovial chondromatosis involves loose body removal in the earlier stages, and debridement and loose body removal without synovectomy in the late stage. With open surgery, approximately 5% of the problems recur, but no series of arthroscopic treatment has been reported. Even with recurrence, arthroscopy is recommended for repeat surgery.
In chronic repetitive hemarthrosis secondary to hemophilia, arthroscopic synovectomy may be helpful. Along with proper medical supervision for administration of deficient clotting factors, arthroscopic synovectomy may decrease the number and severity of future bleeding episodes.
Postoperative Management
Postoperatively, a compression dressing and a posterior splint should be applied for 7 to 14 days to allow swelling and inflammation to subside.
Early motion should be initiated as soon as soft-tissue swelling has abated and pain is controlled.
OSTEOCHONDRAL LESIONS OF THE TALUS
OLT include many pathologic entities, such as osteochondritis dissecans, chondral and osteochondral loose bodies, osteophytes, chondral and osteochondral fractures of the tibia and talus, cystic lesions of the talus, fracture defects,
and arthritis. Controversy persists regarding the etiology, treatment, and prognosis of osteochondral and chondral lesions of the ankle.
and arthritis. Controversy persists regarding the etiology, treatment, and prognosis of osteochondral and chondral lesions of the ankle.
Related posts:

Stay updated, free articles. Join our Telegram channel

Full access? Get Clinical Tree


