How to Palpate
This chapter explains the science and art of palpation. In other words, it explains how to palpate. After an introduction to palpation, 20 guidelines of muscle palpation are discussed. The two most basic guidelines described as the science of muscle palpation are (1) know the attachments and (2) know the actions of the target muscle being palpated. The additional 18 guidelines describe how to begin and perfect the art of muscle palpation. In all, these guidelines can help increase palpatory literacy of the muscles of the body. Before beginning the muscle palpation protocols presented in Chapters 6 through 11, reading this chapter in its entirety is recommended.
Video segments showing how to palpate individual muscles are located on Evolve at http://evolve.elsevier.com/muscolino/knowthebody.
WHAT IS PALPATION?
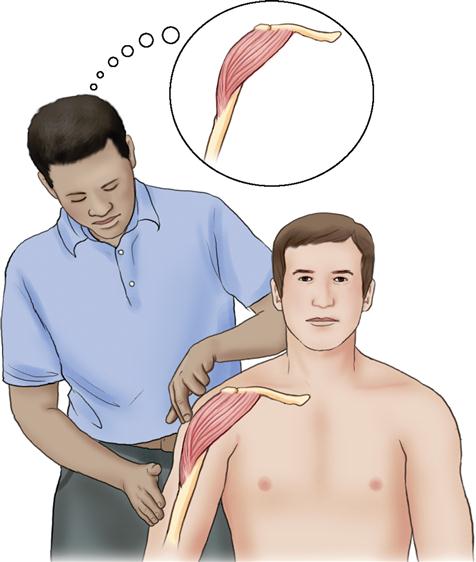
Palpation may be defined in many ways. The word palpation, itself, derives from the Latin palpatio, which means “to touch.” However, defining palpation as simply touching is too simplistic because more is involved. Inherent in the term palpation is not just touching but also the act of sensing or perceiving what is being touched. In this context, palpation involves more than just the fingers and hands. Palpation also involves the mind. Successful palpation requires us to feel with our brains, as well as with our fingers. When palpating, the therapist should be focused with a mindful intent; in other words, the therapist must be in his or her hands. All of the therapist’s correlated knowledge of anatomy must be integrated into the sensations that the therapist’s fingers are picking up from the client’s body and sending to his or her brain. The therapist’s mind must be open to the sensations that are coming in from the client, yet, at the same time, interpret these sensations with an informed mind (Figure 4-1). Incorporating mindful intent into examination and treatment sessions creates mindful touch.
OBJECTIVES OF PALPATION: LOCATION AND ASSESSMENT
There are two main objectives when palpating. Objective 1 is locating the target structure. Objective 2 is assessing the target structure.
The first objective, and indeed perhaps the major objective of the novice therapist, is to locate the target structure being palpated. This feat is not easy to achieve. It is one thing to simply touch the tissues of the client. It is an entirely different matter to be able to touch the tissues and discern the target structure from all the adjacent tissues. This ability requires the therapist to locate all borders of the structure—superiorly, inferiorly, medially, laterally, and even superficially and deep. If the structure is immediately superficial to the skin, then this feat may not be very difficult. Indeed, the olecranon process of the ulna or a well-developed deltoid muscle may be visually obvious and located without even touching the client’s body. However, if the target structure is deeper in the client’s body, then locating the structure may present a great challenge.
As basic as palpation for the purpose of determining location may seem, it is a supremely important first objective because it follows that if a structure cannot be accurately located and discerned from adjacent tissues, then it cannot be accurately assessed. Once the target structure is located, then the process of assessment can begin. Assessment requires the interpretation of the sensations that the palpating fingers pick up from the target structure. It involves becoming aware of the qualities of the target structure—its size, shape, and other characteristics. Is it soft? Is it swollen? Is it tense or hard? All of these factors must be considered when assessing the health of the target structure.
It is worthy of note that as high-tech diagnostic and assessment equipment continues to be developed in Western medicine, palpating hands remain the primary assessment tool of a manual therapist. Indeed, for a manual therapist, palpation—the act of gathering information through touch—lies at the very heart of assessment. Armed with both an accurate location and an accurate assessment of the health of the target structure through careful palpation, the therapist can develop an effective treatment plan that can be confidently carried out.
WHEN DO WE PALPATE?
Always. Whenever we are contacting the client, we should be palpating. This is true not only during the assessment phase of the session but also during the treatment phase. Too many therapists view palpation and treatment as separate entities that are compartmentalized within a session. A therapist often spends the first part of the session palpating and gathering sensory input for the sake of assessment and evaluation. Using the information gathered during this palpation assessment stage, a treatment plan is determined and the therapist then spends the rest of the session implementing the treatment plan by outputting pressure into the client’s tissues. Rigidly seen in this manner, palpation and treatment might each be viewed as a one-way street: palpation is sensory information in from the client, and treatment is motor pressure out to the client. The problem with this view is that we can also glean valuable assessment information while we are treating.
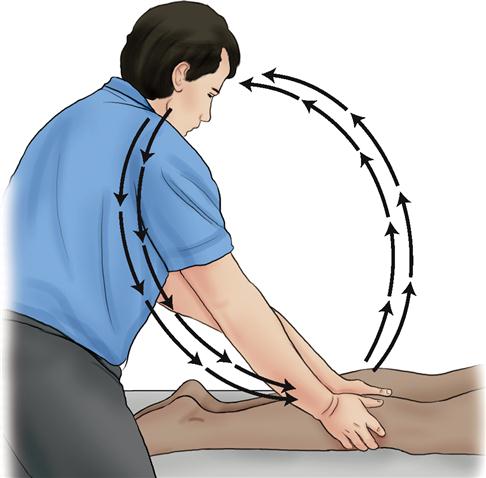
Treatment should be a two-way street that involves not simply motor pressure out to the tissues of the client but also continued sensory information in from the tissues of the client’s body (Figure 4-2). While we are exerting pressure on the client’s tissue, we are also sensing the quality of the tissue and its response to our pressure. This new information might guide us to alter or fine-tune our treatment for the client. Thus while we work, we continue to assess, gathering information that guides the pace, depth, or direction of the next strokes. Ideally, no stroke should be carried out in a cookbook manner, performed as if on autopilot. Treatment is a dynamic process. How the middle and end of each stroke are performed should be determined from the response of the client to that stroke as we perform it. This is the essence of mindful touch, having a fluid interplay between assessment and treatment; assessment informs treatment and treatment informs assessment, creating optimal therapeutic care for the client.
HOW TO LEARN PALPATION
A long-standing exercise to learn palpation is to take a hair and place it under a page of a textbook without seeing where you placed it. With your eyes closed, palpate for the hair until you find it and can trace its shape under the page. Once found, now replace the hair, this time under two pages, and palpate to locate and trace it. Continue to increase the number of pages placed over the hair until you cannot find it. If this exercise is repeated, the number of pages under which you can locate and trace the hair will gradually increase, and your sensitivity will improve.
Even more important than performing palpation exercises with textbooks, applying palpation directly to the client is imperative. When your hands are on your fellow students in school or on your clients if you are in professional practice, constantly try to feel for the structures about which you have learned in your anatomy, physiology, and kinesiology classes. As your hands are moving on the client’s skin, close your eyes so that you block out extraneous sensory stimuli and try to picture all the subcutaneous structures over which your hands are passing. The better you can picture an underlying structure, the better you will be able to feel it with your palpating hands and with your mind. Once felt, you can focus on locating its precise location and assessing its tissue quality.
Given that the foundation of all manual skills rests on our palpatory ability to read the clues and signs that a client’s body offers, the better we hone this skill, the greater palpatory literacy we gain. Perfecting our palpatory literacy is a work in progress—an endless journey. The more we polish and perfect this skill, the greater our therapeutic potential becomes, bringing greater benefit to our clients. However, written chapters can only provide guidelines and a framework for how to palpate. Ultimately, palpation is a kinesthetic skill and, as such, can only be learned by kinesthetic means. In other words, “palpation cannot be learned by reading or listening; it can only be learned by palpation.”*
PALPATION GUIDELINES
The following 20 guidelines are provided for successful muscle palpation. The first two guidelines make up the science of muscle palpation. The remaining guidelines begin and perfect the art of muscle palpation.
The Science of Muscle Palpation
Guideline 1: Know the Attachments of the Target Muscle
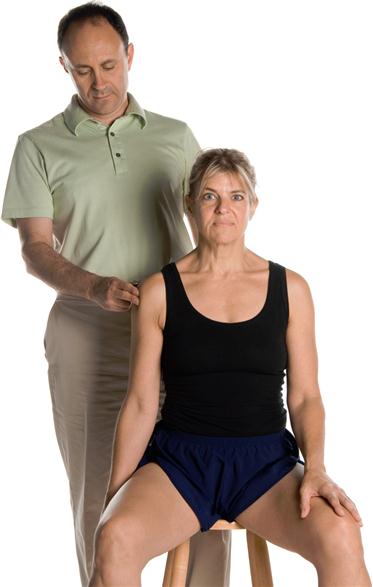
When a target muscle is superficial, it is usually not difficult to palpate. If we know where it is located, we can simply place our hands there and feel for it. Unless a great deal of subcutaneous fat is in that region of the body, apart from the client’s skin, we will be directly on the muscle. Therefore the first step of muscle palpation is to know the attachments of the target muscle. For example, if we know that the deltoid is attached to the lateral clavicle, acromion process, spine of the scapula, and deltoid tuberosity of the humerus, then we need simply to place our palpating hand there to feel it (Figure 4-3).
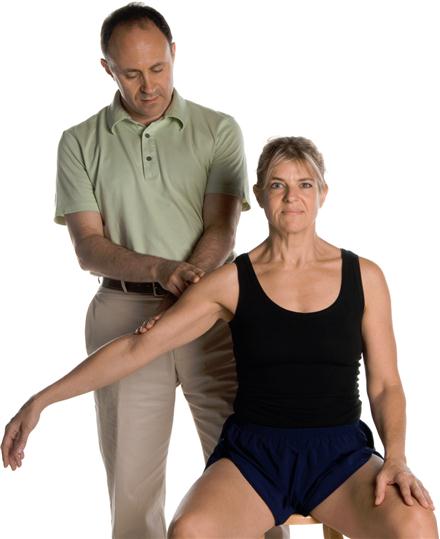
Guideline 2: Know the Actions of the Target Muscle
Sometimes, even if a target muscle is superficial, it can be difficult to discern the borders of the muscle. If the target muscle is deep to another muscle, it can be that much harder to palpate and discern from more superficial and other nearby muscles. To better discern the target muscle from all adjacent musculature and other soft tissues, asking the client to contract the target muscle by performing one or more of its actions is helpful. If the target muscle contracts, it will become palpably harder. Assuming that all the adjacent muscles stay relaxed and therefore palpably soft, the difference in tissue texture between the hard target muscle and the soft adjacent muscles will be clear. This difference will allow an accurate determination of the location of the target muscle. Therefore the second step of muscle palpation is to know the actions of the target muscle (Figure 4-4).
Guidelines 1 and 2 of muscle palpation involve knowing the “science” of the target muscle; in other words, knowing the attachments and actions of the muscle that were learned when the muscles of the body were first learned. Armed with this knowledge, the majority of muscle palpations can be reasoned out instead of memorized. Using the attachments and actions to palpate a target muscle can be thought of as the science of muscle palpation.
Beginning the Art of Muscle Palpation
Guideline 3: Choose the Best Action of the Target Muscle to Make it Contract
Applying knowledge of the attachments and actions of a target muscle to palpate it is a solid foundation for palpatory literacy. However, effective palpation requires not only that the target muscle contracts, but it also requires that an isolated contraction of the target muscle occurs. This means that the target muscle needs to be the only muscle that contracts, and all muscles near the target muscle must remain relaxed. Unfortunately, because adjacent muscles often share the same joint action with the target muscle, simply placing our hands on the location of the target muscle and then choosing any one of the target muscle’s actions to contract it is usually not enough. If the action chosen is shared with an adjacent muscle, then the adjacent muscle will also contract, making it very difficult to discern the target muscle from it.
For this reason, knowing which joint action to ask the client to perform requires the therapist to be creative and to think critically. This knowledge is where the art of muscle palpation begins. It requires knowledge of not only of the actions of the target muscle, but also the actions of all adjacent muscles. With this knowledge, the client can be asked to perform the best joint action for the palpation of the target muscle.
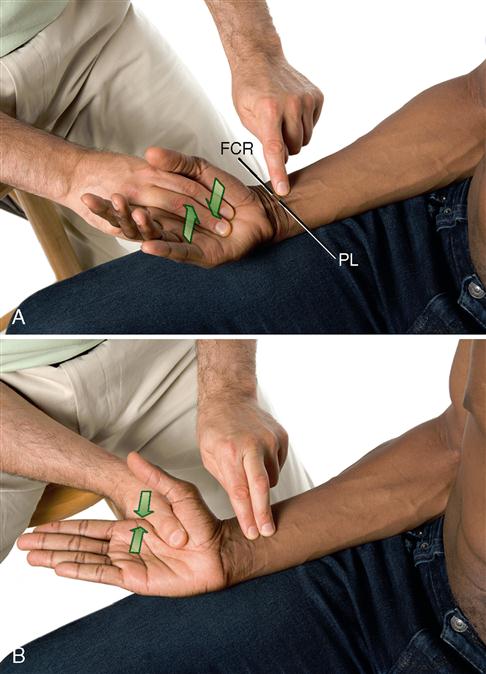
For example, if the flexor carpi radialis of the wrist flexor group is the target muscle, then asking the client to flex the hand at the wrist joint will engage not only the flexor carpi radialis but also the other two wrist flexor group muscles—the palmaris longus and flexor carpi ulnaris. In this case, to palpate and discern the flexor carpi radialis from the adjacent palmaris longus and flexor carpi ulnaris, the client should be asked to perform radial deviation of the hand at the wrist joint instead of flexion of the hand at the wrist joint. This action will isolate the contraction to the flexor carpi radialis. It becomes palpably harder than the relaxed and palpably softer palmaris longus and flexor carpi ulnaris muscles, which facilitate palpating and locating the flexor carpi radialis (Figure 4-5).

Stay updated, free articles. Join our Telegram channel

Full access? Get Clinical Tree


