Upper Limb Orthotics
Heikki Uustal
This chapter will enlighten and educate the practicing clinician on the prescription, fabrication, and use of upper limb orthoses. Historically, upper limb orthotic prescription has been complicated by a lack of universal nomenclature, and a variety of methods used to obtain orthoses (e.g., custom-made by an occupational therapist or a certified orthotist, or simply ordered direct from a catalog and fitted to a patient by any medical professional). This chapter will help clarify the common uses and designs of upper limb orthoses, and promote the use of universal terminology for the prescription of these devices.
DEFINITIONS AND NOMENCLATURE
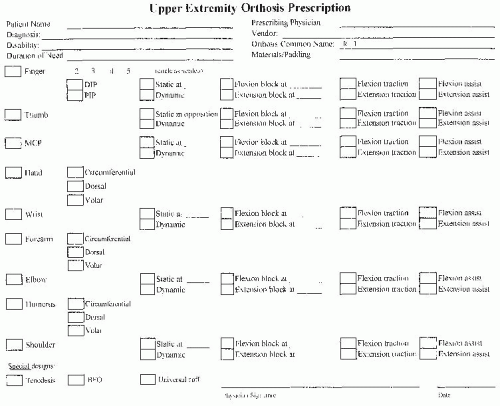
The term orthosis refers to a device that is applied externally to the body to support or improve the function of that body segment. Over the past decade, there has been a strong effort to name all orthoses by the joints they cross, and then specifying any design features related to those joints. Unfortunately, over the past 50 years, upper limb orthoses have been named after the designer or the facility at which they were developed. Better universal terminology would simply include the five common joints of the upper limb including finger, hand, wrist, elbow, and shoulder. The options or control features at each joint could simply be described in a fashion similar to that currently used in lower limb orthotics. The four common options for a joint include fixing the joint in one position, flexion/extension block, flexion/extension traction, and flexion/extension assist. The term “block” refers to a limitation in the range of motion of the joint created by the orthosis. The term “traction” refers to an external force applied across a joint for the purpose of stretching soft tissues (e.g., contracture). The term “assist” refers to an external force applied across a joint to substitute for weak muscles. This is certainly easy to understand as it relates to finger, metacarpophalangeal (MCP) joint, and elbow where we primarily have a hinged joint design. Additional design features will need to describe thumb positioning due to its unique function in opposing the other fingers for both gross grasp and fine motor skills. These design features have been previously described as an opponens bar (for palmar abduction) and C-bar (to maintain first web space). The wrist also requires special attention to address adduction and abduction positioning, or pronation and supination control. The shoulder is a very flexible joint allowing mobility in multiple planes, and potentially leading to challenging nomenclature for positioning. Fortunately, the vast majority of upper limb orthoses incorporating the shoulder are designed to fix the shoulder in a predetermined position following surgery or trauma. There are upper limb orthoses which stabilize a bony segment following fracture or surgery, but do not cross any joint. These orthoses can be named by the segment involved. All the features described here can be incorporated into a prescription template as shown in Figure 75-1.
All upper limb orthoses can be classified into one of three categories: static, dynamic, or hybrid. Static orthoses have no movable joints incorporated into the design. However, a static orthosis may allow active joint motion in one direction, but block motion in another direction (static with block). A static orthosis may also be changed or adjusted to alter the motion allowed or alter the pressure across a joint for stretching purposes (progressive static).
Dynamic orthoses have movable joints that can limit motion (block), increase motion through traction, or substitute for weak muscles using supplemental force (assist).
Hybrid orthoses will incorporate features of both static and dynamic orthoses into one device. This type of orthosis will cross multiple joints with the intention of limiting or stopping motion at some joints, but allowing or augmenting motion at other joints.
Therefore, a proper prescription for an upper limb orthotic device should include the simple definition of the basic platform by the joints or segments that are involved, followed by special design features controlling each of those joints. The prescription should also include materials for each of these components and any special padding indicated. As with any good orthotic prescription, the diagnosis, disability, prognosis, and duration of need should be indicated on the prescription. There should always be communication between the prescribing physician and the professional who fabricates or fits the upper extremity orthotic device to ensure clear understanding of the goals of the device.
UPPER LIMB ORTHOTIC GOALS
The primary purpose of all upper limb orthoses, and the rehabilitation program related to their prescription, is to regain or to preserve prehension of the hand. The upper limb is vastly different from the lower limb because of the unique and critical functioning of the hand. The lower limb simply maintains our
body weight as we move through space, and lower limb orthoses primarily prevent us from falling. Conversely, it is the role of the shoulder, elbow, and wrist to position the hand properly in space to provide the essential function of gross motor grasp and fine motor skills. It is the preservation or restoration of this hand function that we strive for with upper limb orthotics. With this in mind, there are five common goals for upper limb orthotics:
body weight as we move through space, and lower limb orthoses primarily prevent us from falling. Conversely, it is the role of the shoulder, elbow, and wrist to position the hand properly in space to provide the essential function of gross motor grasp and fine motor skills. It is the preservation or restoration of this hand function that we strive for with upper limb orthotics. With this in mind, there are five common goals for upper limb orthotics:
Substitute for weak or absent muscles
Protect damaged or diseased segments by limiting load or motion
Prevention of deformity
Correction of contracture
Attachment of other assistive devices
The first goal is a very common indication for upper limb orthotics. In this case, we substitute for weak or absent muscles at the wrist, elbow, or shoulder that fail to properly position the hand, or we substitute for weak musculature within the hand itself that fails to provide proper prehension. Common clinical examples would include cervical spinal injury, brachial plexus injury, or peripheral nerve injury to the median, ulnar, or radial nerves.
The second goal is to protect damaged or diseased segments such as those commonly seen in cases of surgical repairs, trauma, rheumatoid arthritis, etc. With trauma or surgical repair, the orthosis is designed to control loading across damaged bony segments or sprained/strained soft tissues, to promote proper healing. This goal is commonly achieved through a series of progressive static or dynamic orthoses, each allowing increasing loads or movements across a joint. In the case of rheumatoid arthritis and other progressive diseases, such as scleroderma, loads or motions are controlled with the goal of slowing the progression or natural course of the disease. In these conditions, orthoses are also used as an adjunct in pain control when inflamed joints must be temporarily immobilized and then slowly progressed over time.
The third goal of upper extremity orthoses is the prevention of deformity. There are many clinical situations of upper and lower motor neuron disease or injury (brain injury, stroke, spinal cord injury, brachial plexus injury, peripheral nerve injury) where proper positioning of the upper extremity is critical to prevent contracture or deformity. In these cases, there is no actual disease or injury to the segment included in the orthosis, but there has been proximal neurological injury creating the risk of deformity or contracture.
The fourth goal of upper limb orthoses is the correction of contracture, which may have occurred as a result of disease or immobilization. Very commonly, clinicians are forced to immobilize upper limb segments or joints following a fracture or other significant injury to promote soft-tissue and bony healing. Subsequently, normal range of motion at these joints must be regained through progressive stretching orthoses. This can be achieved through a series of progressive static or dynamic orthoses that are modified on a regular basis. The aggressiveness of the orthotic treatment program is determined by the degree and duration of contracture, and appropriate identification of the soft tissue involved.
The fifth goal of upper limb orthoses is to provide a base for attachment of other assistive devices. The simplest example of
this would be a universal cuff, which wraps around the hand to provide positioning of a spoon, fork, or other eating utensils. Universal cuffs have also been commonly used for writing or keyboard devices or other grooming devices. In contrast, the clinician should recognize that the balanced forearm orthosis (BFO) is simply a wheelchair-mounted accessory, which then attaches to a forearm trough. The BFO provides enormous assistance to the patient with spinal cord injury to carry out activities of daily living (ADLs), such as feeding, grooming, and even access to household technologies (light switch, telephone, television remote control).
this would be a universal cuff, which wraps around the hand to provide positioning of a spoon, fork, or other eating utensils. Universal cuffs have also been commonly used for writing or keyboard devices or other grooming devices. In contrast, the clinician should recognize that the balanced forearm orthosis (BFO) is simply a wheelchair-mounted accessory, which then attaches to a forearm trough. The BFO provides enormous assistance to the patient with spinal cord injury to carry out activities of daily living (ADLs), such as feeding, grooming, and even access to household technologies (light switch, telephone, television remote control).
BIOMECHANICAL PRINCIPLES
There are five critical concepts that must be understood to appreciate the proper design and fabrication of upper limb orthoses. Failure to understand and integrate these principles into the upper limb orthosis may produce less than optimum functional outcome or even injury to the patient. The five principles include:
Three-point control concept
Tissue tolerance to compression and shear forces
The biomechanics of levers and forces
Selection of materials
Static versus dynamic control
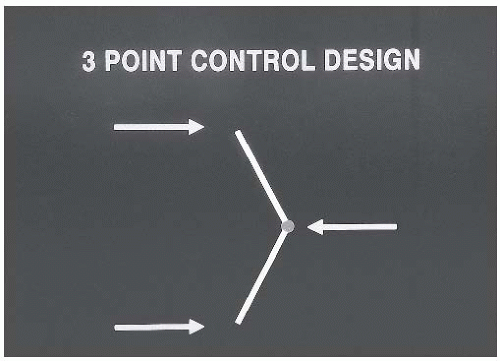
The three-point control concept is the basis of nearly all upper and lower limb orthotic designs (Fig. 75-2). Generally, a strong force is applied at a joint and a counterforce applied proximal and distal to that joint. The location of the force and counterforce may be clearly identified as a specific loop or bar in the orthotic design. However, in many instances the force and counterforces may be obscurely hidden into the design of the orthotic device. The precise point of application and the magnitude of the force and counterforce are critical to achieve the goal of controlling that joint.
 FIGURE 75-2. Three-point control concept. A strong force is applied at a joint to control motion, and a counterforce is applied proximal and distal to the joint. |
The tissue tolerance to both compressive and shear forces must be understood if the orthosis is to be designed and fabricated safely. There are more than 30 pressure-sensitive bony prominences in the wrist, hand, and fingers alone. Avoiding prolonged, excessive pressure over these bony prominences will preserve skin integrity and patient comfort. Pressure duration curves adopted from other rehabilitation fields (such as seating systems) have indicated that higher pressures of 100 to 300 mm Hg are tolerated for only 2 to 4 hours continuously, whereas lower pressures of 20 to 50 mm Hg are tolerated for up to 12 hours a day continuously. If high pressures are anticipated at a joint or bony prominence, then a proper wearing schedule should clearly delineate the duration of time and the frequency of use throughout the day or night. Although a longer stretching time will reduce a contracture more rapidly, the risk of skin breakdown increases steadily with wearing duration. The clinician should also remember that distribution of pressure over a larger surface area is better tolerated than a small focused pressure. It is also important to remember the natural position of the transverse and longitudinal arches of the hand, especially in static positioning orthoses.
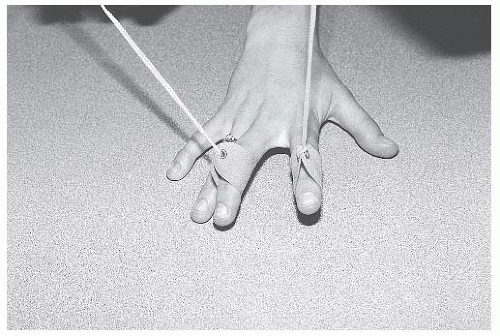
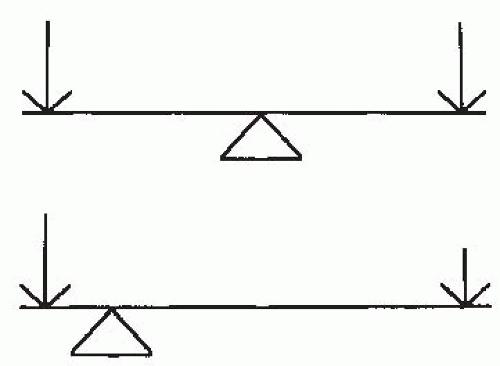
The biomechanical forces applied in upper limb orthotics are most analogous to a class one lever, commonly known as a seesaw. Most individuals recognize that a seesaw has a force applied at both ends with a central fulcrum. Rehabilitation specialists should also understand that a relationship exists between the magnitude of the pressure applied (force) and the distance to the fulcrum (lever). In essence, the farther from the fulcrum or from the joint, the less pressure needed to generate a fixed force across the joint. If tissue tolerance is a concern due to the required magnitude of pressure, one can simply move the point of pressure application farther from the joint to decrease the magnitude of the applied pressure. In other words, by increasing the lever distance, less pressure can generate the same force across the joint (Fig. 75-3). The angle of pull of force is also very important to produce effective control of the identified joint, and to prevent damage to collateral ligaments. If the angle of pull is not perpendicular to the joint, the orthosis may overstretch collateral ligaments and create mediolateral instability at the joint. As an example, stretching a flexion contracture across the MCP joint or interphalangeal (IP) joint requires a direction of pull perpendicular to the finger. If the pull is at an
angle to the finger, then less effective stretching of the flexor tendon is achieved and unwanted stretching of collateral ligaments may occur (Fig. 75-4). The clinician must also understand that forces will impact the design of the device and help determine the materials that will be used to provide structural stability to the orthosis. For example, a long outrigger attached to a small platform on the dorsum of the hand may provide an inadequate base of support and lead to bending or deformity of the outrigger or the orthosis. A more stable outrigger and longer base of support will provide good biomechanical stability to the orthosis and provide the adequate stretch necessary.
angle to the finger, then less effective stretching of the flexor tendon is achieved and unwanted stretching of collateral ligaments may occur (Fig. 75-4). The clinician must also understand that forces will impact the design of the device and help determine the materials that will be used to provide structural stability to the orthosis. For example, a long outrigger attached to a small platform on the dorsum of the hand may provide an inadequate base of support and lead to bending or deformity of the outrigger or the orthosis. A more stable outrigger and longer base of support will provide good biomechanical stability to the orthosis and provide the adequate stretch necessary.
 FIGURE 75-4. Traction angle. The angle of pull is correct on the index finger, but incorrect on the middle finger, because it is not perpendicular to the MCP joint. |
The selection of materials for upper limb orthoses depends on the flexibility, strength, and durability of the material necessary to achieve the proper outcome. Most upper limb orthoses are fabricated of thermoplastics for the structural design. Low-temperature thermoplastics are commonly used because they can be easily shaped or formed to the patient’s limb without the need for high-temperature ovens. They can also be easily modified by a common heat gun. However, these devices may also deform under exposure to common heat sources such as the sun or radiators. High-temperature thermoplastics may be indicated for certain longer-term or high-stress devices. Various metals are still used for parts of upper limb orthoses where a lightweight, strong, and compact design is indicated. This includes aluminum frames, joints, and spring wire materials. Ultimately, carbon fiber materials can be used for very strong and very light designs, but manufacturing these orthoses requires specialized equipment and training. Foam materials are commonly used as padding to improve tissue tolerance in high-pressure areas.
Finally, the overall biomechanics of any upper limb orthosis can be defined as static, dynamic, or hybrid. A traditional static orthosis will simply stabilize or fix one or multiple joints. Generally, a static positioning splint for a flaccid limb will create very low tissue pressures and very low forces at joints. This is tolerated well and can be worn nearly continuously without concern of skin breakdown. However, static positioning splints for an upper limb with an increased tone will certainly generate much higher tissue pressures and the design should incorporate additional padding in these situations. A wearing schedule is also much more important when increased tone is encountered. A dynamic orthosis allows or enhances movement across a joint. Dynamic orthoses generally have fairly low tissue pressures unless external forces are applied such as stretching of a contracture, or in the case of an abnormal increased tone from upper motor neuron injury. In cases of a dynamic orthosis with an external force applied, the biomechanical stresses within the orthosis and the tissue compression will be high.
ANATOMICAL PRINCIPLES
Proper upper limb positioning requires an understanding of multiple anatomical issues, particularly when a joint is to be immobilized. The wrist should be immobilized in slight extension and neutral pronation/supination. This position facilitates hand prehension activities to reach the face and midline trunk for ADLs.
The IP joints of the fingers should be immobilized in extension, but the MCP joints should be immobilized in flexion to maintain the length of the collateral ligaments. The IP and MCP joints should be mobilized as soon as possible to prevent contracture and adhesions of the long flexor and extensor tendons.
Stay updated, free articles. Join our Telegram channel

Full access? Get Clinical Tree


