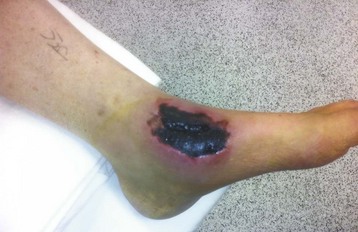
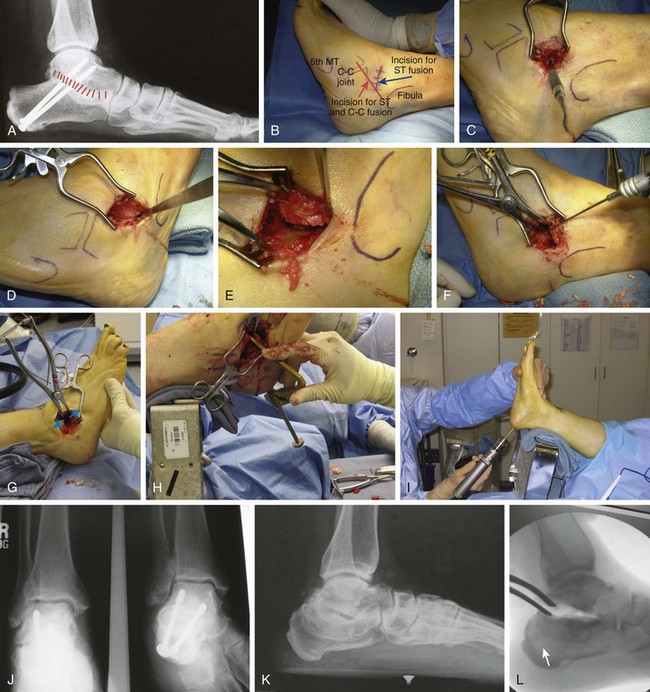
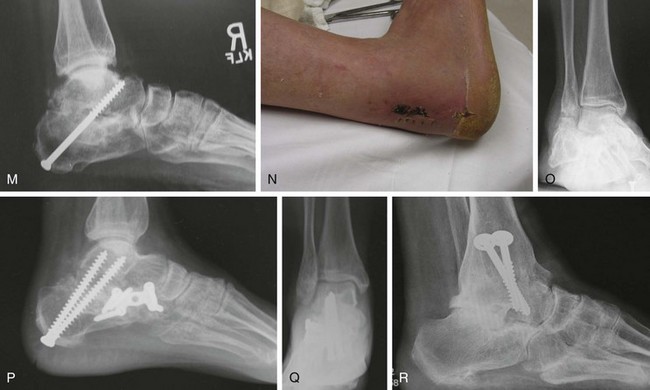
Chapter 20 A skin slough around the foot and ankle can present a difficult management problem because of the lack of adequate subcutaneous tissue. The potential for a skin slough can be minimized by creating full-thickness skin flaps, making incisions of adequate length to minimize tension on the skin edges, using postoperative drainage when appropriate, and applying a firm compression dressing postoperatively. Placing a patient into a cast without adequate padding is not advisable. When a skin slough occurs, it is important to treat it vigorously with local debridement and application of wet-to-dry dressings to promote granulation tissue, followed by coverage with a split-thickness skin graft. Vacuum-assisted closure (wound-VAC) can be extremely useful to manage a wound slough. If the slough is too large, a plastic surgeon should be consulted (Fig. 20-1). 1. The patient is placed in the supine position with a support under the ipsilateral hip to facilitate exposure of the subtalar joint. 2. A thigh tourniquet is applied. 3. The skin incision begins at the tip of the fibula and is carried distally toward the base of the fourth metatarsal. When an isolated subtalar arthrodesis is carried out, the incision usually stops at about the level of the calcaneocuboid joint (Fig. 20-2B). 4. While deepening the incision, the surgeon should be cautious, because the anterior branch of the sural nerve may be crossing the operative site plantarly and the superficial peroneal nerve dorsally. 5. The incision passes along the dorsal aspect of the peroneal tendon sheath and distally along the floor of the sinus tarsi. 6. The extensor digitorum brevis muscle origin is detached and the muscle belly reflected distally, exposing the underlying sinus tarsi, subtalar joint, and calcaneocuboid joint (Fig. 20-2C). The fat pad is dissected out of the sinus tarsi and reflected dorsally. The only way to visualize the middle and anterior facets of the subtalar joint is to remove all the soft tissue from the sinus tarsi. Using a curet will facilitate that. 7. A small elevator is passed along the lateral side of the posterior facet of the subtalar joint. It is not necessary to strip the peroneal tendons off the lateral side of the calcaneus unless a lateral impingement from a previous calcaneal fracture requires decompressing. 8. A lamina spreader is inserted into the sinus tarsi to visualize the posterior facet of the subtalar joint (Fig. 20-2D and E). When looking across the sinus tarsi, the surgeon can see the middle facet of the subtalar joint. If the surgery is being carried out for severe arthrosis or a talocalcaneal coalition, it is often not possible to open the subtalar joint very far. Under these circumstances, a small curet is used to remove the cartilage from the posterior facet. A thin, wide elevator then can be inserted into the joint to pry it open, after which a lamina spreader is inserted. 9. Power osteotomes are ideal to start the preparation of the posterior facet. Articular cartilage can be removed in large strips and subcondral bone exposed. Regular sharp 10. For safety, a curet of appropriate size is used to remove the cartilage posterior and posteromedial and from the middle and anterior facets. This reduces the possibility of damaging the flexor hallucis longus tendon in the posterior aspect of the joint or the neurovascular bundle along the posteromedial aspect of the joint. When removing the articular cartilage from the middle facet, it is important not to inadvertently go too far distally and damage the cartilage on the plantar aspect of the head of the talus, which lies just in front of it. 11. Once all the articular cartilage has been removed, the lamina spreader is removed and the alignment of the subtalar joint observed. If no deformity is present, the surgeon may proceed with feathering or scaling the articular surfaces (Fig 20-2F). If a varus deformity needs to be corrected, bone is removed from the lateral aspect of the posterior facet to correct the deformity. It is unusual to remove more than 3 to 5 mm of bone when correcting a deformity, although occasionally more bone needs to be removed. 12. A valgus deformity is common in posterior tibial tendon dysfunction. It is seldom necessary to remove bone from the medial side of the joint because this is by and large a rotational deformity. There is peritalar subluxation with the navicular subluxing lateral and dorsal, while the calcaneus rotates lateral and posterior, creating a hindfoot valgus. This is corrected by placing a lamina spreader in the sinus tarsi between the lateral process of the talus and the anterior process of the calcaneus. Spreading this space open facilitates reduction around the peritalar joint. There should be caution not to overdistract because this will force the hindfoot in varus (Fig. 20-2G). 13. If a previous calcaneal fracture is present in which the lateral wall needs to be decompressed, the peroneal tendons are elevated from the lateral aspect of the calcaneus as far posteriorly and plantarward as possible. The impinging lateral wall is removed so that it is approximately in line with the lateral aspect of the talus. Sometimes, up to 7 to 10 mm of bone needs to be resected in severe cases. This bone could be morcelized and packed into the sinus tarsi. 14. The posterior and middle facets, along with the bone in the base of the sinus tarsi, are heavily scaled. The dense bone in the floor of the sinus tarsi is deeply scaled and is mobilized so that it can be packed into the tarsal canal after the internal fixation has been inserted. The bone along the lateral aspect of the calcaneus that forms the anterior process may be mobilized to within about 0.5 cm of the calcaneocuboid joint and used for bone graft. When a lateral decompression has been carried out, even more bone is available to the surgeon. Rarely is bone harvested from the iliac crest. 15. After the bone surfaces have been scaled, the subtalar joint is manipulated and placed into the desired position of 5 degrees of valgus. 16. If the calcaneus is severely collapsed, height can be restored with a bone block inserted from posterior (Fig. 20-2K-M). In this case, the incision runs along the Achilles tendon and does not curve around the plantar aspect of the foot to avoid wound problems (Fig. 20-2N). 17. The surgeon should be careful not to put too large a block in the subtalar joint. Also be careful not to force the hindfoot into varus. The larger side of the block should always go medial to create a valgus alignment. 18. The preferred method for stabilization is to place the screw from the heel across the subtalar joint and into the neck of the talus. Screw placement is carried out by placing an aiming guide with the sharp tine in the anterior aspect of the posterior facet of the subtalar joint (Fig. 20-2H).2 The other end of the guide is placed on the heel pad just above the weight-bearing area. This alignment permits the screw to pass through the anterior aspect of the posterior facet and into the neck of the talus, but the screw does not penetrate the sinus tarsi area. This placement provides maximum purchase in the talar neck from the screw. If a fully threaded screw is used, the calcaneus should be overdrilled to create a gliding hole. A guide pin is drilled into the calcaneus until it is visible in the posterior facet of the subtalar joint. If placement is satisfactory, the guide is removed; if not, another attempt is made to place the guide pin correctly (Fig. 20-2I). 19. The subtalar joint is placed into 5 degrees of valgus while also correcting any peritalar rotation/subluxation, and the guide pin is drilled into the talus until it just penetrates the dorsal aspect of the neck of the talus. The pin placement is confirmed by fluoroscopy. 20. With the pin properly placed, a 2- to 3-cm transverse incision is made over the entrance of the guide pin into the heel pad. This incision must be made wide enough to accommodate the screw(s) and, if used, the washer(s) to prevent compressing the skin and fat of the heel pad. The incision is carried directly to bone, and slight stripping is done on each side of the pin to accommodate the washer. A depth gauge is used to determine the length of the screw. 21. The guide pin is advanced through the talar neck, appears on the dorsal aspect of the ankle, and is secured with a clamp. This is important so that when the holes are drilled, the guide pin cannot come out, which can result in loss of alignment. If 7.0-mm cannulated screws are used, the initial hole is drilled with a 4.5-mm bit, just penetrating the neck of the talus. A 7.0-mm drill bit is used to overdrill only the calcaneus, creating the glide hole. The hole in the talar neck is tapped, and a fully threaded, 7.0-mm cannulated screw of appropriate length is inserted. By overdrilling the calcaneus, intrafragmentary compression at the arthrodesis site is achieved. Every screw system will have a smaller and larger drill to achieve the gliding and compression holes. With a fully threaded screw, the maximum number of threads is placed in the neck of the talus, maximizing the compression. In placing the screw, the surgeon should not have more than 2 to 3 mm of screw exposed on the neck of the talus. The position of the screw is verified with fluoroscopy. 22. If a second screw is placed, a parallel guide could be used to place the screw more lateral and posterior to the first. Fluoroscopic guidance is valuable to confirm placement and also to prevent violating the ankle joint with the drill or screw (Fig. 20-2J). 23. The guide pin is removed, and the small bone fragments that have been mobilized are packed into the tarsal canal and the sinus tarsi area. It is not necessary to fill up the sinus tarsi completely when carrying out an isolated subtalar joint fusion. If more bone is needed, it can be obtained from the calcaneus or medial malleolus by using a trephine. 24. The fat pad previously dissected from the sinus tarsi and retracted dorsally is placed back into the sinus tarsi area. The extensor digitorum brevis muscle is closed over the area, creating a cover for the arthrodesis site. 25. The subcutaneous tissue and skin are closed in a routine manner. 26. The patient is placed into a compression dressing incorporating two plaster splints. There is significant interest lately in doing the subtalar fusion arthroscopically. Several recent papers with further information on the topic are listed.5,8 The theoretic advantages of an arthroscopic fusion are a more cosmetic approach and fewer wound complications.1,7 In experienced hands, the results appear to be comparable to open fusions, but there are several pitfalls as well. There is a higher risk of nerve a vascular injury, and there is a very steep learning curve. There are few surgeons at present who are well enough versed in complex hindfoot arthroscopy to make this a viable mainstream alternative. That situation could theoretically change in future but is unlikely. There are ongoing issues in getting subtalar fusions to heal. The reported nonunion rate varies from 5% to 45%. In the largest study in the literature, by Myerson and coworkers, the union rate was 84% (154 of 184) overall, 86% (134 of 156) after primary arthrodesis, and 71% (20 of 28) after revision arthrodesis.4 Coughlin et al3 did a study comparing standard radiographs to computed tomography (CT) scan in evaluating subtalar fusions. The mean observed fusion of the posterior facet of the subtalar joint ranged from 41% at 6 weeks to 61% at 12 weeks and to 86% at 6 months on the radiographs; the mean fusion of the posterior facet on the CT scans ranged from 23% to 48% to 64% at the same time intervals. The agreement between the two methods was poor. The clinical results based on the American Orthopaedic Foot and Ankle Society (AOFAS) score, visual analog score (VAS), and Short Form-12 (SF-12) score were compared with the percentage of joints fused on the CT scans. Coughlin et al3 believe the progress of the fusion cannot be determined accurately from standard radiographs. CT scanning appears to be significantly more reliable. The concept of what constitutes an adequate fusion deserves more extensive study, but it appears that fusion of more than 40% of the surface is adequate. Mann et al6 showed that, functionally, the patients did well, although half observed problems walking on uneven ground and climbing steps and inclines. Seventy percent participated in recreational sports (e.g., walking for pleasure, biking, skiing, swimming), and 14% were able to play sports that required running and pivoting (e.g., basketball, racquet sports). This is a much higher level of activity compared with patients who have undergone a triple arthrodesis. The physical examination demonstrated that the alignment averaged 5.7 degrees of valgus, and the one patient with fusion in varus was dissatisfied. The range of motion demonstrated an average of 9.8 degrees of dorsiflexion compared with 14.2 degrees on the uninvolved side, for a 30% loss of motion, and plantar flexion averaged 47.2 degrees compared with 52.4 degrees, for a 9.2% loss of motion. This resulted in a 14% loss of sagittal plane motion. The transverse tarsal joint motion demonstrated 60% loss of abduction and adduction compared with the uninvolved side.6 Occasionally, in the patient with rheumatoid arthritis, severe subluxation occurs at the subtalar joint. It is imperative that the clinician recognizes this problem so that when a subtalar arthrodesis is carried out, the calcaneus is repositioned under the talus, restoring the normal weight-bearing alignment. Similar severe deformity is seen with a small subset of calcaneal fractures, where the tuberosity dislocates laterally and sits under the fibula. In chronic malunion/nonunion situations, the reduction could be difficult. If the surgeon fails to recognize this malalignment and places a bone block into the lateral side of the subtalar joint, wedging it open will not reposition the calcaneus into correct anatomic alignment (Fig. 20-2O-Q). Infrequently, a subtalar fusion is required after a previous ankle fusion. It is most common after a previous talus fracture, but it could also be due to excess stress after an ankle arthrodesis. In this situation, the author’s group carries out its standard type of fusion. The screw placement is a little simpler because there is no concern about penetrating the ankle joint with the screw (Fig. 20-2R). Two screws are routinely used. The subtalar joint takes longer to heal, and there is a higher nonunion rate.
Treatment of Hindfoot and Midfoot Arthritis
Surgical Principles
 A well-planned incision of adequate length should be made to avoid undue tension on the skin edges.
 An attempt should be made to create broad, congruent cancellous surfaces that can be placed into apposition to permit an arthrodesis to occur.
 The arthrodesis site should be stabilized with rigid internal fixation. This sometimes depends on the surgeon’s ingenuity in creating a stable construct, particularly if poor bone stock is present. There are multiple fixation options available, including screws, staples, and locking and nonlocking plates. The most appropriate option for a specific situation should be used.
 When performing a fusion, the hindfoot must be aligned to the lower extremity and the forefoot to the hindfoot to create a plantigrade foot.
Complications
Specific Arthrodeses
Subtalar Arthrodesis (Fig. 20-2A and Video Clips 26 and 27
![]() )
)
Surgical Technique
 – or
– or  -inch osteotomes could do the same.
Internal Fixation
Closure
Arthroscopic Subtalar Fusion
Author’s Experience
Special Considerations
![]()
Stay updated, free articles. Join our Telegram channel

Full access? Get Clinical Tree


