Transtibial Prosthetics
David Knapp
Learning Objectives
On completion of this chapter, the reader will be able to do the following:
1. Describe the principles underlying current transtibial socket design.
2. Discuss the pros and cons of the various options for prosthetic suspension.
4. Identify key determinants of appropriate transtibial prosthetic alignment.
6. Suggest appropriate strategies to address transtibial gait deviations.
Prosthetic Evaluation
When evaluating a candidate for transtibial prosthesis, a comprehensive physical examination that includes a detailed history interview is essential. The typical physical examination includes: inspection, palpation, evaluation of muscle performance—manual muscle testing (MMT); and active and passive range of motion (ROM) testing—sensory testing, and skin integrity assessment. The interview assesses the individual’s cognitive level, age, health history, vocation, avocation, and home living status. This is also an ideal time to discuss rehabilitation goals with the individual and the rest of the clinical team. Setting realistic goals that are challenging but offer opportunities for incremental victories can go a long way toward reaching a successful outcome. Each member of the clinical team—therapist, physician, person with amputation, and prosthetist—has information and input that is useful in the rehabilitation process. The best outcome will be the result of a collaborative endeavor involving all the team members. There are no hard-and-fast rules that determine the rehabilitation potential; the decision to move ahead with prosthetic fitting is made on an individual basis.
When determining prosthetic candidacy, the individual’s motivation and belief that they are capable of walking are determinant factors. The rehabilitation process will require both physical and mental effort, and sometimes involve working through pain and discomfort. When persons with amputation have the desire and drive to walk again, there is very little the team can do to dissuade them. Likewise, if the person does not believe that walking might be possible, efforts to enhance recovery may be in vain. Involving the person with recent amputation in an amputee support group, or requesting a peer visitor from a local prosthetist, can provide some inspiration and encouragement that therapists, family members, or prosthetist’s who have not experienced amputation simply cannot offer. Peer visitors are individuals of similar age, gender, and amputation level that have been through the rehabilitation process and have successfully reintegrated into the communities (work, leisure, social) that are important to them. Peer visitors are available to spend time with those with recent amputation and share their first-hand experiences. The Internet hosts a variety of organizations that provide support and information for persons new to amputation and prosthetic use, and is a good resource to find local groups that may be beneficial.
Because amputation is often the result of trauma or disease, there are often comorbidities that complicate the overall management of the person with amputation. There are a variety of options available to the prosthetist to provide a functional prosthesis, even when presented with a residual limb that is not ideal. Mild to moderate knee flexion contractures and weakness, for example, may be accommodated for by altering the alignment of the prosthesis. Skin issues, such as adherent scarring and eczema, can be addressed by selecting the appropriate interface material., Pressure on skin and soft tissue over prominent bones can be relieved by altering the socket shape. There are also prosthetic options for those with severe upper-limb dysfunction that will enable the individual to don and doff his or her prostheses independently. It is only with careful consideration of the person’s complete profile that the clinical team can recommend the components and design that will lead to the most optimal prosthetic outcomes.
This clinical analysis includes choosing the features that are most appropriate for the individual’s current status and their anticipated level of function. The most appropriate prosthesis is the prosthesis that suits the person’s individual requirements. One size does not fit all: the ideal prosthesis for one person may be completely useless to another.
Prosthetic design is often a compromise of weight versus function. Adding features that may seldom be used will increase the weight and maintenance requirements of the device. Increased weight leads to increased energy expenditure and premature fatigue.1 On the other hand, exclusion of features that the person will need on a regular basis may lead to excessive stresses on the limb, premature component wear or breakdown, and inefficient gait. The clinical team should agree on the indivdual’s functional goals so that the prosthesis can be designed to meet them. With the materials and fabrication techniques that are available to contemporary prosthetists, those using a prosthesis can walk farther, with greater a energy efficiency than ever before.
Generally speaking, persons who undergo transtibial amputations are likely to return to their previous level of function.2 Those with dysvascular disease, or those who have additional comorbidities because of injury or disease need special consideration when developing their rehabilitation goals and anticipated level of function. The Center for Medicare Services created a hierarchical system to classify the functional potential of persons with lower limb amputations. This system, referred to by “K-levels,” is summarized in Table 23-1.3 Note that each functional level uses the phrase “has the ability or potential” in the description. This highlights the fact that individuals cannot reach their full potential until their prosthesis is provided and rehabilitation has been successful. For certain benefits to be covered under Medicare, the individual must be certified by his or her prosthetist and physician with the appropriate K-level. This is to prevent prescription of prosthesis with costly components that person will not be able to manage or use effectively.
Table 23-1
Classification of Functional Potential of Patients with Lower-Limb Amputations
| K-Level | Medicare Functional Classification Level |
| K0 | The patient does not have the ability or potential to ambulate or transfer safely with or without assistance and a prosthesis does not enhance quality of life or mobility. |
| K1 | The patient has the ability or potential to use a prosthesis for transfers or ambulation on level surfaces at fixed cadence. Typical of the limited and unlimited household ambulator. |
| K2 | The patient has the ability or potential for ambulation with the ability to traverse low-level environmental barriers such as curbs, stairs, or uneven surfaces. Typical of the limited community ambulator. |
| K3 | The patient has the ability or potential for ambulation with variable cadence. Typical of the community ambulator who has the ability to traverse most environmental barriers and may have vocational, therapeutic, or exercise activity that demands prosthetic utilization beyond simple locomotion. |
| K4 | The patient has the ability or potential for prosthetic ambulation that exceeds basic ambulation skills, exhibiting high impact, stress, or energy levels. Typical of the prosthetic demands of the child, active adult, or athlete. |
From Centers for Medicare and Medicaid Services. Medicare Region C Durable Medical Equipment Prosthetic Orthotic Supplier (DMEPOS) Manual. Columbia, SC: Palmetto GBA, 2005.
Early Prosthetic Management
Goals for postoperative management of the transtibial amputee include (a) to maintain full ROM of the hip and knee, (b) to facilitate rapid healing of the suture line, (c) to maintain or improve cardiovascular and pulmonary conditioning, (d) to enhance static and dynamic balance; and (e) to faciltiate functional strength in the remaining musculature.4 Table 23-2 breaks the lifelong rehabilitation of the amputee down into nine distinct stages and summarizes the goals for each stage.
Table 23-2
Phases of Rehabilitation for Persons with Amputation
| Phases | Hallmarks |
| 1.Preoperative | Medical and body condition assessment, patient education, surgical-level discussion, functional expectations, phantom limb discussion |
| 2.Amputation surgery and wound dressing | Residual limb length determination, myoplastic closure, soft-tissue coverage, nerve handling, rigid dressing application, limb reconstruction |
| 3.Acute postsurgical | Residual limb shaping, shrinking, increasing muscle strength, restoring patient’s sense of control |
| 4.Preprosthetic | Wound healing, pain control, proximal body motion, emotional support, phantom limb discussion |
| 5.Prosthetic prescription and fabrication | Team consensus on prosthetic prescription |
| 6.Prosthetic training | Prosthetic management and training to increase wearing time and functional use |
| 7.Community integration | Resumption of family and community roles; regaining emotional equilibrium; developing healthy coping strategies, recreational activities |
| 8.Vocational rehabilitation | Assessment and training for vocational activities, assessment of further education needs or job modification |
| 9.Followup | Lifelong prosthetic, functional, and medical assessment; emotional support |
From Esquenazi A, DiGiacomo RD. Rehabilitation after amputation. J Am Podiatr Med Assoc. 2001;91(1):13-22.
One common complication of transtibial amputation surgery is a loss of full knee extension. Failure to promote full extension of the tibiofemoral joint can lead to delays in prosthetic fitting while ROM is restored. If the lack of knee extension remains, a permanent joint contracture can alter the prosthetic fitting process. The clinical team generally encourages rigid dressings that extend well above the knee and hold the knee in full extension. It has been shown that rigid removable dressings (RRDs) provide more favorable outcomes than elastic bandages when used to control postoperative edema and to provide protection to the surgical site.5 In some regions, persons with new amputation are fitted with immediate postoperative prostheses (IPOP) in the operating room or soon after surgery. The immediate postoperative prosthesis is intended to serve the same purpose as the RRD with the additional feature of allowing supported weight bearing for early mobility. Because of the gross changes to the limb that are anticipated in the first few days after amputation, the IPOP sockets are designed to allow some weight-bearing forces direct to the medial tibial flare and patellar tendon because these structures are far from the surgical site and are not likely to be impacted by post operative edema. It is important to note that weight bearing while in an IPOP should be at the level of toe touch partial weight bearing: Full weight bearing is discouraged as there is generally not enough area to distribute the full body weight in a manner that the skin will tolerate for extended periods of time. Full weight bearing through an IPOP carries risk of damage to the healing surgical construct, and subsequent delayed healing and prosthetic fitting. Assistive devices should be used to encourage partial weight bearing while allowing functional use of the remaining muscles.
The limb will change rapidly throughout the early rehabilitation process and the prosthetist and therapist should closely monitor the fit and alignment of the IPOP. Adding extra layers of socks to the residual limb will accommodate early changes in limb volume. Eventually this will become counterproductive and a replacement socket should be ordered. Immediate postoperative prostheses are fabricated with modular components that allow changes to be made easily.
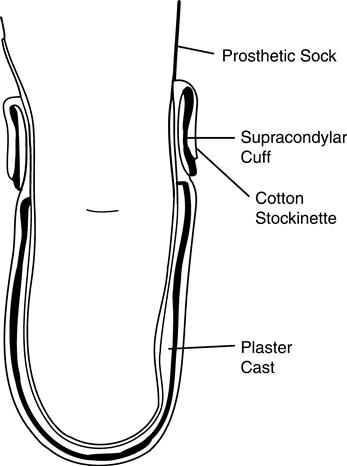
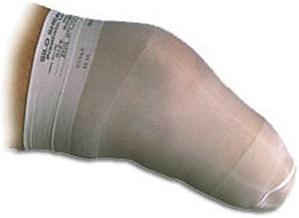
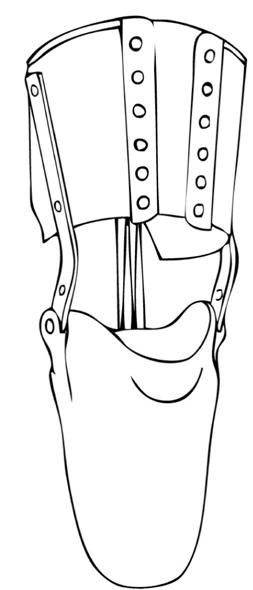
The surgeon may decide that an IPOP is not an option for the individual because of factors including excessive soft-tissue damage or delayed wound healing, a RRD should be utilized.6 One variant of the RRD is a custom-molded plaster socket with a prefabricated plastic collar that encapsulates the indivdual’s limb from the distal end up to approximately two-thirds of the thigh. There also are other variants, including a completely prefabricated plastic socket that is adjustable or a custom-molded plastic socket that is made from a digital scan of the limb.7 Regardless of the variation of RRD chosen, the goals are the same: the RRD (a) keeps the knee in full extension to prevent contracture, (b) protects the limb from exterior trauma, and (c) controls swelling through total contact. This removable device is worn over at least one layer of cotton sock and is held in place with Velcro straps (Figure 23-1). It is also fenestrated to allow airflow and release moisture. The device can be worn 23 hours a day and can be removed easily for dressing changes and bathing.
Prosthetic Prescription
A prosthetic prescription is a detailed description of all the features of the completed prosthesis: (a) socket design, (b) skin-socket interface, (c) suspension strategy, and (d) additional modular components. For transtibial prostheses, the components are limited to feet, shock absorbers, torque absorbers, and dynamic pylons.
The socket is the interface between the residual limb and the prosthesis; all the forces from the ground during gait are transferred to the limb through the socket. All the forces from the limb needed to control the motion of the prosthesis are transferred to the prosthesis through the socket. Much care and time should be spent on socket design and fitting, as a less than ideal fit can quickly lead to pain, injury, and lack of function. The socket design, interface, and suspension need to be considered together as their functions are often interrelated and interdependent upon one another. A soft liner, for example, can function both as an interface and as the suspension for the prosthesis. In the same way, a socket that is designed with a different interface may contraindicate certain suspension options. Forethought regarding how those three design elements intermingle will increase the probability of producing a comfortable and functional prosthesis for the indivudal.
Socket Designs
Early transtibial prostheses were fashioned by hollowing out a block of wood and attaching metal single-axis knee joints and a leather thigh corset. The sockets were referred to as “plug-fit” sockets because they were open-ended and the limb fit into the socket like a plug fits in a drain. The attached thigh corsets took advantage of the conical shape of the thigh to transfer weight proximally and transmit mediolateral forces to and from the limb. Although many persons with amputation were quite functional with this system, the lack of contact on the distal end of the residual limb often led to painful edema in that area. Additionally, the joints and corset added bulk and weight to the prosthesis and unnecessarily restricted knee motion.8
Patellar Tendon-Bearing Socket
By the end of World War II, the large number of veterans who suffered limb loss during combat inspired prosthetists to experiment with new materials and techniques to improve prosthetic comfort and function. In 1959, a symposium was held at the University of California Biomechanics Laboratory to promote the development of transtibial socket fitting. The result was the patellar tendon-bearing (PTB) socket design. This design has been used successfully over the past five decades to strategically load the limb in areas that are more pressure tolerant, namely the patellar tendon and medial tibial flare, and relieve the tissue over bony prominences like the tibial crest and head of the fibula. In most cases, this eliminated the need for proximal weight bearing.9
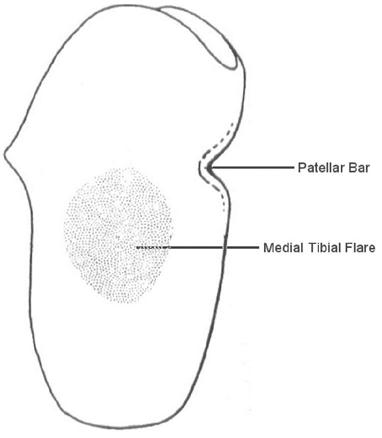
The main goal of the PTB socket design was to increase the surface area on the residuum that is available for weight bearing so as to eliminate the need for the knee joints and thigh corset. The PTB socket was described as “total contact,” which meant that there were supposed to be no voids or air pockets between the limb and socket. This design allowed weight bearing to occur in any area that capable of supporting a load. The term patellar tendon-bearing originates from the use of a patellar “bar” that is built into the socket at the level of the center of the patellar ligament, midway between the patella and the tibial tubercle (Figure 23-2). The socket is aligned in approximately 5 degrees of knee flexion, which allows the bar to act as a weight-bearing surface within the socket. The proximal trim line of the posterior wall is located just proximal to the patellar bar to stabilize the limb in the anteroposterior direction and to prevent the limb from sliding to far down into the socket. The posterior trim line should be lower on the medial side to accommodate the insertion of the medial hamstring during knee flexion.
The other major weight-bearing surface in the PTB socket is the medial flare of the tibia. The proximal end of the tibia broadens out medially and, when stabilized by pressure from the lateral wall of the socket, can effectively accept loading. It is necessary to simultaneously create a relief for the fibular head, which is at the same level, to avoid any pressure on that bony structure. Filling the distal end of the socket with a compliant foam material provides the slight pressure during full weight bearing, which is necessary to control distal edema. The medial and lateral walls of the PTB socket extend up to the level of the adductor tubercle to provide lever arms for mediolateral stability. The PTB technique is still used successfully today, and many modern fitting techniques incorporate at least some of the attributes of the original PTB design.
Total Surface-Bearing Socket
The total surface-bearing (TSB) socket strives to further distribute the weight-bearing load over the entire surface of the limb, even in areas that had been traditionally considered to be pressure intolerant. Strategic compression of soft tissue and relief for bony prominences are the tools used to direct more force into areas of the limb that can tolerate it, and less force into areas that are prone to skin breakdown. The intent in designing a TSB socket is to distribute uniform pressure over the entire surface of the limb.10 It is expected however, that during a typical step while walking, the pressure in any given location will change from a negative pressure during swing phase to high pressure in stance that, if sustained, would cause tissue damage. Because the forces on the limb change quite dramatically throughout the gait cycle, that dynamic pattern must be anticipated so as to use those forces to design the reliefs for pressure-intolerant areas; larger forces means more tissue compression, which require larger reliefs. The other factor to consider is the density and structure of the tissues comprising the limb. Tissue properties vary widely, and there are temporal effects too; muscle tissue, for example, behaves one way while relaxed and very differently while contracting. Once they are accommodated, the relative locations of these tissues within the socket must be preserved; this not only provides a good environment for the tissues, but also allows accurate control of the prosthesis.
To fully accommodate the dynamic tissue loading that occurs in a prosthetic socket, the prosthetist must consider both the shear and the normal forces on the limb. Shear forces run parallel to the limb surface and are best mitigated through the use a socket interface. Interface materials, such as socks, sheaths, flexible liners, and gel liners, offer a continuum of shear reduction on the skin surface. The best materials to minimize shear are those found in gel liners. Normal forces are those that are applied perpendicular to the surface of the limb. The socket walls should be contoured according to the type of tissue in the area and the anticipated loading patterns. Because there is no way to reduce the force on the limb without restricting the inidividual’s activities, the best way to reduce pressure is to distribute the forces over as broad a surface as possible. The actual forces on the limb are a combination of shear and normal forces that occur together in various proportions.
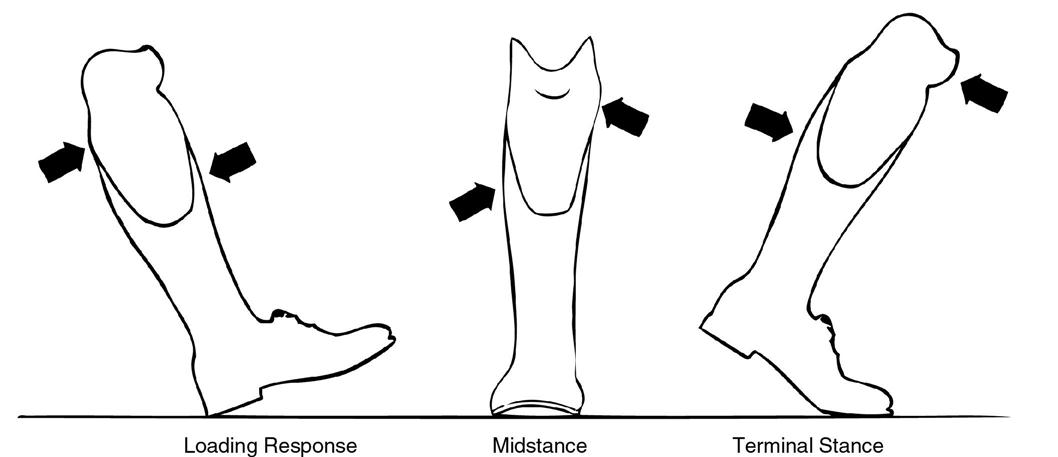
Ambulation is a dynamic event in which the forces on the limb are continually changing; for this reason the prosthetic socket must be designed to function under a variety of loading patterns. The socket must be designed and fitted under physiologic conditions that match that of the intended use. Soft-tissue compression will vary with load; the socket contours must reflect the anticipated load so as to prevent excessive loading on bony prominences. Throughout the gait cycle the forces and moments on the socket and limb change continuously. There is a flexion moment during loading response, a varus moment throughout midstance, an extension moment in terminal stance, and a flexion moment again in preswing (Figure 23-3). The forces on the limb range from a compressive force of 1.2 times body weight in stance, to a distractive force slightly higher than the weight of the prosthesis in swing phase.11 A well-fitting prosthesis must provide tolerable pressure distribution in all of those varied loading conditions. Soft tissue, muscle tissue, and bone contours must each be accounted for in a specific way to achieve a good fit. Soft tissue can tolerate moderate compression so the prosthetist will precompress that tissue in the socket. Muscles can tolerate mild compression but should be encouraged to contract with each step so less precompression should be applied. The shape of muscle tissue changes when it contracts. Flexible materials can be used over muscle bellies that allow for the geometric variability. Finally, bony prominences must be given extra volume within the socket so that when the tissue around them compresses during loading, the pressure will not exceed the tolerable limit.
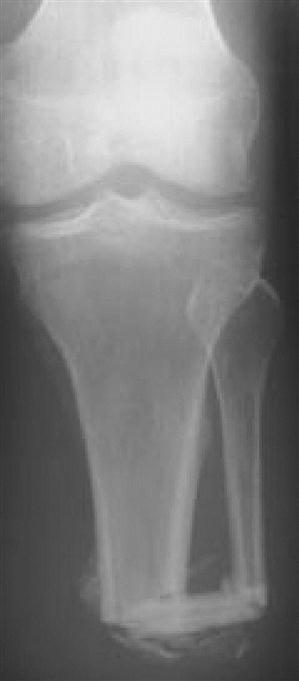
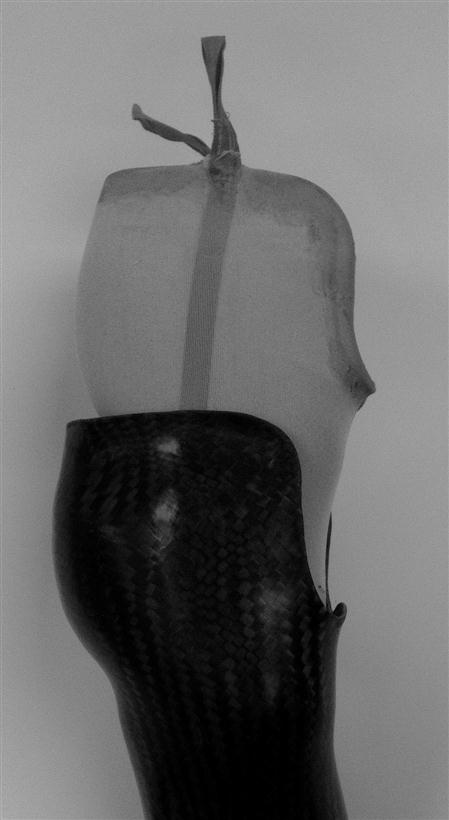
The load-bearing capabilities of the limb can also be affected by the surgical technique used for the amputation. The Ertl procedure, named after Dr. Janos Ertl Sr., is a surgical procedure that involves creating a bone bridge between the distal end of the tibia and fibula, as shown in Figure 23-4 (see Chapter 19 for more detail). The goal of this procedure is to create a tougher, more force-tolerant limb. One problem that this technique aims to solve is nerve impingement. Transtibial amputees are prone to nerve compression between the long bones of the lower leg.12 Forces within the socket push the tibia and fibula together and compress anything in between. If the tibial nerve is trapped between the bones, pain can result. By fusing the bones together at the distal end, the relative motion between them is minimized thereby protecting the soft tissues that are located between them. Many individuals who have had this type of surgical procedure can bear weight directly on the distal end of their limb. This end-bearing capability allows the prosthetist to distribute the person’s weight differently and potentially provide a prosthesis that does not extend as far proximally; this can increase comfort over standard weight-bearing areas and increase the range of knee flexion available to the individual. However, the increased surgical time and subsequent increase in infection risk are often cited as reasons to forgo the Ertl procedure surgical technique.13
Interface Materials
The material that separates the limb from the socket is referred to as an interface. Interfaces play an important role in lower-limb prosthetics. Interfaces can offer shock absorption, they can mimic soft tissue to provide an extra layer of cushioning for those who are bony, and they can help to mitigate shear forces on the limb. Interfaces influence the hygiene, ease of donning, and maintenance requirements of the prosthesis as well. With new materials being developed continuously, there are many interface options for the prosthetist; a discussion of commonly used interface materials is presented here.
Hard Socket
Early prostheses were made from hard materials like wood, which did not offer much cushioning. Persons with amputation used layers of cotton or wool socks to provide a soft interface between their limb and the hard socket. There are several advantages to this system: the socket is relatively thin, so the it is easily concealed under clothing; a clean sock can be used each day, or changed times throughout the day if needed; the number and ply of socks can be adjusted to accommodate for limb volume fluctuation during the day; and the socket itself is very durable. Because there are no compressible surfaces, the fit is reliable; it will not become “packed down” in high pressure areas. It is nonporous, easy to clean, and relatively maintenance free. It also does a fair job of eliminating shear as the coefficient of friction between the socks and socket is relatively low compared to that between the socks and skin.14 This type of socket is most challenging to fit and is not recommended for mature limbs that have lost much of their soft-tissue protection over bony prominences. It is also more difficult to adjust than other socket styles.
Socks and Sheaths
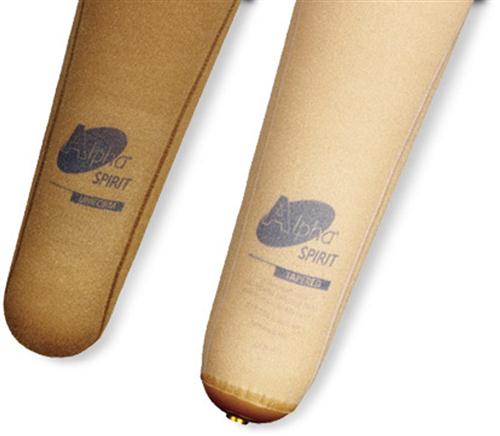
Prosthetic socks can be made from various combinations of cotton, nylon, wool, Lycra, polyester, and spandex. Some manufacturers have recently started using silver fibers in their socks as well to enhance the antimicrobial properties of their socks and sheaths (Figure 23-5). The prosthetic sock provides shock absorption, decreases the shear forces on the limb, and wicks away moisture. To further decrease friction, a nylon sheath is often recommended as the initial layer and the thicker socks would be donned over the sheath. The sock also provides the individual with a method to control socket fit; as the residual limb matures and shrinks, additional sock ply may be required to restore the fit and comfort of the socket. Prosthetic socks come in various ply thicknesses for convenience to the prosthetic wearer; for example, a person can wear one five-ply sock rather than having to don five individual single-ply socks. New prosthetic wearers are typically provided an assortment of one-, three-, and five-ply socks from which they can select. The socks can be layers one on top of the other to achieve the appropriate number of ply.
Soft Inserts
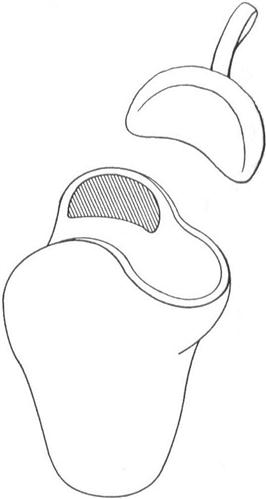
Closed cell foam, used because they do not absorb moisture, can be molded over a model of the limb to create a soft insert. This insert lines the entire socket and terminates just proximal to the socket trim lines (Figure 23-6). For increased protection, a distal end-pad, which is an extra layer of soft material at the bottom of the insert, can be used to cushion the distal end of the tibia. Soft inserts provide an extra layer of cushioning that is needed for more mature limbs that lack adequate soft-tissue thickness. They can be worn over a nylon sheath, which is a very thin nylon stocking similar to women’s stocking, or over any number of sock ply. Wearing the insert directly over the skin without a sock may lead to excessive shear and skin breakdown because of the relative motion between the limb and insert. Single durometer inserts provide a uniform compression profile whereas multidurometer inserts, made from layers of different materials with varied properties, can take advantage of the force-altering characteristics of each layer. For example, a material that has high plastic deformation might offer good shock absorption but would wear out very quickly if used alone. Mating that material with one that has low compression resistance would prevent some of the plastic deformation and extend the useful life of the insert. Soft inserts that can deform during the donning process can be used to accommodate anatomic irregularities that would not be able to slide directly into a rigid socket. For example, an insert for a limb with a bulbous distal end can be made thicker in the narrow area above the bulge so that the diameter of the finished socket would not impede donning. Another example is the wedge needed for supracondylar suspension; this wedge can be integrated as part of the soft insert to facilitate ease of donning.
Flexible Inner Socket
If PTB theory is to direct weight bearing into specific areas of the limb and away from others, then the flexible inner socket is the incarnation of that idea. With this system, an inner socket is made over a model of the limb from a flexible material that will stretch upon the application of force. Then a rigid frame is built around the inner socket, corresponding to areas of the residual limb where weight bearing is desirable. The result is a socket that flexes away from forces in non–pressure-tolerant areas, but remains rigid in the force-tolerant areas. Because flexible sockets in rigid frames can eliminate compressive forces in any specific area, this system is useful for persons with particularly bony residual limbs and those with severe localized sensitivity. They are not recommended for residual limbs with adherent scarring, however, because pressure differentials created by the frame tend to amplify the shear forces on the limb.
Expandable Wall Socket
When the limb is amputated at or below the ankle, the resulting long residual limb present an interesting challenge to the prosthetist. The proximal trim lines of the prosthesis can be lowered to a more distal position on the limb because there is a long lever arm for prosthetic control during ambulation. However the distal residual limbs is larger in diameter than they are in the more proximally because the malleoli are still present. The prosthetist can accommodate for a larger distal size by creating a removable wall in the socket that is replaced after the prosthesis is donned, by using a specially designed soft liner, or by creating an expandable wall socket. The expandable wall socket is made from an elasticized material that stretches enough for the individual to push his or her limb through in weight bearing, and tightens up over the malleoli to provide suspension. This socket is too flexible to attach a foot to, so a rigid frame is made over the flexible socket with a small space between them in which the expansion can occur. This is a self-suspending socket that can be very comfortable for the person. It is difficult to fabricate this style socket, and it is even more difficult to make adjustments to the fit once it is fabricated. More information on these designs can be found in Chapter 22.
Gel Liner
The term gel liner is loosely used in the field to describe a liner that is made from a material that exhibits gel-like properties. There are three basic varieties of these liners: (a) silicone elastomers, which are highly cross-linked at the molecular level; (b) silicone gels that have a relatively low amount of crosslinking; and (c) urethanes. The properties of these materials vary and are relevant to the prosthetist and person with amputation because they directly affect the forces that are transmitted through them to the residual limb. Of particular interest are certain properties of gel liners including: coefficient of friction, compressive stiffness, and shear stiffness. Silicone gels have the lowest compressive and shear stiffness values; this makes them useful in reducing compressive loading and eliminating shear forces on the limb. Lower shear stiffness would be beneficial for a bony limb, but might compromise stability by creating excessive motion on a limb that has more biological soft tissue. Silicone elastomers present the highest compressive stiffness values, so they are best suited to supporting loading without deformation. Elastomers would be beneficial for use on a limb that has a high proportion of soft tissue. Urethanes show the highest coefficient of friction with skin, a property that is useful for preventing localized skin tension and shear.15 Understanding these properties, allows the prosthetist to choose a material that is complementary to the socket design and effectively leverages the force transmission properties of the material against the soft-tissue characteristics of the limb.
Gel liners are a key component of TSB sockets. Gel liners are designed to be worn directly on the skin or over a thin liner referred to as “liner liners.” Liner liners are thin nylon sheaths with silver fibers that are meant to be worn between the skin and gel liner to prevent skin irritation caused by the warm moist environment of the gel. Although great effort is made to eliminate relative motion between the limb and socket, a small amount of motion is unavoidable. Gel liners have a high-friction inner surface, where it is in contact with the limb, and a low friction outer surface where it meets the socket. This encourages whatever small amount of motion is present to occur on the outer surface of the liner and minimizes motion at the liner–skin interface. The colloidal nature of the gel absorbs the shear that is not dissipated by the liner–socket interface so that only a small percentage reaches the skin (Figure 23-7).
Incorporation of a locking pin at the distal end of the gel liner allows the liner to be used for suspension as well. This type of liner is referred to as a “locking liner” as opposed to a “cushion liner” that has no pin. The pin mates with a locking mechanism built into the socket to suspend the prosthesis.
Roll-on liners should fit snugly, but not tightly. As the liner is stretched, a shear profile is established on the limb. A tighter fit creates higher frictional forces and if the pressure distribution is not equal, the frictional forces on the skin will be uneven, leading to blisters and skin problems. This can occur with a very bony limb, unless the liner is custom made for the individual. Custom made gel liners are created over a mold of the residual limb. This is indicated for unusually shaped limbs, those with deep invaginations, or those that need specifically located reliefs or cushions.
Suspension
Another important consideration when designing a prosthesis is the method by which the prosthesis is held to the limb; this is referred to as the “suspension.” When prosthesis is suspended perfectly, there is no relative motion between the socket and the limb. When motion occurs because of a faulty or inadequate suspension system, the limb is subjected to an entirely different loading pattern. This motion is referred to as “pistoning” as it bears some resemblance to the motion of a piston in the cylinder of an internal combustion engine. Pistoning can lead to pain, skin breakdown, and reduced control of the prosthesis. Great care should be taken to minimize motion within the socket. There are several strategies for suspension, they can be used individually as the primary mode of suspension or more than one technique can be used simultaneously to provide auxiliary suspension.
Waist Belt
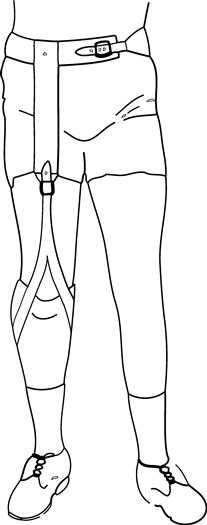
A waist belt connected by an elastic strap to the thigh corset was used to suspend early transtibial sockets. Waist belts encircle the pelvis between the iliac crests and the greater trochanters. These adjustable belts have buckles on the anterior aspect that mated with an inverted Y-strap that is attached to the socket; this allows them to be donned separately and then joined together. Because this system crosses the hip and knee joints, flexion and extension of these joints must be accommodated by an elastic component. Further accommodation of knee flexion is accomplished by the inverted Y-strap (Figure 23-8). The Y-strap is fitted over the patella so that the two arms of the Y move posteriorly during knee flexion to reduce elongation of the elastic strap. The person can adjust tension in the strap based upon individual comfort. Pistoning in the socket is controllable with enough tension in the elastic. Tension in the strap decreases with hip flexion so that the strap has slack while the person is seated. Hip extension produces tension in the strap and will aid in limb advancement as it assists hip flexion in preswing.
Joints and Corset
The joints and corset feature (first discussed in the section on Socket Design) provides suspension as well as a weight-bearing element if the thigh corset is properly fitted over the femoral condyles. A skillfully molded corset can gain purchase over the smaller circumference of the thigh just proximal to the knee joint. The stiff leather corset is fabricated with either straps or laces that can be tightened as the wearer dons the prosthesis. This permits the limb to pass through the corset and then be held securely in position once the corset is tightened. The knee joints, which are typically made from steel, provide a secure connection to the socket. When the condyles are prominent, this can serve as the primary means of suspension and a waist belt is not needed. As the prosthetic knee joints are positioned slightly posterior to the anatomical knee joint center, tension in the cuff to decreases over the condyles as knee flexes, thereby enhancing sitting comfort (Figure 23-9). The joints and corset system can also include a posterior check strap that limits full knee extension. This can be used to eliminate the terminal impact at the end of swing phase, which can be audible, and to prevent excessive wear on the prosthetic knee joints. The thigh cuff allows for full functional range of knee flexion but will cause binding in the popliteal fossa when the knee is flexed beyond approximately 110 degrees. Joints and corset may be the suspension of choice for persons with ligamentous instability of the knee.
Cuff Strap
A cuff strap is a flexible leather cuff that attaches to the medial and lateral walls of the socket at the same point that orthotic knee joints would attach, that is, just posterior and proximal to anatomic knee center (Figure 23-10). The cuff has an adjustable strap that completely encircles the thigh just proximal to the patella. After the person dons the socket, the cuff is secured in place so that prosthesis will hang from the cuff while standing and walking. The anatomic structures that provide the suspension are the patella and the femoral condyles. To create a strong hold, the medial and lateral walls of the socket need to be lower than the standard height; because this reduces mediolateral stability, cuff strap suspension it is not a good choice for short residual limbs. An elastic component may be added to the strap over the patella to increase sitting comfort. This system is simple, quick to fabricate, and provides a secure suspension for the prosthesis while accommodating an unencumbered angle of knee flexion. The cuff does not provide any weight-bearing or mediolateral stability. Cuff strap suspension may be problematic for Persons with much muscle or adipose tissue arounp the lower thigh

Supracondylar Suspension
Suspension can be achieved by incorporating the femoral condyles completely within the rigid transtibial socket. By extending the medial and lateral trim lines of the socket approximately 2 cm proximal to the adductor tubercle, the medial–lateral dimension of the top of the socket can be made narrower than the knee joint; this prevents the knee joint from moving upward out of the socket by capturing the femoral condlyes. Supracondylar suspension also adds significant medial–lateral stability to the prosthesis by increasing the length of the lever arm proximal to knee center. This technique, when combined with a PTB-style socket, is collectively referred to as “PTB-SC.”
This type of socket can be difficult to don because the width of the proximal opening is smaller than the width of the condyles. This problem can be addresed in two ways: either by making the medial wall detachable, or by including the supracondylar wedge in a soft insert. The first method uses a steel bar that is formed into the prosthesis. The entire medial wall of the prosthesis, along with the steel bar, can be removed for donning. Once the limb is in the socket, the bar slides back into a channel in the distal portion of the socket and locks into position with a ball detent (Figure 23-11). The second method uses a flexible liner that has a wedge built into it proximal to medial condyle. The rigid socket is fabricated over the liner such that the medial–lateral dimension of the proximal end of the socket is equal to the widest dimension of the knee. This allows donning of the flexible liner first, then with slight compression of the liner, the limb and liner together slide into the socket and are locked in pace through pressure and friction (Figure 23-12).
< div class='tao-gold-member'>
Related posts:


Stay updated, free articles. Join our Telegram channel

Full access? Get Clinical Tree


