Tibiotalocalcaneal Arthrodesis with Retrograde Intramedullary Nail
John S. Early
Stuart D. Miller
INTRODUCTION
The simultaneous fusion of the tibiotalar and subtalar joints is truly a salvage operation for ambulatory patients. Nonambulatory patients are braced to stabilize the deformity and minimize motion, while ambulatory patients are left with the alternative of below knee amputation or protected weight bearing with bracing to relieve pain. When both joints are involved and painful but with little deformity, a subtalar fusion and total ankle replacement can be a more functional choice in a sedentary or elderly individual. Those with neuropathic deformities, fixed deformities, or bone loss involving both of those joints have no other viable option. In addition, those patients who have failed total ankle replacements where the talus has eroded into the subtalar joint are also candidates for this procedure. Before the advent of the retrograde intramedullary (IM) nail, the salvage procedure was performed by combining the standard techniques for ankle and subtalar fusion with the use of internal or external fixation. The process of realigning and stabilizing each joint was difficult due to the lack of bone for fixation. The task was even more difficult with bone loss on the tibial or talar side. The advent of the IM nail allowed for a more stable means to correct alignment and compress joints than simple screws (1, 2 and 3). Though they were initially described as ankle fusion nails, they did not fuse the ankle in isolation. The technique of retrograde placement required that the nail violate the subtalar joint effectively removing its motion from the normal gait mechanics.
Over the past 10 years many innovations have been made to the nail design, and many companies now offer their own unique design. They all have the same principle: they are designed to be implanted retrograde through the plantar foot allowing fixation of the calcaneus, talus, and tibia. All require the alignment decisions of the plantigrade foot to be made at the time the guide wire is implanted. What makes the nails different is the configuration and order of their screw fixation and their ability to provide internal or external compression. The nails are either straight or with a distal valgus bend. The bend is present to place the heel in a mild valgus position when the nail is implanted. This requires the surgeon to align the heel in a more neutral position than desired while reaming and let the nail bend correct the calcaneus to the final position. For the straight nail, the surgeon places the calcaneus in the desired final position at the time of the guide wire placement.
The early nails had static locking points going through the bone in the medial-to-lateral plane at all levels. Two problems emerged with this configuration. There was no allowance for late subsidence at the fusion site which led to implant breakage and nonunion as seen in IM nails for long bone fractures. Also, the distal screws were placed in a direction that was out of the major plane of motion adding little resistance to the moment arm of the foot. This led to implant loosening and the occasional screw cutting out of the calcaneus.
Over the years, a variety of configurations emerged to improve upon the initial technique. Placing screws from the calcaneal tuberosity into the nail in a posterior-to-anterior position moved the distal screws out from around the neurovascular bundle, and they more effectively resisted hindfoot movement. Initially, the screws were perpendicular to the nail, and fixation was not optimal because of the calcaneal pitch. It was difficult to place a screw into the talus from a 90° posterior approach. Angling the screws at a 20 degree upward (cephalad) angle from the nail allowed better fixation into the calcaneus as it matched the calcaneal pitch angle, but a medial-to-lateral screw was still important to lock the talus to the configuration without relying solely on compression at the fusion site for stability (Fig. 38.1). The way to place a posterior screw into the talus was to rotate and impact the nail so that the proximal oblique hole would allow the screw to pass through the nail and into the talar neck. The Trigen Hindfoot Fusion Nail (Smith and Nephew, Memphis, TN) allows independent positioning of the two distal locking screws. The calcaneal screw is directed from the medial part of the calcaneal tuberosity through the nail toward the cuboid at a 20° inclination. The more proximal talar screw starts from the lateral part of the calcaneal tuberosity through the nail and into the talar neck at a 60° inclination. This allows posterior-to-anterior locking distally, independently to prevent rotation around the nail and improve resistance to dorsiflexion-plantarflexion motion (Fig. 38.2).
The problem of late subsidence was evident in certain patients, such as those with diabetes mellitus (DM). The early use of the retrograde IM nail became a staple of treatment for failed ankle fractures in the neuropathic population. Many times the fusion site at the ankle would resorb before consolidating and the nail could not adapt to the change in axial position, the proximal screws would fail, or the nail would fail and nonunion occur. A dynamic locking hole was placed proximally in the tibia to allow resistance to rotation and allow axial migration in the event that subsidence at the fusion site occurred. This led to a marked reduction in proximal implant failures. In most IM nail designs, there is still the option of medial-lateral fixation distally and a static locking screw proximally for those who wish to use them. The various IM nails that are available feature some form of
compression technique, such as internal compression, external compression, or a combination of both. The nails vary with respect to lengths and diameters that are available and whether they are straight or have a valgus bend.
compression technique, such as internal compression, external compression, or a combination of both. The nails vary with respect to lengths and diameters that are available and whether they are straight or have a valgus bend.
 FIGURE 38.1 Custom IM nail with distal screw adjusted for posterior-to-anterior fixation of the tuberosity and a 20° inclination for better fit to the natural anatomy of the calcaneus. |
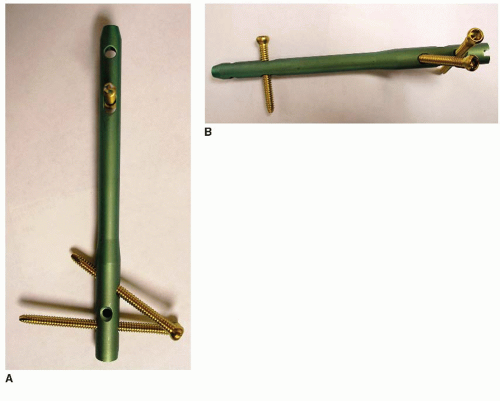 FIGURE 38.2 Hindfoot fusion nail with screws in place to highlight their trajectory. A: Lateral view shows divergence of the distal screws. B: Posterior view. |
INDICATIONS AND CONTRAINDICATIONS
Indications for tibiotalocalcaneal arthrodesis (TTCA) are severe pain and impairment due to arthritis of the ankle and subtalar joints. The cause may be posttraumatic, degenerative, or rheumatoid arthritis; failed ankle replacement; failed arthrodesis with subtalar disease; talar osteonecrosis; selected patients with neuropathic arthropathy; congenital deformities; and neuromuscular disorders (4). Contraindications include infection, peripheral vascular disease, and conditions that restrict the patient’s ability to follow postoperative instructions. It should not be performed in patients who do not have painful subtalar arthritis or in patients who have a significant tibial deformity.
PREOPERATIVE PLANNING
This procedure is usually done for complex foot and ankle disorders such as severe arthritis affecting the ankle and subtalar joints, bone loss, or failed treatment. The majority of patients present with previous incisions, bone defects, or implants in the planned operative area. Their presence requires careful planning to successfully use the IM nail. Access for placing the nail is rarely an issue. It is most important to effectively prepare the joints for fusion. The placement of the nail alone will not lead to a successful fusion if both the tibiotalar and subtalar joint surfaces are not properly prepared. The position of the patient depends upon the approach, and the approach depends upon implants that may need removal, the presence of previous incisions, and the soft tissue condition (Fig. 38.3). Most of the time, a lateral transfibular approach is used because it provides easy access to both the ankle and subtalar joints. The fibula can also be morcellated for bone graft. The fibula may also be used as an onlay graft with screw fixation (Fig. 38.4). In the case of ankle implant failure, the anterior approach is utilized to facilitate implant removal and for joint preparation. In these patients, a small sinus tarsi incision is utilized for access to the subtalar joint.
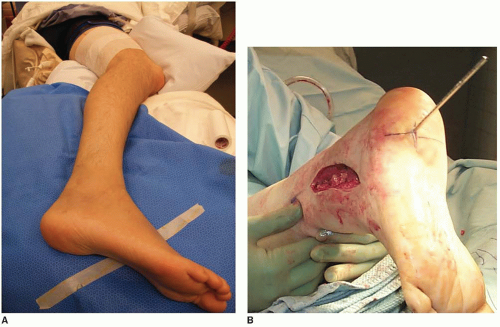 FIGURE 38.3 While supine position is most common, the procedure can also be performed with the patient in the lateral (A) or prone (B) position. |
Weight-bearing radiograph views of the lower extremity are important to assess alignment, arthritis, and instability (Fig. 38.5). A CT scan of the hindfoot and ankle can elucidate the quality of the bone stock and incomplete union from previous trauma. An MRI scan is indicated if avascular necrosis of the talus is suspected (Fig. 38.6). The extent of diseased bone can be visualized to help determine the need for structural allograft to correct the resultant deformity after debridement. A femoral head allograft should be available to provide good structural fill with a porous cancellous surface where a defect is present that affects the ultimate alignment and bone contact of the fusion. The surgical technique of TTCA with an IM nail with external compression and a second technique with internal compression are presented.
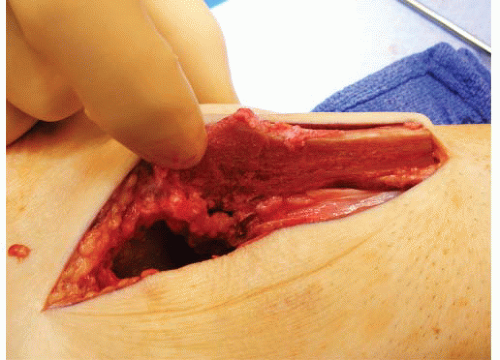 FIGURE 38.4 Lateral approach to access both the ankle and subtalar joints. The lateral half of the fibula is still attached to the posterior soft tissue and rotated externally to gain access to the joints. |
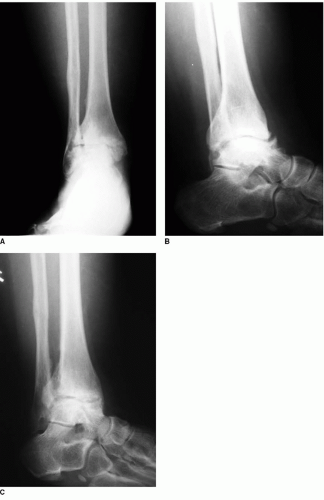 FIGURE 38.5 Radiographs of a 40-year-old female with ankle and subtalar arthritis associated with talar osteonecrosis. A: AP view. B: Lateral view. C: Oblique radiograph. |
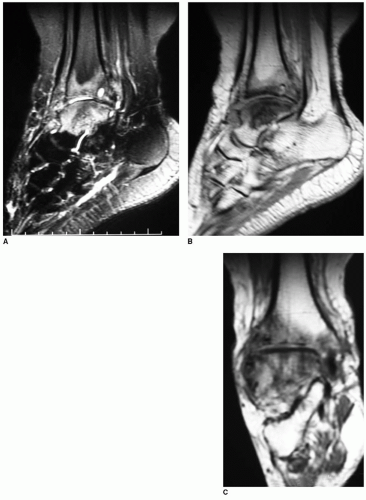 FIGURE 38.6 MRI scan of ankle and hindfoot. A: MRI scan in sagittal plane, T2 image shows osteonecrosis of talar boy. B: MRI, T1 image, sagittal plane. C: MRI scan coronal view, T1 image. |
SURGICAL TECHNIQUES
Technique 1: Tibiotalocalcaneal Arthrodesis with IM Nail and External Compression
Positioning and Approach
The operation may be performed with the patient supine, prone, or lateral based upon the individual patient’s pathology and surgeon’s preference. In the supine position on the operating table, the leg is elevated below the knee to allow the knee to be flexed, removing tension off the Achilles tendon.
A bump is placed under the ipsilateral hip to help point the tibial tubercle to the ceiling. The foot is allowed to hang over the end of the bed to allow easy access to the tuberosity during nail fixation. The fluoroscopic unit is best positioned by the contralateral leg with the view screens toward the head of the operative table on the operative side. The leg is sterilely prepped and draped in the standard manner after placement of a high thigh tourniquet for hemostasis control. The leg is exsanguinated with an elastic bandage and the tourniquet inflated to the desired pressure.
The surgical approach is dependent on the condition of the skin around the ankle, the presence of implants that need to be removed, and the surgeon preference. A lateral approach is used to expose the ankle and subtalar joints. A medial incision is often used to more completely prepare the joint surfaces and obtain bone contact.
Joint Preparation and Alignment
The talar and tibial joint surfaces are carefully resected with bone cuts designed to correct malalignment, while minimizing shortening. Resecting the joint in this manner allows correction of rotation and translation position. Joint surfaces may also be resected by following the contour of the talar and tibial surfaces in cases where there is little deformity present.
Remove all devitalized bone and soft tissue from the tibiotalar and subtalar joints. Bony resection is done to correct deformities so that the foot can be fixed in a plantigrade position, preserving hindfoot and midfoot mobility. The medial and lateral malleoli are shortened if necessary to obtain good bony contact of the joint surfaces. The subchondral bone can be perforated with a 2.0-mm drill bit to provide a good cancellous interface for healing.
When there is major bone deficiency to the tibia or talus, structural bone graft may be used, such as femoral head allograft or iliac crest bone graft. The talar neck and head should be spared to maintain a functioning talonavicular joint. The bone graft is shaped to fit the defect while preparing the fusion site.
The alignment of both ankle and subtalar joints is carefully adjusted to neutral dorsiflexion-plantarflexion, about 5° of external rotation, about 5° of valgus, neutral medial-lateral translation of the talus, and neutral to slight posterior translation of the talus. Alignment should consider the individual patient’s anatomy, and the opposite foot and ankle should be examined.
Intramedullary Nail
Accurate placement of the retrograde nail, regardless of the manufacturer or style, is dependent upon the accurate placement of the initial guide wire. This is where time should be spent to obtain the optimal position because there are few things that can be done to change the path of the nail once the canal has been reamed and still have a stable construct. Accurate anteroposterior (AP) and lateral fluoroscopic views are crucial to ensure proper placement of the guide wire. An axial view of the calcaneus is also helpful to assess the guide wire position in relation to the plantar surface of the calcaneus.
Place the starting point of the guide wire on that plantar ridge to insure adequate fixation of the calcaneus with these devices. To plot the approximate point of the insertion of the guide wire, draw a line between the medial and lateral malleoli projected on the plantar surface of the foot. Divide the line into thirds. The incision should be at a point two-thirds of the medial-lateral distance from the medial malleolus (Fig. 38.7). A vertically oriented incision is made down through the fascia to minimize disruption of the fascia. Fluoroscopy is used to locate both the centerline of the calcaneal ridge and the centerline of the tibia.
Depending on the type of nail being used (straight or curved at the distal end), care should be taken to have the calcaneal alignment desired and be sure that it matches up with access to the tibial shaft. For straight nails the foot sometimes needs to be shifted medially by shaving the medial margin of the medial malleolus or the medial margin of the talus to obtain the desired alignment. For curved nails, the calcaneus should be held in neutral so that the valgus shape of the nail will correspond to the final valgus of the calcaneus. With either nail configuration, excessive hindfoot valgus should be corrected at this time. With the ankle held in a neutral to slight dorsiflexion, the guide wire is advanced into the calcaneus in line with the tibia in both the AP and lateral views.
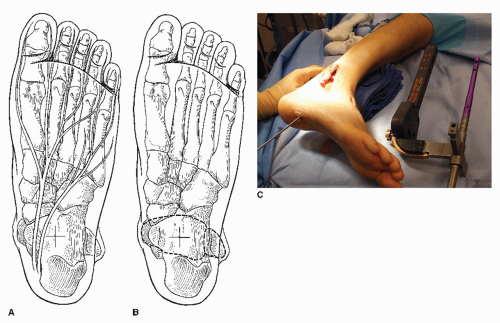
FIGURE 38.7 Proper guide wire placement is crucial to successful IM nail placement. A: Position of the plantar nerves with respect to the centerline of the tibia (cross hairs). B: Tibia and fibula locations relative to the plantar calcaneus. The plantar calcaneal ridge is just lateral to the cross hairs on a line between the calcaneal tuberosity and the medial third of the cuboid. C: Lateral approach and proper placement of guide wire.
Once the guide wire is properly placed in the calcaneus, the desired relationship between the calcaneus and talus needs to be considered. The position of the sinus tarsi space is adjusted with a laminar spreader placed between the anterior process of the calcaneus and the lateral process of the talus. Opening the laminar spreader will open the sinus tarsi and effectively lengthen the lateral column of the foot. This will help realign and balance the foot. The foot is held in the desired position and the guide wire advanced across the subtalar joint, through the talus, and into the tibia up to the isthmus. Visual and fluoroscopic confirmation of the planned fusion position is performed. The importance of the guide wire placement cannot be overemphasized. Every nail system available relies upon proper guide wire insertion for the final fusion position. Adjustment of alignment after reaming over the guide wire is limited to rotation of the foot relative to the tibia.
Each of the available nail systems has their own step-wise manner of assembly, insertion, and fixation. Common to all is the need to ream the nail channel from the plantar aspect of the foot up into the tibia. In this system, a 12.5-mm entry reamer is used through the calcaneus, talus, and into the tibia (Fig. 38.8A) and then sequential canal reamers until the canal is 1 to 1.5 mm larger than the selected nail diameter (Fig. 38.8B and C). It is important with any nail to ream up into the isthmus at least 2 to 3 cm beyond the proposed tip of the nail to allow room for compression and subsidence.
After reaming, to the desired diameter, the nail is assembled onto the insertion and fixation guide and gently impacted by hand into the foot over the guide wire until the end of the nail is flush with the plantar surface of the calcaneus (Fig. 38.9).
Distal Screw Insertion, Compression, and Proximal Locking Screw Insertion
Related posts:

Stay updated, free articles. Join our Telegram channel

Full access? Get Clinical Tree


