The Knee
23.1 Anatomy
Gail A. Shafer-Crane
William M. Falls
Four bones participate in the knee joint: the femur, tibia, fibula, and patella. The distal femur and proximal tibia form the main articulation. The patella, a sesamoid bone within the quadriceps tendon and the patellar ligament, provides anterior stabilization; and the fibula, which articulates proximally and distally with the tibia, allows leg rotation without sacrificing stability. Anatomy of the knee is presented in detail in major anatomical textbooks (1,2,3,4,5,6,7,8).
Important clinical bony landmarks are palpable about the knee joint. The femur flattens and widens just superior to the knee, forming the lateral and medial epicondyles. The articular femoral condyles, rounded ends of the femur, are palpated anterolaterally and medially as the knee is flexed. The quadriceps tendon is palpated just superior to the patella, and the patellar ligament is palpated just inferior to the patella, where it inserts onto the tibial tuberosity. When the knee is extended and relaxed, the patella can be glided laterally and medially on the articular surface of the condyles.
The anterior surface of the proximal tibia is palpated by pressing anterior to posterior with the fingertips along the inferior patellar border on either side of the patellar ligament. The tibial tuberosity is the bony protuberance that provides the insertion for the patellar ligament. It is palpated on the central anterior surface of the proximal tibia. The fibular head is palpated by sliding the thumb lateral to the patellar ligament along the tibial plateau, and then grasping the fibular head with the thumb and fingertips. The examiner can mobilize the head of the fibula in an oblique, anterior-to-posterior plane.
The tibiofemoral joint is the articulation between the articular condyles of the femur and the corresponding tibial condyles located on the superior surface of the tibia, or tibial plateau. This synovial hinge joint permits flexion, extension, and anterior-posterior translation and can bear body weight through approximately 120 degrees of range of motion. The femoral condyles are smooth articular surfaces, covered with hyaline cartilage, that wrap around the distal femur.
The patellofemoral joint is the articulation between the posterior patella and the anterior femoral condyles (Fig 23.1). The patella glides over the anterior articular surface of the distal femur during knee flexion and extension. In knee extension, the patella locks between the condyles to add stability to the knee.
The proximal tibiofibular articulation between the proximal lateral tibia and the proximal medial fibula is a synovial, condyloid joint supported by a fibrous capsule and anterior and posterior ligaments encircling the joint (Fig. 23.1.2). Dorsiflexion and plantarflexion of the foot create slight motions about the joint. The common fibular nerve and the nerve to the popliteus muscle innervate the tibiofibular joint.
The proximal attachment of the fibrous capsule is superior to the femoral articular condyles, and distal to the edges of the articular surface of the tibia. Its posterior attachment is within the intercondylar fossa. The popliteus muscle
(description of the muscles follows) inserts on the tibia through an interruption in the lateral fibrous capsule. The lateral and medial menisci are semicircular fibrocartilaginous discs that lie between the fibular condyles and tibial plateau. Synovial membrane lines the fibrous capsule from the superior attachment of the fibrous capsule to the cruciate ligaments, and wrapping around to attach to the edges of the patella and menisci.
(description of the muscles follows) inserts on the tibia through an interruption in the lateral fibrous capsule. The lateral and medial menisci are semicircular fibrocartilaginous discs that lie between the fibular condyles and tibial plateau. Synovial membrane lines the fibrous capsule from the superior attachment of the fibrous capsule to the cruciate ligaments, and wrapping around to attach to the edges of the patella and menisci.
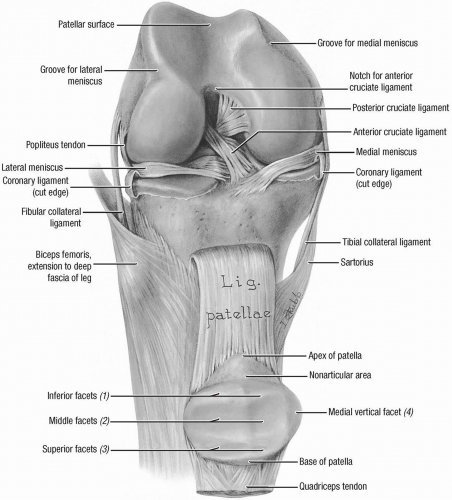 FIGURE 23.1.1. Anterior view of the knee with patella flipped down and out of the trachlea. (From Agur AMR, Lee ML. Grant’s Atlas of Anatomy, 10th ed. Baltimore: Lippincott Williams & Wilkins, 1999.) |
Extracapsular ligaments include the tibial and fibular collateral, posterior meniscofemoral, anterior and posterior cruciate, and transverse ligaments (Fig. 23.1.3). The patellar ligament is considered extracapsular, although it supports the joint capsule. The aponeurosis of the
quadriceps muscle blends with the patellar ligament, reinforcing the fibrous capsule.
quadriceps muscle blends with the patellar ligament, reinforcing the fibrous capsule.
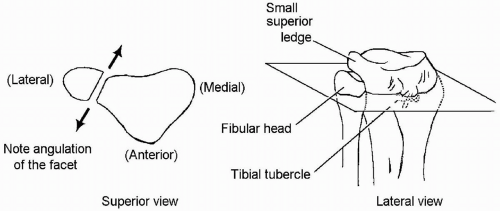 FIGURE 23.1.2. Proximal tibiofibular joint. (From Ward RC, ed. Foundations of Osteopathic Medicine, 2nd ed. Philadelphia: Lippincott Williams & Wilkins, 2003.) |
The femoral, saphenous, tibial, obturator, and fibular nerves all provide branches that supply the knee. Since they also innervate the hip, knee pain is often referred proximally to the hip.
Muscles that act on the knee are divided into flexor and extensor groups. The knee extensors are the quadriceps femoris muscles. These include rectus femoris, vastus lateralis, vastus medialis, and vastus intermedius. The distal attachment of all of the quadriceps muscles is into the quadriceps tendon and aponeurosis and then the base of the patella, then to the tibial tuberosity through the patellar ligament. The extensor muscles of the knee are innervated by the femoral nerve (L2-L4).
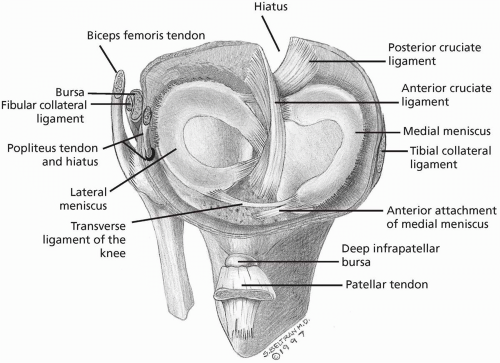 FIGURE 23.1.3. Anterosuperior view of the cruciate ligaments and menisci. (From Stoller. DW, MRI, Arthroscopy, and Surgical Anatomy of the Joints. Baltimore: Lippincott Williams & Wilkins, 1999.) |
Knee flexion is accomplished by thigh muscles (hamstrings, gracilis, sartorius, and popliteus); and lower leg muscles (gastrocnemius, soleus, and plantaris). Hamstring muscles include the long head of the biceps femoris, semimembranosus, and semitendinosus and act as
primary flexors of the knee, and hip extensors. They cross both the knee and the hip and are innervated by the tibial division of the sciatic nerve (L5, S1-S2). The short head of the biceps femoris does not cross the hip, and receives innervation from the fibular (peroneal) division of the sciatic nerve (L5, S1-S2); therefore, it is not technically a hamstring muscle. The gracilis is a medial thigh muscle. This straplike muscle works to adduct the thigh and flex the knee. The sartorius takes an oblique course across the thigh from superolateral to inferomedial. The semitendinosus, gracilis, and sartorius muscles join to make their distal attachment on the pes anserinus, a tendinous structure that attaches to the superior medial tibia (Fig. 23.1.4). A continuation of the semitendinosus tendon also reflects posteriorly to form the oblique popliteal ligament. The popliteus muscle is a small, deep triangular muscle in the posterior knee originating from the lateral femoral condyle and lateral meniscus, and inserting into the posterior, medial surface of the proximal tibia, superior to the soleal line (4).
primary flexors of the knee, and hip extensors. They cross both the knee and the hip and are innervated by the tibial division of the sciatic nerve (L5, S1-S2). The short head of the biceps femoris does not cross the hip, and receives innervation from the fibular (peroneal) division of the sciatic nerve (L5, S1-S2); therefore, it is not technically a hamstring muscle. The gracilis is a medial thigh muscle. This straplike muscle works to adduct the thigh and flex the knee. The sartorius takes an oblique course across the thigh from superolateral to inferomedial. The semitendinosus, gracilis, and sartorius muscles join to make their distal attachment on the pes anserinus, a tendinous structure that attaches to the superior medial tibia (Fig. 23.1.4). A continuation of the semitendinosus tendon also reflects posteriorly to form the oblique popliteal ligament. The popliteus muscle is a small, deep triangular muscle in the posterior knee originating from the lateral femoral condyle and lateral meniscus, and inserting into the posterior, medial surface of the proximal tibia, superior to the soleal line (4).
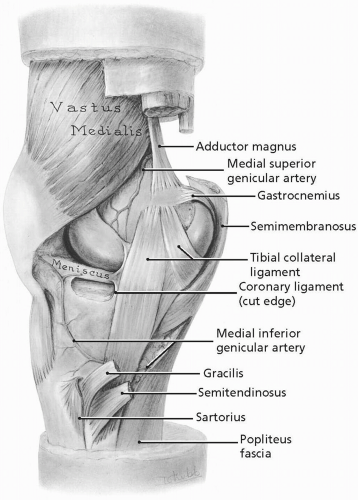 FIGURE 23.1.4. Medial dissection of the knee. Note the relationships among the medial collateral ligament, medial meniscus, and pes anserinus, where the gracilis, semitendinosus, and sartorius attach. (From Agur AMR, Lee ML. Grant’s Atlas of Anatomy, 10th ed. Baltimore: Lippincott Williams & Wilkins, 1999.) |
The calf muscles are also secondary knee flexors due to the two gastrocnemius heads crossing the posterior knee and inserting onto the medial and lateral femoral condyles. Although the soleus and plantaris lie deep to the gastrocnemius muscle, they have a limited role in knee flexion. The soleus muscle makes its proximal attachment at the posterior fibular head, superior quarter of the posterior fibula, and the medial edge of the tibia. The plantaris muscle is a thin tendinous muscle that attaches proximally to the inferior lateral supracondylar line of the posterior femur and the oblique popliteal ligament. All three muscles insert onto
the posterior calcaneus or heel bone of the foot and are innervated by the tibial nerve (S1-S2).
the posterior calcaneus or heel bone of the foot and are innervated by the tibial nerve (S1-S2).
The posterior knee is framed by the popliteal fossa (Fig. 23.1.5). The inferior borders of this diamond-shaped hollow are the heads of the gastrocnemius muscle as they attach to the lateral and medial condyles. It is defined superolaterally by the biceps femoris muscle and superomedially by the semimembranosus and semitendinosus muscles as they make their distal attachments to the lateral and medial femur. The adductor hiatus, the opening of the adductor (Hunter’s) canal, which conducts the popliteal artery and vein through the thigh, is within the superior medial border. The sciatic nerve divides into the tibial and common fibular nerves in the superior confines of the popliteal fossa, and the medial sural cutaneous nerve splits from the tibia at the inferior border. The small saphenous vein, the posterior cutaneous nerve of the thigh, and lymph nodes and vessels are also contained within this space.
 FIGURE 23.1.5. Posterior view of the knee. (From Agur AMR, Lee ML. Grant’s Atlas of Anatomy, 10th ed. Baltimore: Lippincott Williams & Wilkins, 1999.) |
The synovial capsule and bursae form an extensive network within the synovial joint capsule. Lobes of this network are named for the adjacent tendon attachments. The suprapatellar bursa lies beneath the quadriceps tendon, and communicates directly with the anterior synovial joint capsule. The gastrocnemius and semimembranosus bursa communicate with the posterior portion of the synovial joint capsule, as does the popliteus bursa. The deep infrapatellar bursa lies
between the patellar ligament and the tibial tuberosity. The tendons that attach at the pes anserinus, gracilis, sartorius, and semitendinosus are separated by the anserine bursa. There are subcutaneous bursae anterior to the patella and patellar ligament.
between the patellar ligament and the tibial tuberosity. The tendons that attach at the pes anserinus, gracilis, sartorius, and semitendinosus are separated by the anserine bursa. There are subcutaneous bursae anterior to the patella and patellar ligament.
REFERENCES
1. Basmajian JV, Slonecker CE. Grant’s method of anatomy, 11th ed. Baltimore: Williams & Wilkins, 1989.
2. Clemente CD. Gray’s anatomy of the human body; American 30th ed. Philadephia: Lea & Febiger, 1985.
3. Moore KL, Agur AM. Essential clinical anatomy. Baltimore: Williams & Wilkins, 1996.
4. Moore KL, Dalley AF II. Clinically oriented anatomy, 4th ed. Philadelphia: Lippincott Williams & Wilkins, 1999:1164.
5. Netter FH. Atlas of human anatomy. Summit, NJ: CIBA-Geigy Corporation, 1995.
6. Rosse C, Gaddum-Rosse P. Hollinshead’s textbook of anatomy, 5th ed. Philadelphia: Lippincott-Raven, 1997.
7. Williams PL, Warwick R, Dyson M, Bannister LH. Gray’s anatomy, British 37th ed. London: Churchill Livingstone, 1989.
8. Woodburne RT, Burkel WE. Essentials of human anatomy, 9th ed. New York: Oxford Univeristy Press, 1994.
23.2 Physical Examination
Steven J. Karageanes
OBSERVATION
Observe the athlete standing, looking for asymmetry in the knees. The important characteristics to look at and note are listed in Table 23.2.1. Arthritic knees can undergo bony remodeling and changes in alignment, so compare the condyles and tibial plateaus. Note the knee and foot alignment. Genu valgum, or knock-knees, has different implications in knee pain etiology than genu varum, or bowlegs. Genu recurvatum (hyperextension) should also be noted, of the knee, so look for this as well. Always include a foot examination with the knee examination and look for pes planus or cavus, hindfoot and forefoot valgus or varus, and restrictions in range of motion. Again, asymmetrical knee alignment may be a tip-off to degenerative knee changes.
Look at the patellar alignment (1). The winking kneecaps, where each patella faces more medial than normal, can indicate femoral anteversion. Note how lateral the patella rests in the intercondylar sulcus. A patella resting over the edge of the lateral femoral condyle may develop a mechanical tracking disorder.
Patellar position should also be checked (1). Patella alta is a condition in which the patella is anatomically too high in comparison to the femur. In full extension, only the inferior patellar pole should contact the sulcus. If it is above the sulcus, the athlete may have patella alta. Patella baja is when the patella rests too low. Radiographs can rule out both conditions.
Look for obvious signs of injury or trauma, such as ecchymosis, effusion (global or localized), erythema, and abrasion. Loss of landmark distinctions, such as the patella, fibular head, and tibial plateau suggest joint effusion. Fullness in the popliteal fossa may be from a Baker’s cyst, so remember to look there (2).
Upon gait analysis, observe the range of motion in the injured knee compared with the uninjured one, such as excess flexion, internal rotation, and instability (Chapter 25 on gait analysis discusses this further).
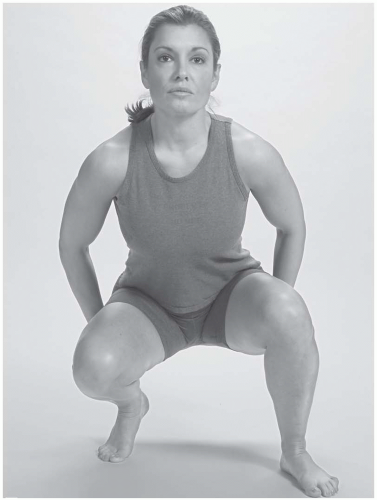 FIGURE 23.2.1. Duck-walk. |
GROSS KNEE TESTING
Duck-walk Test. In this screening test, the athlete moves from a standing to full squat position, with the thigh and calf in contact. From there, ask the athlete to “duck-walk” about 10 feet (Fig. 23.2.1).
Positive test: Pain in the knee, inability to perform the test.
Indicates: Evidence of knee pathology that warrants further testing.
PALPATION
Examine the athlete supine on an examining table. The examiner palpates the knee in four regions: anterior, medial, lateral, and posterior.
Anterior. Palpate the patella and feel for fluid superficial to the patella (prepatellar bursitis, or water on the knee), deformity (fracture or tendon rupture), or bony tenderness. Differential pre-patellar fluid contained in the bursa from an intra-articular effusion.
TABLE 23.2.1. WHAT TO LOOK FOR IN KNEE APPEARANCE | ||||||
|---|---|---|---|---|---|---|
|
Feel superior and inferior to the patella for the quadriceps and patellar tendons, respectively. Look for fluid, tissue bogginess, tendon defects, and tissue tenderness.
Palpate the medial and lateral peripatellar regions, noting tenderness and tissue texture abnormalities. Since normal connective tissue is not tender to the touch, any such findings may be indicative of pathology.
Posterior. This part of the examination is usually done best with the athlete prone. Palpate in the popliteal fossa, noting fullness or tenderness. A Baker’s cyst can form here and cause pain, while possibly indicating meniscus pathology. Pain along the posterior joint lines may indicate posterior horn injury of the menisci.
The popliteus tendon can be palpated at its lateral femoral origin and tibial attachments. Palpate for pain in these two regions. A posterolateral capsular injury has a limited window of opportunity to be surgically repaired, so look for signs of injury.
Medial. Palpate the medial joint line and note any tenderness or tissue texture abnormalities. Bogginess suggests an acute capsular, ligamentous, or medial meniscal injury. Slide up to the medial femoral condyle, feeling the medial collateral ligament (MCL) attachment. Palpate for the same on the medial tibial plateau.
Just slightly posterior and inferior to the tibial MCL attachment is the pes anserinus and its associated bursa. Tenderness here can indicate a pes anserine bursitis or tendon injury.
Lateral. First note the lateral joint line. Palpate the lateral femoral condyle, noting the lateral collateral ligament attachment and Gerdy’s tubercle, which can play a role in iliotibial band syndrome.
Next, palpate the fibular head, the peroneal nerve just behind, and the proximal tibiofibular joint. Palpate the nerve gently, noting any tissue texture abnormalities or deformity.
NEUROVASCULAR EXAMINATION
(Note: In an acute knee injury, the neurovascular exam should be performed quickly to assess nerve damage and vascular compromise before any provocative tests are performed.)
Vascular: Palpate the popliteal artery and check for pulse. Check for abnormal swelling or ecchymosis in the region. Note any varicosities, and palpate for tenderness, which may indicate superficial thrombophlebitis. Homans’ test and calf palpation may be necessary if the index of suspicion is high for a deep venous thrombosis.
Patellar tendon reflex: Ask the athlete to sit, legs relaxed and knee exposed. The examiner uses a reflex hammer to gently strike the midportion of the patellar tendon. The reflex is graded on a +4 scale.
Muscle Strength Testing
Quadriceps: Can be tested various ways. For gross testing, the athlete can sit on a table with the legs relaxed. The athlete extends the leg against a downward examinerapplied force onto the tibia, with the knee either at 90 degrees of flexion or at neutral (Fig. 23.2.2A). For a more accurate and specific measurement, the Cybex machines can be used.
Hamstring: Most commonly tested with the athlete prone on a table. The knee is flexed 20 to 30 degrees, and the athlete contracts against resistance (Fig. 23.2.2B).
Gastrocnemius: The athlete lies supine or prone, and the knee is in full extension. The athlete plantarflexes the foot against the examiner’s resistance (Fig. 23.2.2C).
Note: From this point on in the examination, the athlete is supine on the table, unless alternate techniques are specifically described.
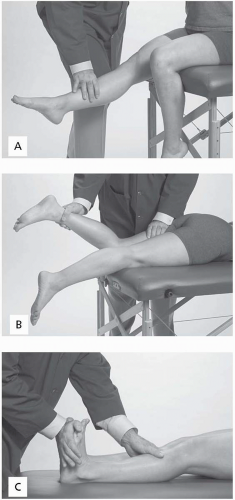 FIGURE 23.2.2. Strength testing. A, Quadriceps. B, Hamstring. C, Gastrocnemius. |
RANGE OF MOTION
Flexion. With the athlete supine and the hip flexed at 45 degrees, bend the knee until the restrictive barrier is met or pain is felt. Normal range is 145 to 150 degrees (1).
Extension. The athlete is supine, and the examiner firmly holds the distal thigh with one hand, while the other hand firmly holds the distal tibia proximal to the ankle. Lift
with the distal hand, while holding with the proximal one. For goniometric measurements, slide the athlete down on the table so the knees are just off the edge. The knee can typically extend to 0 degrees, but some individuals can hyperextend the knee to 10 to 15 degrees, also known as genu recurvatum.
Tibial external/internal rotation. With the hip and knee flexed at 90 degrees, the examiner’s distal hand holds the athlete’s foot or ankle while the proximal hand controls the knee. The ankle is rotated internally, then externally (1).
Quality of range of motion. Feel for ease of motion and crepitus in the knee throughout flexion and extension, specifically around the patellofemoral mechanism. This may indicate chondromalacia or osteoarthrosis.
Patellar mobility. When passively testing range of motion, observe the patellar motion between the condyles. The patella should start laterally in full extension, move medially into the sulcus during midrange flexion, then again laterally as the knee is fully flexed.
PATELLAR MECHANISM
Patellar Laxity. The examiner’s hands are above and below the poles of the patella, thumbs touching together on one side, index fingers on the opposite side. The examiner pushes the patella with the thumbs medially and fingers laterally until tissue restriction is felt (Fig. 23.2.3A). Laxity is graded on a +3 scale.
Patellar Apprehension. When testing patellar laxity (Fig. 23.2.3A) to the point of restriction, ask the athlete if the maneuver provokes any discomfort or sensation of instability.
Positive test: Athlete responds apprehensively, feels uncomfortable, or feels a sensation of giving out or dislocating.
Indicates: Previous patellar dislocation or severe instability.
Patellar Compression. The examiner places his or her hand over the patella and gently pushes toward the table (Fig. 23.2.3B).
 FIGURE 23.2.3. Patellar testing. A, Apprehension test. B, Patellar compression test. C, Patellar glide. |
Positive test: Pain around or under the patella with compression.
Indicates: Injury or inflammation to the patellofemoral articulation.
Patellar Glide. The examiner notes how smooth the patella translates through the intercondylar sulcus during flexion and extension (Fig. 23.2.3C).
Positive test: Palpable or audible crepitus; pain under or around the patella.
Indicates: Chondromalacia patellae, osteoarthrosis, active tracking disorder.
COLLATERAL LIGAMENTS
Valgus Stress Test
At 30 Degrees Flexion. The examiner places one hand on the lateral thigh just above the lateral joint line. The athlete’s leg is lifted, and the lower leg is placed and held against the examiner’s side between the rib cage and humerus, leaving both hands free while the knee and hip are flexed roughly 30 degrees. With both hands firmly holding the proximal tibia, the examiner translates the tibia medially, gapping the medial joint line (Fig. 23.2.4A). Check the opposite knee for comparison. The examiner assesses for laxity, quality of end point, and painful response.
Positive test: Increased laxity, soft or absent end point, pain with maneuver.
Indicates: Medial collateral ligament disruption.
At Neutral. The examiner performs the test with the athlete’s knee at full extension. Laxity suggests medial collateral ligament injury with a likely disruption of the anterior cruciate ligament.
Varus Stress Test
At Neutral. The setup is the same as for the valgus stress test in neutral, except that the examiner’s hands are switched, and the proximal one is on the medial thigh. The examiner then pushes the lower leg medially, gapping the lateral joint line (Fig. 23.2.4B). Perform at neutral and 30 degrees of flexion.
 FIGURE 23.2.4. Collateral ligament testing. A, Valgus stress test at 30 degrees. B, Varus stress test at 30 degrees of flexion. |
Positive test: Laxity with gapping of the joint line, soft or absent end point, pain.
Indicates: Lateral collateral ligament injury with a likely disruption of the posterolateral corner of the knee and/or the posterior cruciate ligament.
MENISCUS
McMurray’s Test. The examiner lifts the leg of the supine athlete, one hand controlling the ankle, while the other hand controls the knee, as shown. To stress the medial meniscus, start the leg in extension and flex the knee. During this maneuver, the clinician internally rotates the tibia while stressing the knee in a varus direction. The examiner is stressing the tibia medially so as to compress the medial joint compartment, while the rotation forces the condyles on and against the medial meniscus. This continues through the full range of motion (ROM) or until the athlete cannot tolerate it (Fig. 23.2.5A).
To test the lateral meniscus, the maneuver is reversed, but the clinician’s hands can stay in the same position. During flexion, the clinician rotates the tibia externally and puts valgus stress on the knee, which compresses the lateral joint compartment (Fig. 23.2.5.B).
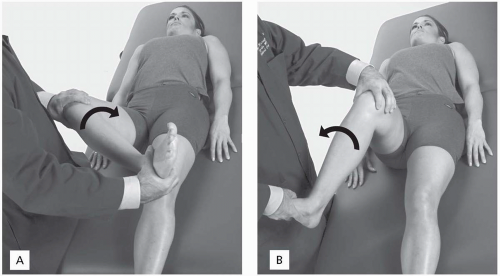 FIGURE 23.2.5. McMurray’s test. A, Varus and internal rotation for the medial meniscus. B, Valgus and external rotation for the lateral meniscus. |
Positive test: A click or clunk sensation; pain in a specific point of ROM that can be mechanically reproduced.
Indicates: Meniscus pathology.
Bounce Test. The clinician takes the relaxed supine leg with one hand on the proximal tibia and the other hand just above the ankle. The clinician first elevates the leg about 6 in., flexes the knee about 10 degrees, then lets the knee fall back toward the table, bouncing into extension. The key is to perform this in a relaxed fashion and with only minimal force (Fig. 23.2.6).
Positive test: Pain when knee fully extends (on the bounce).
Indicates: Meniscus pathology.
Apley’s Grind Test. The athlete is prone with the knee flexed 90 degrees. The clinician pushes down on the foot toward the table and rotates internally to its end point (Fig. 23.2.7). This is repeated in external rotation.
Positive test: Pain with either internal or external rotation.
Indicates: Meniscus pathology.
 FIGURE 23.2.6. Bounce test. |
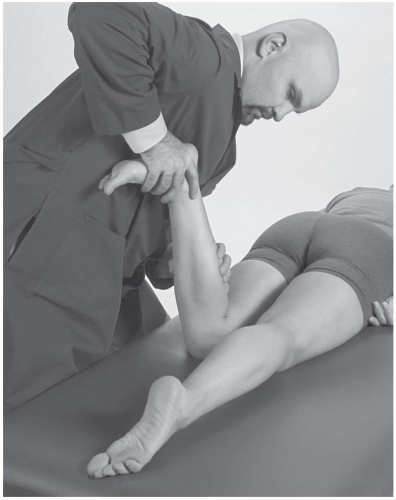 FIGURE 23.2.7. Apley’s grind test. |
ANTERIOR STABILITY
Lachman’s Test. While the athlete is supine, the clinician places the proximal stabilizing hand around the distal thigh just above the patella. The distal mobilizing hand grasps the proximal tibia. Flexing the knee 30 degrees, the distal hand pulls on the tibia away from the table, while the proximal hand stabilizes the leg. This pulling translates the tibia anteriorly (Fig. 23.2.8).
Positive test: Increased laxity, particularly compared with the opposite joint; soft or absent end point.
Indicates: Anterior cruciate ligament insufficiency.
Anterior Drawer Test. The knee is flexed to 90 degrees with the athlete’s foot on the table. The clinician sits on the foot to stabilize the lower leg, while both hands reach around the proximal tibia and translate the tibia anteriorly (Fig. 23.2.9).
Positive test: Excessive translation, particularly in comparison with the opposite joint.
Indicates: Anterior cruciate ligament insufficiency.
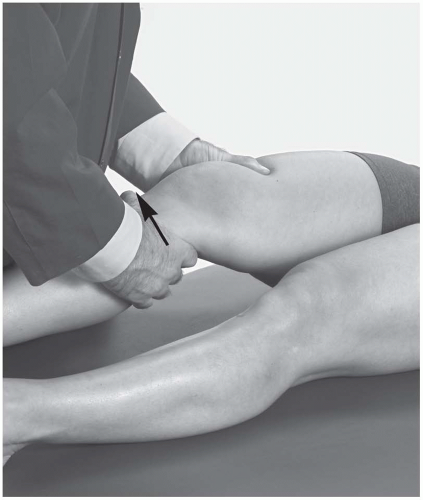 FIGURE 23.2.8. Lachman’s test. |
Pivot Shift Test. The athlete is supine, while the clinician holds the knee with both hands. The knee is held in 20 degrees of flexion and neutral rotation. The athlete is asked to relax the leg, which allows the femur to sag back when the anterior cruciate ligament is disrupted. Knee is first moved into extension with applied valgus and internal rotational stress. Then the knee is flexed to 40 degrees, causing a forward subluxation of the tibia during the sudden change in direction (Fig. 23.2.10). This test is difficult to elicit in the clinical
setting, which is why it is often performed in the operating room under sedation to verify the diagnosis.
setting, which is why it is often performed in the operating room under sedation to verify the diagnosis.
 FIGURE 23.2.9. Anterior drawer test. |
 FIGURE 23.2.10. Pivot shift test.
Related posts:Stay updated, free articles. Join our Telegram channel
Full access? Get Clinical Tree
 Get Clinical Tree app for offline access

|
