Fig. 26.1
Photo demonstrating the second generation SB device used for thumb CMC suspensionplasty
Eaton Stage I
Eaton Stage II and III
These stages are characterized by loss of joint space, osteophytes, and bony sclerosis. Many surgical techniques are used to treat these stages. Our previous preference was arthroscopic hemitrapeziectomy followed by K-wire pinning across the CMC joint. However, as discussed previously, the immobilization that this causes may lead to patient dissatisfaction in the early postoperative period. The technique described in this chapter is designed to allow earlier range of motion while still preventing subsidence of the first metacarpal into the CMC space.
Eaton Stage IV
This stage is defined by pantrapezial osteoarthritic changes including the scaphotrapeziotrapezoid joint. When these findings are present, complete trapeziectomy is required through a standard open technique. Although the CMC space may be maintained with various techniques our preferred technique has been to utilize suture-button suspensionplasty after open full trapeziectomy for stage IV disease.
Surgical Technique
Arthroscopic Setup and Establishment of Portals
Thumb arthroscopy is performed under either regional or general anesthesia. Regional anesthesia has the added benefit of providing postoperative analgesia. A standard wrist arthroscopy tower and 2.3 mm arthroscope are used. The operative field is set up by first placing the thumb in the finger trap, which is suspended from the arthroscopy tower (Linvatec, Largo, FL) at 12–15 lbs of traction. The finger trap and hand are then wrapped with sterile Coban (3M, St. Paul, MN) to stabilize it in the operative field (Fig. 26.2). A tourniquet is placed proximally near the axilla and inflated to 250 mmHg.
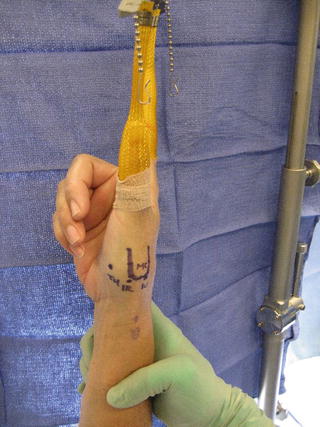

Fig. 26.2
Setup for arthroscopic hemitrapeziectomy
Next, the thumb CMC joint is located by palpating at the proximal end of the thumb metacarpal and feeling for the soft spot proximal to the base of the metacarpal. The 1U portal is located directly ulnar to extensor pollicis brevis tendon. Normal saline is injected into the thumb CMC space and the visualized expansion of the joint space confirms the correct location and angle of entry. A #11 blade scalpel is used to incise the skin over the 1U portal. Using a mosquito clamp, the soft tissue is bluntly dissected to avoid injury to the abductor pollicis longus, extensor pollicis brevis, extensor pollicis longus, the dorsal radial sensory nerve, and the radial artery, which are all in the vicinity. Dissection is continued down to the CMC joint capsule. The capsule is entered and the previously injected fluid elutes from the portal, again confirming successful placement. The 2.3 mm arthroscope is then inserted into the joint space and position confirmed on fluoroscopy. Saline is constantly infused through the arthroscopy pump, which is set to 30 mmHg to create proper joint distention, good visualization, and an adequate working space.
The next portal created is considered the “working portal.” This may be placed into one of two locations: the 1R or thenar portals. The 1R portal is found radial to the APL at the same level as the 1U portal. The thenar portal is approximately 90° and 1 cm volar to the 1R portal. We prefer the thenar portal as it located further from structures such as branches of the dorsal radial sensory nerve. Also, the thenar and 1U portals are perpendicular to each other, which allows the instruments to approach at angles that are favorable for visualization during arthroscopy and partial trapeziectomy (Fig. 26.3).
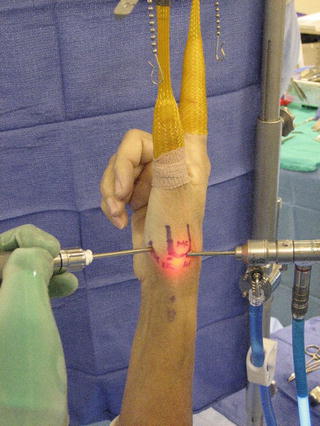

Fig. 26.3
The arthroscope is in the 1-U portal. The shaver is in the thenar portal
The thenar portal is created by placing an 18 gauge needle through the thenar musculature into the CMC joint under direct arthroscopic visualization. Once the correct position is established, the portal is finalized in the same manner as the 1U portal.
Arthroscopic Hemitrapeziectomy
The working portal is used to pass a full-radius 3.5 mm shaver into the joint. This is used to debride the joint space of degenerative articular cartilage, synovitis, articular debris, and loose bodies. After completion of debridement, the shaver is retracted and a 2.9-mm burr (Linvatec, Largo, FL) with a 3.5-mm sheath is positioned to perform the hemitrapeziectomy. Placing a smaller burr within a larger sheath decreases the incidence of clogging by creating more space around the burr. Approximately 3–5 mm of the distal aspect of the trapezium should be removed in order to treat Eaton stage II or III. In order to improve visualization and excision, the shaver and the arthroscope should be alternated between the two portals. Fluoroscopy can also be used to confirm that the hemi-trapezium has been resected appropriately.
At this stage of the procedure the baseline subsidence of the thumb metacarpal is determined using a ballottement test. This is done under spot or live fluoroscopy and the thumb is alternatively pulled and compressed to visualize the amount of subsidence present. This subsidence is noted and later compared to the level of subsidence found following suture-button suspensionplasty (Fig. 26.4).
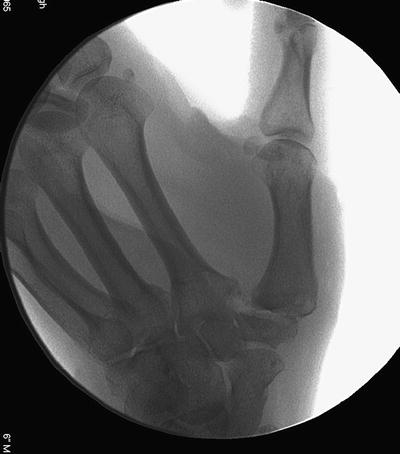

Fig. 26.4
Ballottement test shows complete subsidence of the thumb metacarpal with an axial load following hemitrapeziectomy
Open Trapeziectomy
There are two approaches to an open trapeziectomy: dorsoradial or volar (Wagner). We prefer the dorsoradial approach. This is done via a 2.5 cm incision made longitudinally over the tendons of the first dorsal extensor compartment. APL and EPB tendons are retracted and a longitudinal capsulotomy is made over the CMC joint. The capsule is then elevated off the joint as full thickness flaps both radially and ulnarly. The trapezium is then dissected free from its attachments. It is removed with the help of osteotomes and rongeurs in a piecemeal fashion. The flexor carpi radialis tendon is preserved. Once the trapezium is removed the space may be palpated for any additional osteophytes, which are also removed. A ballottement test, as conducted in the arthroscopic technique, to establish a baseline level of subsidence is performed prior to suture-button suspensionplasty.
Suture-Button Technique of Suspensionplasty
An incision is made at the 1R portal site, which is volar to the APL tendon. The tissues are bluntly dissected down to the dorsal radial base of the first metacarpal. The positioning of the suture button in this location accomplishes two functions: it minimizes the chance of hardware prominence as the SB may be placed under a part of the abductor pollicis longus tendon and it promotes pronation of the thumb. If this stage of the technique is done via an open approach, the suture-button device is placed on the dorsoradial aspect of the first metacarpal. At this point, the next step is to drill a guidewire from the first metacarpal base obliquely to the proximal diaphysis of the second metacarpal. Originally, this was done with a 1.1 mm suture-lasso guidewire (Arthrex, Naples, FL) and then a 2.7 mm drill was placed over the guidewire to make a path for the suture button. There was concern for fracture of the second metacarpal with this large drill and therefore a new guidewire was engineered. The newer guidewire has a Nitinol lasso at the proximal tip so it acts as the suture passer. A second incision is made ulnar to the metacarpal and the tissues are bluntly dissected down to the bone. There is always a branch of the dorsal radial sensory nerve in this wound and it should be identified and protected. The second dorsal interosseous muscle is dissected from the dorsal ulnar side of the second metacarpal to allow exposure of the ulnar aspect of the bone. In general the guidewire is directed to the metadiaphyseal junction; however, precise orientation of the guidewire has been determined to be less important [37]. The proximal and distal trajectories have been studied and a similar thumb range of motion was found. The main difference is that the suture-button device with a proximal trajectory is located further away from the nerve to the first dorsal interosseous muscle. It is clear there is not an ideal trajectory. This cadaveric study found an equivalent and full range of motion regardless of a distal trajectory through the diaphysis or a proximal trajectory through the metaphyseal region of the second metacarpal. Based on these findings, it appears that the trajectory and placement of the suture button can be variable and does not negatively impact the joint range of motion.
The guidewire is placed bi-cortically through the first metacarpal into the second metacarpal. It may be helpful to place a C-clamp targeting guide at the entry and exit sites to help direct the angle of the guidewire. The guidewire is then pulled through the bones out of the exit site (Figs. 26.5 and 26.6). The suture-button device is consequently pulled through the drilled holes as it follows the guidewire. It is then pulled flush against the thumb metacarpal where it is anchored. The second button is fitted over the sutures and placed against the dorso-ulnar cortex of the second metacarpal.
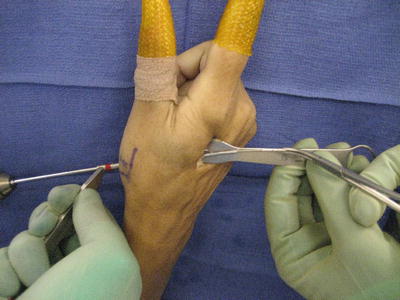
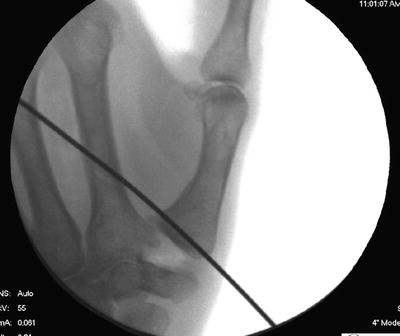

Fig. 26.5
Placement of the 1.1 mm guidewire from the thumb metacarpal to the diaphysis of the second metacarpal

Fig. 26.6
Fluoroscopic view of the appropriate position of the guidewire
The next step in the procedure is to set the tension correctly. The suture-button device should be neither too tight such that the first metacarpal impinges on the base of the second metacarpal, nor too loose that subsidence occurs. Once a provisional knot is placed temporarily, a ballottement test is conducted under fluoroscopy to confirm proper positioning (Fig. 26.7). The thumb is then taken through the full range of motion to confirm adequate motion. Adjustments are made to the suture knot as needed and once the surgeon is satisfied with the tension based on radiographic and tactile evidence the suture is tied down. Suture ends are cut and the incisions are closed. A short-arm thumb spica splint is applied.
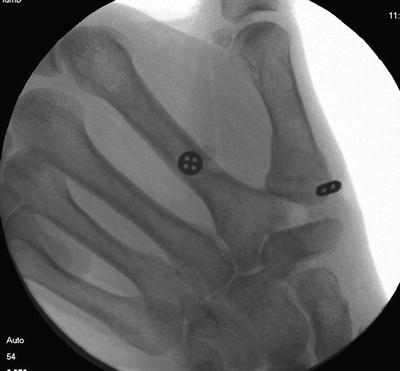

Fig. 26.7
Ballottement test shows subsidence resistance of the thumb metacarpal with an axial load following SB suspensionplasty
Postoperative Care
Surgery is performed in the outpatient setting and patient returns to clinic in 1–2 weeks for suture removal and radiographs. The films are examined for evidence of a preserved CMC joint space and then the patient is immediately enrolled in hand therapy for range of motion exercises. The patient is given a removable thermoplastic short-arm thumb spica splint to be used for comfort only.
Stay updated, free articles. Join our Telegram channel

Full access? Get Clinical Tree


