2.2 Strain and Counterstrain for Pelvic Pain
 Introduction
The gentle and atraumatic nature of the strain and counterstrain (SCS) techniques establishes it as a safe and effective primary mode of intervention in the treatment of painful hypertonic pelvic floor muscles and the joints they influence. Pelvic floor muscle hypertonicity can cause musculoskeletal pain and adversely affect the urogenital and colorectal systems they maintain (Kusunose 1993). This innovative treatment system uses passive body positioning of hypertonic muscles and dysfunctional joints toward positions of comfort or tissue ease that compress or shorten the offending structure. The purpose of movement toward shortening is to arrest aberrant proprioceptive neuromuscular reflexes that maintain muscle hypertonicity, forcing eventual reduction of neuromuscular tone to tonic levels. The strain and counterstrain (SCS) technique is considered to be an indirect manipulative technique, because its action for treatment moves away from the restrictive barriers (Jones 1964, Jones et al. 1995, Kusunose and Wendorff 1990, Travell and Simons 1992, Wilder 1997).
 History
The SCS technique was developed by the American osteopath Dr. Lawrence Jones in the 1950s. It is categorized as an “afferent reduction technique” (Wilder 1997) and was originally called “spontaneous release by positioning” or “positional release technique” (Travell and Simons 1992) before receiving its current name. Jones was motivated to experiment with the concept of positional release in part due to his frustration with the rationale that was current in his time for treatment of osteopathic lesions (somatic dysfunction). He was schooled to believe that somehow joints became locked or subluxed and that the only way to treat them was to bust them loose via high-velocity thrust techniques. His results were generally good, but occasionally a patient would enter his office who resisted all of his manipulative skills—until, Jones states, “only stubbornness kept me from admitting I was stumped” (Wilder 1997). He recounts that he was treating just such a patient when he discovered positional release.
A young man with psoasitis (stooped posture, unable to come completely erect, with severe pain across the low lumbar and sacroiliac area) had been treated by Jones using high-velocity techniques for 6 weeks with no relief of symptoms. He had been treated previously by two chiropractors for 10 weeks, with similar results. He complained of pain in bed and an inability to find a comfortable position that he could stay in for longer than 15 min. Jones therefore devoted one treatment session to finding a reasonably comfortable position for the patient to sleep in. After 20 min of experimentation, a position of amazing comfort was found. Jones relates that “He was nearly rolled into a ball, with the pelvis rotated about 45° and laterally flexed about 30°.” This was the first positive response the patient had had after 4 months of treatment, so Jones propped him in the position and went off to treat another patient. When he returned, 20 min later, he helped the patient upright and was astonished to find he could stand completely erect in total comfort. Examination revealed a full and near pain-free range of motion. All Jones had done was put the patient in a position of comfort and the results were dramatic— after his best efforts had previously repeatedly failed.
This was the inspiration that prompted Jones to experiment with positional release, applying it to all joint and muscle dysfunction. During this developmental period, he observed that following the position-of-release treatment, a return to neutral carried out very slowly was important for the outcome of the treatment. If the patient was returned toward neutral too quickly, especially in the first 15° of the motion, the benefit from the positioning was lost. Also, after initially supporting the first patient in the position of release for 20 min, he was systematically able to reduce the period to 90s. If the position was held for less than 90 s, the results were inconsistent, but more than 90s did not appear to increase the benefit to the patient (Jones 1964, Travell and Simons 1992, Wilder 1997).
The second feature of SCS was the discovery of palpable myofascial tender points and their correlation with specific somatic dysfunction. Jones describes tender points as “small zones of tense, tender, edematous muscle and fascial tissue about a centimeter in diameter” (Wilder 1997). These points, found by moderate palpatory pressure, are directly related to somatic dysfunction and were found with such consistency that they became his diagnostic tool. Tender points are a minimum of four times more tender than normal tissue. Palpation with less than sufficient pressure to cause pain in normal tissue will elicit a sharp local pain or jump sign, characteristic of an SCS tender point. Most of the tender points are found overlying the muscle involved in the dysfunction. Tender points found in the paravertebral musculature or over spinous processes are especially valuable for diagnosing segmental dysfunction in the vertebral column (Jones 1964, Wilder 1997).
 Evaluation with Tender Points
Tender points are not only found over spinous processes or paravertebral musculature. Figure 2.6 shows the magnitude of the number of diagnostic tender points that Jones has mapped out over the entire body. This illustration represents just a small sample of the close to 240 tender points that Jones and colleagues have correlated with very specific muscle and joint neuromuscular dysfunctions (Jones 1964, 1981, Travell and Simons 1992, Wilder 1997).
Specificity in evaluating a structure as involved and complex as the pelvis and low back is what makes SCS tender points such a quick and valuable tool. An accurate assessment of which muscles and joints of the pelvic floor are involved will be crucial to a successful outcome. Numerous tender points have been located in the anterior and posterior pelvis and hips, in the bellies of the iliacus, psoas, levator ani, gluteals, quadratus femoris, piriformis, obturator internus, and adductor muscles and many others, indicating local muscle dysfunctions as well as points that diagnose joint ilial–sacral and sacral–ilial motion restrictions, lumbosacral dysfunctions, and pubic symphysis problems (Jones 1964, 1981, Travell and Simons 1992, Wilder 1997).
An added characteristic of tender points, besides their value as a diagnostic tool, is their use as monitoring points. By monitoring the tender point for changes in tissue tension and the patient’s feedback of either increasing or decreasing sensitivity, the operator is guided to a position of maximum palpatory relaxation beneath the monitoring finger. A marked and prompt reduction in subjective tenderness ensues. Jones calls this the “mobile point” (Jones 1964, Wilder 1997). It is the point of maximum ease or relaxation of the tissue beneath the monitoring finger, where movement in any direction will increase tissue tension. The mobile point signifies the ideal position for release (Jones 1964, 1981, Wilder 1997).
Jones explains the use of tender points in this way: “A clinician skilled in palpation techniques will perceive tenseness and/or edema as well as tenderness, although the tenderness (often multiple times greater than that of normal tissue) is for the beginner the most valuable diagnostic sign. He maintains his palpation finger over the tender point to monitor expected changes in tone and tenderness. With the other hand he positions the patient into a posture of comfort and relaxation. He may proceed successfully just by questioning the patient as he probes intermittently while moving toward the position. If he is correct, the patient can report diminishing tenderness in the tender point area. By intermittent deep palpation he monitors the tender point, seeking the ideal position at which there is at least a two-thirds reduction in tenderness” (Wilder 1997). Finding the position of release in this way, holding this position for 90 s, and returning to neutral very slowly are the major components of the SCS technique.
A common question is the relationship of SCS tender points to Travell’s trigger points, acupuncture points, Chapman’s reflex points, shiatsu points, and the myriad of other systems that use points for diagnosis and treatment. There is, of course, considerable overlap in point locations and the palpatory feel of the tissue, but that is where the similarities end. SCS tender points are different, and recognizing the differences is essential to choosing the appropriate approach.
 Travell’s trigger points are defined as foci of hyperirritability in the muscle and/or fascia that produce a characteristic pattern of referral specific for the muscle involved (Korr 1975).
Trigger points are also associated with a taut band of skeletal muscle that is painful on compression and a local twitch in the muscle fibers containing the trigger point. A local twitch can be produced by stimulation, with a snapping palpation over the taut band eliciting a contraction of the muscle fibers (Korr 1975). SCS tender points can refer to a similar distribution to that of trigger points, but the pain is dull and achy, rather than shooting. The tissue tension at the tender point site can be tight, tense, edematous, or boggy, unlike the fibrotic, dense tissue of a trigger point. Since SCS tender points are exquisitely painful to palpation, patients can react with a jump sign when they are palpated. This response is a full-body pain reaction to the palpation stimulus and not a local twitch of muscle fibers.
There are two major differences between SCS tender points and the other systems that use points (such as acupuncture and shiatsu). Firstly, SCS tender points tend to be more segmental in origin. Points along the vertebral column designate segmental dysfunction at the corresponding vertebral level. The other philosophies identify points as related to full-body systems and are more holistic in nature. Secondly, Jones considers that SCS tender points are a sensory manifestation of a neuromuscular or musculoskeletal dysfunction (Wilder 1997). The points are used to make the diagnosis and to monitor the effectiveness of the treatment technique. Treatment is not directed at the tender point, but at the muscle or joint dysfunction that produces the tender point. If the treatment is effective, the tender point diminishes in tenderness, tissue tension, and edema. In the other philosophies, the treatment is directed toward the painful point by injection, needling, deep pressure, electrical stimulation, and vapocoolants.
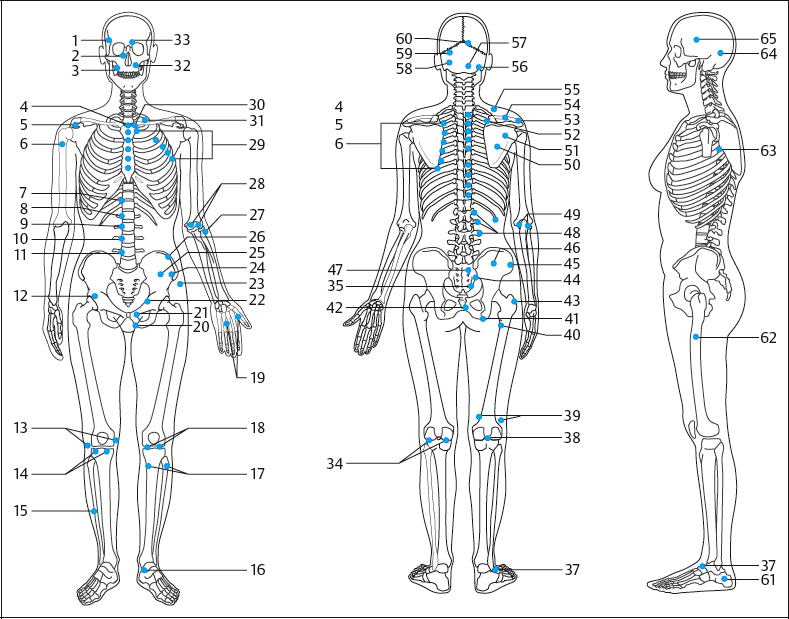
Fig. 2.6 Locations of the tender points. (Reproduced with permission from Jones 1981.)
- Squamous suture
- Nasal bone
- Masseter—temporomandibular joint
- Anterior 1st thoracic vertebra
- Anterior acromioclavicular joint
- Latissimus dorsi
- Anterior 7th thoracic vertebra
- Anterior 8th thoracic vertebra
- Anterior 9th thoracic vertebra
- Anterior 10th thoracic vertebra
- Anterior 11th thoracic vertebra
- Anterior 2nd lumbar vertebra
- Medial and lateral menisci
- Medial and lateral menisci in extension
- Tibialis anterior, medial ankle joint
- Ankle joint in flexion
- Medial and lateral ischiocrural muscles
- Medial and lateral patella
- Thumb and finger
- Lower end of ilium in flare-out
- Anterior 5th lumbar vertebra
- Lower ilium
- Anterolateral greater trochanter
- Anterior 1st lumbar vertebra
- Iliacus
- Anterior 12th thoracic vertebra
- Head of radius
- Medial and lateral ulnar coronoid process
- Depressed upper ribs
- Anterior 8th cervical vertebra
- Anterior 7th cervical vertebra
- Infraorbital nerve
- Supraorbital nerve
- Ankle joint, extended (on gastrocnemius)
- Superior sacroiliac joint in flare-out
- Elevated upper ribs
- Lateral ankle joint
- Posterior cruciate ligament
- Anterior cruciate ligament
- Posteromedial greater trochanter
- Also posteromedial greater trochanter
- Coccyx (for upper aspect of sacroiliac ligament in flare-out)
- Posterolateral greater trochanter
- Lower pole of 5th lumbar vertebra
- 4th lumbar vertebra
- 3rd lumbar vertebra
- Upper pole of 5th lumbar vertebra
- Upper lumbar vertebrae
- Medial and lateral part of elbow
- 3rd thoracic vertebra, shoulder blade
- Lateral 2nd thoracic vertebra, shoulder blade
- Medial 2nd thoracic vertebra, shoulder blade
- Posterior acromioclavicular joint
- Supraspinatus
- Elevated 1st rib
- Posterior 1st cervical vertebra
- Internal occipital protuberance
- Left occipitomastoid suture
- Sphenooccipital synchondrosis
- Right lambdoid suture
- Lateral calcaneus
- Lateral greater trochanter
- Subscapular muscle
- Behind the ear
- Squamous suture
 Techniques
The techniques demonstrated in this section emphasize evaluation and treatment procedures for muscle hypertonicity affecting the lumbosacral, and sacroiliac, sacrococcygeal joints, the pubic symphysis, and the hips, as well as the muscles that support the visceral organs. A thorough SCS evaluation of a patient with pelvic floor pain and other presenting complaints related to hypertonic dysfunction (dyspareunia, coccydynia, vaginismus, constipation, etc.) would be broadened to include the middle thoracic spine and ribs and extend below the knee. The SCS system includes techniques for all the areas of the body, but the details given here are limited due to space constraints.
Evaluation of specific dysfunctions is done by external palpation of the pelvic ring and attached muscles for SCS tender points. SCS tender points can also be found with internal palpation of the pelvic floor muscles and can be used for diagnosis and as monitoring tools to sense the release of tone with the treatment technique, but internal palpation will not be presented here (see section 2.1 above).
SCS evaluation and treatment steps (Figs. 2.7, 2.8):
- Locate the tender point to make a diagnosis.
- Find the position of comfort or the mobile point to treat.
- Monitor the point response but take all pressure off the tissue.
- Hold the position for 90 s.
- Return to neutral slowly, especially in the first 15.
- Recheck the tender point (should be at least 70% improved).

Related posts:

Stay updated, free articles. Join our Telegram channel

Full access? Get Clinical Tree


