PRINCIPLE: Aponeurotic and intramuscular recessions of contracted musculotendinous units can be carried out wherever there is an aponeurotic tendon that surrounds a muscle or a tendon that extends deep into a muscle. There is a limit to the amount of lengthening that can be achieved with an aponeurotic or an intramuscular recession, but overlengthening and permanent weakness are unlikely.
Gastrocnemius Recession (Strayer Procedure)
1. Indications
a. Contracture of the gastrocnemius but not the soleus (see Chapter 5), as determined by the Silfverskiold test (see Assessment Principle #12 and Figure 3-13, Chapter 3), that is creating pain, functional disability, and/or gait disturbance
i. The ankle joint can be dorsiflexed more than 10° with the subtalar joint locked in neutral alignment (see Basic Principle #7, Chapter 2) and the knee flexed, but less than 10° with the knee extended.
2. Technique (Figure 7-1)
a. Make a 4- to 5-cm longitudinal incision approximately halfway between the knee and the ankle 2 fingerbreadths posterior to the posterior edge of the medial face of the tibia
b. Avoid and protect the long saphenous vein
c. Open the facia longitudinally
d. Identify the plantaris tendon along the medial edge of the gastrocnemius tendon and divide it
e. Identify the musculotendinous junction of the gastrocnemius
f. Clear all soft tissues off the posterior surface of the aponeurotic tendon of the gastrocnemius
g. Identify the sural nerve in the fat on the posterior surface of the gastrocnemius, elevate it off the tendon, retract it, and protect it during the tenotomy
h. Using finger-dissection or scissor spreading, elevate a short segment of the distal musculotendinous unit of the gastrocnemius off the soleus from medial to lateral until the muscle of the soleus can be visualized lateral to the aponeurotic tendon of the soleus
i. Avoid extensive proximal-to-distal separation of the two aponeurotic tendons to prevent excessive retraction of the gastrocnemius muscle
j. Cut the gastrocnemius aponeurosis as far distally as possible. Do not be concerned about cutting the distal-most fibers of the gastrocnemius. The gastrocnemius and soleus aponeurotic tendons are not always separate structures distal to all gastrocnemius muscle fibers. The last few fibers do not matter.
k. Recheck the Silfverskiold test to ensure that the ankle can now be dorsiflexed at least 10° above neutral with the subtalar joint in neutral alignment and the knee extended (see Assessment Principle #12 and Figure 3-13, Chapter 3). There should be no difference in the degree of ankle dorsiflexion whether the knee is flexed or extended.
l. There is no need to suture the gastrocnemius tendon to the soleus muscle as long as the blunt separation of the two aponeurotic tendons is limited to a few centimeters.
m. There is no need to repair the compartment fascia.
n. Close the deep fat with a few 2-0 absorbable sutures to prevent adherence of the skin to the muscle
o. Approximate the skin edges with interrupted subcutaneous 3-0 absorbable sutures and a running subcuticular 4-0 absorbable suture
p. Apply a short-leg walking cast with a neutral to 5° dorsiflexed ankle
q. Maintain the cast for 5 to 6 weeks, or longer if needed for other concurrently performed procedures
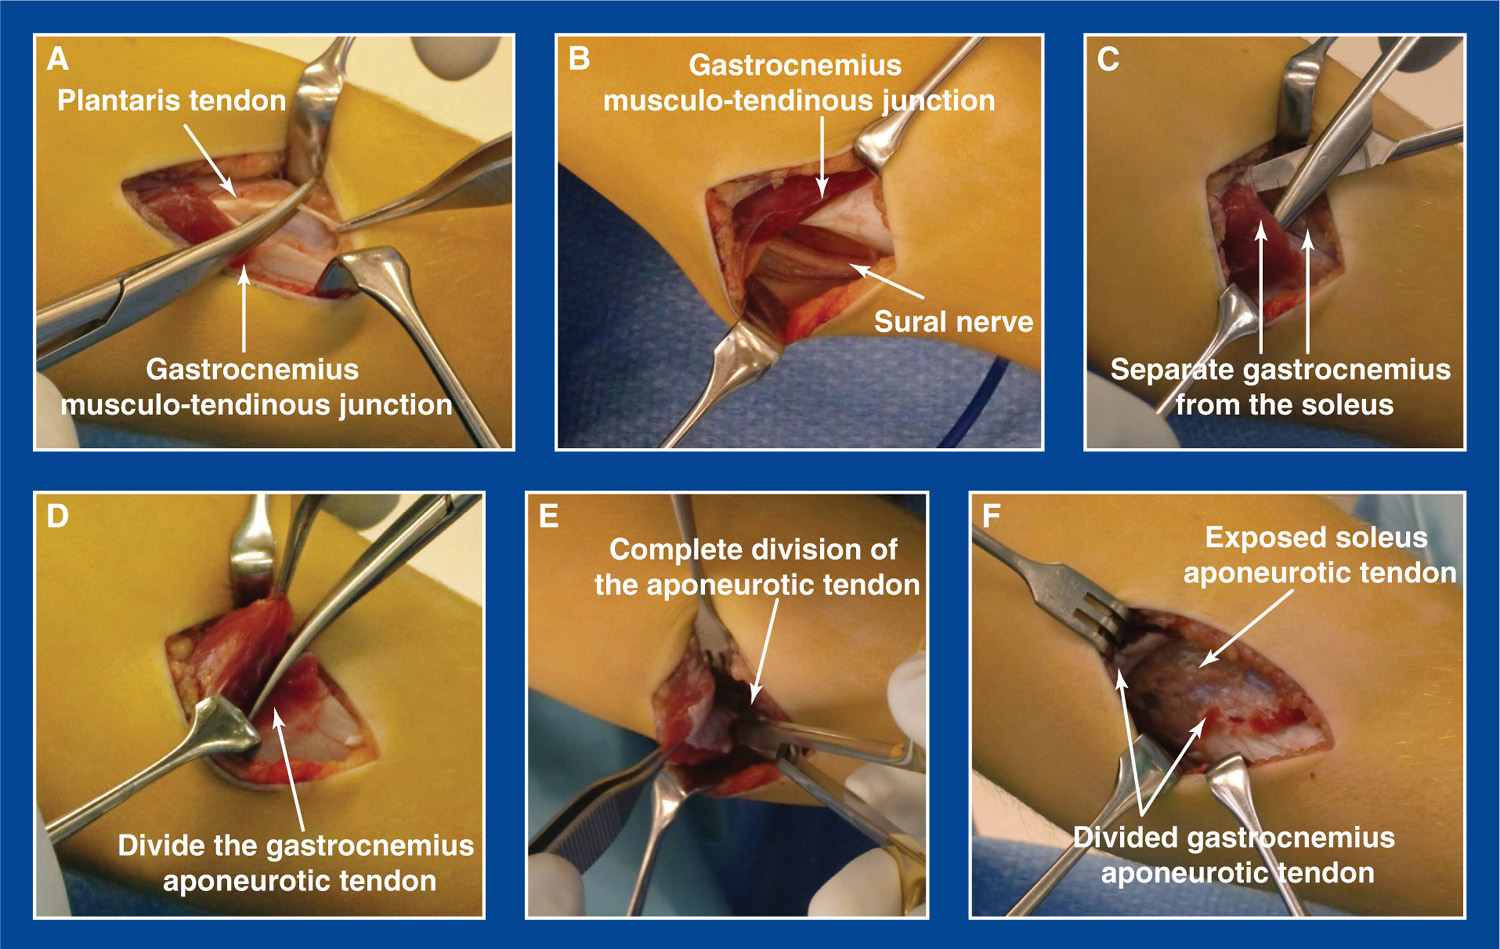
Figure 7-1.Strayer procedure (posteromedial left leg). A. Division of the plantaris tendon. B. Exposure and elevation of the sural nerve off the posterior surface of the gastrocnemius. C. Separation of the aponeurotic tendons of the gastrocnemius and the soleus. D. Initiation of the division of the gastrocnemius aponeurotic tendon. E. Completion of the division of the gastrocnemius aponeurotic tendon. F. Exposed soleus aponeurotic tendon.
3. Pitfalls
a. Inadequate deformity correction due to incorrect determination of the appropriateness for a gastrocnemius recession when, in fact, the soleus is also contracted
b. Release of both the gastrocnemius and the soleus aponeuroses, due to failure to separate them before release
4. Complications
a. Injury to the sural nerve
i. Avoid by isolating and protecting it before tenotomy
b. Adherence of the skin to the muscle, creating an obvious tethering effect with muscle contraction
i. Avoid by closing the deep fat with a few 2-0 absorbable sutures before closing the subcutaneous layer with interrupted 3-0 absorbable sutures
c. Excessive migration of the gastrocnemius muscle with unusually prominent ball-like contours of the two heads of the muscle
i. Avoid by limiting the extent of proximal-to-distal blunt separation of the two aponeurotic tendons
Distal Abductor Hallucis Recession
1. Indications
a. Contracture of the abductor hallucis in:
i. hallux varus (see Chapter 5)
• Also see Longitudinal Epiphyseal Bracket Resection, Chapter 8
ii. Dorsal bunion (see Chapter 5)
• Also see Reverse Jones Transfer of FHL to 1st MT Neck, this chapter
iii. Metatarsus adductus (see Chapter 5)
2. Technique (Figure 7-2)
a. Make a 2-cm longitudinal incision medial to the distal end of the 1st metatarsal (MT)
b. Identify the musculotendinous junction on the medial superficial surface of the abductor hallucis
c. Cut the tendon at its proximal end within the substance of the muscle, thereby creating a recession, and not a tenotomy
d. Approximate the skin edges with interrupted subcutaneous 3-0 absorbable sutures and a running subcuticular 4-0 absorbable suture
e. Apply a short-leg or long-leg weight-bearing or non–weight-bearing cast based on the requirements for the other concurrently performed procedures
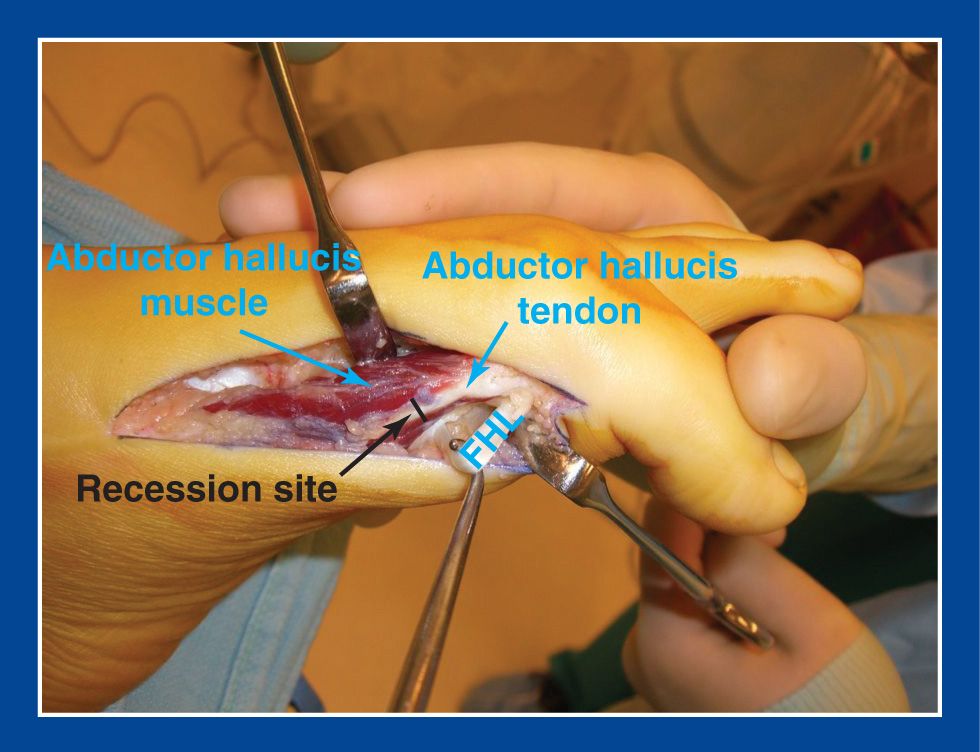
Figure 7-2. The abductor hallucis muscle is exposed distally through an incision that, in this photo, is longer than necessary for a simple recession, as it was being used for a concurrent reverse Jones transfer of the flexor hallucis longus (FHL) to the 1st metatarsal (MT) neck. The tendon is divided proximally within the substance of the muscle belly to avoid complete separation of the musculotendinous unit.
3. Pitfalls
a. The use of this recession rather than proximal release of the three origins of the abductor hallucis for correction of cavovarus deformity (see Superficial Medial Release, Deep Medial Release, Superficial Plantar-Medial Release, and Deep Plantar-Medial Release, this chapter)
4. Complications
a. Complete tenotomy
i. Avoid by releasing the tendon at a level where there is adequate overlapping muscle, i.e., not too far distal
Abductor Digiti Minimi Recession
1. Indications
a. Performed in conjunction with a calcaneal lengthening osteotomy (CLO; see Chapter 8) for correction of symptomatic flatfoot deformity (see Chapter 5)
i. Necessary to release the lateral soft tissue tether that would otherwise impede distraction of the osteotomy fragments
2. Technique (Figure 7-3)
a. This procedure is rarely, if ever, performed in isolation, but always performed in conjunction with a CLO.
b. The incision is, therefore, a modified Ollier incision in a Langer’s line over the sinus tarsi used for the CLO.
c. Clear the fat off the dorsal aponeurosis of the abductor digiti minimi with a Key elevator 1 to 3 cm proximal to the calcaneocuboid joint
d. Using a scalpel and/or scissors, divide the 1-mm-thick aponeurosis transversely starting medially at its attachment on the calcaneus and extending to its most lateral extent. Also release the aponeurosis from the lateral edge of the calcaneus 1 cm anterior and 1 cm posterior to the transverse aponeurotomy
e. Immobilization is based on the concurrently performed CLO—8 weeks in a non–weight-bearing short-leg cast, with a cast change at 6 weeks (see Chapter 8)
3. Pitfalls
a. There is no need to divide the muscle of the abductor digiti minimi. There are a few small veins immediately deep to the aponeurosis. By merely cutting the thin aponeurosis, the veins can often be avoided.
4. Complications
a. None
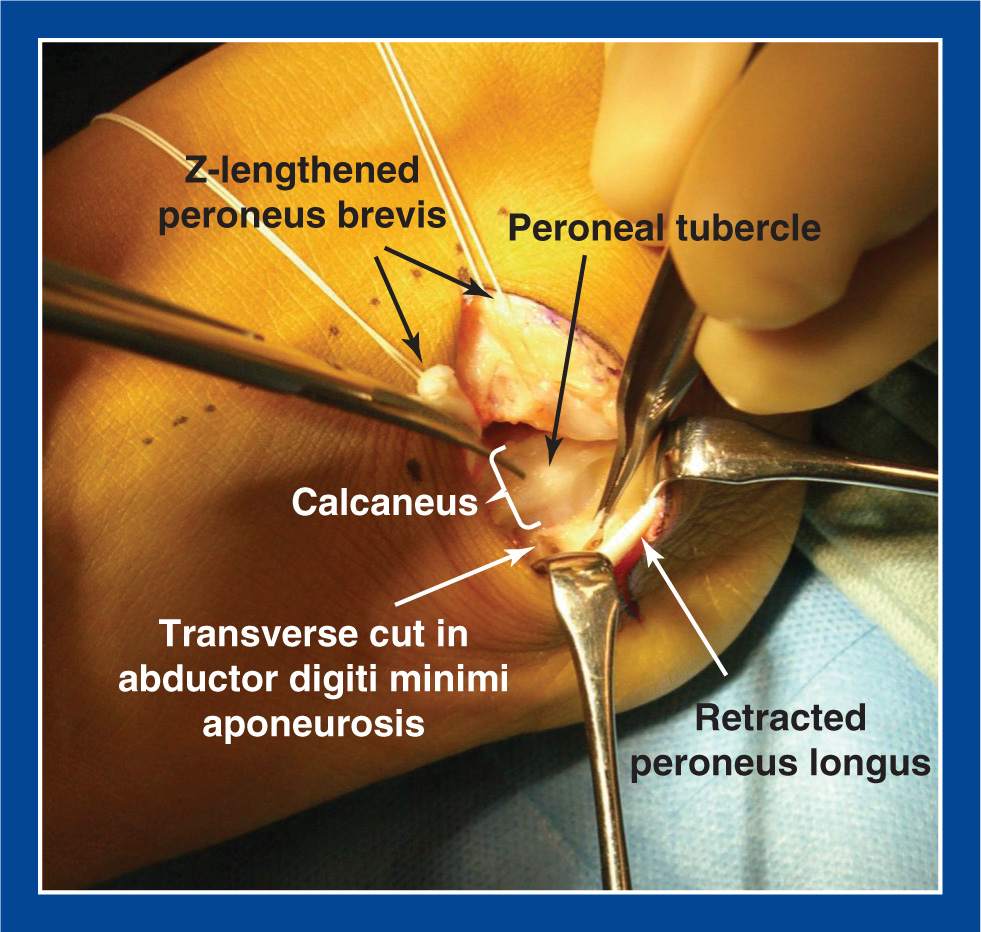
Figure 7-3. The abductor digiti minimi has been exposed through the plantar extent of a modified Ollier incision (used for a CLO) by retracting the peroneus longus (and sural nerve) laterally. The peroneus brevis has been Z-lengthened, and the soft tissue contents of the sinus tarsi have been elevated from the isthmus of the calcaneus in preparation for the osteotomy. The peroneal tubercle is seen on the lateral surface of the calcaneus. After scraping the fat (held in the forceps) off the dorsal surface of the aponeurosis of the abductor digiti minimi with a Key elevator, a transverse cut is made in this 1-mm-thick layer of collagen. It is only necessary to release the aponeurosis and not the muscle. Small veins immediately deep to the aponeurosis should be coagulated. The aponeurosis should also be released from the lateral edge of the calcaneus 1 cm anterior and 1 cm posterior to the aponeurotomy.
Posterior Tibialis Tendon Recession
1. Indications
a. Mild, flexible hindfoot varus and cavovarus deformities (see Chapter 5) with muscle imbalance; performed in conjunction with
i. a split anterior tibial tendon transfer (SPLATT) in CP (see this chapter)
ii. a superficial plantar-medial release (S-PMR) in mild forms of Charcot–Marie–Tooth (CMT) disease (see this chapter)
2. Technique
a. Make a 4-cm longitudinal incision along the posterior edge of the medial face of the tibia approximately 8 to 10 cm proximal to the tip of the medial malleolus
b. Release the fascia from the edge of the tibia
c. The first muscle encountered is the flexor digitorum longus. Confirm its identity by pulling proximally on its intramuscular tendon and observing flexion of the lesser toes. Retract it posteriorly.
d. The next muscle/tendon unit identified is the posterior tibialis. Confirm its identity by pulling proximally on its tendon and observing inversion of the foot. Divide the tendon within the substance of the muscle, cutting as few muscle fibers as possible.
e. Approximate the skin edges with interrupted subcutaneous 3-0 absorbable sutures and a running subcuticular 4-0 absorbable suture
f. Immobilization is based on the concurrently performed procedures, generally a short-leg non–weight-bearing cast for 6 weeks, followed by a short-leg walking cast for 2 weeks.
3. Pitfalls
a. Recession of the flexor digitorum longus (FDL) rather than the posterior tibialis
4. Complications
a. Complete tenotomy
i. Avoid by releasing the tendon at a level where there is adequate overlapping muscle, i.e., not too far distal
b. Division of tibial nerve
i. Avoid by identifying the anatomy as described earlier and ensuring that the dense white cord-like structure has muscle fibers approaching it at oblique angles and firmly attached to it
PRINCIPLE: There is an almost unlimited amount of lengthening that can be achieved with a tendon lengthening, but overlengthening and permanent weakness are possible.
Lengthening the tendon of a contracted musculotendinous unit can be carried out when there is a long bare tendon distal to the muscle belly. These lengthenings are frequently employed in foot deformity corrections. It is important to set the proper tension on the musculotendinous unit when repairing the tendon. The proper tension is established by placing the foot and ankle (and knee, when indicated) at the extent of the desired range of motion and repairing the overlapping limbs of the tendon under slight tension in that position.
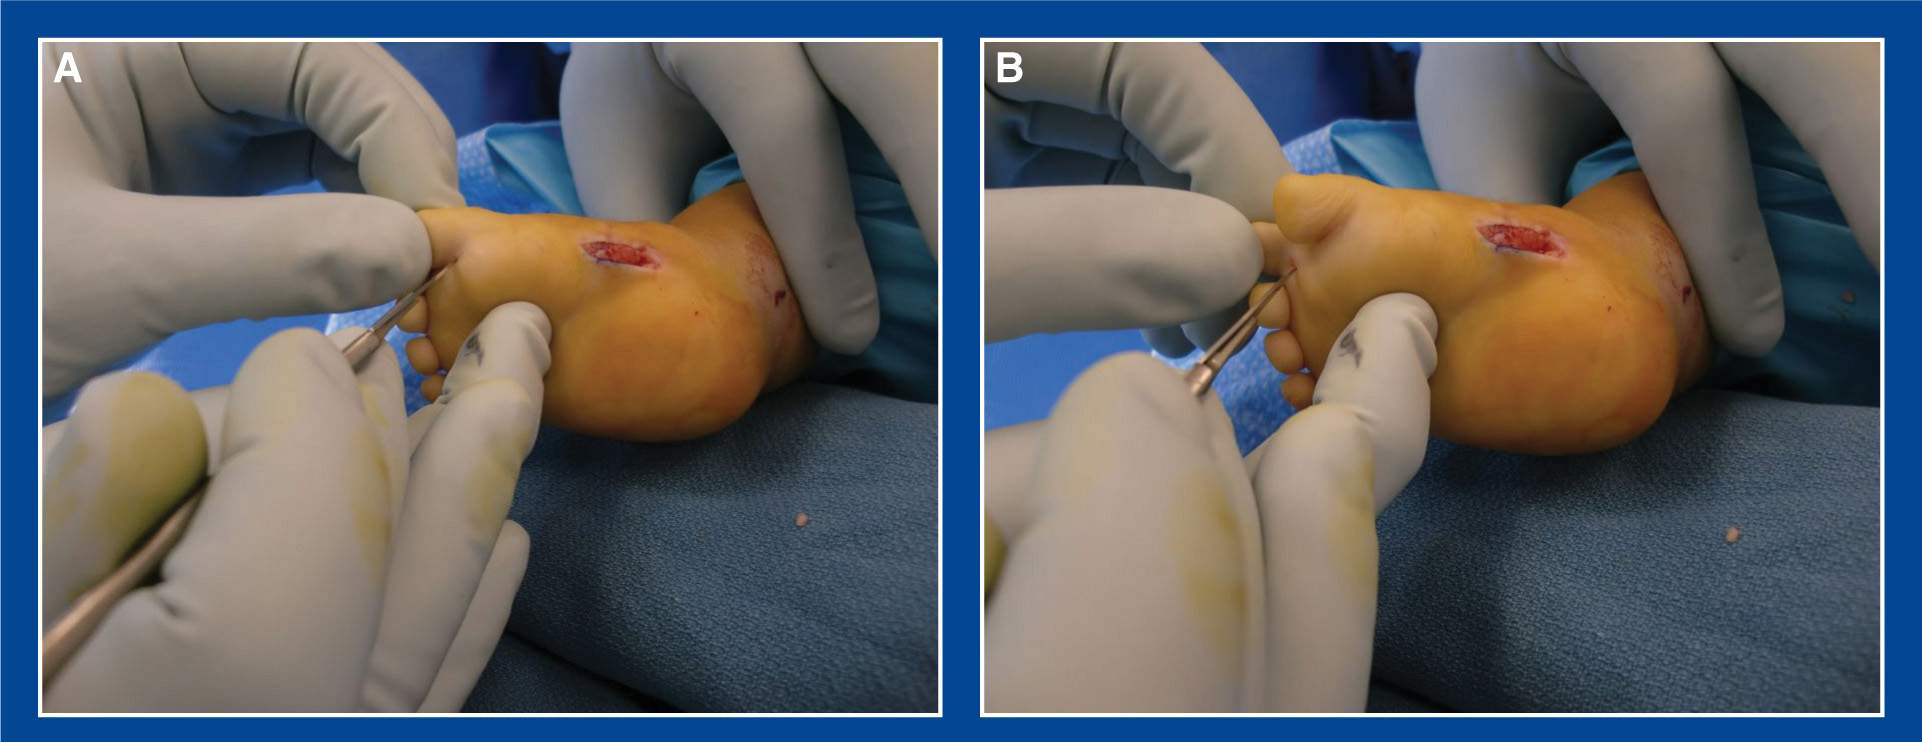
Figure 7-4. A. Percutaneous tenotomy of the FHL in an infant clubfoot. The ankle is dorsiflexed by the surgical assistant to tension the FHL. The surgeon further tensions the FHL by dorsiflexing the hallux while inserting the tip of a #11 scalpel in the medial-lateral center of the toe in the proximal plantar flexion crease. The scalpel is used as both a probe and a knife to first palpate and then divide the FHL using well-controlled short-arc sweeping movements (the NV bundles are very close by). There is a sudden and dramatic extension of the hallux when the FHL is completely released. Note the unrelated medial midfoot incision through which a plantar fasciotomy was performed. B. The same technique is used for each lesser toe with a contracted FDL tendon slip.
Percutaneous Tenotomies of the Flexor Hallucis Longus and Flexor Digitorum Longus to Toes 2 to 5
1. Indications
a. Contracture of the flexor hallucis longus (FHL) and/or the FDL to one or more of the lesser toes
i. in mallet, hammer, and curly toes (see Chapter 5 and Figure 5-65, Chapter 5)
ii. in cavus, clubfoot, and equinus deformities (see Chapter 5)
iii. applicable for infants through adolescents and young adults
2. Technique (Figures 7-4 and 7-5)
a. Ask your assistant to dorsiflex the ankle to tension the long toe flexor tendons
b. Maximally dorsiflex and release one toe at a time
c. Using a #11 scalpel, cut the long flexor tendon to each toe using short-arc sweeping movements starting in the center of the toe at the proximal plantar flexion crease. The tip of the scalpel should be used both as a probe and a scalpel. The incision should be no more than about 3 to 4 mm. There will be a sudden release of tension and the interphalangeal (IP) joints will extend
d. If the distal interphalangeal (DIP) joint extends but the proximal interphalangeal (PIP) does not, the flexor brevis is also contracted and should be released by probing with the tip of the scalpel and cutting deeper and wider as the bone is approached.
e. If the IP joints of the toe extend fully in the relaxed position, there is no further treatment needed, except for immobilization.
f. If the IP joints of the toe can be fully extended, but are flexed in the relaxed position due to skin or other soft tissue contractures, insert a small gauge wire retrograde from the tip of the toe across the IP joints to the base of the proximal phalanx.
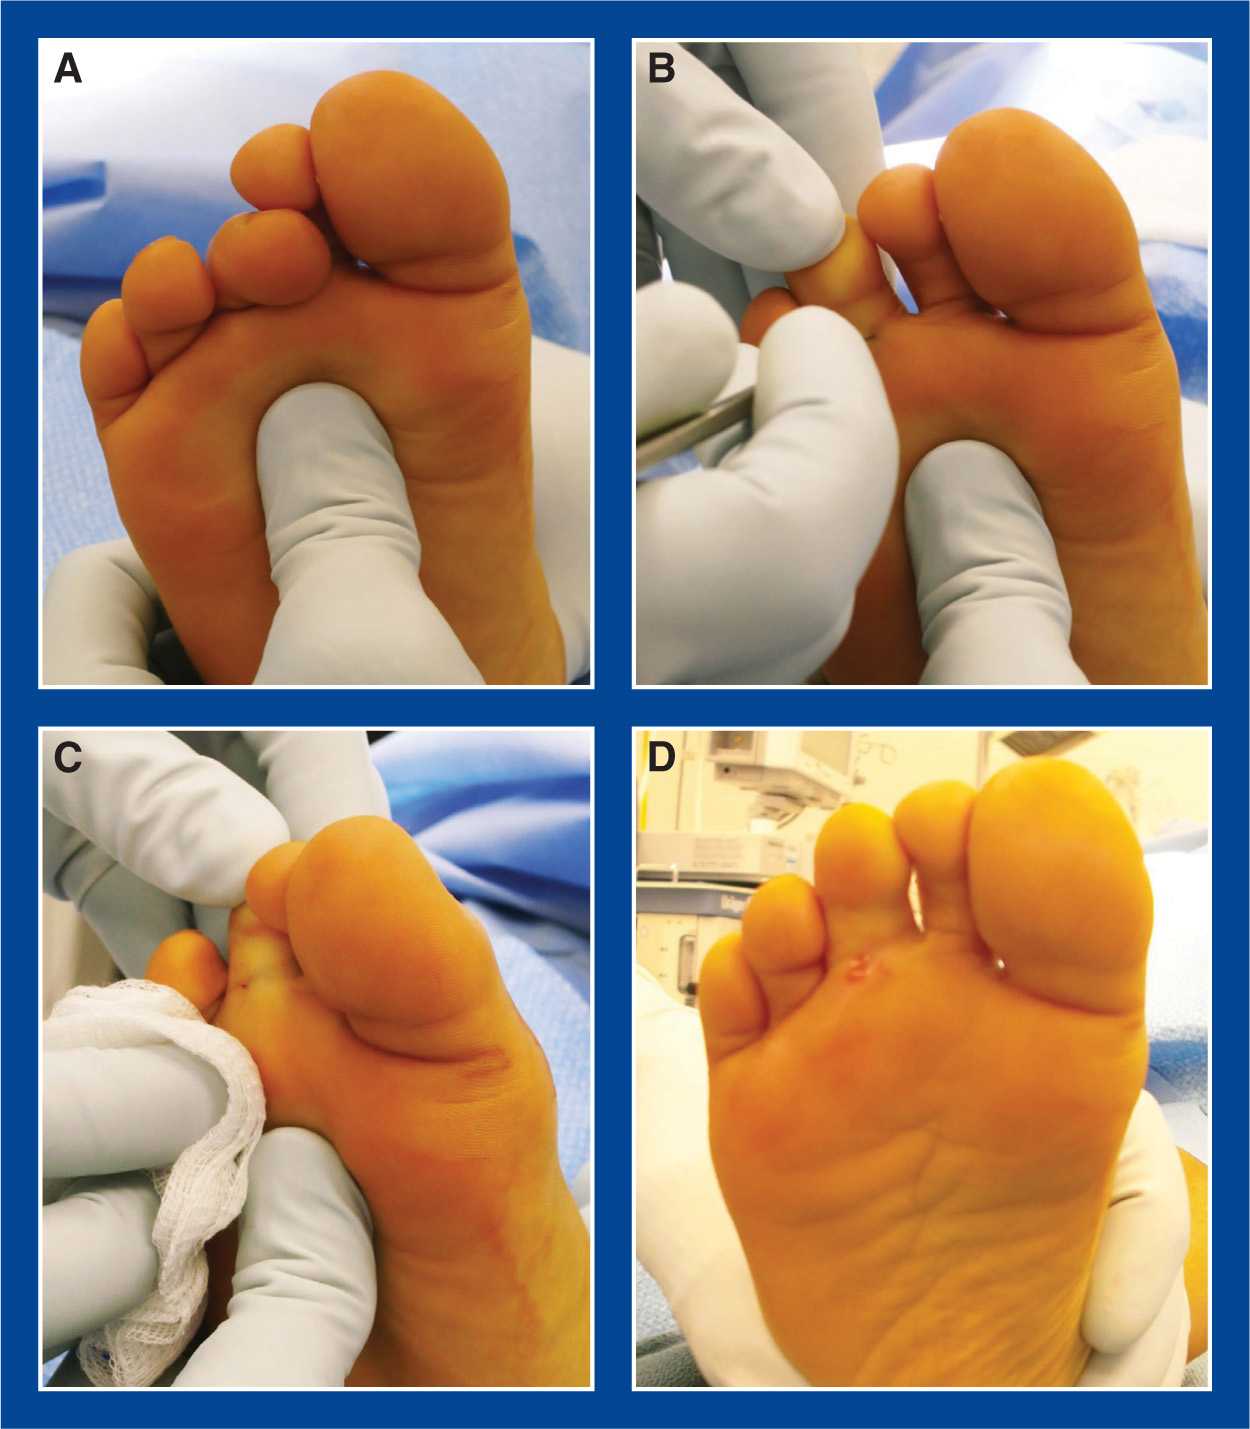
Figure 7-5. A. Four-year-old child with a severe, symptomatic curly 3rd toe. The assistant surgeon is dorsiflexing the ankle with a thumb under the MT heads to tension the FDL tendon. B. The surgeon dorsiflexes the toe. Using a #11 scalpel as both a probe and a cutting device, the FDL tendon is completely divided using short-arc sweeping motions after percutaneous insertion of the blade in the proximal plantar flexion crease of the toe. C. The release is dramatic as the toe suddenly extends. The tiny incision is seen. D. There is minimal (or no) bleeding if the scalpel is maintained in the midline of the toe. The associated varus and external rotation of the toe will gradually correct partially with time.
g. If the IP joints of the toe cannot be fully extended, a volar capsulotomy and pinning, or an arthrodesis, is indicated.
h. No wound closure is required (unless an open capsulotomy is performed).
i. Use a soft dressing with Coban extending above the ankle for a curly toe release. Remove the dressing in 1 week.
j. Use a soft dressing with an Ace bandage and an open-toed post-op shoe for mallet and hammer toes that do not require pinning.
i. Return to clinic in 2 weeks for dressing removal and to initiate twice daily extension stretching exercises
k. Use a short-leg walking cast for mallet and hammer toes that require pinning
i. Return to clinic in 4 to 6 weeks for cast and pin removal and to initiate twice daily extension stretching exercises
l. For toe flexor tenotomies performed as part of complex foot reconstruction surgery, immobilize based on the requirements of the other concurrently performed procedures
3. Pitfalls
a. Inserting the tip of the scalpel too rapidly and too deeply into the tendon so that it engages the tendon and cannot act as a probe to determine the position and limits of the tendon
4. Complications
a. Laceration of a digital nerve or artery
i. Avoid by inserting the tip of the scalpel in the proximal plantar flexion crease centrally and carefully, using it both as a probe and a scalpel.
ii. Avoid excessive medial and/or lateral excursion of the tip of the scalpel
Percutaneous Tendo-Achilles Tenotomy (TAT)
1. Indications
a. Isolated residual tendo-Achilles contracture in an infant with a clubfoot (see Chapter 5) treated by the Ponseti casting method
b. Applicable for a residual tendo-Achilles contracture in an infant with a congenital vertical talus (CVT; see Chapter 5) treated by the reverse Ponseti (Dobbs) casting method or the dorsal open reduction surgical technique (see this chapter)
i. in combination with other procedures
c. A component of a limited, minimally invasive soft tissue release (see this chapter) for a severe, rigid, resistant arthrogrypotic clubfoot in an infant or young child (see Chapter 5)
d. Upper age limit for tendo-Achilles tenotomy (TAT) is unknown, but it is at least age 2 years

Figure 7-6. A. A small amount of lidocaine cream is placed over the intended site for the tenotomy and covered with a clear adhesive dressing. B. It is then covered with a loosely applied elastic bandage to prevent it from displacing during the 30 minutes it takes to penetrate the soft tissues.
2. Technique (Figures 7-6 to 7-10)
a. In the clinic, for clubfoot
i. Place a small amount of lidocaine cream over the hindfoot and ankle and cover with an occlusive dressing
ii. Wipe off the cream after approximately 30 minutes.
iii. Ask your assistant to hold the forefoot with one hand and the thigh with the other hand while positioning the foot and leg parallel with the procedure table
iv. Prep the hindfoot and ankle with iodine prep solution
v. Using a narrow Beaver scalpel, completely divide the tendo-Achilles 1 cm proximal to its insertion on the calcaneus (and the deep posterior heel crease) from an anteromedial approach
vi. In order to avoid injury to the posterior tibial neurovascular (NV) structures, insert the scalpel through the skin directly medial to the tendo-Achilles and perpendicular to the foot in the coronal plane with the face of the blade parallel with the fibers of the tendo-Achilles

Figure 7-7. A. The foot and leg are all held parallel with the procedure table in a secure fashion by the surgical assistant. The hindfoot is prepped with iodine solution. B. Sterile gloves and scalpel are opened on a Mayo stand. C. A narrow scalpel is used. I prefer the shape shown in this image, rather than a pointed tip, because the former can be used as a probe to palpate the tendon and move around it without impaling it prematurely.
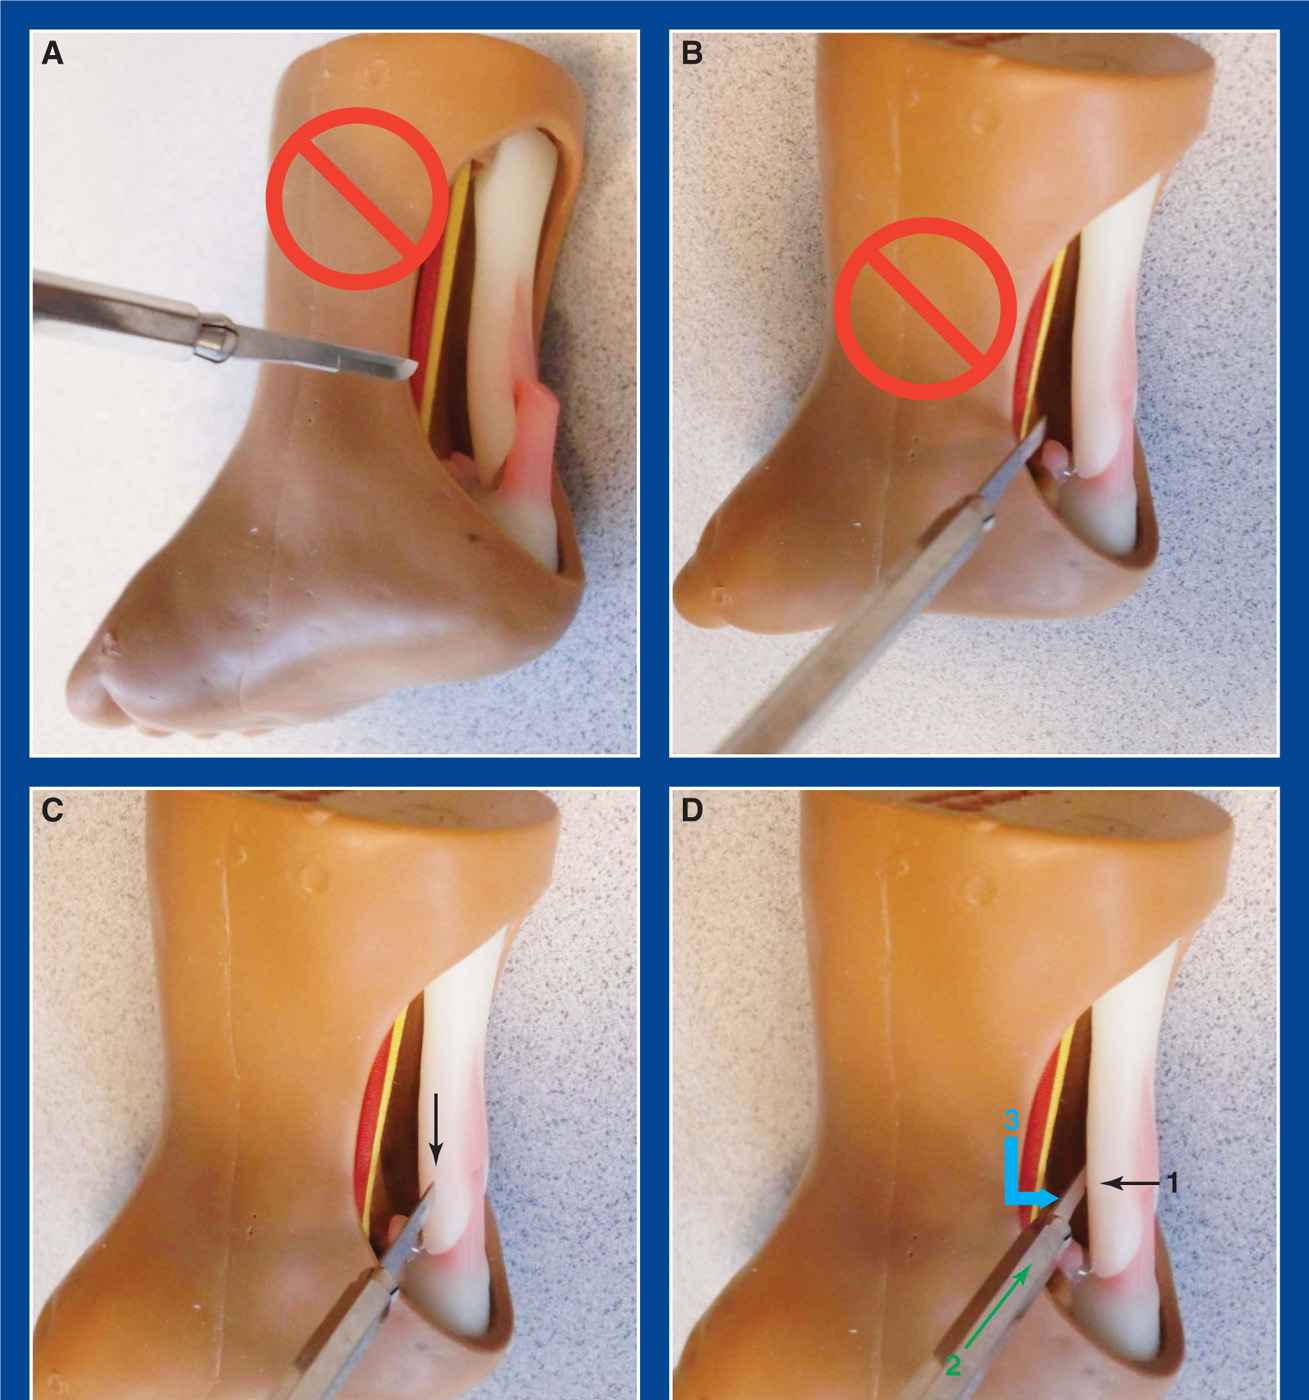
Figure 7-8. A and B. Random insertion of the scalpel on the medial side of the ankle can result in injury to the posterior tibial NV bundle. There are only a few millimeters of space between the NV bundle and the tendo-Achilles in infants and young children. C. To avoid injury to the NV bundle, insert the scalpel aimed directly at the medial side of the tendo-Achilles with the face of the blade parallel with the axis of the tendon and perpendicular to the long axis of the foot, i.e., in the coronal plane (black arrow). There can then only be skin and a little fat before the tip of the scalpel encounters the tendon. D. Once through the skin, use the scalpel as a probe to slowly translate anteriorly on the tendon (black arrow 1). When it reaches the anterior margin of the tendo-Achilles, slide it into the fat that is immediately anterior to the tendon (green arrow 2). Turn the scalpel 90° posteriorly and translate it in that direction (blue angled arrow 3) to cut the tendo-Achilles that is being held under dorsiflexion tension by the surgical assistant. Maintain control of the scalpel to avoid enlarging the skin incision (which should be no longer than the height of the blade).
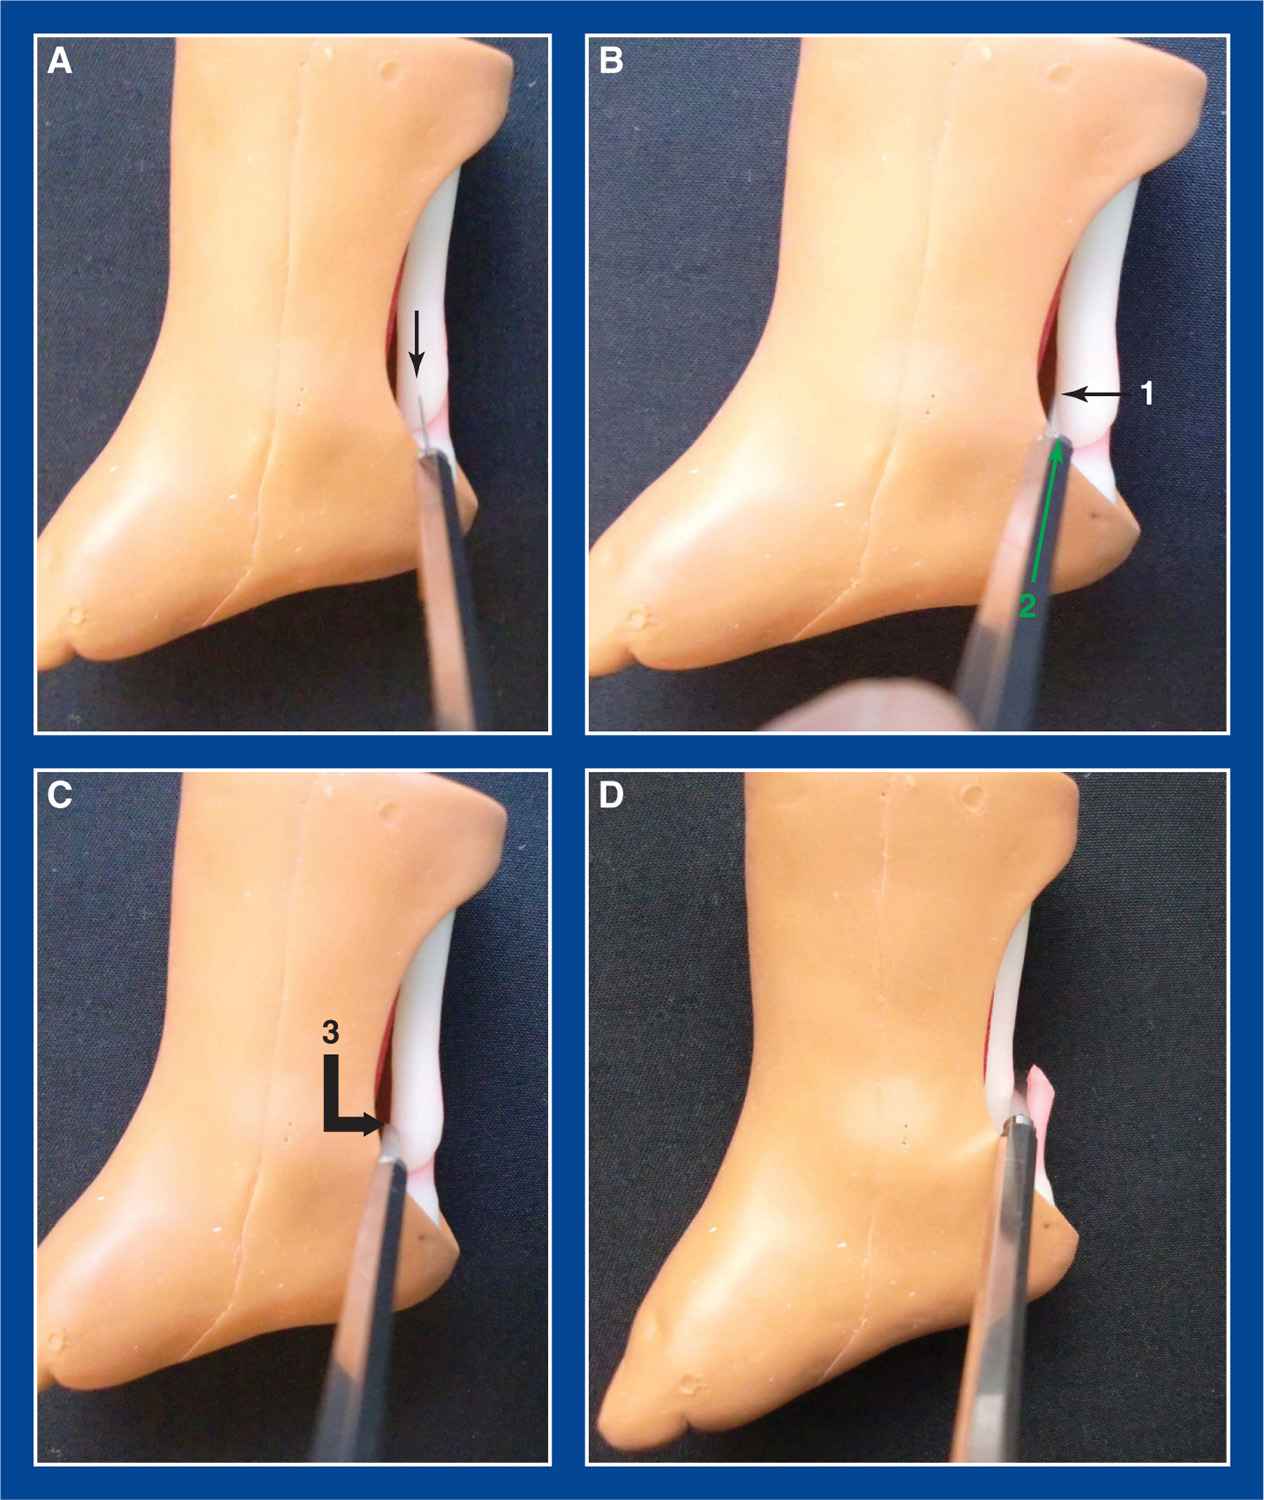
Figure 7-9. Different views of the technique shown in Figure 7-8. See legend.
vii. Using the tip of the scalpel as a probe, slowly advance it anteriorly until it falls into the fat immediately anterior to the tendon
viii. Rotate the scalpel blade 90° and translate it posteriorly to divide the tensioned tendo-Achilles
ix. The release will be experienced by the surgeon and the assistant (and often by observers).
x. Acceptable dorsiflexion is 15° to 20°.
xi. Inject a small volume of 1% lidocaine locally
xii. Apply a pressure dressing for several minutes before applying a long-leg clubfoot cast with the ankle dorsiflexed at least 10° and a 70° external thigh–foot angle
xiii. The children rarely require more than acetaminophen for pain control, though one to two doses of a liquid narcotic medication can be prescribed safely.
xiv. Have the child return to clinic in 3 weeks for cast removal and application of a foot abduction brace (FAB)
b. In the OR for clubfoot, merely eliminate the initial lidocaine cream step
c. In the OR for congenital vertical and oblique talus treated by the reverse Ponseti (Dobbs) casting method,
i. Eliminate the initial lidocaine cream step
ii. Perform a full sterile prep and draping of the lower extremity
iii. Perform a TAT as described
iv. Then make a 3-cm longitudinal incision medial to the talonavicular (TN) joint
v. Release the TN joint capsule medially for visual inspection and confirmation that the joint reduces anatomically with inversion of the subtalar joint
vi. Under direct vision and with mini-fluoroscopic guidance, insert a 0.062″ smooth Steinmann pin retrograde across the TN joint starting dorsal to the 1st MT
vii. Insert a second 0.062″ smooth Steinmann pin retrograde across the TN joint starting medially
viii. Cut the pins and bury the ends under the skin
ix. Use a 3-0 absorbable suture in the subcutaneous tissues and a running 4-0 subcuticular suture in the skin
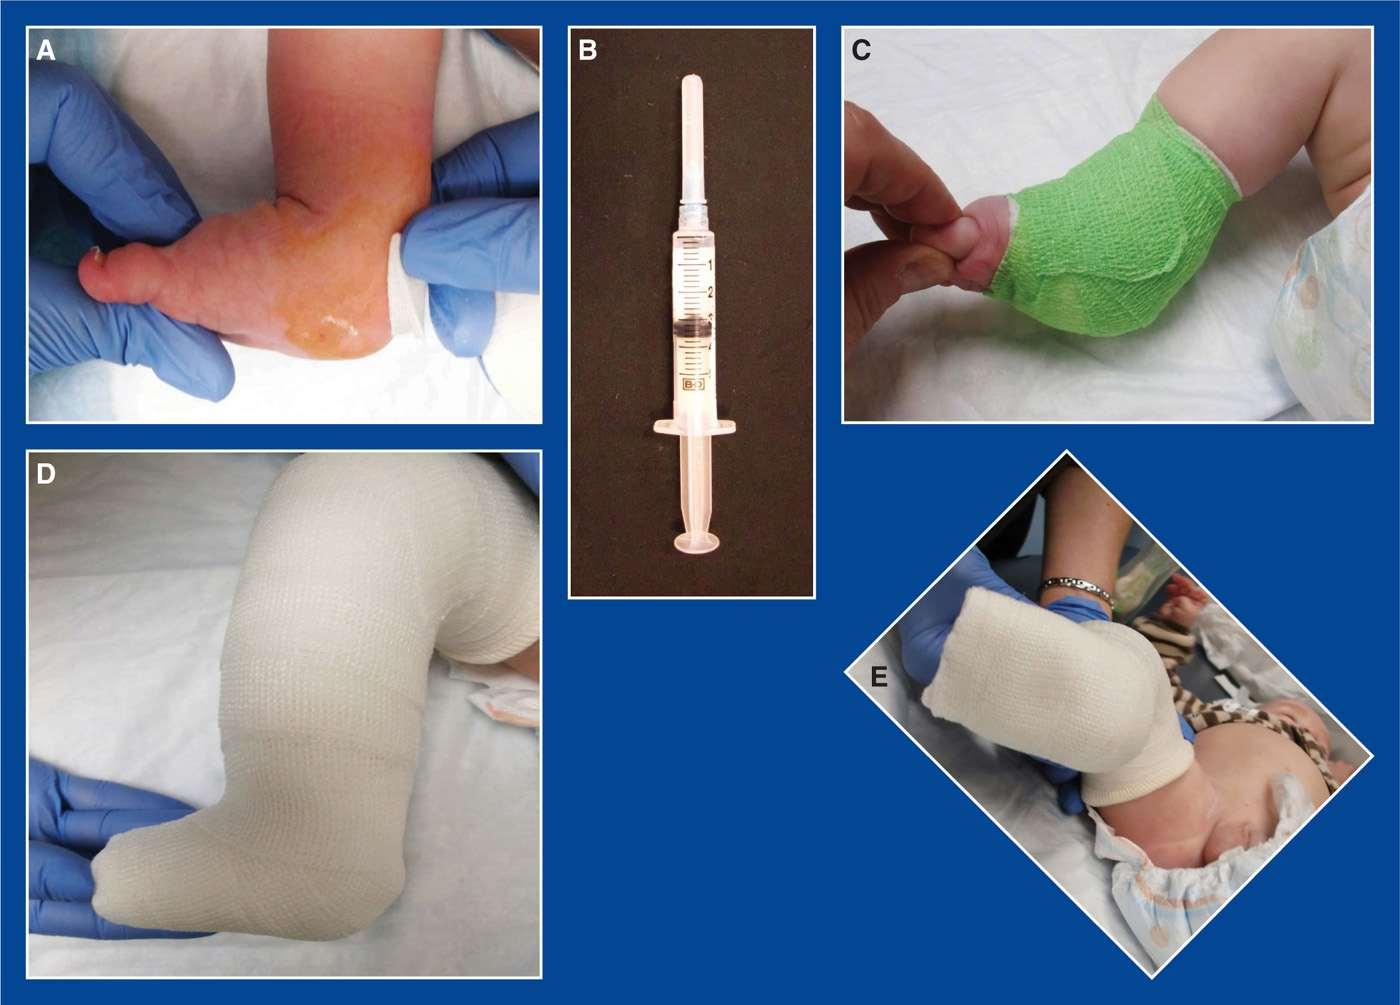
Figure 7-10. A. After the tenotomy is completed, apply direct pressure. There should be no more than a few drops of capillary bleeding, and there should be excellent perfusion of the foot and toes. B. Inject a small amount of lidocaine at the site. I prefer not to inject before the tenotomy, because the infusion will dilate the soft tissues, making it difficult to palpate the tendo-Achilles. C. Loosely wrap the ankle with a sterile gauze pad, cast padding, and an elastic wrap. Maintain the wrap for several minutes while the lidocaine takes effect. D and E. Apply a long-leg clubfoot cast with the ankle dorsiflexed 10° and a thigh–foot angle of 70° external.
x. Apply adhesive strips, a gauze dressing, and a long-leg cast with inversion molding of the subtalar joint, neutral to 5° of dorsiflexion at the ankle, and a 0° thigh–foot angle
xi. Return to clinic in 2 weeks for a long-leg cast change, this time with inversion molding of the subtalar joint, 10° to 15° of ankle dorsiflexion, and a 0° thigh–foot angle
xii. Return to clinic in 3 weeks for another long-leg cast change—same foot and ankle position as the last cast change
xiii. Return to clinic in 3 weeks for the final long-leg cast change—same foot and ankle position as the last two cast changes
xiv. Return to the OR in 1 to 2 weeks for pin removal and to initiate FAB wear with parallel shoes
3. Pitfalls
a. Incomplete tenotomy
i. This occurs infrequently with the described technique, but should be addressed by reinserting the scalpel to release residual uncut tendon fibers using the same steps used initially. Incomplete tenotomy occurs perhaps more frequently if the scalpel is inserted directly from posterior to anterior in the sagittal plane in line with the axis of the foot. The tendo-Achilles is quite wide as it approaches its calcaneal insertion, making complete tenotomy difficult with this approach. The tendon is much thinner from anterior to posterior at that level, so it is easier to release it completely using the technique described earlier. Additionally, it is challenging to know how deep to insert the scalpel when using a direct posterior-to-anterior technique. This uncertainty puts the posterior tibial NV bundle at risk, particularly when the tendon is closer than average to the NV bundle and when there is more than normal subcutaneous fat in the area (Figures 7-11 and 7-12).
b. Unanticipated posterior ankle joint contracture
i. In an older child, the posterior ankle joint capsule may have become contracted, thereby limiting dorsiflexion following a TAT. If inadequate dorsiflexion is achieved after the TAT, consider further serial casting. It is not reasonable to proceed with an open posterior ankle capsulotomy immediately after a TAT. The local environment is favorable for scar tissue to create a new, “normal” tendo-Achilles segment to fill the gap following a percutaneous TAT in an infant or very young child. But the local environment is disrupted by an open exposure and release of the posterior ankle capsule. The tendo-Achilles cannot repair itself in the same way. If the possibility of a capsular contracture is anticipated in an older child, perform an open tendo-Achilles Z-lengthening (see this chapter) through a short segment Cincinnati incision. Proceed with the capsulotomy, if necessary, followed by repair of the tendon at the appropriate tension. If a capsulotomy is not deemed necessary, merely repair the Z-lengthened tendo-Achilles at the appropriate tension.
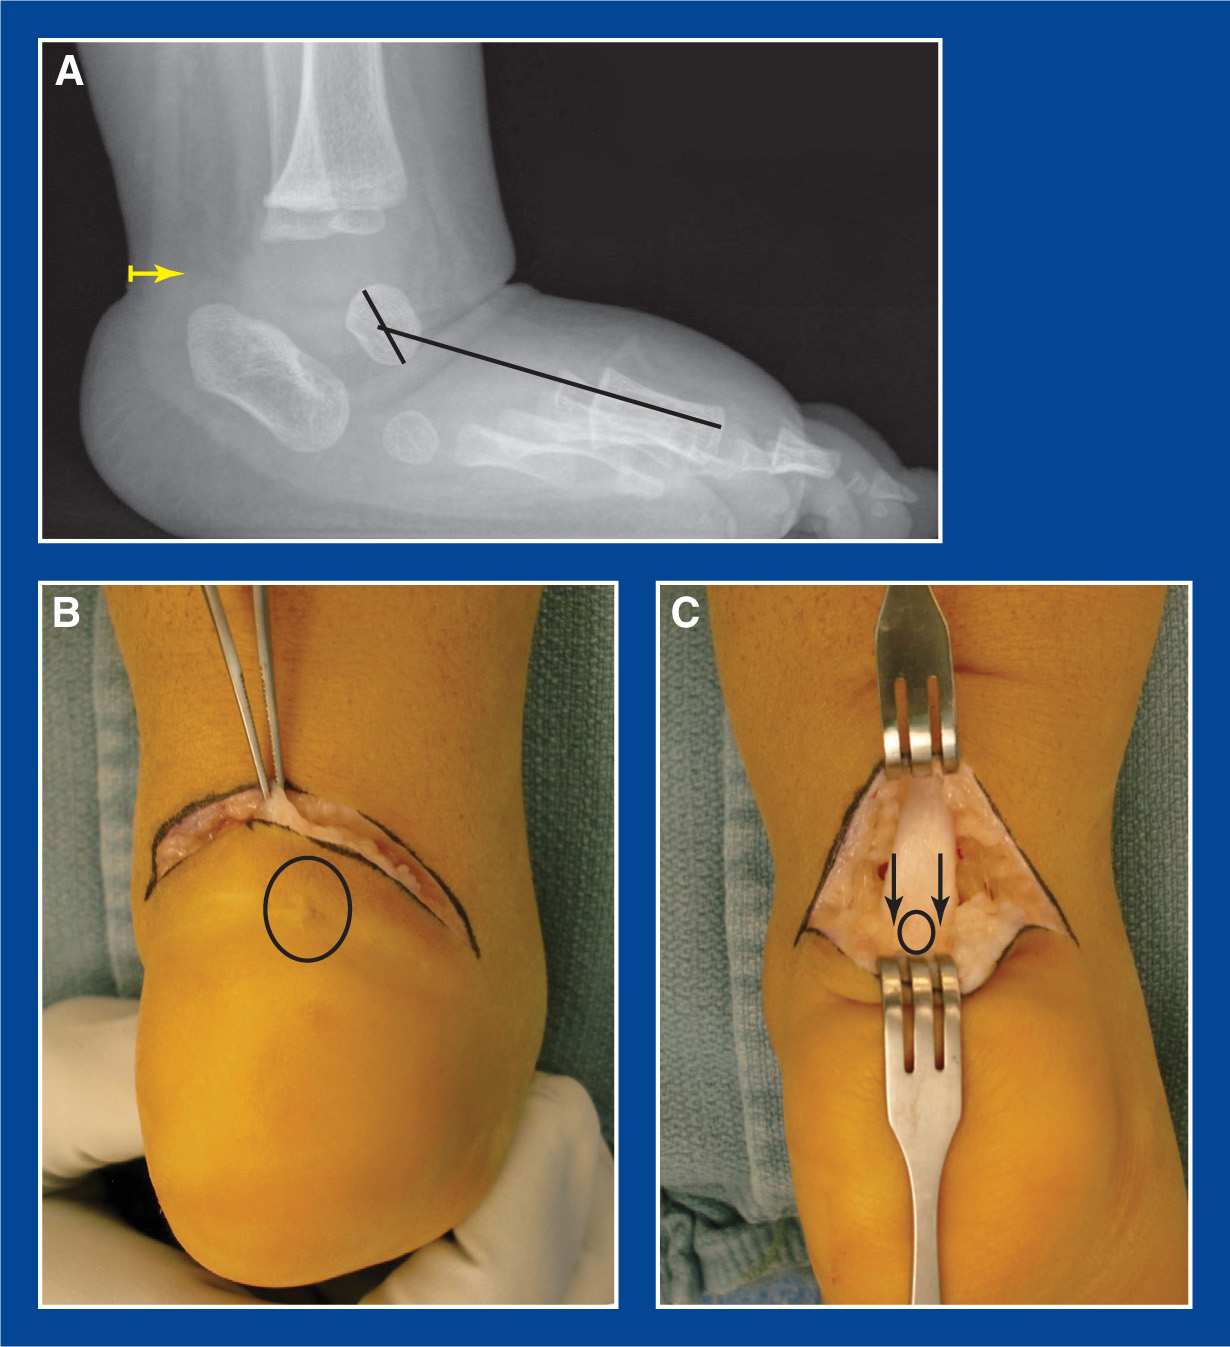
Figure 7-11. A. Lateral x-ray of a left clubfoot in a 7-month-old boy who underwent attempted percutaneous Achilles tenotomy from a direct posterior to anterior sagittal approach at age 3 months (yellow arrow). The incomplete tenotomy was unrecognized, and he was placed in an FAB, which he wore 23 hours per day for several months. A severe and rigid rocker-bottom deformity resulted from the abnormally applied pressures. A series of plantar flexion (CVT-type) casts were applied. The forefoot became aligned with the hindfoot, but the ankle could not be dorsiflexed. B. Photo of the scar from the previous percutaneous midline TAT incision (black circle) obtained at the time of an open TAL and posterior capsulotomy. C. There was scar tissue in the center of the tendo-Achilles (small black circle), but the medial and lateral margins of the tendon had never been cut (black arrows). Another potential pitfall/complication that could have occurred in this case was division of the calcaneal apophysis, due to the distal position of the tenotomy in the posterior heel crease. The tendon should be cut at least 1 cm proximal to the posterior heel crease.
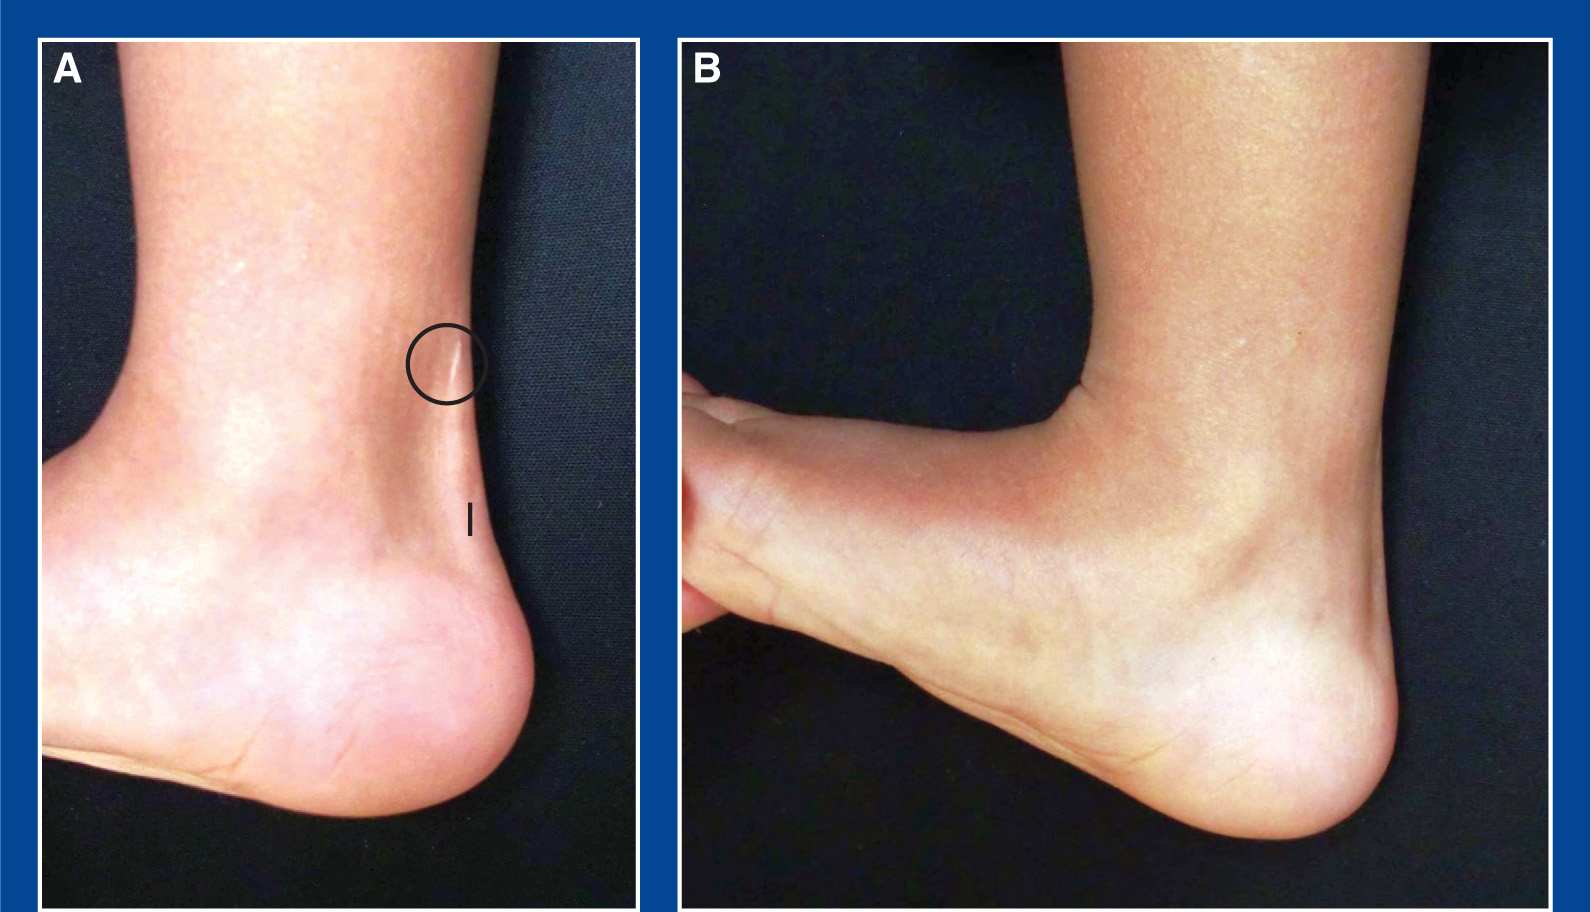
Figure 7-12. A. Two-and-a-half-year follow-up of a well-executed coronal plane percutaneous TAT that was performed at age 3 months. The black line represents the original size and location of the tenotomy incision. It is normal for the scar to migrate proximally. Note its present location (within the black circle). B. Excellent dorsiflexion is appreciated.
4. Complications
a. Nerve injury
i. Avoid by following the technique exactly as described earlier
b. Vascular injury
i. Avoid by following the technique exactly as described earlier
c. Laceration of cartilaginous calcaneal apophysis
i. Avoid by following the technique exactly as described earlier, inserting the scalpel at least 1 cm above the posterior heel crease
Tendo-Achilles Lengthening (TAL)
1. Indications
a. Contracture of the entire triceps surae/tendo-Achilles (see Chapter 5), as determined by the Silfverskiold test (see Assessment Principle #12 and Figure 3-13, Chapter 3), that is creating pain, functional disability, and/or gait disturbance
i. The ankle joint cannot be dorsiflexed at least 10° with the subtalar joint locked in neutral alignment (see Basic Principle #7, Chapter 2) and the knee flexed 90° (with an even greater lack of ankle dorsiflexion with the knee extended) (see Assessment Principle #12 and Figure 3-13, Chapter 3)
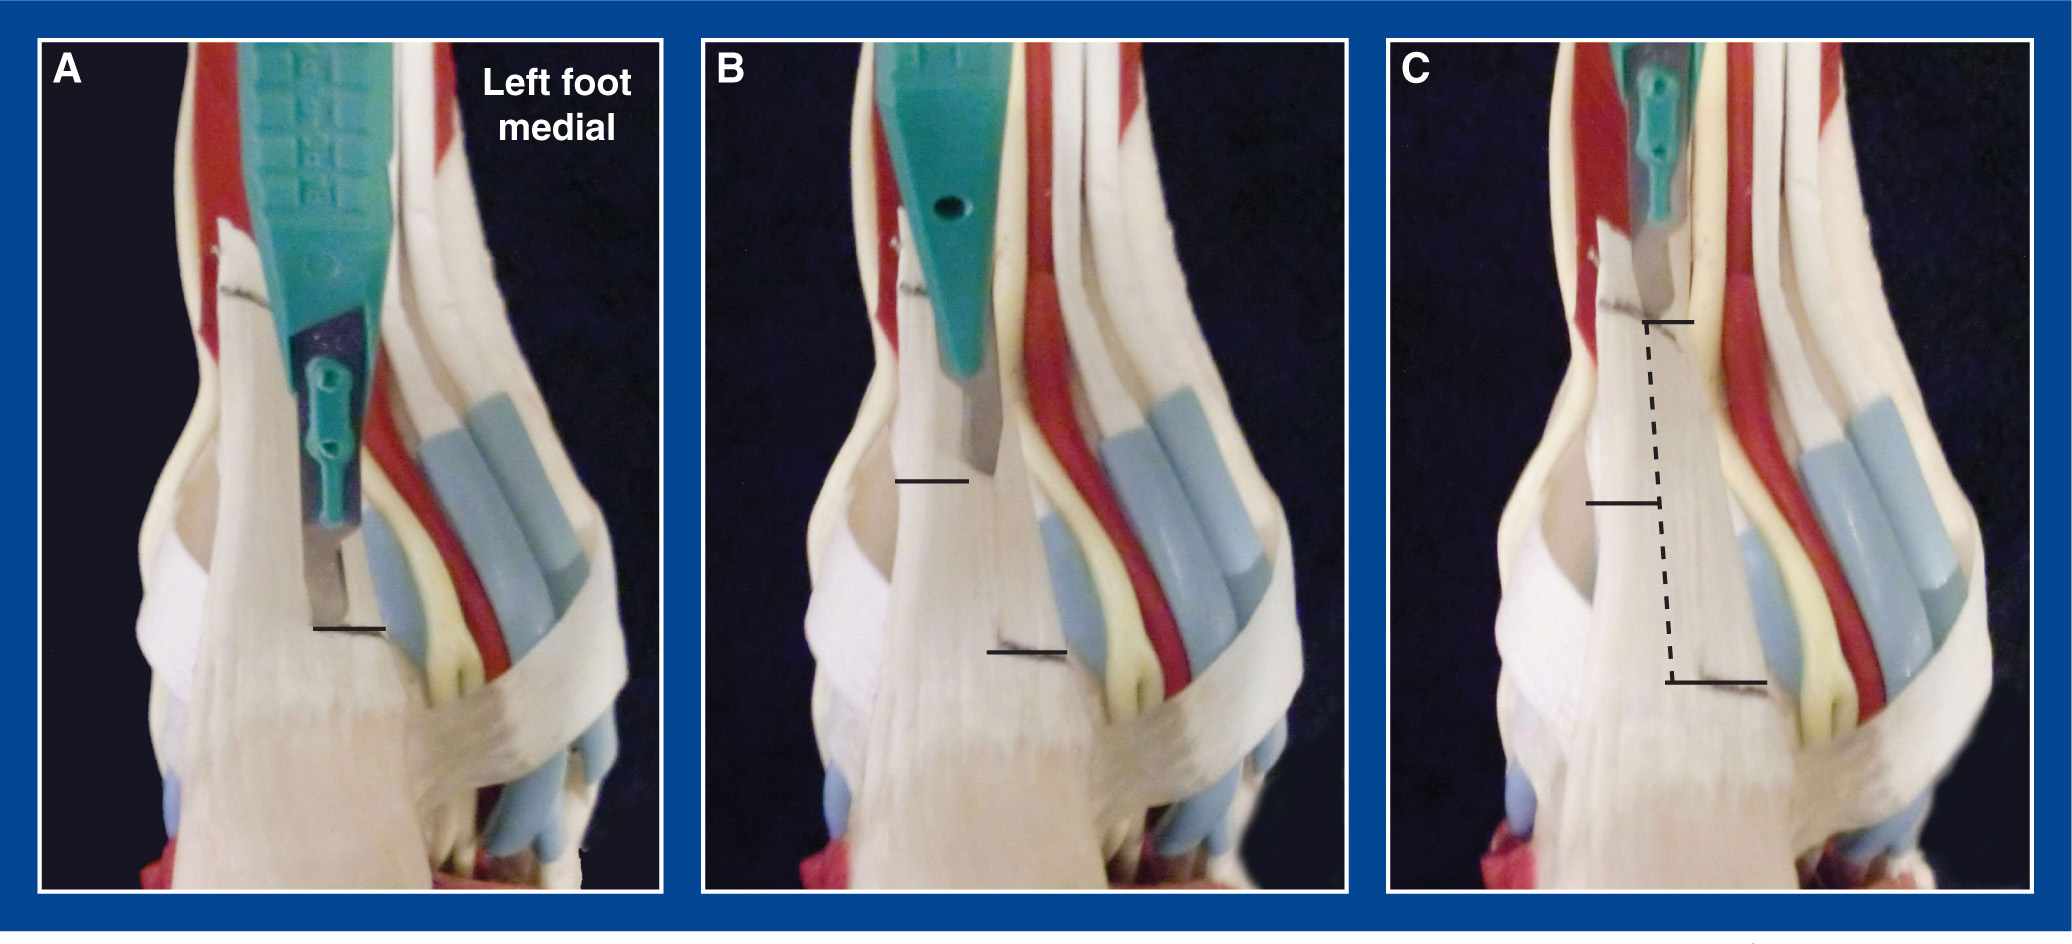
Figure 7-13. Triple cut TAL. A. Insert a #15 scalpel through the skin from posterior to anterior (in the sagittal plane) just proximal to the calcaneus with the face of the blade parallel with the direction of the tendon fibers. Then use it as a probe to identify the sagittal midline of the tendon. Rotate it 90° and translate it medially (for a varus hindfoot deformity) or laterally (for a valgus hindfoot deformity) to cut the desired half of the tendon’s fibers. Avoid making the percutaneous incision any larger than is required for the scalpel to pass through the skin. B. Reinsert the scalpel in the same manner approximately 10 to 15 mm more proximally (depending on the length of the tendon), rotate it 90° in the opposite direction, and translate it until the opposite half of the tendon is released (ignoring the anatomic rotation of the fibers). C. Reinsert the scalpel in the same manner approximately 10 to 15 mm more proximally (depending on the length of the tendon), rotate it 90° in the direction of the first cut, and translate it until the same half of the tendon is released as was released with the first cut. Dorsiflex the ankle with the knee extended until a noticeable, and often dramatic, release is appreciated. Check the Thompson test to ensure that continuity of the musculotendinous unit persists.
2. Technique
a. There are several ways to lengthen the tendo-Achilles and each has its advantages and disadvantages. Some are performed open or semi-open (for more control) and others percutaneously. Some consider and take advantage of the 90° of internal rotation of the tendo-Achilles fibers that takes place in the distal 6 to 8 cm of the tendon, whereas others disregard the rotation of the tendon fibers.
b. Percutaneous Triple-Cut Tendo-Achilles Lengthening (TAL), a.k.a. Hoke Procedure(Figure 7-13)
i. The advantages of this technique are speed and cosmesis.
ii. The disadvantage/risk with this technique is that a complete tenotomy can be inadvertently created; therefore, use it:
• with a thick tendo-Achilles (easier to feel the edges), and
• when the ankle can be dorsiflexed to approximately neutral (90°) with the knee flexed. Using this technique to correct greater degrees of contracture risks the loss of contact between the tendon segments, i.e., a complete tenotomy.
iii. This technique disregards the 90° rotation of the tendon fibers that takes place as they approach their insertion on the calcaneus.
iv. Use a standard lower limb prep and drape
v. Ask your assistant to hold the forefoot with one hand and the leg with the other hand while positioning the foot and leg parallel with the OR table
vi. Place your nondominant thumb and index finger on either side of the tendo-Achilles immediately proximal to its insertion on the calcaneus
vii. Insert a #15 scalpel through the skin from posterior to anterior in the midsagittal plane with the face of the blade in line with the direction of the tendon fibers just proximal to the calcaneus
viii. Use the scalpel as a probe to find the sagittal midline of the tendon by dragging the skin medial and lateral until the midpoint is determined
ix. Insert the scalpel through the tendon in the sagittal midline to the presumed thickness of the tendon (at least 1 cm), turn it 90° (medially for a varus hindfoot and laterally for a valgus hindfoot), and cut the fibers by translating the blade in the desired direction. The skin incision should not enlarge
x. Remove the scalpel and reinsert it 10 to 15 mm more proximally finding the sagittal midline in the same way
xi. This time, cut the opposite half of the tendon
xii. Remove the scalpel and reinsert it 10 to 15 mm more proximally finding the sagittal midline in the same way
xiii. This time, cut the same half of the tendon that was cut distally
xiv. With the knee extended and the subtalar joint in neutral alignment, dorsiflex the ankle to approximately 10°. There should be a sudden release of tension to allow the ankle to dorsiflex, but also a sense of resistance to excessive dorsiflexion
• Perform the Thompson test, by squeezing the calf musculature and watching the ankle plantar flex, to confirm maintenance of musculotendinous continuity
xv. If the ankle does not dorsiflex, palpate each incisional site to determine which one(s) requires reinsertion of the scalpel to release additional fibers
• Perform the Thompson test again
xvi. Apply adhesive strips, a gauze dressing, and a short-leg walking cast with the ankle dorsiflexed no more than 10°
xvii. Remove the cast at 6 weeks and prescribe daily strengthening and stretching exercises to be performed indefinitely
xviii. If both tendo-Achilless are lengthened, consider providing CAM boots to help with mobility during the time it takes to get strong and stable on both legs
c. Open Double Cut Slide TAL (Figure 7-14)
i. The advantage of this technique is that there is little risk for overlengthening or complete tenotomy
ii. The disadvantages/risks with this technique are:
• With extensive lengthenings, it may be hard to identify the opposite fibers. Release of additional fibers, even under direct vision, could inadvertently result in complete tenotomy.
• This technique requires an incision that is larger and, therefore, less cosmetic than the incisions used for the mini-open double cut slide TAL and the percutaneous triple-cut technique.
iii. This technique considers and takes advantage of the 90° of internal rotation of the tendon fibers that takes place as they approach their insertion on the calcaneus (Figures 7-15 and 7-16).
iv. Use a standard lower limb prep and drape with the patient in the supine position
v. Make a 5- to 7-cm longitudinal incision anteromedial to the tendo-Achilles in the concavity between the tendo-Achilles and the posterior edge of the tibia. Never make the incision directly posterior where the shoe counter will later rub and cause irritation. Directly posterior incisions also tend to be uncosmetic, as they often heal thick and wide (Figure 7-17).
vi. Incise the anteromedial aspect of the tendon sheath from proximal to distal
vii. Avoid disruption of the posterior tendon sheath and subcutaneous fat. By so doing, there will be less adherence of the tendon to the skin.
viii. Divide the plantaris tendon distally—if an inadvertent tenotomy occurs, the plantaris can be used as an intercalary graft
ix. Insert a #15 scalpel into the tendon from posterior to anterior with the face of the blade in line with the direction of the tendon fibers and in the sagittal midline of the tendon immediately proximal to the insertion on the calcaneus
x. Insert the scalpel through the tendon to the presumed thickness of the tendon (at least 1 cm), turn it 90° medially, and cut the medial half of the fibers by translating the blade in that direction
xi. Insert a #15 scalpel into the tendon from medial to lateral with the face of the blade in line with the direction of the tendon fibers and in the midcoronal plane of the tendon approximately 4 to 6 cm more proximal than the first cut
xii. Insert the scalpel through the tendon, turn it 90° posteriorly, and cut the posterior half of the fibers by translating the blade in that direction
xiii. With the knee extended and the subtalar joint in neutral alignment, dorsiflex the ankle to approximately 10°. There should be a sudden release of tension to allow the ankle to dorsiflex, and also a sense of resistance to excessive dorsiflexion. The overlapping halves of the tendon should maintain side-to-side contact even with lengthenings of 3 to 4 cm or more. Reinforcing sutures are rarely required.
• Perform the Thompson test, by squeezing the calf musculature and watching the ankle plantar flex, to confirm maintenance of musculotendinous continuity
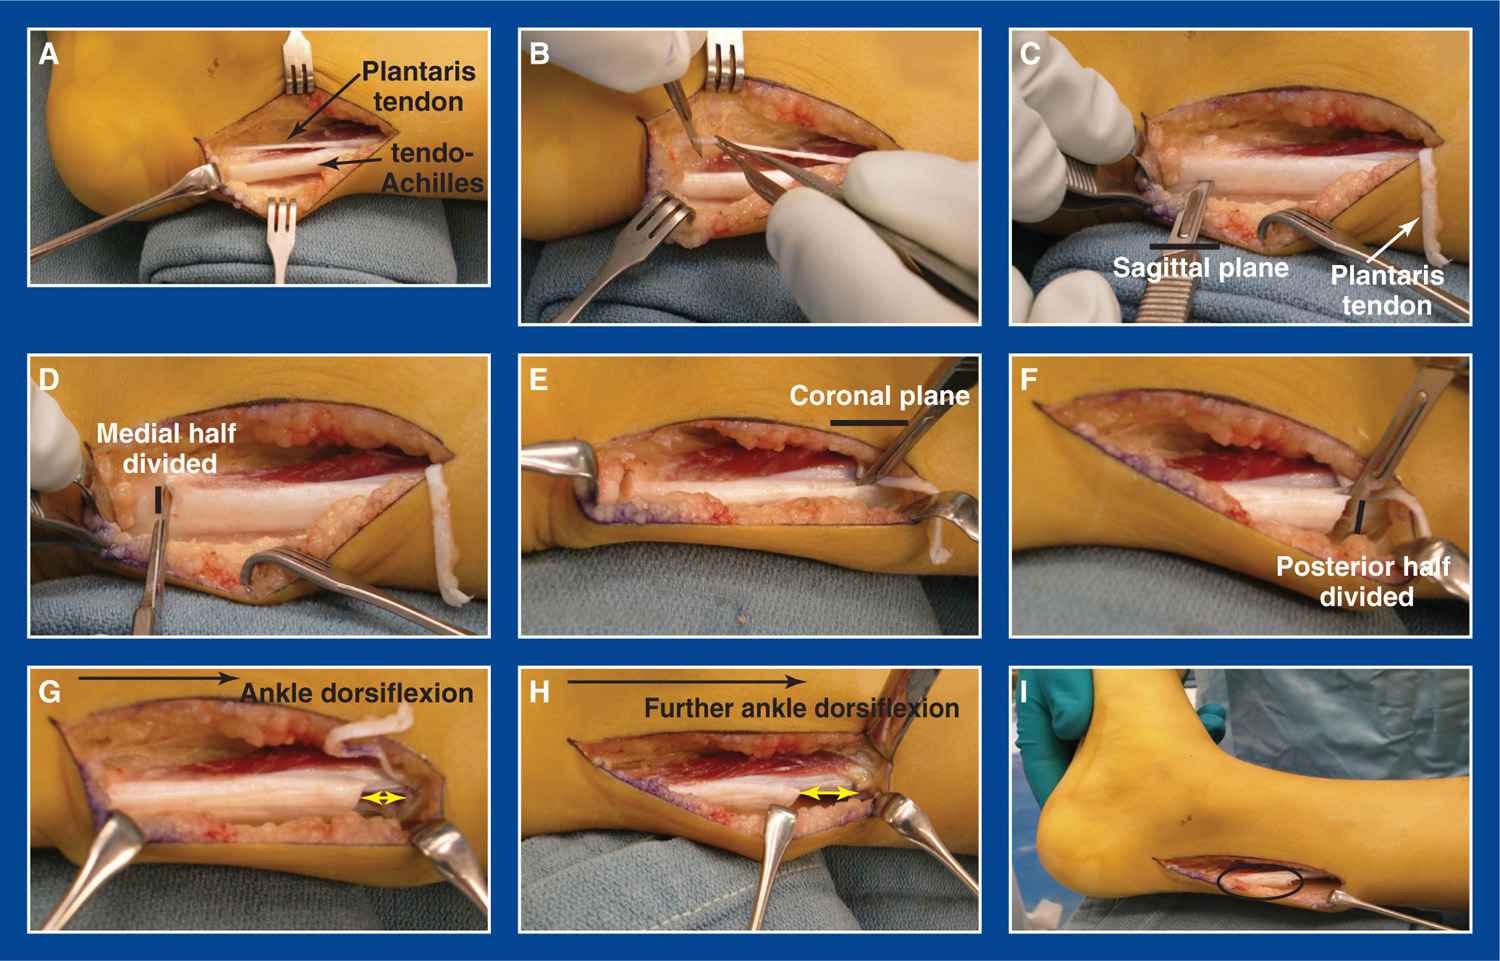
Figure 7-14. Open double cut slide TAL. A. Wide exposure of Achilles and plantaris tendons through a posteromedial incision. B. Distal release of plantaris tendon. C. Scalpel is inserted distally in the midsagittal plane of the tendo-Achilles. D. The scalpel is rotated 90° medially and translated until the hemitendon is released. E. Scalpel inserted proximally in the midcoronal plane of the tendon. F. The scalpel is rotated 90° posteriorly and translated until the hemitendon is released. G. As the ankle is dorsiflexed, the tendon halves begin to slide past each other. H. Even further dorsiflexion of the ankle results in further longitudinal translation of the tendon halves relative to each other. I. Ten degrees of ankle dorsiflexion with the knee extended should be sought—not less and not much more. Ensure that there is enough distance between the proximal and distal cuts that the tendon halves will maintain some side-to-side contact at the final lengthened position. Though not intuitive, translation/lengthening of even 3 to 4 cm can take place without loss of “stable” side-to-side contact between the tendon halves (black oval). Reinforcing sutures can be used, but are often unnecessary.
xiv. If the ankle does not dorsiflex, carefully release only the fibers that appear to be resisting deformity correction
• Perform the Thompson test again
xv. Use a 3-0 absorbable suture in the subcutaneous tissues and a running 4-0 subcuticular suture in the skin of the proximal incision. Apply adhesive strips, a gauze dressing, and a short-leg walking cast with the ankle dorsiflexed no more than 10°
xvi. Remove the cast at 6 weeks and prescribe daily strengthening and stretching exercises to be performed indefinitely
xvii. If both tendo-Achilless are lengthened, consider providing CAM boots to help with mobility during the time it takes to get strong and stable on both legs
d. Mini-Open Double Cut Slide TAL (Figure 7-18)
i. The advantages of this technique are:
• There is little risk for overlengthening or complete tenotomy.
• The incisions are smaller and, therefore, more cosmetic than the incision used for the open double cut slide TAL.
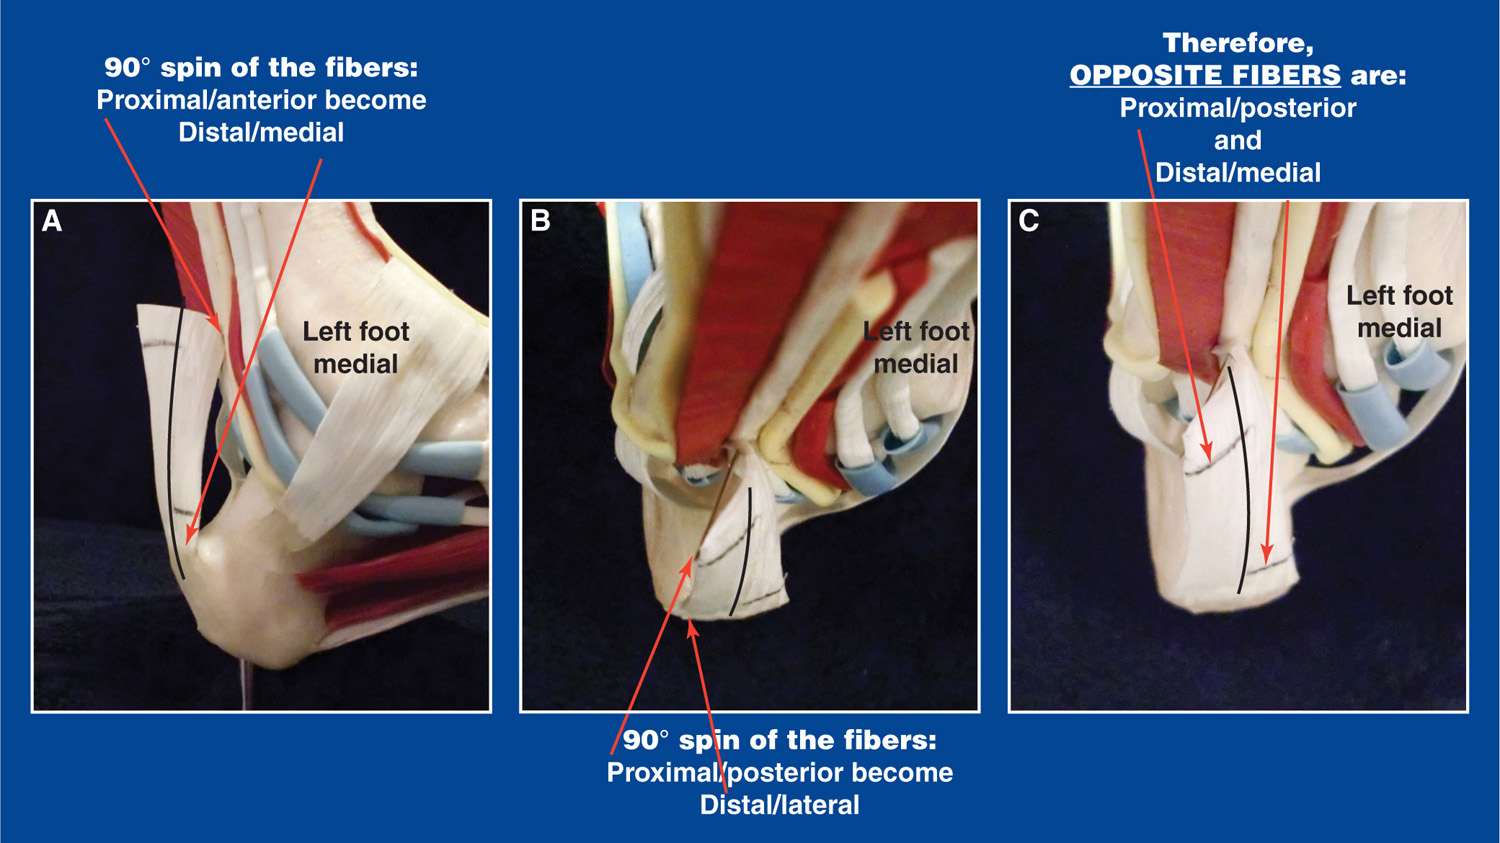
Figure 7-15. A. The tendo-Achilles fibers internally rotate 90° in their terminal few inches as they approach their insertion on the calcaneus. In this lateral view of a left foot model, it can be appreciated that the proximal/anterior tendon fibers become distal/medial at the calcaneus. B. The proximal/posterior fibers become distal/lateral at their insertion. C. Therefore, the opposite fibers are the posterior ones proximally and the medial fibers distally.
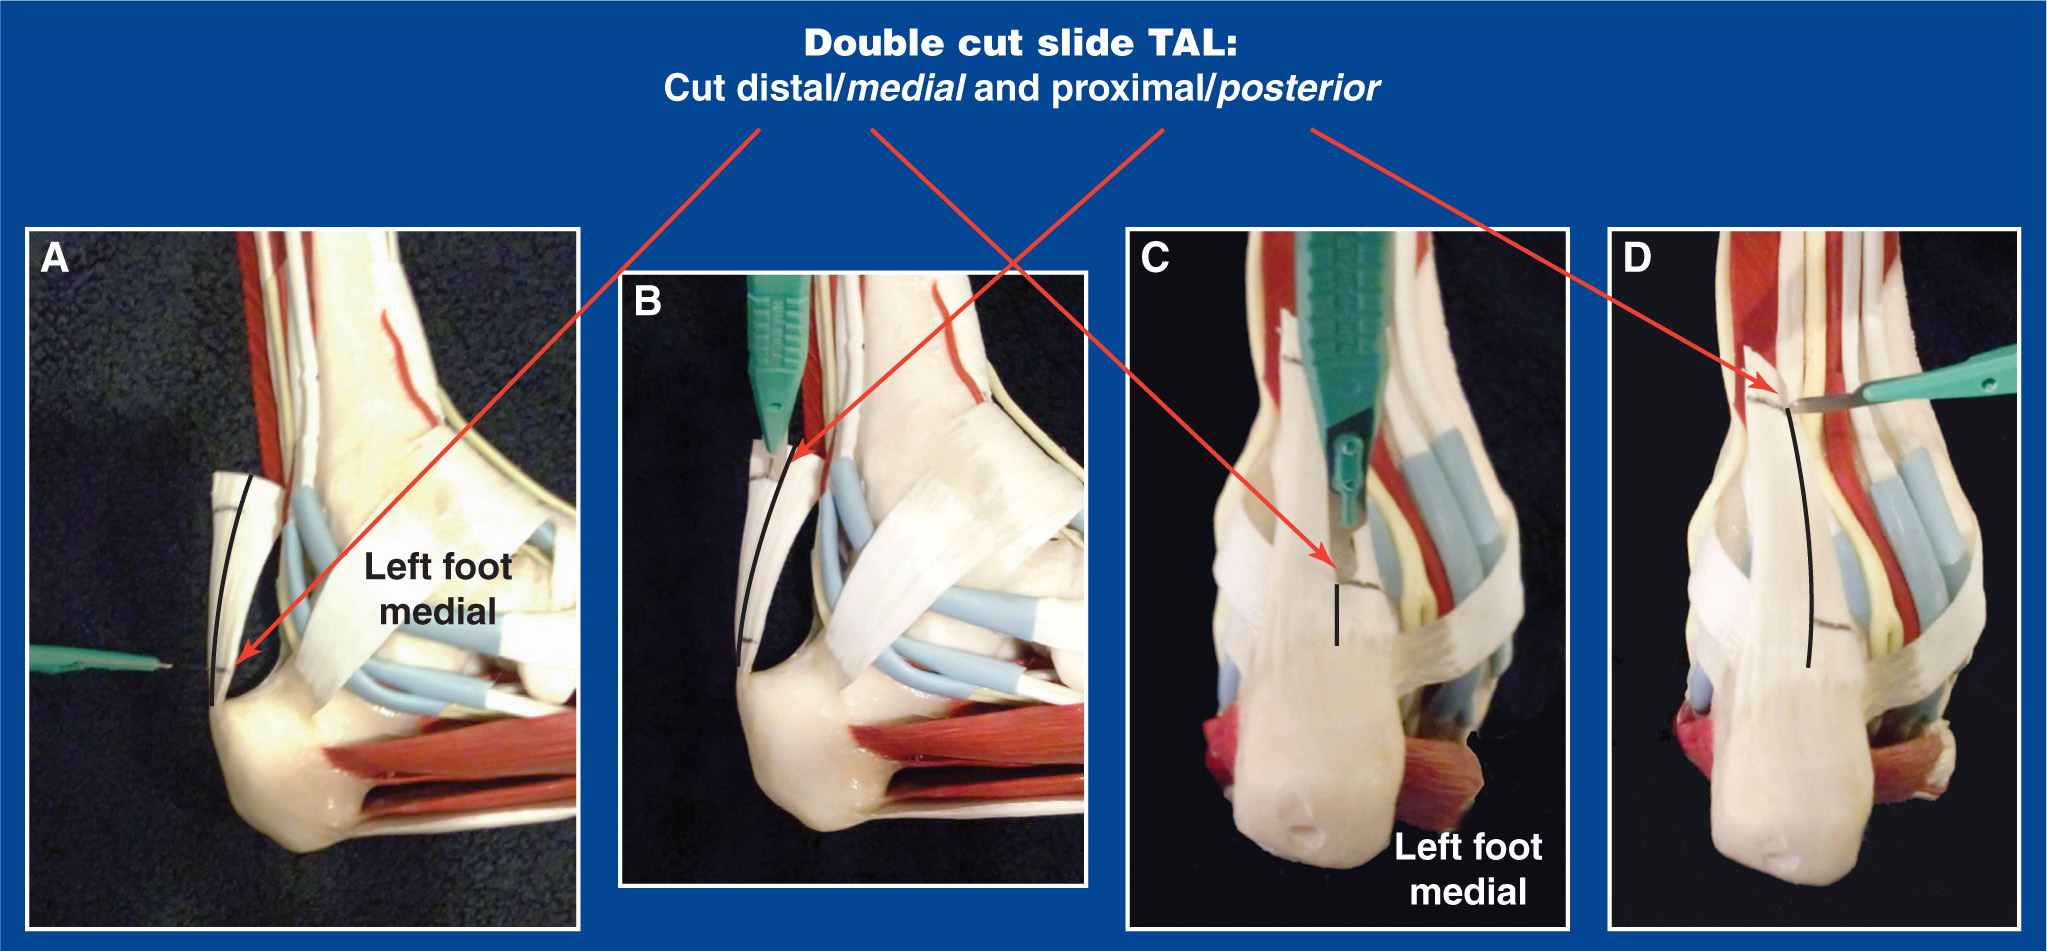
Figure 7-16. A. Medial view of a left foot model showing the 90° rotation of the tendo-Achilles. The medial half of the tendon is cut distally. B. The posterior half of tendon, which contains the opposite half of the fibers, is cut proximally. C. Posterior view of the foot model showing the medial half of the tendo-Achilles being cut distally. D. The posterior half of the tendon is cut proximally.
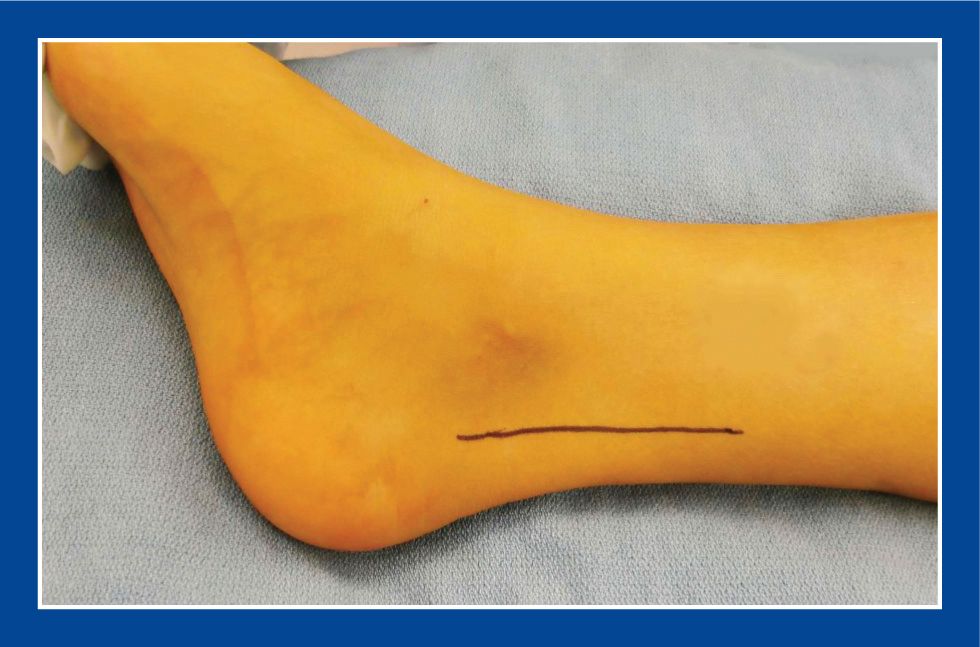
Figure 7-17. The incision for an open tendo-Achilles lengthening should be along the posteromedial aspect of the ankle. Avoid directly posterior incisions.
ii. The disadvantages/risks with this technique are:
• With extensive lengthenings, it may be hard to identify the opposite fibers. Release of additional fibers, even under direct vision, could inadvertently result in complete tenotomy.
• The incisions are larger than those used for the percutaneous triple-cut technique.
iii. This technique considers and takes advantage of the 90° of internal rotation of the tendon fibers that takes place as they approach their insertion on the calcaneus (Figures 7-15 and 7-16).
iv. Use a standard lower limb prep and drape with the patient in the supine position
v. This procedure is identical to the open double cut slide, except that it is performed through a percutaneous distal incision and a short proximal incision (that is the upper portion of the incision used for the open technique).
vi. Place your nondominant thumb and index finger on either side of the tendo-Achilles immediately proximal to its insertion on the calcaneus
vii. Insert a #15 scalpel through the skin from posterior to anterior in the midsagittal plane with the face of the blade in line with the direction of the tendon fibers just proximal to the calcaneus
viii. Use the scalpel as a probe to find the sagittal midline of the tendon by dragging the skin medial and lateral until the midpoint is determined
ix. Insert the scalpel through the tendon to the presumed thickness of the tendon (at least 1 cm), turn it 90° medially, and cut the medial half of the fibers by translating the blade in that direction
x. Make a 1.5- to 2.0-cm longitudinal incision slightly anteromedial to the tendo-Achilles starting at least 5 cm proximal to the distal cut
xi. Under direct vision, release the plantaris tendon and open the tendo-Achilles sheath
xii. Insert a #15 scalpel into the tendon from medial to lateral with the face of the blade in line with the direction of the tendon fibers and in the midcoronal plane of the tendon approximately 4 to 6 cm more proximal than the first cut
xiii. Insert the scalpel through the tendon, turn it 90° posteriorly, and cut the posterior half of the fibers by translating the blade in that direction
xiv. With the knee extended and the subtalar joint in neutral alignment, dorsiflex the ankle to approximately 10°. There should be a sudden release of tension to allow the ankle to dorsiflex, and also a sense of resistance to excessive dorsiflexion. The overlapping halves of the tendon should maintain side-to-side contact even with lengthenings of 3 to 4 cm or more. Reinforcing sutures are rarely required.
• Perform the Thompson test, by squeezing the calf musculature and watching the ankle plantar flex, to confirm maintenance of musculotendinous continuity
xv. If the ankle does not dorsiflex, carefully release only the fibers that appear to be resisting deformity correction
• Perform the Thomson test again
xvi. Use a 3-0 absorbable suture in the subcutaneous tissues and a running 4-0 subcuticular suture in the skin of the proximal incision. Apply adhesive strips, a gauze dressing, and a short-leg walking cast with the ankle dorsiflexed no more than 10°
xvii. Remove the cast at 6 weeks and prescribe daily strengthening and stretching exercises to be performed indefinitely
xviii. If both the tendo-Achilless are lengthened, consider providing CAM boots to help with mobility during the time it takes to get strong and stable on both legs.
e. Open Z-lengthening TAL (Figure 7-19)
i. The advantage of this technique is its ability to correct the most severe contractures that require the greatest amount of lengthening without risk of running out of tendon ends to overlap, as long as adequate length is considered at the time of release.
ii. The disadvantages/risks with this technique are:
• Overlengthening
• This technique requires an incision that is larger and, therefore, less cosmetic than the incisions used for the mini-open double cut slide TAL and the percutaneous triple-cut technique.
iii. This technique disregards the 90° rotation of the tendon fibers that takes place as they approach their insertion on the calcaneus.
iv. Make a 5- to 7-cm longitudinal incision anteromedial to the tendo-Achilles in the concavity between tendo-Achilles and the posterior edge of the tibia. Never make the incision directly posterior where the shoe counter will later rub and cause irritation. Directly posterior incisions also tend to be uncosmetic, as they often heal thick and wide (Figure 7-17).
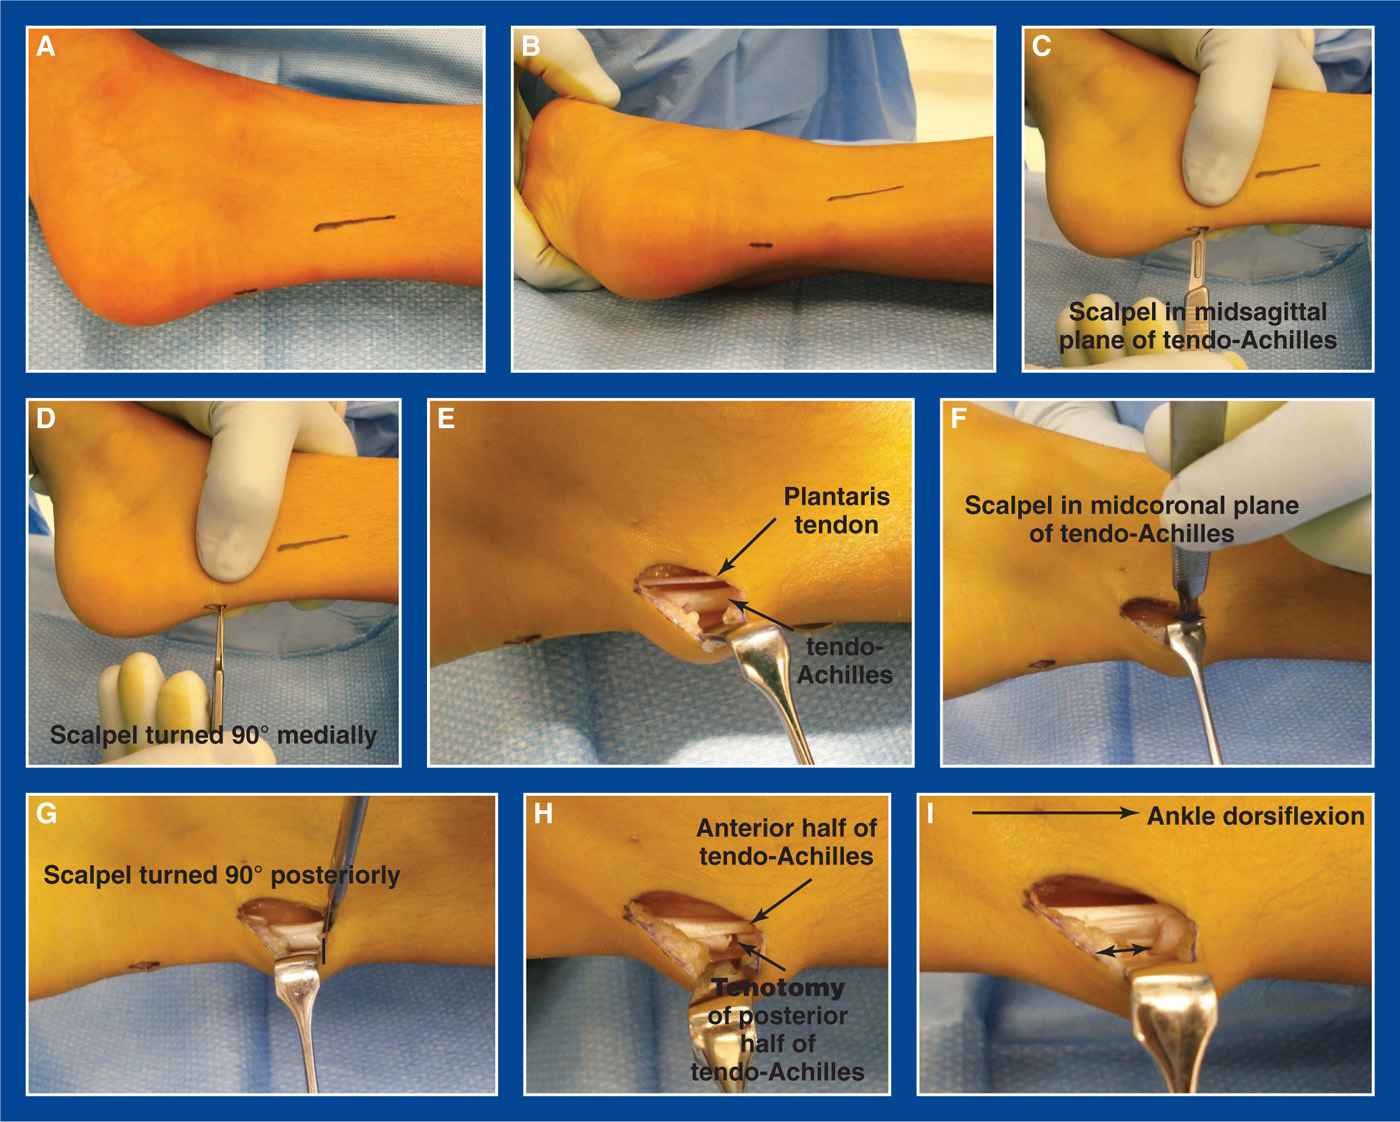
Figure 7-18. Mini-open double cut slide TAL. A. Medial view of the distal midsagittal percutaneous incision and the proximal mini-posteromedial incision marked on the skin. B. Posterior view. C. Scalpel is inserted percutaneously distally in the midsagittal plane of the tendo-Achilles. D. The scalpel is rotated 90° medially and translated until the hemitendon is released. E. The plantaris and tendo-Achilless are exposed through a short posteromedial incision, which is the upper portion of the long incision used for an open tendo-Achilles lengthening (Figure 7-17). The plantaris is divided (not shown). F. The scalpel is inserted in the midcoronal plane of the tendon with the blade parallel with the tendon fibers (black line). G. The scalpel is rotated 90° posteriorly and translated until the hemitendon is released. H. Tenotomy of the posterior half of the tendon fibers is evident. I. As the ankle is dorsiflexed, the ends of the divided posterior half of the tendon begin to separate from each other (double-ended arrow). Ten degrees of ankle dorsiflexion with the knee extended should be sought—not less and not much more. Ensure that there is enough distance between the proximal and distal cuts that the tendon halves will maintain some side-to-side contact at the final lengthened position. Though not intuitive, translation/lengthening of even 3 to 4 cm can take place without loss of “stable” side-to-side contact between the tendon halves. If reinforcing sutures are deemed necessary, the posteromedial incision should be extended distally for visualization.
v. Incise the anteromedial aspect of the tendon sheath from proximal to distal (Figure 7-16)
vi. Avoid disruption of the posterior tendon sheath and subcutaneous fat. By so doing, there will be less adherence of the tendon to the skin.
vii. Divide the plantaris tendon distally—if an inadvertent tenotomy occurs, the plantaris can be used as an intercalary graft
viii. Split the tendo-Achilles longitudinally in the sagittal plane
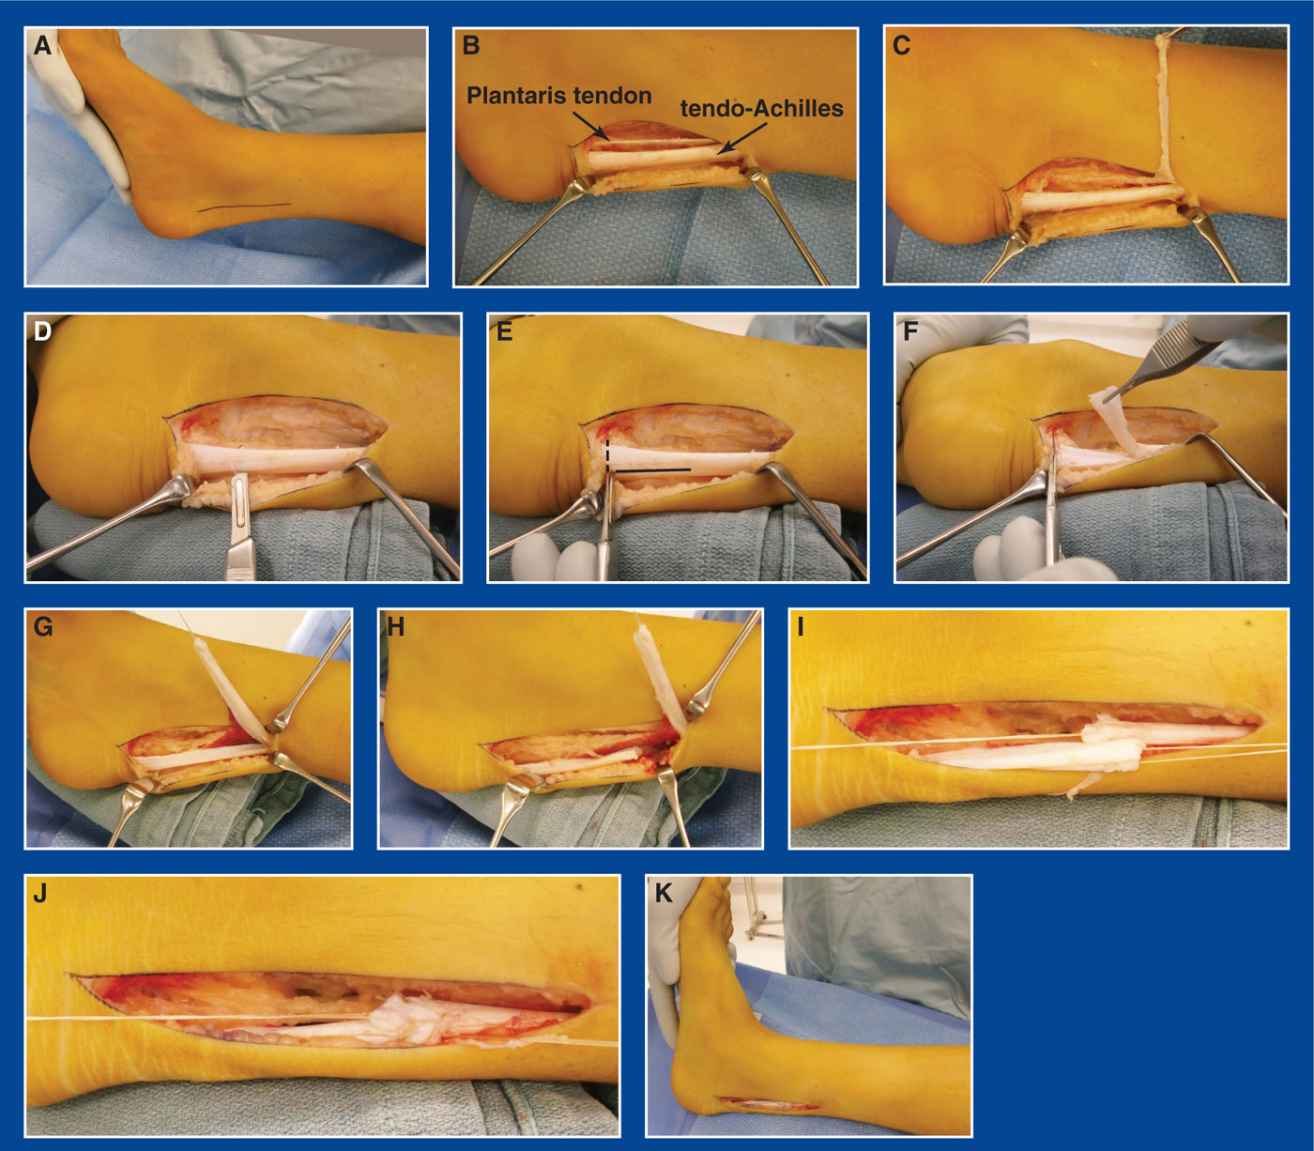
Figure 7-19. Open Z-lengthening TAL. A. Severe tendo-Achilles contracture with inability to dorsiflex the ankle. The planned posteromedial incision site is marked. B. The Achilles and plantaris tendons are exposed. C. The plantaris tendon is released distally and reflected away. D. The scalpel is inserted into the tendo-Achilles in the midsagittal plane proximal to its insertion on the calcaneus. Midcoronal plane lengthening is also possible. E. The scalpel is advanced distally to the insertion site on the calcaneus and turned 90° medially. F. The medial half of the tendon fibers are released from the calcaneus and the free end is elevated. G. The tendon division is continued proximally. H. The lateral half of the tendon is divided approximately 5 to 6 cm. proximal to the distal cut. I. With the ankle dorsiflexed 10° and the knee extended, the lead sutures are pulled in opposite directions to create moderate tension on the overlapping halves of the tendon. J. Figure-of-8 2-0 absorbable sutures are used for the repair. K. Final position of 5° to 10° of dorsiflexion.
ix. For a varus hindfoot, release the medial half of the fibers distally and the lateral half proximally—this will shift the vector of pull on the calcaneus laterally
x. For a valgus hindfoot, release the lateral half of the fibers distally and the medial half proximally—this will shift the vector of pull on the calcaneus medially
xi. Place tagging sutures in both tendon ends
xii. Extend the knee, dorsiflex the ankle to 10°, and repair the overlapping ends of the tendon under moderate tension with 2-0 absorbable sutures
xiii. Use a 3-0 absorbable suture in the subcutaneous tissues and a running 4-0 subcuticular suture in the skin of the proximal incision. Apply adhesive strips, a gauze dressing, and a short-leg walking cast with the ankle dorsiflexed no more than 10°
xiv. Remove the cast at 6 weeks and prescribe daily strengthening and stretching exercises to be performed indefinitely
xv. If both the tendo-Achilless are lengthened, consider providing CAM boots to help with mobility during the time it takes to get strong and stable on both legs
3. Pitfalls for all Achilles lengthening techniques
a. Underlengthening
b. Overlengthening
c. Failure to appreciate the rotation of tendon fibers in the double cut techniques, resulting in complete tenotomy after additional fibers are cut
4. Complications for all Achilles lengthening techniques
a. Complete tenotomy, rather than a lengthening, due to:
i. Inadequate distance between cuts in both the open and percutaneous techniques
• Avoid by becoming expert at the open Z-lengthening technique and then the open double cut slide technique before attempting the other techniques
ii. Excessive release of fibers in the percutaneous technique
• Avoid by practicing the technique open, and then by using it only with thick tendo-Achilless in older children and adolescents
PRINCIPLE: Transfer the right tendon to the right location at the right tension (see Management Principle #22-1, Chapter 4).
Anchoring techniques—it is not known if a tendon can reliably anchor/heal into a cartilage anlage of a bone. The reliable anchoring techniques are:
1. Pulvertaft weave into another tendon
2. Drill hole in a bone with lead sutures tied over a button and felt pad on the plantar aspect of the foot
a. Commercial tendon anchor (rarely indicated in children)
Jones Transfer of Extensor Hallucis Longus to 1st MT Neck
1. Indications
a. Claw deformity of the hallux (see Chapter 5) that causes pain and skin irritation over the dorsum of the IP joint and/or under the 1st MT head
i. usually associated with a cavovarus foot deformity, as in CMT or other neuromuscular disorder (see Cavovarus Foot, Chapter 5)
b. Can be performed as an isolated procedure, but is most often performed during the second stage of a two-stage reconstruction for cavovarus deformity with clawing of the hallux
c. Combine with percutaneous tenotomy of the FHL (see this chapter)
2. Technique (Figure 7-20)
a. If this is an isolated procedure, perform a percutaneous tenotomy of the FHL (see this chapter)
b. If this procedure is being performed in conjunction with other procedures during the second-stage reconstruction of a cavovarus foot, the FHL was already released in stage 1.
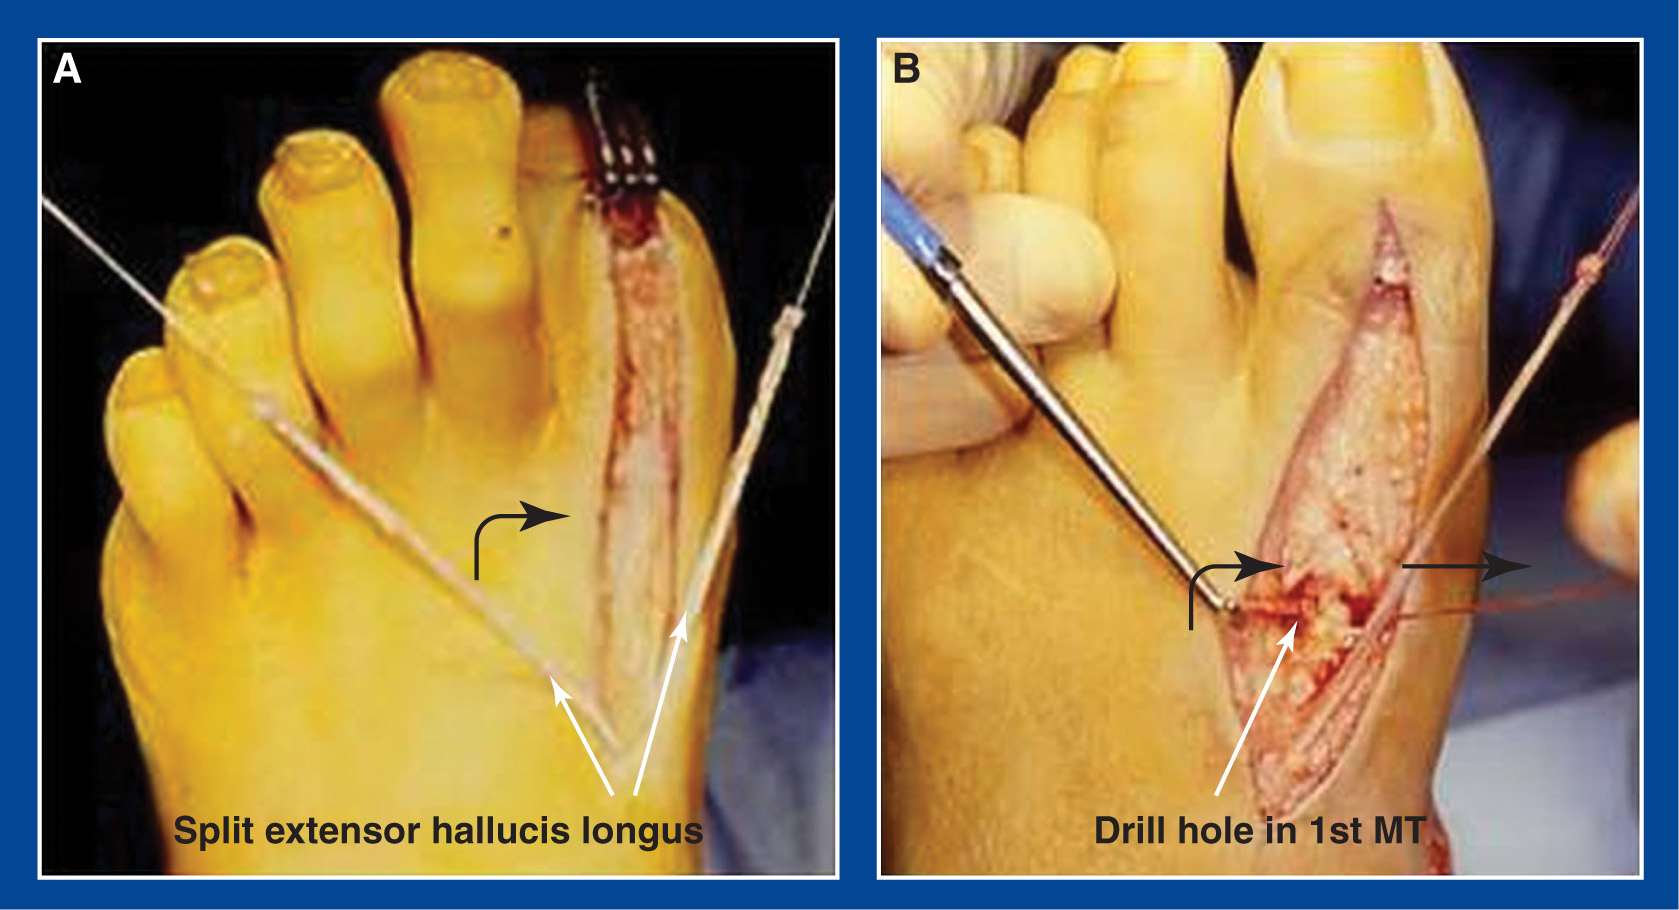
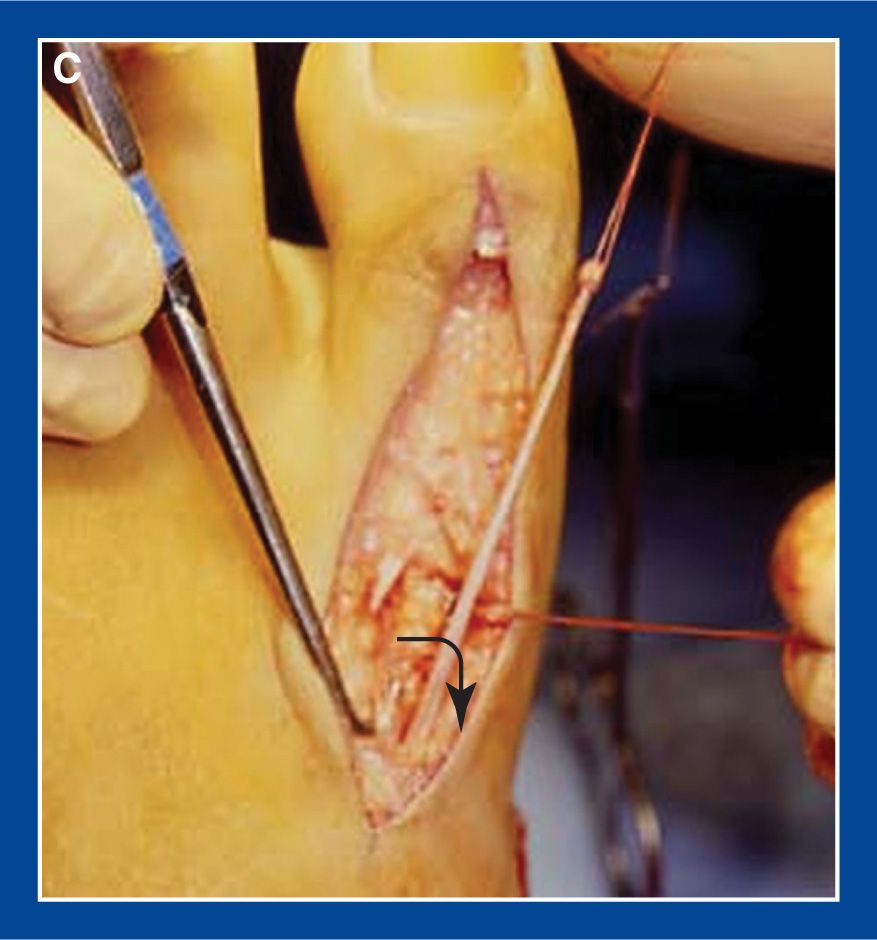
Figure 7-20. Jones transfer. A. Extensor hallucis longus is released from the hallux asymmetrically. B. The long lateral slip is passed transversely through a drill hole in the distal metaphysis of the 1st MT. C. The transferred EHL slip is brought back firmly into the split in the tendon and sutured securely. Ensure that the FHL has been released.
c. Make a longitudinal incision dorsal to the extensor halluces longus (EHL) starting just distal to the hallux IP joint and extending proximally to the base of the 1st MT
d. Release the EHL from its tendon sheath and release all soft tissue attachments to it
e. Split the EHL longitudinally
f. Release the lateral half of the tendon from its insertion on the distal phalanx and insert a Bunnell-type 2-0 absorbable suture in its end
g. Divide the medial half of the tendon immediately proximal to the metatarsophalangeal (MTP) joint and insert a tagging 2-0 absorbable suture in both ends
h. Make a transverse tunnel in the 1st MT neck with a small-diameter power drill
i. Pass the long lateral half of the EHL through the tunnel from lateral to medial
j. Complete all other bone and soft tissue procedures. Importantly, complete the medial cuneiform plantar-based opening wedge osteotomy. Setting the tension on this transfer should be the last procedure performed (or second to last if a SPLATT [see this chapter] is being performed concurrently) before final wound closure and cast application (see Management Principle #24, Chapter 4).
k. With the foot and ankle in anatomic alignment, pull the lateral half of the EHL through the tunnel in the 1st MT and firmly back upon itself
l. Position the transferred half of the EHL in the proximal extent of the split in the EHL and suture the 3 half tendons together with 2-0 absorbable sutures. This effectively simulates a Pulvertaft weave.
m. Pass the long medial distally-based slip of the EHL through a transverse slit in the extensor hallucis brevis/dorsal capsule of the MTP joint. Pull the tendon firmly back upon itself, thereby extending the IP and MTP joints, and suture the afferent and efferent limbs to each other with 2-0 absorbable sutures. This creates an extension tenodesis (Figure 7-21).
n. The alternative is a hallux IP joint arthrodesis (see Chapter 8), which is not indicated in children with open growth plates. The described tenodesis works very well in most cases.
o. Approximate the skin edges with interrupted subcutaneous 3-0 absorbable sutures and a running subcuticular 4-0 absorbable suture
p. Apply a short-leg non–weight-bearing cast
q. Change to a short-leg walking cast after 6 weeks and maintain it until 8 weeks postoperatively
3. Pitfalls
a. Insufficient tension on the distal tenodesis of the EHL to the extensor hallucis brevis to create an extension tenodesis
b. Insufficient tension on the transfer of the EHL to the 1st MT
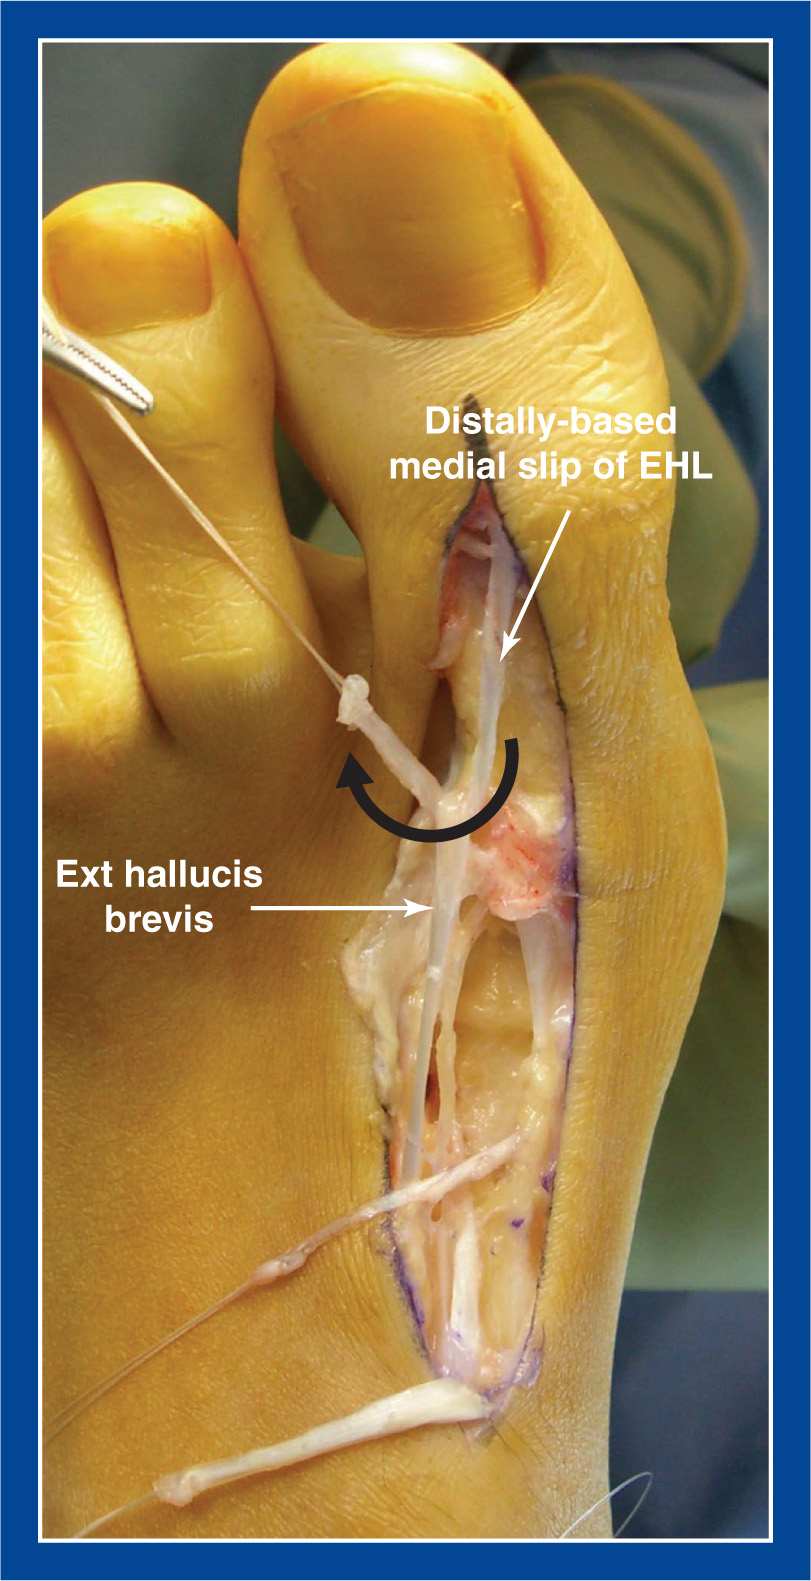
Figure 7-21. EHL tenodesis. The long medial distally-based slip of the asymmetrically cut split EHL is passed transversely through a slit in the extensor hallucis brevis/dorsal capsule of the MTP joint. It is pulled back firmly to extend the IP joint and then sutured securely to itself to create a tenodesis.
c. Failure to release the FHL
d. Failure to release the volar capsule of the IP joint and longitudinally pin across the joint if it does not fully extend following FHL tenotomy
e. Assuming that the EHL transfer will correct forefoot pronation deformity. It will not. A medial cuneiform osteotomy is needed to correct the deformity, whereas the EHL transfer will help prevent recurrent deformity by supplementing the weak anterior tibialis (see Management Principles #5, 6, 15, 22-2, Chapter 4).
4. Complications
a. Drop toe due to insufficient tension, rupture, or stretching out of the tenodesis
i. Avoid by
• setting exaggerated tension initially
• cautioning against barefoot walking
Reverse Jones Transfer of FHL to 1st MT Neck
1. Indications
a. Dorsal bunion (see Chapter 5)
i. Often combined with transfer of the anterior tibialis to the middle (2nd) cuneiform (see this chapter) and a medial cuneiform plantar flexion osteotomy (see Chapter 8)
2. Technique (Figure 7-22)
a. Make a longitudinal incision along the medial border of the forefoot from the 1st MTP joint to the base of the 1st MT
b. Perform an intramuscular recession of the tendon of the abductor hallucis
c. Retract the abductor hallucis plantarward
d. Isolate and release the FHL tendon sheath under the 1st MT from the distal phalanx to the base of the 1st MT. Hyperflex the IP and MTP joints to aid with exposure of the FHL insertion on the distal phalanx
e. Release the FHL from the distal phalanx and split it longitudinally
f. Insert a Bunnell-type 2-0 absorbable suture in the end of one slip of the FHL, leaving long tails on both limbs of the suture; and insert a tagging 2-0 absorbable suture in the other slip
g. If it is not possible to easily dorsiflex the MTP joint past neutral, release the plantar capsule sharply from medial to lateral
h. Make a vertical tunnel in the 1st MT neck with a drill bit a little larger than the thickness of the split half of the FHL
i. Pass the FHL slip with the Bunnell suture through the tunnel from plantar to dorsal
j. Importantly, complete the medial cuneiform plantar flexion osteotomy before setting the tension on the transfer. Setting the tension on this transfer should be the second to last procedure performed before final wound closure and cast application. The last procedure should be setting the tension on the anterior tibialis tendon transfer to the middle (2nd) cuneiform (see Management Principle #24, Chapter 4).
k. With the foot and ankle in anatomic alignment, pull the transferred slip of the FHL (that was passed through the tunnel in the 1st MT) firmly back upon itself
l. Position the transferred slip in the proximal extent of the split in the FHL and suture the 3 half tendons together with 2-0 absorbable sutures. This effectively simulates a Pulvertaft weave.
m. Tension the anterior tibialis tendon transfer to the middle (2nd) cuneiform, if applicable
n. Approximate the skin edges with interrupted subcutaneous 3-0 absorbable sutures and a running subcuticular 4-0 absorbable suture
o. Apply a short-leg non–weight-bearing cast
p. Change to a short-leg walking cast after 6 weeks and maintain it until 8 weeks postoperatively
3. Pitfalls
a. Failure to release a contracted volar capsule of the 1st MTP joint
b. Insufficient tension placed on the transfer
c. Assuming that the transfer will correct forefoot supination deformity. It will not. A medial cuneiform osteotomy is needed to correct the deformity, whereas the FHL transfer will help prevent recurrent deformity by substituting for the weak peroneus longus (see Management Principles #5, 6, 15, 22-2, Chapter 4).
4. Complications
a. None
Hibbs Transfer of Extensor Digitorum Communis to Cuboid or Peroneus Tertius
1. Indications
a. Claw deformity of the lesser toes (see Chapter 5) that causes pain and skin irritation over the dorsum of the IP joints and/or under the MT heads
i. usually associated with a cavovarus foot deformity, as in CMT or other neuromuscular disorder (see Cavovarus Foot, Chapter 5)
b. Can be performed as an isolated procedure, but is most often performed during the second stage of a two-stage reconstruction for cavovarus deformity with clawing of the lesser toes
c. Combine with percutaneous tenotomy of the FDL to all affected toes (see this chapter)
2. Technique (Figure 7-23)
a. If this is an isolated procedure, perform a percutaneous tenotomy of the FDL to toes 2 to 5 (see this chapter)
b. If this procedure is being performed in conjunction with other procedures during the second-stage reconstruction of a cavovarus foot, the FDL to toes 2 to 5 was already released in stage 1.
c. Make a longitudinal incision over the dorsolateral midfoot following the course of the extensor digitorum communis (EDC) and peroneus tertius. Avoid/retract the superficial peroneal nerve.
d. Isolate the peroneus tertius if one exists (approximately 15% of people do not have a peroneus tertius)
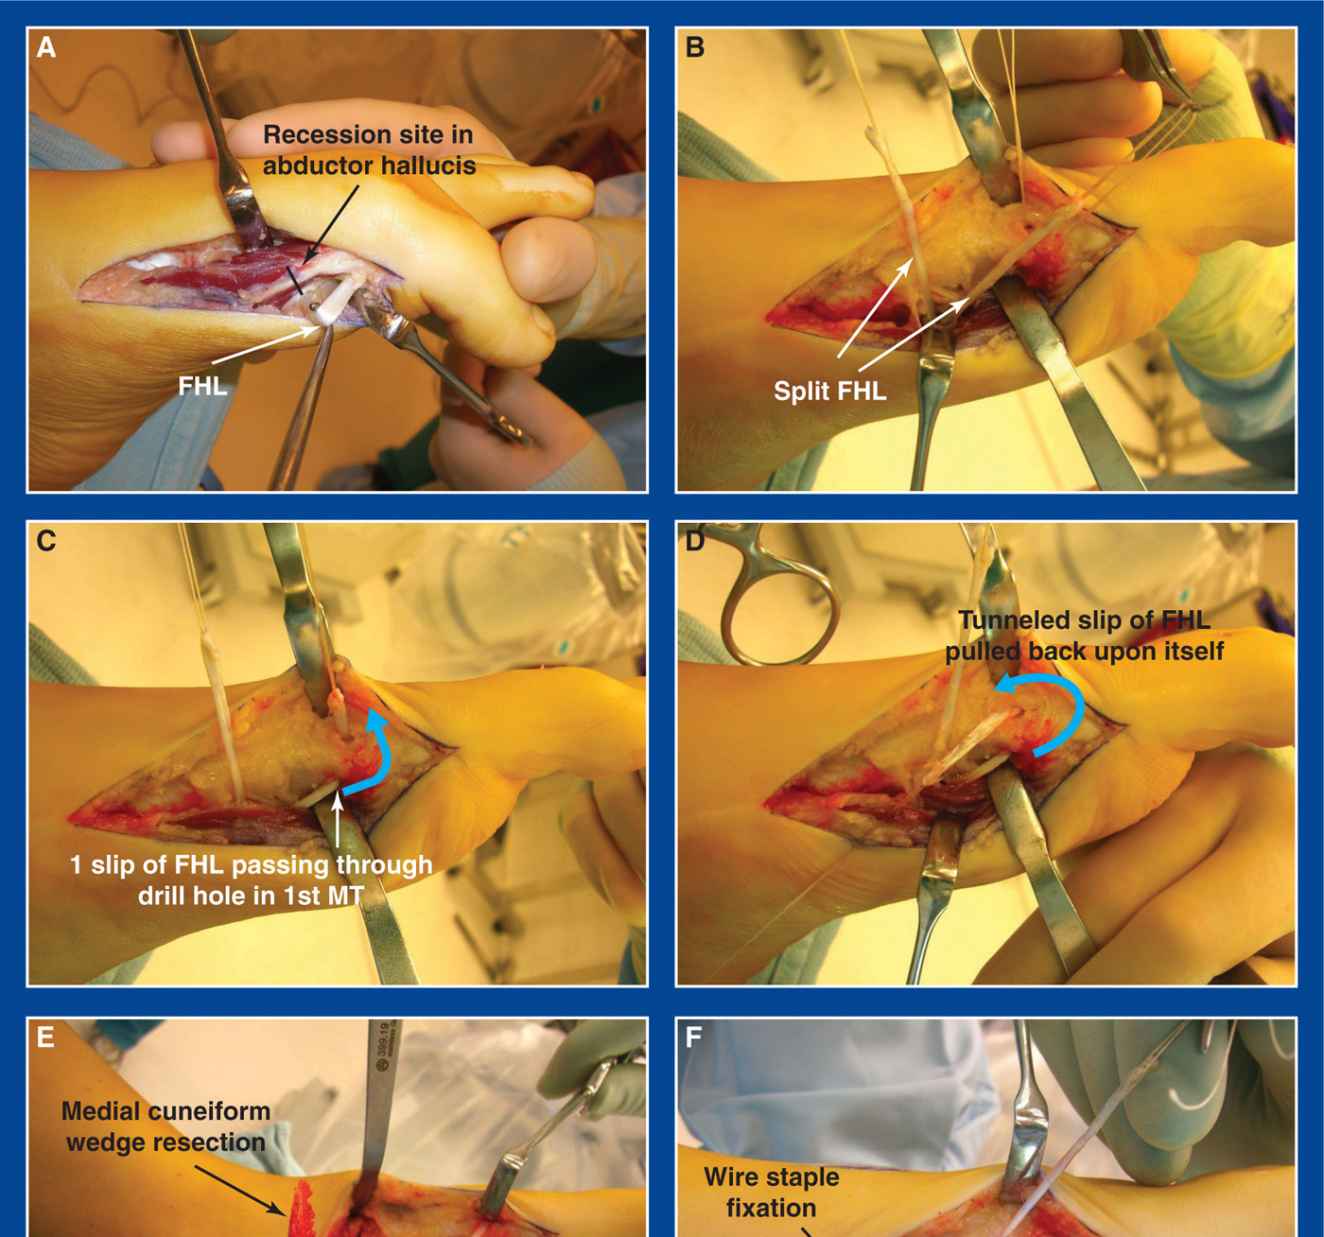
Figure 7-22. Reverse Jones transfer. A. The site of the abductor hallucis intramuscular recession is marked. The FHL is exposed, retracted, and released from its insertion on the distal phalanx of the hallux. B. The FHL is split longitudinally and a tagging suture is inserting in both ends. C. One slip of the FHL is passed through a vertical drill hole in the 1st MT from plantar to dorsal. D. The slip is pulled back on itself. E. A plantar-based wedge of bone has been removed from the medial cuneiform. Plantar flexion of the 1st ray brings the osteotomy surfaces into apposition. F. A wire staple has been inserted from plantar to dorsal to internally fixate the osteotomy. The tendon slip of the FHL that was passed through the drill hole is firmly pulled back upon itself and sutured to itself as well as the other slip of the tendon.
e. Release the EDC slip to the 5th toe as far distal as possible and insert a Bunnell-type #0 absorbable suture in its end, leaving long tails on both limbs of the suture
f. Resect a 2-cm section from the EDC slips to toes 2 to 4
g. If there is a peroneus tertius:
i. pass the EDC slip #5 through a slit in the tertius
ii. complete all other bone and soft tissue procedures. Setting the tension on this transfer should be the last, or second to last (before the Jones transfer), procedure performed before final wound closure and cast application (see Management Principle #24, Chapter 4).
iii. with the foot and ankle in anatomic alignment, pull the EDC slip #5 firmly through the slit in the peroneus tertius while the latter tendon is pulled proximally with a button hook
iv. repair this Pulvertaft weave with figure-of-8 2-0 absorbable sutures
h. If there is no peroneus tertius:
i. drill a hole in the cuboid from dorsal to plantar that is slightly larger in diameter than the EDC slip #5
ii. thread one of the long suture tails into each of two large Keith needles. Pass one of the needles through the hole until the tip pierces the plantar skin, but do not pull it through yet. Leave the needle shaft in the hole. Pass the other needle, exiting 5 to 7 mm away from the first on the plantar surface of the midfoot. If the first suture were left bare in the hole, the second Keith needle would almost certainly pierce and weaken it. Pull both needles and sutures through the hole and out the plantar surface of the foot.
iii. pass the needles through a thick felt pad and through different holes in a large button
iv. complete all other bone and soft tissue procedures. Setting the tension on this transfer should be the last, or second to last (before the Jones transfer), procedure performed before final wound closure and cast application (see Management Principle #24, Chapter 4).
v. with the foot and ankle in anatomic alignment, pull the EDC slip #5 firmly into the hole in the cuboid and tie the sutures over a button and thick felt pad on the plantar aspect of the midfoot
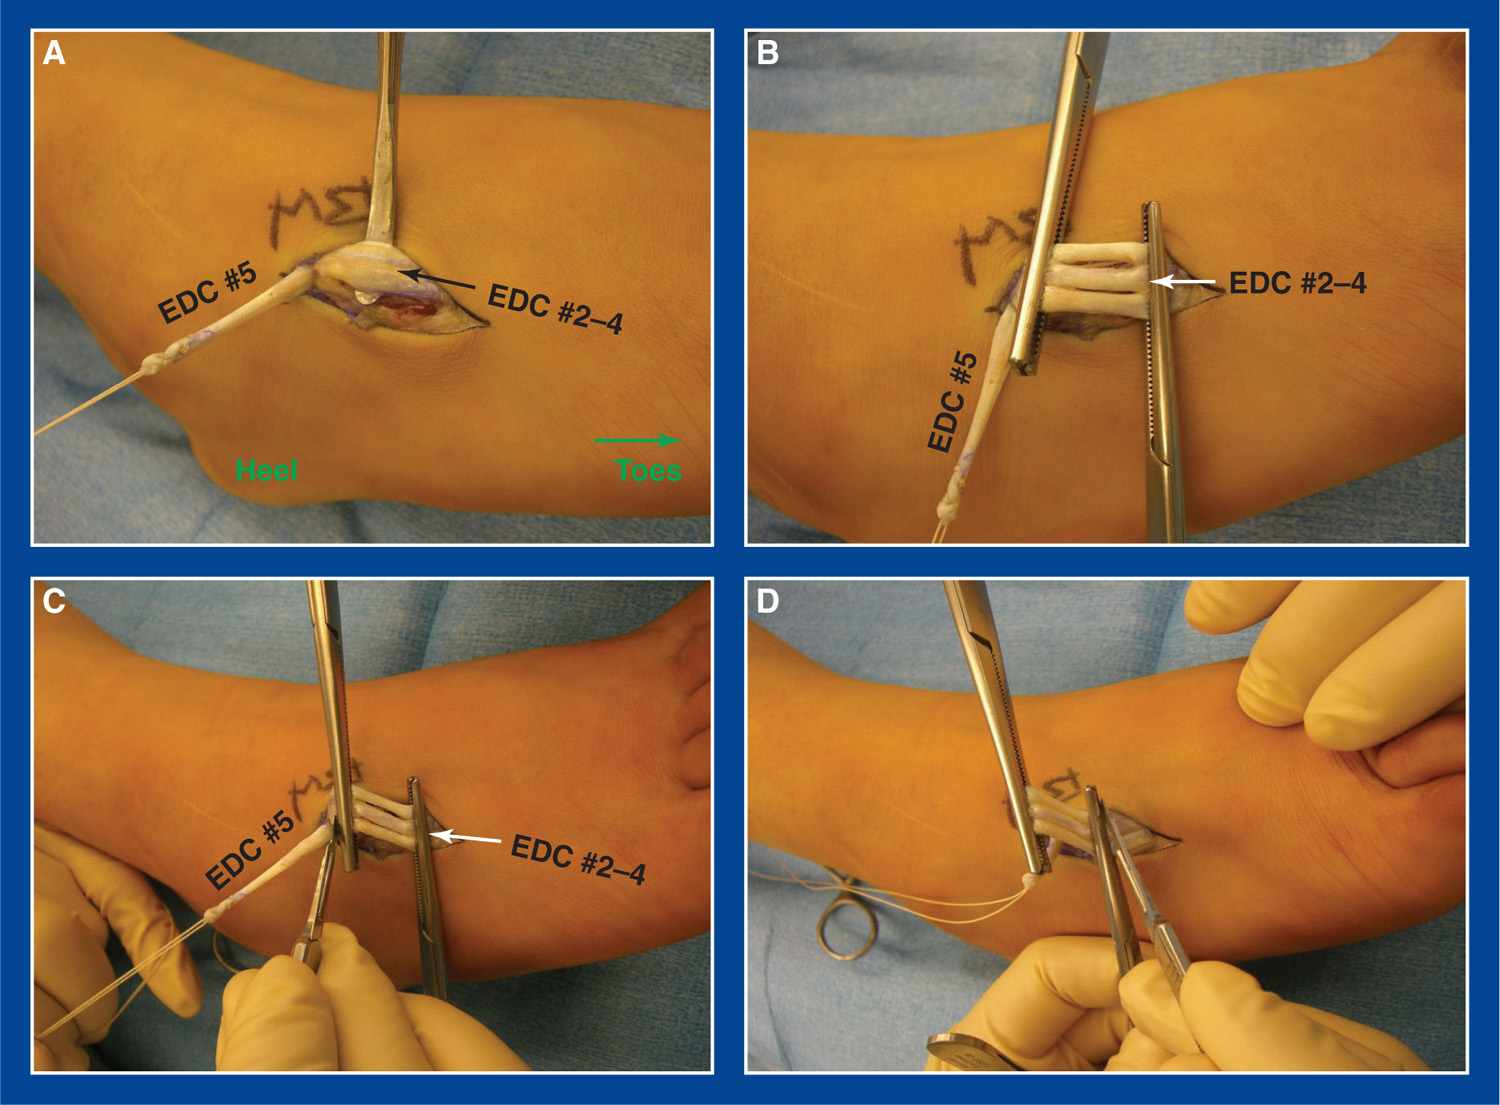

Figure 7-23. Hibbs transfer. A. The EDC slip to the 5th toe was released distally. Other three EDC slips are exposed. B. Kocher clamps are placed on the EDC slips to toes 2 to 4 approximately 2 cm apart. C. Those three slips are divided immediately proximal to the proximal clamp. D. The three slips are divided immediately distal to the distal clamp to complete the segmental resections. E. For feet in which there is no peroneus tertius (˜15%), the lead sutures on EDC slip #5 are passed through a drill hole in the cuboid on Keith needles. F. They exit 5 to 7 mm apart on the plantar surface of the midfoot. G. The tendon is pulled into the hole and the sutures are tied under tension over a thick felt pad and button. H. For feet with a peroneus tertius (˜85%), EDC slip #5 is passed through a slit in that tendon for repair as a Pulvertaft weave.
vi. supplement the button fixation by suturing the tendon to the dorsal periosteum of the cuboid with a 2-0 absorbable suture
i. Approximate the skin edges with interrupted subcutaneous 3-0 absorbable sutures and a running subcuticular 4-0 absorbable suture
j. Apply a short-leg non–weight-bearing cast
k. Change to a short-leg walking cast after 6 weeks and maintain it until 8 weeks postoperatively
3. Pitfalls
a. Insufficient tension on the transfer of the EDC to the peroneus tertius or the cuboid
b. Failure to release the FDL to toes 2 to 5
c. Failure to longitudinally pin the toes temporarily if they do not fully passively extend following release of the FDL
d. Assuming that the EDC transfer will correct foot deformity. It will not (see Management Principles #5, 6, 15, 22-2, Chapter 4).
4. Complications
a. Injury to the superficial peroneal nerve
i. Avoid by careful dissection, identification, and retraction
b. Pull-out of the tendon from the bone
i. Avoid by:
• anchoring the tendon securely with the #0 lead suture tied over a plantar button and adding a supplemental suture between the tendon and the dorsal periosteum of the cuboid
• immobilizing in a cast for at least 6 weeks
Anterior Tibialis Tendon Transfer to the Lateral (3rd) Cuneiform (ATTTx)
1. Indications
a. Clubfoot (see Chapter 5) with full correction of all deformities and with good flexibility, but with muscle imbalance that is characterized by overpull of the anterior tibialis in relation to the peroneus longus and peroneus tertius
i. If residual or recurrent deformities coexist, preoperative serial casting should be performed to correct them.
ii. If any of the segmental deformities cannot be corrected by a series of preoperative casts, they can be surgically corrected concurrent with the tendon transfer (see Management Principles #5, 6, 15, 22-2, Chapter 4).
2. Technique (Figure 7-24)
a. If any residual deformities exist despite preoperative serial casting, they should be corrected before performing the tendon transfer. For example, a TAT (see this chapter) or plantar fasciotomy (PF) (see this chapter) should be performed first.
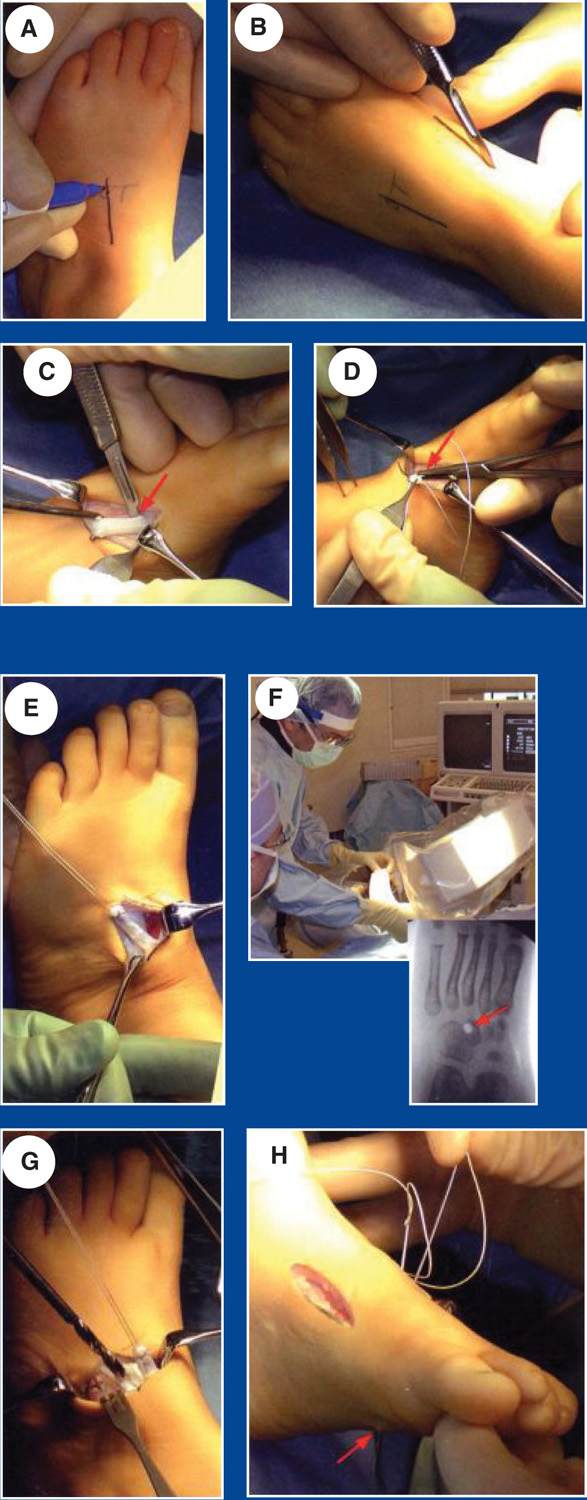
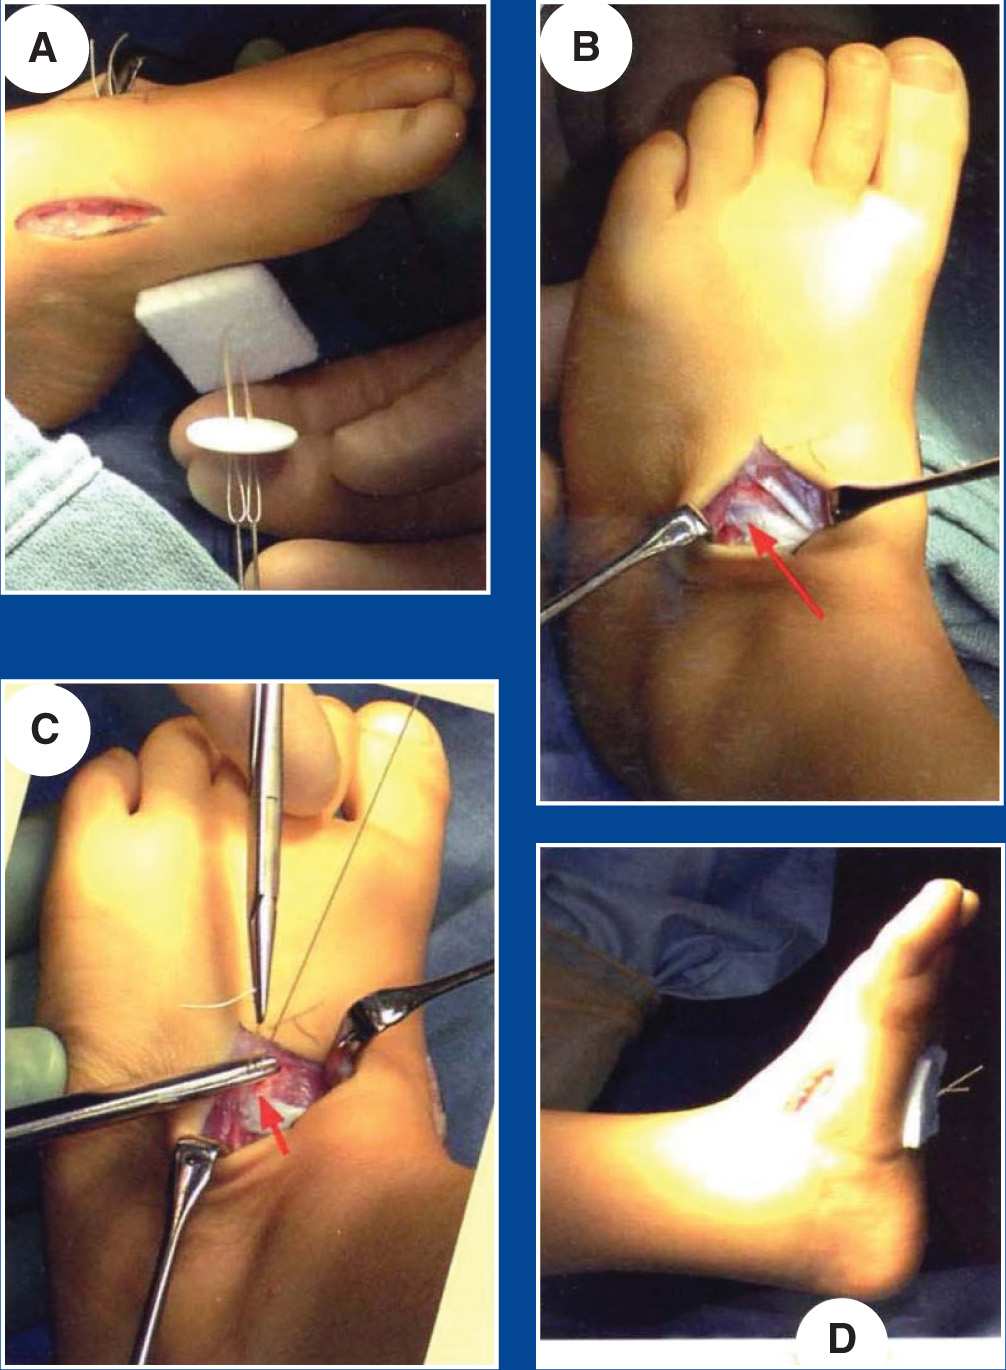
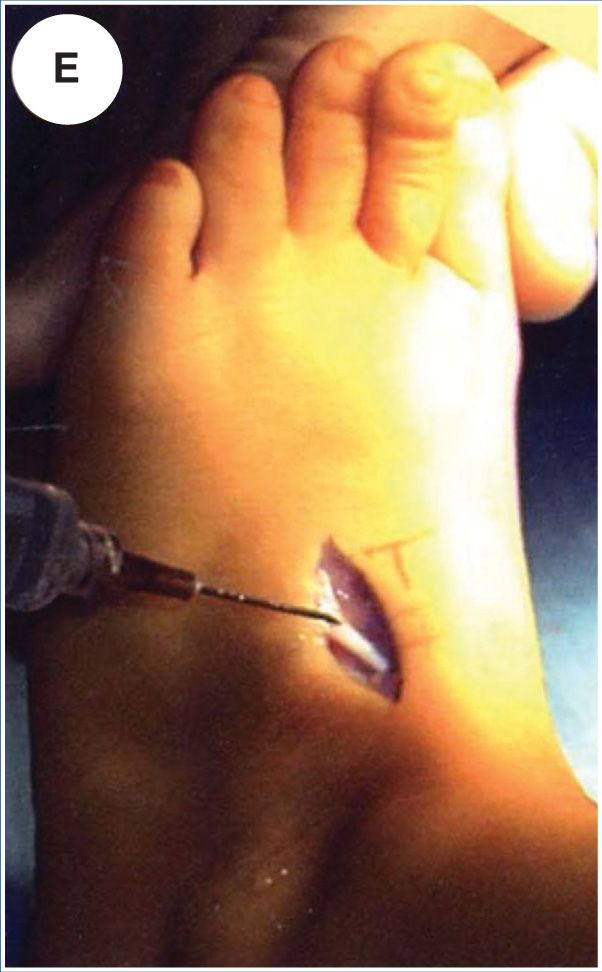
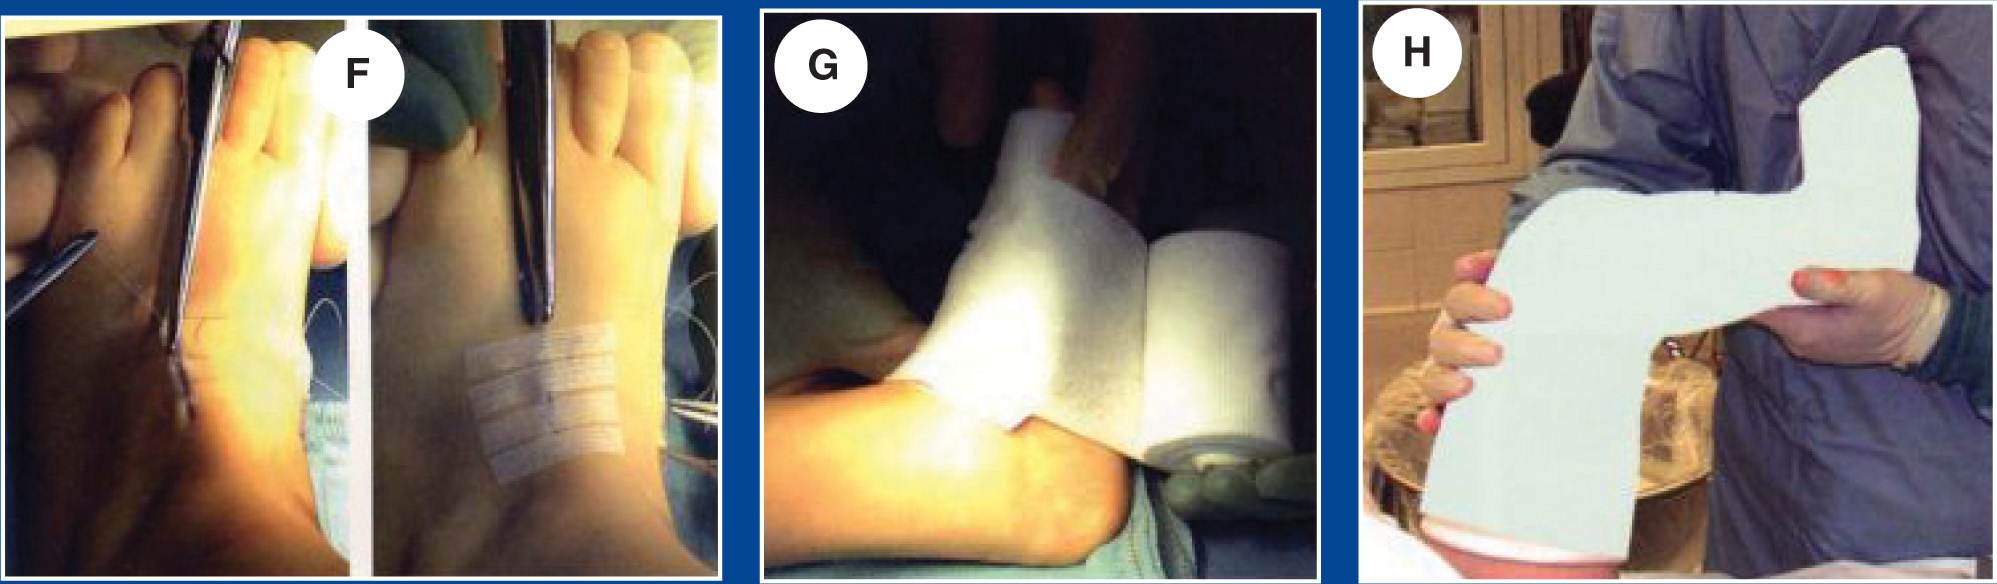
Figure 7-24. Anterior tibialis tendon transfer to the lateral (3rd) cuneiform. See text within figures. (From Mosca VS. In: Lynn Staheli, ed. Clubfoot: Ponseti Management, 3rd ed., www.Global-HELP.org, 2009.)
Anterior Tibialis Transfer
Indication
Transfer is indicated if the child has persistent varus and supination during walking. The sole shows thickening of the lateral plantar skin. Make certain that any fixed deformity is corrected by two or three casts before performing the transfer. Transfers are best performed when the child is between 3 and 5 years of age.
Often, the need for transfer is an indication of poor compliance with brace management.
Mark the sites for incisions
The dorsolateral incision is marked on the mid-dorsum of the foot [A].
Make medial incision
The dorsomedial incision is made over the insertion of the anterior tibialis tendon [B].
Expose anterior tibialis tendon
The tendon is exposed and detached at its insertion [C]. Avoid extending the dissection too far distally to avoid injury to the growth plate of the first metatarsal.
Place anchoring sutures
Place a #0 dissolving anchoring suture [D]. Make multiple passes through the tendon to obtain secure fixation.
Transfer the tendon
Transfer the tendon to the dorsolateral incision [E]. The tendon remains under the extensor retinaculum and the extensor tendons. Free the subcutaneous tissue to allow the tendon a direct course laterally.
Option: localize site for insertion
Using a needle as a marker, radiography may be useful in exactly localizing the site of transfer in the third cuneiform [F]. Note the position of the hole in the radiograph (arrow).
Identify site for transfer
This should be in the mid-dorsum of the foot and ideally into the body of the third cuneiform. Make a drill hole large enough to accommodate the tendon [G].
Thread sutures
Thread a straight needle on each of the securing sutures. Leave the first needle in the hole while passing the second needle to avoid piercing the first suture [H]. Note that the needle penetrates the sole of the foot (arrow).
Pass two needles
Place the needles through a felt pad and then through different holes in the button to secure the tendon [A].
Secure tendon
With the foot held in dorsiflexion, pull the tendon into the drill hole by traction on the fixation sutures and tie the fixation sutures with multiple knots [B].
Supplemental fixation
Supplement the button fixation by suturing the tendon to the periosteum at the site where the tendon enters the cuneiform [C], using a heavy absorbable suture.
Neutral position without support
Without support, the foot should rest in approximately 5–10 degrees of plantar flexion [D] and neutral valgus-varus.
Local anesthetic
A long-acting local anesthetic is injected into the wound [E] to reduce immediate postoperative pain.
Skin closure
Close the incisions with absorbable subcutaneous sutures [F]. Tape strips reinforce the closure.
Cast immobilization
A sterile dressing is placed [G], and a long leg cast is applied [H].
Postoperative care
This patient was discharged on the same day of the procedure. Usually, the patients remain hospitalized overnight. The sutures absorb. Remove the cast at 6 weeks. No bracing is necessary after the procedure. See the child again in 6 months to assess the effect of the transfer.
Related posts:

Stay updated, free articles. Join our Telegram channel

Full access? Get Clinical Tree


