Medial Distal Tibia Guided Growth with Retrograde Medial Malleolus Screw
1. Indications
a. Pain due to lateral hindfoot impingement and/or medial hindfoot soft tissue strain caused by exaggerated congenital or acquired valgus deformity of the ankle joint (see Assessment Principles #11 and 21, Chapter 3; Valgus Deformity of the Ankle Joint, Chapter 5)
b. If there is coincident valgus deformity of the ankle joint and the subtalar joint, the ankle deformity should be corrected first (see Management Principle #23-6, Chapter 4; Valgus Deformity of the Ankle Joint and the Hindfoot, Chapter 5).
2. Technique (Figure 8-1)
a. Make a 7-mm longitudinal incision immediately distal to the medial malleolus in the midcoronal plane of the tibia
b. Insert a guide pin for the 4.5-mm cannulated screws retrograde from the intersection of the medial-to-lateral center of the medial malleolus with the midcoronal plane of the tibia, using mini-fluoroscopy for guidance. Anterior placement could result in recurvatum and posterior placement in procurvatum.
i. Ensure placement in the midcoronal plane of the tibia by visualizing a true lateral image of the ankle on mini-fluoroscopy, i.e., the posterior cortex of the fibula and the posterior cortex of the tibia are colinear. Using the “dome of the talus” as the alignment guide for a true lateral image of the ankle is unreliable in children because of immature ossification of the talus and/or malformations/deformities of the talus. The midcoronal plane of the tibia is typically in line with the anterior cortex of the fibula.
c. Insert the guide pin parallel with, and immediately adjacent to, the medial cortex of the tibial metaphysis. The more medial the screw, the more medial the mechanical center of rotation of angulation (CORA), and the more rapid will be the deformity correction.
d. Use the cannulated reamer up to, but not across, the physis
e. Insert a fully threaded cannulated 4.5-mm screw. Generally, a 52-mm-long screw is a good length.
f. Countersink the head of the screw into the medial malleolus. Be aware that the tip of the medial malleolus might be cartilaginous and, therefore, not visible on fluoroscopy.
g. Use a 4-0 absorbable subcuticular suture
h. No immobilization is required.
3. Pitfalls
a. Correction of subtalar/hindfoot valgus deformity before correction of ankle valgus
b. Failure to countersink the head of the screw, thereby leaving a metallic prominence under the medial malleolus
c. Anterior screw placement resulting in the development of recurvatum while correcting the valgus deformity
d. Posterior screw placement resulting in the development of procurvatum while correcting the valgus deformity
e. Lateral screw placement across the physis. The more lateral the screw crosses the physis, the more lateral the CORA and the longer the time to deformity correction. If the screw crosses the center of the physis, it could result in epiphysiodesis. Crossing the physis lateral to the midline will result in increasing the valgus deformity.
f. Failure to account for rebound valgus deformity. Several degrees of recurrent valgus deformity develop after screw removal in most cases. Therefore, overcorrect a few degrees before removing the screw.
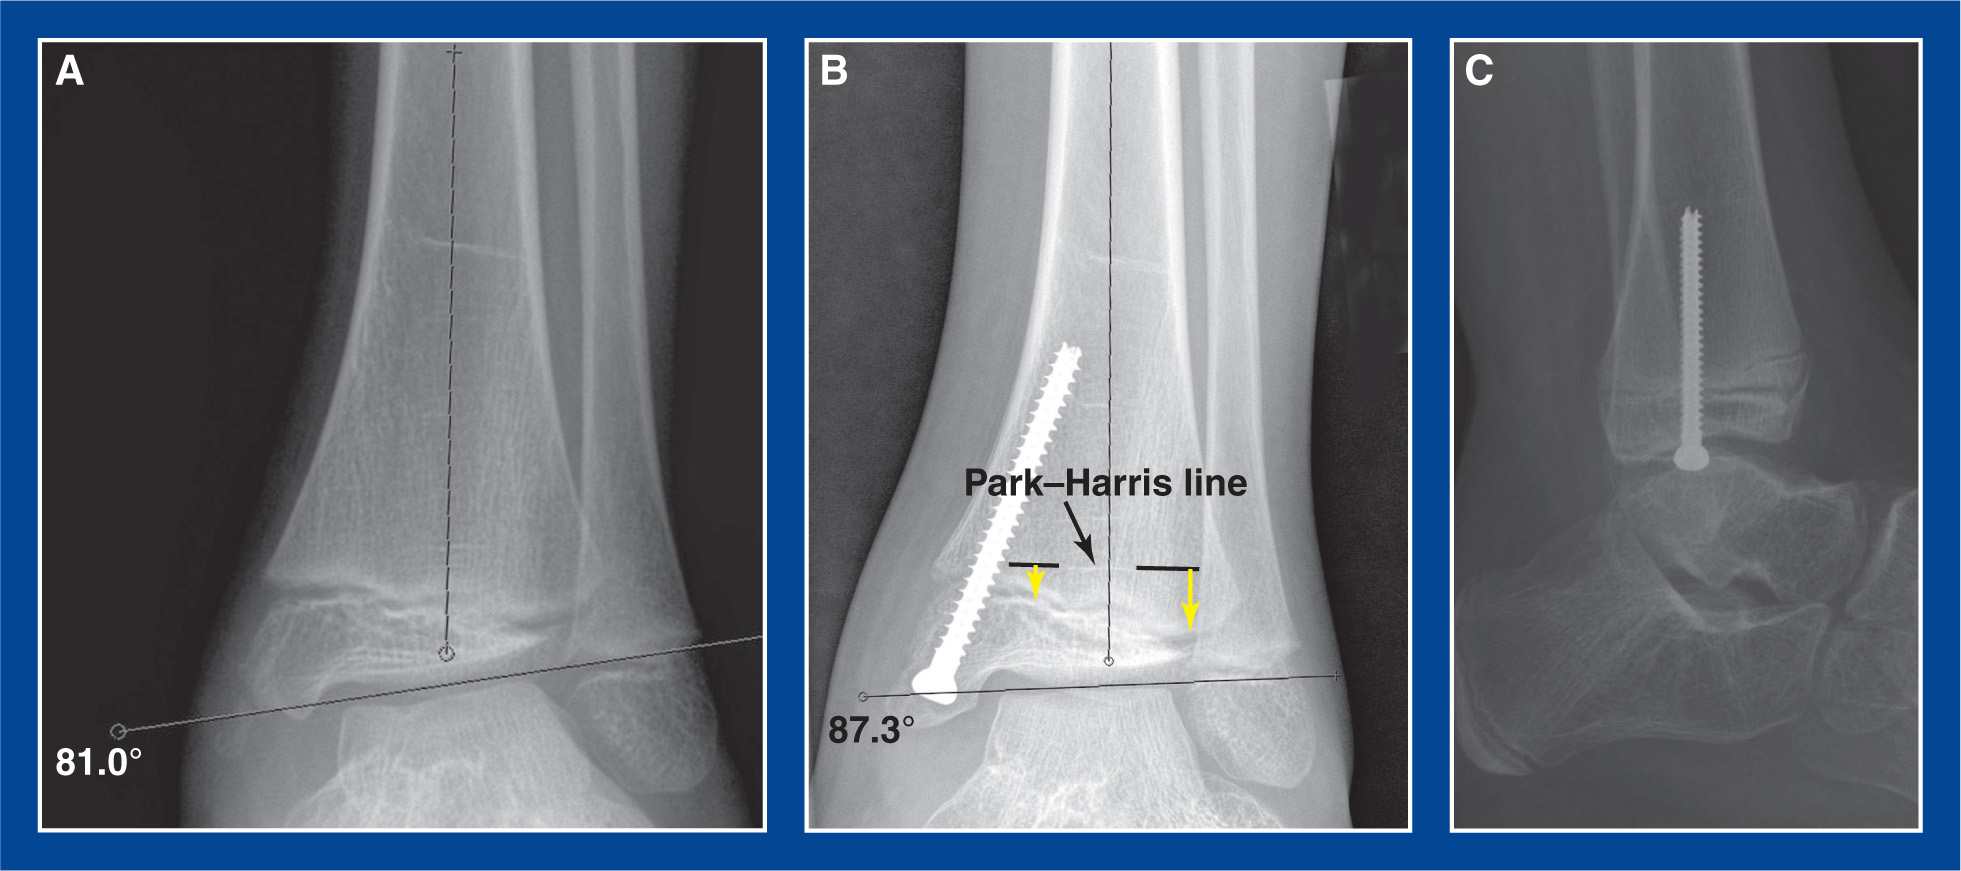
Figure 8-1. Medial malleolus screw hemiepiphysiodesis for guided growth correction of ankle valgus deformity. A. Preoperative AP ankle x-ray showing 9° of valgus deformity. B. 3° of valgus deformity persist 6 months after retrograde insertion of a screw across the medial side of distal tibial physis with a starting point in the center of the medial malleolus. The Park–Harris line (dashed black lines with white P–H line visible between them) confirms deformity correction. The yellow arrows indicate the differential growth of the physis from the P–H line following screw insertion months earlier. C. Lateral radiograph shows that the screw is in the midcoronal plane. This is a true lateral projection of the ankle joint, confirmed by colinear alignment of the posterior cortices of the tibia and fibula at the level of the tibial meta-epiphysis. (see Assessment Principle #20, Chapter 3).
4. Complications
a. Broken screw
i. Avoid by using a large enough screw, which is 4.5 mm in diameter in all but the youngest children. The screw must bend as the angular deformity is corrected. Larger screws resist fracture.
b. Continued physeal growth
i. Avoid by using a fully threaded screw. The threads of a fully threaded and a partially threaded screw are stable in the metaphysis. The head of the screw and the smooth shank of a partially threaded screw are not sufficient to keep the distal portion of the screw stable in the epiphysis of the medial malleolus. The physis will continue to grow, effectively dragging the head of the screw into the medial malleolus. The threads of a fully threaded screw maintain stable fixation in the medial malleolus.
c. Exaggerated overcorrection
i. Avoid by ensuring timely patient follow-up with radiographs. Anticipate deformity correction at approximately 1° per month.
Anterior Distal Tibia Guided Growth with Anterior Plate–Screw Construct
1. Indications
a. Failure of non-operative management to relieve the anterior ankle impingement pain that is most often due to a flat-top talus in a treated clubfoot (see Chapter 5)
2. Technique (Figure 8-2)
a. Make a 4- to 5-cm longitudinal incision over the anterior aspect of the ankle joint lateral to the anterior tibialis tendon
b. Avoid or retract the superficial peroneal nerve
c. Release the proximal portion of the extensor retinaculum longitudinally
d. Incise the anterior ankle joint capsule longitudinally and retract the edges medially and laterally to expose the distal tibial metaphysis and epiphysis
e. Apply a guided growth plate–screw construct across the physis in the midsagittal plane of the tibia using mini-fluoroscopy for assistance.
i. Insert the epiphyseal screw half way between the physis and the articular cartilage
ii. Insert the metaphyseal screw perpendicular to the shaft of the tibia
f. Repair the capsule over the plate with 2-0 absorbable sutures, if possible
g. Repair the extensor retinaculum with 2-0 absorbable sutures
h. Approximate the skin edges with interrupted subcutaneous 3-0 absorbable sutures and a running subcuticular 4-0 absorbable suture
i. Do not lengthen the tendo-Achilles. That would increase the anterior ankle impingement. Reorientation of the ankle joint into recurvatum will improve painless ankle dorsiflexion.
j. Immobilize the ankle in a CAM boot for 1 week to allow the soft tissues to heal
k. Remove the plate and screws after the joint has reoriented and the pain has been resolved for a few months
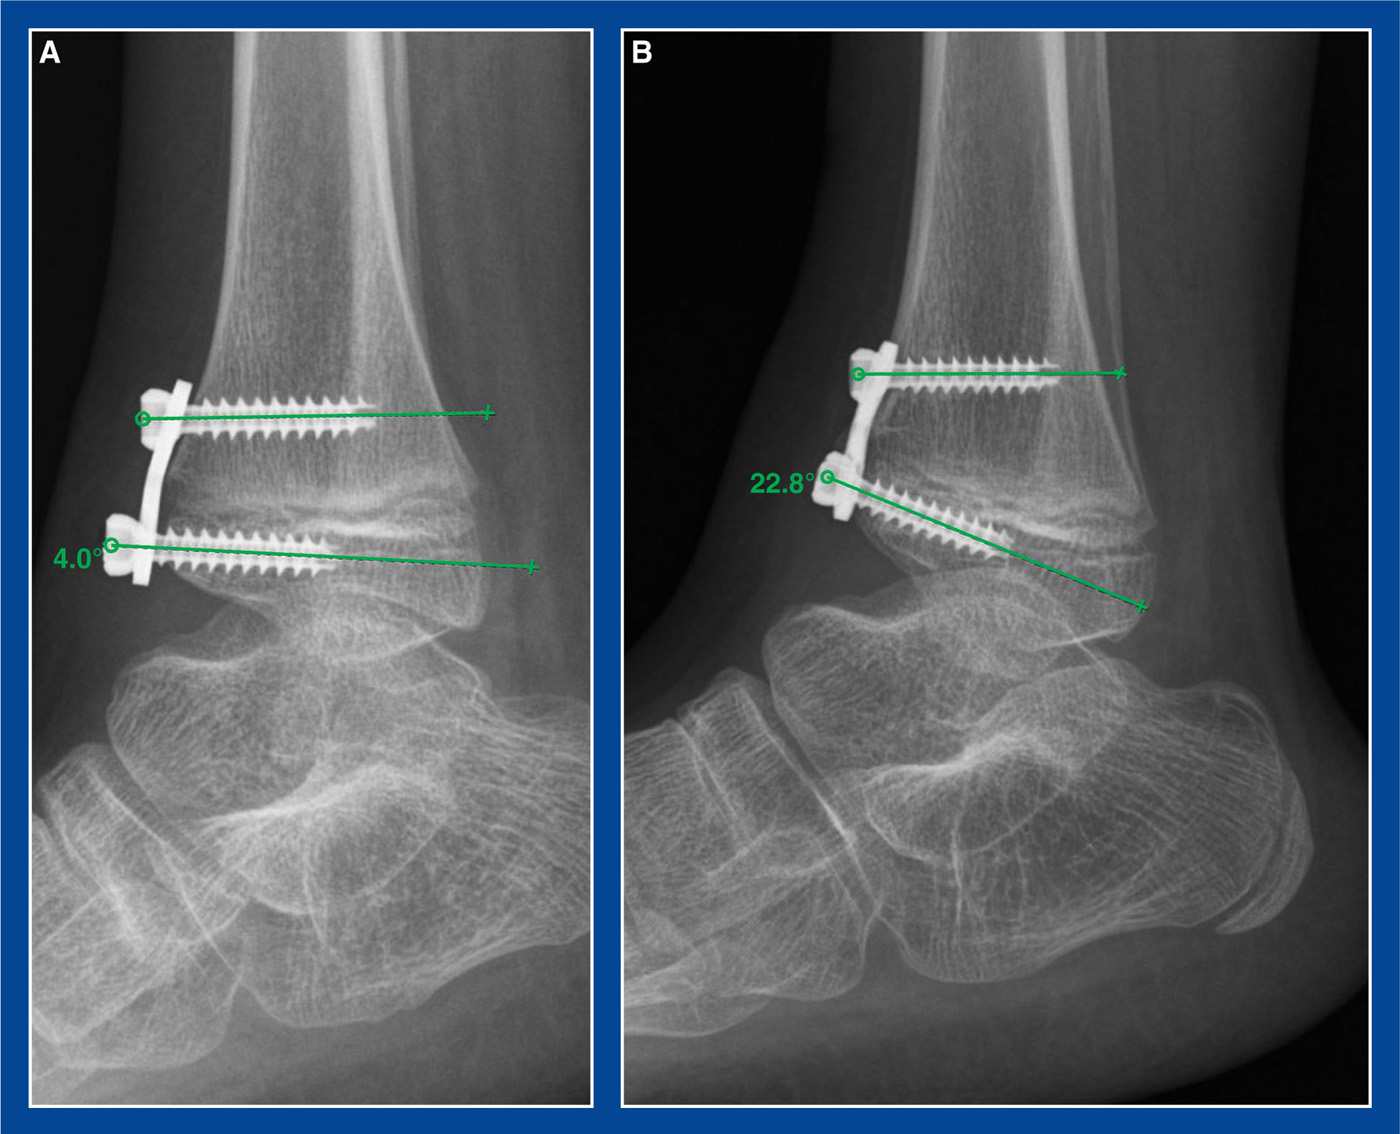
Figure 8-2. Guided growth for anterior ankle impingement. A. Plate/screw construct is seen bridging the anterior distal tibial physis. B. Several months later, the joint has reoriented and grown into recurvatum, thereby increasing dorsiflexion and decreasing the painful anterior ankle impingement.
3. Pitfalls
a. Using a plate so large or poorly positioned that it impinges on the dorsal talar neck more than the offending anterior distal tibial epiphysis already was
b. Concurrent lengthening of the tendo-Achilles. The goal is to move the anterior distal tibial epiphysis away from the dorsal talar neck. Therefore, first reorient the joint into recurvatum/dorsiflexion with guided growth. Then determine if a heel cord lengthening is necessary.
4. Complications
a. Overcorrection
i. Avoid by ensuring patient follow-up
b. Screw insertion into the physis or the joint
i. Avoid by inserting the epiphyseal screw first and using mini-fluoroscopy for guidance
c. Injury to the superficial peroneal nerve
i. Avoid by isolating and retracting/protecting it
1. Indications
a. Pain at the site of the accessory navicular that is not relieved by prolonged attempts at nonoperative treatment (see Chapter 6)
2. Technique (Figure 8-3)
a. Make a 4-cm longitudinal incision along the medial border of the midfoot from the medial cuneiform to the talar neck along the course of the posterior tibialis tendon
b. Incise the soft tissues on the medial surface of the navicular/accessory navicular longitudinally in line with the fibers of the distal extension of the posterior tibialis tendon
c. Continue the incision into the posterior tibialis tendon in the transverse plane for 1 cm
d. Sharply elevate the periosteum/posterior tibialis tendon fibers dorsally and plantarward from the navicular/accessory navicular, exposing the entire accessory navicular and the enlarged medial extension of the main body of the navicular. Preserve these flaps for later repair. Do not release them transversely.
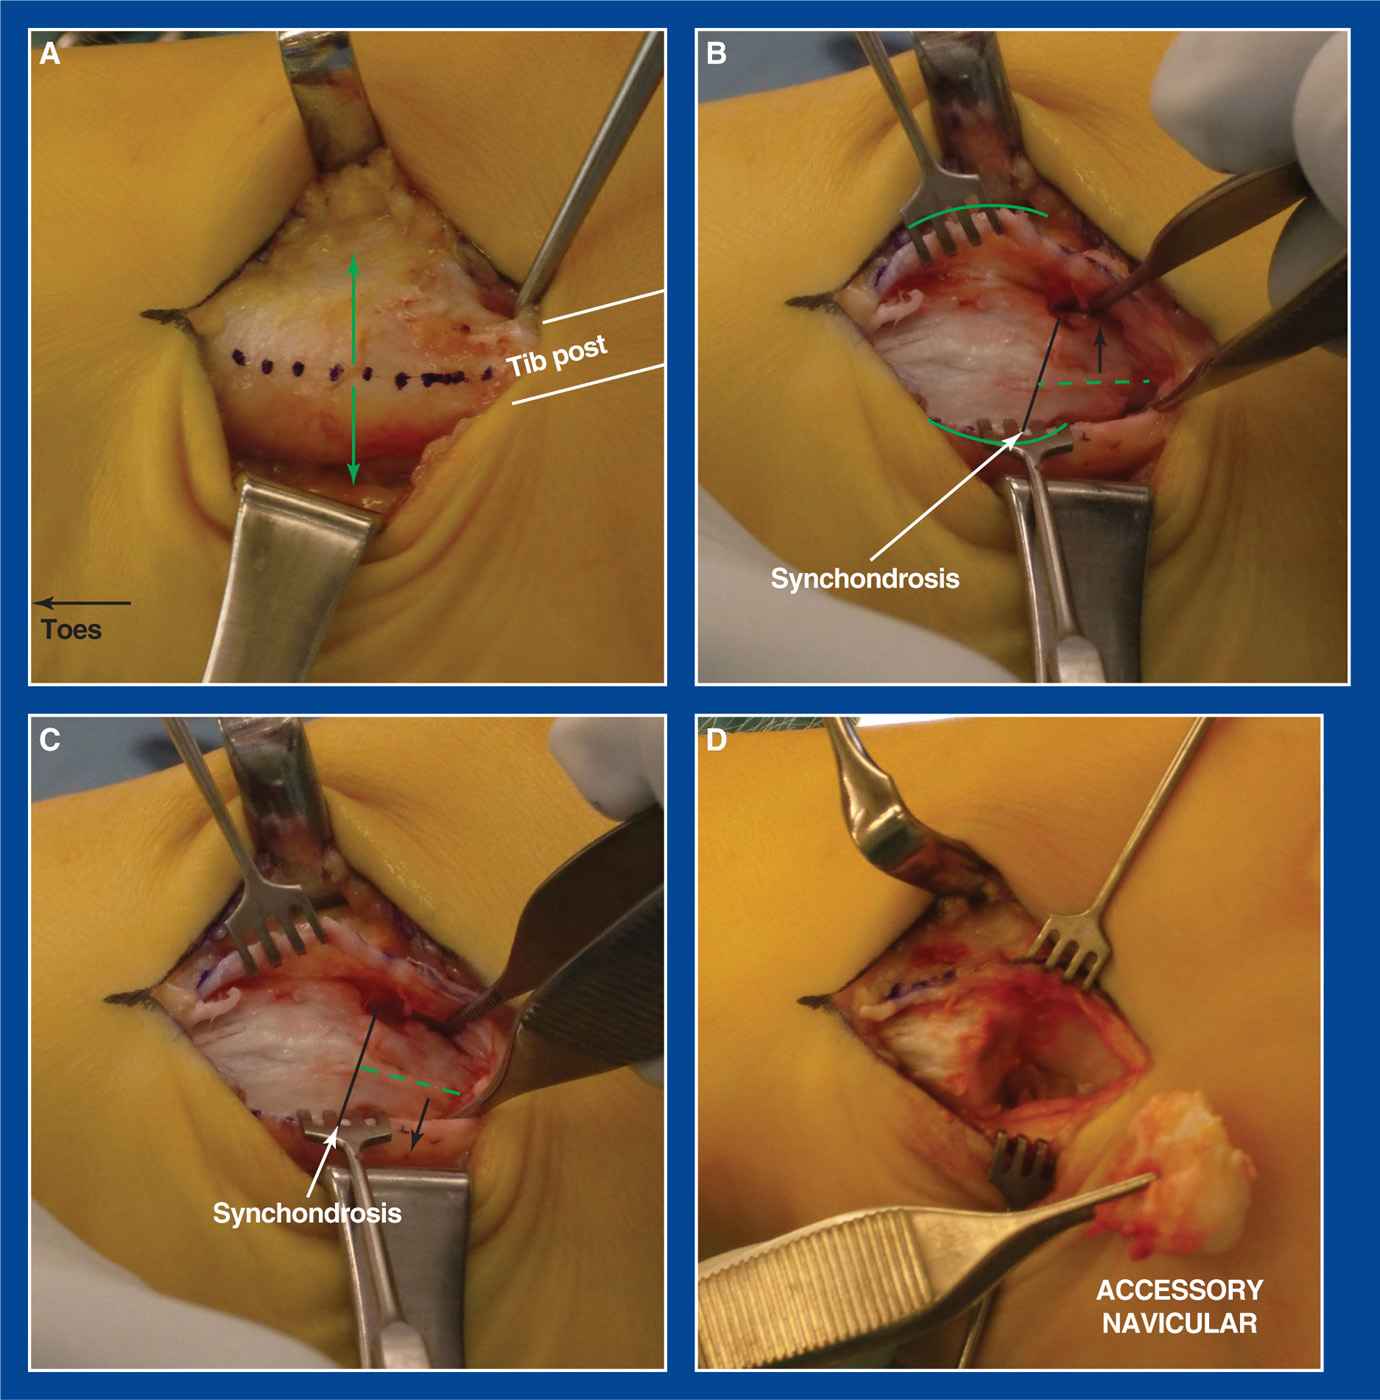
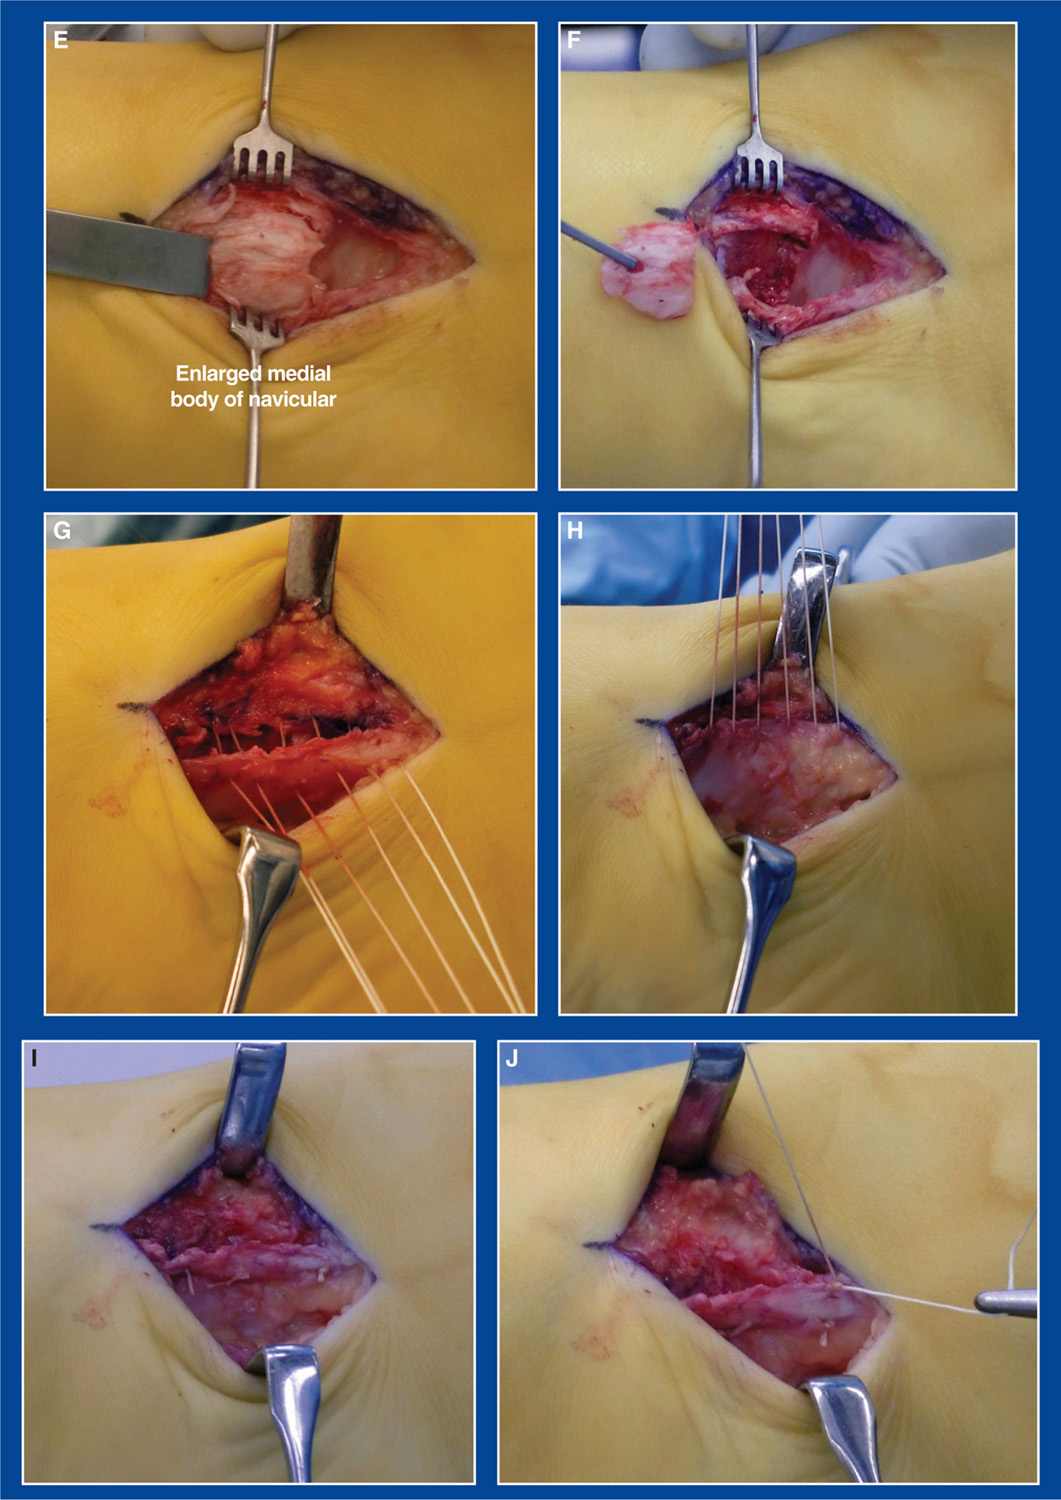
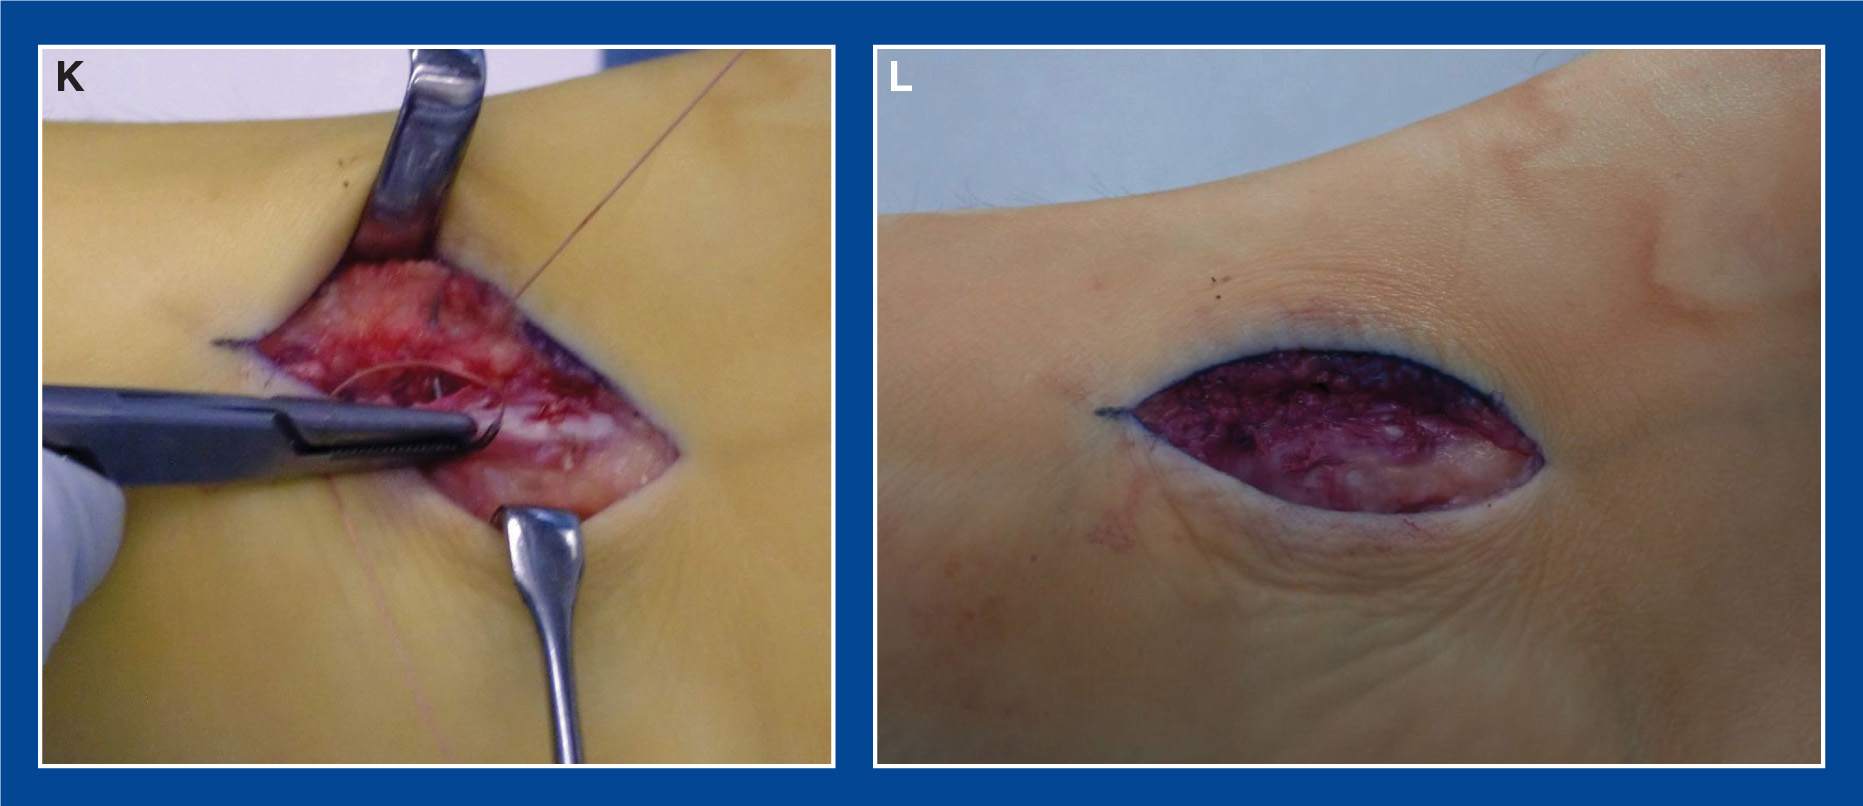
Figure 8-3.Accessory navicular resection (toes to the left and heel to the right of the images). A. The pathology is exposed through a 4-cm longitudinal skin incision directly medial to the bony prominence. An incision is made in the soft tissues on the medial surface of the navicular and accessory navicular in line with the posterior tibialis tendon fibers (dotted blue line). The division of the tendon fibers extends 1 to 2 cm proximally into the posterior tibialis tendon. The button hook is around the tendon as it approaches the navicular from the right side of the image. The green arrows indicate the directions that the dorsal and plantar soft tissue flaps will be elevated. B. The periosteum/tendon fiber flaps (curved green lines) have been sharply elevated both dorsally and plantarward off the navicular and the accessory navicular without detaching them transversely from the navicular. The small four-pronged hooks are shown retracting these soft tissue flaps. The black line indicates the location of the synchondrosis of the accessory navicular with the main body of the navicular. The dotted green line indicates the longitudinal axis of the accessory navicular. The forceps are shown rotating the accessory navicular dorsally at the synchondrosis. C. The forceps are shown rotating the accessory navicular plantarward, thereby demonstrating hypermobility of the accessory navicular at the synchondrosis. D. The accessory navicular has been resected at the synchondrosis. E. The enlarged medial extension of the main body of the navicular is resected flush with the medial surface of the medial cuneiform using an osteotome. F. Forceps are holding the resected bone.G. Multiple vest-over-pants imbrication-type 2-0 absorbable sutures are placed in the flaps in preparation for plantar-to-dorsal plication and tubularization of the tendon. H. Sutures are pulled dorsally to close the dead space that was created by the bone resection. I. The vest-over-pants sutures have been tied. J. A running 2-0 absorbable suture is initiated between the free edge of the plantar flap and the adjacent fibers of the dorsal flap of the posterior tibialis tendon at the proximal (heel) end of the plicated tissues. K. The suture is run along the free edge to smooth the repair. L. Final, smooth imbricated repair.
e. Identify the synchondrosis, incise it, and remove the accessory navicular
f. Using an osteotome, resect the enlarged medial extension of the navicular flush with the medial surface of the medial cuneiform. Confirm adequate resection with mini-fluoroscopy
g. Plicate the soft tissue flaps over the resection site using a dorsal–plantar vest-over-pants technique with 2-0 absorbable sutures
h. Finish the free edge of the superficial flap with a running 2-0 absorbable suture
i. Approximate the skin edges with interrupted subcutaneous 3-0 absorbable sutures and a running subcuticular 4-0 absorbable suture
j. Apply a short-leg non–weight-bearing cast
k. Remove the cast after 6 weeks and initiate weight-bearing
3. Pitfalls
a. Failure to resect the enlarged medial/plantar–medial extension of the main body of the navicular
4. Complications
a. Weakening, stretching, or rupture of the posterior tibialis tendon attachment on the navicular
i. Avoid by preserving the dorsal and plantar soft tissue flaps as described earlier
Calcaneonavicular Tarsal Coalition Resection
1. Indications
a. Activity-related pain in the sinus tarsi region, and occasionally under the medial midfoot, caused by a calcaneonavicular tarsal coalition (see Chapter 5) that is not relieved despite prolonged attempts at nonoperative treatment
2. Technique (Figure 8-4)
a. Use a sterile tourniquet and hindquarter prep if the fat graft will be taken from the posterior buttock crease. A nonsterile tourniquet can be used if the fat graft will be taken from the posteromedial distal thigh
b. Make an oblique incision over the midfoot from the dorsal midline of the navicular to the midlateral point of the anterior calcaneus in a Langer’s line
c. Isolate, retract, and protect the superficial peroneal nerve
d. Elevate the extensor muscles from the sinus tarsi and the coalition from posterior to anterior, tagging the proximal margin for ease of reattachment
e. Place Joker elevators posterior and anterior to the coalition with the tips meeting under the coalition, which is usually around 2.5 cm in depth
f. Using a 10-mm osteotome, cut the navicular from dorsolateral to plantar-medial in line with the head and neck of the talus
g. Using a 10-mm osteotome, cut the calcaneus from dorsolateral to plantar-medial in line with the cuboid/lateral cuneiform joint, trying to preserve as much normal calcaneocuboid joint articulation as possible
h. The two cuts should be approximately 10 to 12 mm apart and parallel to nearly parallel
i. The coalition will be in the resected specimen.
j. If necessary, use a Kerrison rongeur to remove bone and bone fragments from the depths of the resection cavity
k. The spring (calcaneonavicular) ligament should be visible at the base of the resection cavity.
l. Cover the exposed bone surfaces with bone wax
m. Obtain a large fat graft from the posterior–medial aspect of the distal thigh or from the posterior buttock crease and overfill the resection cavity
n. Replace the short toe extensors to their origin with 2-0 absorbable sutures, covering the fat graft
o. Approximate the skin edges with interrupted subcutaneous 3-0 absorbable sutures and a running subcuticular 4-0 absorbable suture
p. Apply a short-leg non–weight-bearing cast. The cast is worn for 2 weeks to allow the soft tissues to heal before initiating range-of-motion exercises
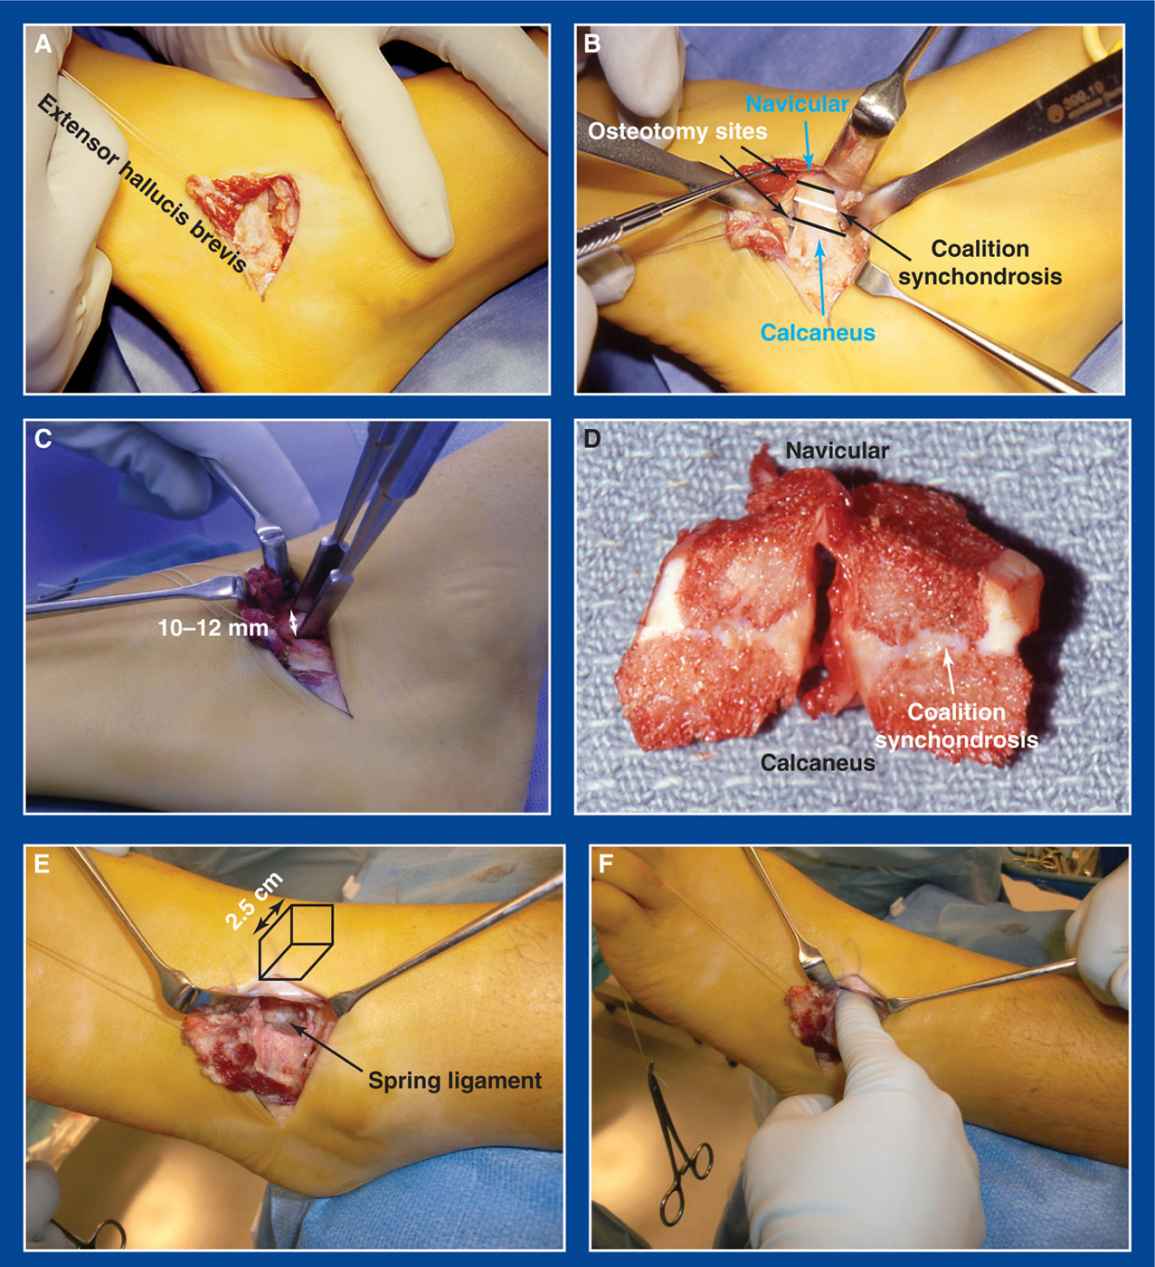
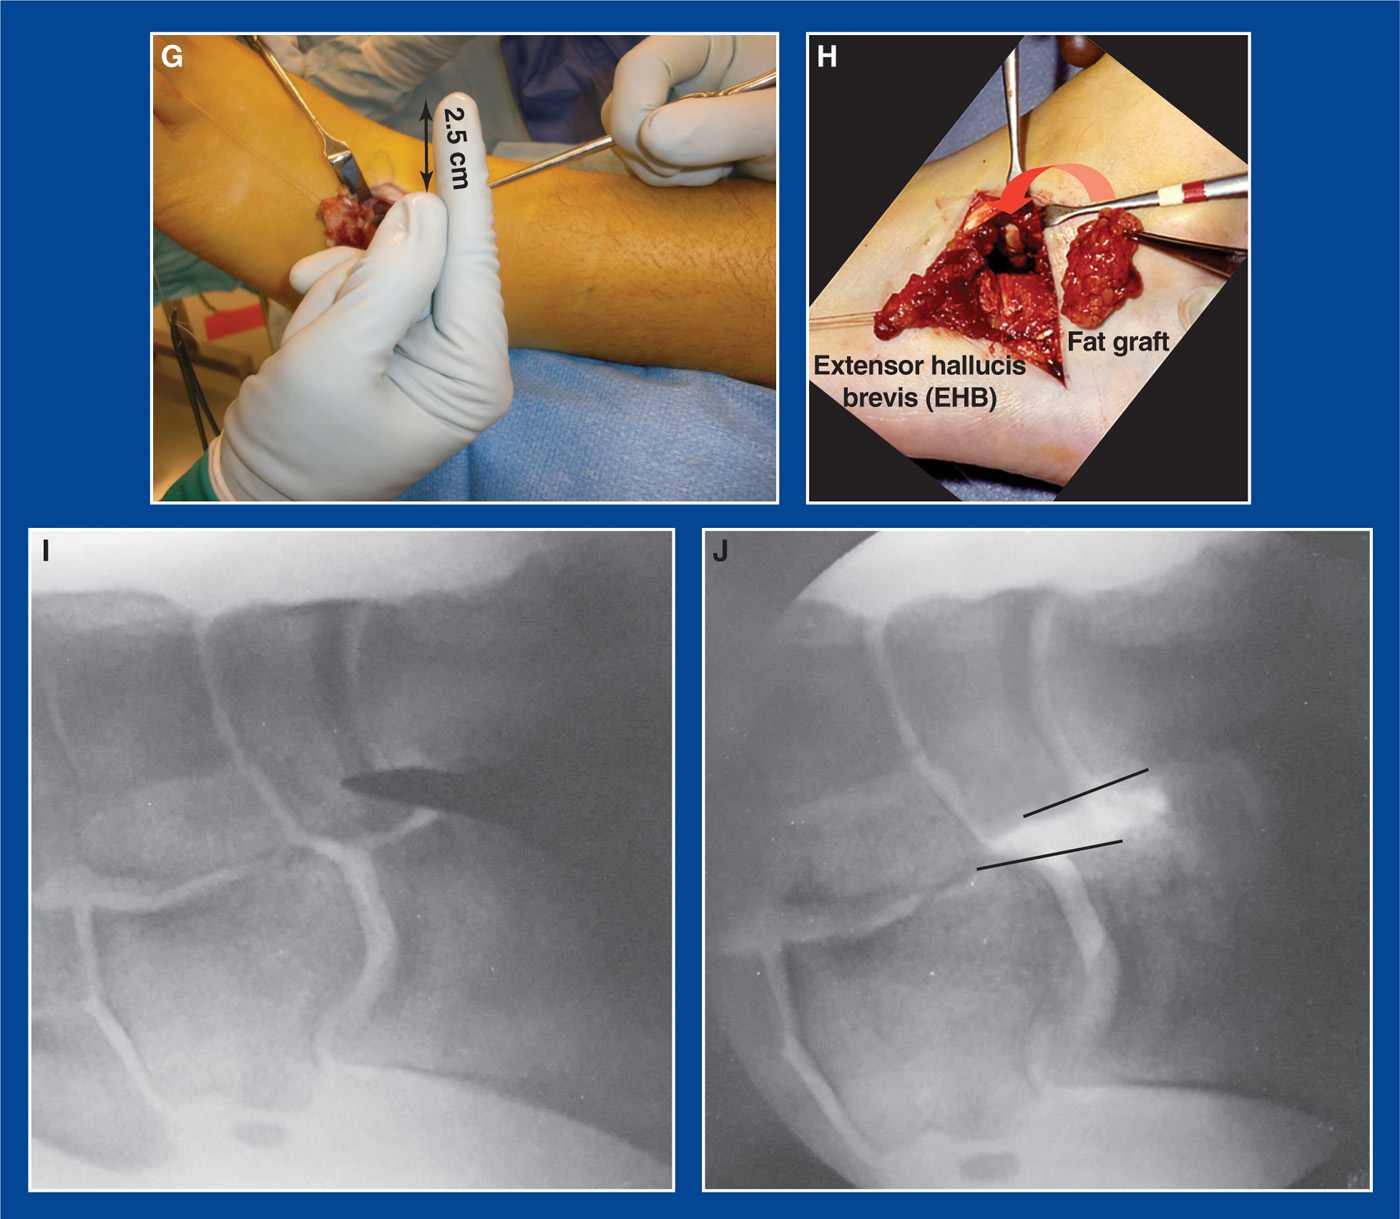
Figure 8-4.Resection of a calcaneonavicular tarsal coalition. A. The EHB is elevated from the sinus tarsi and reflected anteriorly. B. The synchondrosis and adjacent portions of the calcaneus and the navicular are exposed. C. Ten-millimeter osteotomes are positioned 10 to 12 mm apart and parallel to each other for the osteotomies. D. A resected coalition has been bisected to reveal the pathoanatomy. E. The 3D rectangle-shaped resection cavity is visualized with the spring ligament exposed at its base. F. The resection cavity is large enough to accept the surgeon’s index finger. G. The cavity is 2.5 cm deep. H. After the osteotomy surfaces are coated with bone wax, a large free fat graft is inserted to completely fill the cavity. The EHB is pulled over the fat graft and reattached to its origin in the sinus tarsi. I. Preresection oblique intraoperative fluoroscopy image with osteotome in place. J. Postresection oblique image. The navicular osteotomy is made in line with the head/neck of the talus. The calcaneus osteotomy is made in line with cuboid/lateral cuneiform joint.
q. Prescribe a dosage of a nonsteroidal anti-inflammatory drug (NSAID) for 4 weeks
r. Remove the cast after 2 weeks, but continue non–weight-bearing for an additional 4 weeks while the patient regains comfortable range of motion
s. Initiate gradual return to weight-bearing after 6 weeks, using crutches at first to ensure comfort
3. Pitfalls
a. Excessive resection of the articular surface of the calcaneus, resulting in instability at the calcaneocuboid joint
b. Excessive resection of the articular surface of the navicular resulting in instability at the talonavicular (TN) joint
4. Complications
a. Injury to the superficial peroneal nerve
i. Avoid by:
• isolating, retracting, and protecting it
b. Persistence of the coalition
i. Avoid by:
• ensuring that the coalition is completely resected, including at its plantar extent
• Visualize the spring (calcaneonavicular) ligament.
• Probe the depths of the resection cavity with a Freer elevator.
• Obtain an intraoperative oblique fluoroscopic or radiographic image.
c. Recurrence of the coalition
i. Avoid by:
• applying bone wax to the resection surfaces
• inserting a large free fat graft to completely fill the resection cavity and covering it with the EHB
Talocalcaneal Tarsal Coalition Resection
1. Indications
a. Activity-related pain in the medial hindfoot, the sinus tarsi region, and occasionally under the medial midfoot, caused by a talocalcaneal tarsal coalition (see Chapter 5) that is not relieved despite prolonged attempts at nonoperative treatment
b. A coalition of the middle facet in which the size of the coalition is less than 50% the surface area of the posterior facet
c. And with a normal posterior facet, defined as “normal” thickness on coronal CT scan images
2. Technique (Figure 8-5)
a. Use a sterile tourniquet and hindquarter prep if the fat graft will be taken from the posterior buttock crease. A nonsterile tourniquet can be used if the fat graft will be taken from the posteromedial distal thigh
b. Make a longitudinal incision medial to the subtalar joint from the posterior tibial (PT) neurovascular bundle to the TN joint
c. Incise the laciniate ligament (flexor retinaculum) longitudinally directly over the middle facet. Tag the edges with 2-0 absorbable sutures for later identification and repair
d. Retract the flexor digitorum longus (FDL) dorsally or plantarward, depending on the dorsal–plantar location of the coalition and the ease of exposure
e. Retract the flexor hallucis longus (FHL) plantarward from the sustentaculum tali
f. Bluntly identify the posterior edge of the middle facet. Place a baby Hohman retractor there to both identify the posterior extent of the pathologic facet and retract and protect the FHL and PT neurovascular bundle
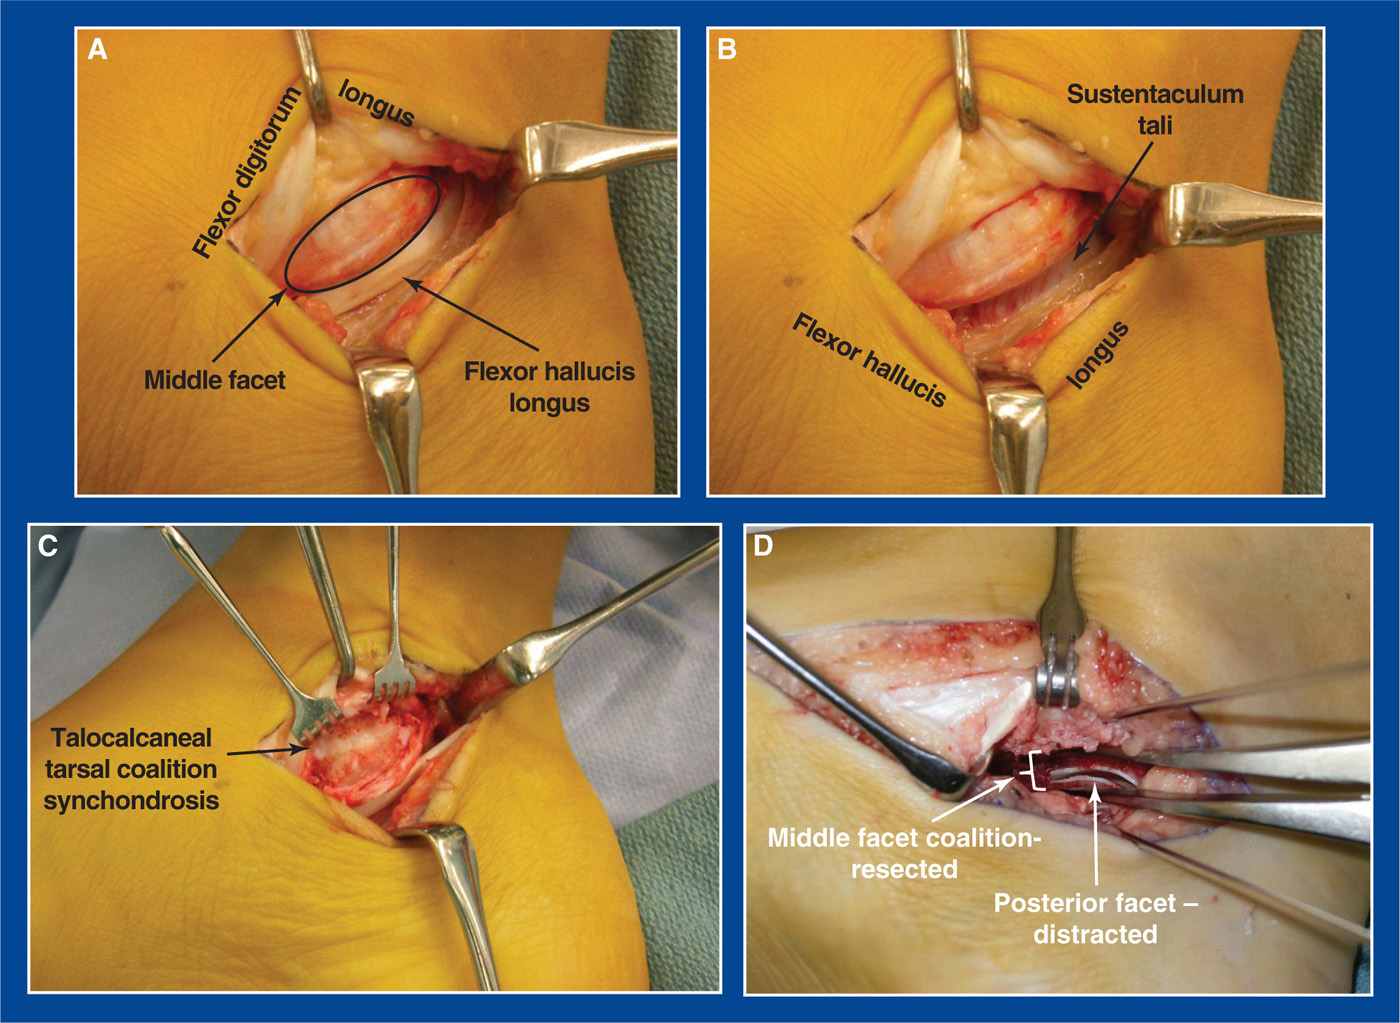
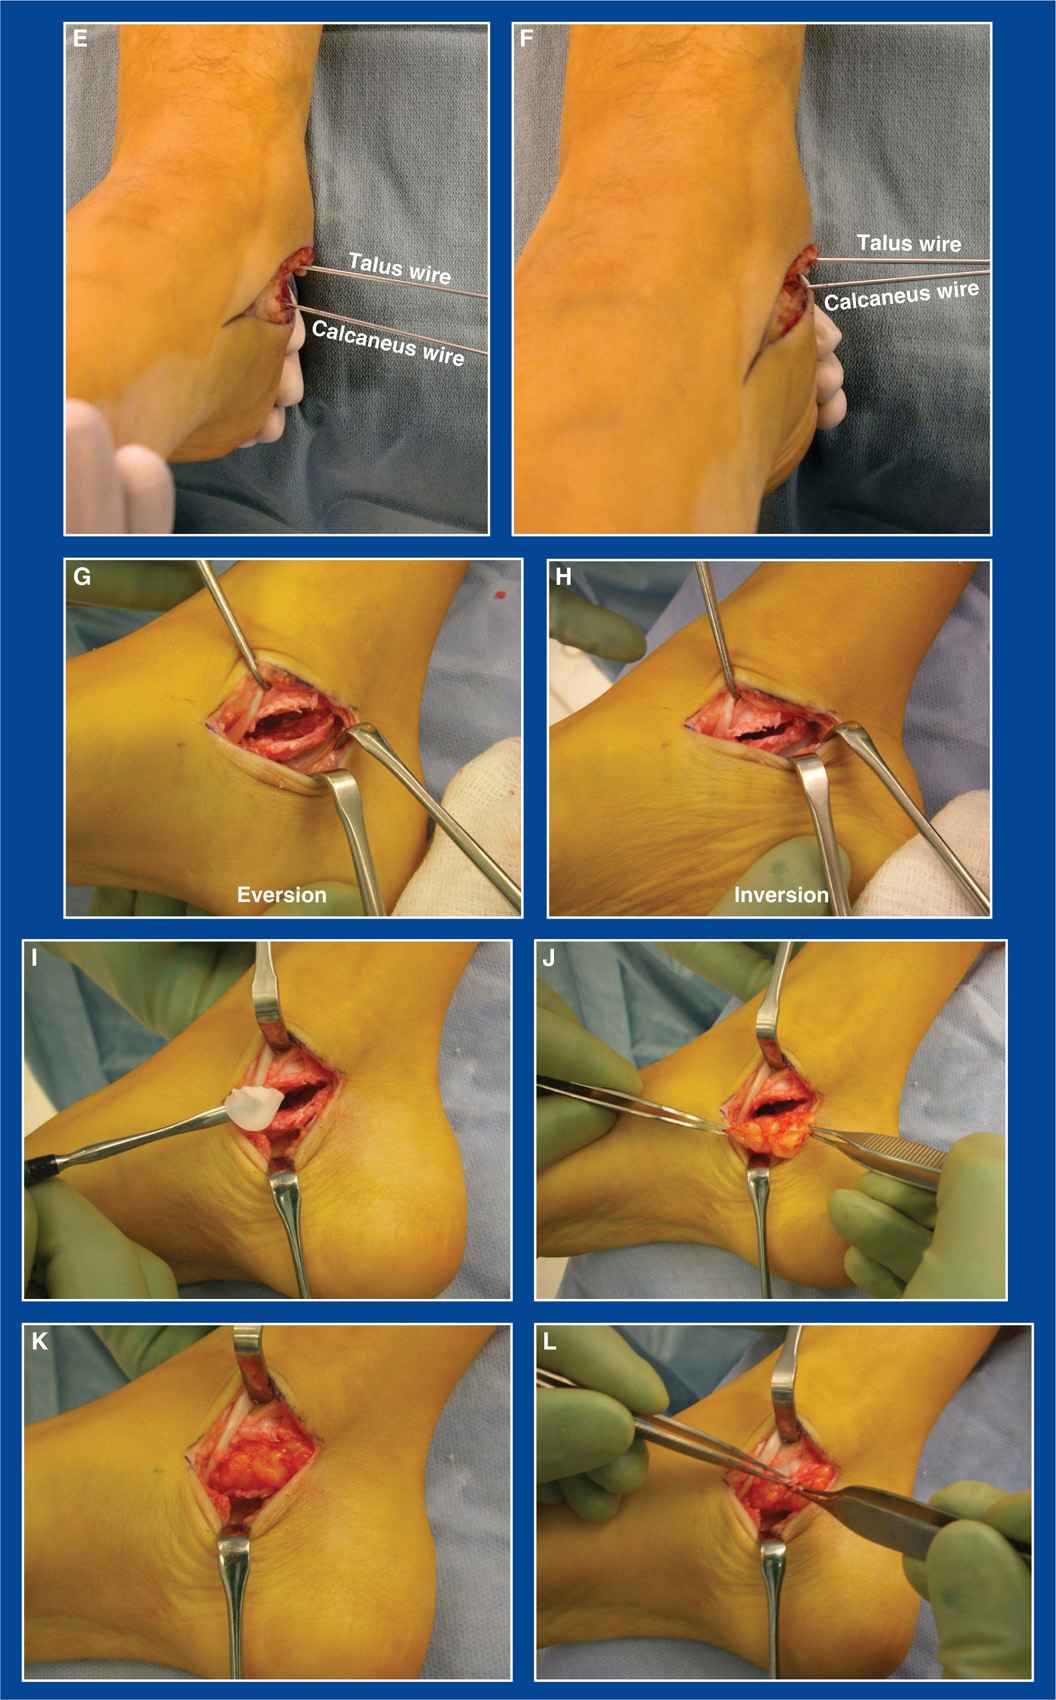
Figure 8-5. Resection of a talocalcaneal tarsal coalition. A. The FDL is retracted dorsally to expose the middle facet, though it might be easier to retract it plantarward in some feet. B. The FHL is retracted plantarward from the sustentaculum tali. C. The periosteum is sharply elevated from the medial surfaces of the talus and calcaneus at the middle facet. The synchondrosis is exposed. D. The middle facet coalition has been resected. The posterior facet is visualized at the base of the resection cavity. A smooth-toothed laminar spreader in the resected middle facet cavity has been used to distract the posterior facet to ensure that there are no remaining bony or cartilaginous connections between the talus and calcaneus. E. Steinmann pins are inserted in the talus and calcaneus from medial to lateral before resection of the coalition. There is no motion between them with attempted inversion and eversion of the subtalar joint. F. Following resection, convergence and divergence of the pins confirms restoration of subtalar motion. G and H. Direct visualization of the resection cavity during eversion and inversion of the subtalar joint, with widening and narrowing of the resection cavity, further confirms complete resection of the coalition. I. Bone wax is applied to the resected bone surfaces. J. A large free fat graft is inserted. K. The fat graft completely fills the cavity. L. The periosteum is repaired over the fat. The flexor retinaculum is subsequently repaired over the graft and the flexor tendons.
g. Bluntly identify the anterior edge of the middle facet. Place a baby Hohman retractor there
h. Longitudinally (from anterior to posterior) incise the periosteum in the center of the medial face of the middle facet
i. Sharply elevate the periosteum from the middle facet dorsally and plantarward. Try to preserve it for later repair, if possible
j. Identify the synchondrosis
k. Using a high-speed 3- to 4-mm burr, remove the synchondrosis from anterior to posterior and medial to lateral. The height of the resection cavity should be 6 to 8 mm
l. The resection is complete when:
i. the healthy posterior facet is visualized.
ii. the talocalcaneal interosseous ligament and surrounding fat are visualized.
iii. the healthy anterior facet is visualized.
iv. the posterior and anterior facets can be distracted easily with a smooth-toothed laminar spreader in the resection cavity of the middle facet.
v. the subtalar joint can be inverted and everted. Do not expect dramatic improvement in range of motion in long-standing cases, but ensure that there are no pathologic bony or cartilaginous connections remaining between the talus and calcaneus
• Insert parallel 0.062″ smooth Steinmann pins from medial to lateral in the talus and calcaneus adjacent to the resection cavity. Invert and evert the subtalar joint to confirm that there is restoration of motion by observing the movement between the pins. If there is limited or no subtalar motion despite confirmed distraction of the posterior facet with the laminar spreader, release the dorsolateral TN joint capsule through a dorsolateral incision. In long-standing coalitions, a contracture/synchondrosis sometimes develops at that location between a dorsal talar beak and a dorsal navicular osteophyte.
m. Cover the exposed bone surfaces with bone wax
n. Obtain a large fat graft from the posterior–medial aspect of the distal thigh or from the posterior buttock crease and use it to overfill the resection cavity
o. Replace the FHL under the sustentaculum tali
p. Repair the periosteum over the fat graft, if possible
q. Replace the FDL to its normal position medial to the middle facet, and repair the laciniate ligament (flexor retinaculum) with 2-0 absorbable sutures over the fat graft
r. Approximate the skin edges with interrupted subcutaneous 3-0 absorbable sutures and a running subcuticular 4-0 absorbable suture
s. Apply a short-leg non–weight-bearing cast. The cast is worn for 2 weeks to allow the soft tissues to heal before initiating range-of-motion exercises
t. Prescribe a dosage of an NSAID for 4 weeks
u. Remove the cast after 2 weeks, but continue non–weight-bearing for an additional 4 weeks while the patient regains comfortable range of motion
v. Initiate gradual return to weight-bearing after 6 weeks, using crutches at first to ensure comfort
3. Pitfalls
a. Inappropriate resection in a foot with an unresectable coalition characterized by an ankylosed and narrow posterior facet and/or an extremely large middle facet coalition
b. Failure to correct severe associated valgus hindfoot deformity either concurrently or staged
4. Complications
a. Persistence of the coalition
i. Avoid by:
• ensuring complete resection. See “l” above in the Technique section.
b. Recurrence of the coalition
i. Avoid by:
• making a large resection cavity
• applying bone wax to the resection surfaces
• inserting a large free fat graft to completely fill the resection cavity and covering it with the periosteum and flexor retinaculum
c. Injury to the PT neurovascular bundle
i. Avoid by retracting and protecting it from the burr
Lichtblau Distal Calcaneus Resection
See under Lateral Column Shortening Procedures later.
Longitudinal Epiphyseal Bracket Resection
1. Indications
a. The presence of a longitudinal epiphyseal bracket (LEB; see Chapter 6)
i. LEB is always associated either with congenital hallux varus (see Chapter 5) or with preaxial polydactyly (see Chapter 6)
2. Technique (Figures 8-6 and 8-7)
a. Make a longitudinal incision along the medial border of the forefoot extending from the hallux to the medial cuneiform
b. If preaxial polydactyly exists, continue the incision distally as an ellipse around the duplicate hallux on the medial side. Resect the duplicate hallux
c. The abductor hallucis is contracted and often exists as a fibrous cord/band in a foot with either congenital hallux varus or preaxial polydactyly. Release it distally (or excise it) (see Chapter 7).
d. Expose the 1st metatarsal (MT) shaft extraperiosteally on its dorsal, medial, and plantar surfaces
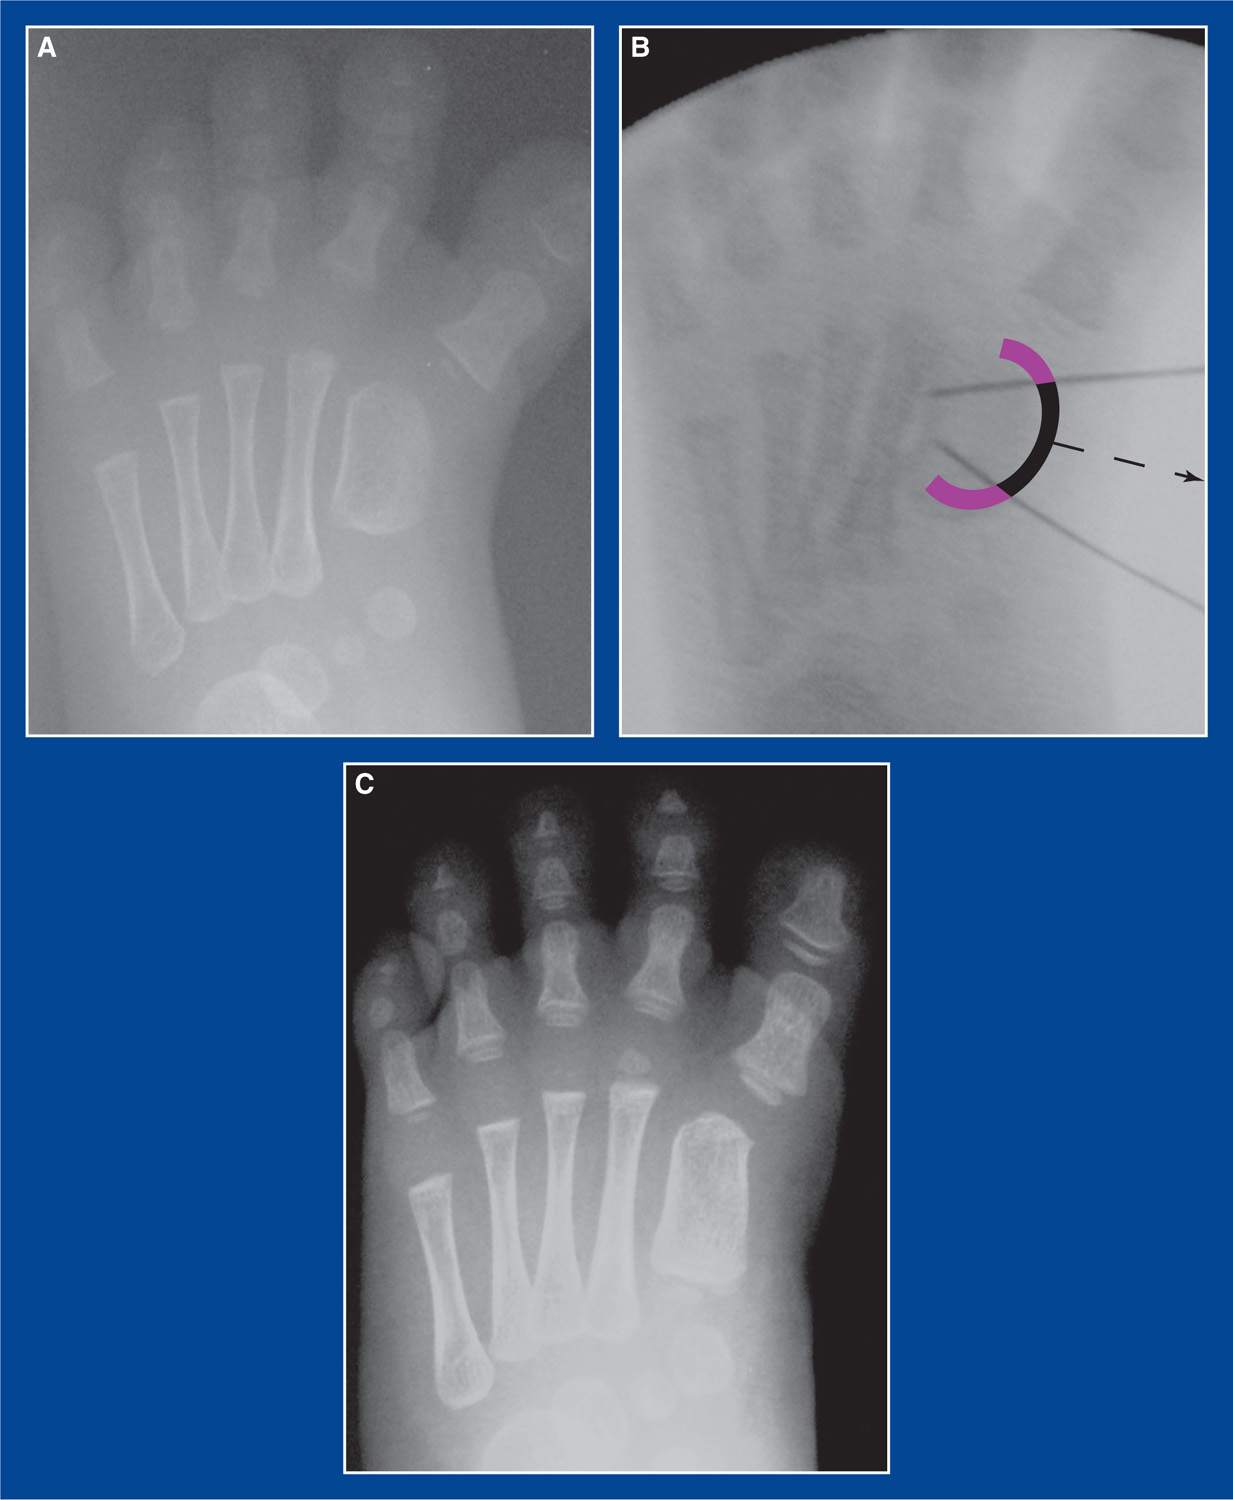
Figure 8-6. A. AP x-ray of a 1st MT LEB associated with congenital hallux varus in an infant. The lateral cortex of the diaphysis is concave, whereas the medial cortex is convex and poorly ossified. The hallux is in varus alignment. B. The purple and black arc represents the LEB. The black central section represents the abnormal portion of the LEB along the medial side of the 1st MT shaft. The convergent black lines are the 25G needles that were inserted to mark the planned extent of resection. C. One year later, the medial cortex of the 1st MT diaphysis is concave and has the normal density of cortical bone. Longitudinal growth of the MT has been established. It is unknown at this time if catch up longitudinal growth will take place.
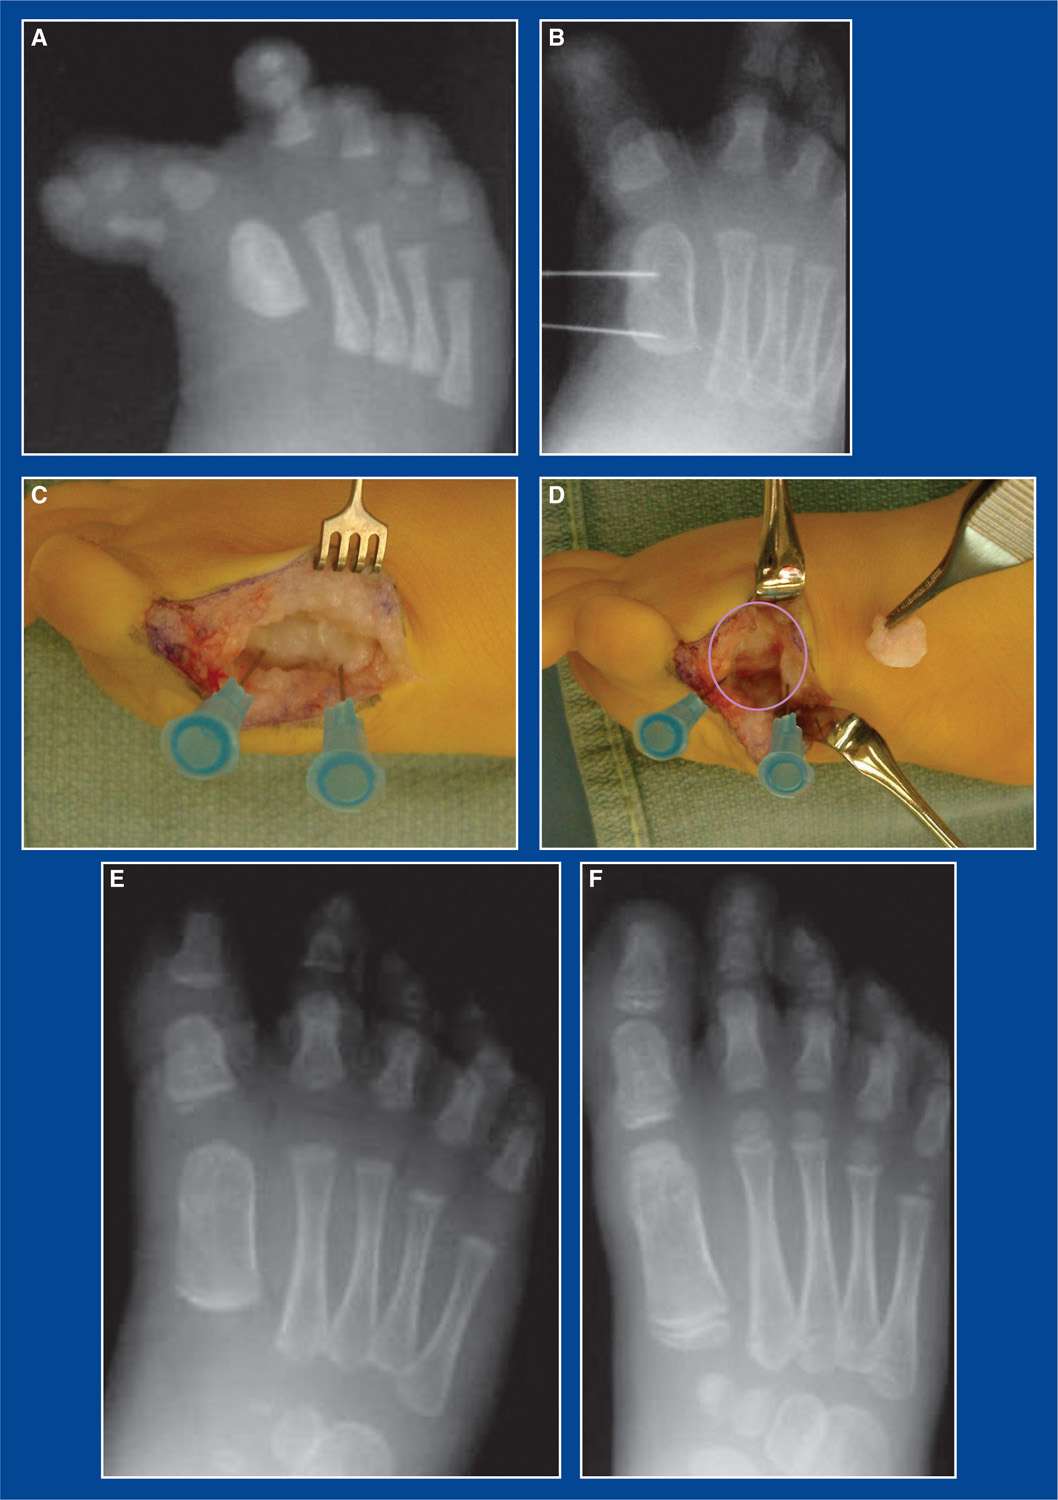
Figure 8-7. A. Preaxial polydactyly with a 1st MT LEB in a newborn infant. B. Intraoperative x-ray obtained when the child was 9 months old. The two 25G needles mark the proximal and distal limits of the planned LEB resection (the distal needle was moved further distally before resection). C. The shiny cartilage of the LEB along the medial surface of the MT shaft can be seen between the needles. D. The 1-cm-thick (medial to lateral) abnormally positioned epiphyseal cartilage (held in the forceps) was resected, sharply exposing metaphyseal-type bone where cortical bone should be (purple oval). E. Normal-appearing medial cortex on the 1st MT shaft 2 years later. F. At 4 years postoperatively, the 1st MT appears normal in length and shape, and the mild residual varus alignment of the 1st MTP joint has corrected to physiologic alignment.
e. Using mini-fluoroscopy for guidance, insert a 25G needle from medial to lateral at the transverse level of the normal physis proximally and another at the level of the normal articular cartilage distally
f. Use a scalpel to incise the thick, abnormally placed epiphyseal cartilage on the medial side of the shaft, cutting from dorsal to plantar immediately distal to the proximal needle and immediately proximal to the distal needle. The epiphyseal cartilage extends dorsomedially and plantar-medially approximately to the midsagittal plane of the MT.
g. Identify the junction between the abnormal epiphyseal cartilage and the normal periosteum on the dorsal and plantar surfaces
h. Incise the periosteum longitudinally on the dorsal and plantar surfaces immediately adjacent to the LEB
i. Use a Freer elevator to separate, or “pop off,” the abnormal epiphyseal cartilage from the shaft of the MT. The technique is similar to separating the iliac apophysis from the iliac crest during hip surgery in children. The exposed bone on the MT shaft is not cortex, but instead juxtaphyseal metaphyseal bone as seen at the iliac crest or during operative treatment of a physeal injury. Make sure all abnormal cartilage is removed, leaving only normal periosteum on the dorsal and plantar surfaces of the MT shaft.
j. The subcutaneous fat and abductor hallucis muscle fall into the gap upon closure of the wound, though a deep fat stitch of a 3-0 absorbable material can be used to ensure that soft tissues fill the gap.
k. Approximate the skin edges with interrupted subcutaneous 3-0 absorbable sutures and a running subcuticular 4-0 absorbable suture
l. If the skin is particularly contracted, the incision can be converted to a Z-plasty (Figure 8-8).
m. It is uncommon to require pin fixation of the metatarsophalangeal (MTP) joint. The articular cartilage of the 1st MT is medially deviated (essentially a reverse, or negative, distal metatarsal articular angle [DMAA]—see Juvenile Hallux Valgus, Chapter 5) and the MTP joint is generally congruous. After establishing longitudinal growth of the MT, the joint tends to reorient itself.
n. Use a long-leg cast (to prevent it from slipping off the infant) for 4 weeks
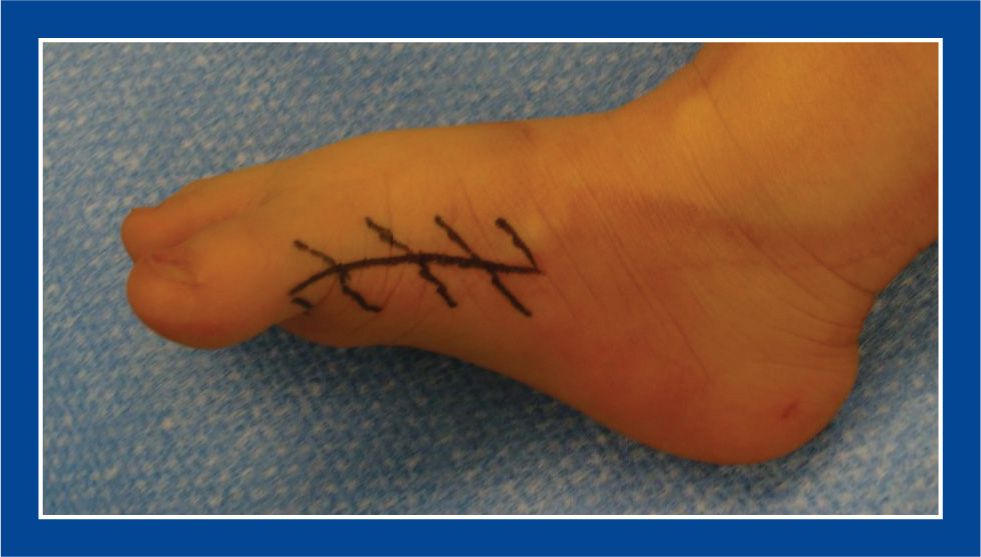
Figure 8-8. Z-plasty of the skin on the medial side of the forefoot may be necessary when correcting congenital hallux varus or preaxial polydactyly with or without resection of a 1st MT LEB.
3. Pitfalls
a. Failure to release the abductor hallucis contracture
b. Failure to resect the proximal-to-distal and dorsal-to-plantar full extent of the abnormal epiphysis. Whereas taking too much of the epiphysis is not good for the remaining bone ends, resecting too little might result in incomplete establishment of normal growth of the MT.
c. Performing a concurrent angular deformity correction osteotomy in infants. In most cases, the varus deformity of the 1st MT and the varus orientation of the 1st MTP joint correct spontaneously. If they do not, an osteotomy can be performed later in childhood.
4. Complications
a. Incomplete resection of the abnormal epiphysis with persistent deformity
i. Avoid by ensuring that the dorsomedial and plantar–medial extensions of the abnormal epiphysis are resected along with the medial portion. Periosteum must be seen on the dorsal and plantar surfaces of the MT shaft.
b. Incision wound edge necrosis
i. Avoid by performing a Z-plasty if the skin appears to be excessively tight upon wound closure and passive abduction of the hallux to approximately neutral alignment on the 1st MT
Resection of Impinging Portion of Dorsally Subluxated Navicular
1. Indications
a. Painful anterior ankle impingement (see Chapter 5) from dorsal subluxation of the navicular on the head of the talus in an adolescent/young adult who underwent surgical treatment for a clubfoot early in life and does not have evidence for arthritis in the TN joint
2. Technique (Figure 8-9)
a. Make a 4- to 5-cm longitudinal incision over the anterior aspect of the ankle joint lateral to the anterior tibialis tendon
b. Avoid or retract the superficial peroneal nerve
c. Release the extensor retinaculum longitudinally
d. Incise the anterior ankle joint capsule longitudinally and retract the edges medially and laterally
e. Reshape the prominent dorsal portion of the navicular with an osteotome
f. Debride surrounding thick abnormal callus tissue, if present
g. Maximally dorsiflex the ankle to confirm, under direct visualization, that there is no residual contact between the navicular and the tibia
h. Repair the ankle joint capsule with 2-0 absorbable sutures
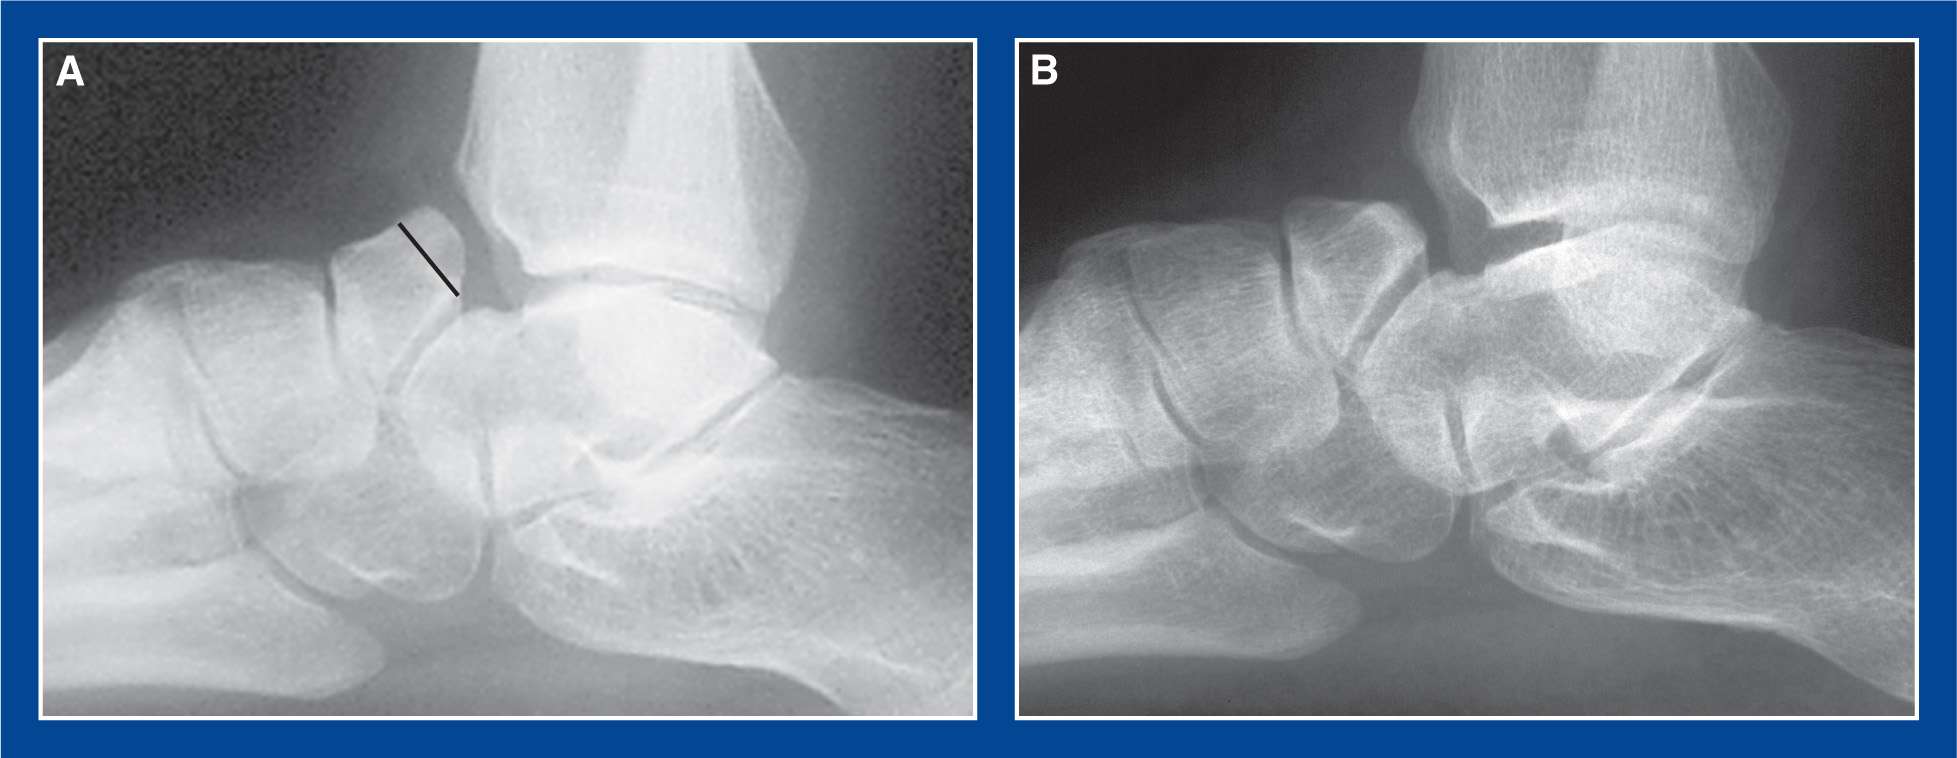
Figure 8-9. A. Standing lateral x-ray of the ankle and hindfoot in a skeletally mature adolescent who underwent clubfoot surgery as an infant and presented at age 16 with intractable impingement-type anterior ankle pain. Her symptoms were not consistent with TN joint arthritis; therefore, TN joint arthrodesis was not indicated. Her overall foot shape was acceptable and, although her foot was very stiff, she had no other symptoms. Black line indicates the level of resection of the dorsally subluxated navicular. B. This x-ray image was taken several months later at which time she was asymptomatic and had improved dorsiflexion.
i. Repair the extensor retinaculum with 2-0 absorbable sutures
j. Approximate the skin edges with interrupted subcutaneous 3-0 absorbable sutures and a running subcuticular 4-0 absorbable suture
k. Apply a non–weight-bearing CAM boot for 2 to 3 weeks to provide comfort during the early healing phase
l. Then initiate active range-of-motion exercises and continue non–weight-bearing for an additional 4 weeks; use of the CAM boot is optional for comfort during this time.
3. Pitfalls
a. Inadequate resection of bone
b. Failure to repair the extensor retinaculum with resultant bow-stringing of the extensor tendons
4. Complications
a. Injury to the superficial peroneal nerve
i. Avoid by isolating and retracting/protecting it
Debridement of Dorsal Talar Neck
1. Indications
a. Painful anterior ankle impingement (see Chapter 5) from a flat-top talar dome with a shallow or flat dorsal talar neck, typically found in a previously treated clubfoot
2. Technique (Figure 8-10)
a. Make a 4- to 5-cm longitudinal incision over the anterior aspect of the ankle joint lateral to the anterior tibialis tendon
b. Avoid or retract the superficial peroneal nerve
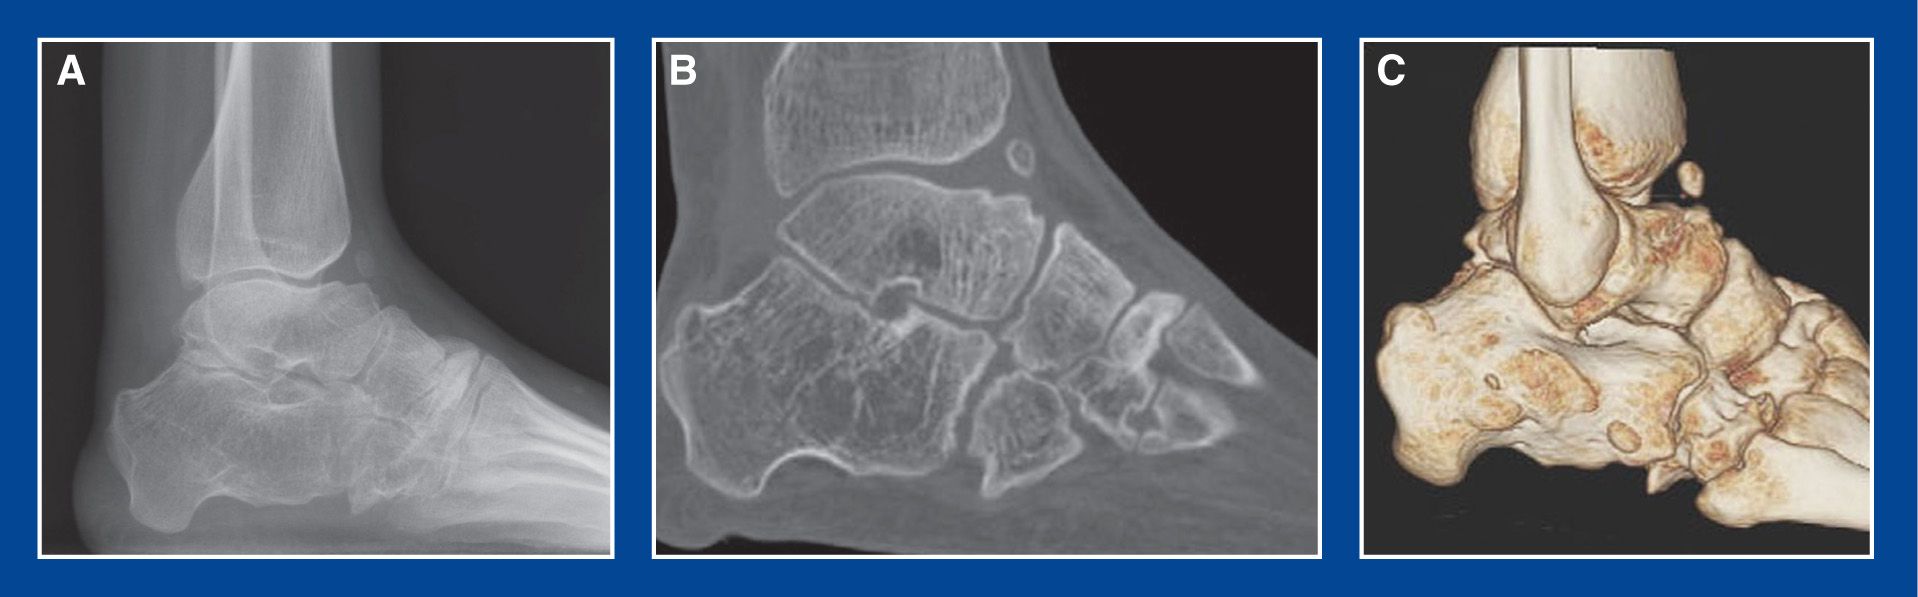
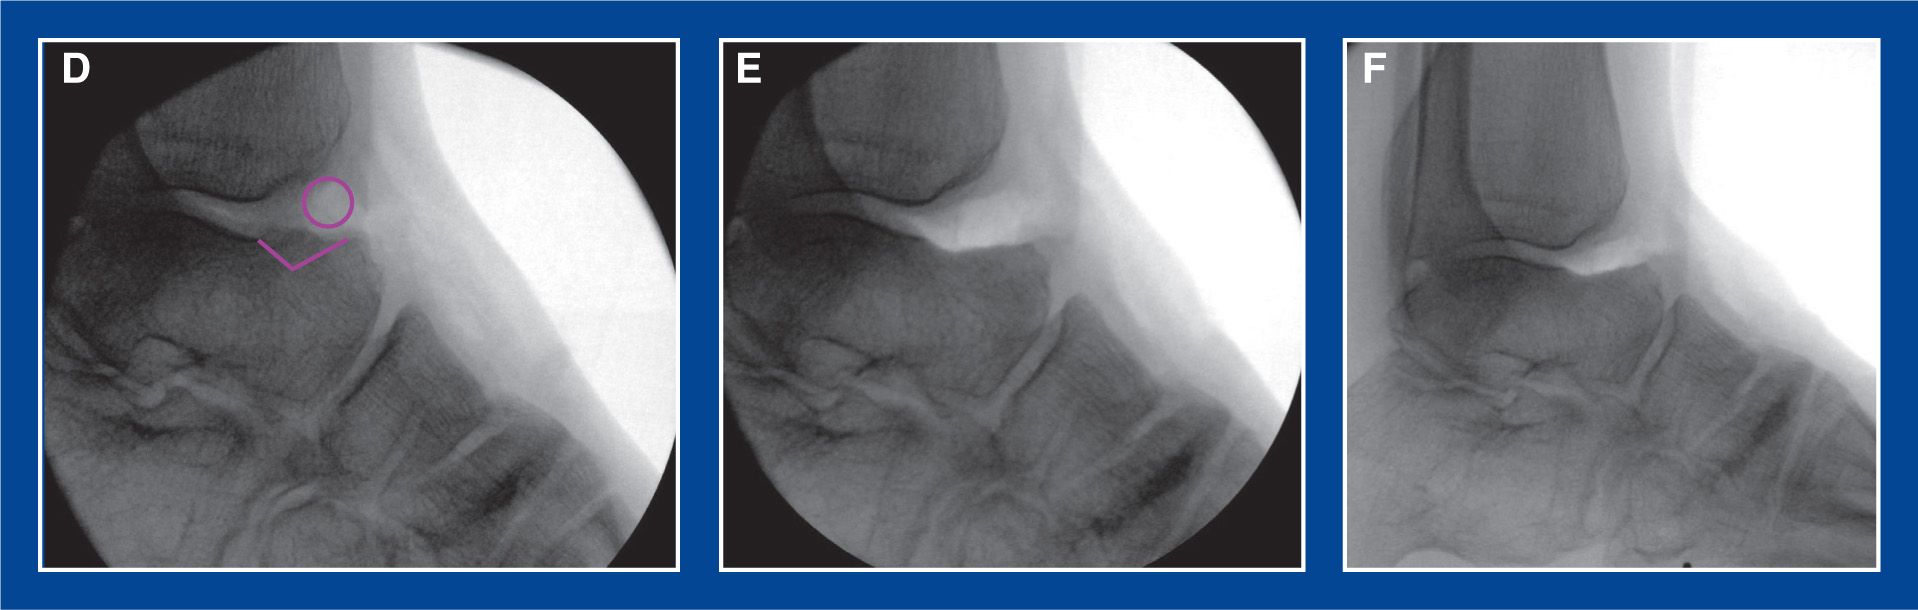
Figure 8-10. Multiply operated, stiff clubfoot in a 15-year-old girl with pain from anterior ankle impingement. A. Flat-top talus with shallow/absent dorsal talar neck concavity (and small heterotopic ossicle) causing anterior ankle impingement and pain. B. Sagittal CT scan image confirming the deformity. C. Three-dimensional CT scan image confirming the deformity. D. Lateral x-ray with purple markings indicating the resections to be performed. E. Lateral x-ray of the ankle in plantar flexion following resection of heterotopic ossicle and reshaping of the dorsal talar neck. F. Lateral x-ray of the ankle in dorsiflexion following resection of heterotopic ossicle and reshaping of dorsal talar neck.
c. Release the extensor retinaculum longitudinally
d. Incise the anterior ankle joint capsule longitudinally and retract the edges medially and laterally
e. Reshape the dorsal talar neck with an osteotome and high-speed burr
f. Resect osteophytes from the anterior distal tibial epiphysis, if present
g. Debride surrounding thick abnormal callus tissue, if present
h. Maximally dorsiflex the ankle to confirm, under direct visualization, that there is no residual contact between the talus and the tibia
i. Repair the ankle joint capsule with 2-0 absorbable sutures
j. Repair the extensor retinaculum with 2-0 absorbable sutures
k. Approximate the skin edges with interrupted subcutaneous 3-0 absorbable sutures and a running subcuticular 4-0 absorbable suture
l. Apply a non–weight-bearing CAM boot for 2 to 3 weeks to provide comfort during the early healing phase
m. Then initiate active range-of-motion exercises and continue non–weight-bearing for an additional 4 weeks; use of the CAM boot is optional for comfort during this time.
3. Pitfalls
a. Inadequate resection of bone
b. Failure to repair the extensor retinaculum with resultant bow-stringing of the extensor tendons
4. Complications
a. Injury to the superficial peroneal nerve
i. Avoid by isolating and retracting/protecting it
1. Indications
a. Macrodactyly (see Chapter 6)
b. Polydactyly (see Chapter 6)
2. Technique (Figure 8-11)
a. Make a V-shaped incision on both the dorsal and plantar surfaces of the foot with the apices at the tarsometatarsal joint level and connecting distally in the web spaces on both sides of the ray to be removed
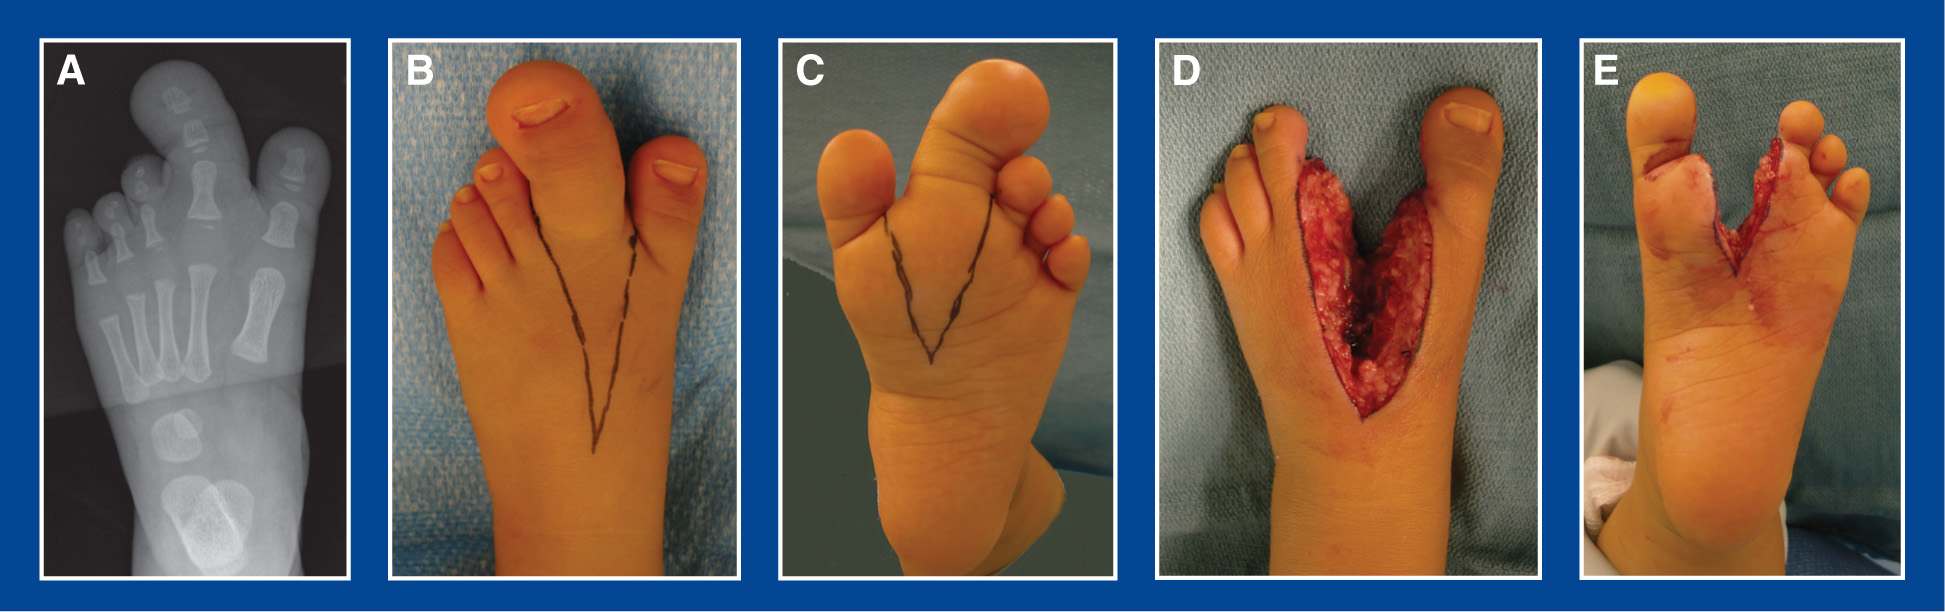
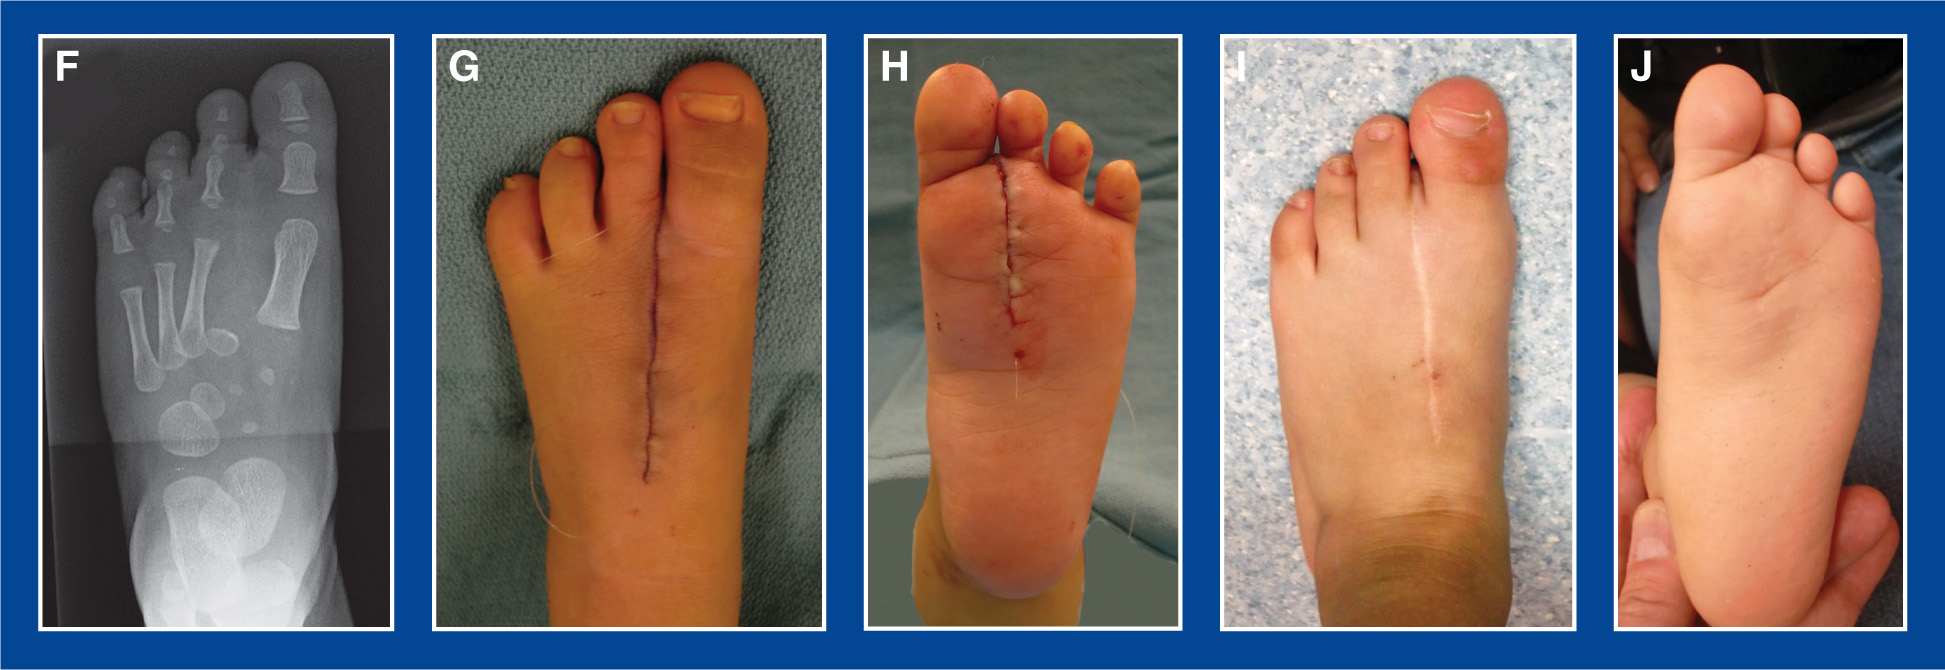
Figure 8-11. A. AP x-ray of a 1-year-old with macrodactyly of the 2nd ray of the foot. B. V-shaped incision is marked on the dorsum. C. V-shaped incision is marked on the plantar aspect. D. Dorsal view after the ray has been resected. E. Plantar view after the ray has been resected. F. AP x-ray after the resection. G. Intraoperative appearance of the dorsum of the foot immediately after the resection. Note the markedly improved appearance of the foot and the cosmetic appearance of the subcuticular suture wound closure. H. Intraoperative appearance of the plantar surface of the foot immediately after the resection. I. Dorsal appearance of the foot 18 months later. Note the cosmetic appearance of the scar (disregard the small recent abrasion at the proximal end). J. Plantar appearance of the foot 18 months later. The scar is barely noticeable.
b. From the dorsal approach, incise sharply and directly to the intermetatarsal spaces on both sides of the MT to be removed
c. Expose the common digital neurovascular bundles in the web spaces and transect the branches to the toe being removed
d. Expose the MT shaft extraperiosteally on its dorsal, medial, and lateral surfaces
e. Transect the MT at the proximal meta-diaphysis, rather than disarticulating the MT Removing the entire MT risks upsetting the congruity of the remaining MTs and tarsometatarsal joints
f. Divide the plantar soft tissues in line with the V-shaped skin incision
g. Release the tourniquet and achieve hemostasis
h. Approximate the distal intermetatarsal ligaments of the adjacent MTs with 2-0 absorbable sutures
i. Resect any excess skin and fat
j. Approximate the skin edges with interrupted subcutaneous 3-0 absorbable sutures and a running subcuticular 4-0 absorbable suture
k. Use a long-leg cast (to prevent it from slipping off the infant) for 4 to 6 weeks
3. Pitfalls
a. Inadequate soft tissue resection, particularly on the plantar surface
4. Complications
a. Necrosis of the lateral toes
i. Avoid by limiting the plantar muscle resection to that under the distal two-third of the MT being resected (the lateral plantar neurovascular bundle travels lateral to the 2nd ray). Resecting plantar subcutaneous fat is generally safe.
b. Progressive overgrowth of residual macrodactyly soft tissues at the resection site
i. Avoid by—it is almost impossible to remove all of the pathological soft tissues because there is no clear demarcation between normal and abnormal. That said, be aggressive and remove all of the soft tissues that appear safe to remove. Prepare the family for the possible need for a debulking procedure (or two) in the future (see Management Principle #10, Chapter 4).
1. Indications
a. Neglected/recurrent/residual congenital vertical talus (see Chapter 5) in which:
i. the TN joint is well-aligned or becomes well-aligned in the frontal plane yet the deformity persists (see Figure 5-29, Chapter 5)
ii. or, the TN joint cannot be aligned with a posterolateral soft tissue release because of resistance of the lateral soft tissues or too short a lateral column of the foot
2. Technique (Figures 8-12 and 8-13)
a. Perform a posterior/posterolateral release (see Chapter 7) if indicated
b. Make a longitudinal incision along the medial border of the midfoot from the base of the 1st MT to a point just distal to the medial malleolus
c. Retract the abductor hallucis plantarward
d. Release the posterior tibialis tendon sheath and expose the tendon from the medial malleolus to its insertion on the navicular
e. Z-lengthen the posterior tibialis tendon to expose the TN joint capsule
f. Release the TN joint circumferentially
g. If the navicular is dorsolaterally displaced, try to reduce it onto the head of the talus. If it cannot be reduced, or if the TN joint is already reduced but severe deformity persists, elevate the distally based Z-lengthened slip of the posterior tibialis off the navicular while maintaining its connections with the cuneiform bones.
h. Release the joint capsules between the navicular and the medial, middle, and lateral cuneiforms
i. Remove the navicular from the foot
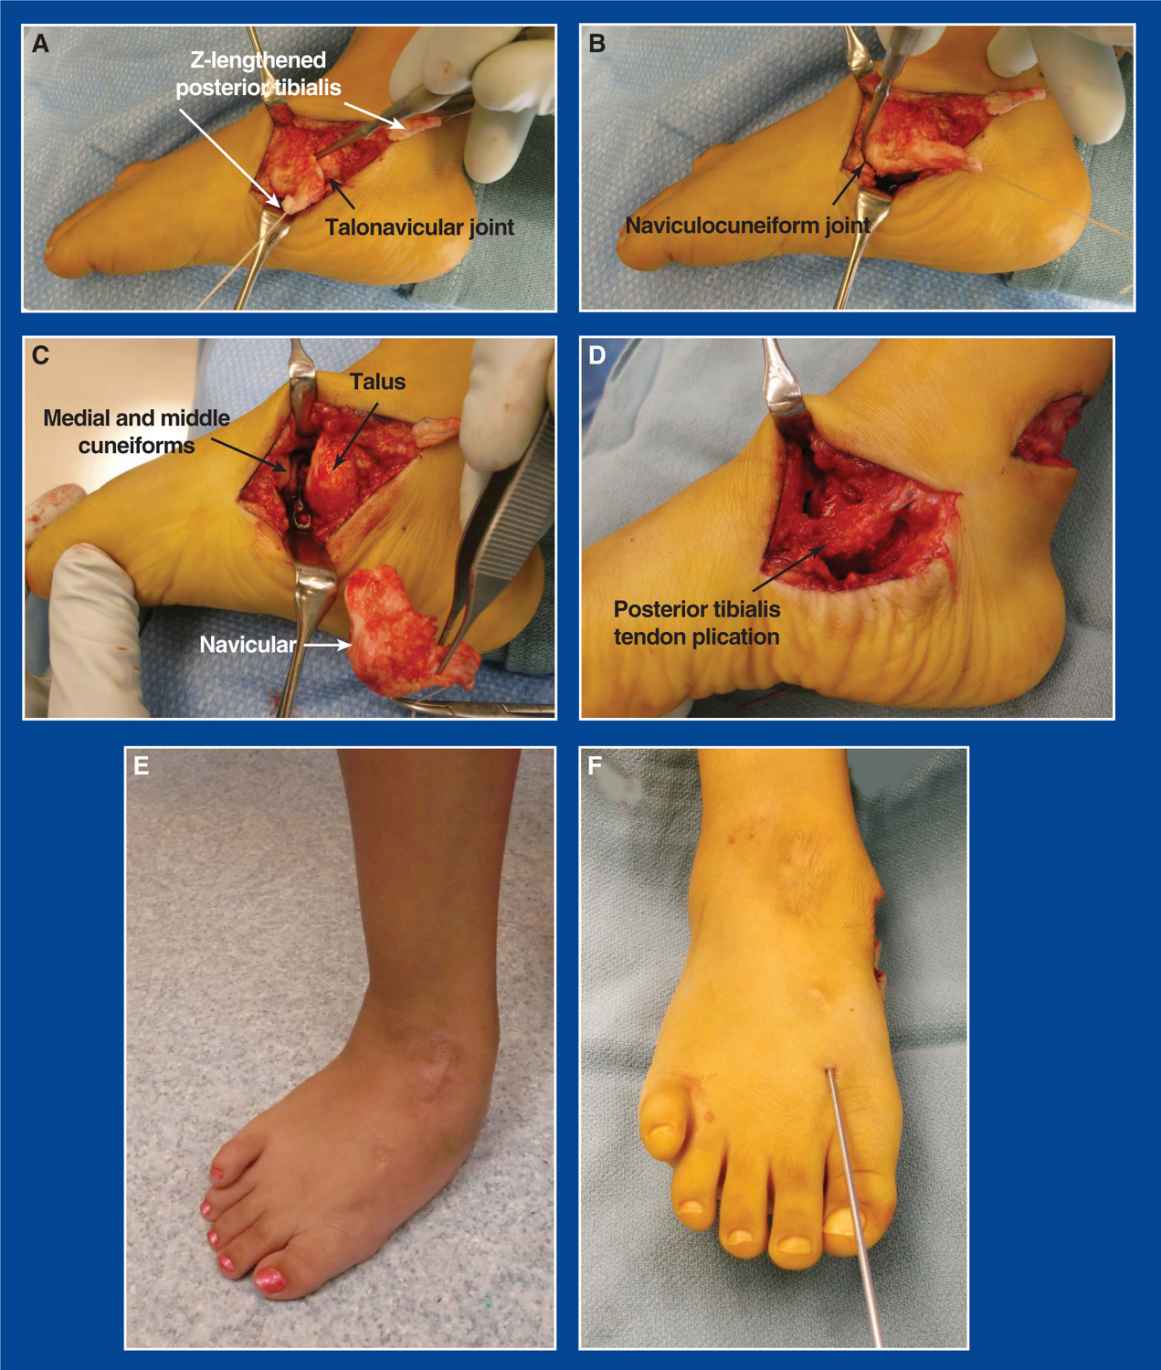
Figure 8-12. Naviculectomy in a 6-year-old girl with arthrogryposis who was previously treated unsuccessfully with a circumferential release. A. The posterior tibialis is Z-lengthened and the TN joint capsule is released circumferentially. B. The naviculocuneiform joints are released. C. The navicular has been removed from the foot. The articular surfaces of the cuneiform bones are exposed. D. The posterior tibialis tendon is plicated. E. Preoperative standing top image of the foot. F. Intraoperative top image of the foot following naviculectomy. The first of two Steinmann pins is in place across the talocuneiform joint. G. Preoperative standing medial image of the foot. H. Intraoperative medial image of the foot following naviculectomy, plantar–medial soft tissue plication, and Steinmann pin fixation. The incision for the posterior release is visualized.
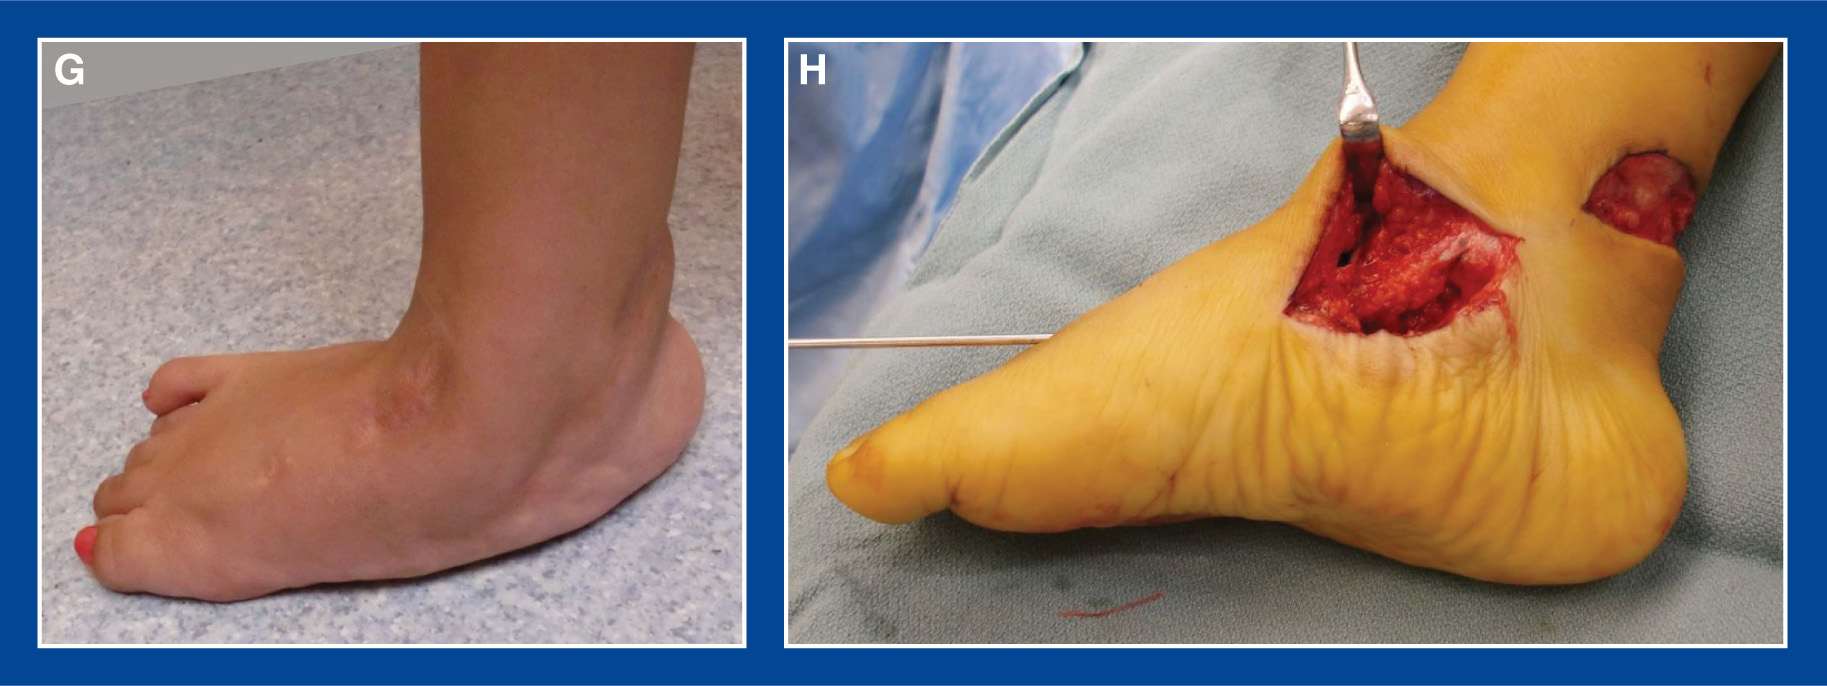
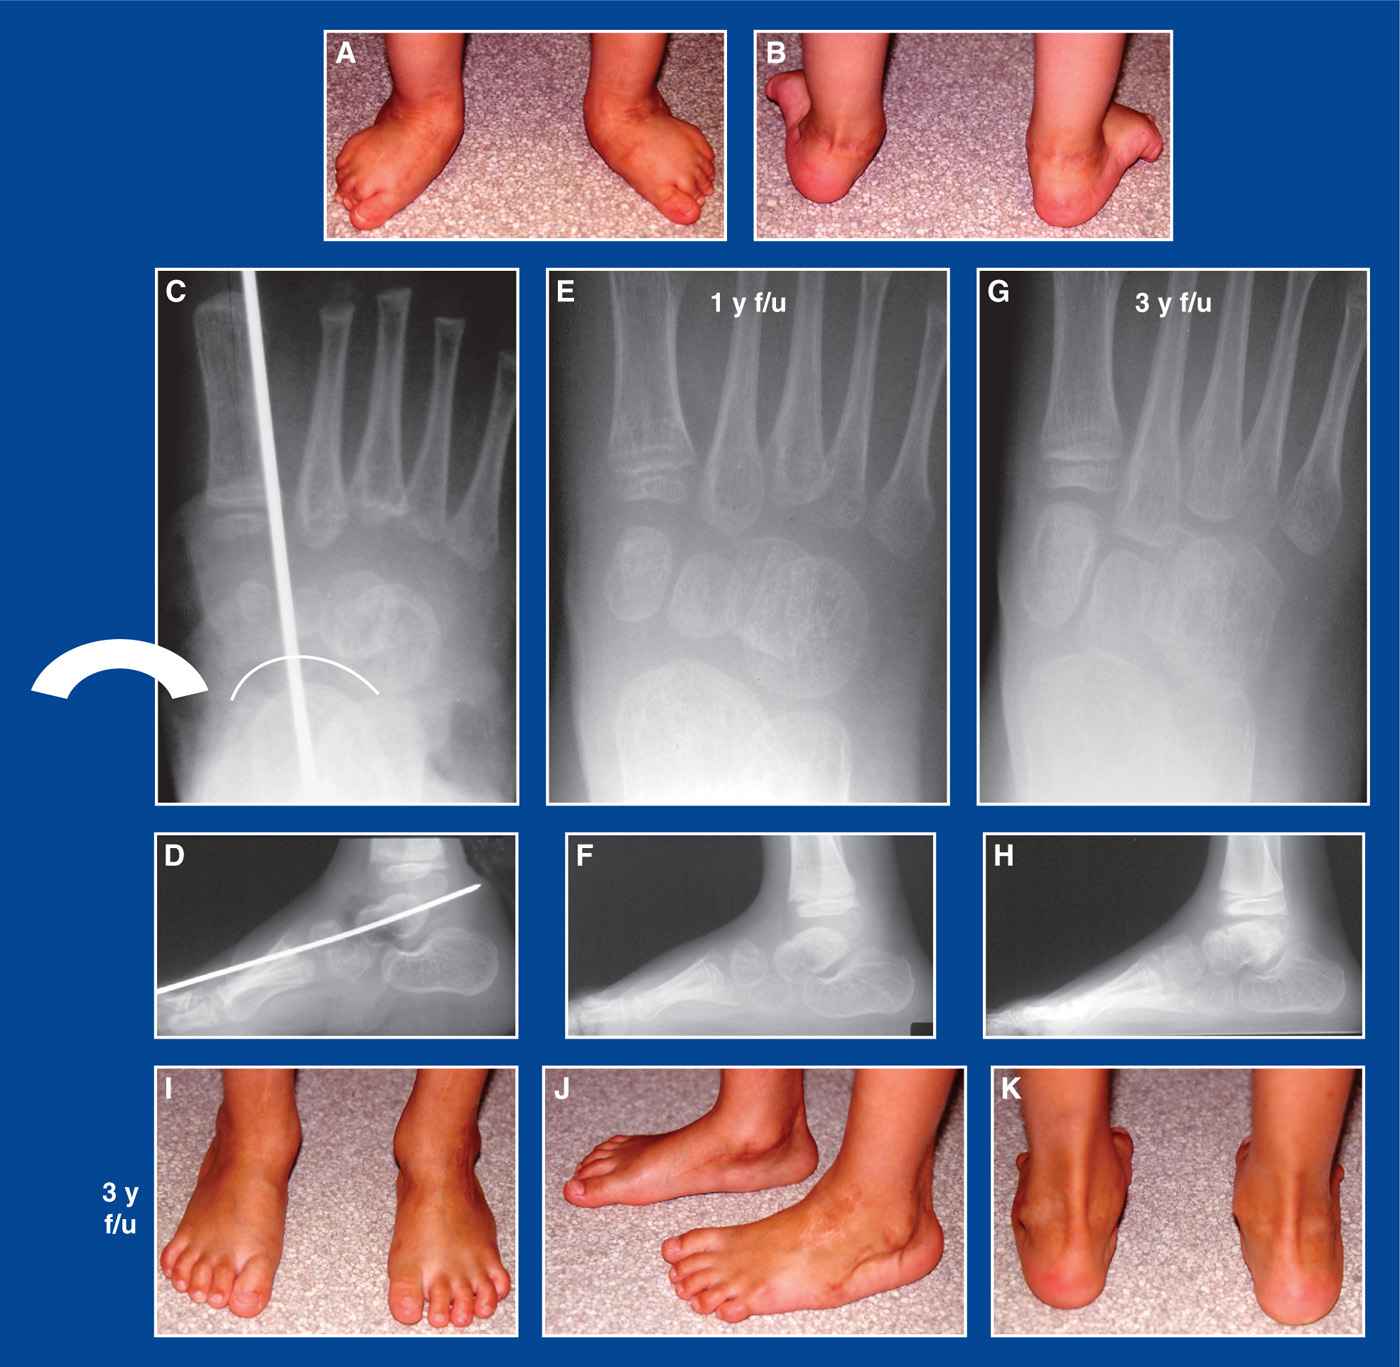
Figure 8-13. A. Preoperative standing top images of recurrent/residual congenital vertical talus deformities in a 3-year-old with arthrogryposis. B. Preoperative standing posterior images. C. AP x-ray of the right foot immediately following naviculectomy, with Steinmann pin fixation in place. The thick arc represents the navicular. The thin arc represents the talocuneiforms joint that resulted from the naviculectomy. D. Lateral x-ray with Steinmann pin in place. E and F. AP and lateral x-rays 1 year post-op. G and H. AP and lateral x-rays 3 years following naviculectomy. I–K. Top, side, and back views of the feet 3 years post-op.
j. Align the proximal articular surfaces of the 3 cuneiform bones with the articular surface of the talar head. They should be fairly congruous and match fairly well.
k. With the foot deformity corrected, insert two crossed 0.062″ smooth Steinmann pins retrograde across the resection site, using mini-fluoroscopic guidance
l. Bend the pins at the insertion sites and cut them long for easy retrieval in clinic in larger feet, or cut the pins short and bury them under the skin in smaller feet (to prevent spontaneous dislodgement)
m. If there is adequate capsular tissue remaining on the medial cuneiform and the talus, repair this tissue plantar-medially with 2-0 absorbable sutures
n. Advance and plicate the two slips of the posterior tibialis tendon with figure-of-8 2-0 absorbable sutures. The tendon can also be sutured to the capsule, thereby creating additional scar at the talocuneiform joint
o. Approximate the skin edges with interrupted subcutaneous 3-0 absorbable sutures and a running subcuticular 4-0 absorbable suture
p. Apply a long-leg, bent knee, non–weight-bearing cast if the child will not be compliant with non–weight-bearing in a short-leg cast
q. At 6 weeks, remove the exposed pins in clinic or the buried pins in the OR and apply another non–weight-bearing cast that will be worn for an additional 3 weeks
r. If the child has arthrogryposis or myelomeningocele, an ankle-foot-orthotic (AFO) can be molded at the 6-week cast change and fitted at the 9-week post-op visit
3. Pitfalls
a. Incomplete removal of the navicular
b. Incomplete posterolateral release
c. Inaccurate alignment of the talocuneiform joints
4. Complications
a. Recurrence of deformity
i. Avoid by plicating the plantar–medial soft tissues (see Plantar–Medial Plication, Chapter 7) at the resection site and maintaining cast immobilization for at least 9 weeks
b. Overcorrection of deformity
i. Avoid by ensuring that the navicular cannot be anatomically positioned on the head of the talus before resecting it
c. Incomplete removal of the navicular
i. Avoid by careful dissection using fluoroscopic guidance if necessary
1. Indications
a. Severe, rigid clubfoot in an infant or young child with arthrogryposis that has not responded adequately to serial casting and limited, minimally invasive soft tissue releases, followed by ongoing serial casting (see Severe, Rigid, Resistant Arthrogrypotic Clubfoot in an Infant or Young Child, Chapter 5)
2. Technique (Figures 8-14 and 8-15)
a. First perform a percutaneous tendo-Achilles tenotomy (see Chapter 7)
b. There are several possible incisions to choose from. My recent personal favorite is a curved incision over the dorsum of the midfoot from posterolateral to anteromedial coursing over the prominent talar head.
c. Isolate and retract the superficial peroneal nerve
d. Transect all extensor tendons to the foot and toes
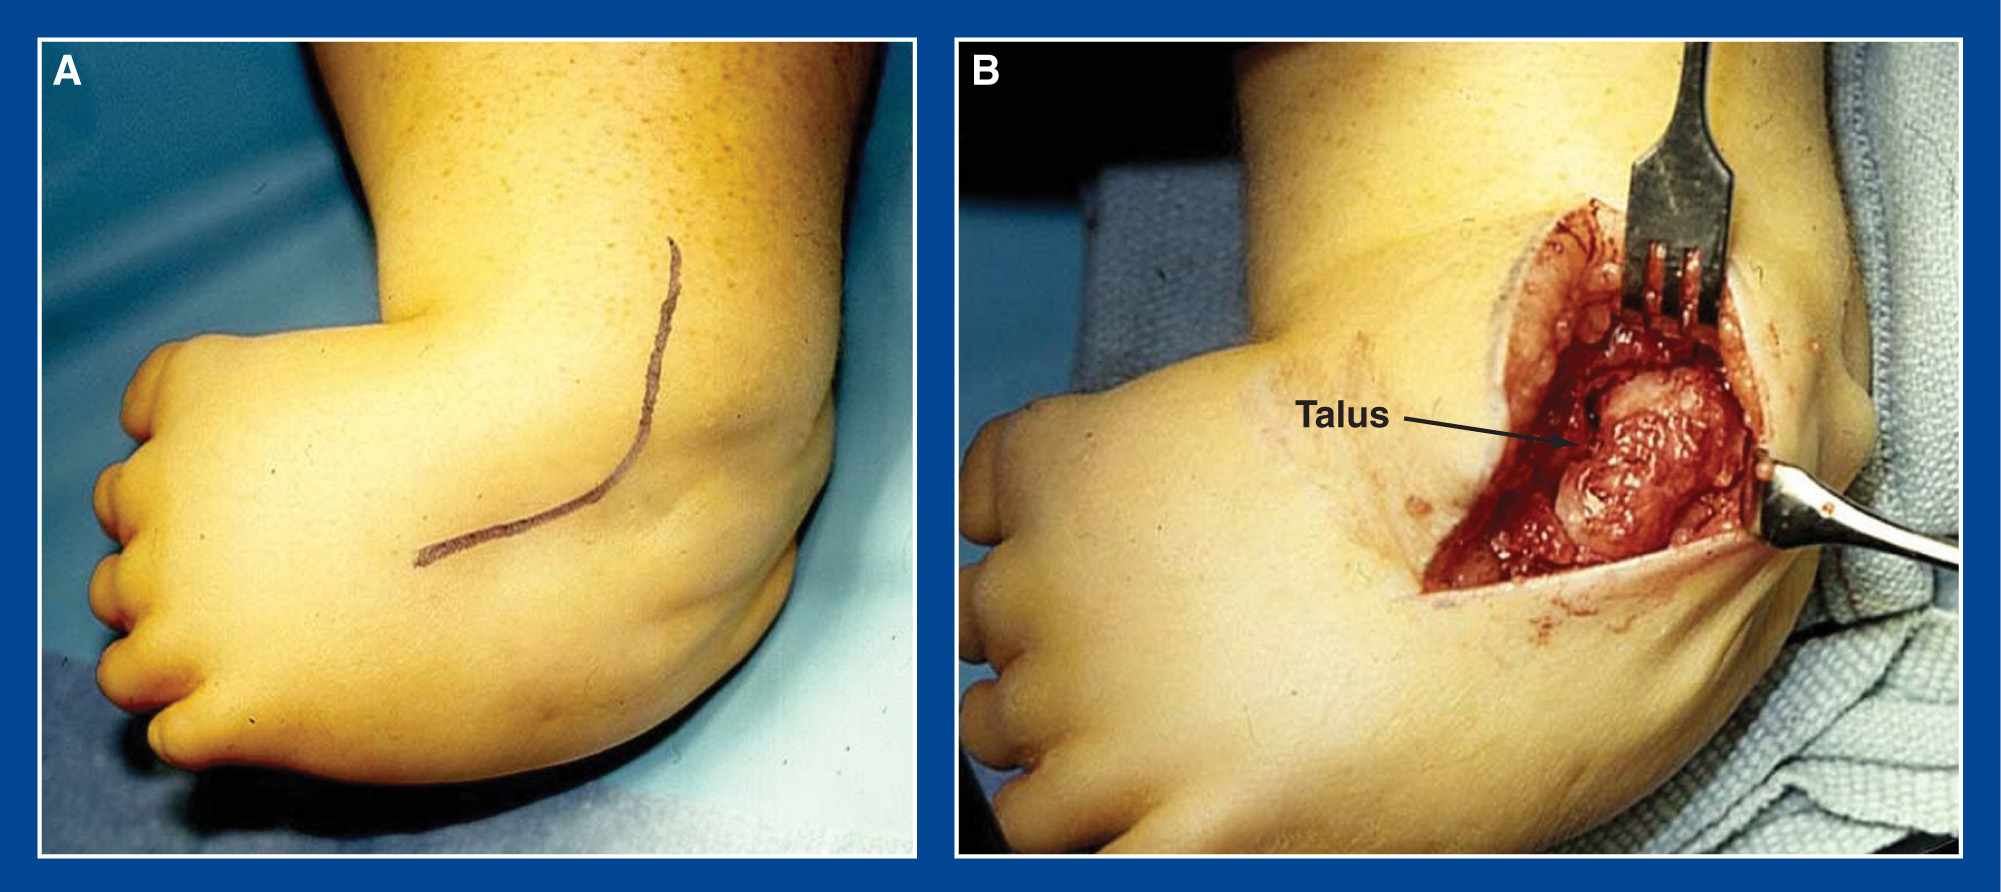
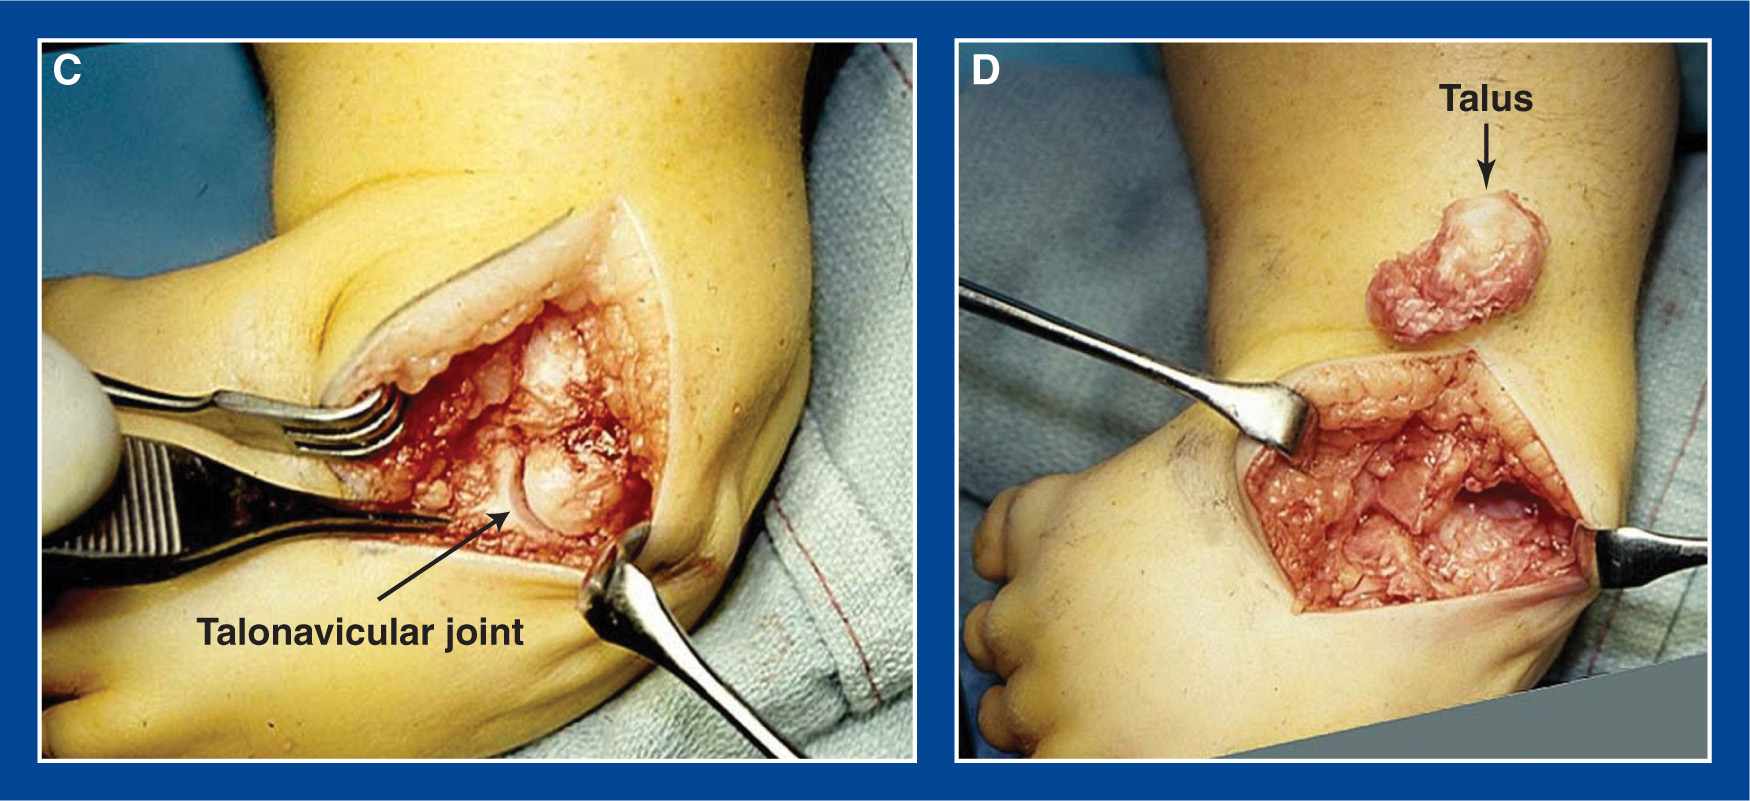
Figure 8-14. A. A curved dorsal incision is centered over the prominent head of the talus. B. The talus is exposed by transection of the extensor tendons and retraction of the superficial peroneal nerve. C. The TN joint is released circumferentially. D. The ankle and subtalar joints are released circumferentially and the talus is extracted from the foot.
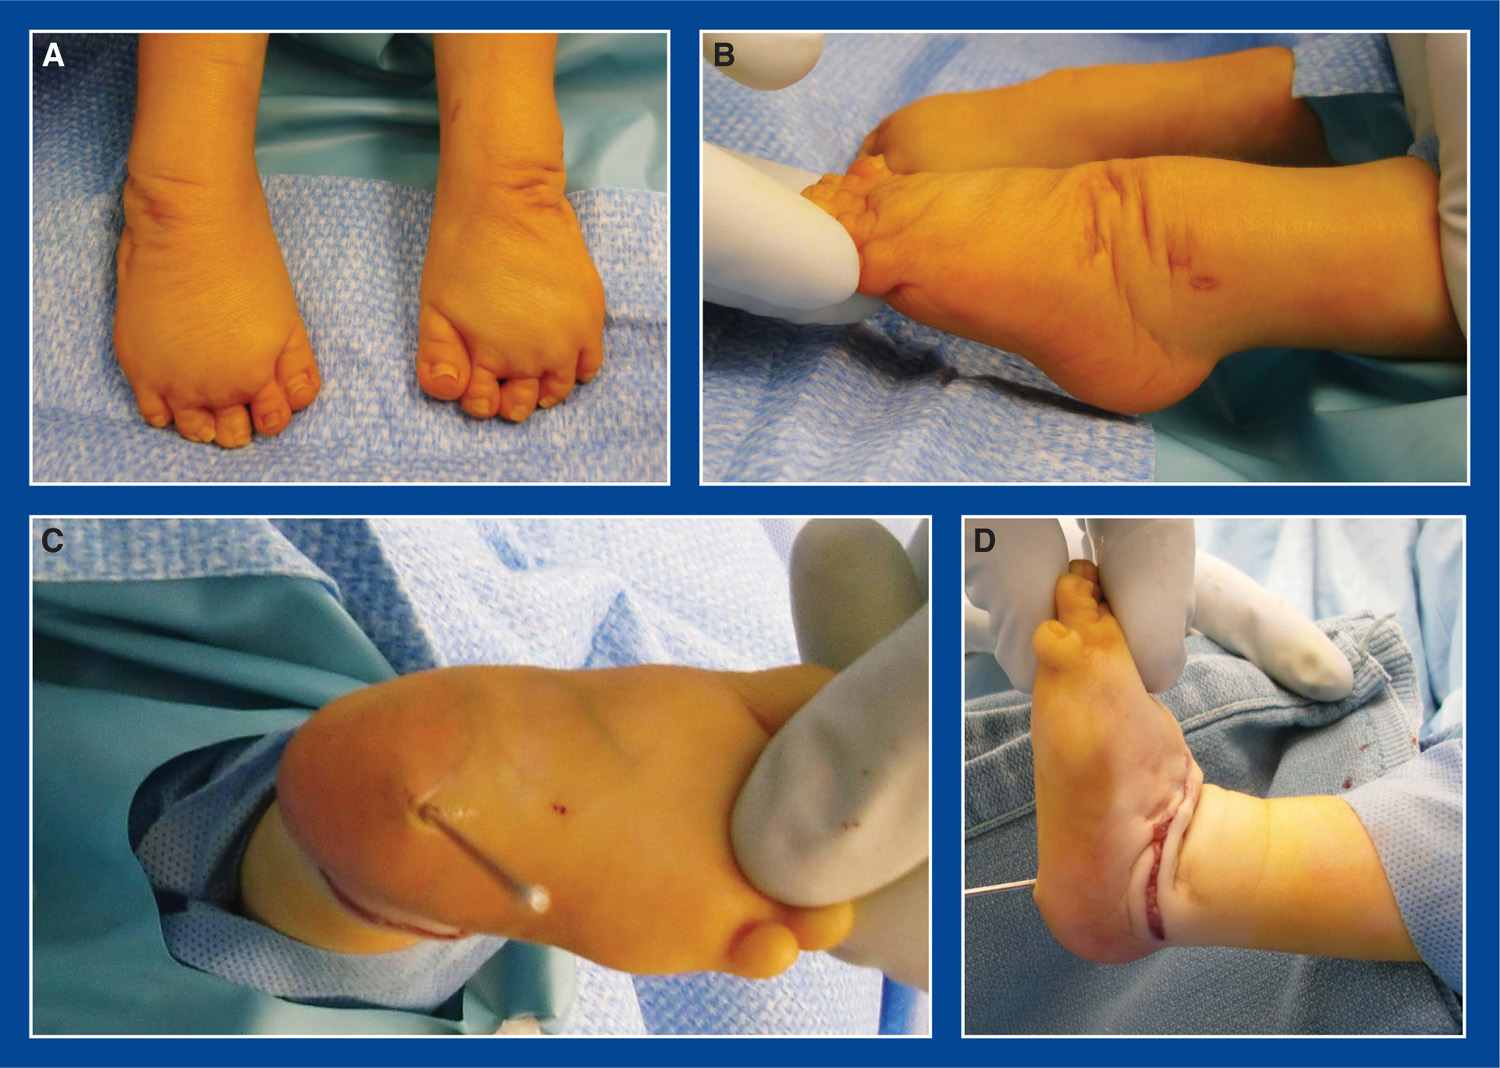
Figure 8-15. A. Top view of bilateral clubfoot deformities in a 1-year-old boy with Freeman–Sheldon syndrome. The cavus, adductus, and varus deformities have been corrected after 20 casts. B. But the navicular is plantar to the head of the talus in both feet and the talus is in extreme and rigid plantar flexion, despite two percutaneous Achilles tenotomies in both feet. C. Following talectomy, the calcaneus is positioned in the ankle mortis and a Steinmann pin is inserted retrograde for temporary fixation. D. The foot is dorsiflexed to 90° or higher.
e. Bluntly elevate the soft tissues from the medial side of the hindfoot bones (talus and calcaneus)
f. Isolate and retract the PT neurovascular bundle posteriorly
g. Incise the posterior tibialis tendon sheath distal and anterior to the medial malleolus and follow the tendon to the TN joint
h. Transect the posterior tibialis tendon
i. Transect the FHL and FDL tendons immediately plantar to the posterior tibialis tendon
j. Release the TN joint circumferentially
k. Release the ankle joint anteriorly and medially with release of the deep deltoid ligament
l. Release the lateral collateral ligaments of the ankle joint
m. Release the subtalar joint medially, laterally, and centrally (release the talocalcaneal interosseous ligament)
n. Finally, release the posterior ankle joint and subtalar joint capsules
o. Remove the talus from the operative field
p. Inset the calcaneus into the ankle joint mortis, moving it posteriorly until the navicular abuts the anteromedial aspect of the distal tibial epiphysis
q. Dorsiflex the calcaneus 5° to 10° from perpendicular to the tibia and insert a 0.062″ smooth Steinmann pin retrograde from the center of the heel pad up into the central canal of the tibial shaft
r. Bend the pin at the insertion site for easy retrieval in clinic
s. Resect a strip of excessively redundant skin from the wound edges if necessary
t. Approximate the skin edges with interrupted subcutaneous 3-0 absorbable sutures and a running subcuticular 4-0 absorbable suture
u. Apply a long-leg bent knee cast with 5° to 10° of ankle dorsiflexion and a neutral thigh–foot angle
v. Change to a fresh long-leg cast at 3 weeks
w. Change the cast again at 6 weeks, at which time the pin can be removed from the heel and a mold can be taken for a 5° to 10° dorsiflexed solid AFO
x. Apply a short-leg cast with 5° to 10° of ankle dorsiflexion and maintain it for 2 to 3 more weeks
y. Remove the cast at that time and replace it with the AFO
3. Pitfalls
a. Incomplete removal of the talus
4. Complications
a. Recurrence of equinus deformity
i. Avoid by:
• first, achieving full deformity correction with 5° to 10° of dorsiflexion held with a retrograde-inserted Steinmann pin
• maintaining deformity correction with full-time use (23 hours per day) of a dorsiflexed AFO
b. Incomplete removal of the talus
i. Avoid by carefully identifying the ankle and subtalar joints with the aid of a Freer elevator and mini-fluoroscopy
Calcaneal Lengthening Osteotomy (CLO)
1. Indications
a. A flexible or rigid valgus/eversion deformity of the hindfoot that
i. is almost always associated with an tendo-Achilles or gastrocnemius tendon contracture, and that
ii. has resulted in intractable pain under the medial midfoot and/or in the sinus tarsi area that
• has not been relieved despite prolonged attempts at nonoperative management
b. Perform a calcaneal lengthening osteotomy (CLO) for the signs and symptoms presented in “a” in
i. flexible flatfoot with a short (tight) Achilles or gastrocnemius tendon (see Chapter 5)
ii. skewfoot (see Chapter 5)
iii. tarsal coalition (see Chapter 5)
iv. rotational valgus overcorrection of the subtalar joint in a surgically treated clubfoot (see Chapter 5)
c. The CLO, in isolation, does not correct flatfoot deformity (or the other named complex multisegment foot deformities, such as skewfoot, that include valgus/eversion deformity of the hindfoot as one of the segmental deformities). It corrects all components of valgus/eversion deformity of the hindfoot (see Basic Principle #6, Chapter 2) at the site of the deformity in the named complex multisegment foot deformities. The success of the osteotomy for hindfoot deformity correction is significantly increased by appropriate management of the soft tissues and concurrent correction of the other segmental deformities of the foot (see Basic Principle #5, Chapter 2; Assessment Principle #8, Table 3-1, Chapter 3). Therefore, the CLO is usually combined with other concurrently performed procedures, including:
i. plantar–medial plication (see Chapter 7)
ii. medial cuneiform osteotomy (see this Chapter)
iii. tendo-Achilles lengthening (see Chapter 7)
iv. gastrocnemius recession (see Chapter 7)
v. resection of tarsal coalition (see this chapter)
2. Technique
Background: In 1961, Dillwyn Evans proposed shortening the lateral column of the foot by means of a calcaneocuboid joint arthrodesis to correct cavovarus deformity in the older child with a residual or recurrent clubfoot. It was his concept that one element of clubfoot deformity was relative overgrowth of the lateral column of the foot. This is the original Evans procedure. He apparently removed too much bone from the lateral column in some feet and created valgus deformities. He proposed that varus and valgus of the hindfoot are opposite deformities based on the relative length of the medial and lateral columns of the foot. In 1975, he proposed lengthening the lateral column of the foot by means of a CLO to correct so-called calcaneovalgus (flatfoot) deformity. This would then best be labeled the reverse Evans procedure. The surgical description in his article was terse, stating only:
“An incision is made over the lateral surface of the calcaneus parallel with, and just above, the peroneal tendons, avoiding the sural nerve lest it be involved in the scar. The anterior half of the bone is exposed and the calcaneocuboid joint is identified. The anterior end of the calcaneus is then divided through its narrow part in front of the peroneal tubercle by an osteotome, the line of division being parallel with and about 1.5 cm behind the calcaneocuboid joint. The cut surfaces of the calcaneus are then prised apart by means of a spreader and a graft of cortical bone taken from the tibia is inserted between the blades of the spreader to maintain separation of the two pieces of the calcaneus.”
Evans D. Calcaneo-valgus deformity.
J Bone Joint Surg Br. 1975;57:270–278
The intermediate-term surgical results in his patients, as reported by Phillips in 1983, indicate that Evans was consistently successful in achieving his goals. I have come to learn that many orthopedic surgeons in the United States attempted to perform the procedure after reading Evans’s article and had variable, but generally poor, results. They, therefore, abandoned it. Recall Management Principle #2 in Chapter 4: A less-than-ideal surgical outcome can be due to a poor technique, a poor technician, or both. A corollary might be: A less-than-ideal surgical outcome can be due to a poor description of a good concept.
Encouraged by Phillips’s report, dissatisfied with other proposed surgical treatments for painful flatfoot deformities, and using my “developing” principles of assessment and management of foot deformities in children, I attempted to interpret what Evans meant and probably did, but did not elaborate upon. The result, published in 1995, was a treatment method for complex multisegment foot deformities that include valgus/eversion deformity of the hindfoot as one of the segmental deformities.
My contributions to Evans’s concept include:
1. Strict indications for surgery—A flexible or rigid valgus/eversion deformity of the hindfoot that is almost always associated with an tendo-Achilles or gastrocnemius tendon contracture, and that has resulted in intractable pain under the medial midfoot and/or in the sinus tarsi area that has not been relieved despite prolonged attempts at nonoperative management.
2. Use of an Ollier incision—It is more cosmetic and extensile than the longitudinal incision proposed by Evans.
3. Location of the osteotomy—It starts laterally at the “isthmus” of the calcaneus. For lack of a better term, I have defined the isthmus as the narrowest dorsal–plantar site of this bone. It is the anatomic manifestation of the radiographic “critical angle of Gissane” that is located where the downward slope of the beak of the calcaneus meets the reverse downward slope of the posterior facet/lateral process of the talus. It is approximately 2 cm posterior to the calcaneocuboid joint. That starting point ensures that the beak of the calcaneus is moved away from the lateral process of the talus, thereby eliminating impingement and its associated pain at that site. The osteotomy ends medially between the anterior and middle facets of the calcaneus/subtalar joint.
In 2003, Ragab et al. published a study of cadaver feet in which they found that 54% of the feet (67% of whites and 40% of blacks) had separate anterior and middle facets or no anterior facet. Forty-six percent of the feet (33% of whites and 60% of blacks) had conjoined anterior and middle facets. Bunning and Barnett, in 1963, first reported on the anatomy of the subtalar joint. They reported separate facets in 67% of whites and 36% of blacks, remarkably similar findings. The authors of the recent study raised a theoretic concern that the CLO could lead to early degenerative arthritis in the subtalar joint if performed in feet with conjoined facets, because the osteotomy in those feet would be intra-articular. Arguments in favor of the CLO for valgus deformity of the hindfoot, despite the apparent anatomy of the subtalar joint, are many:
a. There are no published clinical studies of the CLO in which subtalar joint arthritis was identified. Phillips did not identify subtalar joint arthritis in his average 13-year follow-up study of Evans’s patients. That is significant because Evans very likely cut into the middle facet in most of his patients by cutting “parallel with and about 1.5 cm behind the calcaneocuboid joint.” Phillips reported arthritis in some calcaneocuboid joints, but those joints were not protected from subluxation by pinning, as I have recommended.
b. There is no evidence that the same ratio of separate to conjoined anterior and middle calcaneal facets exists in flatfeet as in other foot shapes. In the referenced studies, there were significant racial differences found in the facet anatomy. Variation in anatomy based on foot shape with either a higher or lower percentage of separate facets is certainly conceivable.
c. The subtalar joint complex is unlike any other joint in the body, except the hip joint, and it is more open and unconstrained than the hip. The anterior facet acts as a small platform that partially supports the plantar–lateral aspect of the head of the talus in a foot with neutral hindfoot alignment, though its primary function might, in fact, be as the lateral attachment point for the spring ligament which actually supports the talar head (see Basic Principle #6, Chapter 2). In a flatfoot, the anterior facet is rotated dorsolaterally around the talar head and the support is lost. The CLO rotates the so-called acetabulum pedis (including the anterior facet) plantar-medially around the head of the talus in the axis of the subtalar joint. This replaces it to its anatomic alignment where it can again provide the needed support for the head of the talus.
d. The actual separation of the calcaneal fragments along the medial column of the calcaneus is small, perhaps 1 to 3 mm. As long as the fragments do not translate vertically, the linear separation should be well tolerated as a simple, small enlargement of the platform that follows the shape and contour of the talar head and subtalar joint.
e. The alternatives of arthroereisis, arthrodesis, and soft tissue plications have higher reported complication rates than calcaneal lengthening in clinical studies. The posterior calcaneal displacement osteotomy creates a compensating deformity rather than correcting the primary deformity. It does not have the power to correct severe deformities and to realign the TN joint.
4. Shape of the bone graft—It should be trapezoidal, rather than triangular, because the foot-CORA (see Assessment Principle #18, Chapter 3) is in the center of the head of the talus (Dumontier et al. 2005), not at the medial cortex of the calcaneus. Therefore, it is a distraction wedge osteotomy rather than an opening wedge osteotomy.
5. Management of the lateral soft tissue restraints—The peroneus brevis (PB) tendon should be lengthened and the abductor digiti minimi aponeurosis should be released, because they are lateral soft tissue restraints that will otherwise impede distraction of the calcaneal bone fragments. The peroneus longus (PL) should be retracted and not lengthened. It is the pronator of the forefoot. As the lateral column of the foot is lengthened, the PL is effectively shortened, thereby pronating the supinated forefoot. And because its insertion is on the medial column of the foot, it does not impede calcaneal lengthening.
6. Management of the medial soft tissue redundancy—The posterior tibialis tendon and the talonavicular joint capsule should be plicated plantar-medially to eliminate the redundancy of those tissues that develops following hindfoot deformity correction with the CLO. This soft tissue plication reinforces and further stabilizes the primary bony structural deformity correction.
7. Stabilization of the calcaneocuboid joint—One or two Steinmann pins should be inserted retrograde across that joint before distraction of the osteotomy to prevent subluxation that would otherwise compromise the outcome.
8. Lengthening of the Achilles or gastrocnemius tendon—Contracture of the heel cord is usually the deformity that converts a painless flexible valgus/eversion hindfoot deformity into a painful deformity. Therefore, it must be eliminated at the time of hindfoot deformity correction with the CLO. The CLO eliminates the pathologic dorsiflexion of the subtalar joint by converting “up (dorsiflexion) and out” to “down (plantar flexion) and in” (see Basic Principle #6, Chapter 2). It does not create ankle joint equinus, it uncovers it. The Silfverskiold test (see Assessment Principle #12, Chapter 3) is used to determine whether the tendo-Achilles or the gastrocnemius tendon alone is contracted so the appropriate site of lengthening can be chosen.
9. Identification and correction of forefoot deformity—Forefoot supination deformity exists in all flatfoot deformities. It is initially flexible and corrects spontaneously immediately following insertion of the graft into the calcaneal osteotomy. In long-standing deformities, the forefoot supination deformity is rigid and does not correct spontaneously. A medial cuneiform osteotomy (MCO) is required to correct this independent segmental deformity or else the hindfoot deformity will likely recur. The CLO does not create forefoot supination deformity, it uncovers it (see Basic Principle #5, Chapter 2; Assessment Principle #8, Figure 3-2, Chapter 3).
a. Attention to all of the details of the technique is critical for consistently good results. There are only two intraoperative decisions that need to be made: (1) whether rigid forefoot supination deformity exists and requires a MCO for correction, and (2) whether the heel cord contracture is in the gastrocnemius alone or in the entire triceps surae.
b. Special equipment: sagittal saw, smooth Steinmann pins, straight osteotomes, laminar spreader with smooth teeth, Joker elevators and narrow Crego retractors (Figure 8-16), and a mini-fluoroscope
c. Place the patient supine with a folded towel under the ipsilateral buttock and put a cushioned ramp under the extremity
d. Prep and drape from the iliac crest to the toes and use a sterile tourniquet if using autograft. If using allograft, prep the lower extremity only and use a nonsterile tourniquet.
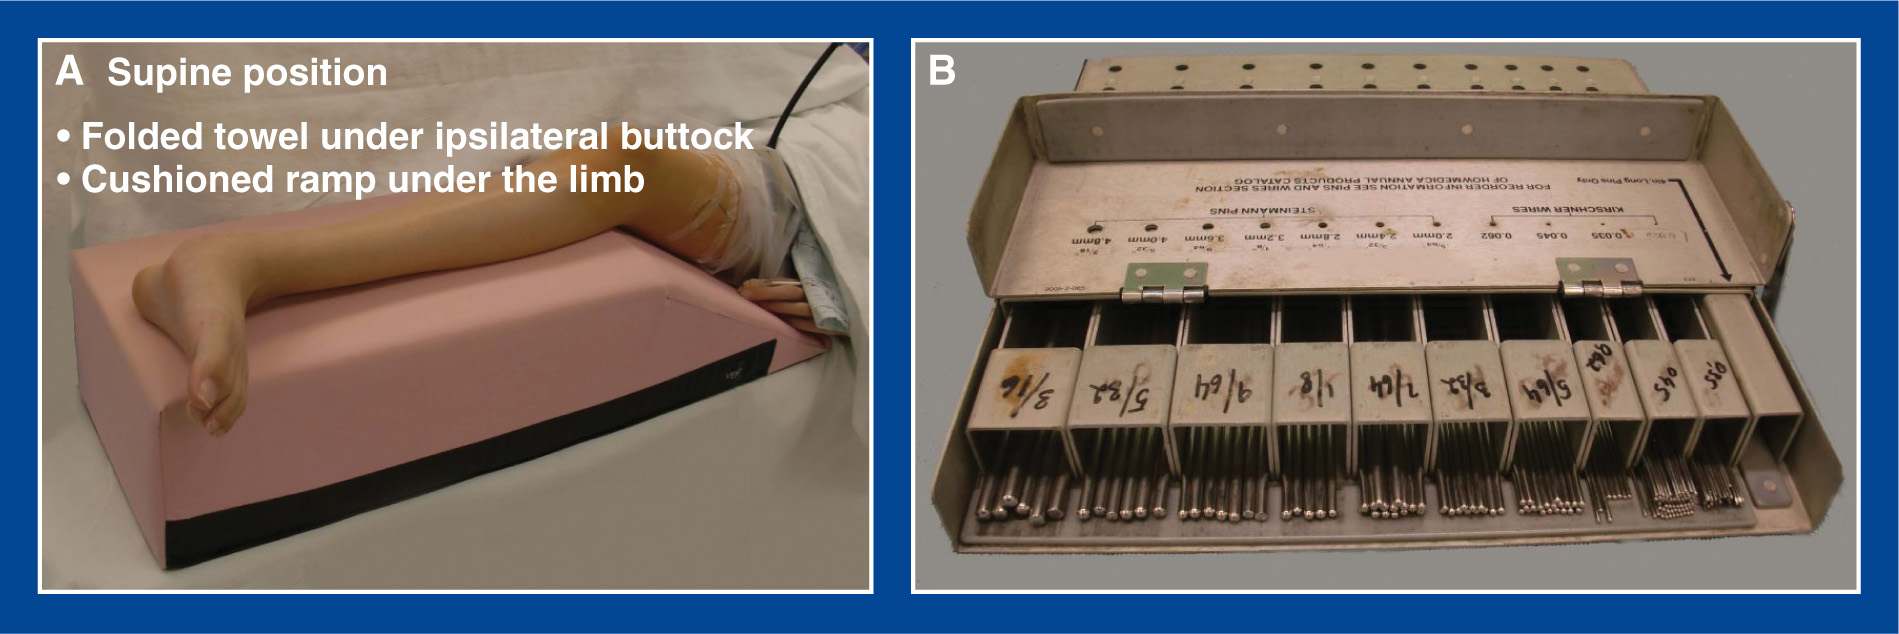
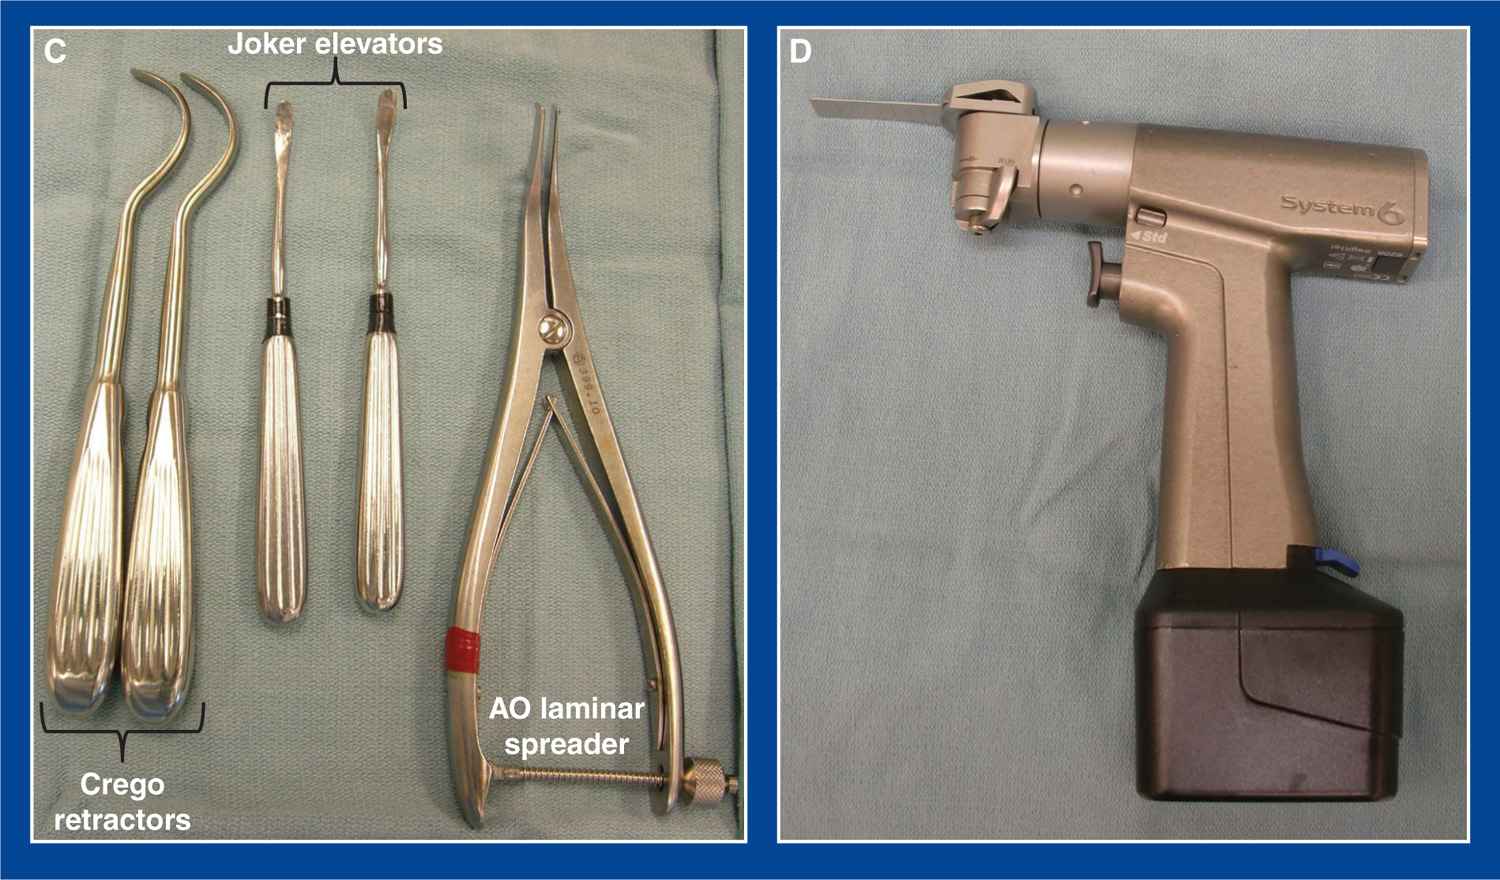
Figure 8-16. A. The patient is placed supine on the operating table with the deformed lower extremity on a cushioned ramp. A folded towel is placed under the ipsilateral buttock. B. Steinmann pins are used for internal fixation. C. Narrow Crego retractors (left), Joker elevators (center), and laminar spreader with smooth teeth (right). D. Sagittal saw.
e. Make a modified Ollier incision in a Langer’s skin line from the superficial peroneal nerve to the sural nerve half way between the beak of the calcaneus and the tip of the lateral malleolus (Figure 8-17)
f. Release the PL and the PB from their tendon sheaths on the lateral surface of the calcaneus. Resect the intervening septum. Resect the peroneal tubercle if it is large
g. Z-lengthen the PB tendon


Figure 8-17. A. A modified Ollier incision is marked in a Langer’s line half way between the tip of the lateral malleolus and the beak of the calcaneus. It extends from the superficial peroneal nerve to the sural nerve. B. The PB and PL tendons are released from their sheaths. The septum between them is resected. A very large peroneal tubercle should be resected. C. The PB is Z-lengthened. The PL is retracted. The aponeurosis of the abductor digiti minimi is divided transversely 2 cm posterior to the calcaneocuboid joint (yellow line). D. The soft tissue contents of the sinus tarsi are elevated from the dorsum of the calcaneus. A Freer elevator is inserted perpendicular to the lateral surface of the calcaneus at the isthmus of the calcaneus (see Technique Background, Location of the osteotomy—earlier), which is approximately 2 cm posterior to the calcaneocuboid (CC) joint. The Freer is inserted until it makes contact with the middle facet. E. The Freer is then externally rotated (purple curved arrow) and advanced (yellow arrow) until the tip falls into the interval between the anterior and middle facets. F. The position of the Freer is confirmed with mini-fluoroscopy. (From Mosca VS. Calcaneal lengthening osteotomy for valgus deformity of the hindfoot. In: Skaggs DL and Tolo VT, editors. Master Techniques in Orthopaedic Surgery: Pediatrics. Philadelphia: Lippincott Williams & Wilkins. 2008; 263–276.)
h. Do not lengthen the PL
i. Divide the aponeurosis of the abductor digiti minimi transversely at a point approximately 2 cm proximal to the calcaneocuboid (CC) joint (see Chapter 7)
j. Elevate the soft tissues from the dorsal surface of the anterior calcaneus in the sinus tarsi. Avoid exposure of, or injury to, the capsule of the calcaneocuboid joint
k. Insert a Freer elevator in the sinus tarsi perpendicular to the lateral surface of the calcaneus at the lowest (most plantar) point of the dorsal surface of the calcaneus, the so-called “isthmus” of the calcaneus (see Technique Background, Location of the osteotomy—earlier). The Freer is inserted until it makes contact with the middle facet.
l. Externally rotate and advanced the Freer until the tip falls into the interval between the anterior and middle facets
m. Although there are not separate anterior and middle facets in a large percentage of calcaneus bones (see above), this interval is very easy to identify in all feet, in my experience. The interval and the position of the Freer can be readily confirmed with an oblique image obtained on mini-fluoroscopy.
n. Replace the Freer with a curved Joker elevator. Place a narrow curved Crego retractor around the plantar aspect of the calcaneus in an extraperiosteal plane in line with the dorsally placed Joker. Remove the retractors and prepare the other surgical sites before performing the calcaneal osteotomy
o. Make a longitudinal incision along the medial border of the midfoot and hindfoot to perform the plantar–medial plication (see Chapter 7). Start at a point just plantar to the medial malleolus and continue anteriorly to the medial cuneiform. This incision can be extended to the base of the 1st MT if an MCO is determined to be necessary.
p. Release the posterior tibialis from its tendon sheath from the medial malleolus to the navicular
q. Cut the posterior tibialis tendon in a Z-fashion, releasing its dorsal one-third to one-half from the navicular. The stump of tendon that remains attached to the navicular contains the plantar one-half to two-third of the fibers (see Plantar–Medial Plication, Figure 7-39, Chapter 7)
r. Incise the TN joint capsule from dorsal-lateral around medially to plantar-lateral, including release of the spring ligament. Resect a 5- to 7-mm-wide strip of redundant capsule from the medial and plantar aspects of the joint (see Plantar–Medial Plication, Figure 7-39, Chapter 7)
s. In a foot with a long-standing talocalcaneal tarsal coalition, the dorsolateral TN joint capsule may become tightly contracted. In some cases, adjacent dorsolateral osteophytes on the talus and navicular may become partially fused together. Release and/or resect this connection with Mayo scissors or an osteotome.
t. Assess the equinus contracture by the Silverskiold test (see Assessment Principle #12, Figure 3-13, Chapter 3) with the subtalar joint inverted to neutral and the knee both flexed and extended. Perform a gastrocnemius recession (see Chapter 7) if 10° of dorsiflexion can be achieved with the knee flexed, but not with the knee extended. Perform an open or percutaneous tendo-Achilles lengthening (see Chapter 7) if 10° of dorsiflexion cannot be obtained even with the knee flexed
u. Replace the Joker elevator and Crego retractor respectively dorsal and plantar to the isthmus of the calcaneus meeting in the interval between the anterior and middle facets of the subtalar joint (Figure 8-18)
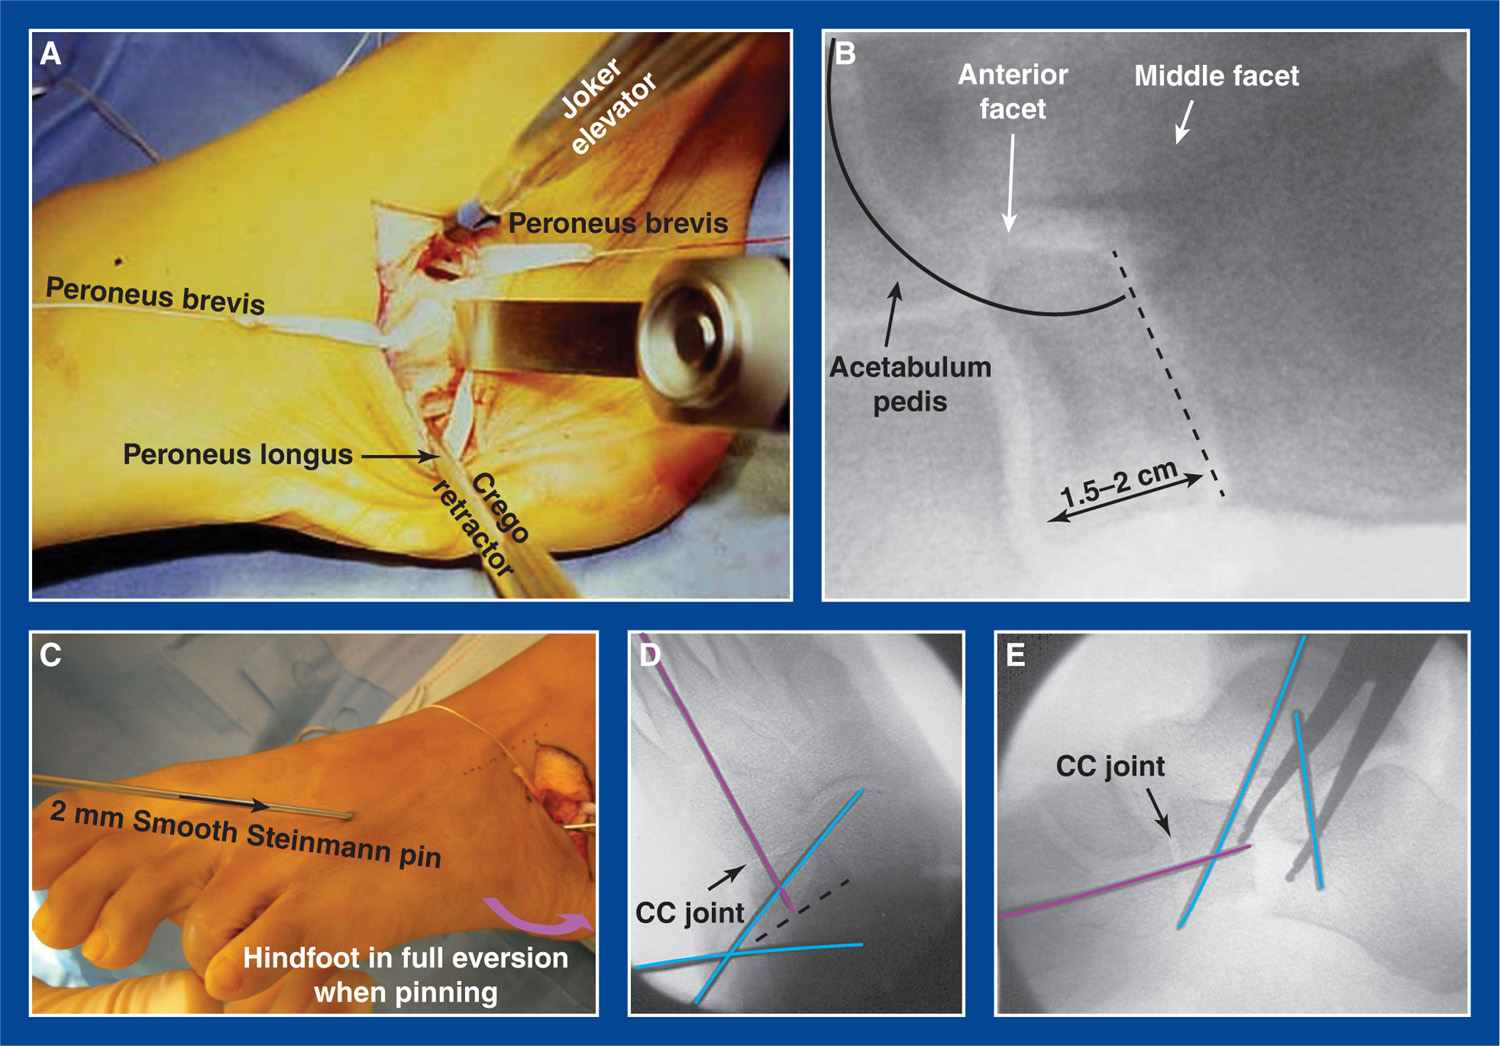
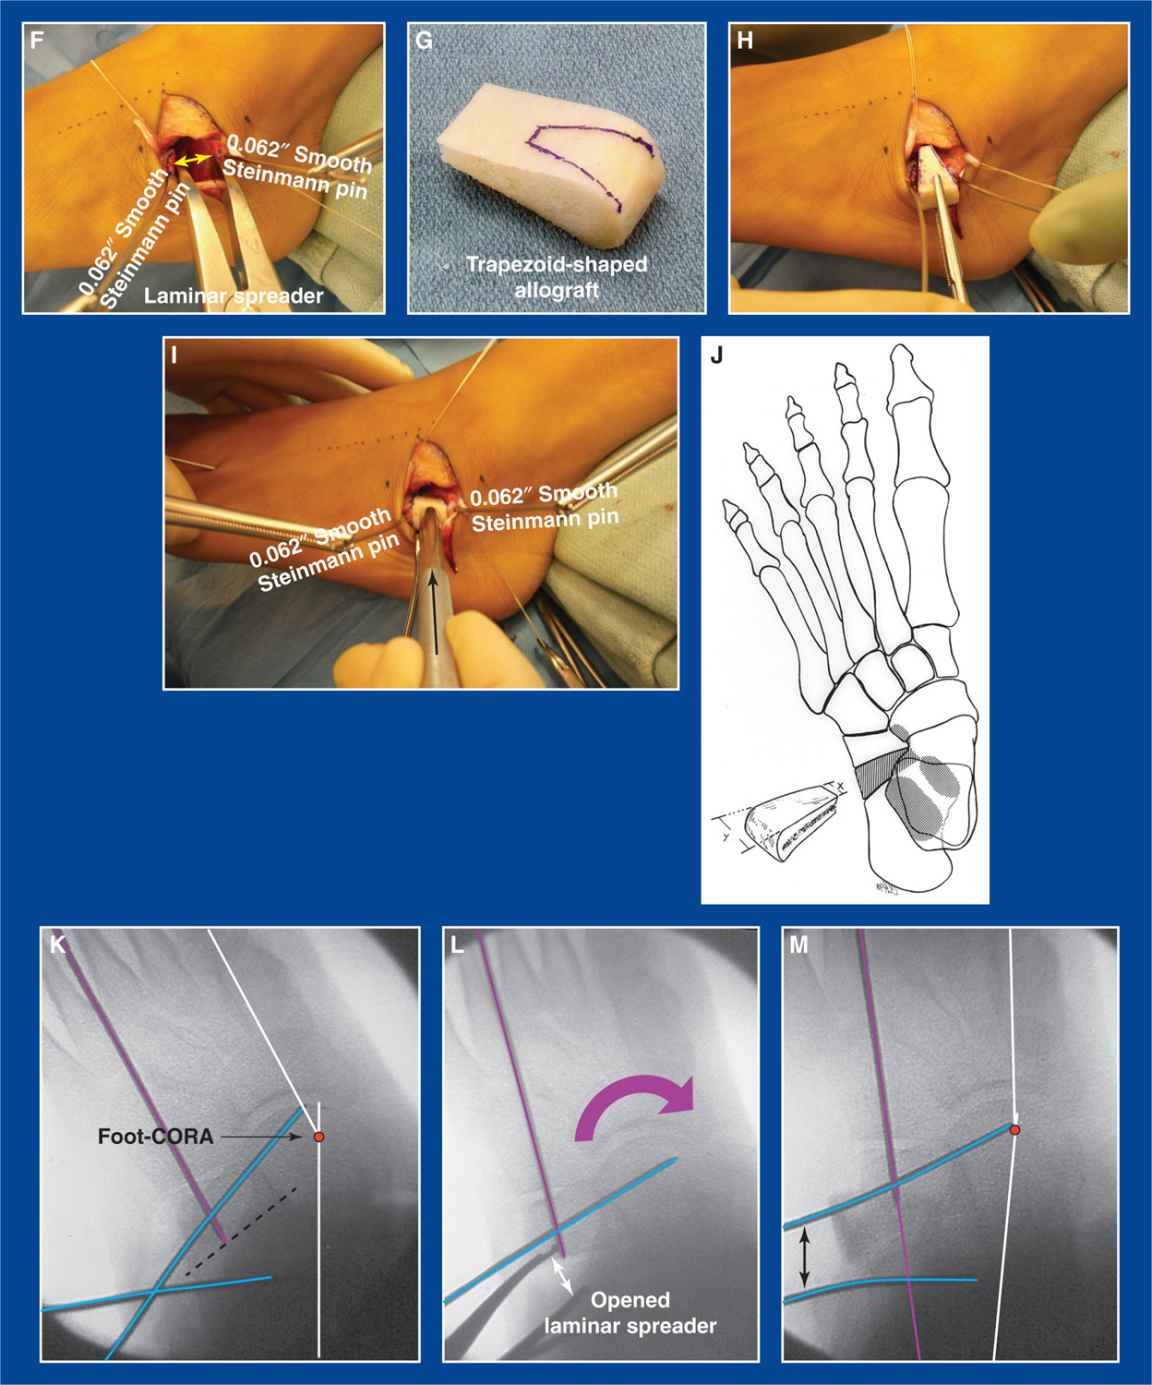
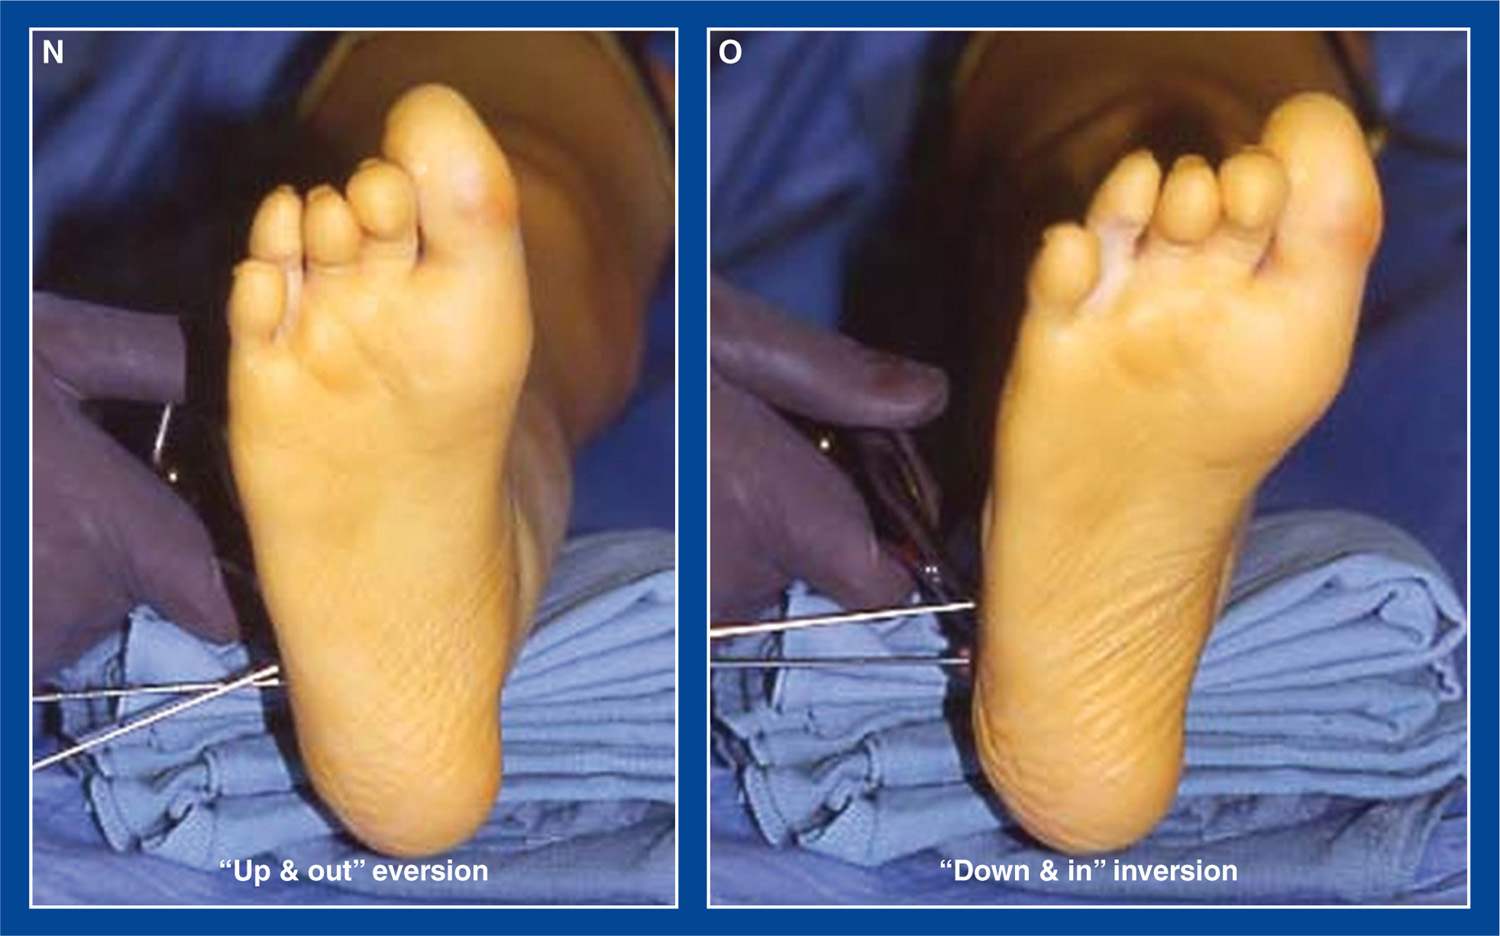
Figure 8-18. A. A Joker elevator is inserted above the isthmus of the calcaneus and a narrow Crego retractor is inserted extraperiosteally from below. They meet in the interval between the anterior and middle facets. A sagittal saw is used to create the osteotomy in line with the retractors. B. The osteotomy (black dashed line) begins laterally at the isthmus of the calcaneus (at or near the “critical angle of Gissane”), which is approximately 2 cm posterior to the calcaneo-cuboid (CC) joint, and ends between the anterior and middle facets medially (see Technique Background, Location of the osteotomy—earlier). The acetabulum pedis is indicated here (see Basic Principle #6, Chapter 2). C. A 2-mm smooth Steinmann pin is inserted retrograde from the dorsolateral forefoot across the anatomic center of the CC joint while holding the foot in the fully everted/flat position. D and E. Mini-fluoroscopy is used to ensure that the pin (purple line) crosses the anatomic center of the CC joint and is advanced to the osteotomy. 0.062″ smooth Steinmann pin joy sticks are inserted from lateral to medial in the anterior and posterior calcaneal fragments (blue lines). They are inserted in a divergent pattern, so they will become more parallel after the fragments are distracted. F. Smooth-toothed laminar spreader is inserted in the osteotomy to determine the size of graft that is required to correct the deformity three-dimensionally, as confirmed by mini-fluoroscopy. G. An iliac crest corticocancellous bone graft is fashioned into a trapezoid shape with its lateral length based on direct measurement of the distracted bone fragments and the medial length approximately 2 to 4 mm. H. The trapezoid-shaped allograft is being inserted while using the joy sticks to open the space. I. The cortical surfaces are axially aligned with the dorsal, lateral, and plantar cortical surfaces of the calcaneus. The graft is firmly impacted (black arrow over the tamp), making it inherently stable. J. Artist’s sketch of a foot with the graft inserted. K. Same intraoperative image as in D, but with the foot-CORA (see Assessment Principle #18, Chapter 3) indicated. L. The laminar spreader has distracted the osteotomy, thereby rotating the acetabulum pedis into anatomic alignment (purple curved arrow). M. With the graft partially inserted, the deformity is almost completely corrected, as confirmed by the correction of deformity at the foot-CORA. Following full insertion of the graft, the 2-mm Steinmann pin (purple line) is inserted retrograde through the graft and into the posterior calcaneus. N. The foot is in the fully everted (up and out/flat) baseline position with the Steinmann pin joy sticks in place and the osteotomy completed.O. The laminar spreader has been opened in the osteotomy thereby creating full inversion (down and in/arched) of the acetabulum pedis/subtalar joint. (From Mosca VS. Calcaneal lengthening osteotomy for valgus deformity of the hindfoot. In: Skaggs DL and Tolo VT, editors. Master Techniques in Orthopaedic Surgery: Pediatrics. Philadelphia: Lippincott Williams & Wilkins. 2008; 263–276.)
v. Perform an osteotomy of the calcaneus using a sagittal saw
w. It is an oblique osteotomy from posterolateral to anteromedial that starts at the “isthmus” of the calcaneus, defined as the narrowest dorsal–plantar site of this bone. It is the anatomic manifestation of the radiographic “critical angle of Gissane” that is located where the downward slope of the beak of the calcaneus meets the reverse downward slope of the posterior facet/lateral process of the talus. It is approximately 2 cm posterior to the calcaneocuboid joint. The osteotomy exits medially between the anterior and middle facets (see Technique Background, Location of the osteotomy—earlier).
x. It is a complete osteotomy through the medial cortex of the calcaneus. Cut the plantar periosteum and long plantar ligament, a.k.a. lateral plantar fascia (not the plantar fascia) under direct vision if necessary, i.e., if these soft tissues resist distraction of the bone fragments.
y. Insert a 2-mm smooth Steinmann pin retrograde from the dorsum of the foot passing through the cuboid, across the anatomic center of the calcaneocuboid joint, stopping at the osteotomy. This is performed with the foot in the original fully everted, deformed position before the osteotomy is distracted. By so doing, the pes acetabulum (navicular, spring ligament, anterior facet of calcaneus) will remain intact and the distal fragment of the calcaneus will not subluxate dorsally on the cuboid during distraction of the osteotomy. Take time on this step and use mini-fluoroscopy to ensure that the calcaneo-cuboid joint is perfectly aligned and that the pin crosses the anatomic center of the joint to prevent subluxation
z. Insert a 0.062″ smooth Steinmann pin from lateral to medial in both of the calcaneal fragments immediately adjacent to the osteotomy. These will be used as joy sticks to distract the osteotomy at the time of graft insertion.
aa. Place a smooth-toothed laminar spreader in the osteotomy and distract maximally, trying to avoid crushing the bone
bb. Assess deformity correction of the hindfoot clinically and using mini-fluoroscopy. The deformity is corrected when the axes of the talus and 1st MT are collinear in both the anteroposterior (AP) and lateral planes
cc. The CLO is a distraction wedge rather than a simple opening wedge, as the center of rotation for angular deformity correction is within the talar head, rather than the medial cortex of the calcaneus.
dd. Measure the distance between the lateral cortical margins of the calcaneal fragments. This is the lateral length dimension of the trapezoid-shaped iliac crest graft that will be obtained either from the child’s iliac crest or from the bone bank. There is no difference in healing rate or complication rate between tricortical iliac crest allograft and bicortical (in a young child) or tricortical (in the adolescent) iliac crest autograft, though there is unnecessary added pain morbidity when autograft is used.
ee. The length of the medial edge of the trapezoid should be 20% to 30% of the length of the lateral edge.
ff. Remove the laminar spreader and use the Steinmann pin joysticks free-hand to distract the calcaneal fragments. Do not use a fixed angle distractor, such as a mini-lengthening rail. This is not a pure linear lengthening osteotomy. It is a three-dimensional distraction wedge. The acetabulum pedis must be allowed to follow the axis of the subtalar joint “down and in” (see Basic Principles #6 and 7, Chapter 2) as it rotates around the head of the talus. A fixed distractor can/will subluxate the TN joint, whereas manual distraction of the osteotomy with Steinmann pins will maintain articular contact as the acetabulum pedis naturally inverts around the head of the talus.
gg. Insert and impact the graft with the cortical surfaces aligned with those of the calcaneal fragments from anterior to posterior in the long axis of the foot. This will place the cancellous bone of the graft in direct contact with the cancellous bone of the calcaneal fragments.
hh. Use mini-fluoroscopy to confirm that there is full three-dimensional correction of all components of hindfoot eversion and that there is no subluxation at the CC joint. If CC joint subluxation is identified, the joint has not been adequately stabilized. Remove the bone graft, reposition the pin more centrally across the joint, and/or add another pin! It is impossible for the CC joint to subluxate if the pin is properly positioned. That is a basic orthopedic principle of bone/joint internal fixation.
ii. Advance the previously inserted 2-mm Steinmann pin retrograde through the graft and into the posterior calcaneal fragment. Bend the pin at its insertion site on the dorsum of the foot for ease of retrieval in clinic. No additional fixation is required. In fact, were the pin not needed to prevent subluxation at the calcaneocuboid joint, no graft fixation would be needed.
jj. Repair the PB tendon with a 2-0 absorbable suture after a 5- to 7-mm lengthening
kk. Plicate the TN joint capsule plantar-medially, but not dorsally, with multiple figure-of-8 2-0 absorbable sutures (see Figure 7-39, Chapter 7)
ll. Advance the proximal slip of the posterior tibialis tendon approximately 5 to 7 mm through a slit in the distal stump of the tendon. Secure this tensioned Pulvertaft weave with a 2-0 absorbable suture (see Figure 7-39, Chapter 7)
mm. Assess the forefoot for structural supination deformity by cupping the heel in one hand, while maintaining neutral ankle dorsiflexion, and visually sighting down the long axis of the foot from toes to heel. If the plane of the MT heads is supinated in relation to the long axis of the tibia or there is dorsal–plantar hypermobility of the 1st MT–medial cuneiform joint, a plantar flexion plantar-based closing wedge osteotomy of the medial cuneiform is needed (see this chapter, and Figure 8-19).
nn. Approximate the skin edges of all incisions with interrupted subcutaneous 3-0 absorbable sutures and a running subcuticular 4-0 absorbable suture
oo. Apply a well-padded short-leg fiberglass non–weight-bearing cast and immediately bivalve it to allow for swelling overnight. Obtain final radiographs of the foot in the cast in the recovery room (Figure 8-20)
pp. Discharge the patient from the hospital the following day after the bivalved cast is overwrapped with fiberglass (see Management Principle #26, Figure 4-20, Chapter 4)
qq. Postoperative management:
i. The patient is immobilized in a below-the-knee cast and is not permitted to bear weight on the operated extremity for 8 weeks. At 6 weeks, the cast is removed to obtain simulated standing AP and lateral radiographs of the foot and to remove the Steinmann pin. Another below-the-knee non–weight-bearing cast is applied. Upon removal of this cast 2 weeks later, final simulated standing AP and lateral radiographs of the foot are obtained. Over-the-counter arch supports are used initially and indefinitely to provide added cushioning and comfort for the “new” weight-bearing surfaces of the foot. Physical therapy is rarely needed.
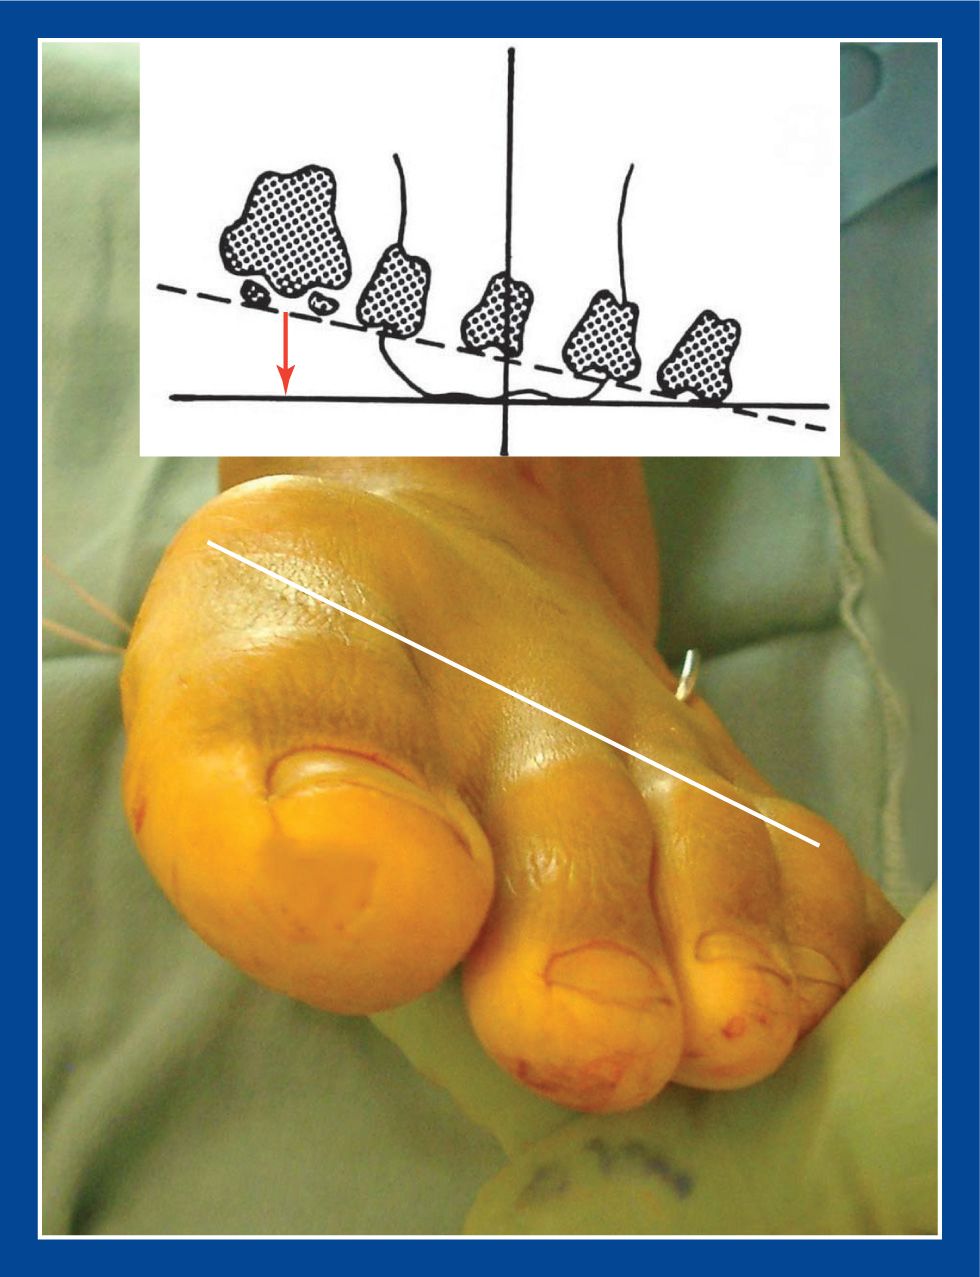
Figure 8-19. The rotational alignment of the forefoot is assessed following correction of the hindfoot deformity and the heel cord contracture. If, as in this case, the forefoot is rigidly supinated, an osteotomy of the medial cuneiform is required (see Medial Cuneiform Plantar Flexion Plantar-Based Closing Wedge Osteotomy [MC-PF-CWO], this chapter). (From Mosca VS. Calcaneal lengthening osteotomy for valgus deformity of the hindfoot. In: Skaggs DL and Tolo VT, editors. Master Techniques in Orthopaedic Surgery: Pediatrics. Philadelphia: Lippincott Williams & Wilkins. 2008; 263–276.)
3. Pitfalls
a. Failure to pay attention to all of the details of the technique as described.
b. Failure to create the osteotomy between the anterior and middle facets of the calcaneus. Try to find the interval between the anterior and middle facets of the subtalar joint to create an extra-articular osteotomy, acknowledging that perhaps only approximately 54% of individuals have separate facets.
c. Failure to lengthen the PB and the aponeurosis of the abductor digiti minimi, while preserving the PL
d. Failure to prevent subluxation of the CC joint by predistraction retrograde pinning
e. Failure to appreciate and correct rigid supination deformity of the forefoot
f. Failure to lengthen a contracted gastrocnemius or tendo-Achilles
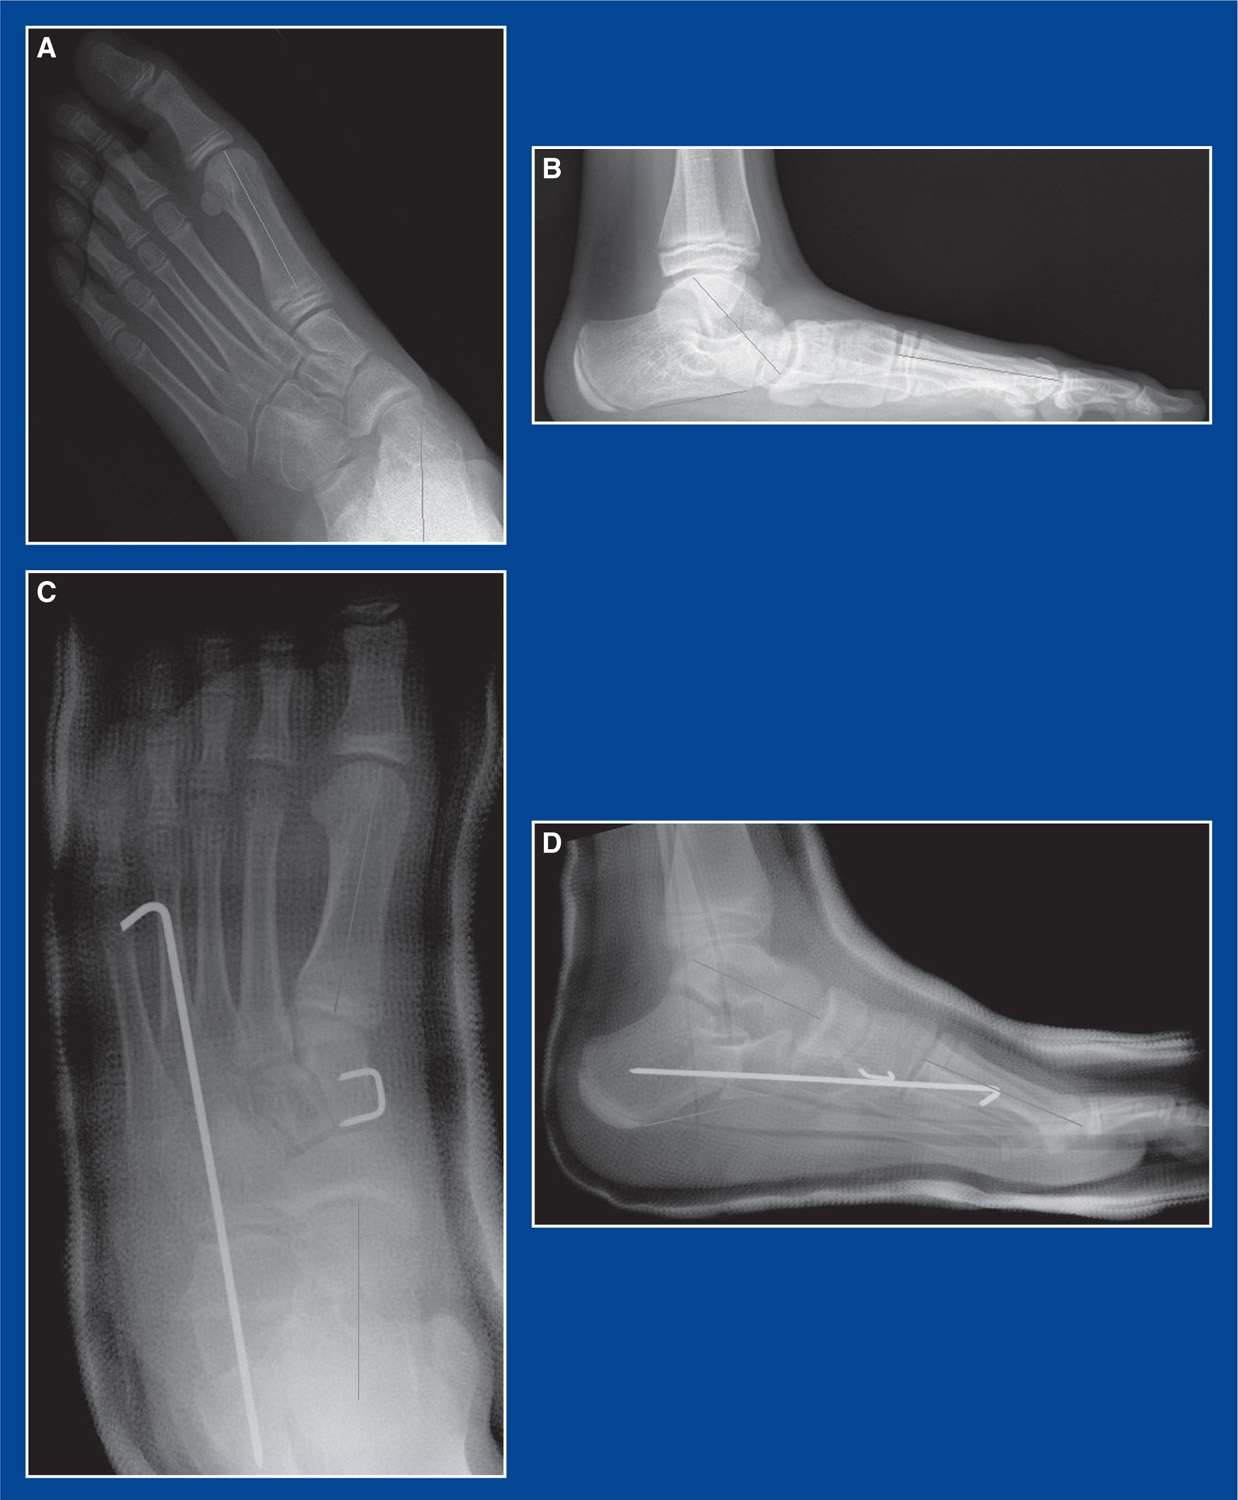
Figure 8-20. A and B. Preoperative AP and lateral radiographs of the foot. C. Postoperative AP view in the bivalved cast. Note the correction of the external rotation component of eversion deformity of the subtalar joint with alignment of the TN joint and correction of the talo–1st MT angle. D. Postoperative lateral view demonstrates dorsiflexion of the talus, alignment of the TN joint, correction of the talo–1st MT angle, and normalization of the calcaneal pitch. (From Mosca VS. Calcaneal lengthening osteotomy for valgus deformity of the hindfoot. In: Skaggs DL and Tolo VT, editors. Master Techniques in Orthopaedic Surgery: Pediatrics. Philadelphia: Lippincott Williams & Wilkins. 2008; 263–276.)
4. Complications
a. Subluxation of the CC joint, with resultant incomplete deformity correction and the eventual development of premature arthritis
i. Avoid by retrograde insertion of a pin across the anatomic center of the CC joint, with the foot held in the fully everted position, after the osteotomy is created but before the osteotomy is distracted
b. Incomplete deformity correction
i. Avoid by:
• releasing the lateral soft tissues (PB and abductor digiti minimi aponeurosis)
• releasing the dorsolateral aspect of the TN joint capsule in long-standing cases and in feet with talocalcaneal tarsal coalitions
• pinning the CC joint before distraction of the osteotomy
• inserting the proper size graft
• confirming adequate correction intraoperatively with mini-fluoroscopy
c. Persistent equinus
i. Avoid by lengthening the Achilles or gastrocnemius tendon, based on the Silfverskiold test, and confirming adequacy of ankle dorsiflexion with the knee extended after deformity correction
d. Persistent forefoot supination
i. Avoid by assessing forefoot supination intraoperatively after the calcaneus and the heel cord have been lengthened. Correct it with an MCO if identified
e. Recurrence of deformity
i. Avoid by paying attention to all of the details of the procedure as outlined.
Posterior Calcaneus Displacement Osteotomy (PCDO)
1. Indications
a. Lateral hindfoot impingement pain and/or medial hindfoot soft tissue strain due to exaggerated valgus deformity of the hindfoot without eversion of the subtalar joint
i. This deformity is most often due to lateral translational overcorrection of the subtalar joint in a surgically treated clubfoot (see Chapter 5).
ii. Also indicated for symptomatic hindfoot valgus malformation in congenital synostosis of the subtalar joint (see Chapter 6)
b. Residual varus deformity of the subtalar joint in a cavovarus foot (see Chapter 5) that does not correct fully with a deep plantar-medial release (D-PMR; see Chapter 7)
i. The usual reason for incomplete deformity correction after a D-PMR is that the deformity has been present for too long and the tissues are unyielding.
c. Because the foot-CORA (see Assessment Principle #18, Chapter 3) is the nearby subtalar joint, translation of the posterior fragment is more powerful and effective than angulation in deformity “correction”.
2. Technique (Figure 8-21)
a. The posterior calcaneus displacement osteotomy can be used to correct valgus, varus, planus, cavus, and combinations of these deformities, depending on the direction of displacement.
b. If the only procedure being performed under the anesthetic is the posterior calcaneus displacement osteotomy, place the patient prone to improve visual confirmation of the deformity correction. If other procedures are to be performed concurrently, it is generally easier to carry out all procedures with the patient supine.
c. Make a slightly curved incision on the lateral aspect of the calcaneus following the course of the peroneal tendons starting posterior to the lateral malleolus and ending at the glabrous skin plantarward. This is the same incision used for a PL to PB transfer (see Chapter 7).
d. Isolate and protect the sural nerve
e. Expose the tuber of the calcaneus extraperiosteally on its dorsal, lateral, and plantar surfaces using blunt dissection
f. Use a Joker elevator to elevate the soft tissues extraperiosteally off the dorsal aspect of the tuber calcanei immediately posterior to the posterior facet of the subtalar joint, continuing around the medial side of the calcaneus deep to the PT neurovascular bundles
g. Use a Joker elevator to elevate the soft tissues extraperiosteally off the plantar aspect of the tuber calcanei approximately 1.5 to 2 cm anterior to the dorsally placed Joker, continuing around the medial side of the calcaneus deep to the PT neurovascular bundles
h. Replace the Jokers with narrow Crego retractors. They will overlap on the medial side of the calcaneus deep to the neurovascular bundles. The Crego retractors define the plane of the planned osteotomy in relation to the plantar aspect of the foot. Prepare for a more vertical osteotomy if planning some dorsal displacement (to correct cavus) or plantar displacement (to correct planus/flatfoot) in addition to the lateral or medial displacement.
i. Insert a 2-mm threaded Steinmann pin from medial to lateral through the posteroplantar corner of the calcaneus in the plane of the MT heads. This pin will be used as a joy stick. More importantly, it defines the translational plane of the osteotomy, which is not perpendicular to the lateral cortex of the calcaneus.
i. An osteotomy perpendicular to a varus calcaneus will result in plantar displacement of the posterior fragment during lateralization and may prevent full lateral displacement
ii. An osteotomy perpendicular to a valgus calcaneus will result in plantar displacement of the posterior fragment during medialization and may prevent full medial displacement
j. Cut the calcaneus with a sagittal saw in line with the Crego retractors (more or less vertically—see “h” above) and parallel with the threaded Steinmann pin. With the Crego’s in place, there should be little concern for injury to the medial soft tissues (Figure 8-22)
k. Use a wide, straight osteotome to lever the posterior calcaneal fragment away from the body of the calcaneus and, thereby, elevate the periosteum on the medial side of the bone fragments
l. Translate the posterior fragment in the desired direction(s). Plantar flex the ankle to relax the tension on the tendo-Achilles and to facilitate movement of the fragment
m. If, despite adequate elevation of the periosteum on the medial side and maximum displacement of the posterior fragment, the deformity does not fully correct, a wedge of bone can be removed from the medial side of the posterior fragment in a valgus deformity or the lateral side of the posterior fragment in a varus deformity
i. When correcting a varus deformity, a plantar fasciotomy is frequently necessary. This can be performed in the standard manner as described in Chapter 7.
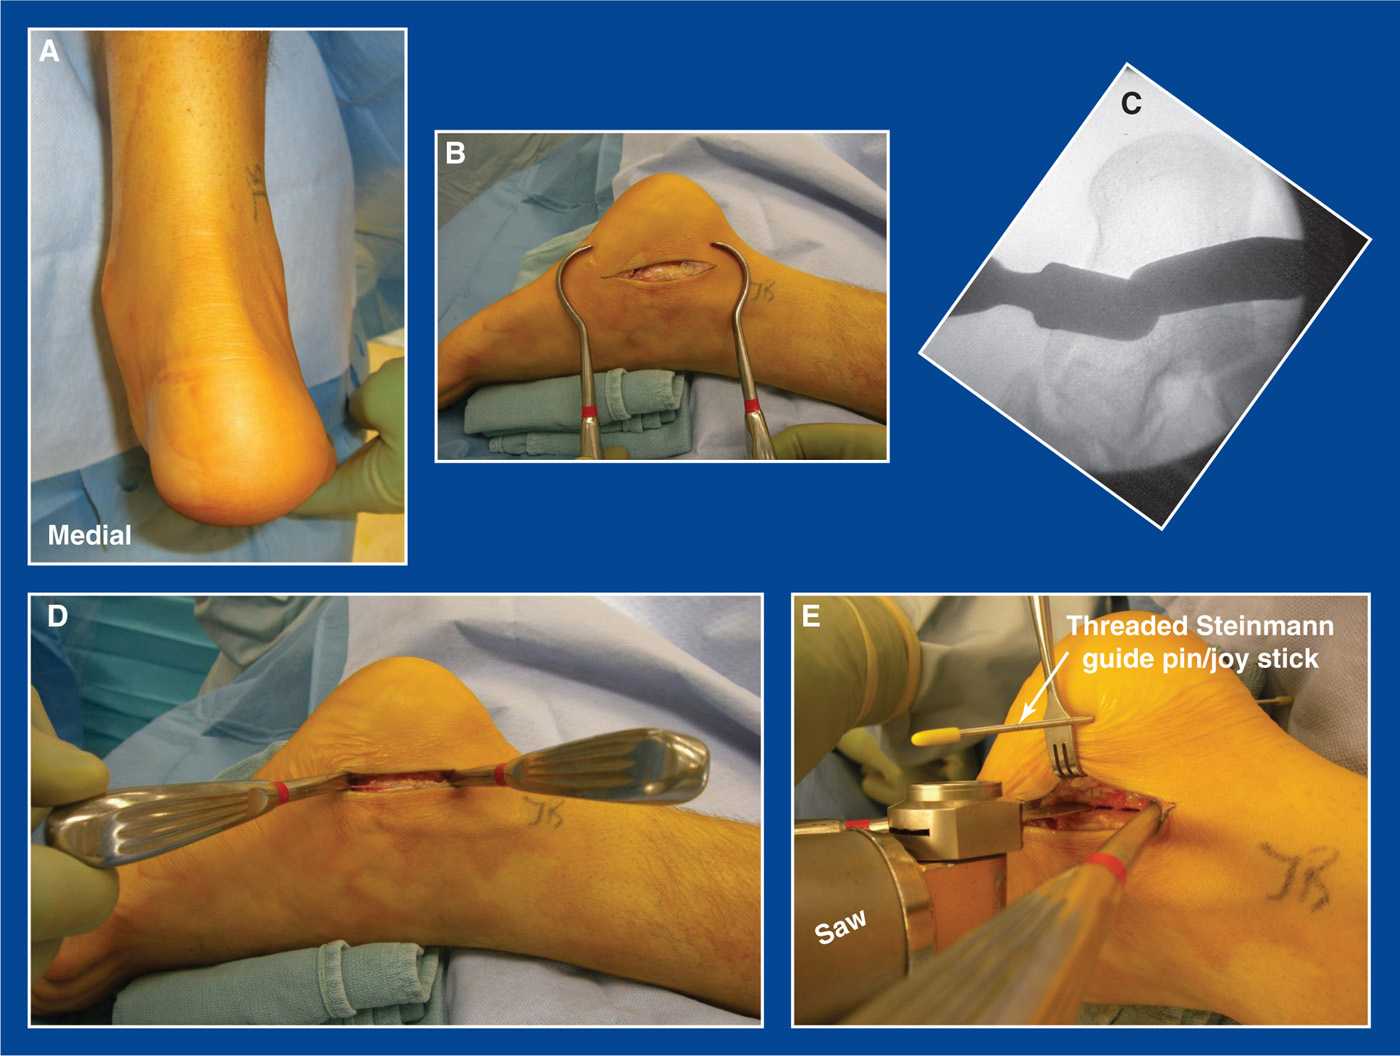
Figure 8-21. Posterior calcaneus displacement osteotomy. A. Posterior view of a symptomatic lateral translational valgus hindfoot deformity. B. Curved lateral incision over the peroneal tendons and sural nerve. Protect all three structures. C. Radiographic appearance of Crego retractors passed extraperiosteally around the tuber of the calcaneus deep to the PT neurovascular bundles on the medial side. D. Clinical appearance of the Crego retractors in place. E. A 2-mm threaded Steinmann pin has been inserted transversely in the calcaneus in the plane of the MT heads to act as a guide pin defining the true transverse plane. A sagittal saw is used to create the osteotomy in the plane defined by the Steinmann pin and angled approximately 45° from the plantar surface of the foot. The Crego retractors protect the medial soft tissues.
n. Internally stabilize the osteotomy (Figure 8-23)
i. In a skeletally immature child, use a 2.4- to 2.8-mm smooth Steinmann pin that aligns with the posterior surface of the os calcis apophysis and exits on the dorsolateral midfoot/forefoot. Bend the pin at the skin penetration site on the dorsum of the foot for ease of removal in clinic.
ii. In a skeletally mature adolescent, use a cannulated 6.5-mm or larger partially threaded screw inserted antegrade into the anterior calcaneus and with the screw head countersunk into the posterior calcaneus.
o. Approximate the skin edges with interrupted subcutaneous 3-0 absorbable sutures and a running subcuticular 4-0 absorbable suture
p. A short-leg non–weight-bearing fiberglass cast is applied and bivalved. It is overwrapped with fiberglass before discharge from the hospital the following day
q. The cast is changed to a walking cast at 6 weeks postoperatively after obtaining simulated standing lateral and Harris x-rays
i. and removing the Steinmann pin in the young children
3. Pitfalls
a. Inability to adequately displace the posterior calcaneus fragment due to
i. insufficient elevation of the periosteum on the medial side of the bone fragments
ii. obliquity of the plane of the osteotomy
iii. contracture of the plantar fascia in a cavovarus foot deformity
b. Incomplete deformity correction because of poor visualization of the hindfoot. Prone positioning obviates this problem, but is not possible if other procedures are being performed concurrently
4. Complications
a. Injury to the PT neurovascular bundles
i. Avoid by:
• careful extraperiosteal dissection on the medial side of the tuber calcanei with a Joker elevator
• placement of narrow Crego retractors around the tuber calcanei in the line of the osteotomy that act as targets for the saw blade
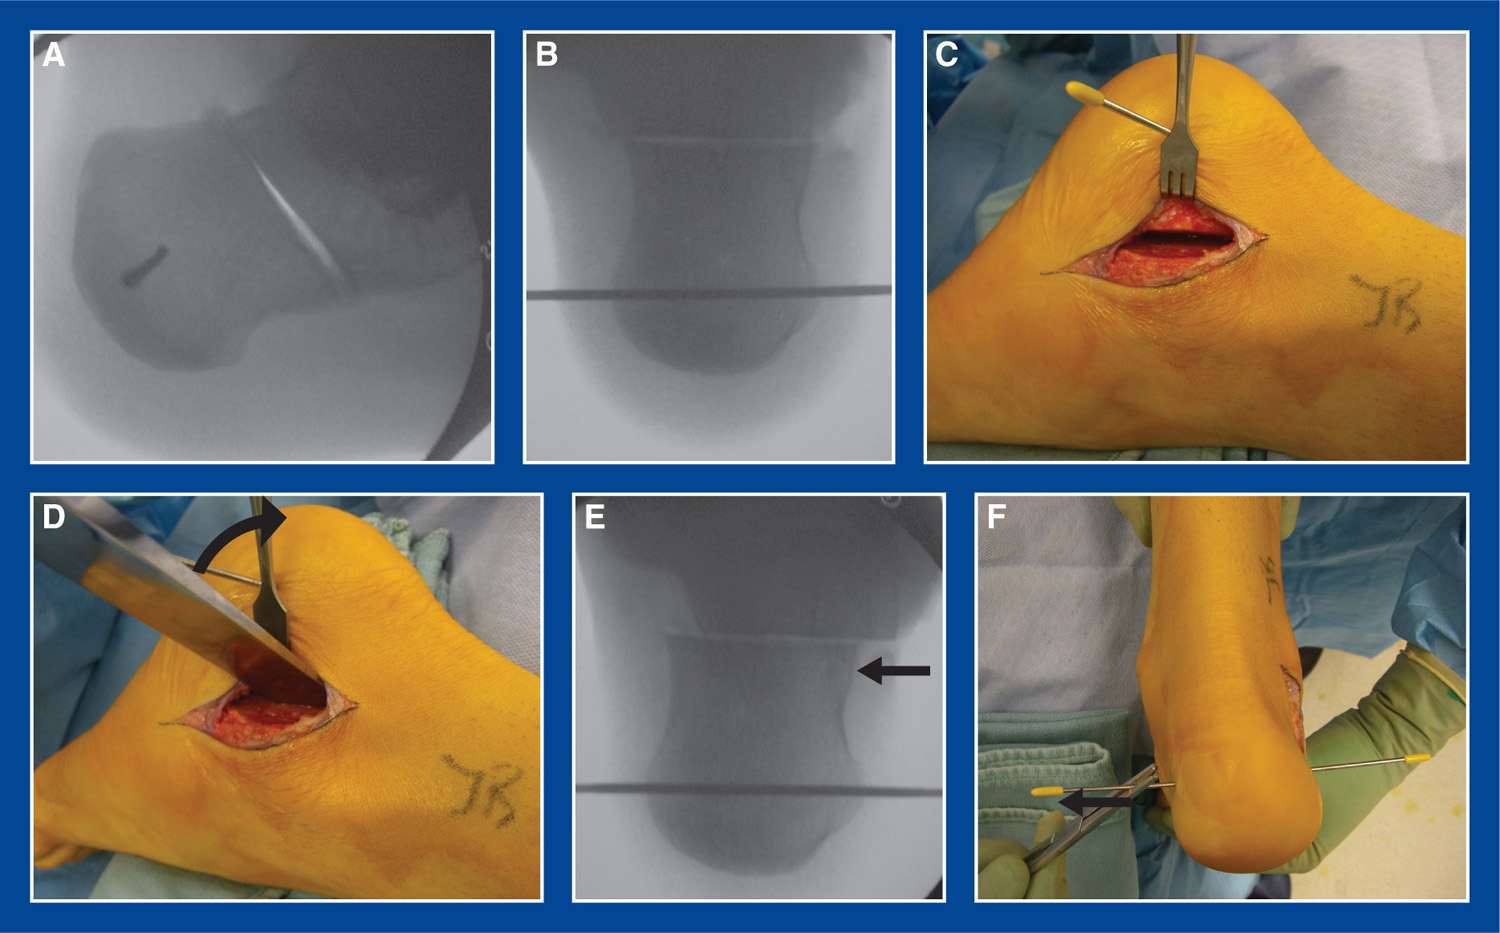
Figure 8-22. A. Lateral x-ray shows completed osteotomy. Threaded Steinmann guide pin/joy stick is seen. B. Harris axial x-ray shows completed osteotomy and threaded Steinmann guide pin/joy stick. C. The osteotomy is visualized with the posterior calcaneal fragment displaced slightly medially. D. A broad, straight osteotome is used as a lever (black curved arrow) to elevate the periosteum on the medial side of the fragments and to displace the posterior calcaneal fragment further medially. E. Initial medial displacement of the posterior fragment can be seen. F. The posterior fragment is displaced using pressure on the lateral side of the fragment and with assistance of the Steinmann pin joy stick. Plantar flexion of the ankle will facilitate movement of the fragment medially by relaxing the tendo-Achilles.
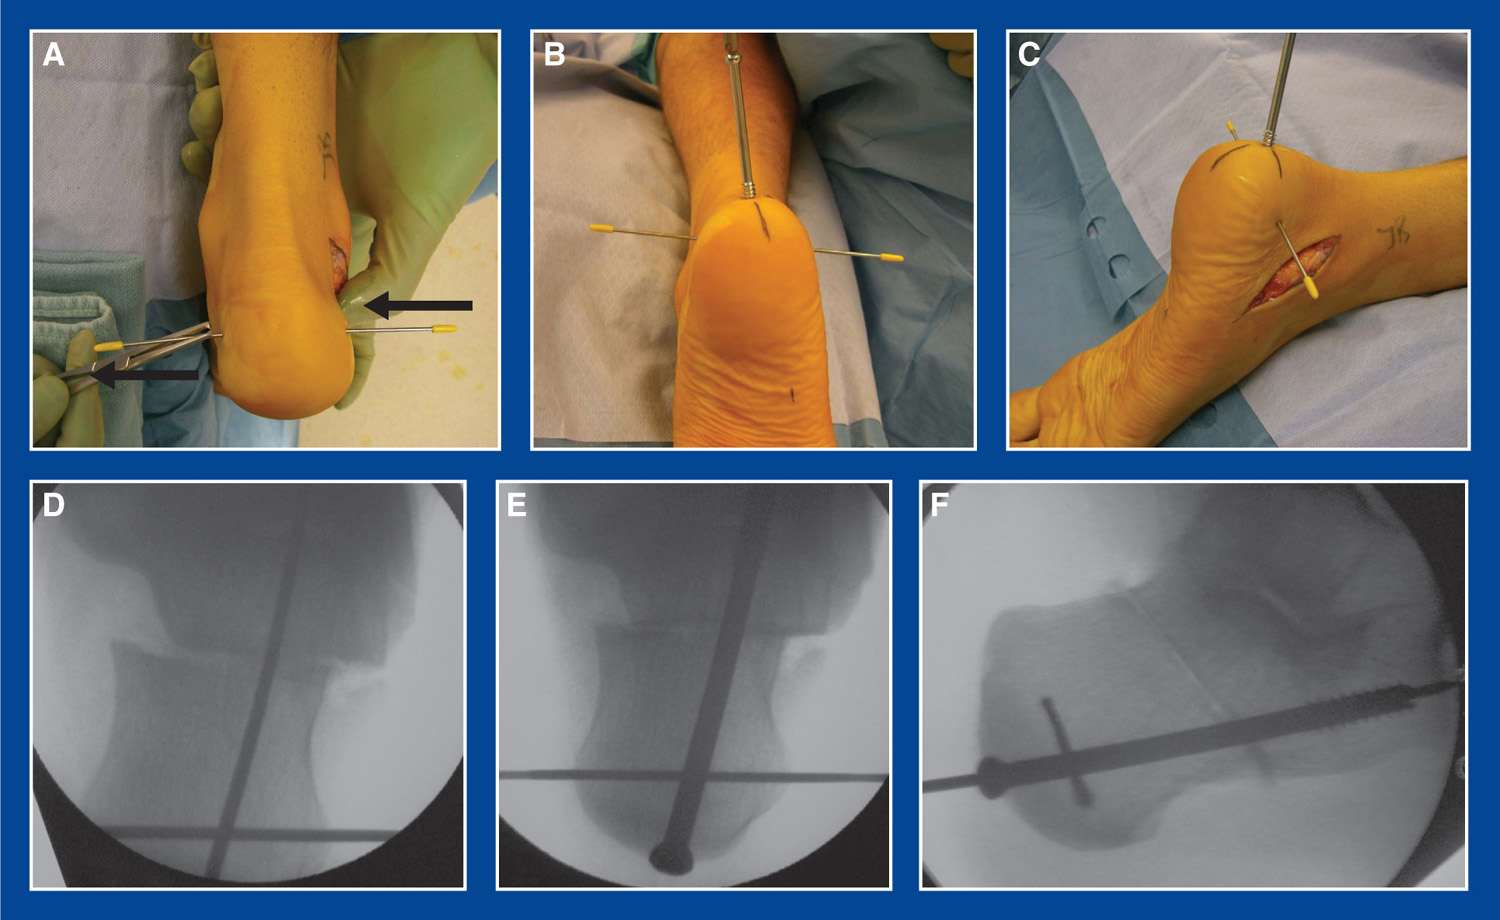
Figure 8-23. A. The posterior calcaneal fragment is being pushed medially with a thumb and pulled medially with a Kocher clamp on the Steinmann pin joy stick. B and C. A 6.5-mm partially threaded, cannulated screw is being inserted. D. Harris axial mini-fluoroscopy image with cannulated screw guide pin in place. E and F. Harris and lateral mini-fluoroscopy images with cannulated screw in place (before removal of guide pins).
b. Injury to the sural nerve
i. Avoid by careful identification, dissection, and retraction
Medial Cuneiform Osteotomy—“Generic” (MCO)
1. Indications
a. The medial cuneiform contains the foot-CORA for forefoot pronation, forefoot supination, midfoot adduction, and midfoot abduction (see Assessment Principle #18, Figures 3-21 and 3-22, Chapter 3). Osteotomies in this bone can be used to correct all of these individual deformities as well as combinations of them. The medial cuneiform is, therefore, the workhorse of the medial column of the foot (see Management Principle #19, Chapter 4).
2. Technique—This technique section is the basis for all types of medial cuneiform osteotomies and will be so-referenced in the subsequent operative procedure outlines. (Figure 8-24)
a. Make a longitudinal incision along the medial midfoot centered on the medial cuneiform
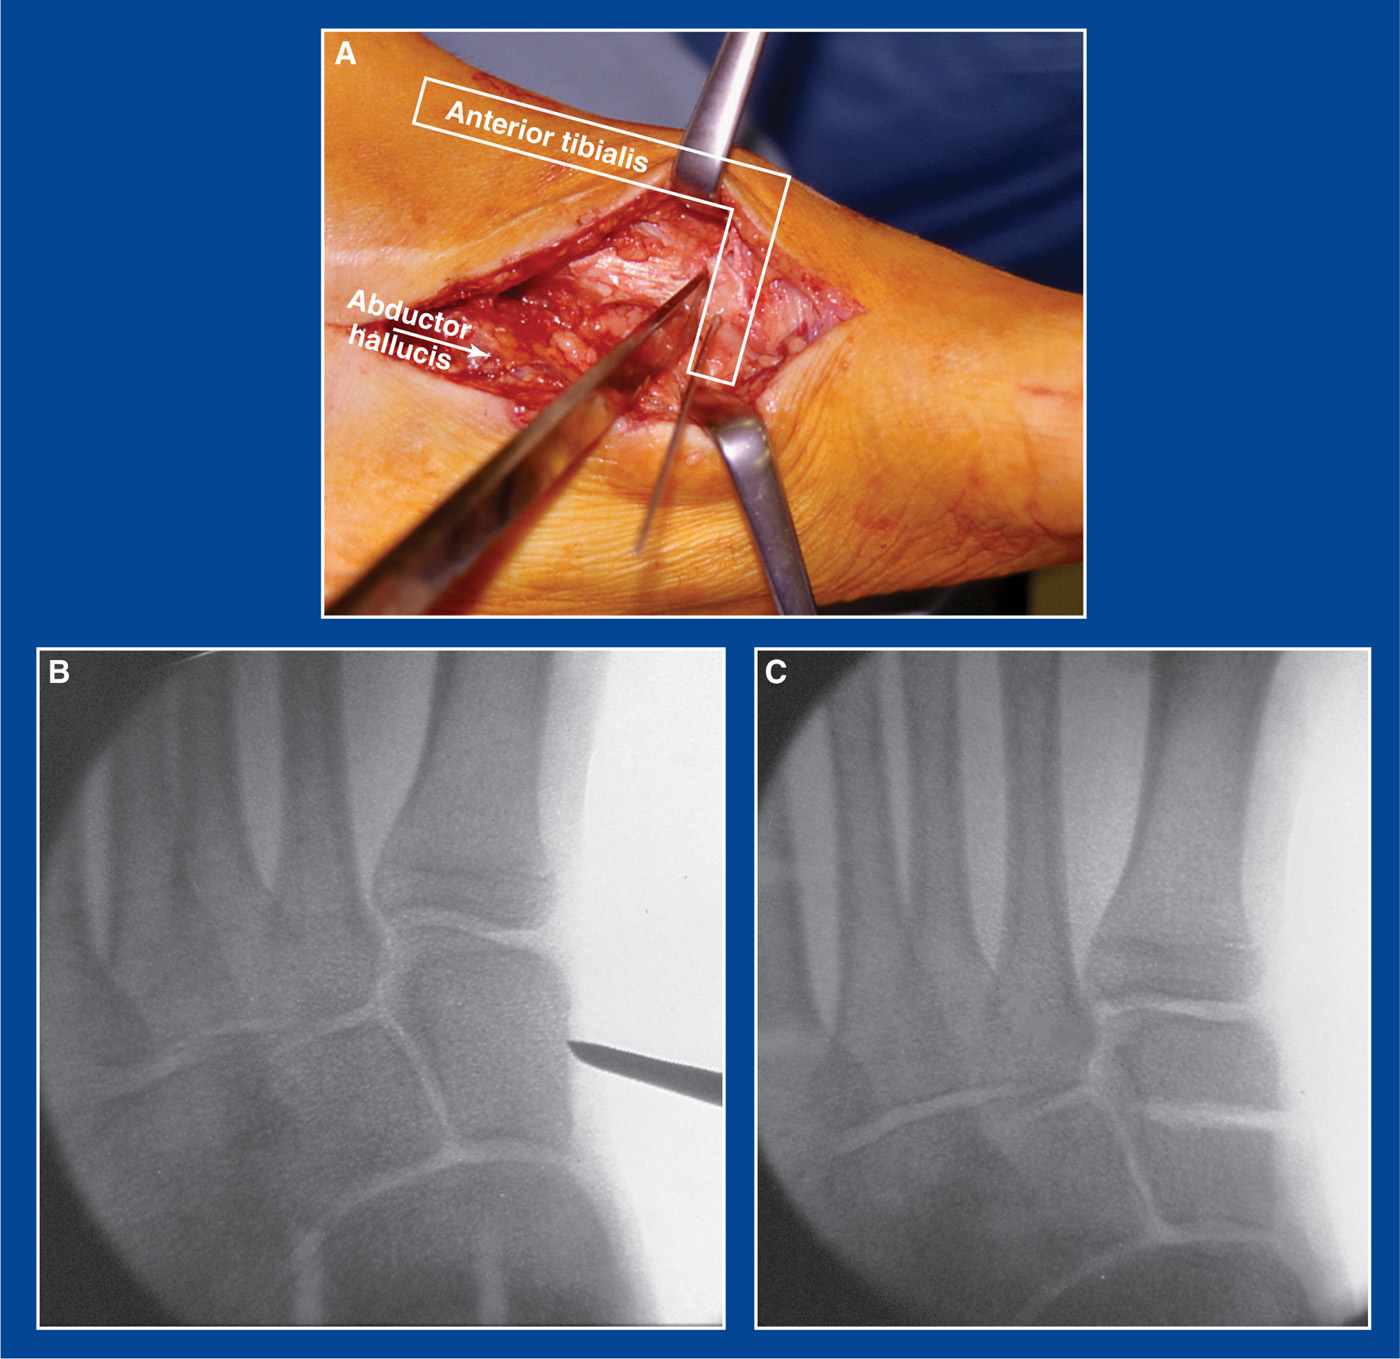
Figure 8-24. A. Through a longitudinal medial midfoot incision, the abductor hallucis is retracted plantarward. The anterior tibialis is released from its tendon sheath and elevated from the dorsal and medial surfaces of the proximal half of the medial cuneiform without detaching it from the distal half of the bone. Baby Hohmann or Langenbeck (shown) retractors can be used for exposure. An osteotome is used to identify the proper starting point for the osteotomy. A Steinmann pin can be inserted under mini-fluoroscopy as a guide pin for the direction of the osteotomy, but is not necessary. B. The starting point for the osteotomy is confirmed by mini-fluoroscopy to be half way between the distal and proximal ends of the bone. It is directed slightly distal-lateral to end adjacent to the 2nd MT–middle cuneiform joint. C. The completed osteotomy is in line with the 2nd MT–middle cuneiform joint, thereby creating a “joint” next to a joint (see Assessment Principle #18, Figure 3-21, Chapter 3).
b. Retract the abductor hallucis plantarward
c. Release the anterior tibialis tendon sheath to expose the tendon. Retract the tendon dorsally
d. Expose the medial cuneiform extraperiosteally on its dorsal, medial, and plantar surfaces
e. Identify the midpoint (from distal to proximal) of the medial cuneiform along its medial surface. It is typically at the proximal edge of the anterior tibialis tendon as it crosses the medial cuneiform and also where a dorsal–plantar ridge in the bone exists. Confirm this position with mini-fluoroscopy.
f. Using a sagittal saw and starting at the medial surface midpoint, cut the medial cuneiform from medial to slightly distal-lateral, i.e., angle the saw blade slightly distal-lateral, aiming at the 2nd MT–middle cuneiform joint. Make the osteotomy in the coronal plane perpendicular to the long axis of the 1st ray.
i. By starting the osteotomy at the medial midpoint, both bone fragments will be large. This will provide for better control of the fragments and more room for fixation, if needed.
ii. By cutting the lateral cortex of the medial cuneiform adjacent to the 2nd MT–middle cuneiform joint, the fragments of the medial cuneiform will have greater mobility than they would if the lateral cortex were cut adjacent to the medial cortex of the middle cuneiform (see Assessment Principle #18, Figure 3-21, Chapter 3).
3. Pitfalls
a. Failure to identify the ideal medial starting point for the osteotomy. Mini-fluoroscopy will provide the desired assistance.
b. Failure to cut the lateral cortex adjacent to the 2nd MT–middle cuneiform joint. Though not a disaster if the cut is not located there, the recommended position for the osteotomy will improve the mobility of the fragments and the ability to achieve the desired outcome.
c. Failure to cut the dorsal cortex. It is hidden under the anterior tibialis and much more dorsal than expected. It must be cut or the fragments will resist repositioning.
4. Complications
a. Creating the osteotomy too far distal or proximal, resulting in the smaller fragment being unstable and/or subject to dysvascularity.
i. Avoid by using mini-fluoroscopy for guidance
Medial Cuneiform (Medial) Opening Wedge Osteotomy (MC-Medial-OWO)
1. Indications
a. Metatarsus adductus—as an isolated idiopathic deformity (see Chapter 5) or as a component of recurrent or persistent clubfoot deformity (see Chapter 5)
i. most often performed in combination with a closing cuboid wedge osteotomy (see Assessment Principle #18, Figure 3-21, Chapter 3; Closing cuboid wedge osteotomy, this chapter)
b. Metatarsus primus varus, in juvenile hallux valgus (JHV; see Figure 5-60, Chapter 5)
2. Technique
a. See Medial cuneiform osteotomy “generic,” Technique a–f
g. Insert 0.062″ smooth Steinmann pin joy sticks from medial to lateral in the distal and proximal bone fragments
h. In metatarsus adductus (Figure 8-25):
i. release the plantar fascia and/or the distal tendon of the abductor hallucis in severe deformities (see Chapter 7 for both procedures)
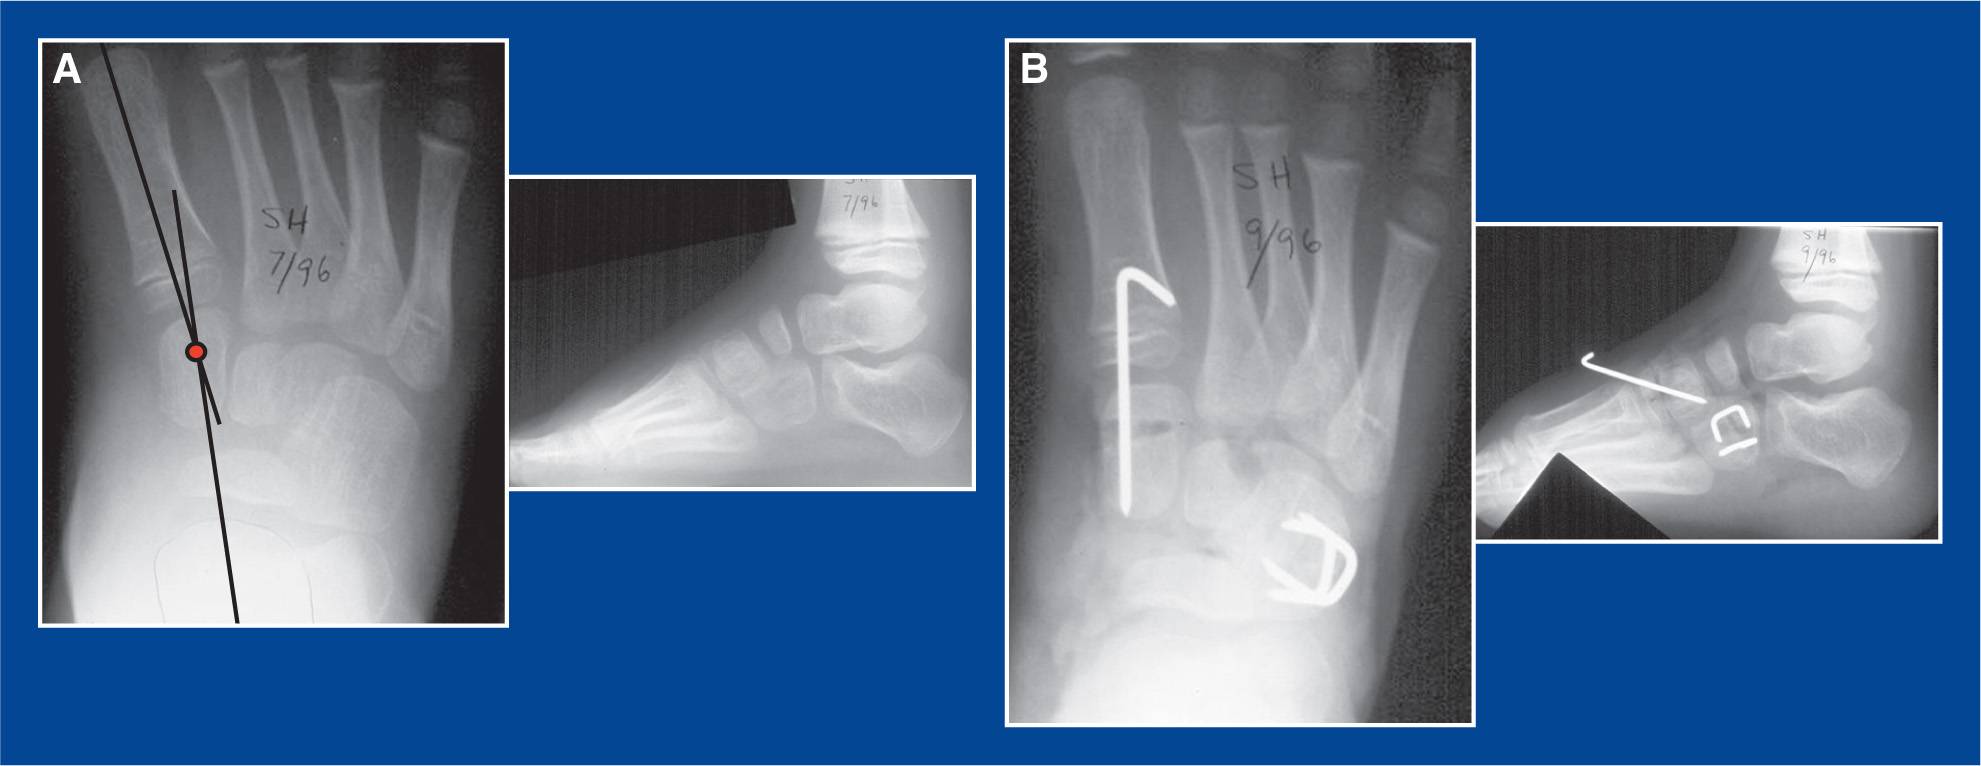
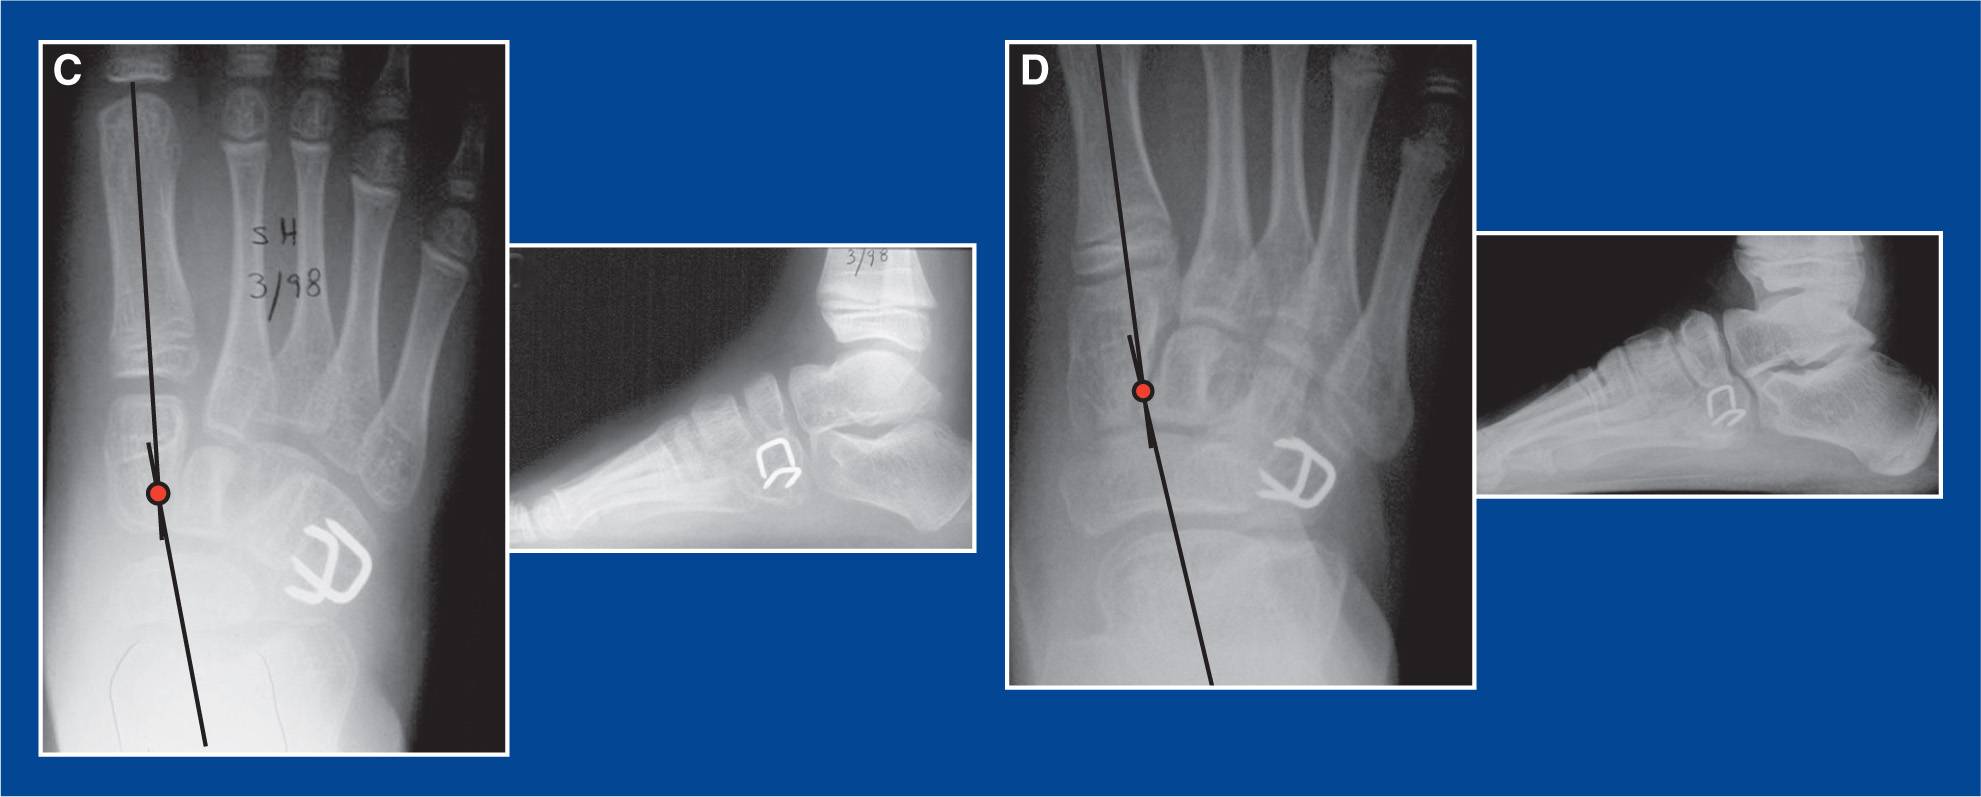
Figure 8-25. A. AP and lateral x-rays of a former clubfoot in a 7-year-old boy with symptomatic residual metatarsus adductus. The foot-CORA (red dot) is in the medial cuneiform (see Assessment Principle #18,Figure 3-21, Chapter 3). B. X-rays taken 6 weeks after medial cuneiform medial opening wedge osteotomy with bone graft from the cuboid closing wedge osteotomy (see this chapter). C. X-rays taken 2 weeks later. The foot-CORA has been corrected to physiologic abduction. D. X-rays taken 8 years later. The deformity correction has been maintained.
ii. perform the cuboid closing wedge osteotomy (see this chapter)
iii. abduct the 1st ray and open the osteotomy with the joy sticks
iv. insert the bone wedge from the cuboid (Figure 8-26)
i. In metatarsus primus varus:
i. initiate all other procedures that are being performed concurrently
ii. abduct the 1st ray and open the osteotomy with the joy sticks
iii. fashion a tricortical iliac crest allograft or autograft into a triangle of the appropriate size and shape. Often, the length of the medially-based wedge is 5 to 8 mm
iv. insert and impact the wedge—base medial and apex lateral
j. The graft will, in most cases, be inherently stable and not require fixation.
k. If the graft is not inherently stable, insert a 0.062″ smooth Steinmann pin retrograde across the site from the dorsal forefoot. Add a supplemental wire or a staple if necessary. Bend the wire(s) at the insert site(s) and leave long for easy retrieval in clinic.
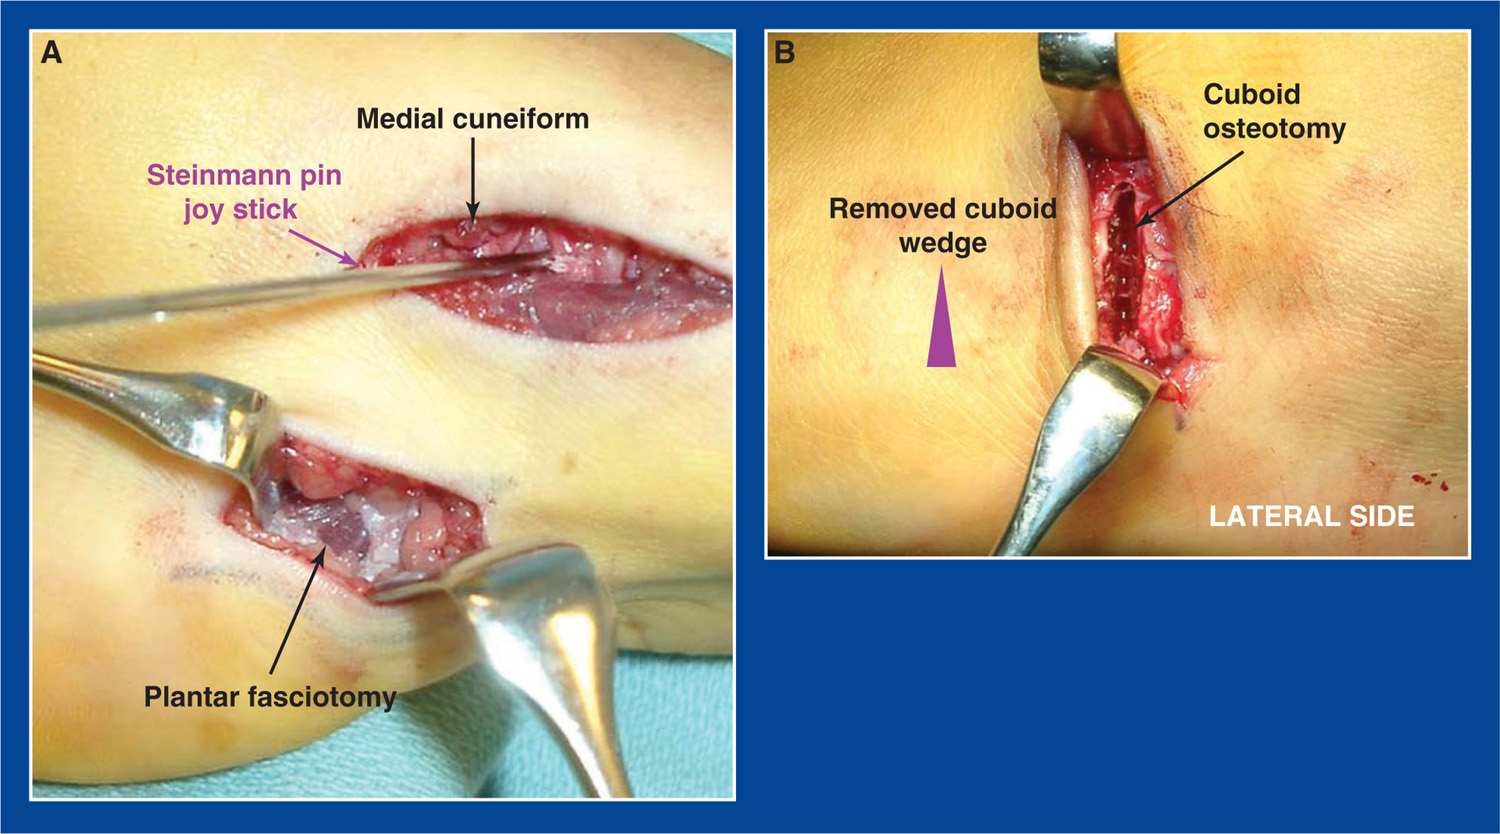
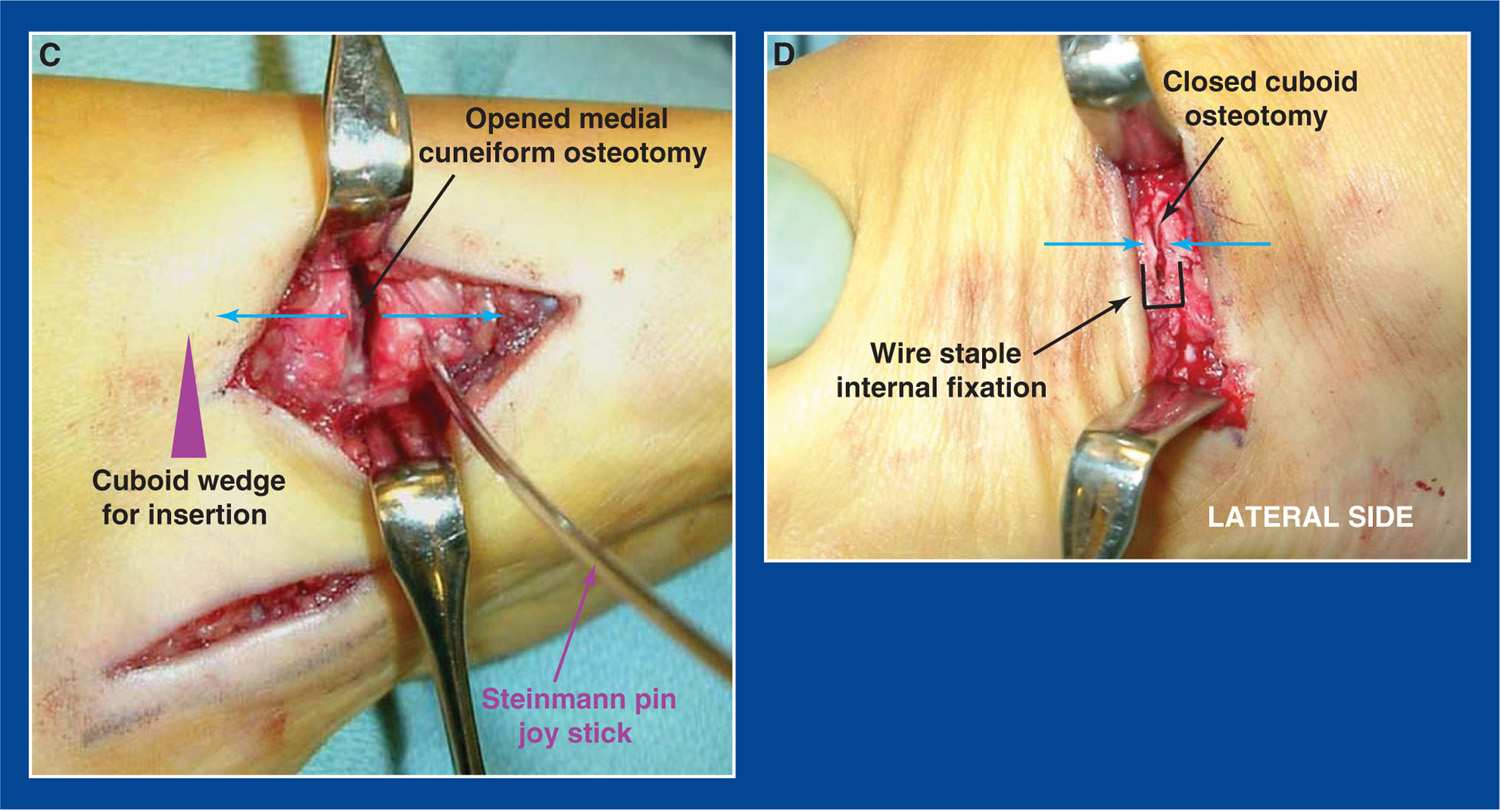
Figure 8-26. Medial cuneiform opening wedge and cuboid closing wedge osteotomies for metatarsus adductus. A. The plantar fasciotomy can be seen (see Chapter 7). A Steinmann pin has been inserted as a joy stick from medial to lateral into the distal fragment of the medial cuneiform after the osteotomy has been performed. A proximal pin was not used in this case. B. A laterally-based wedge of bone has been resected with a sagittal saw from the middle of the cuboid (see this chapter). C. The wedge of bone is inserted into the MCO. D. The osteotomy surfaces of the cuboid are brought into apposition by abducting the forefoot on the hindfoot. A wire staple is used for internal fixation.
l. Approximate the skin edges with interrupted subcutaneous 3-0 absorbable sutures and a running subcuticular 4-0 absorbable suture
m. Apply a short-leg non–weight-bearing cast
n. Six weeks later, obtain simulated standing AP and lateral x-rays of the foot out of the cast, remove the wire(s) if present, and replace the cast with a short-leg walking cast that will be worn for 2 weeks
3. Pitfalls
a. Failure to identify the ideal medial starting point for the osteotomy. Mini-fluoroscopy will provide the desired assistance.
b. Failure to cut the lateral cortex adjacent to the 2nd MT–middle cuneiform joint. Though not a disaster if the cut is not located there, the recommended position for the osteotomy will improve the mobility of the fragments and the ability to achieve the desired outcome.
c. Failure to cut the dorsal cortex. It is hidden under the anterior tibialis and much more dorsal than expected. It must be cut or the fragments will resist repositioning.
4. Complications
a. Creating the osteotomy too far distal or proximal, resulting in the smaller fragment being unstable and/or subject to dysvascularity
i. Avoid by using mini-fluoroscopy for guidance
b. Extrusion of the graft
i. Avoid by using internal fixation if there is any concern about the stability of the graft in the osteotomy
Medial Cuneiform (Dorsiflexion) Plantar-Based Opening Wedge Osteotomy (MC-DF-OWO)
(see Assessment Principle #18, Figure 3-22, Chapter 3; and Management Principle #19, Figure 4-9A, Chapter 4)
1. Indications
a. Rigid pronation deformity (plantar flexion of the 1st ray) of the forefoot in a cavovarus foot (see Chapter 5)
b. Adduction/pronation (plantar flexion of the 1st ray) deformities of the forefoot in a skewfoot (see Chapter 5)
2. Technique (Figures 8-27 and 8-28)
a. See Medial cuneiform osteotomy “generic,” Technique a–f
g. Complete other structural deformity corrections of the foot and, in the case of a cavovarus foot, prepare the tendons for transfer (without setting the tension on them until after the MCO)
h. Insert 0.062″ smooth Steinmann pin joy sticks from plantar to dorsal in the proximal and distal bone fragments
i. Dorsiflex the 1st ray with the distal joy stick and open the osteotomy to determine the size of bone graft required. A laminar spreader may be helpful.
j. Fashion a tricortical iliac crest allograft or autograft into a triangle of the appropriate size and shape. The length of the base of the wedge is 7 to 10 mm in severe deformities.
k. For cavovarus (see Chapter 5)
i. insert and impact the wedge of bone into the medial cuneiform with the base plantar and apex dorsal. The dorsal cortices of the 2 medial cuneiform fragments will automatically remain in contact.
l. For skewfoot (see Chapter 5)
i. in the young child without severe hindfoot equinovalgus
• insert and impact the wedge of bone into the medial cuneiform with the base plantar medial.
ii. in the older child and adolescent with severe, symptomatic hindfoot equinovalgus
• first perform a CLO (see this chapter) and a gastrocnemius recession (see Chapter 7) or tendo-Achilles lengthening (see Chapter 7), based on the results of the Silfverskiold test (see Assessment Principle #12, Chapter 3)
• insert and impact the wedge of bone into the medial cuneiform with the base plantar-medial.
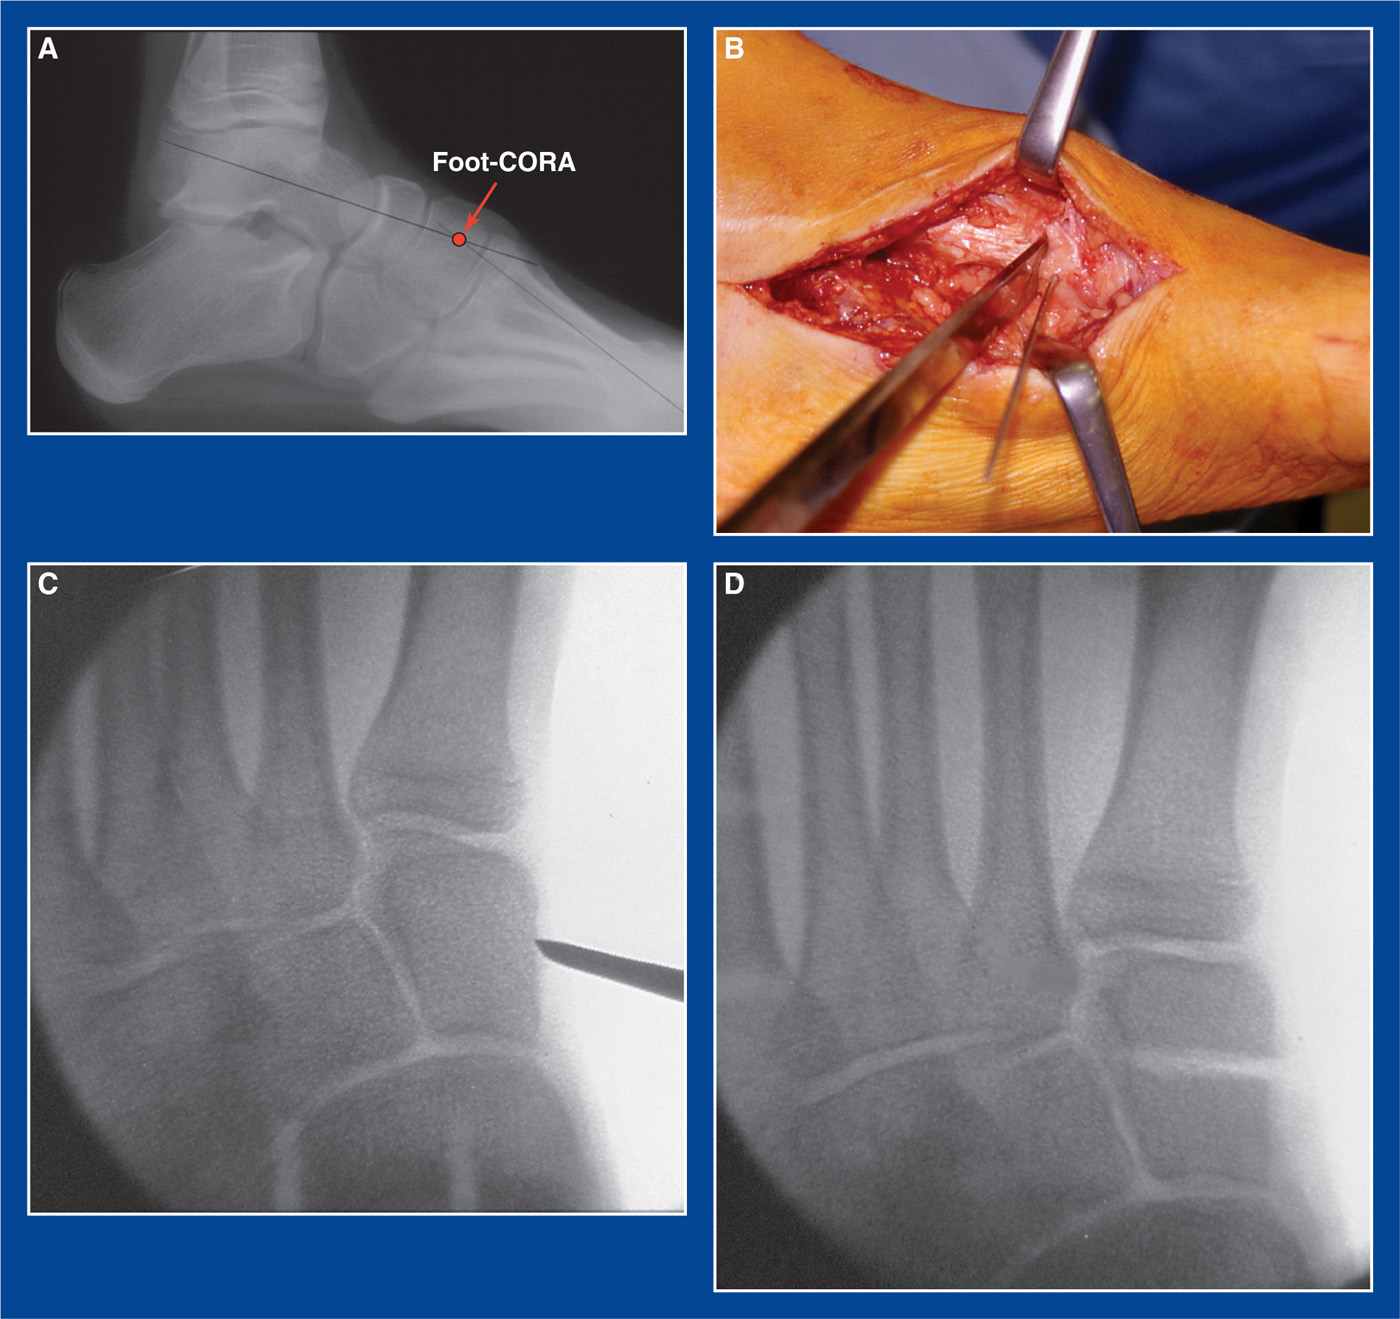
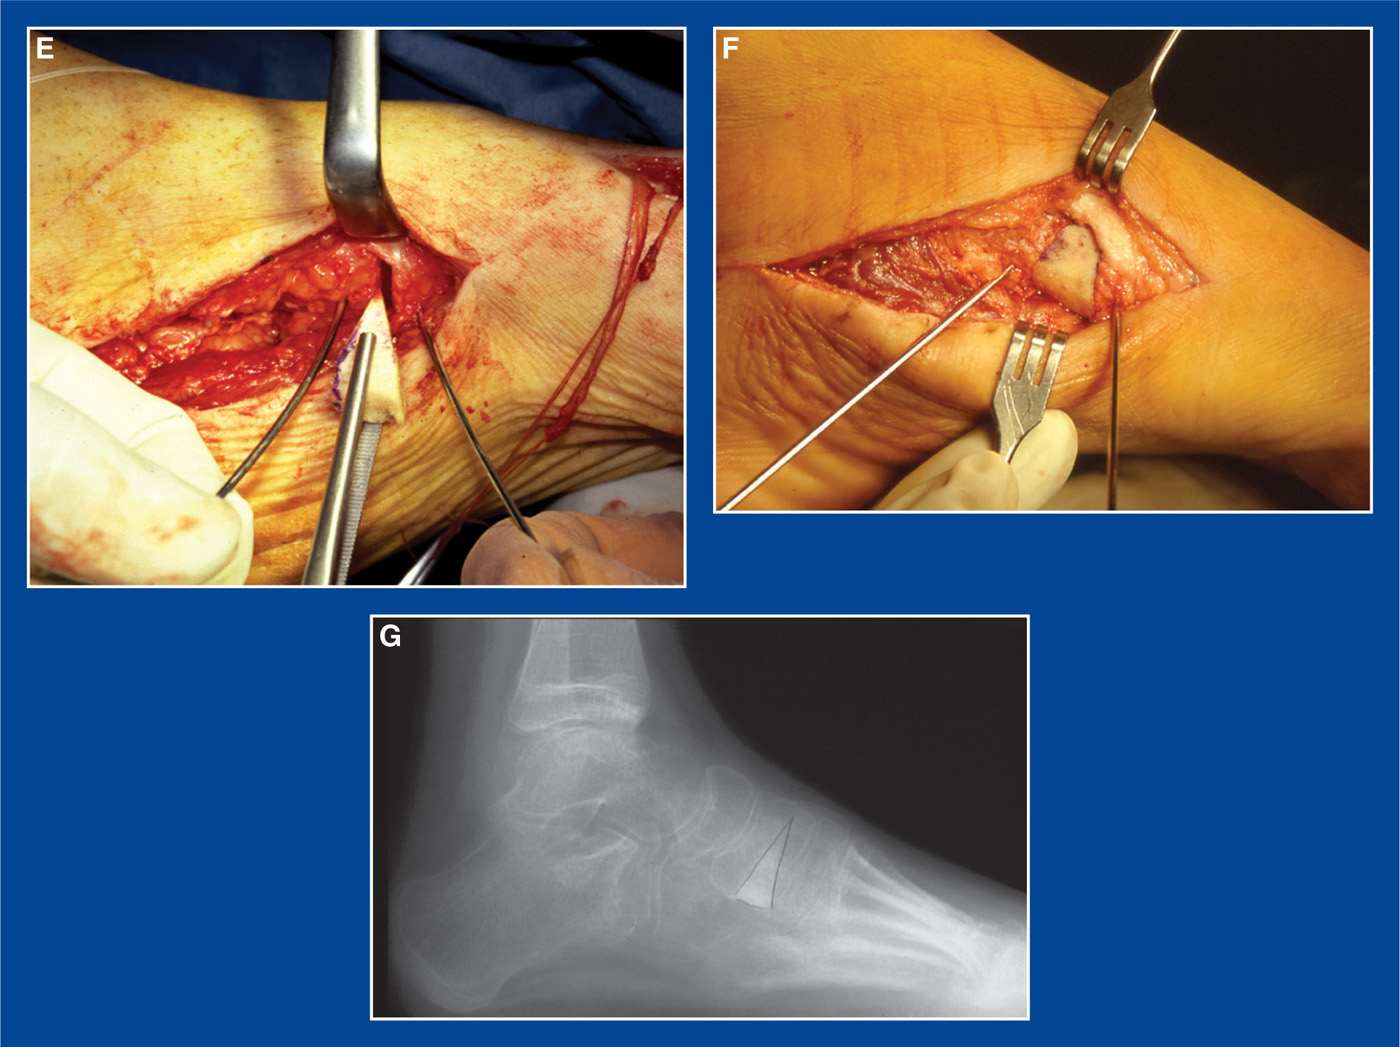
Figure 8-27. A. Standing lateral x-ray of a cavovarus foot deformity. The foot-CORA for the cavus deformity is in the medial cuneiform (see Assessment Principle #18, Figure 3-22, Chapter 3). B. An osteotome is used to site the osteotomy, using mini-fluoroscopic guidance. C. Fluoroscopic image shows the starting point for the osteotomy half way between the distal and proximal ends of the bone, which is usually at the proximal edge of the anterior tibialis tendon as it crosses the medial surface of the medial cuneiform. The osteotomy is angled slightly distal-lateral to end adjacent to the 2nd MT–middle cuneiform joint. D. Fluoroscopic image shows the completed osteotomy in the ideal position. It was performed with a sagittal saw. E. Steinmann pin joy sticks, that were inserted from plantar to dorsal, are used to open the osteotomy on the plantar surface. A freeze-dried tricortical iliac crest allograft is fashioned into a triangle. F. The graft is inserted and impacted into the osteotomy with the base plantar and the apex dorsal. G. The graft is usually inherently stable and, therefore, does not require internal fixation. There will be slight abduction through the osteotomy despite attempts to place the base of the graft directly plantar, which is actually a desirable effect in a cavovarus foot deformity (see Management Principle #19, Figure 4-9A, Chapter 4).

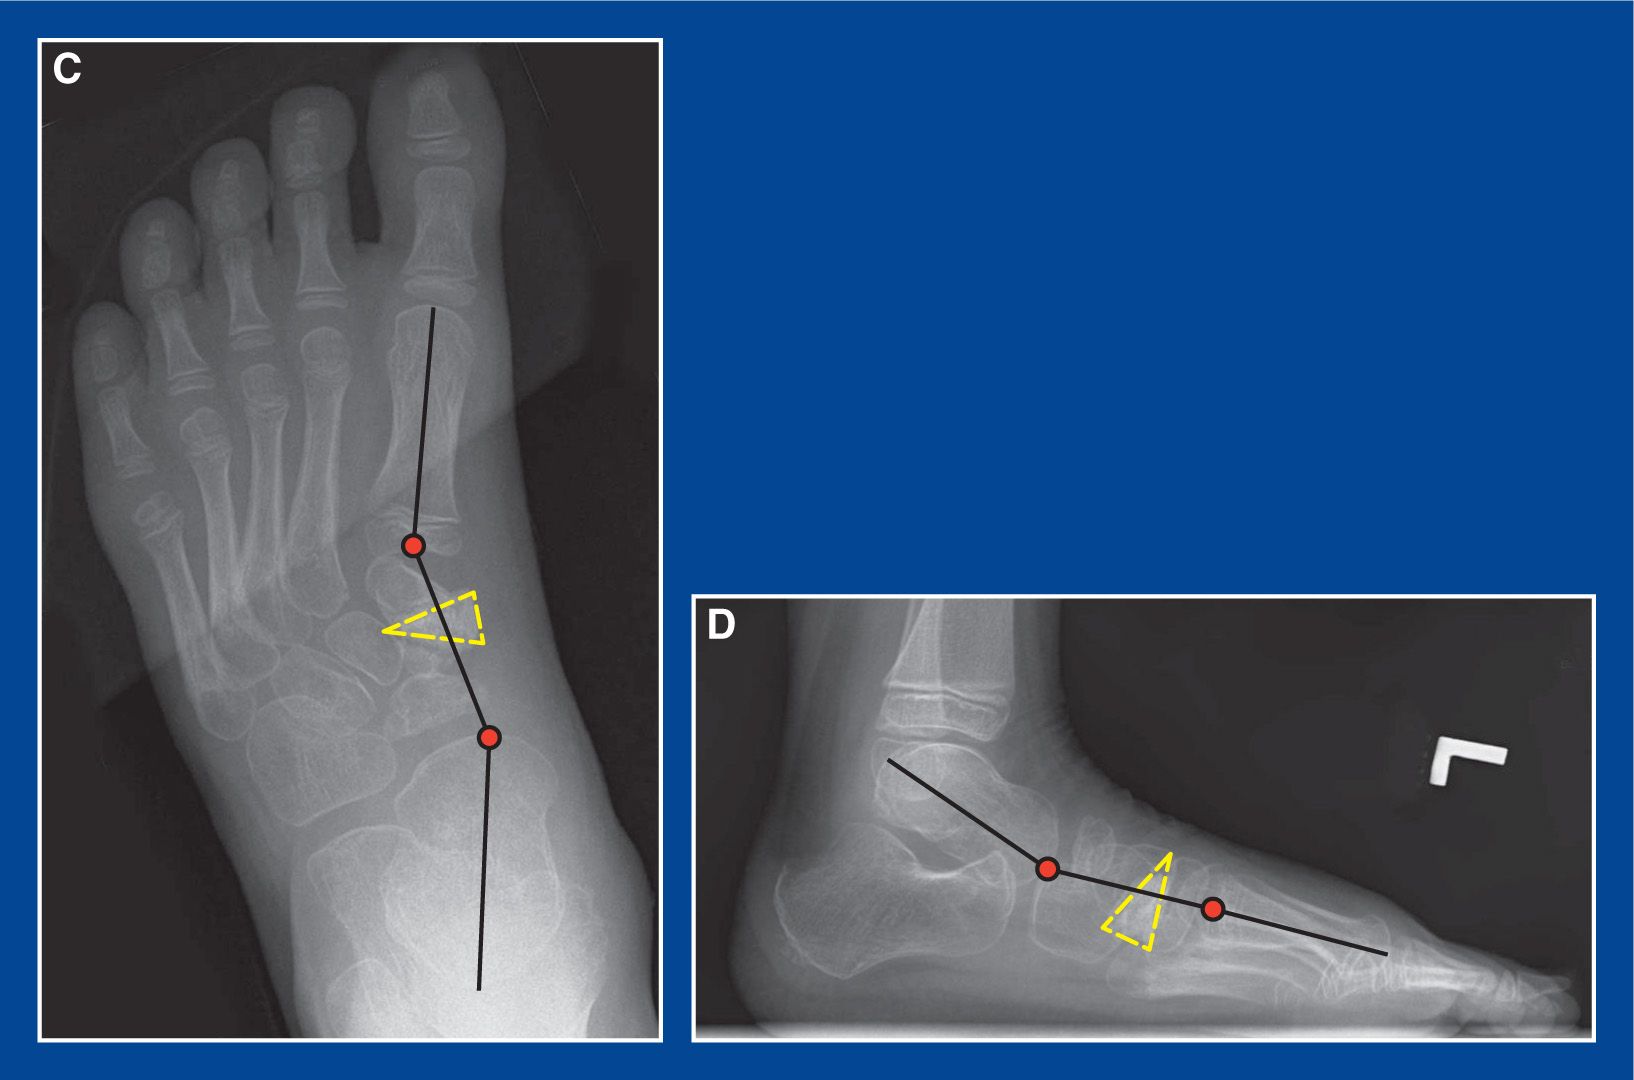
Figure 8-28. Skewfoot in a 7-year-old girl with pain along the medial side of the 1st MT and hallux when wearing shoes. A and B. Standing AP and lateral x-rays show skew deformities in both planes, but without severe hindfoot equinus (this is typical for a skewfoot in a young child [see Skewfoot, Chapter 5]). There are adductus and cavus deformities at the midfoot-forefoot-CORAs based on the tarsal–1st MT angles (see Assessment Principle #18, Figure 3-23, Chapter 3). C and D. Following an MC-DF/abduction-OWO (the base of the wedge was aligned plantar-medially [yellow dashed triangles] to correct both deformities concurrently (see Management principle #19, Figure 4-9A’ Chapter 4), both deformities were improved and her symptoms were relieved. By stretching the plantar–medial soft tissues, there was incidental improvement in eversion of the subtalar joint. This is manifest by improved alignment of the navicular on the head of the talus (note talotarsal angles) in both planes.
m. The graft will, in most cases, be inherently stable and not require fixation.
n. If the graft is not inherently stable, insert a 0.062″ smooth Steinmann pin retrograde across the site from the dorsal forefoot. Add supplemental wire fixation if necessary. Bend the wire(s) at the insert site(s) and leave them long for easy retrieval in clinic.
o. Approximate the skin edges with interrupted subcutaneous 3-0 absorbable sutures and a running subcuticular 4-0 absorbable suture
p. Apply a short-leg non–weight-bearing cast
q. Six weeks later, obtain simulated standing AP and lateral x-rays of the foot out of the cast, remove the wire(s) if present, and replace the cast with a short-leg walking cast that will be worn for 2 weeks. If a CLO is performed concurrently for a skewfoot in an older child, maintain non–weight-bearing in the final cast.
3. Pitfalls
a. Failure to identify the ideal medial starting point for the osteotomy. Mini-fluoroscopy will provide the desired assistance.
b. Failure to cut the lateral cortex adjacent to the 2nd MT–middle cuneiform joint. Though not a disaster if the cut is not located there, the recommended position for the osteotomy will improve the mobility of the fragments and the ability to achieve the desired outcome.
c. Failure to cut the dorsal cortex. It is hidden under the anterior tibialis and much more dorsal than expected. It must be cut or the fragments will resist repositioning.
4. Complications
a. Creating the osteotomy too far distal or proximal, resulting in the smaller fragment being unstable and/or subject to dysvascularity
i. Avoid by using mini-fluoroscopy for guidance
b. Extrusion of the graft
i. Avoid by using internal fixation if there is any concern about the stability of the graft in the osteotomy
Medial Cuneiform (Plantar Flexion) Plantar-Based Closing Wedge Osteotomy (MC-PF-CWO)
(see Management Principle #19, Figure 4-9B, Chapter 4)
1. Indications
a. Structural supination deformity of the forefoot with a normal rectangle-shaped medial cuneiform and no adduction deformity of the midfoot (including absence of metatarsus primus varus) as seen in most
i. flatfoot deformities (see Chapter 5) and
ii. dorsal bunion deformities (see Chapter 5)
2. Technique (Figure 8-29)
a. See Medial cuneiform osteotomy “generic,” Technique a–f
g. Complete the structural correction of the hindfoot deformity in a flatfoot using a CLO (see this chapter) and lengthen the gastrocnemius (see Chapter 7) or the tendo-Achilles (see Chapter 7), based on the results of the Silfverskiold test (see Assessment Principle #12, Chapter 3)
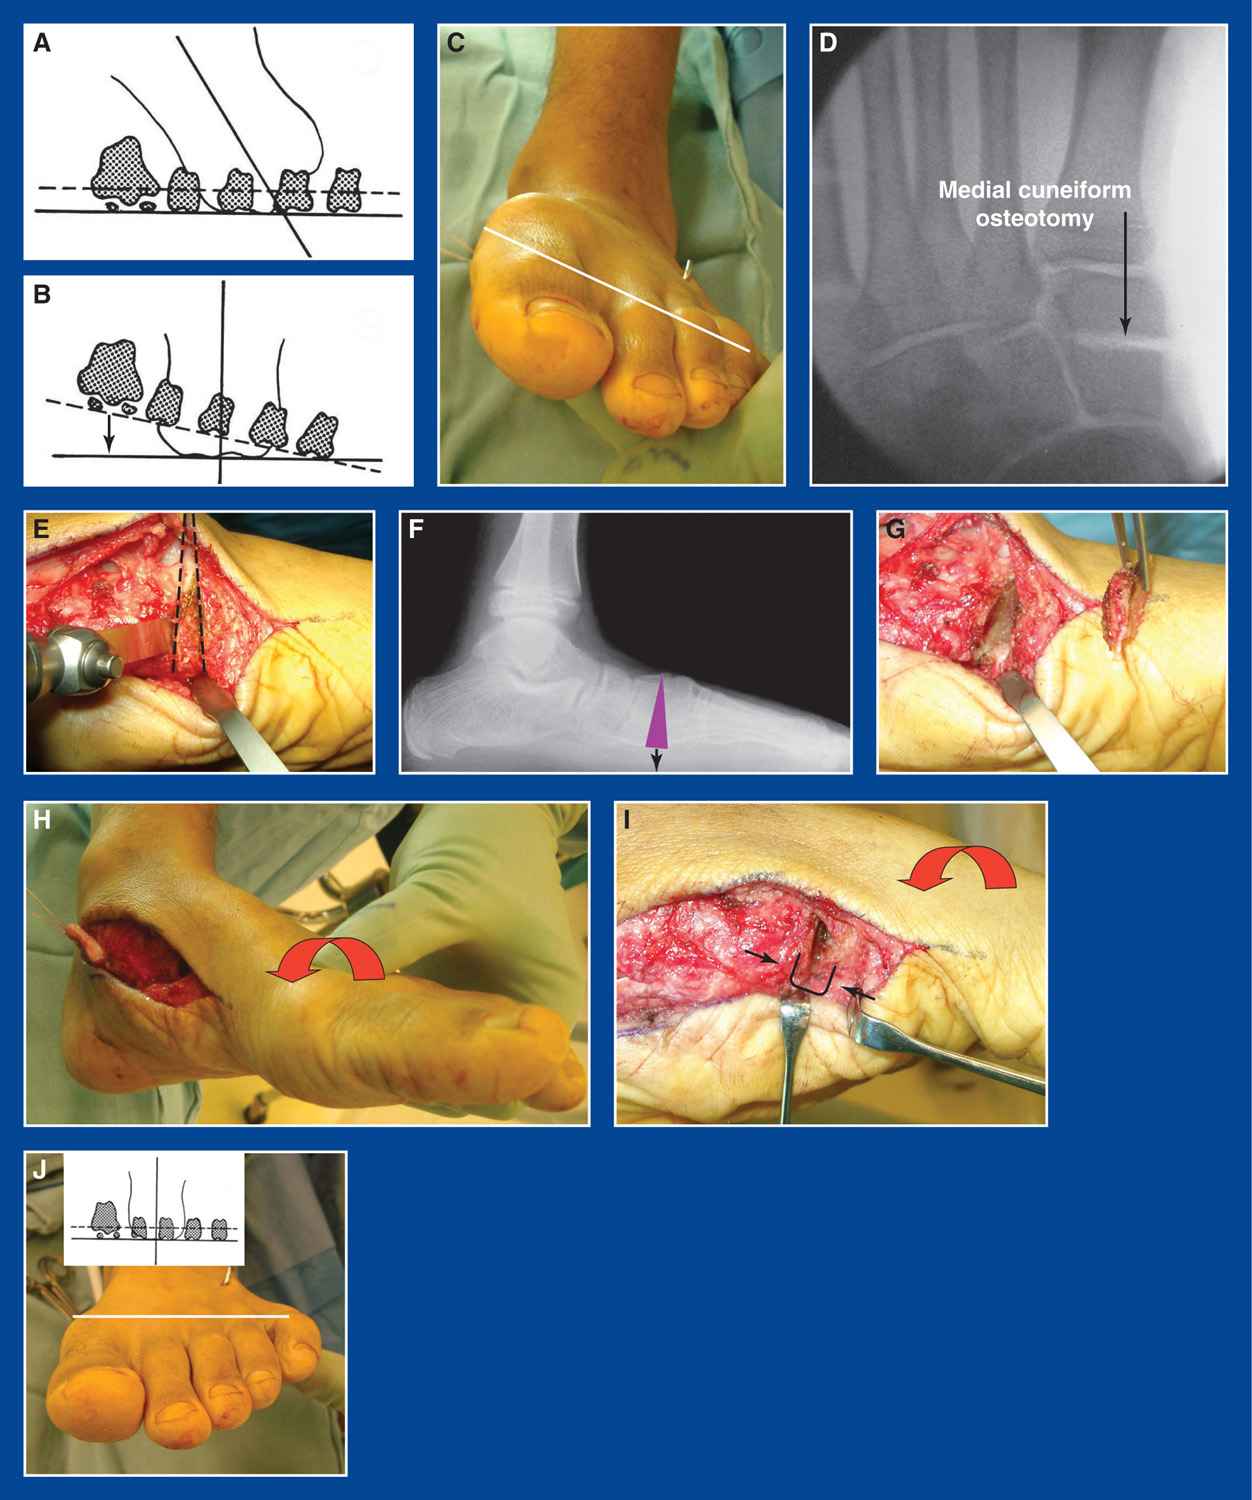
Figure 8-29. A. Artist sketch of a flatfoot with supination deformity of the forefoot in relation to the valgus deformity of the hindfoot (see Basic Principle #5, Chapter 2). B. This is better appreciated after the hindfoot valgus has been corrected to neutral, as after a CLO. The black arrow indicates the need to pronate the forefoot (plantar flex the 1st ray) to establish a balanced tripod (see Basic Principle #5, Chapter 2; Assessment Principle #8, Figure 3-2, Chapter 3; and Management Principle #23-3, Chapter 4). C. A clinical photo of a flatfoot taken intraoperatively after a CLO reveals rigid, structural supination deformity of the forefoot. The white line indicates the plane of the MT heads. The CLO did not create the forefoot supination, it exposed it. D. The MCO in its ideal position is identified on the mini-fluoroscopic image. E. A plantar-based closing wedge osteotomy of the medial cuneiform is indicated by the dashed lines. F. X-ray representation of the osteotomy. G. The wedge has been removed from the medial cuneiform. H. The forefoot is pronated, which plantar flexes the 1st ray and brings the osteotomy surfaces into apposition. I. A wire staple fabricated from a 0.062″ smooth Steinmann pin is inserted from plantar to dorsal across the osteotomy while the forefoot is held in forced pronation. J. The forefoot and hindfoot deformities are now corrected. (From Mosca VS. Calcaneal lengthening osteotomy for valgus deformity of the hindfoot. In: Skaggs DL and Tolo VT, editors. Master Techniques in Orthopaedic Surgery: Pediatrics. Philadelphia: Lippincott Williams & Wilkins, 2008; 263–276.)
h. Prepare the tendon transfers for a dorsal bunion reconstruction, but do not set their tensions until the MCO is completed
i. Remove a plantar-based wedge of bone from the cut surfaces of both fragments of the previously osteotomized medial cuneiform, or simply remove a plantar-based wedge of bone initially
j. Plantar flex the 1st ray to bring the cut surfaces into apposition
k. Keep taking small wedges of bone until the supination deformity (dorsiflexion of the 1st ray) is fully corrected. Often, the total length of resected bone from the plantar cortex is 5 to 8 mm
l. The osteotomy is closed and internally fixed with a 0.062″ smooth wire staple (fabricated from a Steinmann pin intraoperatively) that is inserted from plantar to dorsal.
m. Approximate the skin edges with interrupted subcutaneous 3-0 absorbable sutures and a running subcuticular 4-0 absorbable suture
n. Apply a short-leg non–weight-bearing cast
o. Six weeks later, obtain simulated standing AP and lateral x-rays of the foot out of the cast, and replace the cast with a short-leg walking cast that will be worn for 2 weeks. If a CLO is performed concurrently, maintain non–weight-bearing in the final cast.
3. Pitfalls
a. Failure to identify the ideal medial starting point for the osteotomy. Mini-fluoroscopy will provide the desired assistance.
b. Failure to cut the lateral cortex adjacent to the 2nd MT–middle cuneiform joint. Though not a disaster if the cut is not located there, the recommended position for the osteotomy will improve the mobility of the fragments and the ability to achieve the desired outcome.
c. Failure to cut the dorsal cortex. It is hidden under the anterior tibialis and much more dorsal than expected. It must be cut or the fragments will resist repositioning.
4. Complications
a. Creating the osteotomy too far distal or proximal, resulting in the smaller fragment being unstable and/or subject to dysvascularity
i. Avoid by using mini-fluoroscopy for guidance.
b. Loss of fixation
i. Avoid by using two staples if the first one has tenuous purchase.
Medial Cuneiform (Plantar Flexion) Dorsal-Based Opening Wedge Osteotomy (MC-PF-OWO)
(see Management Principle #19, Figure 4-9C, Chapter 4)
1. Indications
a. Structural supination deformity of the forefoot with a trapezoid-shaped medial cuneiform and mild-to-severe adduction deformity of the midfoot as seen in
i. some flatfoot deformities
ii. some skewfoot deformities
iii. some dorsal bunion deformities
2. Technique
a. See Medial cuneiform osteotomy “generic,” Technique a–f
g. Complete the structural correction of the hindfoot deformity in a flatfoot or skewfoot using a CLO (see this chapter) and lengthen the gastrocnemius (see Chapter 7) or the tendo-Achilles (see Chapter 7), based on the results of the Silfverskiold test (see Assessment Principle #12, Chapter 3)
h. Prepare the tendon transfers for a dorsal bunion reconstruction, but do not set their tensions until the MCO is completed
i. Insert 0.062″ smooth Steinmann pin joy sticks from dorsal to plantar in the distal and proximal bone fragments of the medial cuneiform
j. Plantar flex the 1st ray with the joy stick in the distal fragment and open the osteotomy to determine the size of the required bone graft
k. Fashion a tricortical iliac crest allograft or autograft into a triangle of the appropriate size and shape. Often, the length of the base of the wedge is 5 to 8 mm
l. Insert and impact the wedge of bone into the osteotomy with its base dorsal and apex plantar. Adjust the position of the base of the wedge more or less medially depending on the amount of adductus deformity to be corrected concurrently.
m. This is a challenging osteotomy because the anterior tibialis acts like a dorsal tension band that resists dorsal distraction of the bone fragments. Maintenance of contact between the plantar cortices of the bone fragments is also difficult, but very important.
n. Plantar flex the 1st ray to keep the plantar cortices of the 2 medial cuneiform fragments in contact while inserting a 0.062″ smooth Steinmann pin retrograde across the site from the dorsal forefoot. Add supplemental wire fixation if necessary. Bend the wire(s) at the insert site(s) and leave long for easy retrieval in clinic.
o. Approximate the skin edges with interrupted subcutaneous 3-0 absorbable sutures and a running subcuticular 4-0 absorbable suture
p. Apply a short-leg non–weight-bearing cast
q. Six weeks later, obtain simulated standing AP and lateral x-rays of the foot out of the cast, remove the wire(s), and replace the cast with another short-leg non–weight-bearing cast that will be worn for 2 weeks
3. Pitfalls
a. Failure to identify the ideal medial starting point for the osteotomy. Mini-fluoroscopy will provide the desired assistance.
b. Failure to cut the lateral cortex adjacent to the 2nd MT–middle cuneiform joint. Though not a disaster if the cut is not located there, the recommended position for the osteotomy will improve the mobility of the fragments and the ability to achieve the desired outcome.
c. Failure to cut the entire dorsal cortex. It is hidden under the anterior tibialis and much more dorsal than expected. It must be cut or the fragments will resist repositioning.
d. Incomplete deformity correction, because of failure to maintain contact between the plantar cortices of the 2 medial cuneiform fragments at the time of wire fixation
4. Complications
a. Creating the osteotomy too far distal or proximal, resulting in the smaller fragment being unstable and/or subject to dysvascularity
i. Avoid by using mini-fluoroscopy for guidance
b. Loss of fixation.
i. Avoid by using one or two well-positioned and stable smooth Steinmann pins
Medial Cuneiform (Dorsiflexion) Dorsal-Based Closing Wedge Osteotomy (MC-DF-CWO)
(see Management Principle #19, Figure 4-9D, Chapter 4)
1. Indications
a. Pronation/abduction deformity of the forefoot (extremely rare, and probably only seen as an iatrogenic deformity)
2. Technique
a. See Medial cuneiform osteotomy “generic,” Technique a–f
g. Complete other structural deformity corrections
h. Remove a dorsally-based wedge of bone from the cut surfaces of both fragments
i. Dorsiflex the 1st ray to bring the cut surfaces into apposition
j. Keep taking small wedges of bone until the pronation deformity (plantar flexion of the 1st ray) is fully corrected. The total length of resected bone from the dorsal cortex may be 5 to 8 mm
k. The osteotomy is closed and internally fixed with a 0.062″ smooth wire staple (fabricated from a Steinmann pin intraoperatively) that is inserted from dorsal to plantar
l. Approximate the skin edges with interrupted subcutaneous 3-0 absorbable sutures and a running subcuticular 4-0 absorbable suture
m. Apply a short-leg non–weight-bearing cast
n. Six weeks later, obtain simulated standing AP and lateral x-rays of the foot out of the cast, and replace the cast with a short-leg walking cast that will be worn for 2 weeks
3. Pitfalls
a. Failure to identify the ideal medial starting point for the osteotomy. Mini-fluoroscopy will provide the desired assistance.
b. Failure to cut the lateral cortex adjacent to the 2nd MT–middle cuneiform joint. Though not a disaster if the cut is not located there, the recommended position for the osteotomy will improve the mobility of the fragments and the ability to achieve the desired outcome.
4. Complications
a. Creating the osteotomy too far distal or proximal, resulting in the smaller fragment being unstable and/or subject to dysvascularity
i. Avoid by using mini-fluoroscopy for guidance
b. Loss of fixation
i. Avoid by using two staples if the first one has tenuous purchase
Cuboid Closing Wedge Osteotomy (CCWO)
1. Indications
a. Lateral column shortening for midfoot adduction deformity
i. often performed in combination with a MC-Medial-OWO (see Figure 8-25 in this chapter, and Assessment Principle #18, Figure 3-21 in Chapter 3) to treat
• metatarsus adductus—as an isolated idiopathic deformity (see Chapter 5) or as a component of recurrent or persistent clubfoot deformity (see Chapter 5)
• skewfoot (see Chapter 5)
ii. This osteotomy is too far distal to have an effect on TN joint alignment (see Management Principle #18, Figure 4-7, Chapter 4)
2. Technique (Figure 8-30)
a. Make a longitudinal incision along the lateral border of the midfoot centered on the cuboid
b. Isolate and retract, or avoid, the sural nerve
c. Release the PB from its tendon sheath and retract it plantarward
d. Expose the cuboid extraperiosteally on its dorsal, lateral, and plantar surfaces
e. Insert two 25G hypodermic needles in the cuboid in the desired locations of the osteotomy cuts that will result in removal of a wedge of bone large enough to correct the adduction deformity of the lateral border of the foot. The proximal needle should be perpendicular to the axis of the calcaneus and the distal needle should be perpendicular to the axis is of the 5th MT. Use mini-fluoroscopy for guidance.
f. Resect the wedge of bone with a small sagittal saw by cutting between and immediately adjacent to the needles
g. Preserve the bone for insertion in the medial cuneiform
h. Perform a medial cuneiform osteotomy “generic” technique a–f and MC-medial-OWO technique g, h, j, and k (this chapter)
i. Abduct the forefoot on the hindfoot to approximate the cut surfaces of the cuboid. Remove more bone, if necessary, to align the axis of the forefoot on the hindfoot. Use mini-fluoroscopy for guidance.
j. Insert a staple made from a 0.062″ smooth Steinmann pin across the osteotomy while holding the forefoot firmly abducted on the hindfoot. Alternatively, insert a 0.062″ smooth Steinmann pin retrograde across the resection site of the cuboid from the dorsolateral aspect of the foot. Bend the wire at the insertion site and cut it long for ease of removal in clinic.
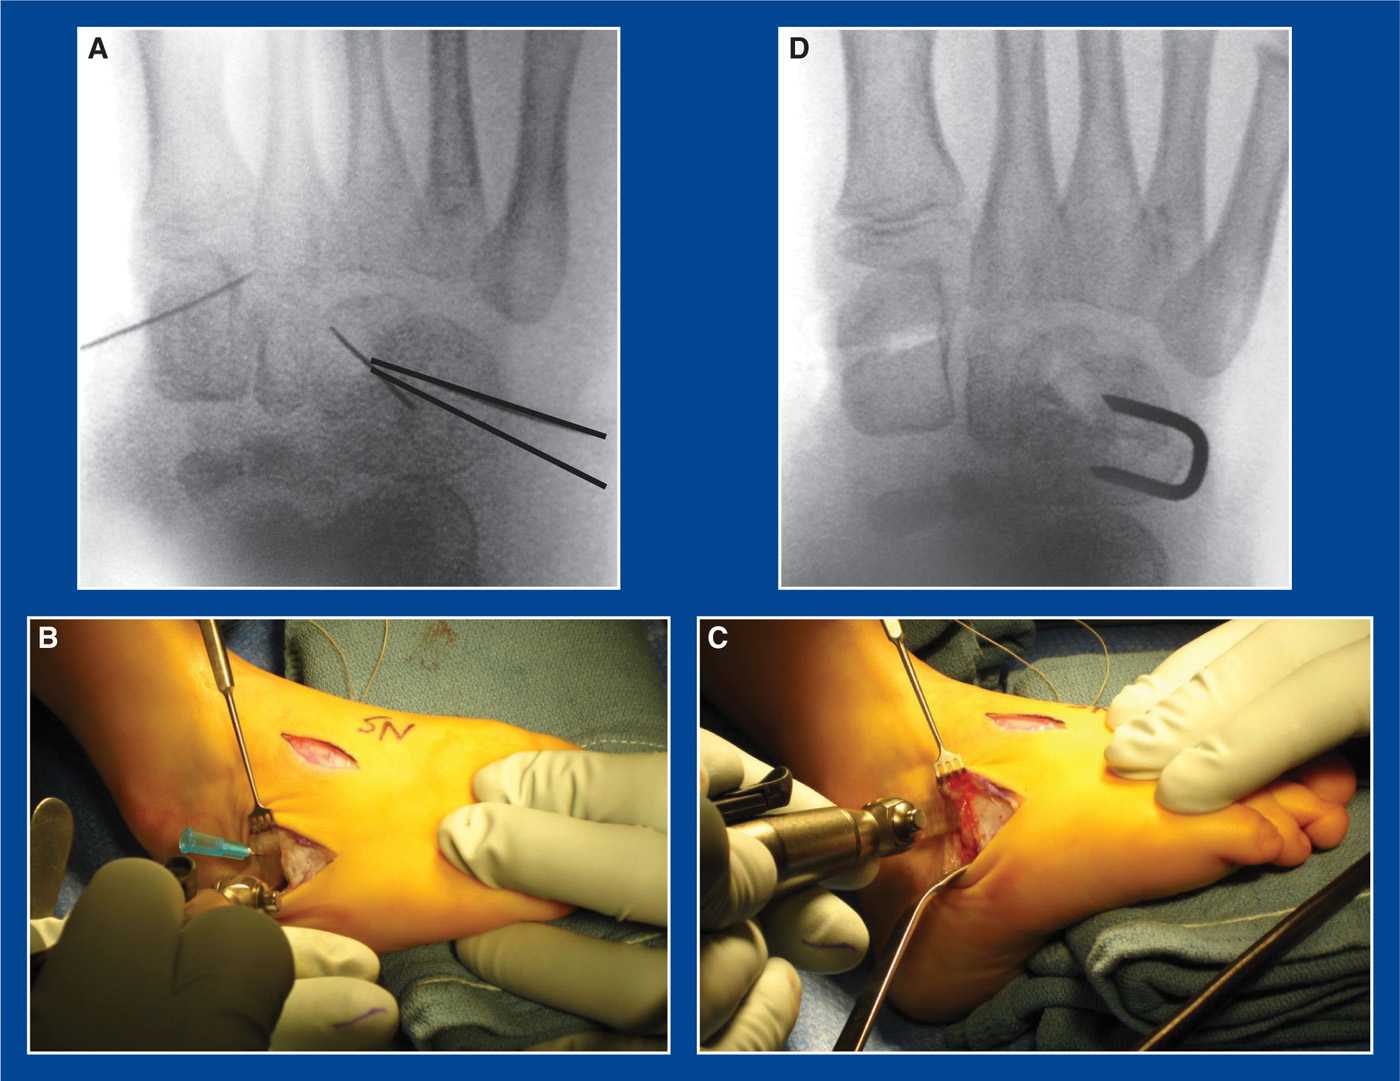
Figure 8-30. A. AP intraoperative mini-fluoroscopy image showing a 25G needle marking the site of the MCO (left) and another marking the lateral cuneiform (central) through which a drill hole will be made for a anterior tibialis tendon transfer. The two thick black lines (right) represent the locations for the 25G needles that are inserted in the cuboid to mark the location of the closing wedge osteotomy. B. The distal osteotomy is created with a microsagittal saw. C. The proximal osteotomy is created with the microsagittal saw. The lateral base length of the wedge is at least 4 to 5 mm. D. With the forefoot abducted on the hindfoot, the wedge of bone removed from the cuboid was inserted into the MCO. A wire staple (made from a 0.062″ smooth Steinmann pin) was inserted across the osteotomy site in the cuboid for internal fixation.
k. Approximate the skin edges with interrupted subcutaneous 3-0 absorbable sutures and a running subcuticular 4-0 absorbable suture
l. Apply a short-leg non–weight-bearing cast
m. Six weeks later, obtain simulated standing AP and lateral x-rays of the foot out of the cast, remove the wire(s), and replace the cast with a short-leg walking cast that will be worn for 2 weeks
3. Pitfalls
a. Inadequate resection of bone resulting in
i. persistence of deformity
ii. inadequate graft size/strength for correction of the medial cuneiform deformity
4. Complications
a. Injury to the sural nerve
i. Avoid by isolating and protecting it
Calcaneocuboid Joint Resection/Arthrodesis
(the “original” Evans procedure; see Calcaneal Lengthening Osteotomy Technique Background, this chapter)
1. Indications
a. Lateral column shortening for resistant subtalar joint inversion in a recurrent, persistent, or neglected clubfoot (see Chapter 5), typically in a child with arthrogryposis who is at least 8 years old
2. Technique (Figure 8-31)
a. Perform a D-PMR (see Chapter 7). The soft tissues along the plantar–medial midfoot/hindfoot, including the TN joint capsule, must be released in an effort to align the navicular with the head of the talus.
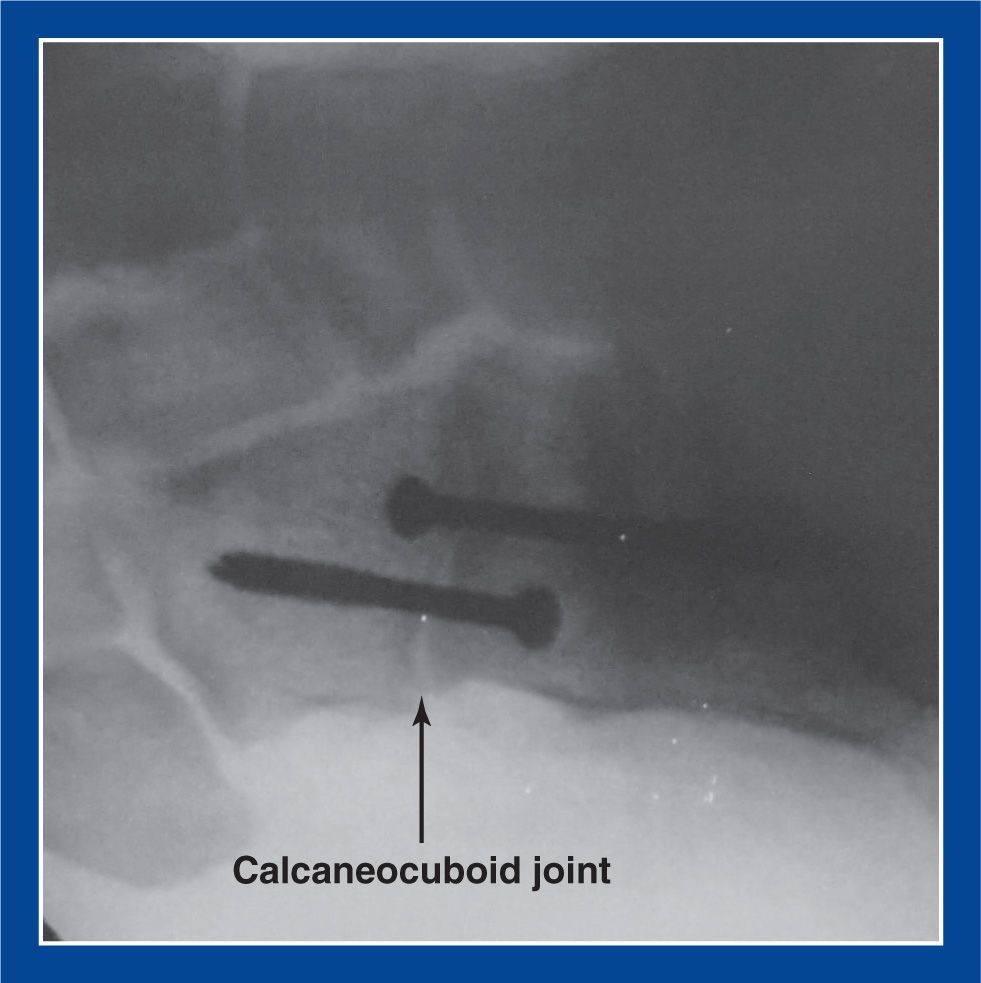
Figure 8-31. The articular surfaces of the calcaneus and cuboid were resected at the CC joint. Crossed screws were used for internal fixation in this teenager.
b. If the subtalar joint does not evert completely and the navicular remains medially positioned on the head of the talus in a child who is at least 8 years old, a calcaneocuboid joint resection/arthrodesis is indicated to pull the navicular laterally (see Management Principle #18, Figure 4-7, Chapter 4).
c. Make a longitudinal incision along the lateral border of the midfoot centered on the calcaneocuboid joint
d. Isolate and retract, or avoid, the sural nerve
e. Release the PB from its tendon sheath and retract it plantarward
f. Release/resect the calcaneocuboid joint capsule
g. Place a Freer or Joker elevator over the dorsum of the calcaneocuboid joint
h. Place a Joker elevator or narrow Crego retractor plantar to the calcaneocuboid joint
i. Using a sagittal saw, cut the calcaneus perpendicular to the longitudinal axis of the bone starting 3 to 5 mm proximal to the distal articular surface of the bone
j. Using a sagittal saw, cut the cuboid perpendicular to the longitudinal axis of the 5th MT starting 3 to 5 mm distal to the proximal articular surface of the bone
k. Abduct the forefoot/midfoot on the hindfoot to approximate the cut surfaces of the bones and to pull the navicular laterally to align it with the talar head. Remove more bone from either or both of the bones, if necessary, to align the axis of the forefoot with that of the hindfoot. Use mini-fluoroscopy for guidance.
l. Internally fixate the arthrodesis using one of several methods:
i. Insert one or two 0.062″ smooth Steinmann pin(s) retrograde across the fusion site from the dorsolateral aspect of the forefoot. Bend the wire(s) at the insertion site(s) and cut them long for ease of removal in clinic.
ii. Insert one or two wire staples made from a 0.062″ smooth Steinmann pin across the fusion site from lateral to medial
iii. Insert crossed screws
m. Approximate the skin edges with interrupted subcutaneous 3-0 absorbable sutures and a running subcuticular 4-0 absorbable suture
n. Apply a well-padded short-leg non–weight-bearing cast with the ankle at neutral, the subtalar joint everted, and the midfoot abducted
o. At 6 weeks, remove the cast (and exposed pin(s) if used for fixation) in the clinic and apply a short-leg walking cast that will be worn for an additional 3 to 6 weeks
3. Pitfalls
a. Inadequate resection of the bones, resulting in persistence of the deformity
b. Inadequate D-PMR
4. Complications
a. Injury to the sural nerve
i. Avoid by isolating and protecting it
b. Excessive resection of the bones, thereby creating a flatfoot or creating a large gap that leads to nonunion
i. Avoid by removing a little bone at a time
Lichtblau Anterior Calcaneus Resection
1. Indications
a. Lateral column shortening for resistant subtalar joint inversion in a recurrent, persistent, or neglected clubfoot (see Chapter 5), typically in a child with arthrogryposis who is between 3 and 8 years of age
2. Technique (Figure 8-32)
a. Perform a D-PMR (see Chapter 7). The soft tissues along the plantar–medial midfoot/hindfoot, including the TN joint capsule, must be released in an effort to align the navicular with the head of the talus.
b. If the subtalar joint does not evert completely and the navicular remains medially positioned on the head of the talus in a child between the ages of 3 and 8 years, a Lichtblau procedure is indicated to pull the navicular laterally (see Management Principle #18, Figure 4-7, Chapter 4).
c. Make a longitudinal incision along the lateral border of the midfoot centered on the anterior calcaneus
d. Isolate and retract, or avoid, the sural nerve
e. Release the PB from its tendon sheath and retract it plantarward
f. Release the calcaneocuboid joint capsule
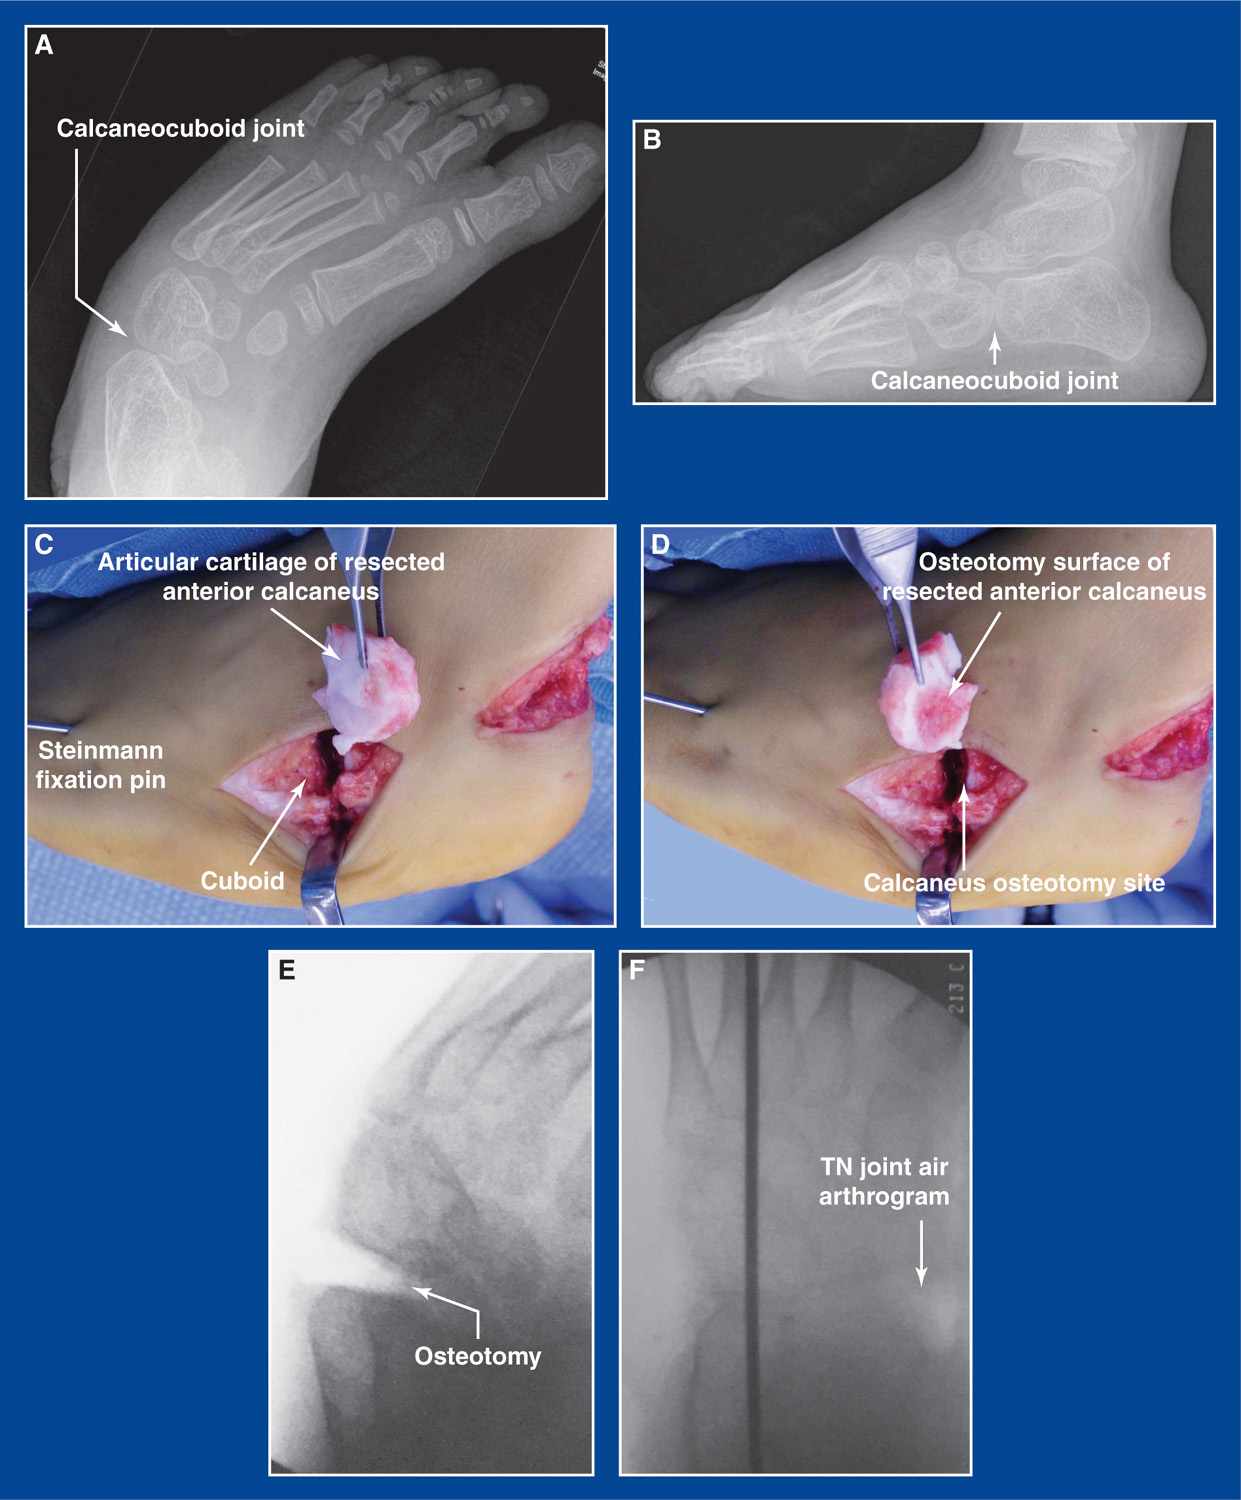
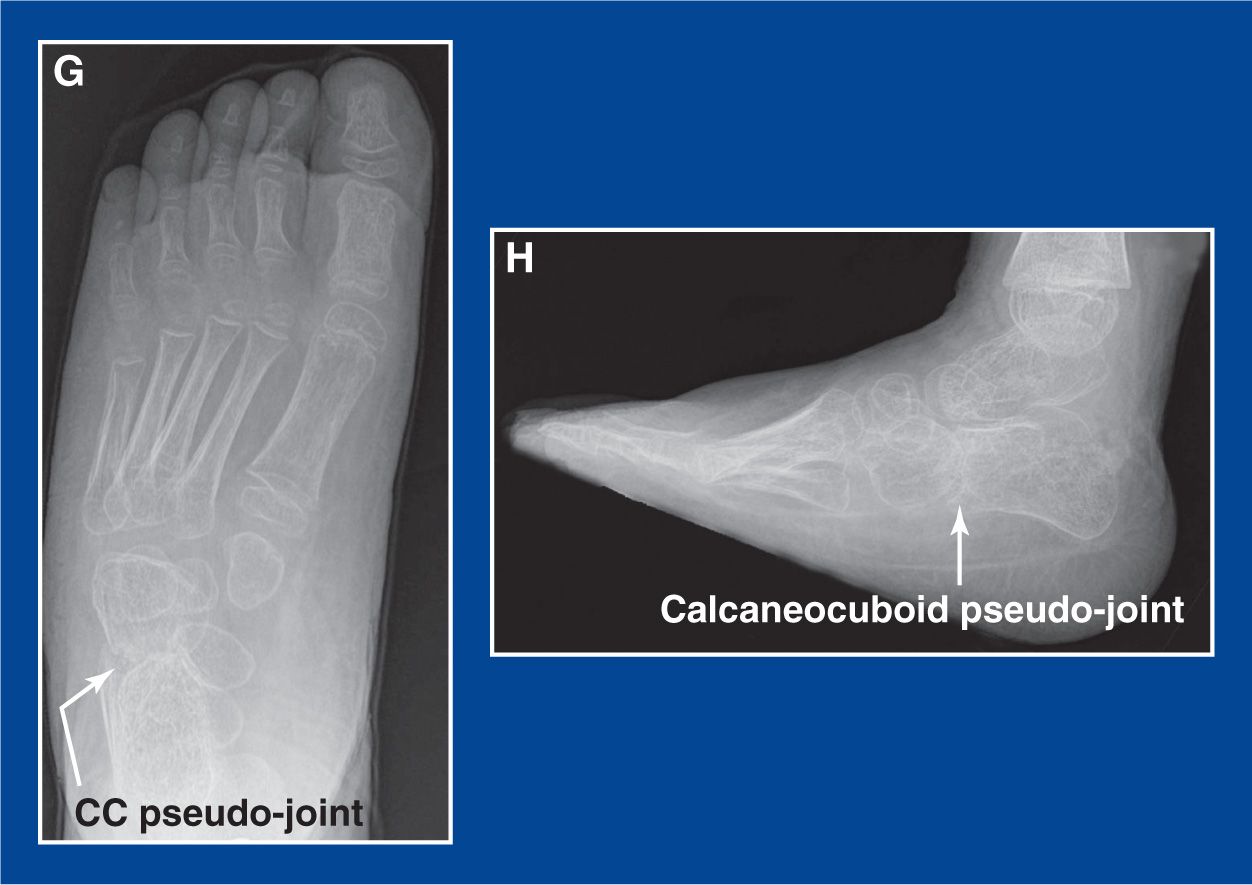
Figure 8-32. A. Simulated standing AP x-ray of a severe, recurrent clubfoot deformity in a 6-year-old child with distal arthrogryposis. Varus malorientation/subluxation of the calcaneocuboid joint can be seen. B. Simulated standing lateral x-ray of the same foot. C. The anterior calcaneus has been resected. The articular cartilage surface of the fragment is shown. The longitudinal internal fixation wire has been inserted up to, but not yet across, the resection site. D. The osteotomy surface of the fragment is shown. E. An intraoperative mini-fluoroscopy image shows the osteotomy site after the fragment was removed. F. The Steinmann pin has been advanced across the resection site. An air arthrogram was created at the TN joint following the capsular release. G. AP x-ray of the foot 1 year later shows improved alignment and a pseudo-calcaneo-cuboid joint. H. The lateral x-ray from that clinic visit shows the pseudo-joint even better than the AP image does.
g. Place a Freer or Joker elevator over the dorsum of the anterior calcaneus proximal to the anterior facet
h. Place a Joker elevator or narrow Crego retractor plantar to the anterior calcaneus
i. Using a sagittal saw, cut the calcaneus perpendicular to the longitudinal axis of the bone starting 5 to 8 mm proximal to the distal articular surface of the bone
j. Abduct the forefoot/midfoot on the hindfoot to approximate the articular cartilage surface of the cuboid with the cut surface of the calcaneus and to pull the navicular laterally to align it with the talar head. Remove more bone from the calcaneus, if necessary, to align the axis of the forefoot with that of the hindfoot. Use mini-fluoroscopy for guidance
k. Insert one or two 0.062″ smooth Steinmann pin(s) retrograde across the resection site from the dorsolateral aspect of the forefoot. Bend the wire(s) at the insertion site(s) and cut them long for ease of removal in clinic
l. Approximate the skin edges with interrupted subcutaneous 3-0 absorbable sutures and a running subcuticular 4-0 absorbable suture
m. Apply a well-padded long-leg cast (to ensure non–weight-bearing in these young children) with the ankle at neutral, the subtalar joint everted, and the midfoot abducted
n. At 6 weeks, remove the cast and pin(s) in the clinic and apply a short-leg walking cast that will be worn for an additional 2 weeks
3. Pitfalls
a. Inadequate resection of the distal calcaneus resulting in persistence of the deformity
b. Inadequate D-PMR
4. Complications
a. Injury to the sural nerve
i. Avoid by isolating and protecting it
b. Excessive resection of the distal calcaneus, thereby creating a flatfoot or creating a large gap
i. Avoid by removing a little bone at a time
Anterior Calcaneus Closing Wedge Osteotomy
(Reverse Calcaneal Lengthening Osteotomy)
1. Indications
a. Lateral column shortening for resistant subtalar joint inversion in a recurrent, persistent, or neglected idiopathic clubfoot (see Chapter 5), typically in a 3- to 8-year-old child
2. Technique (Figure 8-33)
a. Perform a D-PMR (see Chapter 7). The soft tissues along the plantar–medial midfoot/hindfoot, including the TN joint capsule, must be released in an effort to align the navicular with the head of the talus.
b. If the subtalar joint does not evert completely and the navicular remains medially positioned on the head of the talus in a child between the ages of 3 and 8 years, an anterior calcaneus closing wedge osteotomy is indicated to pull the navicular laterally (see Management Principle #18, Figure 4-7, Chapter 4).
c. Make a longitudinal incision along the lateral border of the hindfoot centered on the anterior calcaneus
d. Isolate and retract, or avoid, the sural nerve
e. Release the PL and the PB from their tendon sheaths and retract them plantarward
f. Avoid exposure of, or injury to, the capsule of the calcaneocuboid joint.
g. Elevate the soft tissues from the sinus tarsi
h. Insert a Freer elevator into the sinus tarsi perpendicular to the lateral cortex of the calcaneus at the level of the “isthmus,” the narrowest dorsal–plantar site of this bone that is located immediately anterior to the posterior facet and posterior to the calcaneal beak (see Calcaneal Lengthening Osteotomy, this chapter). Rotate the Freer anteriorly until it falls into the interval between the anterior and middle facets of the subtalar joint
i. Place a Joker elevator plantar to the dorsally placed Freer elevator
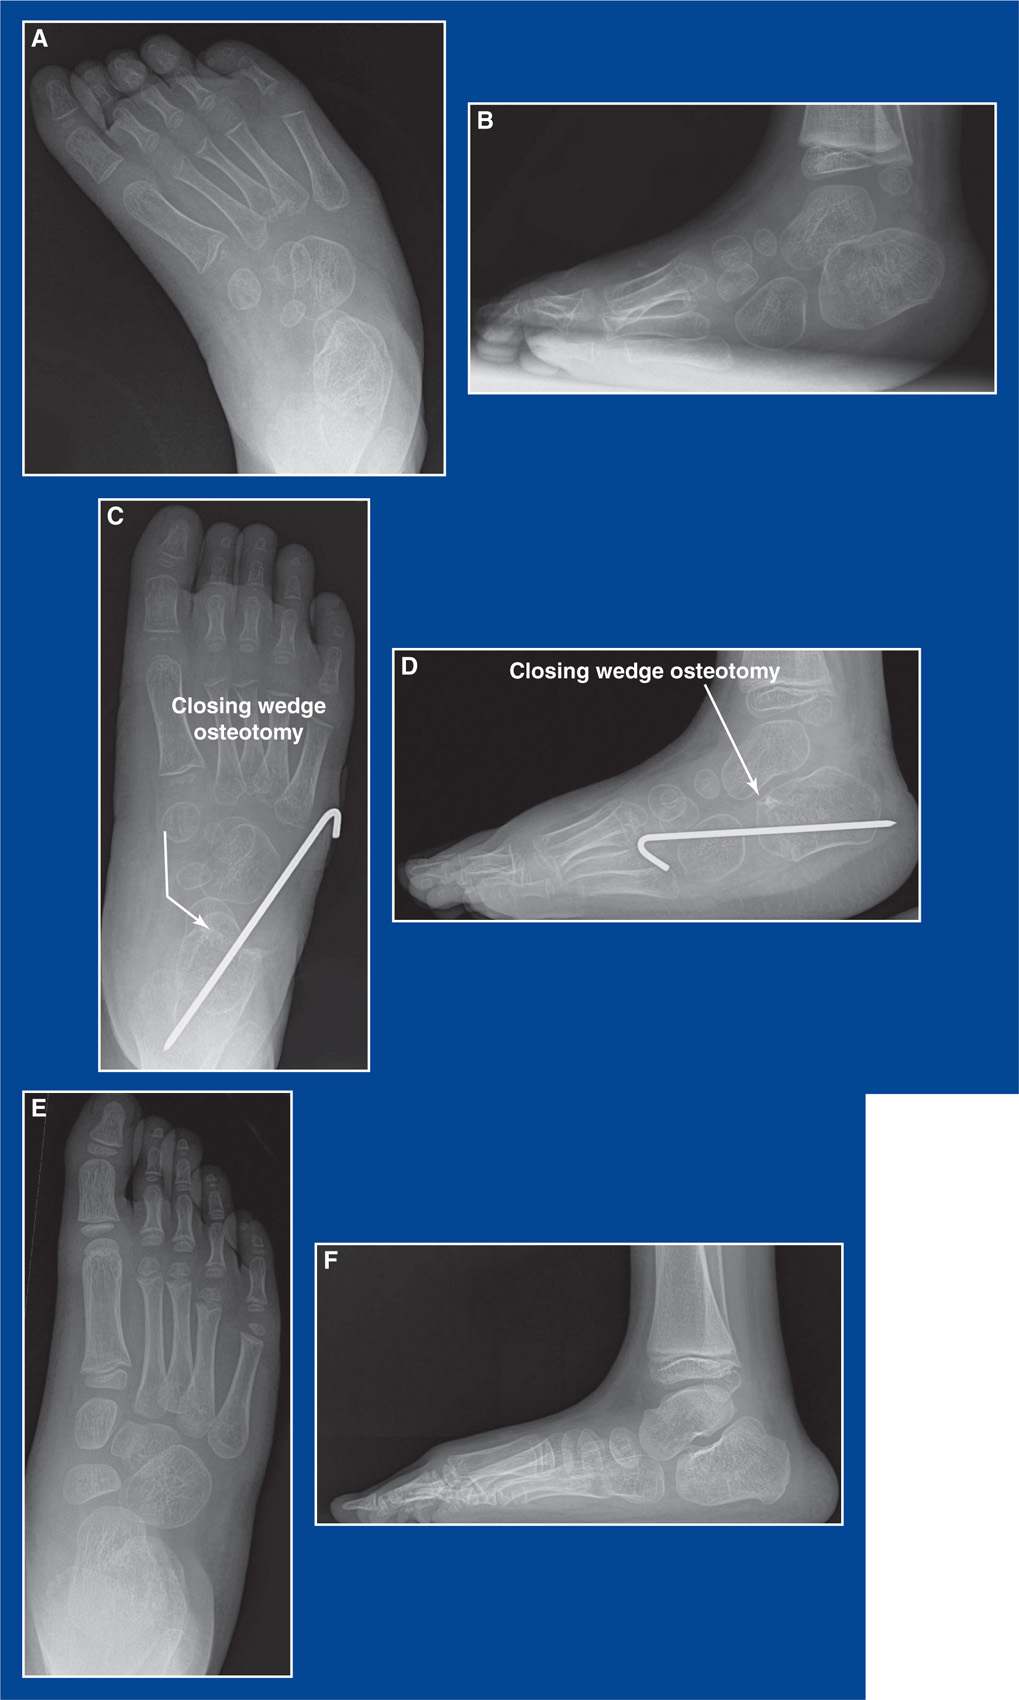
Figure 8-33. A. Simulated standing AP x-ray of a severe, rigid, recurrent idiopathic clubfoot. B. Simulated standing lateral x-ray of the same foot. C. Simulated standing AP x-ray taken 6 weeks after having undergone a D-PMR and a closing wedge osteotomy of the anterior calcaneus. D. Simulated standing lateral x-ray taken the same day. E. Simulated standing AP x-ray taken 3 years later shows excellent alignment of the foot and a remodeled anterior calcaneus. F. Simulated standing lateral x-ray taken 3 years later shows the same excellent alignment and remodeling.
j. Using a microsagittal saw and starting at the isthmus, cut the calcaneus in line with the retractors, exiting medially between the anterior and middle facets
k. Remove a laterally-based wedge of bone from one or the other of the calcaneal fragments. Keep removing small wedges of bone until the lateral border of the foot is straight (and the TN joint is confirmed to be aligned using mini-fluoroscopy)
l. Insert one or two 0.062″ smooth Steinmann pin(s) retrograde across the resection site from the dorsolateral aspect of the forefoot. Bend the wire(s) at the insertion site(s) and cut them long for ease of removal in clinic
m. Approximate the skin edges with interrupted subcutaneous 3-0 absorbable sutures and a running subcuticular 4-0 absorbable suture
n. Apply a well-padded long-leg cast (to ensure non–weight-bearing in these young children) with the ankle at neutral, the subtalar joint everted, and the midfoot abducted
o. At 6 weeks, remove the cast and pin(s) in the clinic and apply a short-leg walking cast that will be worn for an additional 2 weeks
3. Pitfalls
a. Inadequate wedge resection of the anterior calcaneus resulting in persistence of the deformity
b. Inadequate D-PMR
4. Complications
a. Injury to the sural nerve
i. Avoid by isolating and protecting it
1. Indications
a. Metatarsus primus varus in a skeletally mature adolescent with juvenile hallux valgus (see Chapter 5)
b. NOTE:
i. The base of the 1st MT is NOT the foot-CORA (see Assessment Principle #18, Chapter 3) for any forefoot or midfoot deformity. The medial cuneiform is the foot-CORA for cavus (plantar flexion of the 1st ray, pronation of the forefoot), supination of the forefoot (dorsiflexion of the 1st ray), metatarsus adductus (midfoot adductus), and metatarsus primus varus.
ii. Therefore, a medial cuneiform osteotomy (see this Chapter) is preferred over a 1st MT base osteotomy to correct
• pronation of the forefoot (plantar flexion of the 1st ray) in a cavovarus foot
• supination of the forefoot (dorsiflexion of the 1st ray) in a flatfoot
• adduction of the midfoot in metatarsus adductus and skewfoot
• adduction of the 1st ray in some cases of metatarsus primus varus.
iii. If a 1st MT base osteotomy is used to correct cavus deformity, the shaft fragment must be dorsally translated as well as dorsally angulated, because the deformity correction is occurring away from the foot-CORA.
iv. 1st MT base osteotomies for cavus deformity correction have a greater likelihood of creating stress transfer to the 2nd MT head than medial cuneiform osteotomies.
2. Technique (see Figure 5-61, Chapter 5)
a. There are many techniques for creating a 1st MT base osteotomy, but I prefer the oblique rotational osteotomy
b. Make a longitudinal incision along the medial border of the midfoot centered on the base of the 1st MT
c. Expose the proximal half of the 1st MT extraperiosteally
d. Insert a 0.045″ smooth Steinmann pin from medial to lateral through the MT heads and in the transverse plane of the MT heads. This is a guide pin that will be referenced to ensure that the osteotomy is performed in the proper plane. If the osteotomy is rotated from the plane of the MT heads, it will create either dorsiflexion or plantar flexion of the 1st MT when the shaft fragment is rotated on the base fragment.
e. Begin the osteotomy as far proximal as possible in the 1st MT using a small sagittal saw cutting from medial to lateral. It should be rotated at least 45° from perpendicular to the MT shaft and inclined from dorsal/proximal to plantar/distal. Importantly, it should be in the transverse plane defined by the guide pin in the MT heads.
f. Before completing the osteotomy, create a lag screw hole for a 2.8- to 3.5-mm-diameter cortical screw that crosses the osteotomy at a right angle. Create a countersink recess in the dorsal cortex to prevent prominence of the screw head.
g. Complete the osteotomy, remove the guide pin from the MT heads, rotate the shaft fragment laterally, and insert the proper length screw in the prepared hole. Fixation should be excellent with the single screw.
h. Complete the other procedures that are being performed concurrently
i. Approximate the skin edges with interrupted subcutaneous 3-0 absorbable sutures and a running subcuticular 4-0 absorbable suture
j. Apply a short-leg non–weight-bearing cast. It will take approximately 6 weeks to heal.
3. Pitfalls
a. Failure to ensure proper alignment of the 1st MTP joint by failing to perform the appropriate associated procedures for correction of hallux valgus
4. Complications
a. Performing a 1st MT base osteotomy before skeletal maturity and, thereby, either damaging the growth plate or performing the osteotomy far from the foot-CORA for metatarsus primus varus which, as in metatarsus adductus (see Assessment Principle #18, Chapter 3), is in the medial cuneiform.
i. Avoid by delaying surgery for JHV until skeletal maturity. Then one can perform a 1st MT base osteotomy or a medial cuneiform medial opening wedge osteotomy (see this chapter)
b. Rotational malinclination of the osteotomy, thereby creating plantar flexion or dorsiflexion of the 1st MT
i. Avoid by inserting a Steinmann pin from medial to lateral through the MT heads in the transverse plane of the MT heads to act as a guide pin that defines the true transverse plane of the forefoot
c. Prominence of the screw head requiring a second operation to remove it
i. Avoid by countersinking the screw head
1. Indications
a. Bunionette (Tailor’s bunion) (see Chapter 5)
2. Technique (Figure 8-34)
a. Make a longitudinal incision lateral to the 5th MT extending distal to the MTP joint
b. Expose the 5th MT shaft extraperiosteally
c. Insert a 0.045″ smooth Steinmann pin from lateral to medial within the MT heads and in the transverse plane of the MT heads. This is the guide pin that will be referenced to ensure that the osteotomy is in the proper plane. If the osteotomy is rotated from the plane of the MT heads, it will create either dorsiflexion or plantar flexion of the 5th MT when the shaft is rotated on the base.
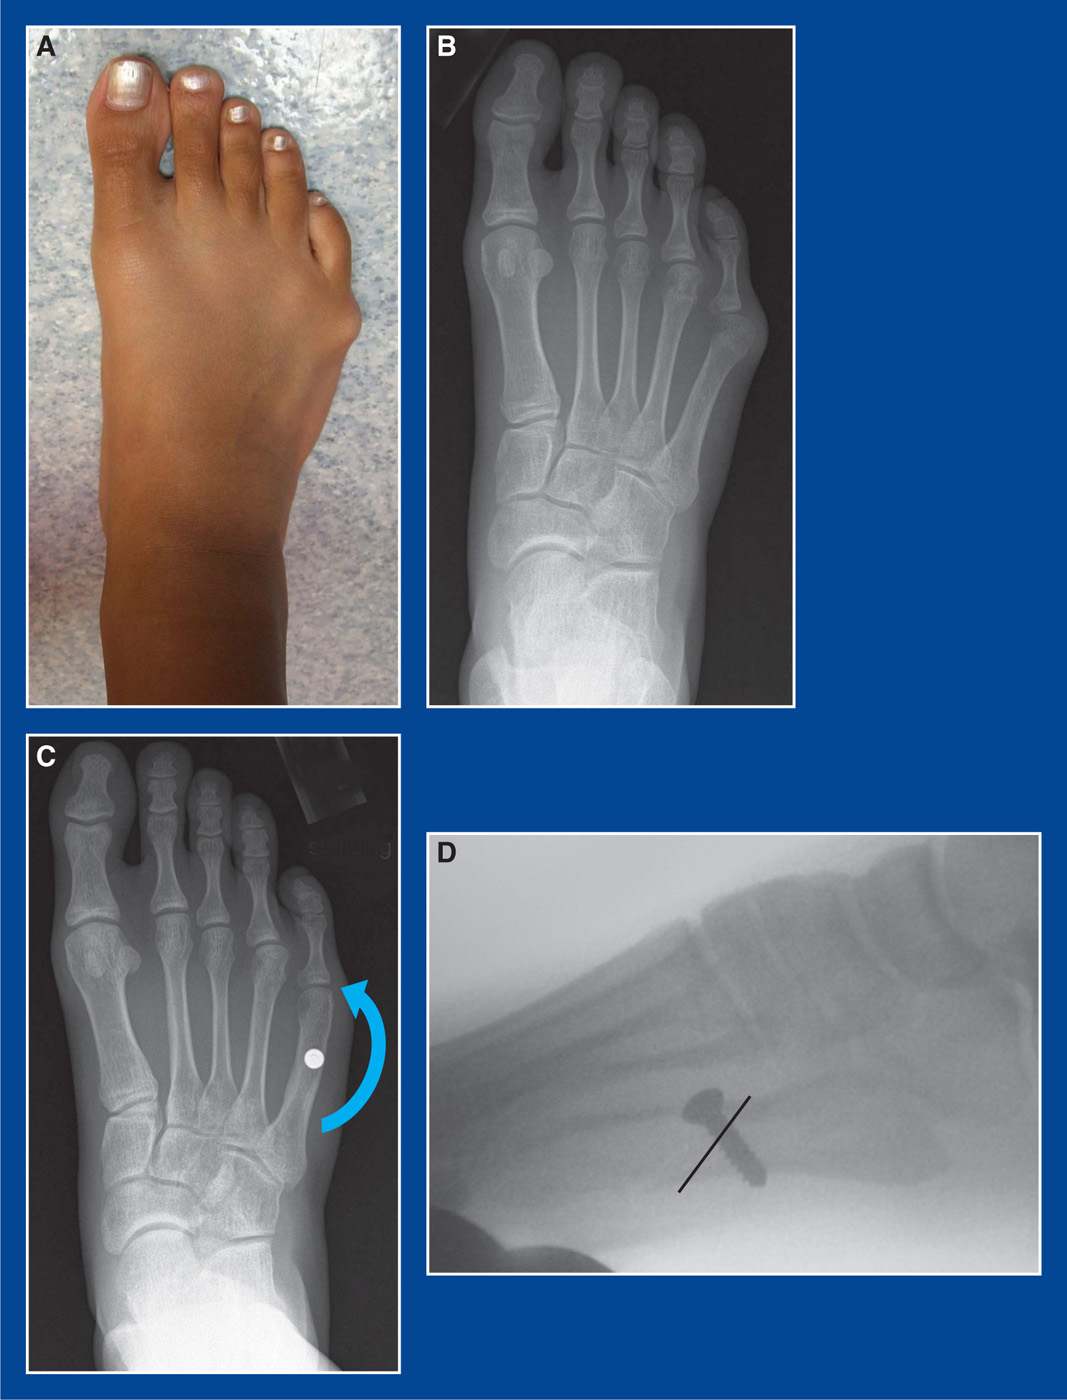
Figure 8-34. A. Clinical photo of a bunionette deformity in a teenage girl. B. Standing AP x-ray of her foot. C. Standing AP x-ray taken 1 year after an oblique, rotational osteotomy of the 5th MT. The blue curved arrow shows the effect of the rotation around the screw. The lateral exostosis of the MT head was resected and the lateral capsule was plicated. D. An intraoperative mini-fluoroscopic image shows the position of the oblique transverse plane osteotomy (black line).
d. Begin the osteotomy at the CORA of the bone deformity or as far proximal as possible in the 5th MT using a small sagittal saw cutting from lateral to medial. The blade should be rotated at least 45° from perpendicular to the MT shaft and inclined from dorsal/posterior to plantar/anterior. It is, therefore, an oblique transverse plane osteotomy in which the transverse plane is defined by the guide pin in the MT heads.
e. Before completing the osteotomy, create a lag screw hole for a 2.0- to 3.5-mm-diameter cortical screw that crosses the osteotomy at a right angle. Create a countersink in the dorsal cortex to avoid prominence of the screw head
f. Complete the osteotomy, remove the MT heads guide pin, rotate the shaft medially, and insert the proper length screw. Fixation should be excellent with the single screw.
g. Complete the other procedures that are being performed concurrently, such as medial 5th MTP capsulotomy, lateral 5th MT head shaving, and lateral 5th MTP joint capsular plication
h. Approximate the skin edges with interrupted subcutaneous 3-0 absorbable sutures and a running subcuticular 4-0 absorbable suture
i. Apply a short-leg non–weight-bearing cast. It will take approximately 6 weeks to heal.
3. Pitfalls
a. Failure to ensure proper alignment of the 5th MTP joint by failing to perform the appropriate associated procedures for correction of a tailor’s bunion
4. Complications
a. Rotational malinclination of the osteotomy, thereby creating plantar flexion or dorsiflexion of the 5th MT
i. Avoid by inserting a Steinmann pin in the MT heads to act as a guide pin that defines the true transverse plane of the forefoot
b. Prominence of the screw head requiring a second operation to remove it
i. Avoid by countersinking the screw head
1st Metatarsal Distal Osteotomy
1. Indications
a. High DMAA of the 1st MT, usually with a congruent 1st MTP joint, in JHV (see Figures 5-55 and 5-56, Chapter 5)
2. Technique (see Figure 5-60, Chapter 5)
a. There are many techniques for creating a distal 1st MT osteotomy, but I prefer a simple medially-based closing wedge osteotomy.
b. Make a longitudinal incision along the medial border of the proximal phalanx and distal half of the 1st MT. Gently curve the incision dorsally over the bunion (1st MT head). The incision can be continued proximally to concurrently perform a 1st MT base osteotomy (see this chapter) or a MCO (see this chapter).
c. Create a U-shaped capsular flap, sharply elevating the thick capsule off the medial side of the 1st MT head and reflecting it distally on its proximal phalanx attachment
d. Using an osteotome or small sagittal saw, resect the medial exostosis of the 1st MT head retrograde from the sulcus on the medial edge of the articular surface in line with the medial cortex of the MT shaft
e. Do not release the adductor hallucis or the lateral capsule of the 1st MTP joint. The joint is congruous but maloriented in most cases, so lateral capsular release is not indicated. There is a risk of devascularizing the MT head when lateral soft tissue release is combined with a distal 1st MT osteotomy.
f. Start to create an osteotomy with a small sagittal saw that is parallel with and 1 to 1.5 cm proximal to the articular surface of the 1st MT head
g. Before completing the first cut, start a second osteotomy that is perpendicular to the 1st MT shaft and designed to intersect with the more distal cut at the lateral cortex
h. Insert a 0.045″ or 0.062″ smooth Steinmann pin from distal/medial to proximal/lateral in the head fragment stopping at the distal osteotomy
i. Insert a 0.045″ or 0.062″ smooth Steinmann pin from proximal/medial to distal/lateral in the shaft fragment stopping at the proximal osteotomy
j. Complete both osteotomies
k. Adduct and laterally displace the MT head fragment (the CORA is distal to the osteotomy) to bring the osteotomy surfaces into apposition with the proper axial alignment of the head on the shaft
l. Advance the pins across the osteotomy capturing the far cortices for stable fixation
m. Advance the capsular flap proximally on the medial surface of the MT shaft and repair it with multiple figure-of-8 2-0 absorbable sutures
n. Confirm correction of all deformities with mini-fluoroscopy
o. Approximate the skin edges with interrupted subcutaneous 3-0 absorbable sutures and a running subcuticular 4-0 absorbable suture
p. Apply a short-leg non–weight-bearing cast. It will take approximately 6 weeks to heal.
3. Pitfalls
a. Failure to ensure proper alignment of the 1st MTP joint by failing to perform the appropriate associated procedures for correction of hallux valgus. There are many. Treatment must be individualized.
4. Complications
a. Avascular necrosis of the 1st MT head
i. Avoid by performing either a distal 1st MT osteotomy or a lateral 1st MTP joint capsular release. The former is indicated if there is a congruent joint and a high DMAA. The lateral is indicated if there is an incongruent joint and a normal DMAA.
b. The list of complications following surgery for hallux valgus is exceedingly high
i. Avoid by:
• avoiding hallux valgus surgery, except when prolonged attempts at nonoperative treatment fail to relieve the pain
• studying the unique anatomic variations and deformities in the patient’s foot and lower extremity and having a surgical plan for each one. Individualize treatment.
Distal Tibia and Fibula Varus, Valgus, Flexion, Extension, Rotational Osteotomies
1. Indications
a. Distal tibia and fibula varus, valgus, extension, flexion, and/or rotational deformities
2. Technique (see Management Principle #20, Figures 4-10 to 4-16, Chapter 4)
a. Prep the entire lower extremity and use a sterile tourniquet. This will enable accurate assessment of the thigh–foot angle, which is particularly important when correcting rotational deformities
b. Make a 3- to 4-cm longitudinal incision along the posterolateral edge of the distal fibula meta-diaphysis, i.e., adjacent to the intended site of the tibial osteotomy
c. Incise the periosteum and expose the fibula subperiosteally
d. Place Joker elevators around the fibula as tissue protectors
e. Using a small sagittal saw, create an oblique osteotomy in the predetermine proper plane (see Management Principle #20-2, Chapter 4)
f. Irrigate and then close this incision with interrupted subcutaneous 3-0 absorbable sutures and a running subcuticular 4-0 absorbable suture
g. Make a 5- to 7-cm longitudinal incision 1 cm lateral to the anterior crest of the distal tibial metaphysis
h. Incise the periosteum along the crest and expose the tibial metaphysis subperiosteally to no closer than 1 cm from the growth plate
i. For a pure rotational tibial osteotomy:
i. Make sure the fibula osteotomy is in the oblique sagittal plane (see Figures 4-11 and 4-13, Chapter 4)
ii. Precontour a five-hole dynamic compression plate or locking plate to the flair of the tibial metaphysis
iii. With the distal end of the plate approximately 1 cm from the physis and the plate axially aligned with the shaft of the tibia, insert fully threaded cortical screws in the two distal holes (see Management Principle #20-3, Figure 4-14, Chapter 4)
iv. Make a notch in the tibia with an osteotome half way between screw holes 2 and 3, the planned site for the osteotomy
v. Also make a longitudinal score with the osteotome along the cortex adjacent to the plate. This will be a reminder of the rotational alignment of the bone before the osteotomy was performed
vi. Remove the plate and two screws
vii. With narrow Crego retractors surrounding the tibia subperiosteally at the level of the notch, perform an osteotomy with a sagittal saw that is perpendicular to the shaft of the tibia (see Management Principle #20-4, Figure 4-15, Chapter 4)
viii. Reattach the plate and two screws to the distal fragment
ix. Rotate the foot/distal fragment until the thigh–foot angle is neutral (0°). Hold that position with a Verbrugge clamp
x. Fasten the plate to the tibial shaft with three fully threaded cortical screws, dynamizing at least one of them
j. For a valgus-correcting, or a valgus-correcting and rotational osteotomy:
i. Make sure the fibula osteotomy is in the oblique coronal plane (see Figures 4-10 and 4-12, Chapter 4)
ii. A plate and screws can be used on the tibia, but the angular deformity can make it difficult to properly align and fix the plate distally before the osteotomy is performed.
iii. Measure and mark the approximate distance needed on the tibia for the osteotomy to be performed between what would/will be the second and third holes on the plate.
iv. Insert a 0.062″ smooth Steinmann pin retrograde from the medial malleolus stopping short of the intended distal osteotomy site
v. Insert a second 0.062″ smooth Steinmann pin retrograde from the anterolateral corner of the epiphysis stopping short of the intended distal osteotomy site
vi. Make sure both pins are parallel with the longitudinal axis of the tibia in the coronal plane. They provide assessment of alignment and control of the distal tibial fragment (see Management Principle #20-3, Figure 4-14, Chapter 4).
vii. With narrow Crego retractors surrounding the tibia subperiosteally at the level of the notch, perform an osteotomy with a sagittal saw that is parallel with the ankle joint
viii. Then perform the second and more proximal osteotomy on the shaft fragment. It is perpendicular to the shaft and designed to meet the first osteotomy at the lateral cortex (see Management Principle #20-5, Figure 4-16, Chapter 4).
ix. Bring the osteotomy surfaces into apposition and translate the distal fragment laterally until the medial cortices of the two fragments align. That is usually sufficient to centralize the ankle under the tibia (see Management Principle #20-1, Figure 4-10, Chapter 4).
x. Rotate the distal fragment to correct rotational deformity, if indicated
xi. Advance the Steinmann pins retrograde across the osteotomy and into the opposite tibial cortices of the shaft. Check the thigh–foot angle and adjust rotation, if indicated
xii. Either use these pins as definitive fixation or apply a plate and screws on the smoothest surface
k. For a varus-correcting osteotomy in a skeletally mature (or nearly mature) adolescent, as following a medial malleolus fracture with medial growth arrest (Figure 8-35):
i. Make sure the fibula osteotomy is in the oblique coronal plane (see Figures 4-10 and 4-12, Chapter 4)
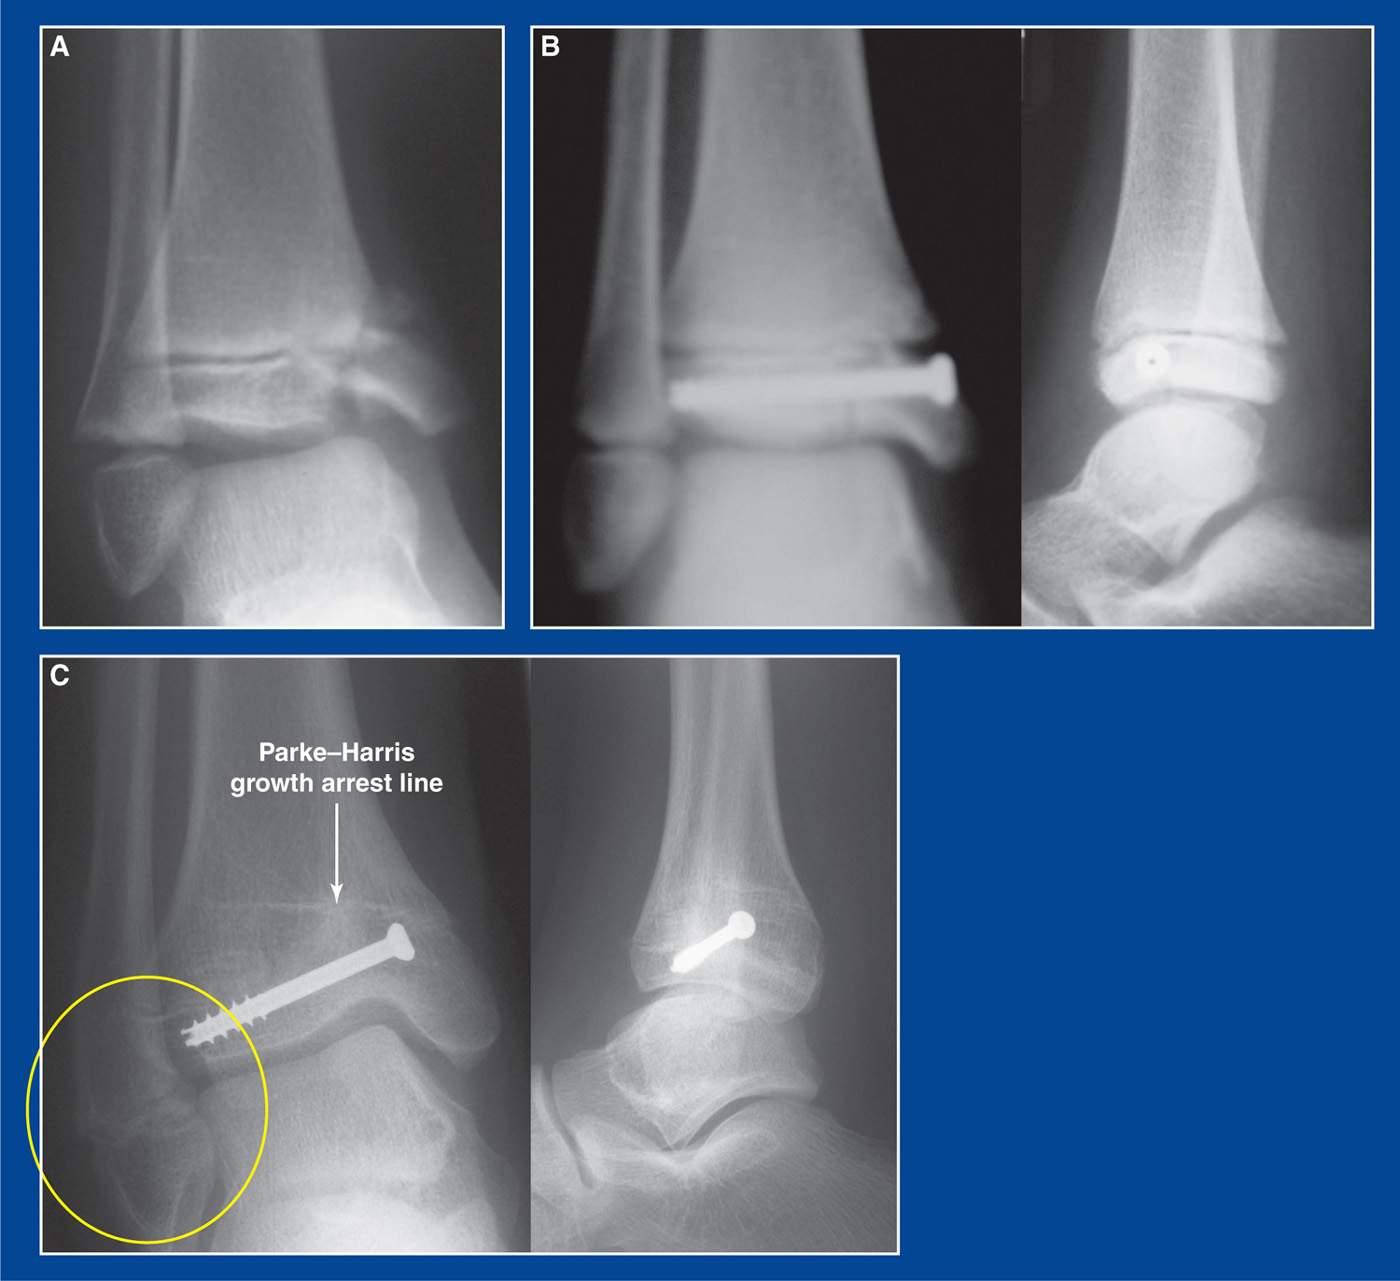
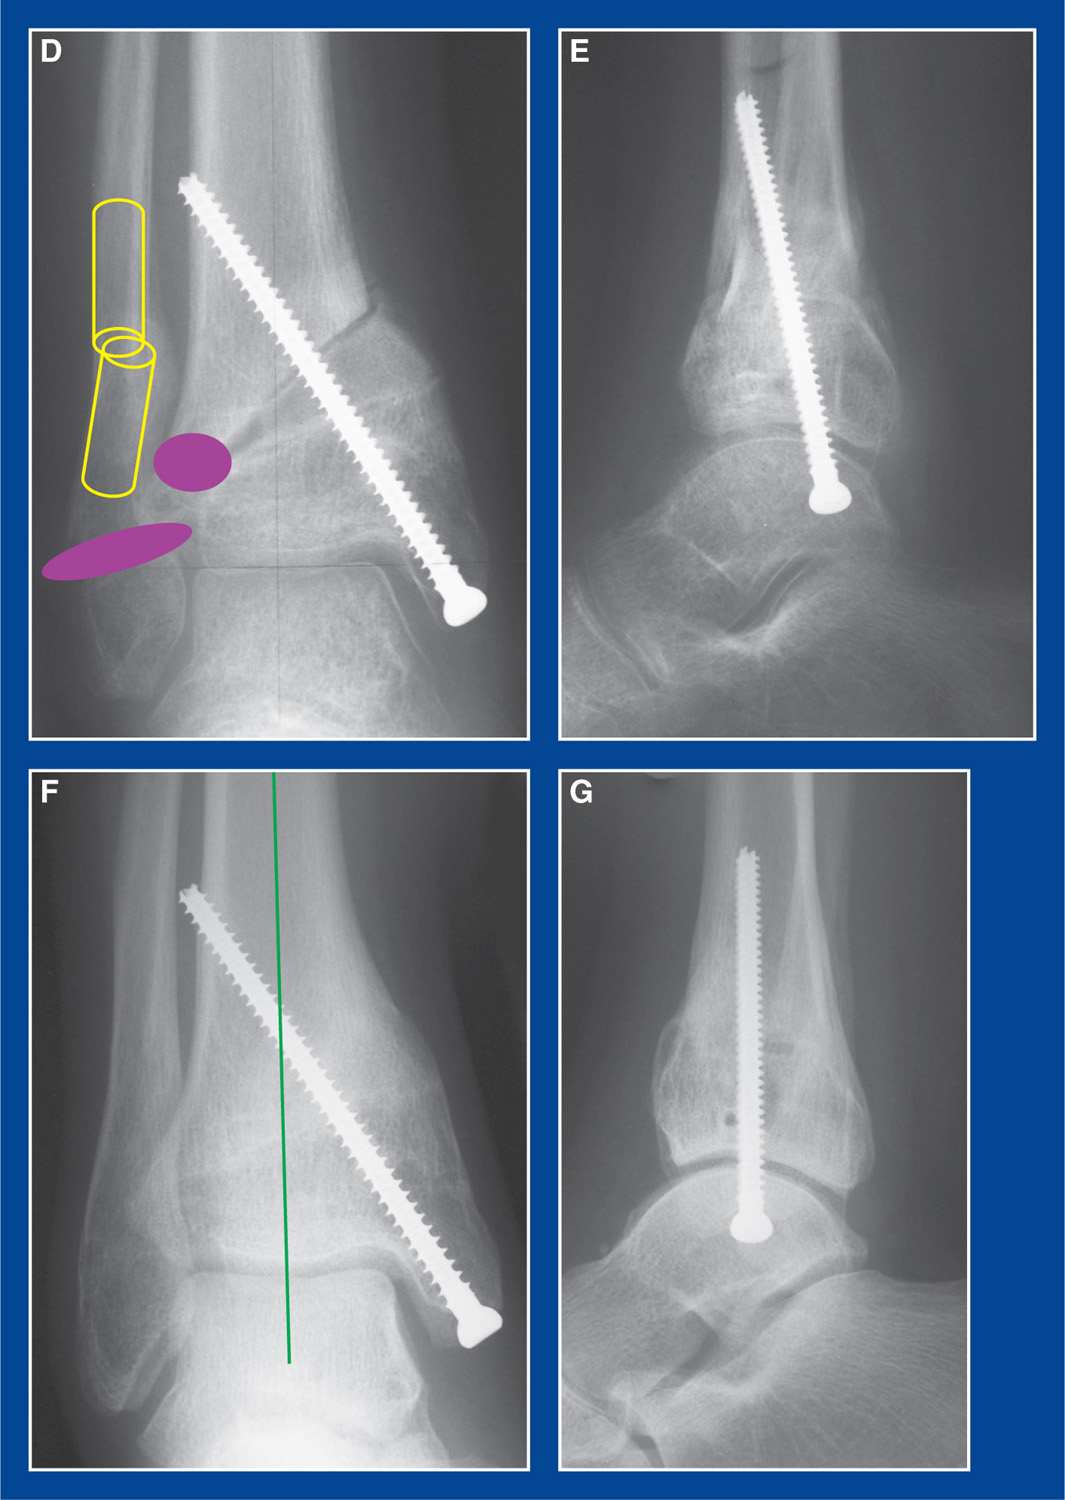
Figure 8-35. A. AP x-ray of a Salter–Harris IV medial malleolus fracture in an 8-year-old girl. B. AP and lateral x-rays after open reduction internal fixation. C. AP and lateral x-rays after failing to follow-up for 4 years and 4 months. Medial distal tibial growth arrest is apparent. The Park–Harris growth arrest line and the physis converge medially. The distal fibula and lateral distal tibial growth plates are still open (inside the yellow circle). D. Distal fibula and lateral distal tibia epiphysiodeses (purple ovals) were performed at the same time as the deformity correction osteotomies. An oblique coronal plane fibula osteotomy was performed. The lateral extent of the oblique distal tibial osteotomy was located at the CORA (the lateral margin of the physis), so translation was not required. Fairly minimal fixation was required because of the significant compression forces across the medial aspect of the opening wedge osteotomy and the inherent stability of the structural bone grafts. E. Early postoperative lateral x-ray. F. AP x-ray taken 6 months later shows excellent healing and deformity correction. The center of the talus is directly in line with the mid-axis of the tibia. G. Lateral x-ray obtained the same day shows excellent sagittal plane correction.
ii. If the distal fibula and lateral distal tibial growth plates are not yet closed, perform epiphysiodesis of both with a drill
iii. Make the tibial incision on the medial surface of the epimetaphysis rather than anteriorly
iv. Expose the tibia subperiosteally as far distal as possible
v. Retract and protect the PT neurovascular bundle
vi. With curved retractors anterior and posterior to the distal metaphysis, make an oblique osteotomy from proximal-medial to distal-lateral starting 3-4 cm proximal to the tip of the medial malleolus and ending at the lateral edge of the growth plate
vii. Open the osteotomy medially, hinging on the lateral periosteum
viii. Insert large tricortical iliac crest bone grafts to fill the space symmetrically from anterior to posterior. Beware not to create a procurvatum or recurvatum deformity
• If a procurvatum or recurvatum deformity exists along with the varus deformity, place the base of the graft(s) more posteromedial or anteromedial to simultaneously correct both planes of deformity.
ix. Insert one to two fully threaded 4.5-mm-diameter cannulated screws retrograde from the tip of the medial malleolus across the osteotomy and graft, capturing the lateral metaphyseal cortex with screw threads
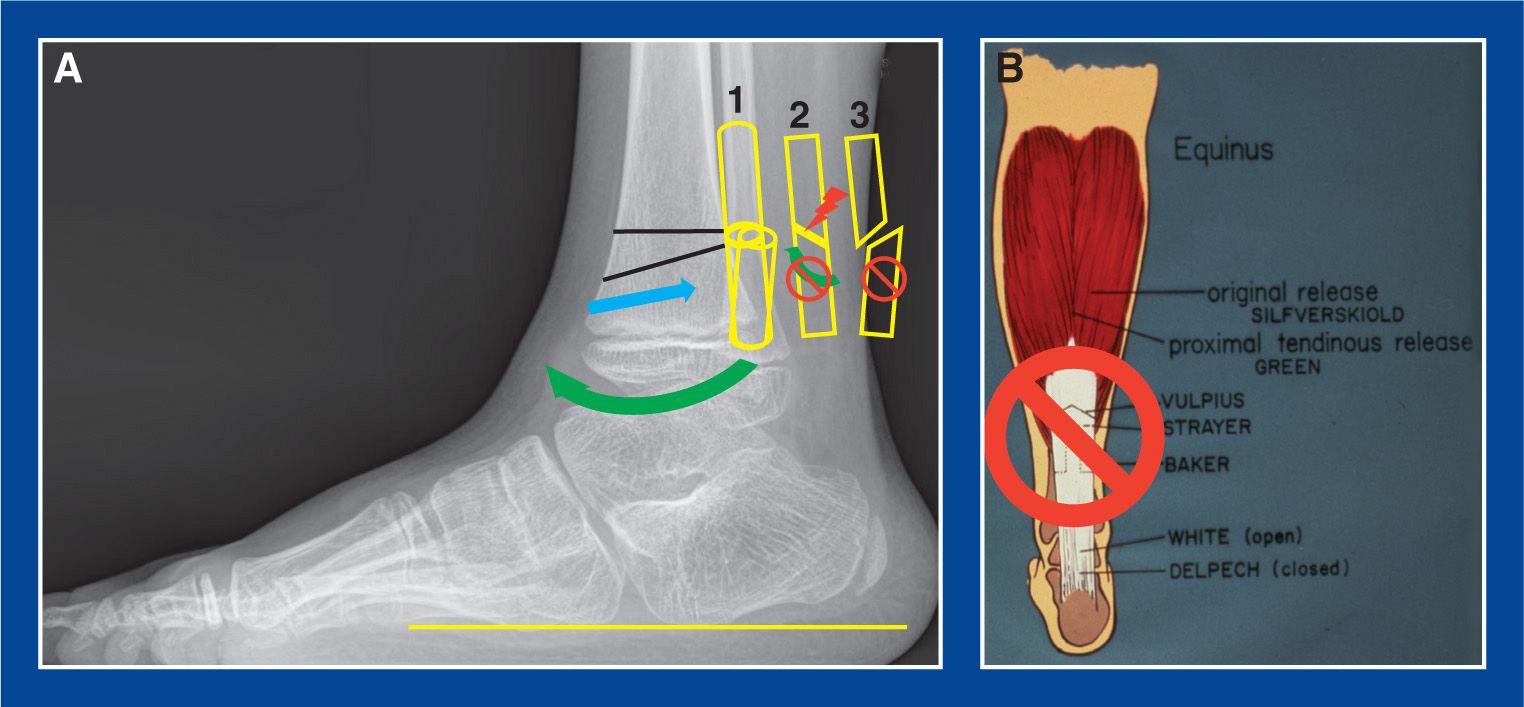
Figure 8-36. A. Lateral x-ray shows the location of the osteotomies of the distal tibia (black lines) needed to reorient the ankle joint and create increased dorsiflexion (green curved arrow) to eliminate anterior ankle impingement. In this skeletally immature child, guided growth with a screw/plate construct (see this chapter) is preferable. This x-ray is used merely for conceptualization of the osteotomy. The distal cut is plantar flexed approximately 10° in relation to the plantar surface of the foot (yellow line). The proximal cut is perpendicular to the tibia shaft. A trapezoid of bone is removed, because the apex of the deformity is the tendo-Achilles, not the posterior tibial cortex. The distal fragment is dorsiflexed and posteriorly translated (blue arrow) to respect the CORA. The anterior cortices of the two fragments should be aligned. The fibula osteotomy should be in the oblique sagittal plane, as shown under number 1, to enable deformity correction of the tibia while maintaining contact between the fibula fragments. The plane of the oblique coronal fibula osteotomy under number 2 would create impingement of the fragments and disallow deformity correction of the tibia. The plane of the oblique coronal fibula osteotomy under number 3 would separate the fragments completely and lead to delayed healing of the fibula. B. A reminder that neither the tendo-Achilles nor the gastrocnemius should be lengthened, because that would only increase anterior ankle impingement.
l. For correction of anterior ankle impingement in a skeletally mature adolescent (Figure 8-36):
i. Make sure the fibula osteotomy is in the oblique sagittal plane
ii. Insert a 0.062″ smooth Steinmann pin retrograde from the medial malleolus stopping short of the intended distal osteotomy site
iii. Insert a second 0.062″ smooth Steinmann pin retrograde from the anterolateral corner of the epiphysis stopping short of the intended distal osteotomy site (see Management Principle #20-3, Chapter 4).
iv. With narrow Crego retractors surrounding the tibia subperiosteally, perform an osteotomy with a sagittal saw that is 10° plantar flexed in relation to the plantar surface of the foot with the foot held in maximum dorsiflexion
v. Then perform the second and more proximal osteotomy perpendicular to the shaft (see Management Principle #20-5, Chapter 4) such that a trapezoid of bone is removed. The (usually scarred) heel cord is the true CORA, and it will often prevent deformity correction if a simple wedge is removed.
vi. Bring the osteotomy surfaces into apposition and translate the distal fragment posteriorly (see Management Principle #20-1, Chapter 4)
vii. Advance the Steinmann pins retrograde across osteotomy and into the tibial metaphyseal cortices opposite the side of entry. Additional internal fixation can be with anterior staples or a plate and screws.
m. For all types of tibial osteotomies discussed above, close or attempt to close the periosteum over the plate with 2-0 absorbable sutures
n. Approximate the skin edges with interrupted subcutaneous 3-0 absorbable sutures and a running subcuticular 4-0 absorbable suture
o. Apply a short-leg non–weight-bearing fiberglass cast and bivalve it. Overwrap the cast with fiberglass before discharge from the hospital
p. Total cast immobilization is 8-12 weeks, with one or two cast changes and no weight-bearing until at least 6 weeks.
3. Pitfalls (see Management Principle #20, Chapter 4)
a. Failure to achieve control of the distal tibial fragment before the osteotomy is performed
b. Failure to make the single cut of a pure rotational tibial osteotomy or the shaft side (2nd) cut of an angular tibial osteotomy perpendicular to the shaft of the tibia
c. Failure to perform a fibula osteotomy
d. Failure to cut the fibula in the proper oblique plane
e. Failure to correct the translational deformity along with the angulation deformity
f. Performing an tendo-Achilles lengthening or gastrocnemius recession
4. Complications
a. Injury to the distal tibial growth plate
i. Avoid by limiting distal subperiosteal exposure to no closer than 1 cm from the physis
b. Delayed or nonunion of the tibia
i. Avoid by:
• keeping a cool saw blade
• alternatively, making the osteotomy(s) with drill holes and an osteotome
• creating good apposition of the osteotomy surfaces and compressing/dynamizing the osteotomy
Related posts:

Stay updated, free articles. Join our Telegram channel

Full access? Get Clinical Tree


