CHAPTER 20 Shoulder Arthroscopy
General Principles
HISTORY
Burman performed the first arthroscopic examination of the shoulder in 1931, during a study of multiple cadaveric joints.1 Watanabe developed the Number 21 arthroscope in 1950.2 This instrument became the mainstay of arthroscopic examination for the next 2 decades. However, employing a tungsten bulb in a fragile carrier, it provided inconsistent illumination and a high risk of breakage within the joint. With the development of rigid telescopic devices and fiberoptic illumination in the 1970s, arthroscopy became a safer and more reliable procedure.
Arthroscopy of the shoulder has evolved more slowly than in the knee. The first clinical reports were by Andren and colleagues in 1965,3 Conti in 1979,4 and Wiley and Older in 1980,5 who arthroscopically investigated patients with frozen shoulders and other disorders. Watanabe and colleagues6 clarified the location and use of anterior and posterior portals. Watanabe also published the first reports of arthroscopic diagnosis of osteochondral fractures, identification and removal of loose bodies, evaluation of the extent of rheumatoid arthritis, and identification of lesions of the biceps brachii and glenoid labrum.6,7 Since 1980 there has been a proliferation of research and clinical application of shoulder arthroscopy. Multiple series with increasing length of clinical follow-up have described management of subacromial arch impingement, rotator cuff tears, acromioclavicular joint arthrosis, biceps tendon and labral tears, coracoclavicular ligament reconstruction, and shoulder instability with arthroscopic techniques.
ANATOMY
One of the greatest contributions of shoulder arthroscopy has been to better delineate both normal and pathologic intra-articular and subacromial anatomy. Indeed, normal anatomic variations such as those seen in the glenoid labrum8 or abnormal conditions such as the superior labrum anterior and posterior (SLAP) lesion9 were only fully appreciated after the advent of arthroscopic examination.
Intra-articular Anatomy
Biceps Tendon and Anchor
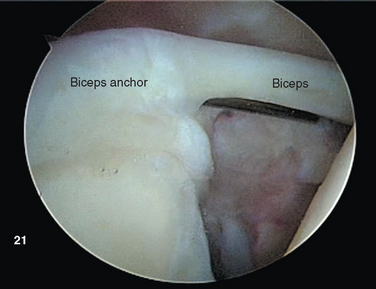
The proximal tendon of the biceps brachii serves as an excellent landmark for orientation upon insertion of the arthroscope. The intracapsular segment of the tendon originates from the superior glenoid labrum as the biceps anchor at the supraglenoid tubercle (Fig. 20-1).10 Vangsness and colleagues performed cadaveric dissections on 105 shoulders, and distinguished four types of origin. Most commonly, the biceps originates predominantly from the posterior or equally from the posterior and anterior labrum, drawing 40% to 60% of its fibers from the tubercle and the remainder from the labrum itself.11 The tendon courses laterally over the humeral head, entering the bicipital groove under the transverse humeral ligament.
Occasionally, the normal tendon consists of two or three distinct bands. In addition, other anatomic variations have been reported, including partial investment of the biceps within a vestigial remnant or mesotendon12 or its incorporation into the substance of the overlying supraspinatus tendon.12,13 Variations in biceps anatomy are almost certainly secondary to its migration through the supraspinatus during embryologic development14,15 and are not pathologic in the absence of other inflammatory or degenerative changes.
The long head of the biceps tendon exits the shoulder joint over a pulley complex composed of fibers contributed by the superior glenohumeral ligament and medial and lateral bands of the coracohumeral ligament. Pathologic degeneration or injury to this complex may be related to impingement of the subscapularis and pulley on the anterosuperior labrum and can lead to subluxation or dislocation of the tendon from the bicipital groove of the humerus.16–22 Intra-articular lesions of the biceps tendon, including tears or detachment of the glenoid anchor point, complete midsubstance tears, degenerative fraying (most often seen in conjunction with chronic impingement syndrome or rotator cuff tears), and tenosynovitis, are clearly evident.
Glenoid Labrum
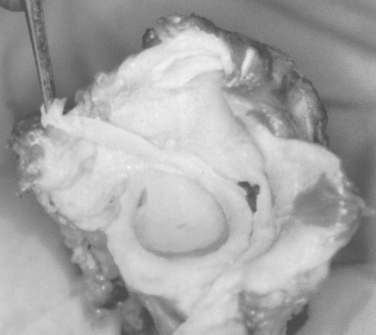
The glenoid labrum has been likened to the knee meniscus in both structure and function. However, Moseley and Overgaard, in an elegant dissection and histologic study, demonstrated that the labrum consists primarily of fibrous tissue, unlike the fibrocartilaginous meniscus of the knee.23 According to Moseley, fibrocartilaginous tissue is present within the labrum but is confined to a small transitional zone at the attachment to the glenoid rim.23 They concluded that the glenoid labrum is a redundant fold of capsular tissue that changes shape with different states of rotation of the humeral head (Fig. 20-2).
The exact function of the labrum appears to be multifaceted. It clearly has a significant role in the stability of the glenohumeral joint. The glenoid labrum, through its wedge shape, increases both the depth and conformity of the glenoid and serves as the site of attachment of the glenohumeral capsuloligamentous complex to the scapula.24 Disruption of the glenoid labrum is the most commonly noted lesion in the unstable shoulder.25–28 This disruption can occur in the labral substance (fraying or complete tearing), or it can manifest as a separation of the labrum from the glenoid margin.
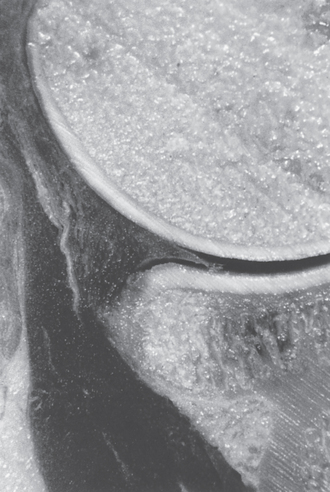
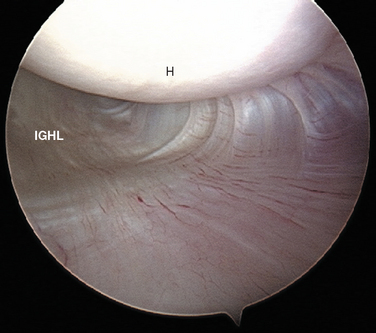
There is great anatomic variation in the normal labrum. Labral width varies from 1 to 5 mm, tapering as it runs from inferior to superior glenoid attachments. In cross-section, the labrum is wedge shaped and can be meniscoid in appearance in the thicker portion (Fig. 20-3). Detrisac and Johnson have documented the presence of a labral sulcus or hole as a normal variant in approximately 20% of anatomic specimens.29 This sulcus is present anteriorly, superior to the equator of the glenoid. Smooth, well-rounded borders differentiate it from a pathologic labral detachment (Fig. 20-4). Williams, Snyder, and Buford have defined another nonpathologic anatomic variant in which a robust anterosuperior labral complex is absent in lieu of a cord-like middle glenohumeral ligament.8
Glenoid
The glenoid is ovoid or pear shaped and covered by articular cartilage. Often the normal glenoid has evidence of a central bare area with thin cartilage and thickening of the subchondral bone surface. At the anterior waist of the glenoid, an indentation or notch is present, and this can be confused with bony abnormalities in patients with anterior instability. Burkhart and colleagues have described methods for quantifying the degree of bone loss associated with traumatic dislocations.30
Capsular Ligaments and Subscapularis Tendon
The external surface of the anterior shoulder joint capsule appears relatively uniform. It is only on close examination of the intra-articular surface, as provided by arthroscopy or cadaveric dissection, that discrete capsular ligaments become evident. The glenohumeral ligaments are in fact only thickenings of increased collagen density in the glenohumeral capsule, and there is a wide variation in the arthroscopic appearance of these structures, which depends on individual differences in capsular volume or laxity, relative capsular distention during arthroscopy, and the presence or absence of pathologic conditions. Schlemm first described three zones of distinct capsular thickening that he named the glenohumeral ligaments: superior, middle, and inferior (Fig. 20-5).31
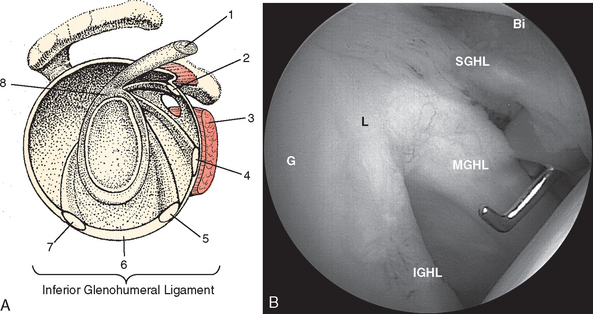
The middle glenohumeral ligament (MGHL) has two alternate sites of glenoid origin. The most common is from the supraglenoid tubercle and superior labrum just caudal to the SGHL. Alternatively, it arises from the scapular neck. Variability in MGHL origin can have important functional implications. The more medial scapular neck origin can result in a larger anterior capsular volume, which could theoretically contribute to a loss of anterior restraint, leading to instability.23,32 Regardless of origin, the MGHL runs obliquely across the cephalad portion of the subscapularis tendon to insert at the junction of the lesser tuberosity and anatomic neck of the humerus. Williams described an anatomic variant of the MGHL in which the ligament is a cord-like structure and the anterosuperior labral tissue is essentially absent (the Buford complex).8
Turkel and coauthors have defined two discrete portions of the aIGHL: the thickened anterosuperior edge, which they named the superior band (Fig. 20-6), and the diffuse thickening of the anteroinferior shoulder capsule, which they named the axillary pouch (Fig. 20-7).33

Schwartz and coworkers have subsequently delineated complimentary anatomy of the pIGHL. The posterosuperior portion of the IGHL is similar to its anterior counterpart, occurring as a distinctly thickened band. This posterior portion acts in concert with the anterior segment to stabilize the glenohumeral joint against anteriorly and posteriorly directed forces.34 The pIGHL is optimally visualized from an anterior arthroscopic portal.
The tendon of the subscapularis is located anteriorly in the shoulder joint and is intimately related to the glenohumeral ligaments (Fig. 20-8). Moseley and colleagues studied the synovial recesses of the anterior capsular mechanism and found that the tendon of the subscapularis enters the joint most commonly via the subscapularis recess, situated between the superior and middle glenohumeral ligaments.23 Arthroscopically, the most cephalad portion of the tendon is clearly evident in this position as a discrete structure. With the arthroscopic camera oriented perpendicular to the horizon in an upright patient, the subscapularis runs in an almost horizontal direction, as opposed to the more oblique MGHL.
The capsular mechanism, including the subscapularis and glenohumeral ligaments and glenoid labrum, as well as their contribution to normal joint stability, can be demonstrated on arthroscopic examination. Under arthroscopic visualization, the subscapularis tendon tightens during both external rotation and abduction of the glenohumeral joint. Conversely, the tendon becomes lax during internal rotation. With progressive abduction, the subscapularis tendon migrates superiorly, uncovering the anteroinferior portion of the humeral head. Turkel and colleagues, in selective cutting studies, determined the anterior stabilizing function of the glenohumeral ligaments at various arm positions. They concluded that the subscapularis cannot effectively block anterior dislocation at higher degrees of abduction.33
The superior glenohumeral ligament, which becomes lax with progressive arm abduction, takes up tension only as the arm adducts to the trunk; therefore, it cannot resist anterior humeral translation. Warner and coworkers have instead demonstrated that the SGHL is the primary restraint to inferior humeral translation in the adducted shoulder.35
The MGHL, similar to the subscapularis tendon, tenses with external rotation, loosens with internal rotation, and moves progressively cephalad with abduction. Cutting of the MGHL demonstrated it to be effective (when intact) in limiting excessive external rotation below 45 degrees of abduction only.33
Visualization from the primary posterior portal demonstrates the two anterior portions of the IGHL complex as described by Turkel and colleagues (see Figs. 20-6 and 20-7).33 Adduction of the arm to the trunk in neutral rotation relaxes both the superior band and axillary pouch portions. Progressive external rotation in the adducted position tenses the superior band. With progressive abduction and external rotation, the axillary pouch fibers tense and pouch volume decreases. Thus, at 90 degrees of abduction and maximal external rotation, a broad, taut ligamentous structure covers the entire anteroinferior humeral head. These findings correlate with Turkel’s discovery that division of the superior band resulted in dislocation of the externally rotated and adducted arm. Subsequent abduction tensioned the axillary pouch capsule, restoring stability.33 Combined sectioning of both the superior band and the axillary pouch resulted in dislocation via external rotation at both 45 and 90 degrees of abduction.
O’Brien and colleagues36 described the reciprocal functions of the anterior and posterior bands of the IGHL complex, dependent on the position of the humerus. As the humerus is externally rotated, the anterior capsule spreads like a sail to envelop the anterior humeral head. Horizontal flexion of the humerus on the glenoid will cause the posterior band to become cord-like. With internal rotation, the converse is true: The posterior-inferior capsule spreads to cover the humeral head, and horizontal extension will create tension of the anterior band. Thus, O’Brien and coauthors further defined the superior band of the aIGHL as the primary anterior stabilizer in the shoulder abducted 90 degrees, with between 0 and 30 degrees of horizontal extension.36 At 30 degrees of horizontal flexion, the pIGHL also acts to resist anterior translation.36
Additional biomechanical analysis of posterior humeral instability by O’Brien and coauthors has demon-strated that the pIGHL helps to prevent posterior translation at 90 degrees of abduction.36 However, posterior dislocation would not routinely occur unless the anterior capsuloligamentous structures were concurrently sectioned.34,36
Humeral Head
Posteriorly, a normal sulcus or bare area, as recognized by DePalma, is present between the insertion of the posterior capsule and overlying synovial membrane and the edge of the articular surface.37 DePalma found variability in the size of this bare area that was directly proportional to age. No such area typically exists in young patients. He postulated that the capsule and synovium progressively retract from this region beginning in the third decade. This normal age-related anatomic variation should not be confused with the impaction fracture created during traumatic anterior dislocations (the Hill—Sachs lesion). The bare area, characterized by punctate holes for tendon fiber and vessel penetration along the exposed subchondral plate, lies lateral to the usual region of a Hill—Sachs lesion. Additionally, no articular cartilage remains lateral to the bare area, in contrast to the condition often seen adjacent to a Hill—Sachs lesion (Fig. 20-9). This bare area must also be confined posteriorly, because any bare region between articular cartilage and the rotator cuff indicates a partial- or full-thickness rotator cuff tear.
Intra-articular Rotator Cuff
The rotator interval is a region defined by the superior edge of the subscapularis and the anteroinferior edge of the supraspinatus. Based on microscopic embryologic and cadaveric dissection studies, Cole and colleagues defined two predominant anatomic variants. In 24% of specimens, the rotator interval is spanned by a contiguous bridge of capsule consisting of poorly organized collagenous tissue, whereas in 76%, only a very thin layer of synovium spanned the interval.38 The functional implications of these congenital variants can become important when shoulder instability is suspected.
Extra-articular Anatomy
Rotator Cuff and Subacromial Space
During subacromial bursoscopy, it is possible to follow the fibers of the coracoacromial ligament to the lateral border of the coracoid process, where the conjoined tendons of the direct (short) head of the biceps tendon and coracobrachialis tendon are present. This exposure is necessary for osteoplasty of the lateral coracoid for coracoid impingement as well as for skeletonizing the coracoid neck for arthroscopic coracoclavicular ligament reconstruction.39
Scapulothoracic Articulation
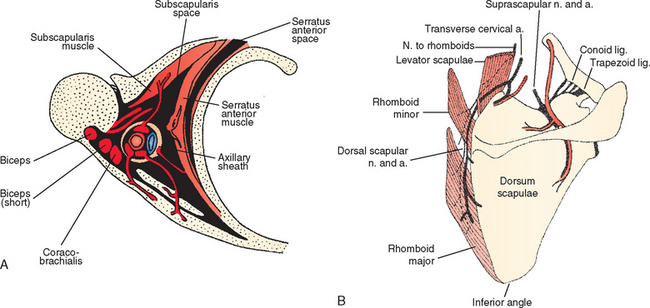
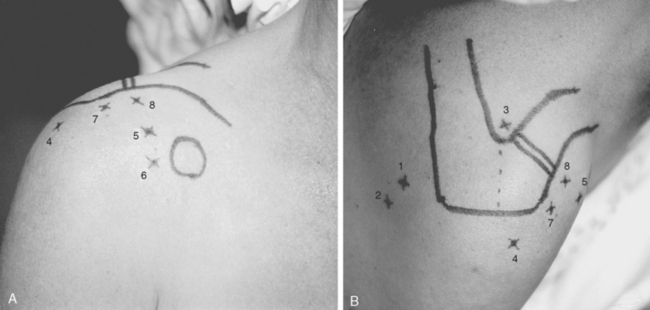
Pathology of the scapulothoracic space is an infrequent cause of pain and discomfort in the shoulder. Several studies have recently more clearly delineated the arthroscopic anatomy of this region.40–43 Ruland and coworkers43 noted that the scapulothoracic articulation is more accurately defined in terms of two spaces. The subscapularis space is bounded by the serratus anterior muscle anteriorly, the subscapularis muscle posteriorly, and the axilla laterally. The second serratus anterior space is bounded by the chest wall anteriorly, the serratus anterior muscle posteriorly, and the rhomboids medially (Fig. 20-10A). Because there are no clear bony landmarks for orientation from within the serratus anterior space bursa, care must be taken that arthroscopic portals are placed at least 3 cm medial to the vertebral border of the scapula to avoid injury to the dorsal scapular nerve and artery, and placed inferior to the caudal border of the scapular spine to avoid injury to the transverse cervical artery and suprascapular neurovascular structures (see Fig. 20-10B). A recent report of an alternative inside-out superior portal has been described44 with safe margins from neurovascular structures. Using the traditional medial portals or the superior portal (or both), bursectomy of the serratus anterior space, resection of the bony margin of the superomedial angle of the scapula, or resection of osteochondromata of the anterior scapula is possible and relatively safe.
POSITIONING, PORTALS, AND DIAGNOSTIC ARTHROSCOPY
Equipment and Operating Room Setup
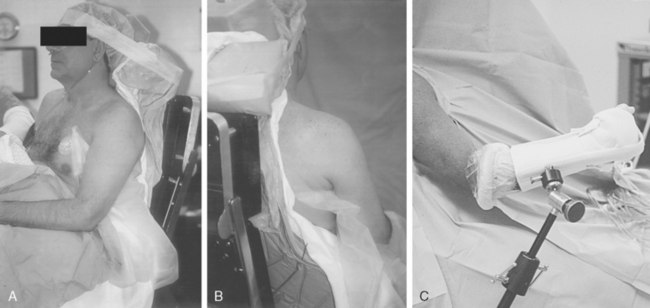
Shoulder arthroscopy may be performed with the patient in either the lateral decubitus or beach chair position. If the beach chair position is chosen, several commercially available seated positioners can be employed. Alternatively, a standard operating table allowing hip and knee flexion is used. Regardless of the positioner employed, the patient must be carefully positioned so that the operative shoulder is unencumbered to the medial border of the scapula to facilitate complete access to both the anterior and posterior aspects of the shoulder. This can be achieved by use of either a vacuum beanbag support or a modular trunk support section with removable cut-away sections behind each shoulder. No upper extremity traction device is required, but an articulated forearm holder can be extremely helpful for intraoperative positioning of the shoulder (Fig. 20-11).
For the lateral decubitus position, a standard or fracture table with padded kidney rests is used. A shoulder traction device is positioned at the foot of the table on the contralateral side to allow abduction and flexion of the operative shoulder. Traction is placed through a suspended pulley system using 5 to 15 lb (10-30 kg), depending on the size of the patient. Care must be taken to avoid excessive traction to the extremity, because excessive strain to the brachial plexus can result in a transient neurapraxia.45 Paulos and Franklin reported a 30% incidence of transient neurapraxia after shoulder arthroscopy using traction.46
Anesthesia and Examination Under Anesthesia
Several methods of examination for glenohumeral ligamentous laxity exist, but we prefer a modification of Hawkins′ load-shift maneuver.47 The arm is held in a position of neutral rotation and 45 degrees of abduction, with the scapula stabilized by the operating table. The examiner stands behind the operative shoulder and grasps the ipsilateral elbow with his or her right hand for a right shoulder and the left hand for a left shoulder. This hand then places an axial load along the humeral shaft, compressing the humeral head into the glenoid surface. The examiner’s opposite hand grasps the midhumerus and translates the humeral head anteriorly, posteriorly, and inferiorly. The degree of translation in all directions is noted. Grade 1 laxity is characterized by translation without perching of the humeral head on the glenoid rim. In grade 2 laxity, the head rides up and perches on or slightly over the glenoid rim but spontaneously reduces. Grade 3 laxity is present when the head can be translated over the glenoid rim and remains locked out anteriorly or posteriorly when the translating force is withdrawn while maintaining the axial loading force. The examination should be performed in neutral rotation and then maximal internal and external rotation to determine if the anterior or posterior portions of the glenohumeral ligament complex can be tensioned to diminish or eliminate the translation(s).
Inferior laxity is also evaluated using the sulcus test.47,48 The arm is placed at the side in neutral rotation. The examiner grasps the humerus and places axial traction in the distal direction. The degree of translation is noted as earlier. A grade I sulcus is characterized by an inferior translation of less than 1 cm, grade II by translation between 1 and 2 cm, and grade III by significant inferior translation in excess of 2 cm.
Patient Positioning
Properly performed, this technique allows the surgeon free access to the entire anterior and posterior aspects of the shoulder girdle, including the entire scapula (see Fig. 20-11).
The base housing for an articulated arm-holding device should be attached to the side rail of the table before draping. The upper extremity, shoulder girdle, and neck are sterilely scrubbed and draped in routine fashion.
Diagnostic Arthroscopy
Basic Portal Anatomy and Placement
Primary Posterior Portal
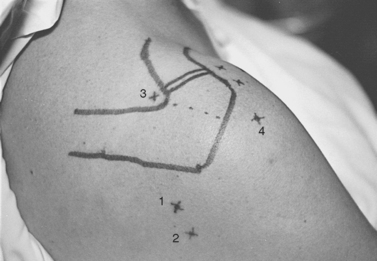
Next, the humeral head and glenohumeral joint are palpated by placing the fingers anteriorly and the thumb posteriorly and by moving the humeral head in an anteroposterior direction on the glenoid. The primary posterior portal site can be localized as the soft spot in the triangular region between acromion, glenoid, and humeral head palpated with the thumb in this position; this point is variable, but it is approximately 2 cm medial and 2 to 3 cm distal to the posterolateral tip of the acromion (Fig. 20-12). The closest major neurovascular structure is the axillary nerve and posterior humeral circumflex vessels, which are caudal to the teres minor muscle belly.
Anterosuperior Portal
After localization of the biceps tendon and orientation of the glenohumeral joint to the vertical axis, the triangular space into which the anterosuperior portal will be placed can be localized. This intra-articular space is bordered superolaterally by the biceps tendon, inferiorly by the subscapularis tendon, and medially by the anterosuperior portion of the glenoid (Fig. 20-13). The subscapularis tendon is recognized as a rounded, discrete, horizontal tendinous structure in the area of the anterior capsule.
The external entry site is then chosen on the anterior aspect of the shoulder. This site varies among patients and differs depending on the specific pathology to be addressed, but in general an acceptable working portal is about 1 cm lateral and 2 cm cephalad to the lateral subcutaneous border of the coracoid process (Fig. 20-14A). Placement in this region avoids potential injury to the neurovascular structures in this area. Anatomic studies of the anterior portal performed by Matthews and colleagues have demonstrated that the region medial to the coracoid contains the brachial plexus and axillary artery and vein. In the lateral inferior region, the musculocutaneous and subscapular nerves are at risk.49 With these exterior and intra-articular landmarks clearly established, a spinal needle is placed into the joint from the external entry site, piercing the intra-articular triangle (see Fig 20-13).
Additional Portals: Intra-articular
Anteromedial Portal
The anteromedial portal is a variation of the basic anterosuperior portal described earlier. The portal enters the joint just superior to the cephalad edge of the subscapularis tendon. The external entry varies but usually lies just lateral and adjacent or slightly distal to the tip of the coracoid process (see Fig. 20-14). A cannula placed in this location and orientation allows an additional accessory superolateral portal (see later) to be established without cannula impingement. This combination is extremely useful in anterior soft tissue stabilization procedures.
Anteroinferior Portal
Davidson and Tibone have described an anteroinferior glenohumeral joint portal.50 This portal is also established in an inside-out fashion. The humerus is placed in abduction, and a blunt Wissinger rod is directed into the axillary pouch as laterally as possible. The dermis and subscapularis are then bluntly externally dissected down to the capsule and palpable rod, and a cannula is placed. Cadaver studies reveal that the portal travels through the subscapularis tendon lateral to the conjoined biceps—coracobrachialis tendon. The mean distance in 14 cadaveric specimens between the portal and the musculocutaneous nerve was 22.9 ± 4.9 mm; the mean distance to the axillary nerve was 24.4 ± 5.7 mm.50 Although this portal may be efficacious in certain situations (particularly with respect to placement of suture anchors at the anterior-inferior aspect of the glenoid), we have not found it necessary in most surgical procedures. The potential for iatrogenic nerve injury remains a concern, and it may be more pronounced when this portal is used during lateral decubitus positioning.51
Supraspinatus Portal
The point of entry is the supraspinatus fossa, bounded anteriorly by the clavicle, laterally by the medial border of the acromion, and posteriorly by the scapular spine (see Fig. 20-12). The portal is identified by a spinal needle passed through this spot, directed 20 degrees laterally and 15 degrees anteriorly. The needle tip is identified in the joint above the superior-posterior junction of the glenoid neck. A cannula is then inserted along the same path. Anatomic dissections have shown the cannula to pass through the trapezius muscle and the muscle belly portion of the supraspinatus. The suprascapular nerve and artery lie 3 cm medial to this portal site, well out of range of possible injury if appropriate orientation is confirmed.52
Accessory Superolateral Portals (Rotator Interval Portal)
One or more accessory superolateral portals (all lateral and cephalad to the coracoid process) can be added to allow simultaneous visualization and instrumentation of the anterior glenoid (see Fig. 20-14).53 The external entry site lies anterior to the anterolateral corner of the acromion. The portal enters the joint through the rotator interval capsule just anterior to the anterior edge of the supraspinatus tendon. As with other anterior portals, the accessory superolateral portal(s) should be localized with a spinal needle passed percutaneously under arthroscopic vision before making the skin incision.
Posteroinferior (Axillary) Portal
A posteroinferior glenohumeral joint portal is useful for providing accessory fluid flow, removing loose bodies, treating inferior capsular tears, or for gaining efficient access to the axillary recess for débriding osteoarthritic spurs from the humeral head. Portal position is identified using a spinal needle placed directly into the axillary pouch, under arthroscopic visualization from an anterior portal. The skin incision is positioned 1 to 2 cm caudal to the original posterior portal (see Fig. 20-12). Given the proximity of this portal to the axillary nerve, the cannula should be placed strictly along the needle tract, taking care not to stray caudal to the capsular layer of the axillary recess. To help prevent iatrogenic injury, the surgeon can place a guidewire and use a cannulated blunt trocar cannula system when working in this region.
Extra-articular Portals
Posterior Subacromial Portal
The posterior subacromial (PSAC) portal is made through the same skin incision as the primary posterior portal (see Fig. 20-12) and is the most commonly used primary viewing portal for the subacromial space. After glenohumeral arthroscopy is completed, the cannula is withdrawn from the glenohumeral joint and redirected through the deltoid into the subacromial space, aiming toward the anterolateral quadrant of the acromion. At our institution, we avoid injecting fluid into the subacromial space immediately before placing the arthroscope, because improper needle placement can lead to bursal distention, making visualization difficult. Alternatively, tactile confirmation of appropriate positioning in the subacromial space can be obtained by rubbing the trocar tip medially and laterally along the rough acromial undersurface. Next, the arthroscope is inserted and low-pressure fluid flow is initiated. Once the arthroscope is confirmed to be in the space, several irrigations can be performed by transiently removing the scope from the inflow cannula and repositioning it. Visualization is greatly enhanced by early placement of a lateral subacromial (LSAC) portal for outflow.
Lateral Subacromial Portal
The LSAC portal is highly useful for visualization and instrumentation of the subacromial space. Located 2 to 3 cm distal to the lateral edge of the midlateral acromion (depending on the size of the patient), it has several advantages (see Figs. 20-12 and 20-14). First, this portal allows triangulation in the subacromial space. Owing to the arcing shape of the typical acromial undersurface and frequent presence of anterior spur formation, instruments are more easily introduced into the subacromial space from the lateral approach than from anteriorly or posteriorly. Lateral instrument placement lies parallel to the coracoacromial ligament, allowing simplified resection of this structure if indicated. The portal is well suited to visualizing, probing, and grasping rotator cuff tears. Tears may be arthroscopically repaired through this portal, or the opening can be extended to a mini-open deltoid-splitting approach by continuing the incision in a longitudinal or transverse direction.
The LSAC portal passes through the deltoid and deltoid fascia directly into the subacromial bursa, well protected from the axillary nerve, which lies approximately 5 cm distal to the lateral acromial border. The site and angle of alignment of the portal should be confirmed with a spinal needle before the cannula is introduced. Commonly, inexperienced surgeons place the portal too close to the lateral edge of the acromion. In patients with a thick subcutaneous layer or large anterolateral acromial spurs, such proximal portal placement causes impingement of instruments on the lateral acromial edge and impedes access to the anterior, medial, and posterior subacromial space.
Anterior Subacromial Portal
An anterior subacromial portal (ASAC) is useful for additional outflow or instrumentation during subacromial bursoscopy, coracoid decompression, and coracoclavicular ligament reconstruction. External entry is obtained through the same incision as the working anterosuperior portal (see Fig. 20-14). Similar to creation of the PSAC portal, a trocar is replaced in the anterosuperior cannula; the cannula is then withdrawn and redirected in a cephalad direction into the subacromial space.
Anterior Acromioclavicular Joint Portal
The anterior acromioclavicular (AAC) joint portal can prove extremely useful during arthroscopic distal clavicle and acromioclavicular joint resection and visualization into the subscapularis bursa and coracoid region. The external entry site is directly anterior to the acromioclavicular joint and approximately 1 to 2 cm distal to the subcutaneous anterior edge of the clavicle (see Fig. 20-14). The medial-lateral location of the acromioclavicular joint can be confirmed using a narrow-gauge needle before placing the portal. The portal should be placed to allow an instrumentation cannula to sit in the subacromial space just caudal to the acromioclavicular joint capsule.
Superior Acromioclavicular Joint Portal
Superior acromioclavicular (SAC) portal(s) can also be useful during resection of the distal clavicle and acromioclavicular joint. The external entry sites can be placed at any point along the cephalad margin of the acromioclavicular joint (see Fig. 20-14). However, to avoid excessive trauma to the cephalad acromioclavicular joint capsule and acromioclavicular ligaments, the portals should be placed in a line so as to enter the acromioclavicular joint obliquely and the anterosuperior or posterosuperior corners of the joint. Thus, the skin incision for the ASAC portal lies 5 to 8 mm anterior to the anterosuperior edge of the clavicle, whereas the corresponding incision for its PSAC counterpart lies an equal distance posterior to the posterosuperior edge. As with the AAC portal, it is valuable to confirm the joint position with a needle before establishing the portal.
The joint space (before resection) is often too narrow to permit a large instrument or cannula to pass. Therefore, these portals may be established without a cannula, or with cannula placement only after partial joint resection has been accomplished. It is helpful to bevel the medial edge of the acromion at the acromioclavicular joint from the lateral or anterior subacromial portals to aid in visualization and instrumentation of the acromioclavicular joint.
Scapulothoracic Portals
Patient positioning and portal placement are discussed in detail in the next section. The patient is positioned in the prone position, with the operative arm draped free in the chicken wing position to wing and retract the scapular body. Three portals can be routinely used for scapulothoracic bursoscopy and débridement of the scapulo-thoracic articulation. Two medial portals are usually established 3 to 4 cm medial to the vertebral border of the scapula, below the scapular spine at the junction of superior and middle and the middle and inferior thirds of the vertebral border of the scapula (see Fig. 20-10). The trocar and cannula must be angulated almost parallel to the chest wall to prevent inadvertent entry into the thoracic cavity. A third inside-out portal has been described44 at the superior region of the scapular body, which may be helpful for débridement of bony prominences at the superomedial angle of the scapula. Bursoscopy, bursectomy, and excision of the superomedial eminence are possible without establishing the superior portal, which can place the transverse cervical artery and dorsal scapular and suprascapular neurovascular structures at risk.43,54
Primary Joint Examination
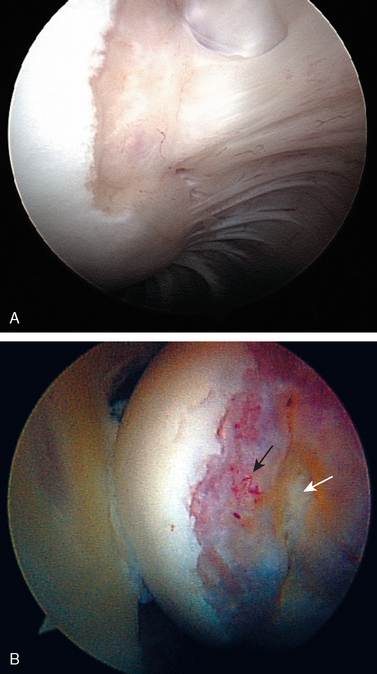
After establishing primary posterior and anterosuperior (rotator interval) portals, the biceps tendon and anchor are inspected and the tendon is probed along its intra-articular course. The biceps tendon anchor at the superior glenoid serves as an obvious anatomic landmark for orientation in the joint. Beginning here, the entire labral complex is visualized circumferentially around the glenoid. A probe is inserted through the anterior cannula, and the labrum is probed for evidence of detachment or tearing (Fig. 20-15). The probe is placed under the biceps anchor, and the anchor is lifted, if possible (Fig. 20-16). The arthroscope is positioned to view the space between the biceps anchor and the superior glenoid rim.
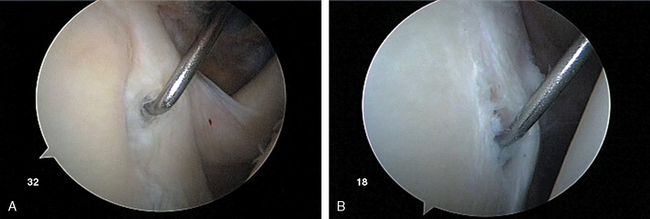
Wide anatomic variation exists in labral morphology in this region. The surgeon can be deceived by a meniscoid labral shape in which the labral superior attachment is slightly recessed and can masquerade as a pathologic detachment. Such a meniscal variant is usually stable with the peel-back maneuver.55 With inspection of the anchor, the arm is elevated to 90 degrees abduction and externally rotated. This places traction on the uninjured biceps tendon, and in the pathologic state, the biceps anchor lifts off the glenoid rim. These conditions can also be differentiated by the presence of normal articular cartilage to the point of labral attachment in the normal setting and of inflammatory tissue with erythema and fibrinous debris in the pathologic setting.
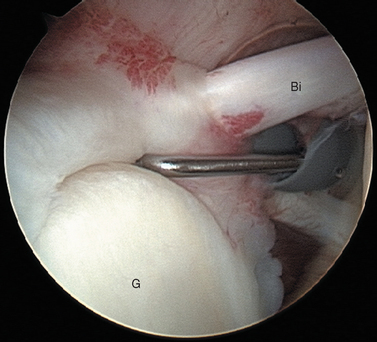
The surgeon uses the arthroscope to follow the tendon to its exit from the joint laterally over the pulley complex (superior glenohumeral ligament, medial band of the coracohumeral ligament, lateral band of the coracohumeral ligament) and into the bicipital groove (Fig. 20-17). A probe inserted over the biceps can be used to pull the biceps inferiorly along the anterior edge of the glenoid. This brings tendon hidden in the groove into the joint for inspection, and it also allows inspection of the integrity of the pulley system because medial tendon subluxation will be obvious with this provocative maneuver. Any evidence of deformation, erythema, fraying, tearing, or detachment should be noted (see Fig. 20-17).
From the primary posterior portal, the anterior and inferior capsulolabral ligamentous complex is visualized. The anterior labrum is followed from the biceps anchor along its course at the anterior and inferior labrum. Several normal anatomic variations such as the Buford complex and sublabral hole have been described in this chapter and should not be mistaken for labral injury (Fig. 20-18). The probe is used to test the integrity of the attachment of the labrum at the glenoid rim from the midanterior (3-o′clock position, right and 9-o′clock position, left) to inferior (6-o′clock position, right and left) positions.

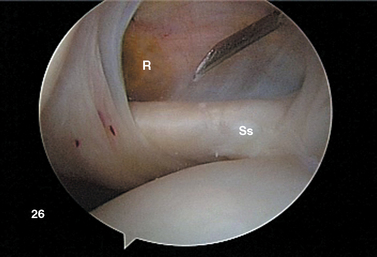
FIGURE 20-18 Arthroscopic view from the primary posterior portal of a right shoulder, showing the typical appearance of a Buford complex. The probe is around the cord-like origin of the middle glenohumeral ligament. This is a normal variant in anatomy and does not represent specific labral pathology. Compare the origin of the MGHL in this image with that in Figure 20-19. G, glenoid; Ss, subscapularis tendon.
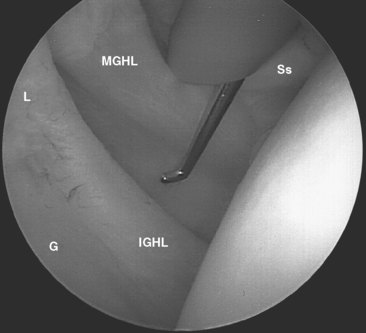
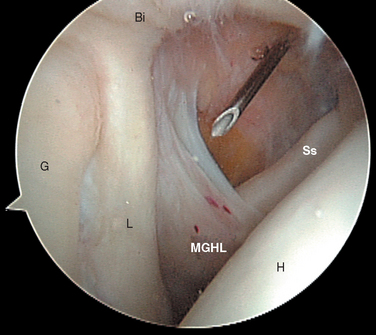
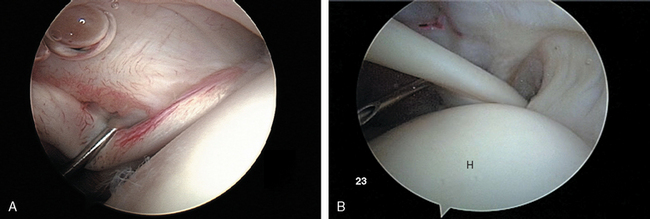
The subscapularis tendon is the most distinct and obvious structure at the anterior capsule (see Fig. 20-13). It is noted entering the joint at the subscapularis recess, which forms the medial part of the rotator interval between the SGHL and the MGHL (Fig. 20-19). The SGHL is rarely distinct medially, and it is often obscured from view by the biceps tendon. Laterally it is easily identified as part of the medial portion of the biceps pulley complex (see Fig. 20-17). The MGHL is draped obliquely over the deep surface of the subscapularis tendon and becomes taut with external rotation. In most cases, the MGHL can be identified at its origin from the anterosuperior labrum.
The division between the aIGHL and the MGHL is demarcated by the superior band of the aIGHL, which is often a distinct structure seen directly attaching to the labrum in the inferior portion of the anterior wall (see Figs. 20-5 and 20-6). During external rotation and abduction, this can tighten. The aIGHL can be followed caudally as it blends into the axillary pouch (see Fig. 20-7). During external rotation, the capsule in this region twists and tightens, considerably decreasing the volume of the axillary pouch. The insertion of the aIGHL laterally at the humeral neck should be noted. Bach’s group, Wolf’s group, and several other authors have described traumatic avulsion of the humeral attachment of the aIGHL as a potential cause of anterior instability.56,57
With the arm hanging at the patient’s side in neutral humeral rotation, the viewing tip of the arthroscope (in the primary posterior portal) is placed into the anterior capsular recess above the equator of the glenoid. An attempt is then made to pass the shaft of the arthroscope caudally past the humeral head to place the viewing tip into the axillary pouch. This drive-through test, as described by Warren,58 requires the humeral head to translate laterally to allow passage of the arthroscope shaft and is impossible to perform in most normal shoulders. The ability to drive through, especially with the arm in increasing degrees of external rotation, supports a diagnosis of capsular laxity. The use of the drive-through test during the intraoperative decision-making process is important. The drive-through phenomenon can be falsely positive in cases of large or massive rotator cuff tears, which can allow lateral translation of the humeral head in the absence of excessive capsular laxity.
Attention is then directed laterally to the humeral head. With a sequence of internal rotation to assess the anterior aspect, external rotation to assess the posterior aspect, abduction to examine superiorly, and adduction with the arthroscope in the axillary pouch to examine inferiorly, the entire articular surface of the humeral head can be visualized through the posterior portal. Particular attention should be paid to the posterolateral portion of the humeral head for the presence of a Hill—Sachs compression defect, while remembering that with advancing age a bare area is commonly seen in this region. The normal humeral bare area has no articular cartilage lateral to it, whereas articular cartilage is often present in the pathologic Hill—Sachs defect (see Fig. 20-9).
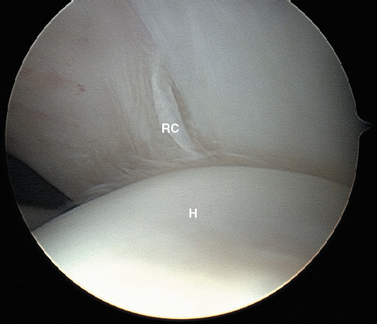
Next, the arm is placed in the rotator cuff position: approximately 45 degrees of forward flexion, 20 to 30 degrees of abduction, and 10 degrees of external rotation. This relaxes tension on the supraspinatus and infraspinatus portions of the cuff to allow better distention and visualization. The arthroscope is directed to the anterolateral exit of the biceps at the intertubercular groove, and the objective is turned laterally to view the rotator cuff insertion from anterior to posterior. The cuff undersurface is evaluated by visualizing and probing the tendons lateral to their insertion site into the greater tuberosity (Fig. 20-20). The size, shape, and thickness of any fraying or tearing is noted. In the setting of partial tears, a blunt probe may be inserted through a lateral subacromial portal to ballotte and probe the outer surface of the tear to help the surgeon develop a sense of the degree of tissue compromise and whether full-thickness degeneration of the tendon has occurred.

Stay updated, free articles. Join our Telegram channel

Full access? Get Clinical Tree


