Salto-Talaris Total Ankle Arthroplasty: Features, Surgical Technique, and Results
James P. Halloran
Selene G. Parekh
SALTO-TALARIS TOTAL ANKLE ARTHROPLASTY
Total ankle arthroplasty (TAA) has become a topic of increasing interest over the past decade as patients and orthopedic surgeons demand a better alternative to arthrodesis. During the 1970s and 1980s, TAA had a reputation for a high failure rate, and as a result, arthrodesis was the preferred method of treatment for tibiotalar arthritis. More recently, however, improved surgical technique, improved surgeon experience, and improved design of surgical instrumentation and implants have led to superior outcomes compared to earlier TAA generations.
PATHOGENESIS OF ANKLE OSETOARTHRITIS
Degenerative, posttraumatic, and inflammatory arthritis are the primary causes for tibiotalar degeneration. Other causes are observed relatively infrequently but include pigmented villonodular synovitis, hemochromatosis, and osteochondral lesions of the talus.
FEATURES OF SALTO-TALARIS
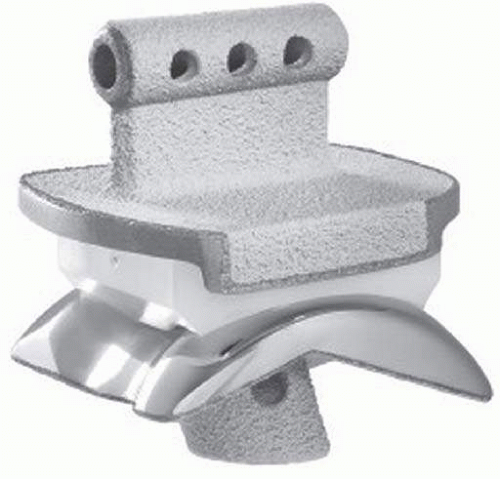
The Salto-Talaris (Tornier, Bloomington, MN) TAA is an anatomically designed, fixed-bearing prosthesis available in the United States—approved by the Food and Drug Administration (FDA) in November 2006. This design is based on a mobile-bearing design (Salto) that has been used outside of the United States.
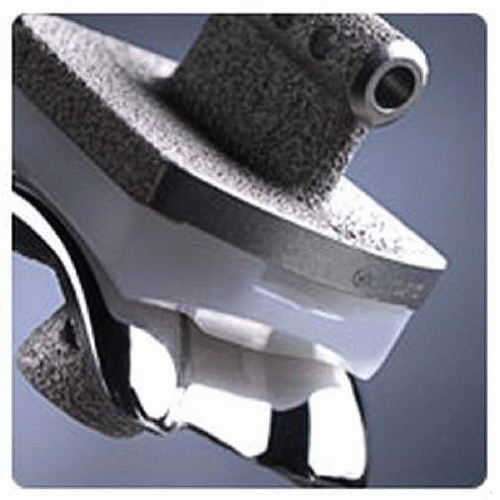
The initial three-piece “Salto” design (Fig. 4.1) displayed good early results, but a study using postoperative radiographic evaluation to assess polyethylene motion demonstrated little to no motion of the mobile bearing.1 This lack of motion led to the fixed-bearing design of the Salto-Talaris (Fig. 4.2).
A key feature of this fixed-bearing implant is that the mobilebearing concept has been incorporated into the trial reduction stage. During the trial reduction, the mobile tibial trial component is allowed to rotate into proper position during ankle range of motion. It is thought that with repetitive plantar flexion and dorsiflexion, the tibial component will settle into the most appropriate anatomic axis of the ankle.
PRINCIPLES AND GOALS OF TAA
The goals in performing TAA are pain reduction with restoration of the mechanical axis of the affected ankle, restoration of the anatomic joint line, and restoration or maintenance of soft tissue balance. These basic principles should be achieved in the operating room in order to optimize patient outcomes.
TECHNIQUE
Positioning
The patient is placed in a supine position with the patella of the affected extremity facing the ceiling. If needed, a bolster is placed under the ipsilateral hip to help achieve neutral rotational alignment of the lower extremity. Ensure that the plantar aspect of the foot is placed at the most distal edge of
the operating table as the surgeon will operate from the foot of the bed. A thigh tourniquet is placed prior to sterile draping. Patient preparation and sterile draping should include the knee joint. The fluoroscopy machine will be set up on the operative side of the operating room table.
the operating table as the surgeon will operate from the foot of the bed. A thigh tourniquet is placed prior to sterile draping. Patient preparation and sterile draping should include the knee joint. The fluoroscopy machine will be set up on the operative side of the operating room table.
Approach
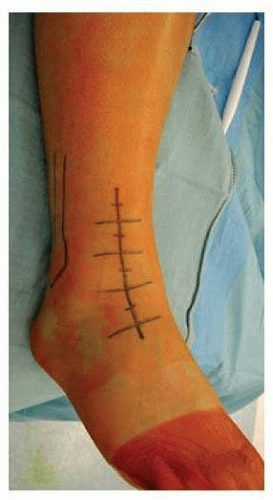
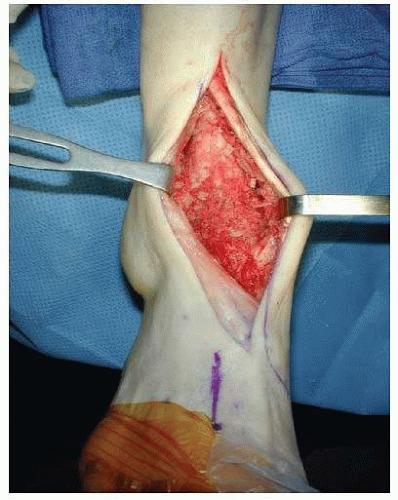
A standard anterior midline incision is used to gain access to the tibiotalar joint. The incision is placed one fingerbreadth lateral to the anterior tibial spine and is started 6 to 8 cm proximal to the ankle joint and continued approximately 4 to 5 cm distal to the ankle joint (Fig. 4.3).
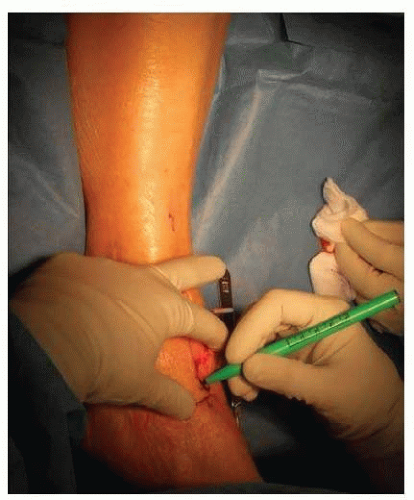
Sharp dissection is carried through the skin and subcutaneous tissue. Care is taken not to undermine the skin edges. Manipulation of the skin edges is also kept at a minimum. If necessary, the skin incision is extended to take the tension off the wound during retraction. Retraction is not performed until the extensor hallucis longus (EHL) is taken out of its sheath. The superficial peroneal nerve is identified and marked with a marking pen (Fig. 4.4), and this is protected throughout the entire procedure.
Meticulous hemostasis is maintained during the approach. The extensor retinaculum is then identified. The interval for this approach is between the EHL and tibialis anterior (TA) tendons (Fig. 4.5). After identifying the EHL and TA tendons, an incision is made over the EHL sheath.
The TA is kept within its sheath to prevent any bowstringing postoperatively. This approach also protects the tendon during closure of the anterior incision. Next, the neurovascular bundle is found and retracted laterally. Gelpi retractors are used to retract medial and lateral deep soft tissues. The periosteum and joint capsule are sharply incised in line with the incision. Medial and lateral flaps are created with a scalpel and a periosteal elevator. The operating surgeon’s goal is to see both the medial and lateral gutters clearly. Elevation of the joint capsule is taken just proximal to the talonavicular joint. Exposure of the articular surfaces of the talonavicular joint is avoided.
Using an osteotome and a rongeur, anterior tibial and talar osteophytes are removed. In addition to the removal of the anterior osteophytes, approximately 5 mm of the anterior distal tibia is removed. A reciprocating saw is started in the medial and lateral gutters, respectively. The saw is brought proximally through the distal aspect of the tibia. An osteotome is then used to remove the distal anterior lip of the tibia. This will allow visualization of the apex of the tibial plafond. A 1/4-in osteotome
is placed in the medial gutter to help determine the rotation of the ankle.
is placed in the medial gutter to help determine the rotation of the ankle.
Tibial Resection
The goal is to restore the mechanical axis in the coronal plane and match the posterior slope in the sagittal plane. The extramedullary guide is aligned parallel with the anterior tibial crest in the coronal plane (Fig. 4.6A) and in the sagittal plane (Fig. 4.6B).
The extramedullary guide is secured proximally with a selfdrilling pin. This pin should be perpendicular to the anterior tibial crest, with about 5° of external rotation.
Using the extramedullary guide and fluoroscopy, the coronal plane orientation is assessed. In a tibia without deformity, the goal is to make a perpendicular cut to the mechanical axis of the tibia. If the coronal plane alignment is slightly deviated, it can be easily corrected by shifting the extramedullary guide medially or laterally by sliding it over the proximally placed tibial pin. If there is a severe deformity proximal to the ankle, then this should be corrected prior to the TAA, either simultaneously or with a staged procedure.
The next assessment will be the sagittal plane orientation. The purpose of the extramedullary alignment guide is to reproduce a maximum 7° posterior slope of the distal tibia. The guide needs to be parallel to the anterior tibial crest for this to be reproduced.
After achieving satisfactory coronal and sagittal plane orientation, rotational alignment is evaluated. Rotation is critical for correct implantation of the TAA. Malrotation could lead to malleolar impingement or edge loading of the polyethylene. The goal is to place the implant on the center bisecting line of the talus in the coronal plane (Fig. 4.7). A 1/4-in osteotome is placed into the medial and lateral gutters. A short guide pin is placed into the rotational jig. The goal is to align the pin in the center of the “goal post” created by the osteotomes. Some have advocated using the second metatarsal for rotational alignment; however, we find that a midfoot or forefoot deformity can misguide the rotation.
Stay updated, free articles. Join our Telegram channel

Full access? Get Clinical Tree


