Radial Shortening in Kienböck’s Disease
John M. Rayhack
Indications
Kienböck disease is a well-known disorder involving avascular necrosis of the lunate (1). The five Lichtman stages of this entity have been well defined (2,3). In stage I, radiographs are normal. Magnetic resonance image (MRI) usually diagnoses stage I Kienböck disease before any increased opacity or morphologic changes appear on standard radiographs. In stage II, the lunate becomes increasingly radio dense. Stage IIIA reveals lunate sclerosis and morphologic changes, including possible fragmentation, but without associated carpal alignment changes. In stage IIIB, carpal collapse and fixed volar flexion of the scaphoid are visible. Pan carpal arthrosis exists in stage IV. Radial shortening in Kienböck disease is advocated for patients with Lichtman stage I, II, and IIIA. Whereas inclusion of stage IIIB in the indications for radial shortening is controversial (3), ample evidence in the literature supports its use (4,5,6,7,8,9,10,11). Although most patients are young adults, teenagers are not exempt from avascular necrosis of the lunate (9). Radial shortening is appropriate for a young patient with open epiphyses; however, growth potential must be taken into consideration.
Contraindications
Patients with Lichtman stage IV involvement with radial-lunate or lunocapitate osteoarthritic changes are not appropriate candidates for a radial shortening osteotomy.
Preoperative Preparation
Ulnar Variance
Ulnar variance is established by obtaining a posteroanterior (PA) radiograph (Fig. 40-1) with the arm abducted, elbow flexed at 90 degrees, and with the forearm in neutral rotation. A lateral radiograph
enables evaluation of dorsal–volar and proximal–distal lunate morphologic changes (Fig. 40-2). Because Kienböck disease is often associated with a negative ulnar variance, radial shortening to decrease the relative disparity is an appealing surgical approach to decrease the presumed excessive pressure on the lunate intraosseous vasculature. It is not necessary to restore the variance to neutral or ulnar plus because this might provoke an iatrogenic ulnar impaction syndrome.
enables evaluation of dorsal–volar and proximal–distal lunate morphologic changes (Fig. 40-2). Because Kienböck disease is often associated with a negative ulnar variance, radial shortening to decrease the relative disparity is an appealing surgical approach to decrease the presumed excessive pressure on the lunate intraosseous vasculature. It is not necessary to restore the variance to neutral or ulnar plus because this might provoke an iatrogenic ulnar impaction syndrome.
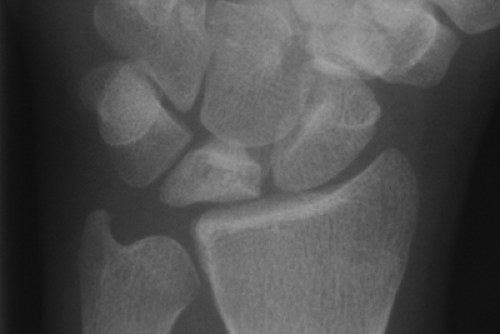 Figure 40-1 Posteroanterior (PA) radiograph of stage IIIA Kienböck’s disease associated with a negative ulnar variance. |
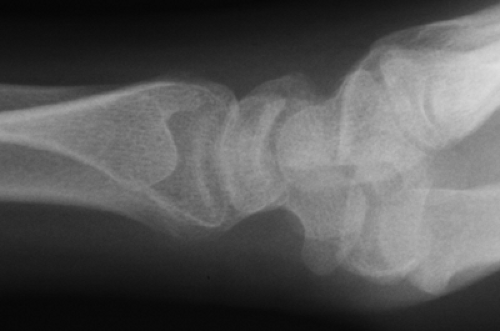 Figure 40-2 Lateral radiograph of stage IIIA Kienböck’s disease, demonstrating increased volar-dorsal lunate height and decreased proximal-distal lunate width. |
Technique
Surgical Approach
A volar Henry approach is used to expose the radius. This volar approach has the advantage of applying the plate in a position in which it will not need to be removed once the osteotomy has healed.
To judge appropriate saw guide placement, first apply the specialized slotted Kienböck plate (Rayhack® Kienböck Radial Shortening System, Wright Medical Technology, Inc. Arlington, TN.) after contouring, on the volar radial surface, ensuring that the two distal plate holes are aligned to permit good bone purchase.
Mark hole no. 2 on the bone and align the saw guide hole no. 2 over this mark. This will position the distal end of the saw guide just at the origin of the volar flare of the radius (Fig. 40-3). Thus, the inflexible saw guide is inhibited from being placed too far distally in the volar approach. This placement also ensures an inadvertent osteotomy intrusion into the distal radial–ulnar joint.
Nevertheless, it is important to ensure that the oblique cut of the saw blade does not enter this articulation.
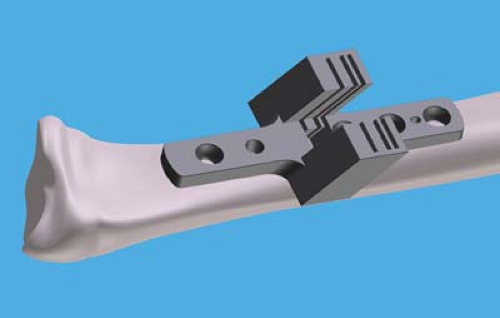
Figure 40-3 Positioning of the precision Kienböck saw guide at the origin of the volar radial flare.
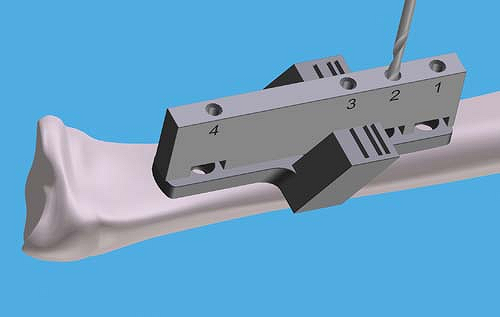
Figure 40-4 Straight drill guide placement on the saw guide with drilling of screw hole no. 2.

Figure 40-5 Reapplication of the straight drill guide with drilling of screw hole no. 4.
While manually holding the saw guide centered over the radius, apply the straight drill guide over the saw guide. The straight drill guide has a small prong proximally and a larger prong distally to allow exact positioning on the saw guide.
First drill hole no. 2 with a 2.5-mm drill bit through the straight drill guide (Fig. 40-4). Proper depth measurement of the cortical screw holes is critical. Excessively long screws may be palpable on the patient’s dorsal forearm; however, bicortical screw capture must be ensured. These same screws holding the saw guide will ultimately hold the Kienböck plate in position.
Remove the drill guide and tap the hole with a 3.5-mm tap after measuring the screw depth. Place the appropriately sized screw in hole no. 2. This step avoids proximal or distal shifting of the saw guide.
Reapply the drill guide and drill hole no. 4 (Fig. 40-5). The saw guide must remain centered on the radius and not displace medially or laterally.
Measure, tap, and insert screw no. 4.
Expected Amount of Radial Shortening
Two predetermined amounts of radial shortening are possible with this saw guide.
Using slots 2 and 1 (middle and proximal slots) results in 2.8 mm of shortening.
Using slots 3 and 2 (distal and middle) results in 4.2 mm of shortening (Fig. 40-6). Slots 1 and 3 should not be used together to perform any osteotomy in this radial leveling procedure.
To create two parallel bone cuts, the distal cut should be made first 50% of the way through the radius followed by a partial 50% proximal cut (Fig. 40-7). This is particularly important in the very narrow 2.8-mm shortening procedure.
Continue the distal cut 75% and then the proximal cut 75%.
Complete the distal cut and then the proximal cut. Always complete the distal cut first. This will help to maintain two parallel bone cuts without the saw blade “glancing” into the distal cut surface from the proximal cut. It is important to protect all soft tissues from the cutting area. The median nerve is potentially vulnerable in this procedure. A Davis brain retractor may be passed completely around the radius to help protect all soft tissues during the osteotomy procedure. It is important to irrigate with sterile slush saline to cool the bone and minimize bone necrosis during the osteotomy procedure. Only pass the saw blade beyond the line marked “Kienböck’s Radial Max Depth” on the saw blade with extreme care. You may allow this line to pass the top of the Kienböck’s saw guide a few millimeters to complete the osteotomy of a very large caliber radius. Failure to pay strict attention to this detail can result in soft tissue and bone damage.
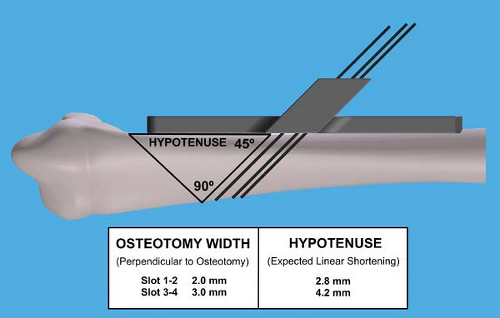
Figure 40-6 Two predetermined amounts of radial shortening possible with this saw guide: 2.8 or 4.2 mm.
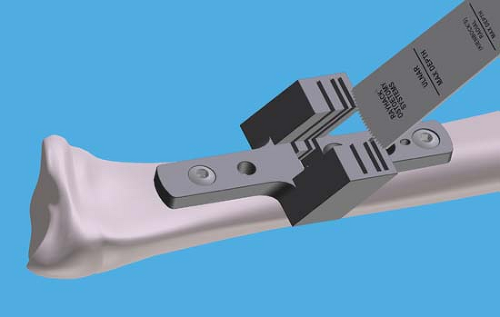
Figure 40-7 Initial cutting of the distal osteotomy surface with specialized saw blade placed through the 45-degree angled saw guide slot.
Once both osteotomy cuts are made, remove all screws and temporarily place them in the appropriately numbered holding slots in the tray.
While removing the Kienböck saw guide, a great deal of tension may be present in the screws.
Carefully apply the screwdriver and apply dorsal forearm counter pressure to avoid stripping of the 2.5-mm hexagonal slot in the screw head during the screw removal process.
Kienböck Bone Plate Fixation
Due to the volar flare of the radius, slightly prebend the plate to the concave contour of the radius. This can be performed at the beginning of the procedure before saw guide placement. The specialized plate benders facilitate plate contouring (Fig. 40-8). The unique “pass through” slots in the plate benders will help minimize plate scratching.
Avoid torquing the plate benders to prevent longitudinal and rotational distortion of the plate.Related posts:

Stay updated, free articles. Join our Telegram channel

Full access? Get Clinical Tree


