CHAPTER 8 Posterior Ankle Arthroscopy for Conditions Causing Ankle Pain
Os Trigonum, Posterior Ankle Soft Tissue Impingement, Flexor Hallucis Longus Stenosis, Haglund’s Deformity, and Other Considerations
Posterior ankle arthroscopy is an increasingly used technique that allows the orthopedic surgeon to address a number of causes of posterior ankle pain.1–4 This minimally invasive technique has several advantages over traditional open surgical approaches to the posterior ankle, which can involve extensive dissection because of the depth of the ankle from the posterior skin. Concerns for wound healing problems in this high–tensile area of skin are minimized by the use of small arthroscopy portals, which often eliminates the need for postoperative immobilization and speeding recovery. One concern with using arthroscopic techniques in the posterior ankle region is the potential for neurovascular injuries.5 However, with application of good anatomic knowledge of the posterior ankle region and the use of proper technique, this approach has proved to be safe and effective.3–6 The magnification provided by the arthroscope allows the surgeon to work with greater precision and enhances the safety of the procedure. Several common causes of posterior ankle pain that are readily treated with posterior ankle arthroscopy are described in this chapter.
OS TRIGONUM
Os trigonum syndrome has been described in association with posterior ankle impingement in activities involving extreme plantar flexion, such as classical ballet and soccer. Also, a symptomatic os trigonum can be associated with tenosynovitis of the flexor hallucis longus (FHL) tendon.7–10
Normal and Pathologic Anatomy
Symptomatic os trigonum syndrome can be caused by repetitive forced plantar flexion, as seen in ballet dancers and soccer players, although symptoms can arise in other athletes and in nonathletes after acute ankle injuries. The normal talus has a posteromedial and a posterolateral tubercle. The posterolateral tubercle provides attachment for the fibrous component of the beginning of the tunnel for the FHL tendon. An enlarged posterolateral tubercle is called a trigonal process, and one that is separated from the body of the talus is called an os trigonum. Sarrafian summarized four large series totaling 2142 talus specimens, and the incidence of os trigonum ranged from 2.2% to 7.7%.11 In some cases, an apparent os trigonum may represent nonunion of a fractured trigonal process after forced plantar flexion, but this has no bearing on clinical decision making or treatment.
History and Physical Examination
Athletes with posterior ankle pain due to an os trigonum have complaints similar to those of any patient with posterior ankle impingement; pain is worsened with plantar flexion. Posterior ankle pain can be vague by patient history, and the presence of FHL tenosynovitis can further diffuse the pain sensation. The physical examination finding of tenderness anterior to the Achilles tendon and retrocalcaneal bursa is strongly suggestive of posterior ankle impingement and can be elicited from both the posterolateral and the posteromedial sides of the ankle. This is particularly true when an unstable os trigonum is present. FHL tenosynovitis adds to the posteromedial tenderness in some cases. Extreme passive plantar flexion can exacerbate the pain, but this increase in pain is not specific for os trigonum, because it can also be found in cases of posterior soft tissue impingement.
Diagnostic Imaging
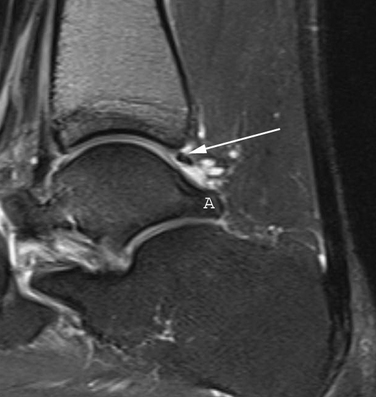
Radiographs are helpful for demonstrating the presence of an os trigonum or large trigonal process. Magnetic resonance imaging (MRI) is the preferred test for assessing the pathoanatomy of the os trigonum, which is best demonstrated by bone marrow edema of the os trigonum and adjacent talus. MRI is also helpful in differentiating other causes of posterior ankle pain and impingement, such as FHL tenosynovitis, loose bodies, posterior soft tissue impingement, and occult osteochondral lesions (Fig. 8-1).12 Fluoroscopy can be used to guide injection of the os trigonum for diagnostic purposes.13 Ultrasound can also be used to assess the pathoanatomy of the posterior ankle.14
Treatment Options
Arthroscopic Technique
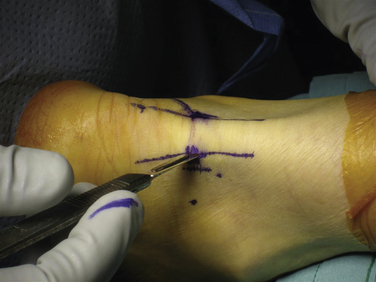
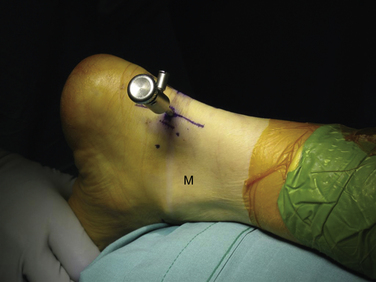
The ankle joint is marked anteriorly by placing a skin marker across the joint line of the dorsiflexed ankle. Two portals are made on either side of the Achilles tendon, 1 to 2 cm inferior to the anterior ankle joint line at approximately the level of the tip of the fibula (Fig. 8-2). This position allows adequate access to the ankle and subtalar joints. Alternatively, fluoroscopy can be used to confirm portal position. After the skin incisions are made, it is essential to use a fine, straight hemostat to spread tissues anterior to the Achilles tendon and make a puncture directly in the midline through the fascia separating the superficial and deep posterior compartments (Figs. 8-3 and 8-4). After this ventral fascia is penetrated, the hemostat is directed laterally and then advanced anteriorly in a posterolateral position behind the ankle. The hemostat can then be spread during removal to open the fascial opening. This is performed from both portals. It is important to maintain this method of placing instruments into the deep posterior compartment. Introducing instruments through this midline fascial opening from the superficial posterior compartment and initially directing instruments laterally protects the posteromedial neurovascular structures (Fig. 8-5).

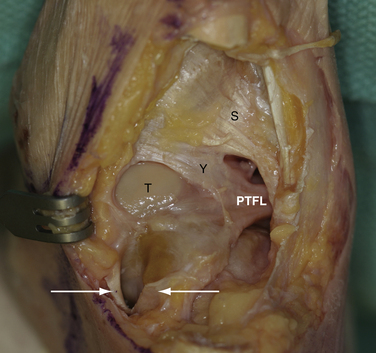
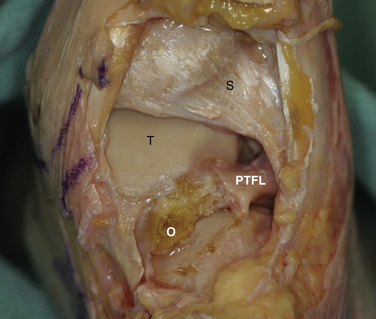
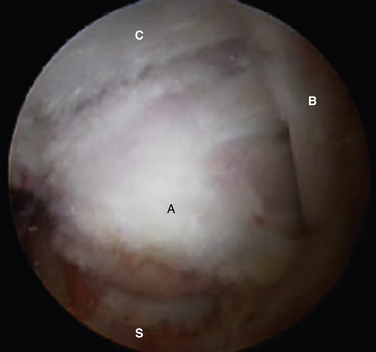
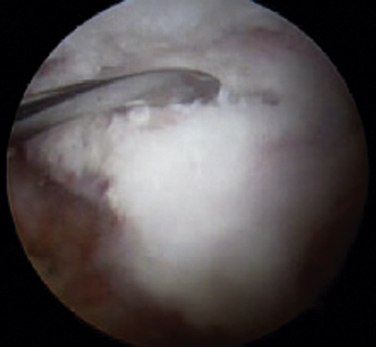
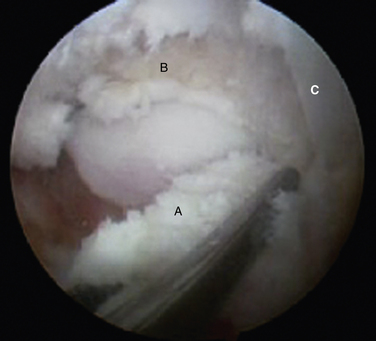
Initially, the arthroscope is placed through the medial portal and a soft tissue débrider through the lateral portal. Loose connective tissues behind the ankle joint are removed to demonstrate the superficial posterior tibiofibular ligament (PTFL) (Fig. 8-6). The ankle is dorsi and plantar flexed to identify the articular margin, and the os trigonum posterior to this point can then be cleared of lateral soft tissues. Some fibers of the posterior talofibular ligament are attached to the os trigonum, but the remainder of the PTFL attachment onto the talus should be preserved (Fig. 8-7). The subtalar joint is identified, and the clearing of soft tissues around the os trigonum continues, using the joint line of the ankle and subtalar joint as boundaries. Medially, the FHL tendon can be identified by moving the great toe into dorsiflexion. The FHL is used to mark the most medial boundary of the dissection (Fig. 8-8). The proximal attachment of the FHL tunnel is released from the os trigonum, which also serves to release the FHL, relieving any stenosis of the muscle or tendon simultaneously. At this point, the scope should be able to visualize the os trigonum well, and a freer elevator or similar blunt elevator can be used to probe the os and the fibrous junction between the os and the posterior talus (Fig. 8-9). In many cases, this junction can be loosened with a combination of the freer elevator and the shaver. Alternatively, a bipolar or unipolar cautery device may be used to strip the soft tissues, including the posterior talofibular ligament and the attachment of the FHL tendon sheath, from the os trigonum. After it is free, the os trigonum can be removed with a hemostat through either portal, although the posterolateral portal often works better (Fig. 8-10). It may be necessary to extend the portal enough to allow for the removal of a large os in some cases. Final inspection and débridement of the edges of the excision site can be performed. It is not uncommon for the calcaneal articular surface of the subtalar joint to be exposed posteriorly, because the os trigonum often has an articular surface that corresponds to the calcaneal side of the joint (Fig. 8-11).
PEARLS& PITFALLS
POSTERIOR ANKLE SOFT TISSUE IMPINGEMENT
“Posterior ankle impingement syndrome” was long used as a general phrase to describe posterior ankle pain that is worsened with plantar flexion of the ankle.15,16 Over time, a more anatomic approach to diagnosing the cause of posterior ankle pain has evolved, and posterior ankle soft tissue impingement is now recognized as a separate, although often associated, condition resulting from posterior bony impingement. Posterior ankle soft tissue impingement results from either a tear of the deep portion of the PTFL from the posterior rim of the tibial plafond or a tear of the posterior portion of the deep deltoid ligament (DDL).17–19
Normal and Pathologic Anatomy
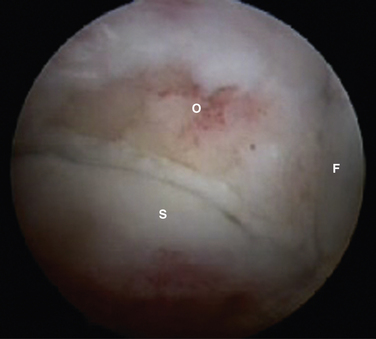
The ligaments of the posterior ankle have been well described and are pictured in Figure 8-6.20 The PTFL is composed of a deep and a superficial component. The superficial fibers are visible from the posterior view and fan out in a superior and medial direction from the fibular attachment to attach broadly on the tibia. The deep portion is a thick band that lies anterior to the superficial ligament and extends across the back of the ankle joint to the medial malleolus. It is not easily seen from the posterior view in an intact specimen. The deep band forms a labral rim of the posterior tibial plafond and increases the coverage of the posterior talus.
When the deep band is torn from the attachment on the tibial plafond, it becomes hypermobile and can displace into or out of the ankle joint, creating painful impingement symptoms. If the torn ligament is unstable, it usually lies in an inferior and more posterior position and can then be readily visualized from the posterior arthroscopic view (Fig. 8-12). If posterior impingement is suspected and the ligament is not visualized in this manner, a probe can be passed into the ankle joint and stability can be tested by pulling posteriorly on the ligament to determine whether it is displaced out of the joint. From the anterior arthroscopic view, posterior impingement is often not easily visualized with joint distention, but the ligament can be displaced into the ankle joint with posterior pressure, giving clear evidence of the instability and impingement.
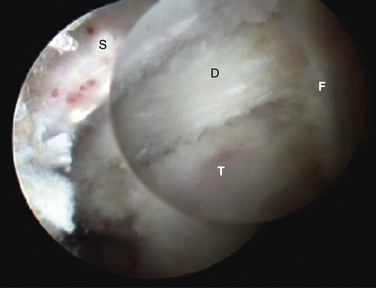
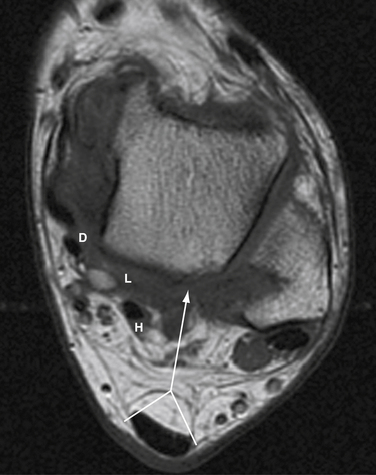
FIGURE 8-12 Posterior soft tissue impingement from torn deep posterior tibiofibular ligament (D). Figure 8-1 is a magnetic resonance image of the same patient. F, flexor hallucis longus tendon; S, superficial posterior tibiofibular ligament; T, talus.
After débridement of the unstable deep PTFL is completed, the posterolateral talar dome is well visualized (Fig. 8-13
Related posts:
 Soft Tissue Impingement of the Ankle Joint
Osteochondral Lesions of the Talar Dome: Anatomy, Etiology, and Evaluation
Instrumentation and Operative Setup for Ankle and Subtalar Arthroscopy
Anatomy, Evaluation, and Operative Setup for Posterior Ankle Arthroscopy
Osteochondral Lesions of the Talar Dome: New Horizons in Cartilage Replacement
Fusion for Degenerative Arthritis of the Ankle
Soft Tissue Impingement of the Ankle Joint
Osteochondral Lesions of the Talar Dome: Anatomy, Etiology, and Evaluation
Instrumentation and Operative Setup for Ankle and Subtalar Arthroscopy
Anatomy, Evaluation, and Operative Setup for Posterior Ankle Arthroscopy
Osteochondral Lesions of the Talar Dome: New Horizons in Cartilage Replacement
Fusion for Degenerative Arthritis of the Ankle
Stay updated, free articles. Join our Telegram channel

Full access? Get Clinical Tree


