Plastic and Reconstructive Surgery
Tod R. Storm
Michael S. Lee
Plastic surgery is a broad field involving specialized techniques of soft tissue handling used to minimize or revise scarring, to improve healing, and to cover soft tissue defects. The word plastic is derived from the Greek word plastikos, meaning “to mold.” Atraumatic surgical skills are incorporated into the manner in which tissues are incised, handled, and sutured to enhance the overall healing process. Although producing a fine, subtle scar is important cosmetically, it is arguably more important to avoid scars that are symptomatic with weight-bearing or when wearing shoes. Skin grafting and local soft tissue flaps can be used for immediate coverage of wounds that would otherwise require an extended period to heal if they were allowed to close by secondary intention. Improvements in microsurgical techniques and free tissue transfers have reduced the necessity for major amputations. All these areas fall within the scope of plastic and reconstructive surgery. This chapter covers basic and advanced techniques, as well as considerations necessary for performing these soft tissue manipulations in the foot and ankle.
GENERAL PRINCIPLES
TISSUE HANDLING
Bunnell (1) first used the term “atraumatic technique” to describe how soft tissues should be handled during surgery. Gentle handling of the tissues produces less trauma and thereby tends to enhance healing and reduce scar formation. The atraumatic technique also includes the means by which retraction is exerted by the assistant. This is an often overlooked area in which unnecessary tissue trauma may develop during the course of surgery.
Although the surgeon may be able to influence certain aspects of wound healing, many factors are beyond the surgeon’s control. For example, children and adolescents have a tendency for quick wound healing. However, in these patients, wounds are also more likely to be hypertrophied or discolored. Patients with darker skin are prone to form hypertrophic or keloid scars, whereas patients with fair skin heal with a finer scar. Hairless regions of the body, such as the palms and soles, also have a tendency to heal with finer scars (2).
INCISION PLANNING AND TECHNIQUE
Incision planning for the foot, ankle, or leg includes three important considerations: the type and amount of surgical exposure required, the relationship of the incision with the relaxed skin tension lines (RSTLs), and the avoidance of local neurovascular structures. The exposure must be adequate to perform the proposed procedure as well as to provide access for the insertion of internal fixation or other devices if required. When the procedure is performed through an incision that is too small, not only does it create more difficulty for the surgeon but also it may lead to more vigorous retraction or tissue handling to achieve appropriate visualization of the surgical field. In essence, creating a larger surgical incision is often less traumatic.
Dupuytren (3) and Langer (4) were the first to describe lines of tension across the skin that run perpendicular to the long axis of underlying muscles. The work of these two men was primarily performed on cadavers. Kocher (5), in 1892, recognized the potential surgical importance of Langer lines and described a set of surgical incisions parallel to these lines. However, Langer lines represent skin tension in rigor mortis and are no longer used for incision planning (6). Cox (7) later described cleavage lines that were different from those previously described by Langer, although the research method appeared similar. Cox also based his work on cadavers of average build and noted that the line pattern varied according to body configuration because of the differences in body curvature and shape.
Thus, two sets of skin lines were often employed by surgeons as guidelines for surgical incisions. However, these two sets of skin lines differed and were not valid for all body types or age groups. Finally, Borges and Alexander (8) described lines similar to those described by Cox but termed the former set of lines RSTLs (Fig. 79.1) (8). Tension is the force that causes scars to widen or hypertrophy. Most areas of the body have tension in many different directions, but the tension is greatest in the direction of the RSTLs. These lines were based on the furrows formed when skin is relaxed and are created by the directional pull of the underlying structures such as the bones and muscles (8,9).
Borges and Alexander (8) realized that an incision made perpendicular to the RSTLs would gap open under tension, whereas incisions made parallel to the RSTLs would close with minimal tension (Fig. 79.2) (5,8). The skin demonstrates its greatest ability to stretch in a direction perpendicular to the RSTLs along the lines of maximum extensibility. Because the orientation of the collagen fibers within scar tissue is determined by tension on the wound, placing the incision parallel to the RSTLs results in less tension on the wound. Wounds with little or no tension produce a lesser degree of scarring. Therefore, one should consider placing the surgical incision parallel to the RSTLs whenever practical.
To find the RSTLs, one simply relaxes the skin in an area by passive manipulation or by muscle movement. In areas where motion is minimal, the RSTLs may be found by using the pinch test (Fig. 79.3). When the skin is pinched parallel to the RSTLs, a regularly shaped furrow is created, whereas pinching the skin perpendicular to the RSTLs demonstrates little skin motility. Pinching the skin oblique to the RSTLs gives rise to an S-shaped pattern.
Ideally, an incision is best made parallel to the RSTLs. The next best goal is to orient the incision obliquely across
the RSTLs. However, at times, good surgical exposure for the procedure cannot be obtained unless the incision is oriented perpendicular to the RSTLs. Achieving adequate visualization and access to the tissues is of greater concern when one performs surgery.
the RSTLs. However, at times, good surgical exposure for the procedure cannot be obtained unless the incision is oriented perpendicular to the RSTLs. Achieving adequate visualization and access to the tissues is of greater concern when one performs surgery.
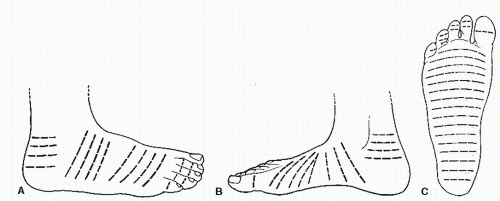 Figure 79.1 RSTLs as described by Borges and Alexander. |
Incisions placed in flexion-extension creases or at right angles to the direction of muscle pull over joints are ideal (10). Incisions that cross one or more joints are more susceptible to postoperative contracture. However, in most cases, to obtain adequate surgical exposure, the incision needs to be orientated in a linear manner. Adding a slight curvature to the incision helps to reduce tension on the healing wound and tends to enhance the appearance of the subsequent scar.
The final consideration relative to incision planning is the location of the neurovascular structures proximate to the surgical site. Making an incision parallel to the neurovascular structures reduces the risk of damage and allows for easier retraction. Unfortunately, it may not always be possible to satisfy all three of these criteria listed. For example, on the anterior ankles, the RSTLs are oriented in a transverse manner, perpendicular to the neurovascular structures.
Plantar incisions deserve special attention because a thick, hypertrophic scar on the weight-bearing surface may be symptomatic. Although surgeons have generally been wary of plantar incisions, it appears that these fears have not been confirmed with clinical experience, provided certain precautions are considered (11,12,13 and 14). These precautions may include avoiding placement of the incision directly beneath a weight-bearing area such as the metatarsal head or instituting a period of non-weight-bearing postoperatively (15).
Before making an incision, one may choose to map the proposed approach with a skin marker. “Measure twice, cut once” is an old carpenter’s adage that also applies to surgery. Crosshatches may be used to aid in skin closure to ensure that the wound margins are closed evenly. Skin incisions should be made perpendicular to the skin and with one pass of the knife. Care must be taken to avoid skiving the wound margins during creation of the skin incision (Fig. 79.4). This problem is more likely to occur with a curved incision or with incisions coursing over uneven surfaces. When the margins of the skin are skived, the undermined edge is more likely to be devascularized, possibly leading to wound-healing problems. In addition, a skived incision creates greater injury to the dermis and results in an irregular closure that may lead to a more noticeable or hypertrophied scar.
It is useful to apply tension on either side of the incision line to separate the tissues and to allow greater control of incision depth. When multiple strokes are needed to pass through the dermis, more potential damage is created within this layer. Changing to a deep blade after the skin incision is a common practice, but it has been shown to be unnecessary (16,17).
The initial incision may be made with either a no. 10 or a no. 15 blade and is usually based on the surgeon’s preference. Frequently, the no. 15 blade is used for smaller or curved incisions such as the digits, and the no. 10 blade is used more commonly for large or linear incisions.
The initial incision may be made with either a no. 10 or a no. 15 blade and is usually based on the surgeon’s preference. Frequently, the no. 15 blade is used for smaller or curved incisions such as the digits, and the no. 10 blade is used more commonly for large or linear incisions.
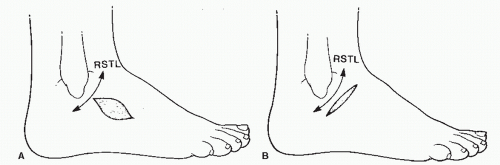 Figure 79.2 A: An incision placed perpendicular to the relaxed skin tension line (RSTL) gaps. B: An incision placed parallel to the RSTL coapts easily. |
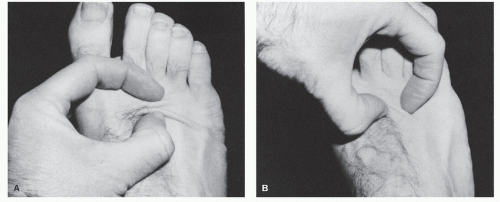 Figure 79.3 A: Pinching the skin in line with RSTL gives rise to a regularly shaped furrow. B: Pinching the skin perpendicular to the RSTL demonstrates limited skin mobility. |
SKIN CLOSURE
Skin closure may have a major influence on incision healing and the final cosmetic appearance of a scar. To the patient, the scar often reflects the surgeon’s skills because this is what is visible postoperatively. The goal of wound closure should always be to “reapproximate and not strangulate” the wound edges. If the sutures are too tight, then the wound edges will be placed under too much tension, which will create areas of localized ischemia. This increases the risk of wound complications. The tension across a wound can be diminished by undermining the wound margins or using deep closure.
The type of suture used is largely based on the surgeon’s preference. Reactivity rates, strength, and handling properties are some of the issues to consider when deciding which suture to use. Nonabsorbable sutures made from various materials such as nylon and polypropylene are available. Most have extremely low reactivity rates. Monofilament material has a smaller surface area to collect bacteria than braided types, and it may be used on wounds in which the risk of infection is higher (18). Braided materials tend to handle better and possess better knot security. Braided materials are also stronger than monofilament lines of the same gauge (19). To minimize tissue reaction, the smallest-diameter suture that will approximate the wound should be used. In foot surgery, 2-0, 3-0, 4-0, and 5-0 suture sizes are most commonly employed.
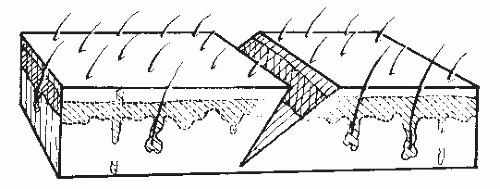 Figure 79.4 Skiving the incision increases the amount of damage to the dermis. |
Skin closure may also be achieved using a skin glue (e.g., Dermabond) (20). The glue is applied to the skin with an applicator and is “set” in approximately 2 to 3 minutes; this method reduces the time needed for wound closure. This material should not be used to close deep tissue. In addition to reducing closure time, the final scar may be improved with this technique, and sutures will no longer need to be removed. The strength of closure with this product appears to be comparable to traditional techniques at 10 days (20).
DOG EAR REPAIR
A dog ear is the excess tissue that may accumulate on one side of, or at the end of, an incision after closure. This typically occurs when the two sides of the defect are of unequal length or when sutures are spaced unevenly during wound closure. Dog ears may also be created when tissue is rotated about a wide base or if a fusiform defect with too great of an angle is closed. Dog ears are not only cosmetically unappealing, but they can also cause areas of increased pressure and subsequent callous formation. Involutions created by the dog ears may also serve as a nidus for infection. For these reasons, large dog ears should typically be repaired.
When a wound with unequal sides is closed, a dog ear forms on the longer side (Fig. 79.5). Various methods have been described to repair these one-sided dog ears (Fig. 79.6). One of the easiest methods is to excise a triangular portion of skin from the dog ear itself. The width of the base of the triangle to be excised should be the length needed to equalize the length between each side of the incision. If the triangle to be excised is perpendicular to RSTLs, then a smaller section of skin is normally excised to prevent excessive tension on the incision.
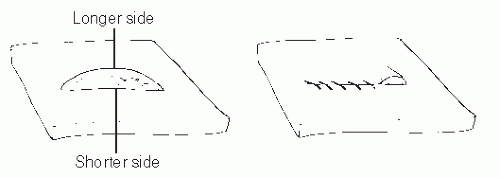 Figure 79.5 A one-sided dog ear created during wound closure resulting from an unequal-sided defect. |
A two-sided dog ear may occur when the angle at the end of a fusiform defect is too great or when tissue is rotated about a wide axis. When a dog ear forms on both ends of an incision, and the dog ear is small, it can simply be excised with two small semielliptic incisions, similar to excising a skin lesion (21). The skin to be excised is preferably oriented parallel to the RSTLs. Therefore, if the original incision is parallel to RSTLs, the semielliptic incisions continue along the same line to leave one linear incision. If the original incision is perpendicular to RSTLs, then the final result will be a T. When the defect is oblique to the RSTL, then the dog ear excision is best performed at an angle to the incision (Fig. 79.7).
Multiple techniques have been described when the dog ear involves both sides of the incision and the original incision is parallel to RSTL (21,22). One of the easiest methods is to use a skin hook to lift the redundant tissue and then continue the incision along one side of the dog ear. The redundant tissue is then pulled over the original surgical incision, and a second incision is made parallel to remove excess tissue (22) (Fig. 79.8).
When one is performing rotational or advancement flap procedures, preoperative planning can prevent or limit dog ear formation. However, dog ears are inevitable with certain procedures. Burow triangles can often be incorporated into advancement flaps in which dog ears can be expected to occur (23). If these procedures are performed correctly, they should not significantly increase the risk of flap failure. Burow triangles are created to excise tissue where an expected redundancy will occur, most commonly at the base of a flap. One side of the triangle is based along the flap, and the length is equal to the distance that the flap will be advanced. The other two sides of the triangle must be of equal length (Fig. 79.9).
Back cuts are occasionally needed when rotating tissue about a wide base (Fig. 79.10). These back cuts can compromise the vascularity to a flap and should be used with great caution. Most dog ears, especially those on weight-bearing surfaces, flatten with time. Therefore, one should not undertake too much risk when excising tissue.
SKIN GRAFTING
A commonsense approach to wound coverage employs the use of the least difficult procedure that will provide adequate coverage for the particular wound and location. Direct closure, skin grafting, local flaps, and distant flaps are the available methods, in ascending order of difficulty. Skin grafting involves the transferring of a portion of skin, devoid of its blood supply, from one part of the body to another.
Full-thickness wounds that heal by secondary intention involve contracture and epidermal migration from the wound margins. This process can take an extended period when the wound is large or when healing conditions are suboptimal. A skin graft provides rapid coverage of the wound and reduces the complications and disability associated with protracted healing. Skin grafts also have low complication rates compared with more invasive procedures, such as large rotational skin flaps. In the case of full-thickness skin grafts (FTSGs), donor sites may be closed primarily. With split-thickness skin grafts (STSGs), the donor site may be left to reepithelialize from the remaining dermal structures and wound margins.
Skin grafts can be classified as autografts (from the same individual), allografts (from the same species), or xenografts (from different species) (24). Cadaver skin has been used and may initially demonstrate some degree of take. However, the host eventually rejects the graft, and this complication limits the use of allografts to temporary biologic dressings. Xenografts fail to demonstrate signs of taking and are also used only as temporary biologic dressings (25). Advances in cultured epithelia may provide new alternatives in skin graft coverage (26). Cultured epithelial cells for grafting can expand up to 10,000 times the original surface area and can provide a significant amount of skin graft coverage in the severely burned patient (27).
Autogenous skin grafts are divided into two general types: FTSGs and STSGs. This distinction is based on the thickness of
dermis within the graft (Fig. 79.11). Definite differences exist between these two types of grafts, so the selection of one over the other is specific to each individual case.
dermis within the graft (Fig. 79.11). Definite differences exist between these two types of grafts, so the selection of one over the other is specific to each individual case.
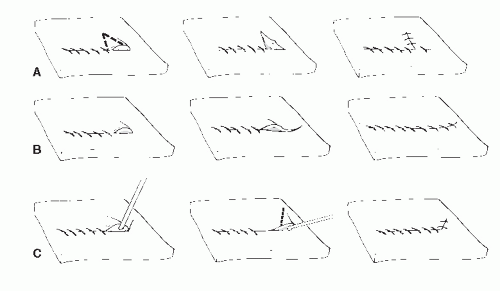 Figure 79.6 Multiple methods for repairing one-sided dog ears. |
 Figure 79.7 Repair of a two-sided dog ear with a three-to-one elliptic excision based on the orientation of the relaxed skin tension lines (RSTLs). |
SPLIT-THICKNESS SKIN GRAFTS
As the name suggests, STSGs include the epidermis and a portion of the dermis. STSGs vary in the amount of dermis that is included, and they are generally classified as thin (0.008 to 0.012 inch), intermediate (0.013 to 0.016 inch), and thick (0.017 to 0.02 inch) (28) (Fig. 79.12). The thinner the graft, the more likely a graft is to “take.” The reason may be the increased number of small vessels located in the superficial dermis that are transected during the harvesting process. These transected vessels aid in the revascularization process. Thinner grafts also have less tissue to support with the available blood supply.
The higher initial success rate is the main advantage to using a thin graft over thicker grafts. However, a thinner graft undergoes a greater degree of contraction because of the smaller amount of dermis that is present. Thin grafts are also more prone to hyperpigmentation and are less durable. Thicker grafts retain more of the dermal appendages, a feature that makes them more durable and provides a better cosmetic appearance. One must balance each of these considerations with the anticipated stress that will be applied to the area once it is healed.
STSGs should only be used in areas of adequate vascularity with a healthy wound base and should not be used to cover structures that are relatively avascular such as tendon, cartilage, and bone (29). However, a tendon that is covered by paratenon or bone that is covered by periosteum may support an STSG. Furthermore, an STSG may be used to cover small avascular regions, less than 0.5 cm in diameter, by a process known as bridging (30).
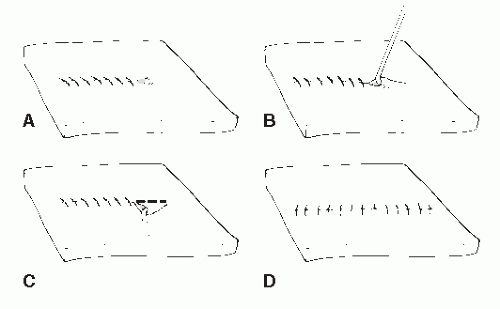 Figure 79.8 A,B: Dog ear repaired by continuing incision along one side of the redundant tissue. C,D: Pulling the redundant tissue over the new incision and excising excess tissue. |
Technique
Graft harvesting is made easier with the use of an electric, gaspowered, or battery-powered dermatome. The graft thickness can be preset on the dermatome, and the width of the graft can be varied by using different plates supplied with the instrument (Fig. 79.13). Grafts that are harvested with the power dermatome tend to be more uniform in width and thickness when compared with hand-harvested grafts (Fig. 79.14). Grafts can also be harvested using hand instruments such as Wecht or Humby knives (Fig. 79.15). The Wecht knife is useful for obtaining small grafts, whereas the Humby knife yields larger segments of skin. Using hand instrumentation for harvesting STSGs requires experience and is generally not recommended if a power dermatome is available.
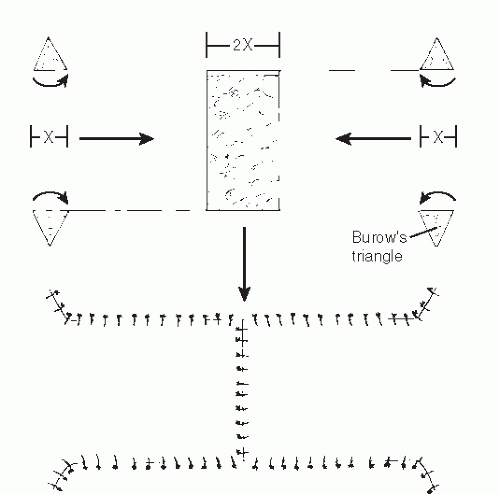 Figure 79.9 Design of advancement flaps to cover a central defect. Burow triangles incorporated to prevent dog ear formation. |
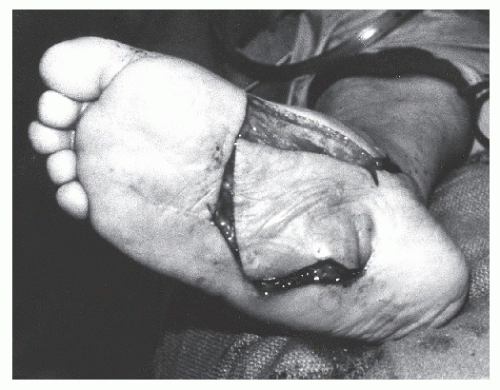 Figure 79.10 Back cut made at the medial base of a medial plantar artery flap to relieve tension on the pedicle. |
Common donor sites for STSGs are the thigh, buttock, and calf. The plantar medial arch can also be used to obtain smaller grafts. The donor site may remain noticeable even after healing. Therefore, the least conspicuous site should be chosen if cosmesis is of concern. The donor site remains cherry red for a number of months and then lightens with time. Dark-skinned patients may have an area of hypopigmentation at the donor site.
When one harvests the graft, the donor site should be prepared with saline or mineral oil. This allows the dermatome to slide smoothly across the skin surface and prevents binding or bunching of the skin that can lead to uneven graft thickness. The dermatome is held at approximately 45 degrees to the skin; firm and constant pressure is applied as the instrument is advanced. An assistant can help to guide the graft as it presents itself in the dermatome. To obtain an even, symmetric graft, a tongue blade can be used to flatten and tighten the skin in front of the dermatome. When enough graft has been harvested, the dermatome is lifted from the surface in a scooping action. The dermatome should be kept running until it leaves the skin surface. This allows the graft to be separated cleanly from the donor site. Adequate graft should be taken to cover the wound. If extra graft is harvested, it may be replaced on the donor site and will aid in reepithelialization at this level.
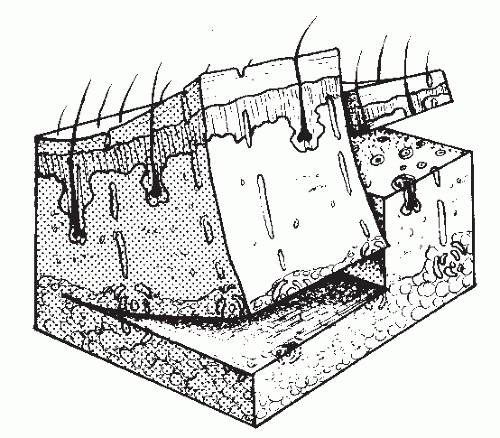 Figure 79.11 A full-thickness cut of a skin graft involves the superficial fascia; a partial-thickness cut is through a portion of the dermis. |
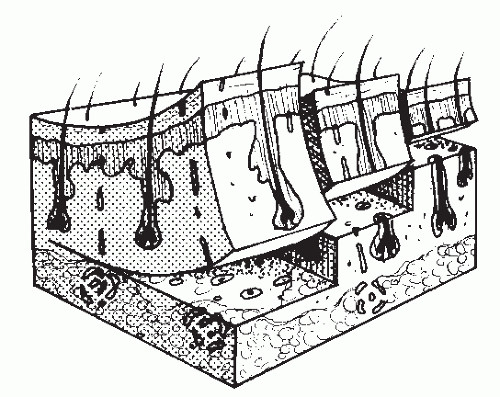 Figure 79.12 Thin, intermediate, and thick STSGs are classified by the amount of the dermis that is harvested. |
Frequently, the STSG is meshed to allow the graft to expand and to cover more surface area (Fig. 79.16). A mesher is capable of providing various ratios of expansion. The total surface area of an STSG may be expanded by as much as eight times its original size. In foot surgery, it is usually unnecessary to expand a graft by more than one and one-half times its original size because of the relatively small surface areas to be covered. The more a graft is expanded by meshing, the more epithelialization must take place to cover the interstices, thus creating a checkerboard appearance once the wound is healed. Meshing also prevents fluids from accumulating beneath the graft and thereby minimizes the risk of a seroma or hematoma (31).
Two meshers are commonly used. With one, the meshing ratio is determined by changing the blades in the instrument. The second, more commonly used device has a fixed cutting blade. The graft is placed on disposable plastic templates before it is passed through the instrument to determine the meshing ratio. With this latter type of mesher, it is extremely important that the grooves on the template are facing upward and the graft is placed on these grooves. If the graft is placed on the wrong side of the template and is passed through the mesher, the graft will be shredded. It is best to place the graft on the mesher dermis side upward. When the graft has been meshed, the template may be used to apply the graft by simply inverting the graft over the recipient bed. Once the process is complete, the graft should be handled as little as possible to prevent the individual strands of the meshed graft from becoming inverted.
STSGs may also be meshed by hand, a technique known as pie crusting. This is accomplished by making many small slits in the harvested STSG with a scalpel (Fig. 79.17). Pie crusting serves the same purpose as meshing in preventing the accumulation of fluids beneath the graft, although this process is not as effective as meshing. In addition, pie crusting fails to provide any significant expansion of the graft.
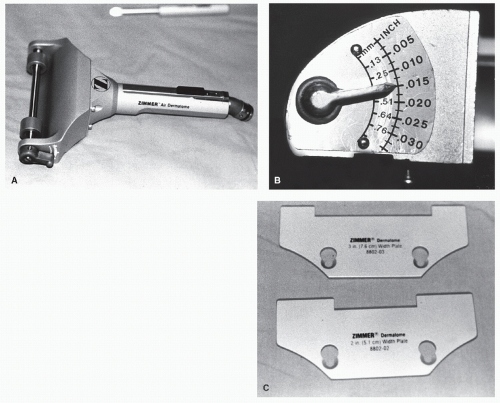 Figure 79.13 A: Zimmer gas-powered dermatome. B: A lever adjusts the graft thickness. C: Graft width is determined by interchangeable plates. |
Before application of the graft, the recipient bed must be prepared properly to ensure that the graft will have good “take.” The bed must be free of fibrotic and necrotic tissue. Toward this end, the wound is thoroughly débrided and irrigated. The wound margins are sharply débrided, and the base of the wound is typically curetted. A wound that is either infected or contaminated invariably causes the graft to fail. Some bacteria, such as group A β-hemolytic streptococci and Pseudomonas aeruginosa produce proteolytic enzymes that prevent the graft from adhering to the recipient bed (32). Recipient beds with bacterial counts greater than 100,000/g have been shown to have remarkably high failure rates (33). Silver sulfadiazine cream
applied to a wound four to five times a day has been shown to reduce the bacterial count significantly (34). The production of granulation tissue demonstrates that adequate vascularity exists at the graft site. Certain different types of biologic or other materials may be considered to enhance wound healing in preparation for the graft (25). However, each surgeon develops his or her own preferences. Finding a universal scheme for wound care is not realistic because wounds and patients differ.
applied to a wound four to five times a day has been shown to reduce the bacterial count significantly (34). The production of granulation tissue demonstrates that adequate vascularity exists at the graft site. Certain different types of biologic or other materials may be considered to enhance wound healing in preparation for the graft (25). However, each surgeon develops his or her own preferences. Finding a universal scheme for wound care is not realistic because wounds and patients differ.
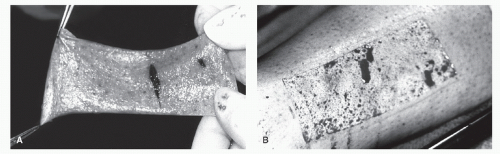 Figure 79.14 A: A uniform split-thickness graft taken with a power dermatome. B: Appearance of the donor site after harvesting an STSG. |
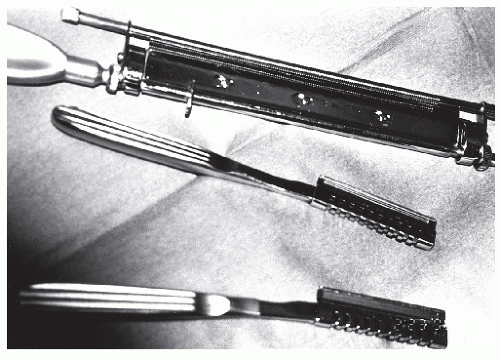 Figure 79.15 Wecht and Humby knives used for harvesting STSGs. |
Hemostasis of the recipient bed must be complete, because excessive bleeding may result in a hematoma. Hemostasis may be achieved by various methods including direct pressure, electrocautery, topical thrombin, and use of an epinephrinesoaked gauze pad.
The entire graft must maintain intimate contact with the recipient bed. Any portions of the graft that are “tenting” and are not in contact with the bed will fail. It is best to place the graft loosely on the bed and to allow it to fall into all concave surfaces and along the side walls of deeper wounds. Lightly flushing with normal saline helps the graft to draw into these concavities. A small border of STSG may be allowed to overlap the wound margins because this portion can be trimmed at a later date. The graft should be sutured into place by passing the suture through the graft to the host, a technique that prevents the graft from being lifted off the recipient bed. Excessive suturing is unnecessary because grafts that depend on sutures for stabilization are doomed to failure. In larger grafts, sutures may be used in the center of the wound to aid in adherence to the bed.
The dressing plays an important role in the postoperative care of an STSG. The ideal dressing prevents shear forces from disrupting the graft, prevents the collection of fluid under the graft, and provides a moist, sterile environment for healing. The stent dressing is commonly used in this situation. The first step in applying this dressing is to attach nonabsorbable sutures around the periphery of the wound. One end of the suture is secured to the skin, and the other end is left long so it may be tied over the dressing. These sutures should be evenly spaced, so pressure on the graft is equally dispersed (Fig. 79.18). The first layer of the dressing is a fine-meshed nonadherent gauze (e.g., Xeroform) placed directly on the STSG. This is used to ensure that the graft is not lifted from the bed with the first dressing change. The next layer consists of fluffed gauze or cotton balls soaked in saline or glycerin to keep the graft moist and viable. The sutures are then tied over the dressing to the suture directly on the opposite side of the wound. The sutures should be tight enough to create even compression across the graft, thus gently forcing the glycerin-soaked dressing into any concavities of the wound bed. A bulky dry dressing is applied over this stent dressing to provide added protection to the graft. Casting, Unna boots, and tie-over dressings can help to limit shear forces.
During the initial phase of the healing process, the flow of fluids is predominantly from the wound bed into the graft. This fluid accumulation may cause significant swelling. Limiting postoperative edema helps to prevent seroma formation beneath the graft. Generally, the foot is elevated for the first 5 to 7 days postoperatively to reduce the tendency for swelling further.
Opinions differ regarding when the first dressing change should take place. Some surgeons advocate daily dressing changes starting on the first postoperative day to prevent fluid accumulation under the graft, which is often the most common cause of failure (35). Other surgeons believe that the graft should not be disturbed for 3 to 7 days postoperatively. The most common practice is to inspect the STSG on the third postoperative day. Earlier inspection may disrupt the graft.
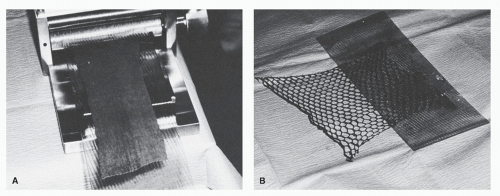 Figure 79.16 A meshing device can expand grafts to cover larger areas, as well as allow for drainage. A: Graft inserted for meshing. B: Meshed graft. |
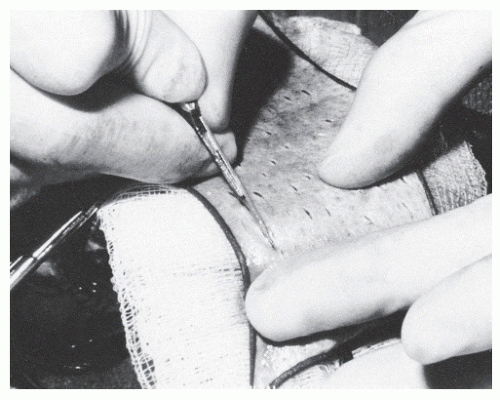 Figure 79.17 Pie-crusting technique for graft preparation. |
STSGs may survive periods of ischemia for up to 5 days, and FTSG may survive periods of ischemia for up to 3 days (36). Therefore, when the wound is inspected on the third postoperative day, if a seroma or hematoma is present, it can be evacuated, and the graft may still survive. If the graft has been disrupted during the postoperative period, it may be reapplied under sterile technique.
Excess STSG may be placed in a sealed container wrapped in a moist sterile sponge and stored at 0°C to 5°C for up to 21 days (37). However, after 3 to 4 days, the viability of the graft is considerably reduced (38). Excess graft may also be stored on the donor site under a semipermeable polyurethane dressing. The fluid that collects beneath this dressing helps to provide nutrition to the graft. If the graft is needed, it can easily be removed from the donor site in the first 3 to 5 days.
FULL-THICKNESS SKIN GRAFTS
Full-thickness skin grafts include the epidermis, dermis, and most of the dermal appendages. These types of skin grafts are more durable because of the overall thickness and the retention of sebaceous glands. Moreover, hair follicles remain in the graft; therefore, an appropriate donor site should be chosen for the desired cosmetic result. Because there is more tissue to be supported while the blood supply is being reestablished, this graft has a higher failure rate.
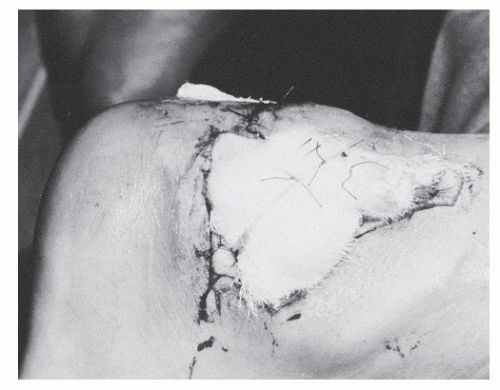 Figure 79.18 Traditional stent dressing for compression over a graft. |
The flexor creases, such as the popliteal fossa, the inguinal area, and the gluteal fold, are common donor sites. Small grafts, sometimes referred to as pinch grafts, can also be taken from the sinus tarsi area. Harvesting the graft in line with the flexor crease results in formation of a scar parallel to the RSTLs and facilitates primary closure of the donor site.
Harvesting of the graft begins by drawing the outline of the incisions on the skin. An elliptic incision in a 3:1 length-to-width ratio allows primary closure with minimal tension. Adequate graft should be harvested to allow for minimal tension across the graft when it is sutured to the recipient site. This reduces the risk of “tenting.” The graft is excised from the donor area by dissecting through the dermis and taking as little adipose tissue as possible with the skin (Fig. 79.19). The donor site is then closed primarily.
All remaining fat should be removed from the graft. One technique is to stretch the specimen over the surgeon’s finger and to use curved Kay scissors to remove the fat (Fig. 79.20). FTSGs are not meshed, but pie crusting may be used to promote drainage if a potential hematoma or seroma is of great concern. More sutures are often required with an FTSG to stretch the tissue back to its original size. As with STSG, the graft must be in complete contact with the recipient bed.
The postoperative course is also similar to that of patients with an STSG. Seroma, hematoma, infection, and shear forces are the greatest threats to graft survival. Once healing has taken place, an FTSG provides a more cosmetically pleasing and durable result than an STSG.
GRAFT AND DONOR SITE HEALING
Graft healing may be divided into three basic stages: the plasmatic stage, the stage of inosculation, and the reorganization and reinnervation stage. For these stages of graft healing to occur, the skin graft must be in stable contact with a healthy recipient bed. When a graft is initially placed on a wound, a
fibrin layer forms between the wound and the graft. This fibrin layer helps to secure the graft and allows diffusion of nutrients from the bed to the new skin (29). This stage is called the plasmatic phase and lasts approximately 24 to 48 hours. During this time, capillary budding from the recipient bed also begins. However, the graft remains ischemic and is white and dusky in appearance.
fibrin layer forms between the wound and the graft. This fibrin layer helps to secure the graft and allows diffusion of nutrients from the bed to the new skin (29). This stage is called the plasmatic phase and lasts approximately 24 to 48 hours. During this time, capillary budding from the recipient bed also begins. However, the graft remains ischemic and is white and dusky in appearance.
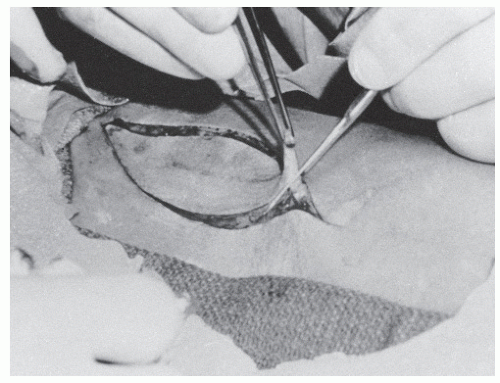 Figure 79.19 Outline for removal of FTSG and direct closure of the defect. |
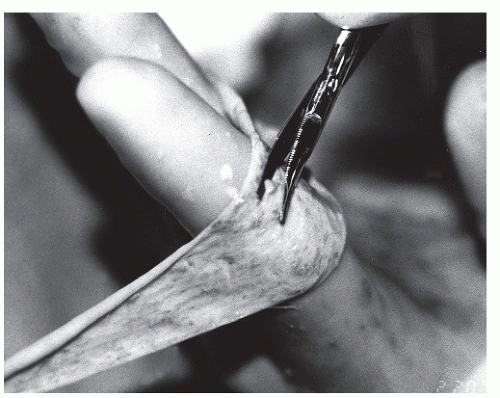 Figure 79.20 Removal of fat from an FTSG using curved Kay scissors. |
At approximately 48 hours, the host capillaries begin to make contact with the graft, beginning the second stage, the phase of inosculation. It remains unknown whether reanastomosis occurs between the new vessels and the transected vessels of the graft or whether the new vessels simply use the transected vessels as conduits to reestablish circulation (2). In either case, the more transected vessels that are present both in the host bed and the graft, the more likely the graft is to take. This finding provides one explanation for the higher success rate of thin grafts, which have many more transected vessels than thicker STSGs. Outflow of blood and lymph from the graft occurs by approximately the fifth to sixth postoperative day. Before this time, edema of the graft must be controlled with strict elevation of the extremity and good compression dressings.
The graft then enters the third and final stage in which reinnervation and reorganization occur as the connective tissue develops. Reorganization may continue for 1 to 2 years, and reinnervation may last up to 2 years, depending on the size and thickness of the graft (39,40).
Donor site healing for STSGs proceeds by epithelialization from the remaining epithelial structures, such as sebaceous and sweat glands and hair follicles. STSG donor sites can be extremely painful during the healing process. Using a semipermeable polyurethane dressing (e.g., Op-Site) allows the donor site to remain moist and thereby significantly reduces postoperative pain (41).
SKIN FLAPS
Although skin grafting is the mainstay of wound coverage because of its simplicity and low morbidity, the technique fails to provide adequate soft tissue coverage in many situations. In these instances, the surgeon may rely on various skin flaps to provide closure of the soft tissue envelope. Microsurgical techniques including free tissue transfer and complex rotational flaps have been helpful in the field of limb salvage.
TABLE 79.1 Flap Classifications | |||||||||||||||||||||||||||
|---|---|---|---|---|---|---|---|---|---|---|---|---|---|---|---|---|---|---|---|---|---|---|---|---|---|---|---|
| |||||||||||||||||||||||||||
A skin flap may be defined as a segment of skin and subcutaneous tissue that is transferred or rotated to restore a tissue defect (42). Unlike skin grafts, skin flaps retain in some capacity their own vascular supply and sensorium in many instances. The base of the flap, which retains vascularity, is referred to as the pedicle. The pedicle may include portion of skin, subcutaneous tissue, and the vascular supply, or it may be limited to the vascular structures, such as an island flap or free flap, as discussed later in this chapter.
CLASSIFICATION
Skin flaps are most commonly classified in one of two ways: by the motion the flap undergoes to cover the defect or by the means in which the flap receives its blood supply (Table 79.1). Grabb and Myers (43) classified skin flaps according to the source of vascularity. The classification of flaps based on vascular supply is particularly useful because the vessels supplying the flap are the major factor limiting movement.
Flaps classified on their vascular supply fall into two categories: random-pattern flaps and axial-pattern flaps. A randompattern flap is vascularized by the cutaneous dermal-subdermal plexus. These flaps lack a primary artery and vein and rely on the perfusion of the dermal-subdermal vessels from the pedicle of the flap. The ability of the pedicle to provide adequate blood to the tissues limits a random flap’s length. A length-to-base ratio of 1:1 is generally accepted to provide adequate vascular perfusion to the distal end of the flap (44). Thus, the base must remain wide, a feature that can greatly limit flap mobility and rotation. Some have reported success with a 2:1 ratio. It has been this author’s experience that a 1.5:1 ratio provides consistently successful outcomes and is most practical in foot surgery.
Axial-pattern flaps contain a primary artery and vein that are incorporated into the pedicle of the flap. Therefore, perfusion depends on the axial artery rather than on the width of the pedicle and cutaneous perfusion. Any portion of the flap distal to the direct supply of the axial artery is effectively a random flap and is perfused by the dermal-subdermal plexus. As a result, this portion of the flap is subject to the length-to-base ratio at the distal end to maintain a good vascular supply.
Variations of the axial-pattern flap include the island flaps and free flaps. An island flap is an axial flap in which the pedicle of the flap consists only of the artery and vein that have been dissected free from the soft tissues, to provide greater mobility of the tissue and to allow more than 180 degrees of rotation. A free flap is also an axial-pattern type flap, but the tissue is
harvested from a distant site, a procedure requiring microsurgical anastomosis of the vascular pedicle to a recipient vascular supply in the foot or leg.
harvested from a distant site, a procedure requiring microsurgical anastomosis of the vascular pedicle to a recipient vascular supply in the foot or leg.
When skin flaps are classified according to movement of the flap, the movement may take place from a local or a distant donor site. Local flaps are created in the soft tissues immediately adjacent to the defect and may be subdivided into advancement, transpositional, rotational, and interpolational flaps (23). Rotational flaps are semicircular and are rotated about a pivot point. Transpositional flaps are also rotated about a point; however, these flaps are composed of linear dimensions such as squares or rectangles. Interpolational flaps are also rotated about a pivot point, but they differ from rotational and transpositional flaps because the flap must pass over or under intact tissue between donor and recipient sites (23). Advancement flaps have fixed points that are stretched as the donor tissue is pulled into the recipient bed. Examples of advancement flaps include bipedicle flaps and V-Y advancement flaps.
Distant flaps are those that are transferred from another region of the body, such as a free flap or cross-extremity flap. These flaps are often used for larger defects of the foot and ankle region. Distant flaps also require more technical expertise including such specialized techniques as microsurgery.
LOCAL FLAPS
The ideal shape of the rotation flap is a half-circle, although many other rotation flaps have been described and used successfully. When using a half-circle rotation flap, a larger-diameter flap creates less tension across the wound (45,46). Excessive tension may be alleviated by creating either Burow triangle or a back cut (Fig. 79.21). Burow triangle is designed to be closed primarily. However, a back cut is usually left open to heal by secondary intention or is covered with a skin graft (46). Closure of a back cut may recreate the tension that was previously released. Rotational flaps on the plantar surface of the foot have been used effectively to close wounds primarily that were created after excision of plantar lesions and hypertrophic scars (45,47).
Advancement flaps are most often random-pattern flaps that are moved in one direction to cover small defects. No rotation or lateral movement occurs in this type of flap. They can, however, have an axial-pattern blood supply. Because these flaps are typically random-pattern flaps and tension across the area can potentially disrupt the blood supply, these types of flaps should be used to cover small defects that require limited advancement (48). In addition, the inherent elasticity of the skin may dictate the amount of advancement. Some undermining of the end of the flap may be necessary, and the length-to-width ratio of this segment should be the 1:1 ratio previously described. This is unnecessary if Doppler examination shows an axial artery that extends into the flap. These flaps are commonly square or rectangular, and redundant skin at the base of the flap is inevitable. Burow triangle may be incorporated into the flap design to alleviate this redundancy (46) (Fig. 79.22).
Another type of advancement flap is the bipedicle flap. This is created by making a linear counterincision parallel to the defect. The counterincision should be twice the length of the defect. The interposed skin between the defect and incision is undermined and is advanced to cover the wound. The donor site defect is then closed using an STSG or an FTSG (Fig. 79.23).
V-Y AND Y-V SKIN PLASTIES
The V-Y and Y-V skin plasties are advancement flaps that are useful in lengthening scar contractures or in reducing contracted digits across the metatarsophalangeal joints (49). The V-Y skin plasty has been commonly employed to treat an overlapping fifth digit (50) (Fig. 79.24). Because this is a random-pattern flap, the apex may be placed either proximally or distally. Generally, the wider the base of the flap, the greater the blood
supply to the distal segment will be, thereby reducing the risk of tip necrosis. The full thickness of the tissues should be undermined before advancement to release any tension that may limit the amount of mobility. The flap is effectively advanced in the direction opposite the apex to create the lengthening desired with a V-Y skin plasty.
supply to the distal segment will be, thereby reducing the risk of tip necrosis. The full thickness of the tissues should be undermined before advancement to release any tension that may limit the amount of mobility. The flap is effectively advanced in the direction opposite the apex to create the lengthening desired with a V-Y skin plasty.
 Figure 79.21 A rotational flap has been designed to cover the plantar defect after excision of the ulcer. A Burow triangle is incorporated to address the dog ear at the base of the flap. (Continues on next page) |
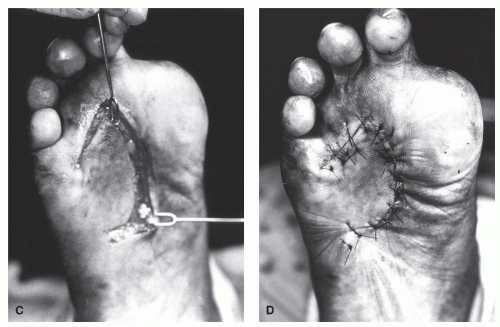 Figure 79.21 (Continued)
Related posts:Stay updated, free articles. Join our Telegram channel
Full access? Get Clinical Tree
 Get Clinical Tree app for offline access

|
