Periarticular Endoscopy
Niek C. van Dijk
Gino M. M. J. Kerkhoffs
Peter A. J. de Leeuw
Maayke N. van Sterkenburg
In 1931, Burman (1) found the ankle joint unsuitable for arthroscopy because of its typical anatomy. Tagaki and later Watanabe (2) made considerable contributions to arthroscopic surgery, and the latter published a series of 28 ankle arthroscopies in 1972. Since the late 70s, numerous publications have followed. Over the last 30 years, arthroscopy of the ankle joint has become an important procedure with numerous indications for both anterior as well as posterior pathology and pathology of tendons. Endoscopic surgery offers the possible advantages of direct visualization of structures, improved assessment of articular cartilage, less postoperative morbidity, faster and functional rehabilitation, earlier resumption of sports, and outpatient treatment (3, 4 and 5). The value of diagnostic arthroscopy nowadays is considered limited (6,7). Posterior ankle problems pose a diagnostic and therapeutic challenge, because of their nature and the deep location of hindfoot structures. This makes direct access more difficult. Historically, the hindfoot was approached by a three-portal technique, that is, the anteromedial, anterolateral, and posterolateral portals, with the patient in the supine position (8, 9 and 10). The traditional posteromedial portal is associated with potential damage to the tibial nerve, the posterior tibial artery, and local tendons (11). A two-portal endoscopic approach with the patient in the prone position was introduced in 2000 (12). This technique has shown to give excellent access to the posterior ankle compartment, the subtalar joint, and extra-articular structures (12, 13, 14 and 15). This chapter provides up-to-date information on posterior ankle arthroscopy and tendoscopy with a wide variety of indications highlighted.
STANDARD TWO-PORTAL HINDFOOT APPROACH
Introduction
Posterior ankle pathology can be treated by means of a standard two-portal hindfoot approach. The posteromedial and lateral hindfoot portals have proved to be anatomically safe and reliable (16,17) and clinically provide excellent access to the posterior aspect of the ankle and subtalar joint, including extra-articular hindfoot structures (12). Hindfoot arthroscopy compares favorably to open surgery with regard to an overall lesser morbidity and quicker recovery. Since the introduction of the technique in 2000 (12), an increasing number of pathologic conditions can be treated. These will be discussed in the upcoming paragraphs. First, the standard technique for hindfoot endoscopy, including its pearls and pitfalls, will be discussed (12, 18). The individual pearls and pitfalls for each indication will be mentioned in the corresponding subchapters.
Technique
Hindfoot endoscopy can be carried out in an outpatient setting under general, spinal, or regional anesthesia. The affected side is marked preoperatively, and the patient is placed in prone position. Prophylactic antibiotics are not routinely administered. A tourniquet is applied above the knee and pressured at 300 mm Hg prior to instrument insertion. The ankle is positioned slightly over the distal edge of the operating table with a small triangular support under the lower leg, allowing free movement of the ankle. Normal saline or Ringer solution by gravity flow is used for irrigation. A 4.0-mm 30° arthroscope is routinely used and distraction is not persistently applied; however, a soft-tissue distractor may be used when indicated (19).
For correct portal placement, several anatomical landmarks must be taken into account; these include the sole of the foot, the lateral malleolus, and the medial and lateral borders of the Achilles tendon. The authors prefer to mark each of the anatomical references on the skin. The ankle is subsequently brought in the neutral position (90°), and a straight line, parallel to the sole of the foot, is then drawn from the tip of the lateral malleolus to the Achilles tendon, and is extended over the Achilles tendon to the medial side.
The posterolateral portal is located just proximal to, and 5 mm anterior to, the intersection of the straight
line with the lateral border of the Achilles tendon. The posteromedial portal is located at the same level as the posterolateral portal, but on the medial side of the Achilles tendon (Fig. 88.1).
line with the lateral border of the Achilles tendon. The posteromedial portal is located at the same level as the posterolateral portal, but on the medial side of the Achilles tendon (Fig. 88.1).
First, the posterolateral portal is made as a vertical stab incision, and a mosquito clamp is used to spread the subcutaneous layer. The foot is now in a slightly plantarflexed position. The clamp is directed anteriorly, toward the first interdigital webspace. When the tip of the clamp touches bone, it is exchanged for a 4.5-mm arthroscopic cannula with the blunt trocar pointing in the same direction. The trocar is situated extra-articularly at the level of the posterior talar process and is exchanged for the 4.0-mm 30° arthroscope, pointing laterally. At this time, the scope is still outside the joint in the fatty tissue overlying the capsule.
Second, the posteromedial portal is made with a vertical stab incision, and a mosquito clamp is introduced through the posteromedial portal and directed toward the arthroscope shaft at a 90° angle until the clamp contacts the arthroscope. The ankle is still in a slightly plantarflexed position, and the arthroscope has remained in position through the posterolateral portal, still directing toward the first interdigital webspace. The arthroscope shaft is used as a guide for the mosquito clamp to travel anteriorly. While in contact with the arthroscope shaft, the clamp glides over the shaft toward the ankle joint until bone is reached. Once the arthroscope and clamp are both touching bone, the mosquito clamp is left in position and the arthroscope is pulled slightly backward and tilted until the tip of the clamp comes into view. The soft tissue layer covering the joints consists of fatty tissue and the deep crural fascia. At the lateral side, a specialized part of the crural fascia can be recognized, which is called the Rouvière ligament.
The clamp is now directed to the lateral side in an anterior and slightly plantar direction. This movement creates an opening in the crural fascia just lateral to the posterior talar process. The fatty tissue and subtalar joint capsule are subsequently opened. The mosquito clamp is exchanged for a 5-mm full radius shaver (Fig. 88.2). With a few turns of the shaver, the subtalar joint capsule and soft tissue are gently removed. The opening of the shaver blade is facing bone. This part of the procedure is carried out in a blind fashion. The shaver is then retracted, and the scope is brought anteriorly through the opening in the crural fascia to visualize the posterolateral aspect of the subtalar joint. Once the joint is recognized, the opening in the crural fascia is enlarged to create more working area. At the level of the ankle joint, the posterolateral talar prominence and the posterior talofibular ligament (PTFL) are recognized. Just proximal to the PTFL, the intermalleolar ligament or tibial slip is recognized and more proximal and deep part of the tibiofibular ligament, also named transverse ligament, can be assessed.
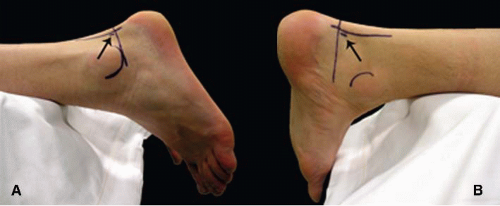 FIGURE 88.1. A: Posterolateral portal. B: Posteromedial portal (arrows). |
The cranial part of the posterior talar process is freed from the Rouvière ligament and crural fascia to identify the flexor hallucis longus (FHL) tendon. The FHL tendon is an important safety landmark. Since the neurovascular bundle runs just medial to this tendon, the area lateral to the FHL tendon is regarded as being safe (Fig. 88.3).
Once the safe working area is defined, pathology can be addressed. Applying manual distraction to the calcaneus opens up the posterior compartment of the ankle and instruments can be introduced. We prefer to apply a soft-tissue distractor at this point (19). When indicated, a synovectomy and/or capsulectomy can be performed. The talar dome can be inspected over almost its entire surface as well as the complete tibial plafond. Possible osteochondral defects (OCDs) can be debrided, drilled, and microfractured.
In the following sections, each of the different indications is explained in detail.
Pearls and Pitfalls
Create the posterolateral portal just proximal and lateral to the imaginary intersection of the horizontal line, perpendicular to the foot sole, from the tip of the lateral malleolus to the Achilles tendon with the ankle in the neutral position.
The posteromedial portal is located at the same level as the posterolateral portal, just medial to the Achilles tendon.
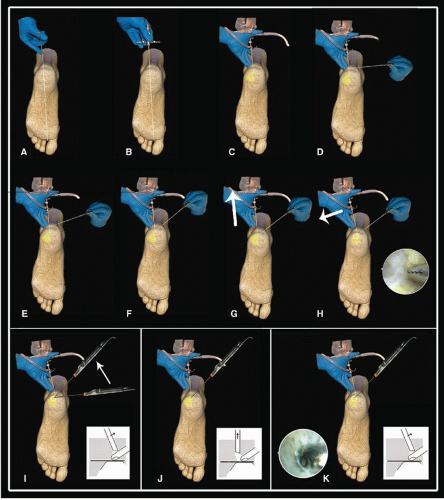
FIGURE 88.2. Introduction of instruments for standard two-portal hindfoot approach. A: First, the lateral portal is made. B: Instruments are introduced in the lateral portal pointing toward the first webspace. C: Direction of view is always to the lateral side. D: Through the medial portal the instrument is introduced horizontally, until it touches the shaft of the scope. E, F: The scope is used as a guide for the instrument in the medial portal to travel anteriorly. When the instrument touches bone, the scope is slightly lifted (G) and tilted laterally, until the instrument comes into view (H). I, J, K: The same maneuvre is performed each time an instrument is introduced into the medial portal.
Use the arthroscopic shaft, inserted through the posterolateral portal and directed toward the interdigital webspace in between the first and the second toe, as a guide to travel anteriorly with the instruments inserted through the posteromedial portal.
Exchanging instruments through the posteromedial portal requires a careful step-by-step procedure to prevent iatrogenic damage to the neurovascular structures. The direction of the arthroscope is hereby essential. At the start, the instruments must always be directed
toward the first webspace with the ankle in slight plantarflexion. Subsequent instrument insertions through the posteromedial portal must be perpendicular to the arthroscope until they are in contact. The arthroscopic shaft should routinely be used to guide the instruments inserted through the posteromedial portal up to the level of the bone. For accurate orientation, the arthroscopic view (30° angulation) should always be directed to the lateral side.

FIGURE 88.3. Overview after standard two-portal hindfoot approach. Safe working area.
Proximal and lateral to the posterior talar process the crural fascia can be quite thick; this local thickening is called the ligament of Rouvière. This ligament should at least be partially excised of sectioned, using arthroscopic punch or scissors, to reach the level of the subtalar joint and/or ankle joint.
Always operate lateral from the FHL tendon to prevent damage to the neurovascular bundle, which is located just medially from the FHL tendon.
Posterior ankle arthroscopy is an advanced endoscopic procedure; surgeons not familiar with endoscopic surgery are advised to practice in a cadaveric setting (20).
POSTERIOR ANKLE IMPINGEMENT
Introduction
The pathophysiological mechanism to produce this syndrome can be divided into an overuse and a trauma group.
The overuse group mainly consists of ballet dancers, downhill runners, and soccer players (21, 22 and 23).” In these different sports, hyperplantarflexion is common, resulting in compression of the anatomical structures between the calcaneus and the posterior part of the tibia.
A hyperplantarflexion trauma and supination trauma can cause damage to these structures and can finally lead to a chronic posterior ankle impingement syndrome. A differentiation must be made between the two groups, since overuse trauma seems to have a better prognosis (24) and patients are more satisfied after arthroscopic treatment (25). Congenital anatomic anomalies such as a prominent posterior talar process, an os trigonum, or a bipartite talus (26) can facilitate the occurrence of the syndrome. An os trigonum is estimated to be present in 1.7% to 7% and occurs bilateral in 1.4% people (27, 28 and 29). These congenital anomalies in combination with a traumatic or overuse injury facilitate the occurrence of symptoms (23, 30, 31 and 32).
In the presence of a congenital bony anomaly, the soft tissue structures in the hindfoot are more prone to injury. With plantarflexion, bony anomalies impinge between the posterior part of the distal tibia and the calcaneus. The posterior ankle ligaments, such as the intermalleolar ligament, transverse ligament, and/or the PTFL, can become damaged during these ankle movements in the presence of bony anomalies. The posterior ankle impingement syndrome is, therefore, most frequently a combination of soft and bony impingement. Nevertheless also pure soft tissue ankle impingement can be present, as for instance, an isolated injury to the intermalleolar ligament (33), and pure bony impingement such as loose bodies can be present.
History and Physical Examination
Posterior ankle impingement syndrome is by definition a pain syndrome. The pain is mainly present in the hindfoot during forced plantarflexion. A specific test to detect
posterior ankle impingement is the forced passive hyperplantarflexion test. The forced hyperplantarflexion test is performed with the patient in a sitting position with the knee flexed to 90°. The test must be performed with repetitive quick passive hyperplantarflexion movements. The test can be repeated in slight external rotation or slight internal rotation of the foot relative to the tibia. The test is considered positive when the patient complains of recognizable pain during the test. A negative test rules out the posterior ankle impingement syndrome. A positive test is followed by a diagnostic infiltration with Xylocaine. Disappearance of pain following infiltration confirms the diagnosis.
posterior ankle impingement is the forced passive hyperplantarflexion test. The forced hyperplantarflexion test is performed with the patient in a sitting position with the knee flexed to 90°. The test must be performed with repetitive quick passive hyperplantarflexion movements. The test can be repeated in slight external rotation or slight internal rotation of the foot relative to the tibia. The test is considered positive when the patient complains of recognizable pain during the test. A negative test rules out the posterior ankle impingement syndrome. A positive test is followed by a diagnostic infiltration with Xylocaine. Disappearance of pain following infiltration confirms the diagnosis.
Diagnostic Imaging
In patients with a posterior ankle impingement, the anteroposterior (AP) ankle view typically does not show abnormalities. Osteophytes, calcifications, loose bodies, chondromatosis as well as hypertrophy of the posterosuperior calcaneal border can often be detected by the lateral ankle radiograph. In case of doubt for the differentiation between hypertrophy of the posterior talar process or an os trigonum, we recommend a lateral radiograph view with the foot in 25° of exorotation (Fig. 88.4). Especially in posttraumatic cases, a spiral CT scan can be important to ascertain the extent of the injury and the exact location of calcifications or fragments. Soft tissue pathology and the posterior ankle ligaments can be visualized best using an MRI scan (34, 35).
Treatment Options
The deep location of hindfoot structures makes direct access difficult. Historically, the hindfoot was approached by a three-portal technique (i.e., anteromedial, anterolateral, posterolateral), with the patient in the supine position (36). The traditional posteromedial portal is associated with potential damage to the tibial nerve, the posterior tibial artery, and local tendons (37). We describe the treatment of the most common posterior ankle impingement etiologies through the two-portal hindfoot approach with the patient in the prone position, as is discussed in detail previously.
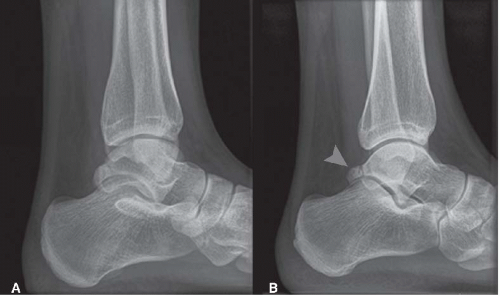 FIGURE 88.4. A: Conventional lateral radiograph of a right ankle. B: Posterior impingement view. An os trigonum is now visible. |
During the standard endoscopic hindfoot approach, first the FHL tendon must be localized, as this is the safety landmark during the entire procedure that determines the medial border of the working area. Now the hindfoot can be inspected for specific pathologies.
Loose bodies can be localized and removed according to the preoperative planning based on the CT scan. Routinely inspect the posterior ankle ligaments, that is, the intermalleolar, transverse, and PTFL. From distal to proximal, the PTFL, intermalleolar ligament, and transverse ligament can subsequently be recognized. Distinguishing the intermalleolar ligament from the transverse ligament can be difficult. Ankle dorsiflexion tensions both ligaments, creating a gap mainly at the lateral side. In case the ligaments are swollen, partially ruptured or in case of fibrosis, the ligaments can be (partly) removed or debrided.
Specific soft tissue impingement such as synovitis, chondromatosis, and/or excessive scar tissue can be removed using a shaver.
Removal of a symptomatic os trigonum (Fig. 88.5), a nonunion of a fracture of the posterior talar process or a symptomatic large posterior talar prominence, involves partial detachment of the PTFL and release of the flexor retinaculum and a release of the talocalcaneal ligament, which all attach to the posterior talar prominence. Detachment is achieved using an endoscopic punch.
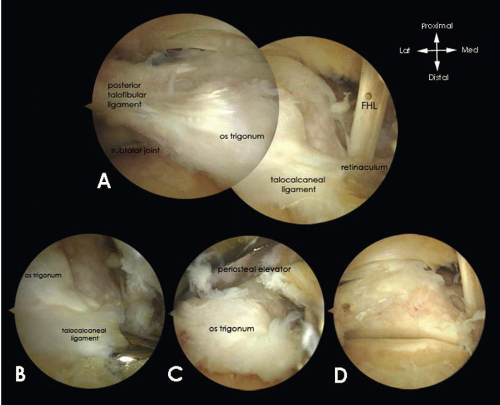 FIGURE 88.5. A: Endoscopic overview of the hindfoot after identification of the FHL tendon. An os trigonum is visible. B: With a punch, the posterior talofibular and talocalcaneal ligaments are released. C: With a periosteal elevator, the os trigonum is released and removed thereafter with a grasper. D: View after removal of the os trigonum. |
In case of a symptomatic large posterior talar prominence, the bony prominence should additionally be detached from the talus using a chisel to allow removal with a grasper.
Rehabilitation Protocol
The patient can be discharged the same day of surgery and weight bearing is allowed as tolerated. The patient is instructed to elevate the foot when not walking to prevent edema. The dressing is removed 3 days postoperatively, and the patient is permitted to shower. Performing active range of motion exercises for at least three times a day for 10 minutes each is encouraged. With satisfaction of the surgeon and patient, no further outpatient department contact is necessary. Patients with limited range of motion are directed to a physiotherapist.
Pearls and Pitfalls
Ankle dorsiflexion creates a gap in between the intermalleolar and the transverse ligament at the lateral side, allowing a clear distinction between both ligaments on inspection.
If a hypertrophic posterior talar process is removed by using a chisel, care must be taken not to place the chisel too far anteriorly. Only the inferoposterior part of the process should be removed with the chisel. The remnant of the process can be taken away with a bonecutter shaver. If initially the chisel is placed too much anteriorly, it is hard to avoid taking away too much bone at the level of the subtalar joint.
OSTEOCHONDRAL DEFECT POSTERIOR COMPARTMENT ANKLE JOINT
Introduction
An OCD is a lesion involving both the articular cartilage and the subchondral bone. The incidence of OCDs of the talar dome in patients with acute lateral ankle ligament ruptures is 4% to 7% (6, 38). OCDs are usually located on the posteromedial (58%) or anterolateral (42%) side of the talus (39). Medial lesions are typically deep and cupshaped; lateral lesions are shallow and wafer-shaped (40). Inappropriate treatment of OCDs may eventually result in osteoarthritis of the ankle (40).
The etiology of OCD is a previous trauma to the ankle joint, which is reported in 93% of lateral lesions and
61% of medial lesions (39). In lateral lesions, the trauma mechanism is usually a combination of inversion and dorsiflexion; in medial lesions, the combination is inversion, plantar flexion, and rotation (41). In nontraumatic OCDs, possible causes are genetic, metabolic, vascular, endocrine, or degenerative as well as morphologic abnormalities (41, 42).
61% of medial lesions (39). In lateral lesions, the trauma mechanism is usually a combination of inversion and dorsiflexion; in medial lesions, the combination is inversion, plantar flexion, and rotation (41). In nontraumatic OCDs, possible causes are genetic, metabolic, vascular, endocrine, or degenerative as well as morphologic abnormalities (41, 42).
History and Physical Examination
Patients with a chronic lesion typically experience persistent or intermittent deep ankle pain during or after activity, sometimes accompanied by swelling and limited range of motion. Often, on examination, few abnormalities are found. Affected ankles may have a normal range of motion with the absence of swelling and no recognizable tenderness on palpation.
Diagnostic Imaging
Routine radiographs consist of weight-bearing anteroposterior and lateral views of both ankles. The radiographs may show an area of detached bone surrounded by radiolucency.
Initially, the damage may be too small to be visualized on a routine radiograph. A heel rise mortise view may reveal the posterior OCD (43). For further diagnostic evaluation, CT and MRI have demonstrated similar accuracy (43). A multislice helical CT scan is preferred because it is more helpful for preoperative planning.
Treatment Options
For asymptomatic of low symptomatic lesions, conservative therapy must be tried prior to any surgical intervention for at least 6 months. Conservative measures for these lesions may consist of rest and/or restriction of (sporting) activities with or without treatment with nonsteroidal antiinflammatory drugs (NSAIDs). Also, a cast to immobilize the ankle is a possibility (42, 44). The aim is to unload the damaged cartilage, so edema can resolve and necrosis is prevented. Another objective of the conservative treatment could be healing of a (partly) detached fragment to the surrounding bone.
A surgical intervention must be considered for symptomatic OCDs interfering with daily activity. Symptomatic lesions are treated primarily by debridement and bone marrow stimulation, consisting of removal of all the unstable cartilage, including the underlying necrotic bone (39). Any cysts underlying the defect are opened and curetted. The sclerotic-calcified zone that is most commonly present is perforated by means of microfracturing into the vascularized subchondral bone. The underlying intraosseous blood vessels are disrupted and growth factors are released, leading to the formation of a fibrin clot in the created defect. The formation of local new blood vessels is stimulated, marrow cells are introduced into the OCD, and fibrocartilaginous tissue is formed (45). In case of a cystic defect ≥15 mm in size, we consider placing a cancellous bone graft in the defect (46).
Retrograde drilling, combined with cancellous bone grafting when necessary, may be performed for primary OCDs when there is intact cartilage with a large subchondral cyst (47). When primary treatment fails, osteochondral autograft transfer system (OATS) or autologous chondrocyte implantation (ACI) are options for talar defects (48, 49). With OATS, one or more osteochondral plugs are harvested from a lesser weight-bearing area of the knee and transplanted into the defect (49). Although most reports show excellent results, the technique is associated with donor site morbidity, and a medial malleolar osteotomy is often required (50, 51 and 52). ACI is the implantation of in vitro-cultured autologous chondrocytes, using a periosteal tissue cover after expansion of isolated chondrocytes. Despite excellent results reported by some investigators (48, 53), disadvantages include the two-stage surgery, high cost, and reported donor site morbidity (51, 53). Talar fragment fixation with one or two lag screws is preferred in acute or semiacute situations in which the fragment is ≥15 mm. In adolescents, fixation of an OCD always should be considered following failure of a 6-month period of conservative treatment.
Surgical Technique
Most OCDs will not exceed 15 mm. These lesions are treated with debridement and drilling. Depending on the location of the lesion, which must be mapped preoperatively, ideally with a CT scan, a noninvasive soft-tissue distraction device can be very helpful (19). Lesions located in the tibia plafond are difficult to assess without such a device.
After having determined the posterior working area, which is lateral to the FHL tendon, the intermalleolar ligament must be tilted using a hook to enter the talocrural joint. The lesion can now be addressed and its extent can be determined with a probe or hook. Debridement is performed by means of the bonecutter shaver or a small closed cup curette. It is important to remove all necrotic bone and overlying unstable cartilage (54). After full debridement, the sclerotic zone is perforated several times at intervals of approximately 3 mm. Perforation can be achieved by using a 2-mm drill, a microfracture awl or a 1.4-mm K-wire. A K-wire has the advantage of flexibility, whereas a drill may break more easily if the position of the ankle is changed during drilling. Microfracturing by means of a microfracture awl offers the possibility to work “around the corner” and results in microfractures of the trabeculae rather than destruction of the bone (55), but any created small bony particles should be carefully removed (56). Sufficient hemorrhage can be checked by loosening the tourniquet (Fig. 88.6).
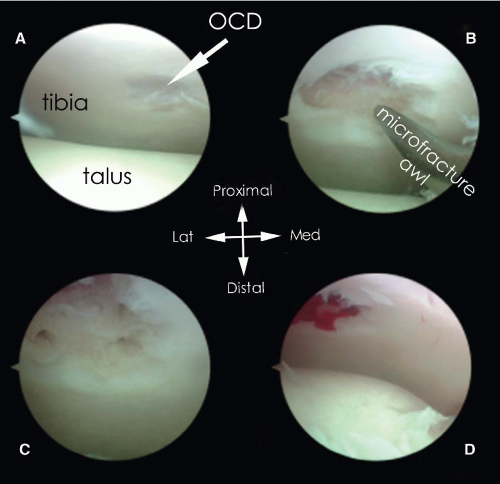 FIGURE 88.6. Debridement and microfracturing of an OCD of the posterior tibial plafond. A: OCD. B: After debridement with a curette, a microfracture probe is introduced. C: OCD after microfracturing. D: On release of the tourniquet, bleeding of subchondral bone is visible.
Related posts: Acromioclavicular Separations: Arthroscopic Reconstruction of The Acromioclavicular Joint
Multidirectional and Posterior Shoulder Instability
The Stiff Shoulder: Planning and Treatment Options
Arthroscopic Suprascapular Nerve Release
Arthroscopic Management of Lateral Epicondylitis
Clinical Approach to Articular Cartilage Pathology Acromioclavicular Separations: Arthroscopic Reconstruction of The Acromioclavicular Joint
Multidirectional and Posterior Shoulder Instability
The Stiff Shoulder: Planning and Treatment Options
Arthroscopic Suprascapular Nerve Release
Arthroscopic Management of Lateral Epicondylitis
Clinical Approach to Articular Cartilage Pathology
Stay updated, free articles. Join our Telegram channel
Full access? Get Clinical Tree
 Get Clinical Tree app for offline access

|