Patellar Tendon Autograft for Anterior Cruciate Ligament Reconstruction

Chapter 72


Patellar Tendon Autograft for Anterior Cruciate Ligament Reconstruction


Clinical and Surgical Pearls and Pitfalls


• Harvest the tendinous and tibial plug portions of the bone–patellar tendon–bone autograft with the leg in flexion.


• Harvest of the patellar plug in extension with the foot on a sterile Mayo stand will allow the superior skin flaps to be more easily mobilized.


• Changing hands while the saw is used during graft harvest enhances visualization of the bone cuts.


• Make a triangular cut for the tibial bone plug and a trapezoidal cut for the patellar bone plug. The latter avoids penetration into the patellar articular surface.


• A shorter femoral bone plug (10 × 20 mm) should be fashioned if a femoral independent drilling technique is used. This will facilitate the turn the graft has to make within the notch after exiting the tibial tunnel.


• Notch preparation should be carried out with a motorized shaver and arthroscopic electrocautery device. Do not use a burr to perform osteoplasty, because this may obliterate the landmarks used to facilitate anatomic femoral tunnel placement.


• The use of a curved femoral aimer, flexible guide pin, and reamers will facilitate visualization without the resource challenges with maintaining a hyperflexed position and the change in orientation hyperflexion induces in the landmarks for femoral ACL tunnel placement.


• While the bone–patellar tendon–bone ACL graft is pulled through the tibial tunnel, a probe or looped arthroscopic suture retriever should be used to help lever the pulling suture at the intra-articular entrance of the tibial tunnel. This will keep the pulling vector in line with the tibial tunnel, as well as keeping the sutures from abrading on the intra-articular tunnel entrance.


• Graft-tunnel mismatch is a concern with the medial portal femoral independent technique, because the femoral tunnel, femoral bone plug, and intra-articular length of the ACL will likely be shorter than when a transtibial technique is used. Therefore we recommend creating a long tibial tunnel to help manage this.


Anterior cruciate ligament (ACL) rupture commonly occurs among both professional and amateur athletes. Because the ACL is the primary restraint to anterior displacement of the tibia on the femur and a secondary stabilizer to tibial rotation, an ACL-deficient knee can lead to meniscal injury, functional instability, and early-onset osteoarthritis.1 These are potentially devastating consequences in certain populations of patients, especially in athletes who participate in cutting or pivoting activities. The ACL is the most frequently torn knee ligament requiring surgical repair, and more than 100,000 ACL reconstructions are performed each year in the United States.2


A variety of decisions must be made when performing ACL reconstruction, including surgical technique, graft source, and graft fixation. Graft options may include autograft (bone–patellar tendon–bone, hamstring, and quadriceps tendon) or allograft (bone–patellar tendon–bone, Achilles tendon, and anterior tibialis tendon) tissue. The bone–patellar tendon–bone autograft has been the most commonly used graft during the last 15 years and is the graft of choice of physicians treating National Collegiate Athletic Association (NCAA) Division 1A and professional athletes.37 This is because of the graft’s ready accessibility, good mechanical strength, bone healing, and interference screw fixation. One of our primary goals in ACL reconstruction is to reapproximate the native ACL anatomy with respect to tibial and femoral tunnel placement. This anatomy has been well described in the literature. Several surgical techniques for drilling the femoral and tibial ACL tunnels can be used to accomplish this, including transtibial drilling, medial portal femoral independent drilling, outside-in femoral independent drilling, and two-incision ACL reconstruction. This chapter details the surgical technique for anatomic transtibial and medial portal femoral independent endoscopic ACL reconstruction with a bone–patellar tendon–bone autograft.


Preoperative Considerations


History


The diagnosis of ACL injury is often apparent from the characteristic history that is provided by the patient. Typical descriptions of the injury mechanism include the following:


Physical Examination


The physical examination is essential in the diagnosis of ACL injury and the evaluation of associated pathologic changes, such as meniscal or chondral damage and associated ligamentous injury.


Assessment of the injured knee includes evaluation of gait, limb alignment, presence of an effusion, knee range of motion, patellar instability, anterior knee or joint line tenderness, and varus or valgus laxity. The Lachman and pivot-shift tests remain the most specific examinations for the evaluation of ACL injury. A positive result of the posterior drawer test, posterior sag, or increased tibial external rotation at 30 or 90 degrees signals the presence of associated posterior cruciate ligament (PCL) or posterolateral corner injury. Instrumented knee arthrometry with anterior drawer testing at 30 degrees can be helpful in confirming ACL injury when the side-to-side difference is greater than 3 mm.


Imaging


Indications and Contraindications


The ideal candidate for an ACL reconstruction with bone–patellar tendon–bone autograft is a young, active patient with no effusion, full range of motion, and no patellar tendon disease. In addition, patients with symptomatic intra-articular disease, such as meniscal injury or loose bodies, may benefit from earlier surgical intervention. Of note, it is vital to educate the patient concerning the risks and benefits of the various graft options for the patient to make the final informed decision. For example, patients in certain professions, such as roofers and carpet layers, should be counseled about the increased incidence of discomfort with kneeling.


ACL reconstruction with a bone–patellar tendon–bone autograft is relatively contraindicated in patients with degenerative joint disease, in patients with a history of patellar tendon disease, and in those patients who are sedentary, inactive, or elderly. In addition, patients who have limited motion preoperatively or who are unable to comply with a rigorous postoperative protocol are poor candidates as well. Patients with a history of anterior knee pain or pain with kneeling should be advised to choose a different graft option. Last, ACL reconstruction in the skeletally immature patient remains a challenge and requires extensive discussion of the risks and benefits involved. In patients with significant growth remaining, soft tissue grafts such as hamstring, rather than bone–patellar tendon–bone grafts, are thought to pose less risk of premature physeal closure.


Surgical Technique


Anesthesia and Positioning


After induction of general, spinal, or regional anesthesia, the patient is placed in the supine position on a standard operating room table. A thorough examination under anesthesia is performed.


Examination under anesthesia includes the Lachman test, anterior and posterior drawer tests, varus and valgus stress testing, and pivot shift test. Evaluation of external rotation at 30 and 90 degrees of flexion is important to assess the stability of the posterolateral corner. Comparison examination of the contralateral knee is done as well. If pivot shift testing demonstrates clear ACL insufficiency, the bone–patellar tendon–bone graft can be harvested before diagnostic arthroscopy.


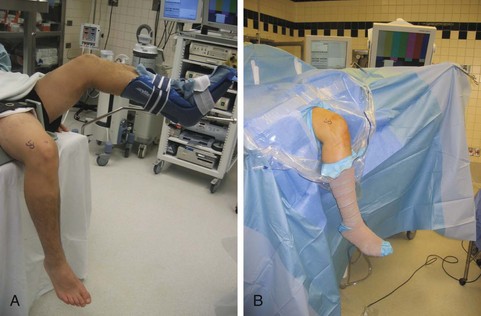
At this time a tourniquet is placed and the thigh is secured in a leg holder for added stability. The contralateral leg is positioned in a well-padded foot holder with the knee and hip flexed to protect the peroneal nerve. The foot of the operating room table is then dropped, and the waist is flexed to diminish the amount of lumbar extension (Fig. 72-1). The leg is prepared and draped in sterile fashion while preoperative antibiotics are administered.


Incision


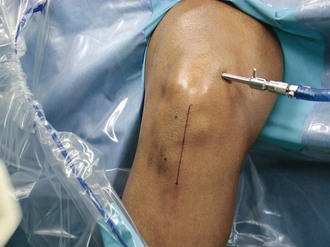
The longitudinal incision for the bone–patellar tendon–bone harvest starts at the most distal aspect of the patella, just medial to the midline, coursing distally to 2 cm below the tibial tubercle (Fig. 72-2). Alternatively, the use of transverse skin incisions over the lower pole of the patella and tibial tubercle may provide a more cosmetic skin scar and potentially avoid injury to the infrapatellar branch of the saphenous nerve.


Specific Steps


Box 72-1 outlines the surgical steps of this procedure.


1 Bone–Patellar Tendon–Bone Graft Harvest


After the anatomic landmarks have been appropriately marked and the knee is flexed, a longitudinal incision, just medial to midline, is made from the distal tip of the patella to 2 cm distal to the tibial tubercle. This incision allows graft harvest and placement of the tibial tunnel through the same operative approach. This incision is carried directly down to the transverse fibers of the peritenon of the patellar tendon. After skin flaps are raised both medially and laterally, a No. 15 blade is used to incise the peritenon longitudinally at its midline. Metzenbaum scissors extend this cut proximally and distally and undermine the peritenon medially and laterally to fully expose the entire patellar tendon.


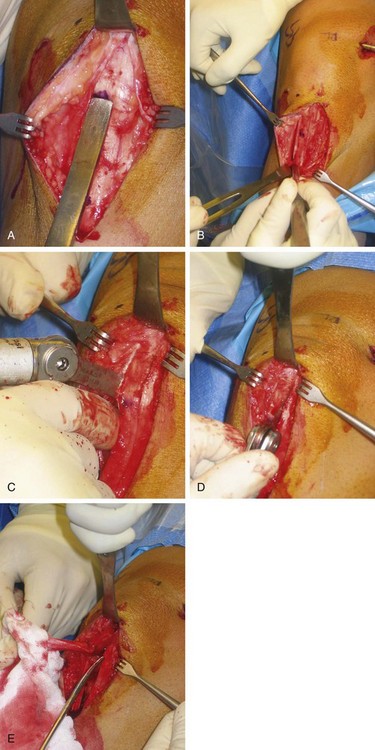
The patellar tendon’s width is measured proximally and distally and marked with a marking pen. The bone–patellar tendon–bone autograft ideally is 10 mm wide with 10- × 25-mm bone plugs (10- × 20-mm femoral plug for medial portal femoral independent technique). Parallel longitudinal incisions spaced 10 mm apart are made in the patellar tendon, then the periosteum and soft tissues overlying the tibial and patellar bone cuts are outlined with the blade. The tendon incisions are performed with the knee flexed, thus keeping the patellar tendon on tension. Extension of the knee aids in skin flap mobilization and thus visualization for the transverse crosscuts at the patellar and tibial bone block edges.


At this point, an oscillating saw is used to make first the tibial then the patellar bone plug. With use of the nondominant thumb to stabilize the saw and the index finger to protect the graft between the inner and outer portion of the graft (Fig. 72-3), the tibial cortex is scored longitudinally on profile to remove an equilateral triangle of bone. This leaves a maximal amount of bone around the tibial tubercle and remaining patellar tendon to minimize the risk of postoperative complications, such as patellar tendon avulsion or tubercle fracture. The distal transverse tibial crosscut is made with the saw held at a 45-degree oblique angle to the cortex by use of the corner of the blade on each side of the plug, but the tibial bone plug is left in place at this time. The patellar tendon bone plug is then made in a trapezoidal shape, with a depth not exceeding 6 to 7 mm to avoid damage to the articular surface. Once again, the proximal transverse crosscut is made at a 45-degree oblique angle to the cortex. The saw is then placed parallel to the medial and lateral edges to complete the patellar bone plug crosscuts. Half-inch and quarter-inch curved osteotomes are now used to carefully mobilize the bone plugs without levering. A lap sponge can be placed around the freed tibial plug to improve traction, and Metzenbaum scissors are used to carefully remove any remaining fat or soft tissues. Once it is freed, the graft is wrapped in a moist sponge and walked to the back table by the operative surgeon, where it is placed in a safe location known to all members of the surgical team.


Stay updated, free articles. Join our Telegram channel

Sep 11, 2016 | Posted by in SPORT MEDICINE | Comments Off on Patellar Tendon Autograft for Anterior Cruciate Ligament Reconstruction

Full access? Get Clinical Tree

Get Clinical Tree app for offline access