Meniscus Repair: Inside-Out Suture Technique
Kevin F. Bonner
INDICATIONS/CONTRAINDICATIONS
In an effort to preserve meniscal function, meniscus repair should be performed when there is a reasonably good chance the meniscus will heal and maintain its function. Patient age, activity level, knee stability, type, location, and chronicity of the tear are important factors when considering meniscal repair versus resection. In general, active patients under the age of 45 years with a longitudinal tear within 3 to 5 mm of the meniscocapsular junction are good candidates for repair. Radial tears going to the meniscocapsular junction are also typically repaired in a young patient (more common lateral). The younger the patient, the more likely I am to attempt repairing a tear considered to have marginal healing capacity. Degenerative type tears or tears with minimal healing capacity are treated with partial meniscectomy. Anterior cruciate ligament (ACL) reconstruction is strongly recommended in the setting of a repairable meniscus tear and instability.
Although all-inside meniscus repair devices are becoming much more popular as the result of their ease of use, the inside-out technique is the most versatile and still considered the “gold standard.” Although I have also used suture-based all-inside meniscus repair devices for several years, I still often use the inside-out repair technique.
PREOPERATIVE PLANNING
The diagnosis of a meniscus tear can be made with reasonable certainty with a thorough history, physical examination, and radiographs. Magnetic resonance imaging (MRI) is not required but is often helpful in differentiating between meniscal versus articular cartilage pathology and in the assessment of associated injuries in the acute setting. We can also get a fairly good idea whether a tear may be repairable based on signal patterns; but certainly the final decision between meniscectomy and repair is not made until the time of surgery (Fig. 8-1).
If a patient has a potentially repairable meniscus it is important to have all of the equipment and personnel available. A skilled assistant is required to perform an inside-out repair. Even for surgeons who prefer an all-inside repair technique, it is important to be proficient and ready with the alternative technique of inside-out repair, since some tears are not as amenable to all-inside repair. It is important to discuss with the patient the risks and benefits, as well as the difference in the rehabilitation protocol, for a meniscus repair versus a meniscectomy.
SURGERY
Preoperatively in the holding area, the correct side is confirmed and the patient’s knee is signed. Within 1 hour prior to surgery, the anesthesiologist intravenously administers 1 g (2 g if patient >80 kg) of a first-generation cephalosporin (Cefazolin) if the patient is not allergic. Alternatively, the patient is given Clindamycin 600 to 900 mg intravenously. Regional versus general anesthesia is decided by the patient and the anesthesiologist.
Patient Positioning
The patient is placed in a supine position with the leg resting straight on the operating room table. A tourniquet is placed on the proximal thigh, and lateral thigh post is used to allow a valgus stress to improve visualization of the medial compartment. A pillow is placed under the contralateral knee. The knee is positioned distal to the break in the table, allowing posteromedial access if the foot of the table is flexed during the procedure. After adequate anesthesia, an examination under anesthesia is performed comparing both knees.
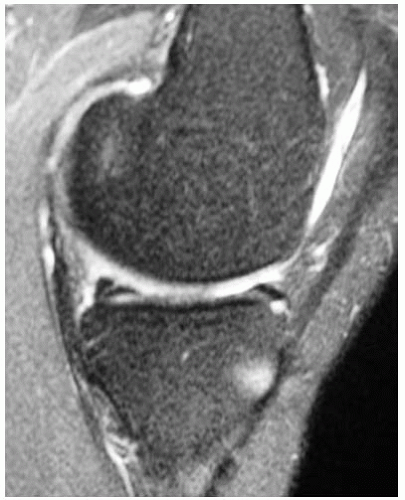 FIGURE 8-1 MRI of a potentially repairable medial meniscus tear in a 22-year-old woman. |
The portal sites and any additional incision sites are infiltrated with 0.25% Marcaine with 1:200,000 epinephrine. The meniscus repair (with or without ACL reconstruction) may be performed with or without a tourniquet. If a tourniquet is used, the leg is exsanguinated with an esmark wrap, and the tourniquet is inflated to 300 mm Hg. If an ACL reconstruction is to be performed in the same setting, I will harvest the graft prior to performing knee arthroscopy. A diagnostic arthroscopy is performed first if there is any uncertainty regarding the status of the ACL. Allografts are also used fairly frequently in my practice. All of these grafts will be prepared at the back table by the assistant. The assistant will work on the graft until he or she is needed for the meniscus repair.
Diagnostic Arthroscopy
The diagnostic arthroscopy is started with placement of the anterolateral portal adjacent to the patellar tendon 1 cm below the inferior pole of the patella. The arthroscope is gently inserted into the joint through the anterolateral portal with the knee in 70 to 90 degrees of flexion. With the arthroscope focused in the medial compartment, the anteromedial portal is created with the aid of an 18-gauge spinal needle. The anteromedial portal should be just to the medial side of the patellar tendon. Depending on the side of the meniscus tear, the medial portal can be adjusted appropriately. For a medial sided tear, the spinal needle is placed adjacent to the patellar tendon just superior to the anterior horn of the medial meniscus confirming optimal access to the posterior horn. If preoperatively it is determined that the lateral meniscus is most likely going to require repair, I may delay making the anteromedial portal until the knee is in the figure-of-4 position. In this setting, use the spinal needle as a probe to help determine if a medial tear is present. Optimal placement of the anteromedial portal for a lateral meniscus repair is typically more superior than for a medial meniscus repair, since the suture cannula will need to avoid the tibial eminence.
I will initially assess the tear and determine the feasibility of a successful repair. The younger the patient the more prudent to attempt repair. A probe is used to characterize the size of the tear, degree of instability, quality of the tissue, and zone of the tear (i.e., red-red, red-white, white-white). The width and integrity of the meniscal rim is evaluated in a far peripheral tear to determine if an all-inside device may be an option. Far posterior tears may need to be assessed with a 70-degree scope placed posterior through the notch. Once the diagnostic arthroscopy is complete, the meniscus repair will proceed in a step-wise fashion.
Tear Preparation
A meniscal rasp (Acufex, Andover, MA) is used to debride granulation tissue on both sides of the tear (Fig. 8-2). Alternatively, a 3.5-mm shaver may be used to debride the edges of the tear site. It is important to take quite a bit of time in preparing the edges to healthy tissue since this step is crucial in optimizing the healing potential. Rasp the perimeniscal synovium both superior and inferior to the tear site. In the case of a displaced repairable bucket handle tear, it is often useful to debride the edges of the tear prior to reduction (Fig. 8-3). This will give you direct visualization and access to both sides of the tear. Once the tear edges are abraded back to healthy tissue, the meniscus is reduced into an anatomic position. After the meniscus site is prepared, the posteromedial or posterolateral incision is created.
Preparation of a peripheral, far posterior tear may require access through a posteromedial or posterolateral portal. These portals are made approximately 1 cm above the joint line with the knee at 90 degrees of flexion. The 70 scope is placed posterior through the notch, and a spinal needle is used to direct posterior portal placement. Alternatively, I prefer to make a small portal through the capsule once the posteromedial or posterolateral approach has been made. A rasp or shaver is used through the posterior portal to access the tear site.
Technique for Medial Meniscus Repair
Optimal positioning of the skin incision can be enhanced with translumination of the posteromedial joint line by placing the arthroscope in the medial compartment with the room lights dimmed (Fig. 8-4). The knee should be flexed between 60 and 90 degrees for the exposure. A 3- to 4-cm vertical incision is created along the posteromedial joint line posterior to the medial collateral ligament (Fig. 8-5). Approximately two thirds of the incision should be distal to the joint line because the needles tend to angle downward as they exit the meniscus and capsule. The saphenous vein should be posterior to the incision and can often be seen by translumination through the joint.
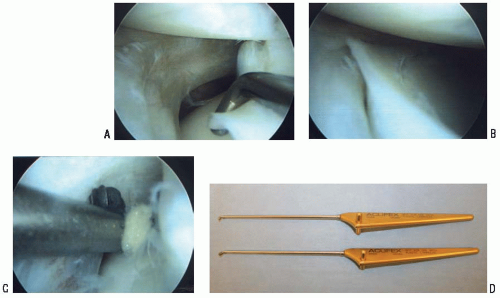 FIGURE 8-2 A-C: Evaluation and preparation of a lateral meniscus tear using a meniscal rasp (Acufex, Andover, MA) (D). |
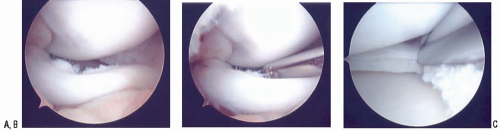 FIGURE 8-3 A: Displaced bucket handle medial meniscus tear in a 15-year-old. B: Tear edge of the displaced fragment is prepared with a shaver prior to reduction. C: Posterior rim is prepared with the fragment displaced anterior allowing optimal visualization. |
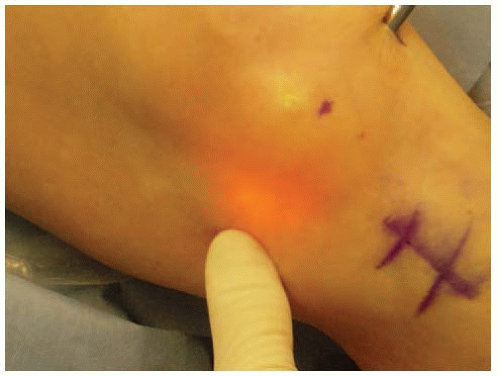 FIGURE 8-4 Translumination of the medial or lateral compartment may assist in planning posterior incision site. |
 FIGURE 8-5 A 3- to 4-cm incision is made posterior to the MCL. Two thirds of the incision is below the joint line. |
On dissection through the subcutaneous tissue, the oblique pes fascia is identified. An incision is made anterior within the fascia, which should be split proximal and distal using Metzenbaum scissors (Fig. 8-6). Care is taken to retract the sartorius, gracilis, and semitendinosis tendons along with the saphenous nerve posteromedial (Fig. 8-7). The saphenous nerve will lie within the posterior border of the sartorius and with retraction of the tendons should be protected. Knee flexion will relax the pes tendons and aid in retraction. If a hamstring autograft will be used for an ACL reconstruction, it is very helpful to harvest the grafts first, allowing for much easier dissection and retraction.
The deep dissection is continued in the interval between the medial head of the gastrocnemius and the joint capsule. Keep the knee in flexion to relax the hamstrings and the medial head of the gastrocnemius. Separating the muscle off the capsule is facilitated by starting distal. Start with a pair of Metzenbaum scissors, followed by placing an index finger to help expand this interval. By dorsiflexing and plantar flexing the ankle, the surgeon should be able to palpate the gastrocnemius on the posterior side by his or her finger (Fig. 8-8). This will assist in verifying the proper plane. Once developed, a posterior retractor is positioned anterior to the medial gastrocnemius muscle (Fig. 8-9). By retracting the medial head of the gastrocnemius lateral and posterior, the neurovascular structures will be protected (Fig. 8-10
 Patella and/or Extensor Mechanism Allograft Reconstruction
 Acute Quadriceps Tendon Repair
 Anatomic Anterior Cruciate Ligament Double-Bundle Reconstruction
 Double-Bundle Posterior Cruciate Ligament Reconstruction
 High Tibial Osteotomy in Knees with Associated Chronic Ligament Deficiencies
 Opening Wedge Osteotomy—Proximal Tibia and Distal Femur


Related posts:
Patella and/or Extensor Mechanism Allograft Reconstruction
Acute Quadriceps Tendon Repair
Anatomic Anterior Cruciate Ligament Double-Bundle Reconstruction
Double-Bundle Posterior Cruciate Ligament Reconstruction
High Tibial Osteotomy in Knees with Associated Chronic Ligament Deficiencies
Opening Wedge Osteotomy—Proximal Tibia and Distal Femur
Stay updated, free articles. Join our Telegram channel
Full access? Get Clinical Tree
