Lateral Lumbar Interbody Fusion
Neil Badlani
Frank M. Phillips
INDICATIONS
Lateral lumbar interbody fusion (LLIF) is a relatively new technique that allows for interbody fusion and anterior column support through a minimally invasive, transpsoas approach. Like any interbody fusion, it allows for increased surface area for fusion, restoration of disc and foraminal height, and potential correction of both sagittal and coronal plane deformities (4,8,13). It is therefore indicated when interbody fusion and anterior column support or reconstruction is desired in the thoracic or lumbar spine, proximal to L5-S1. Examples of this include
Instability/low-grade spondylolisthesis
Sagittal or coronal deformity correction
Degenerative disc pathology, that is, discogenic low back pain or postdiscectomy axial back pain
Foraminal stenosis treated though indirect decompression from restoration of disc height
Adjacent segment disease
Revision for posterior pseudoarthrosis
CONTRAINDICATIONS
The iliac crest generally precludes performing an LLIF at L5-S1 and may make the approach to L4-L5 challenging.
Variations in retroperitoneal anatomy, including prior surgery with scarring or abnormal location of blood vessels (that may accompany rotational deformities of the spine), will make the lateral approach more challenging. This anatomy should always be reviewed prior to the procedure.
In cases of severe central stenosis, the indirect decompression from LLIF alone will likely not be enough to decompress the neural elements.
High-grade spondylolisthesis
Severe osteoporosis may predispose to greater subsidence; therefore, additional fixation is recommended (1).
ADVANTAGES
LLIF is essentially a minimally invasive variation of anterior lumbar interbody fusion (ALIF). When compared to ALIF, LLIF allows for interbody fusion without the need for an access surgeon and without the potential disruption to peritoneal contents, the sympathetic hypogastric plexus, and avoiding the need for mobilization of the great vessels (12,15).
When compared to posterior approaches for interbody fusion, LLIF spares the important posterior paraspinal muscular-ligamentous structures. There is greater access to the disc space through a larger portal for discectomy and interbody preparation without the need for retraction on the intracanal neural elements implicit to a transforaminal lumbar interbody fusion or posterior lumbar
interbody fusion. A larger implant can be placed after LLIF when compared to posterior interbody fusion.
interbody fusion. A larger implant can be placed after LLIF when compared to posterior interbody fusion.
DISADVANTAGES
Approach-related challenges including potential direct or traction injury to the lumbar plexus or disruption of the psoas itself. These can be minimized with knowledge of the relevant anatomy and careful neurologic monitoring.
L5-S1 cannot be accessed through this approach.
No direct decompression of the neural elements can be performed.
The procedure is performed in the lateral decubitus position, and therefore, repositioning is typically required if additional posterior instrumentation or decompression is required.
PREOPERATIVE PREPARATION
Positioning
Patient positioning is critical in LLIF. The procedure is done in the lateral decubitus position. Either left- or right-sided approaches can be done. The relevant anatomy and the desired spinal deformity correction should be considered when deciding which side to approach from. In general, at L4-L5, we prefer to approach from the side with a more caudal iliac crest. Otherwise, right lateral decubitus position, allowing for a left-sided approach, is generally used, unless the spinal deformity dictates otherwise.
A radiolucent bendable surgical table is required. Portable C-arm fluoroscopy is used throughout the case and therefore must be able to pass freely under the table to obtain imaging.
Given these considerations, we prefer to use a regular operating room (OR) table, turned 180 degrees with the patient’s head at the normal position of the feet. This allows for easier passage of the fluoroscopy machine under the table.
Neurophysiologic monitoring electrodes should be placed on the patient’s lower extremities to allow for triggered and free-run electromyographic (EMG) testing during the procedure. The anesthesia provider should be informed to avoid using long-acting muscle relaxants, which may preclude accurate neurologic monitoring.
The patient should be positioned with the break in the bed at the level of the greater trochanter. The pelvis should be level, with the gluteal crease visualized from the bottom of the bed as a horizontal line, parallel to the table.
Appropriate padding is used over bony prominences and sites of nerve compression, particularly the peroneal and ulnar nerves. An axillary roll aids in positioning the trunk and arms, which can be draped over an arm board.
The patient is taped down in several places, which is again critical to success of the procedure. The trunk is secured to the table with one strip of tape over the rib cage, proximal to the field, and a second just below the iliac crest. The hips and knees should be flexed and taped with two individual strips. The first starts at the iliac crest and follows parallel to the femur, over the anterior knee, and to the table. This should provide some distal traction force to the iliac crest. The second follows the path of the tibia, crossing the other at 90 degrees and secured to the table at both ends (Fig. 29-1).
The table is flexed at the break, moving the pelvis caudally and the rib cage cranially away from the iliac crest, improving lateral access particularly at L4-L5, and opening up disc spaces in the lumbar spine (Fig. 29-2).
RADIOGRAPHIC LOCALIZATION
The surgeon stands posterior to the patient. Ideally, the C-arm is brought in from the anterior direction to be less obtrusive to the surgeon (Fig. 29-3).
An anteroposterior (AP) fluoroscopic image is obtained first. It is recommended to adjust the tilt of the table to get the desired true AP image and keep the C-arm in a fixed position. This allows for ease of transition between true AP and true lateral images throughout the case with only a 90-degree turn of the machine.
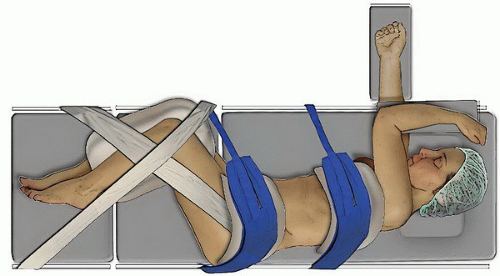 FIGURE 29-1 Taping configuration for patient positioning. |
True AP and lateral images with centered spinous processes, symmetric pedicles, and distinct endplates should be obtained before prepping and draping (Fig. 29-4).
SKIN MARKING
A wide surgical field should be draped with the lateral border of the rectus abdominis as the anterior boundary and midline spinous processes posteriorly.
Before incision, localization of the disc space is performed on the lateral fluoroscopic image. For a single level, an incision from the anterior to posterior border of the disc can be used, in line with the disc space itself (Fig. 29-5). For multiple levels, it is possible to use a more oblique incision to access 2 or 3 discs. This should be angled with a trajectory from posterior superior to an anterior inferior to account for the lordosis.
If desired, a counterincision into the retroperitoneal space can be made to aid in the initial passage of instruments into the retroperitoneal space. This is a horizontal incision made posterolaterally (Fig. 29-6). Ideally, this is made just at the lateral border of the erector spinae muscle and also allows for palpation of the psoas, transverse processes, and even the disc space itself although this will vary in larger patients. The finger in the retroperitoneal space is used to escort instruments inserted laterally on to the psoas muscle.
TECHNIQUE
Initial Approach and Retroperitoneal Exposure
If the two-incision technique is used, the counterincision should be made first.
After dissection through subcutaneous tissue with electrocautery, Metzenbaum scissors are used for blunt dissection through the abdominal oblique musculature at a 45-degree angle. Once a loss of resistance is felt, the retroperitoneal space has been entered. Scissors are carefully spread to dilate the opening.
Scissors are removed, and the surgeon’s finger is then passed through the plane created into the retroperitoneal space. Abdominal contents should have fallen sufficiently forward, but blunt finger dissection can be done additionally to better ensure the path is clear and any adhesions are disrupted (Fig. 29-7).
The undersurface of the direct lateral approach incision is then palpated. The incision is made, and dissection can be done with the Bovie down through the abdominal musculature toward the retroperitoneum and onto the surgeon’s finger.
This approach can be done safely through a single incision as well. Care should be taken through the dissection. Distinct muscle layers of the external abdominal oblique, internal abdominal oblique,
and transversalis abdominis can be identified to aid in knowledge of the depth of the approach. The transversalis fascia has a smooth, glistening appearance, which can be recognized and is the last layer to traverse before entering the retroperitoneal space.
and transversalis abdominis can be identified to aid in knowledge of the depth of the approach. The transversalis fascia has a smooth, glistening appearance, which can be recognized and is the last layer to traverse before entering the retroperitoneal space.
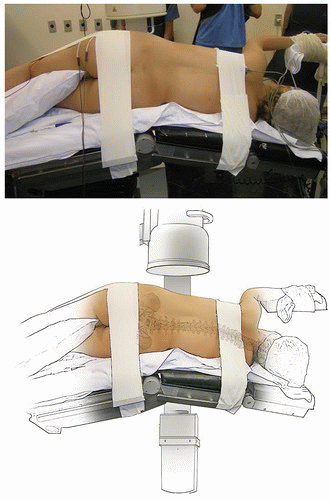 FIGURE 29-2 Photograph and illustration of table flexion improving lateral access and opening of disc spaces in the lumbar spine. |
Transpsoas Approach and Intervertebral Disc Access
A small cannulated initial dilator is passed into the wound. If the counterincision has been made, dilators can be guided into the retroperitoneum with the surgeon’s finger and onto the psoas (Fig. 29-8A and B


Related posts:

Stay updated, free articles. Join our Telegram channel
Full access? Get Clinical Tree
