Anterior Thoracolumbar Corpectomy and Stabilization
Thomas A. Zdeblick
INDICATIONS/CONTRAINDICATIONS
Anterior thoracolumbar corpectomy and stabilization is most often indicated for the treatment of trauma or spinal tumors (1, 2, 3, 4,6,11). Less frequently, it may be indicated for pseudoarthrosis, chronic instability, disc herniation, or disc degeneration. In rare instances, corpectomy may also be used for the treatment of severe scoliotic spinal deformity; however, this is addressed in a separate chapter.
With trauma, the most common indication is burst fracture with neurologic deficit. Thoracolumbar burst fractures with marked comminution or fractures of both endplates may also be suitable for anterior stabilization (4). Patients with burst fracture malunions and a kyphotic angle exceeding 25 degrees, those with persistent pain, and those with neurologic worsening are also suitable for this procedure. Contraindications in trauma include fracture dislocations or multilevel involvement.
Both metastatic and primary spinal tumors may be treated anteriorly. For metastatic disease, the indication for anterior treatment is one- or two-level vertebral body involvement with pathologic fracture and bone and/or tumor retropulsion that causes canal compromise. Typically, these cases involve neurologic deficit. Obviously, factors such as patient age, concomitant disease, bone quality, and tumor type affect a surgeon’s decision to perform corpectomy. Primary tumors are amenable to en bloc excision if they are contained within the vertebral body. En bloc corpectomy is outlined at the conclusion of this chapter.
PREOPERATIVE PREPARATION
Preoperative review of the computed tomography (CT) scan or magnetic resonance imaging (MRI) scan or both is helpful (Figs. 16-1, 16-2, 16-3 and 16-4). Unless the pathology is unilateral, I prefer the approach from the left side. This obviates the need to retract the liver. However, the position of the aorta should be visualized on the CT and/or MRI scan. On occasion, the aorta is in a far left-sided position. In these cases, a right-sided approach is preferable. In addition, should anterior stabilization be contemplated, preoperative measurements of the screw or bolt lengths can be obtained from the CT scan. By measuring the width of the vertebral bodies above and below the fractured vertebra on the CT scan template, the surgeon can accurately choose screw length in order to obtain bicortical purchase.
The patient is positioned in the lateral decubitus position (Fig. 16-5). The hips and knees are flexed on the ipsilateral side to relax the psoas muscle. The surgeon should ensure that a true lateral position is obtained. Multiple pillows between the patient’s arms or a suspended arm holder for the ipsilateral arm helps maintain the lateral position. I typically utilize gel padding and a beanbag with suction
and wide adhesive tape to maintain position. An axillary roll should be placed just superior to the beanbag. The operative incision can then be marked carefully before the patient is draped. The gibbus deformity and the ribs should be palpated to plan the incision. I generally plan to use the rib two levels above the involved vertebra. However, an anteroposterior (AP) radiograph or fluoroscopy can be used to confirm this. Typically, for an L1 burst fracture, the bed of the eleventh rib is used for access.
and wide adhesive tape to maintain position. An axillary roll should be placed just superior to the beanbag. The operative incision can then be marked carefully before the patient is draped. The gibbus deformity and the ribs should be palpated to plan the incision. I generally plan to use the rib two levels above the involved vertebra. However, an anteroposterior (AP) radiograph or fluoroscopy can be used to confirm this. Typically, for an L1 burst fracture, the bed of the eleventh rib is used for access.
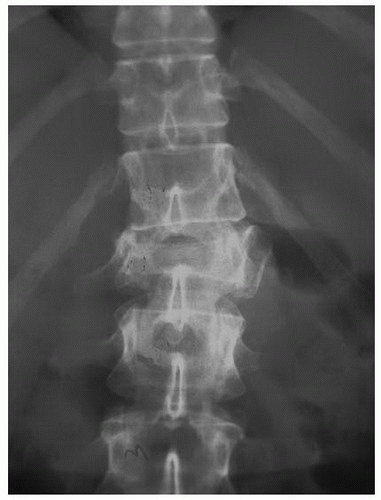 FIGURE 16-1 AP radiograph of an L1 burst fracture. The widening of the pedicles in the lateral deformity is visible in this asymmetric fracture. |
TECHNIQUE
An oblique skin incision 4 to 6 inches long is made along the 11th rib (if there is an L1 fracture). This usually extends proximally to the proximal angle of the rib and distally to the tip of the rib. Dissection with cautery is carried out to isolate the eleventh rib. Care should be taken on the inferior border of the rib to avoid the underlying neurovascular bundle. It is then subperiosteally exposed and divided at its proximal angle. Distally, it is divided near its cartilaginous juncture. The surgeon then enters the pleural cavity by sharply dividing the pleura along the bed of the rib. The superior surface of the diaphragm is easily visualized. Blunt dissection can be carried out near the cartilaginous distal tip of the 11th rib. With blunt dissection, the retroperitoneal space is entered just beneath the diaphragm. This plane can then be developed bluntly with sponge sticks. Once both superior and inferior surfaces of the diaphragm are well visualized, the diaphragm should be marked with cautery at points approximately 2 cm from its periphery, along the chest wall. I then divide the diaphragm with cautery along this line and between multiple stay sutures. As the division proceeds medially, the crus of the diaphragm is encountered and is divided from its spinal origin using cautery. The surgeon should then be able to place self-retaining rib retractors, and visualization of the lateral aspects of the T12, L1, and L2 vertebral bodies is possible.
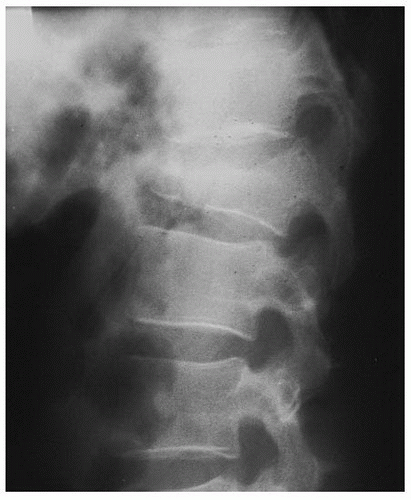 FIGURE 16-2 Lateral radiograph of an L1 burst fracture. Marked kyphosis, loss of height, and posterior retropulsion of bone are present. |
 FIGURE 16-3 Sagittal CT scan reconstruction of an L1 burst fracture. The marked comminution of the superior endplate and the severe retropulsion of the “culprit” fragment into the spinal canal are apparent. |
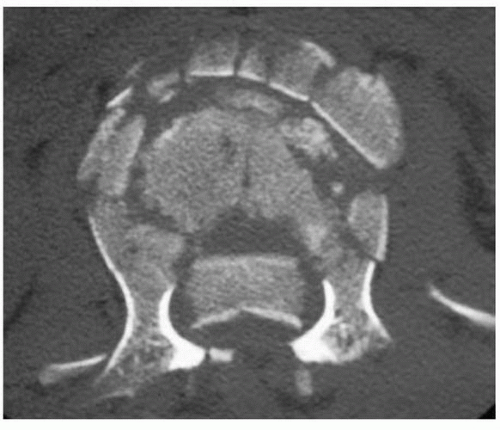 FIGURE 16-4 Axial CT scan of a severe L1 burst fracture; again, the marked comminution of the endplate and the severe retropulsion of the fragment are apparent. The patient had presented with nearly complete motor paralysis below the L1 level. |
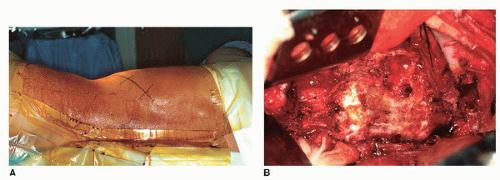 FIGURE 16-5 A: Intraoperative photograph showing the positioning in the operating room. The patient is in the lateral decubitus position, and in this photograph, the head is to the right and the feet are to the left. An axillary roll has been placed, and the arms are well padded in front of the patient. An oblique incision is marked out along the bed of the eleventh rib. B: Photograph showing intraoperative exposure of the lateral aspects of T12, L1, and L2. The diaphragm has been divided near its periphery, and the psoas muscle has been retracted in an anterior-to-posterior direction. The vertebral bodies are exposed anteriorly to the midline and posteriorly back to the lateral aspect of the pedicle. In this photograph, the patient’s head is to the right, and the feet are to the left. The stay sutures within the divided diaphragm can be seen at the upper right. The anterior aspect of the vertebral body is at the bottom of the photograph. |
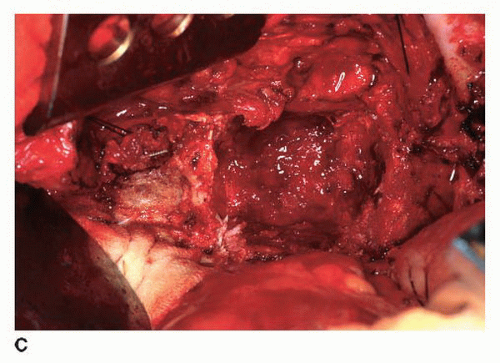 FIGURE 16-5 (Continued) C: The corpectomy is performed by first incising the disc spaces above and below the fracture vertebrae. These discs are then removed by using a combination of elevators, curettes, and rongeurs. The corpectomy is performed first with rongeurs and then with a high-speed bur. The final posterior fragments are then removed with a curette. The dura is then seen bulging into the decompression trough. The surgeon needs to ensure that the decompression has been completed across the width of the spinal canal. The dura is visible within the corpectomy defect at the superior aspect of the photograph. |
Alternatively, only the posterior 4 to 6 cm of the diaphragm can be divided and the remaining diaphragm retracted. Care needs to be taken to place a suture at the apex of the diaphragmatic division to prevent propagation.
At this point, a radiograph is obtained with spinal needles placed in the disc space above and below the suspected pathology. Often, this pathology is obvious secondary to hematoma or deformity. After radiographic confirmation, the pleura overlying the vertebral bodies of T11 to L1 is divided vertically, and the segmental vessels overlying T11, T12, and L1 are isolated. I prefer to isolate these vessels by using cautery to incise in a parallel manner above and below the segmental vessels down to bone. A fine right-angled clamp is then passed beneath each segmental vessel, and each vessel is ligated. Typically, ligation is performed with silk ties, metallic clips, or both. Each of the segmentals overlying each of the three vertebral bodies is then divided. It is important to ligate these vessels in the midportion of the vertebral bodies. This allows the intersegmental anastomoses, which are present posteriorly and provide blood flow to the spinal cord, to remain intact.
Once the segmental vessels are divided, subperiosteal dissection is carried out along the lateral aspects of the vertebral body above and below the pathology. It is important to make sure that the vertebral body is exposed to the anterior midline. The anterior longitudinal ligament can be lifted off the vertebral body using a sharp elevator and cautery. Bleeding points from the vertebral body itself can be controlled with bone wax. Posteriorly, the lateral aspect of the vertebral body needs to be exposed to the lateral aspect of the pedicle. At this point, the foramen should be palpable with a Penfield elevator. Proximal to T11, this exposure may require resection of the rib head overlying the disc space. At L1 and below, it requires retraction of the psoas muscle in an anterior-to-posterior direction. With L1 fractures, this is not usually difficult. However, with fractures in the midlumbar spine, retraction of the psoas muscle can become quite difficult. It is important to begin at the anterior margin of the psoas muscle and work along the vertebral body, retracting this muscle posteriorly.
This method protects the nerve roots, which run within the psoas muscle. In rare cases, a portion of the anterior psoas muscle may be divided using cautery if visualization is inadequate. However, this must be done carefully to protect the nerve roots within.
This method protects the nerve roots, which run within the psoas muscle. In rare cases, a portion of the anterior psoas muscle may be divided using cautery if visualization is inadequate. However, this must be done carefully to protect the nerve roots within.
Related posts:

Stay updated, free articles. Join our Telegram channel

Full access? Get Clinical Tree


