Movement of the body or any of its parts involves considerable activity from those muscles directly responsible. Muscle is the only biological tissue capable of actively generating tension. This characteristic enables the human skeletal muscle to perform the important functions of maintaining upright body posture, moving body parts, and absorbing shock. For functional body motions to take place, the muscles producing movement must have a stable base from which to work from. If a functional limitation is highlighted during the physical examination of the patient, the clinician must determine the cause of the functional and/or participation restrictions. If the cause is found to be poor muscle performance, a progression of exercises to enhance muscle performance must be initiated. One of the most common ways of improving muscle performance is through the use of graded resistance exercises, which can be applied globally or locally. The clinician must remember that there are a number of factors that influence a patient’s ability to exercise. These factors can include fear of pain or reinjury, poor motivation, low compliance, depression, the side effects of medication, and impaired attention or memory.
CHAPTER 12
Improving Muscle Performance
OVERVIEW
Muscle Performance
The ability of a muscle to carry out its various roles is a measure of muscle performance. The three main types of muscle contraction are isometric, concentric (Fig. 12-1A and B), and eccentric (Fig. 12-2A and B) (see Chapter 1). Muscle performance can be assessed by measuring a number of parameters. These include strength, endurance, and power.
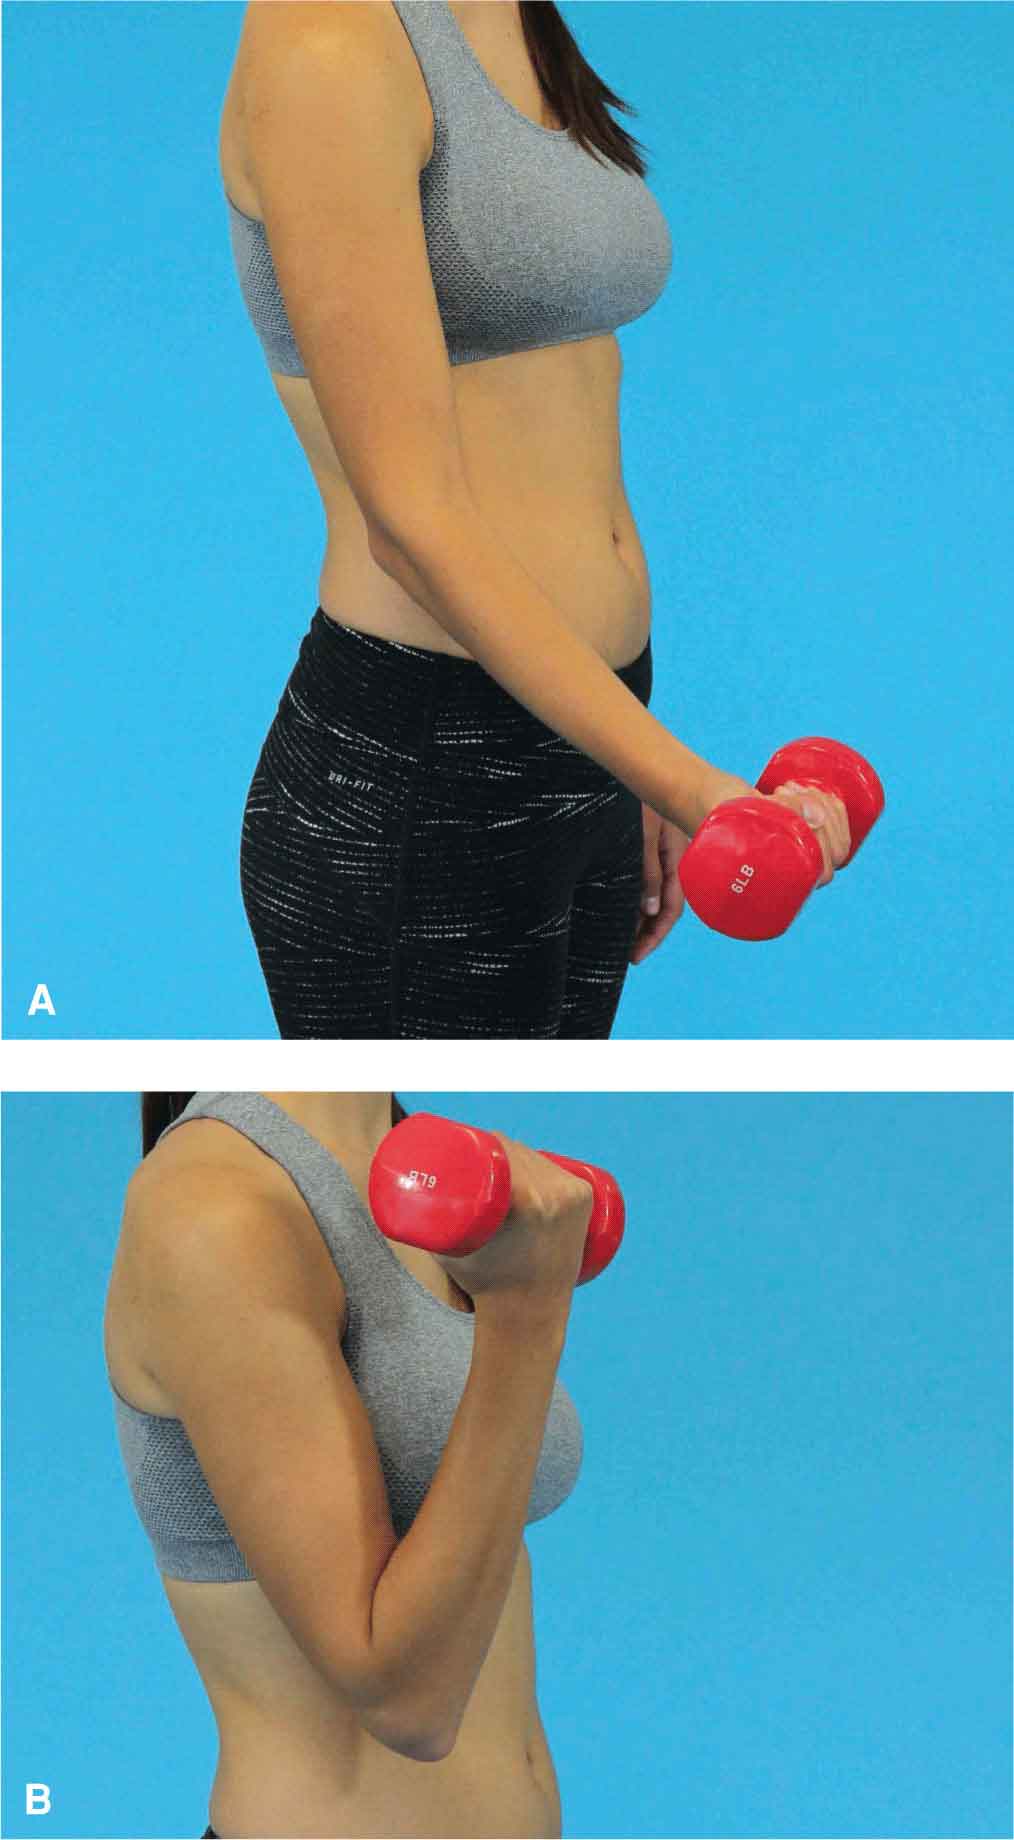
FIGURE 12-1 Concentric contraction. A: Start position. B: End position.
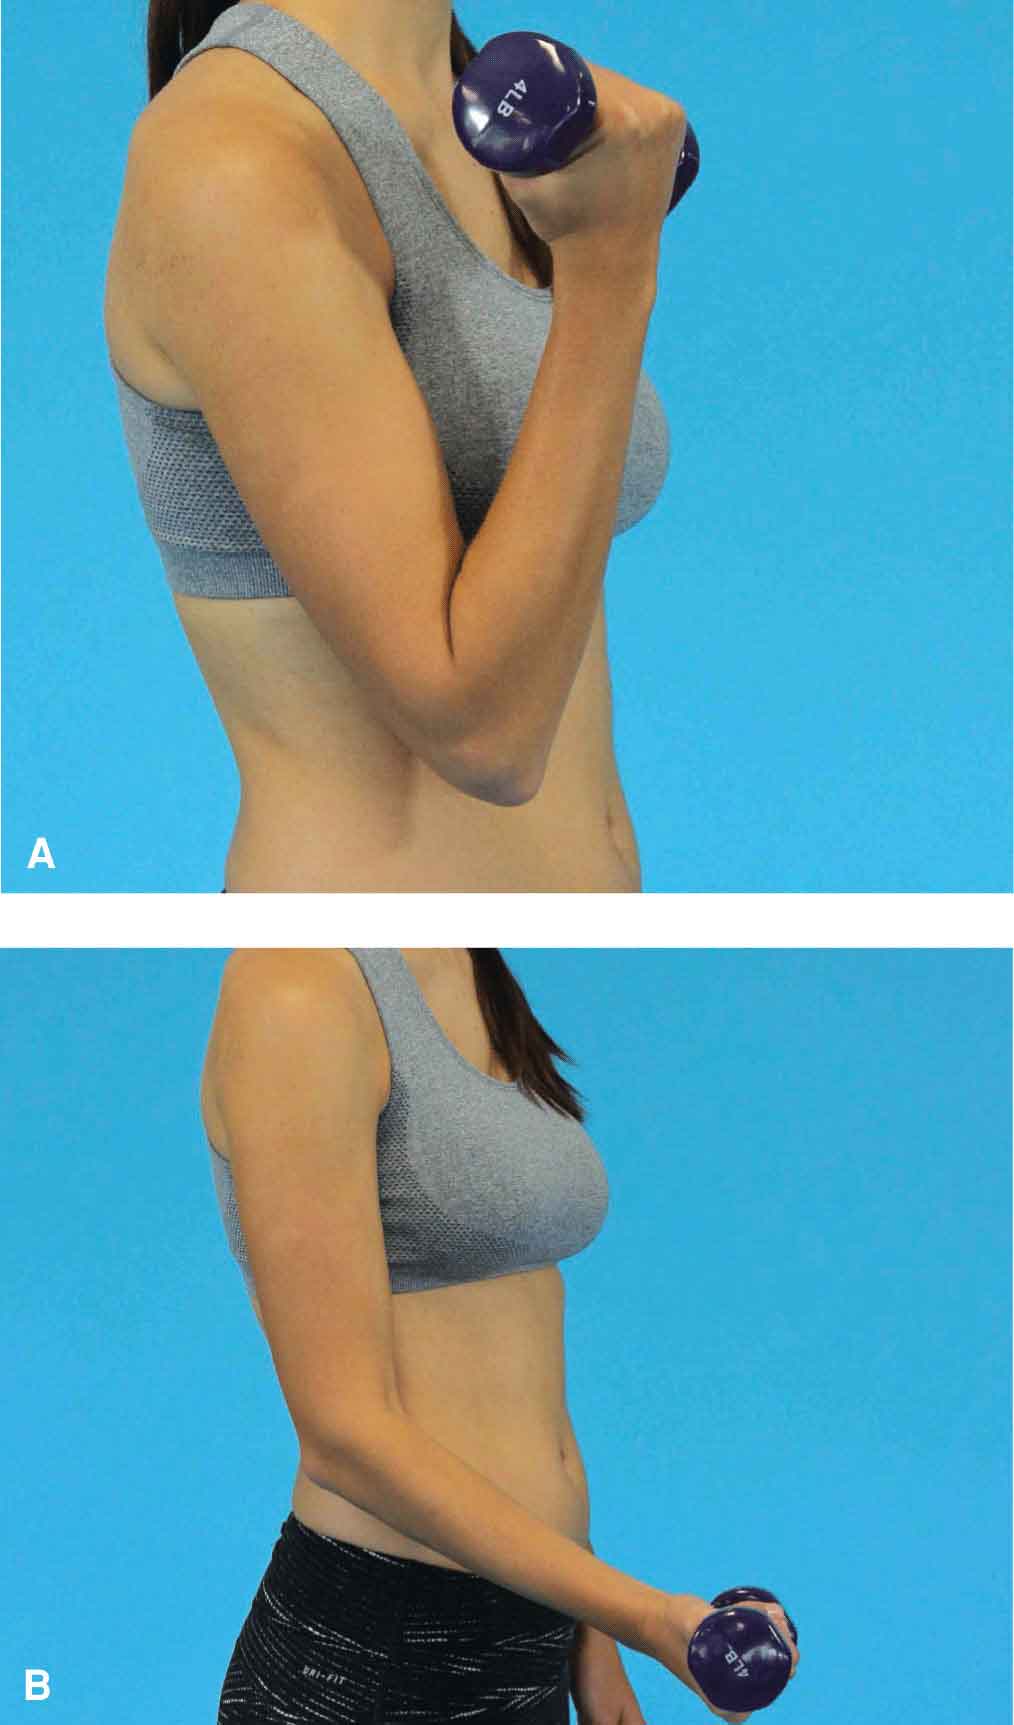
FIGURE 12-2 Eccentric contraction. A: Start position. B: End position.
 Strength. The improvement of muscle strength is an integral component of most rehabilitation programs. Strength may be defined as the amount of force that may be exerted by an individual in a single maximum muscular contraction against a specific resistance, or the ability to produce torque at a joint. Strength can be measured in one of three ways: as a maximal force exerted in an isometric contraction, the maximal load that can be lifted once, or the peak torque during isokinetic measurement. In a clinical setting, muscle strength can be measured as follows:
 Manual muscle testing (MMT): MMT is an acceptable standardized process utilized to find gross strength deficits and to isolate muscle groups and actions (see later).
 Using a dynamometer: Dynamometry is the process of measuring forces that are doing work. A dynamometer is a device that measures strength by using a load cell or spring-loaded gauge. These measurements are more objective than MMT. Examples of a dynamometer include the following:
- Handheld: This is used to assess the grip strength of a patient, or to measure muscle group strength by having the patient exert maximal force against the dynamometer.
 Isometric: This measures the static strength of the muscle group by stabilizing the extremity using stabilization straps or verbal instruction.
 Isokinetic: This measures the strength of a muscle group during a movement with constant, predetermined speed.
 Power. Mechanical power is the product of strength and speed. More specifically, power is work per unit of time (force × distance/time) or force × velocity (distance × time). Thus, time is an essential element when training for power. Muscular power, the maximum amount of work an individual can perform in a given unit of time, is the product of muscular force and velocity of muscle shortening. Muscles with a predominance of fast-twitch fibers generate more power at a given load than those with a high composition of slow-twitch fibers.1 The ratio for mean peak power production by type IIb, type IIa, and type I fibers in skeletal tissue (see Chapter 1) is 10:5:1.2 Greater force development is the rate at which strength increases and is the most important normal adaptation for the majority of athletes, as muscular power is an important contributor to activities requiring both strength and speed. The assessment of power involves increasing the work a muscle must perform during a specific period of time, or reducing the amount of time required to produce a given force.
 Endurance. Skeletal muscle endurance requires the ability of a muscle, or group of muscles, to continue to perform low-intensity sustained activities without fatigue while maintaining proper alignment of the body segments over an extended period of time with balance and control. There are two types of endurance: general endurance, which is a base level of cardiorespiratory ability, and special endurance, which is related to specific activities (metabolic capacity).3 Endurance can be assessed by having the patient perform many repetitions using low resistance or sustaining a muscle contraction for an extended period of time.
The above parameters are used in rehabilitation to enhance balance, joint stabilization, coordination, the performance of activities of daily living, and to improve athletic performance. These three components of muscle performance are important in functional activities as they can allow the patient to interact with their environment in a more efficient and pain-free way through increased movement control and capacity. It is important to remember that muscle performance changes throughout the lifespan but that improvements in strength and endurance are possible with only a modest increase in physical activity. The changes that occur in early childhood through adolescence are described in Chapter 30. The changes that occur throughout adulthood are summarized in Box 12-1.
To measure improvement in muscle performance, it is necessary to have a baseline measurement from which to demonstrate gains. Typically the baseline measure used is muscle strength through an assessment of the patient’s ability to perform an isometric contraction. Muscle testing requires that the patient be able to voluntarily control the tension developed in the muscles. Muscle strength can be assessed grossly or specifically. Normally, gross strength is assessed first, and specific testing is used when the gross muscle screening highlights an area of muscle weakness.
Gross Muscle Screening
A gross muscle screening is performed on a patient when a quick assessment of the patient’s general level of muscle strength is required. If any weakness is found during the gross muscle screening test, a specific muscle test is then performed. It is important to remember that the gross muscle screening does not detail the determination of strength; it only provides the clinician with information as to whether a region of the body is either normal or weak. Regardless of the type of muscle testing used, the procedure is innately subjective and depends on the subject’s ability to exert a maximal contraction. This ability can be negatively affected by such factors as pain, poor comprehension, motivation, cooperation, fatigue, and fear.
The gross muscle testing procedures for each of the main regions of the body are described in Table 12-1. One of the more common gross muscle testing procedures is the one performed by the clinician before gait training with an assisted device when the clinician is not sure of the patient’s capabilities. In this scenario, the clinician must efficiently assess the strength of the major muscle groups that are used when using an assistive device. The muscle groups tested include the shoulder abductors (Fig. 12-3), the shoulder flexors (Fig. 12-4), the shoulder extensors (Fig. 12-5), the elbow flexors (Fig. 12-6), the elbow extensors (Fig. 12-7), the wrist extensors (Fig. 12-8), the wrist flexors (Fig. 12-9), the hip flexors (Fig. 12-10), the knee extensors (Fig. 12-11), the knee flexors and hip extensors (the hamstrings) (Fig. 12-12), the hip abductors (Fig. 12-13), the ankle dorsiflexors (Fig. 12-14), and the ankle plantarflexors (Fig. 12-15).
TABLE 12-1 | Gross Muscle Screening |
Patient Position | Tested Muscle Group | Procedure |
Supine | Hip flexors | The patient is instructed to raise both legs off the supporting surface simultaneously while keeping both legs straight. The position is held for 10 seconds. The hip flexors can also be tested in the sitting position. |
Hip abductors | The patient is instructed to abduct the legs to each side then to hold the position while the clinician attempts to bring the legs together. | |
Hip adductors | The patient is instructed to keep the legs together while the clinician attempts to separate the legs | |
Hip extensors | The patient is instructed to flex the hips and the knees keeping the soles of the feet on the supporting surface and to raise the pelvis from the supporting surface. This position is held for 10 seconds. | |
Shoulder flexors and scapular upward rotators | The patient is instructed to flex the shoulder to 90 degrees with the elbow straight and to hold the position while the clinician attempts to push the arms into extension | |
Shoulder extensors and scapula downward rotators | The patient is instructed to flex the shoulder to 90 degrees with the elbow straight and to hold the position while the clinician attempts to push the arms into flexion | |
Shoulder horizontal abductors | The patient is instructed to flex the shoulder to 90 degrees with the elbow straight and to hold the position while the clinician attempts to push the arms together into horizontal adduction | |
Shoulder adductors | The patient is instructed to bring the hands together in front of the chest, keeping the elbow straight and to hold this position. The clinician attempts to separate the arms into horizontal abduction. | |
Neck and trunk flexors | The patient is instructed to hold both arms straight in front of the body and then to raise the head and shoulders off the supporting surface, and to hold this position | |
Supine or sitting | Shoulder abductors | The patient is instructed to abduct the shoulder to the side up to shoulder level with the elbows straight. The clinician attempts to push the arms down to the patient’s sides into shoulder adduction. |
Shoulder adductors | The patient is instructed to abduct the shoulder to the side up to shoulder level with the elbows straight. The clinician attempts to push the arms over the patient’s head into shoulder abduction. | |
Shoulder internal rotators | The patient is instructed to hold the arms at the sides, flex the elbows to approximately 90 degrees and to place the forearms in neutral. The clinician attempts to push the arms outward into external rotation of the shoulder | |
Shoulder external rotators | The patient is instructed to hold the arms at the sides, flex the elbows to approximately 90 degrees and to place the forearms in neutral. The clinician attempts to push the arms inward into internal rotation of the shoulder | |
Elbow flexors | The patient is instructed to hold the arms at the sides, flex the elbows to approximately 90 degrees and to place the forearms in neutral. The clinician attempts to push the forearms toward the supporting surface into elbow extension | |
Elbow extensors | The patient is instructed to hold the arms at the sides, flex the elbows to approximately 90 degrees and to place the forearms in neutral. The clinician attempts to push the forearms toward the shoulders into elbow flexion | |
Forearm supinators | The patient is instructed to hold the arms at the sides, flex the elbows to approximately 90 degrees and to place the forearms in neutral. The clinician attempts to turn the palms down into pronation | |
Forearm pronators | The patient is instructed to hold the arms at the sides, flex the elbows to approximately 90 degrees and to place the forearms in neutral. The clinician attempts to turn the palms upward into supination | |
Wrist flexors | The patient is instructed to hold the arms at the sides, flex the elbows to approximately 90 degrees and to place the forearms in neutral. The clinician attempts to push the palms away from the body into wrist extension | |
Wrist extensors | The patient is instructed to hold the arms at the sides, flex the elbows to approximately 90 degrees and to place the forearms in neutral. The clinician attempts to push the palms toward the body into wrist flexion | |
Finger flexors | The patient is instructed to hold the arms at the sides, flex the elbows to approximately 90 degrees and to place the forearms in neutral. The clinician places his or her index and middle fingers into the patient’s hand and the patient is asked to squeeze the fingers. The clinician then attempts to pull the fingers out. | |
Finger extensors | The patient is instructed to hold the arms at the sides, flex the elbows to approximately 90 degrees and to place the forearms in neutral. The patient is asked to straighten the fingers and then the clinician attempts to push the fingers into flexion | |
Anterior interossei | The patient is instructed to hold the arms at the sides, flex the elbows to approximately 90 degrees and to place the forearms in neutral. The patient is asked to adduct the fingers and then the clinician attempts to pull the fingers into abduction | |
Posterior interossei | The patient is instructed to hold the arms at the sides, flex the elbows to approximately 90 degrees and to place the forearms in neutral. The patient is asked to abduct the fingers and then the clinician attempts to push the fingers into adduction | |
Opponens pollicis | The patient is instructed to hold the arms at the sides, flex the elbows to approximately 90 degrees and to place the forearms in neutral. The clinician places his or her index finger between the patient’s thumb and each finger one at a time while asking the patient to pinch the finger | |
Sitting | Latissimus dorsi and triceps | The patient is instructed to place both hands on the supporting surface next to the hips, keeping the elbows straight and the shoulder shrugged. The patient is then asked to depress the scapular by lifting the buttocks off the supporting surface. |
Upper trapezius and levator scapulae | The patient is instructed to shrug the shoulders toward the ears and to hold the position. The clinician attempts to push the shoulders down into depression | |
Internal rotators of the hip and evertors of the feet | The patient is instructed to evert the foot and to hold the position while the clinician pushes on the lateral border of each foot, into inversion and external rotation of the hip | |
External rotators of the hip and invertors of the feet | The patient is instructed to invert the foot and to hold the position while the clinician pushes on the medial border of each foot, into eversion and internal rotation of the hip | |
Prone | Rhomboids, middle trapezius, and posterior deltoid | The patient is instructed to flex the elbows level with the shoulders, pinch or adduct the scapulae together and raise the arms from the supporting surface. The clinician attempts to push the arms downward |
Elbow and shoulder extensors | The patient is instructed to raise the arm off the supporting surface while keeping the arms at the sides and the elbows straight. The clinician attempts to push the arms downward | |
Extensors of the hips, back, neck, and shoulders | The patient is instructed to keep the arms at the sides and to raise the head and shoulders and arms and legs of the supporting surface simultaneously by arching the back. The position is held for 10 seconds | |
Prone or sitting | Hamstrings | The patient is instructed to flex the knees to about 90 degrees. The clinician attempts to pull the knees into extension |
Quadriceps | The patient is instructed to flex the knees to about 90 degrees. The clinician attempts to push the knees into flexion | |
Standing | Gastrocnemius/soleus | The patient is instructed to stand on one leg with one finger on the supporting surface for balance. The patient is then asked to rise up on tiptoes and to repeat 10 times. The other leg is then tested |
Dorsiflexors | The patient is instructed to walk on the heel for 10 steps | |
Hip and knee extensors | The patient is instructed to do five partial deep-knee bends |
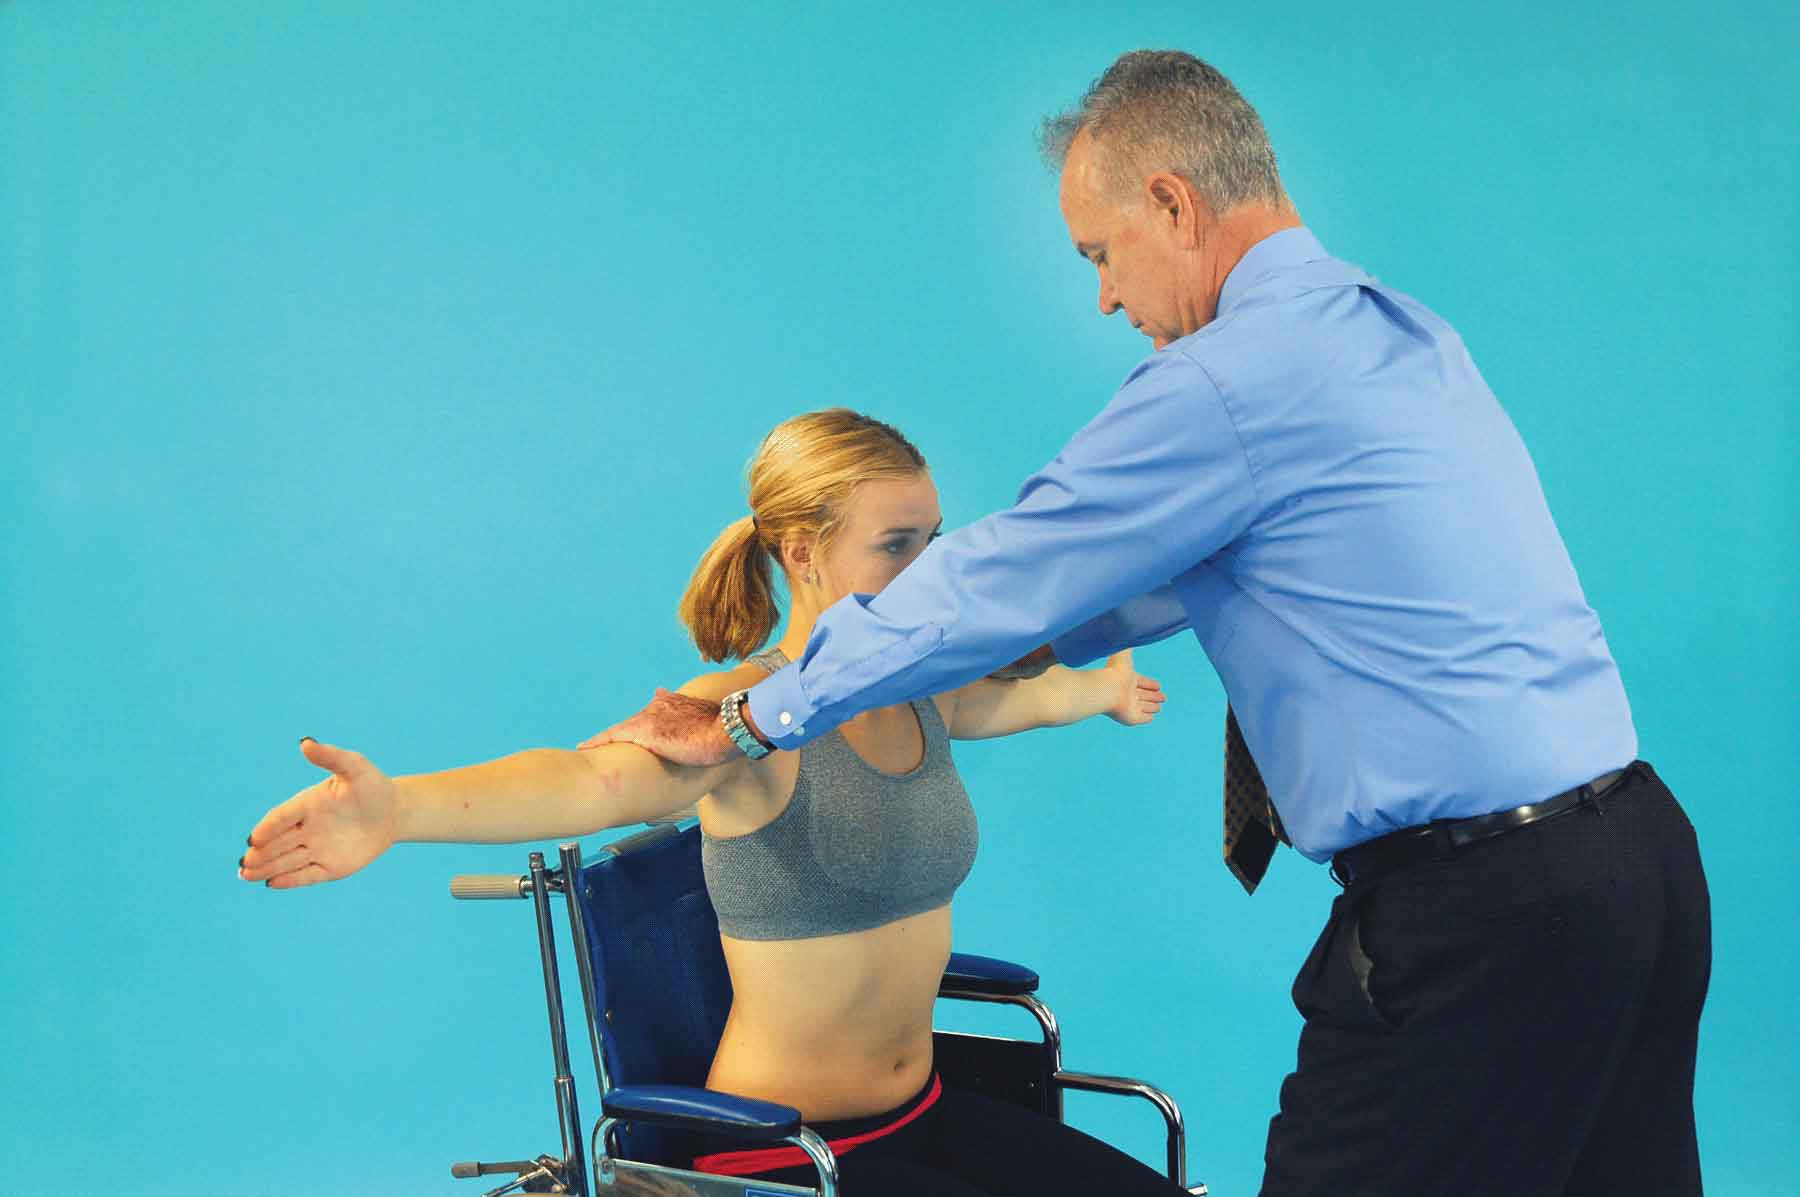
FIGURE 12-3 Gross muscle testing of the shoulder abductors.

FIGURE 12-4 Gross muscle testing of the shoulder flexors.
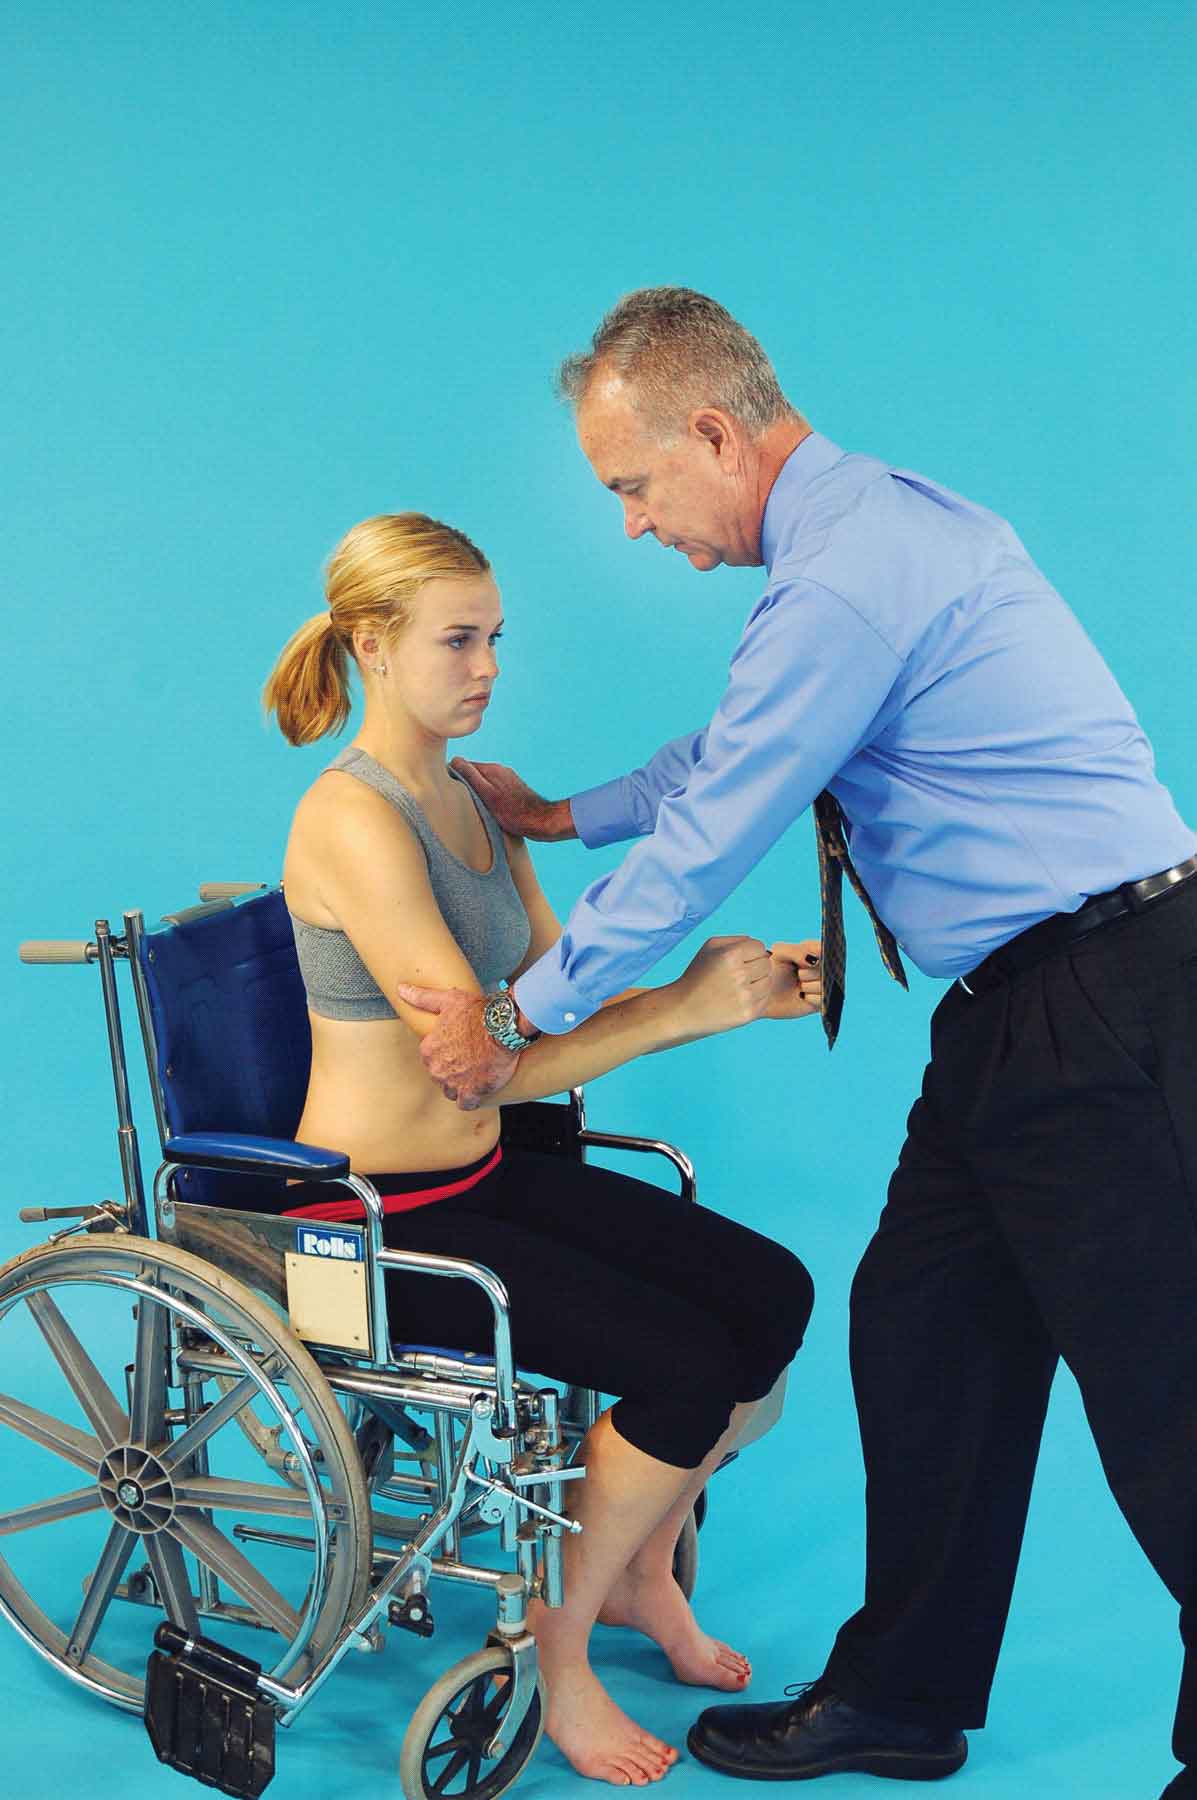
FIGURE 12-5 Gross muscle testing of the shoulder extensors.

FIGURE 12-6 Gross muscle testing of the elbow flexors.

FIGURE 12-7 Gross muscle testing of the elbow extensors.
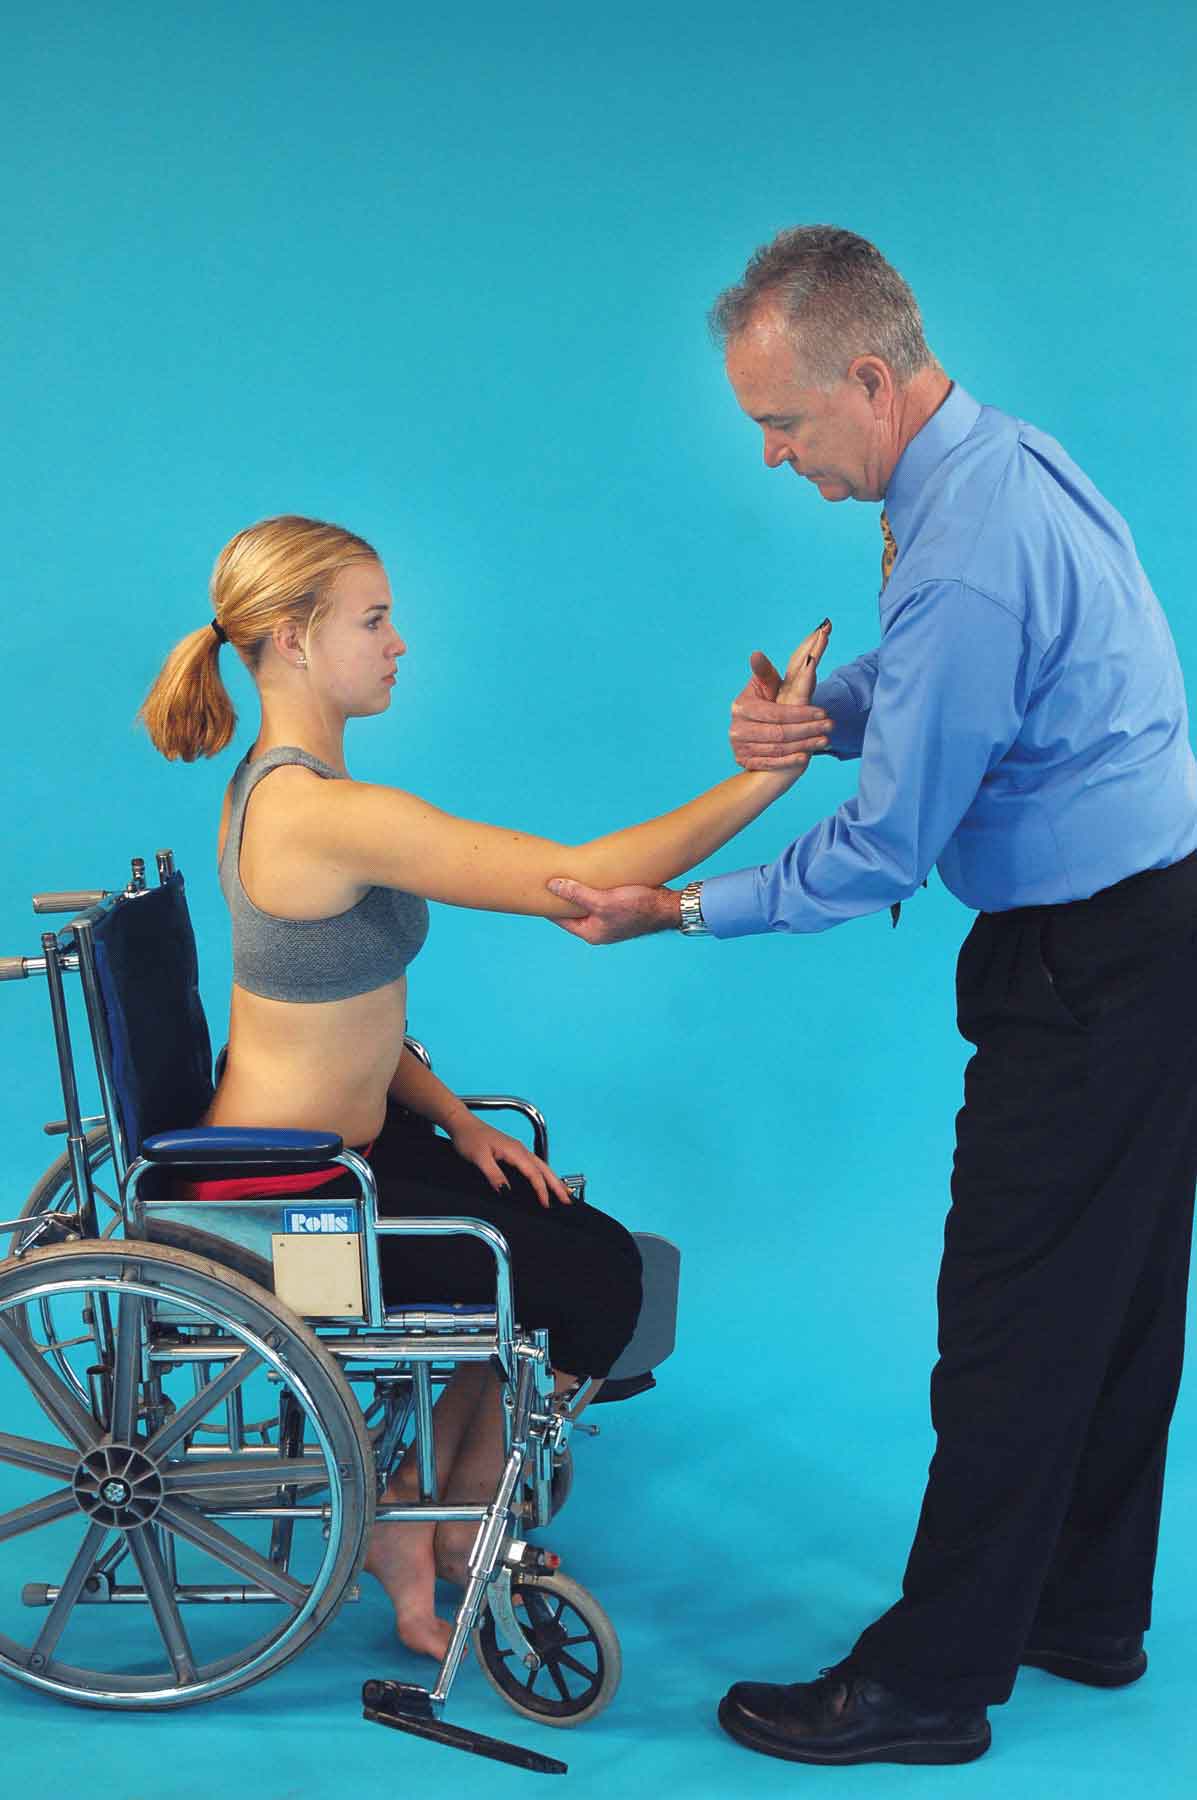
FIGURE 12-8 Gross muscle testing of the wrist extensors.
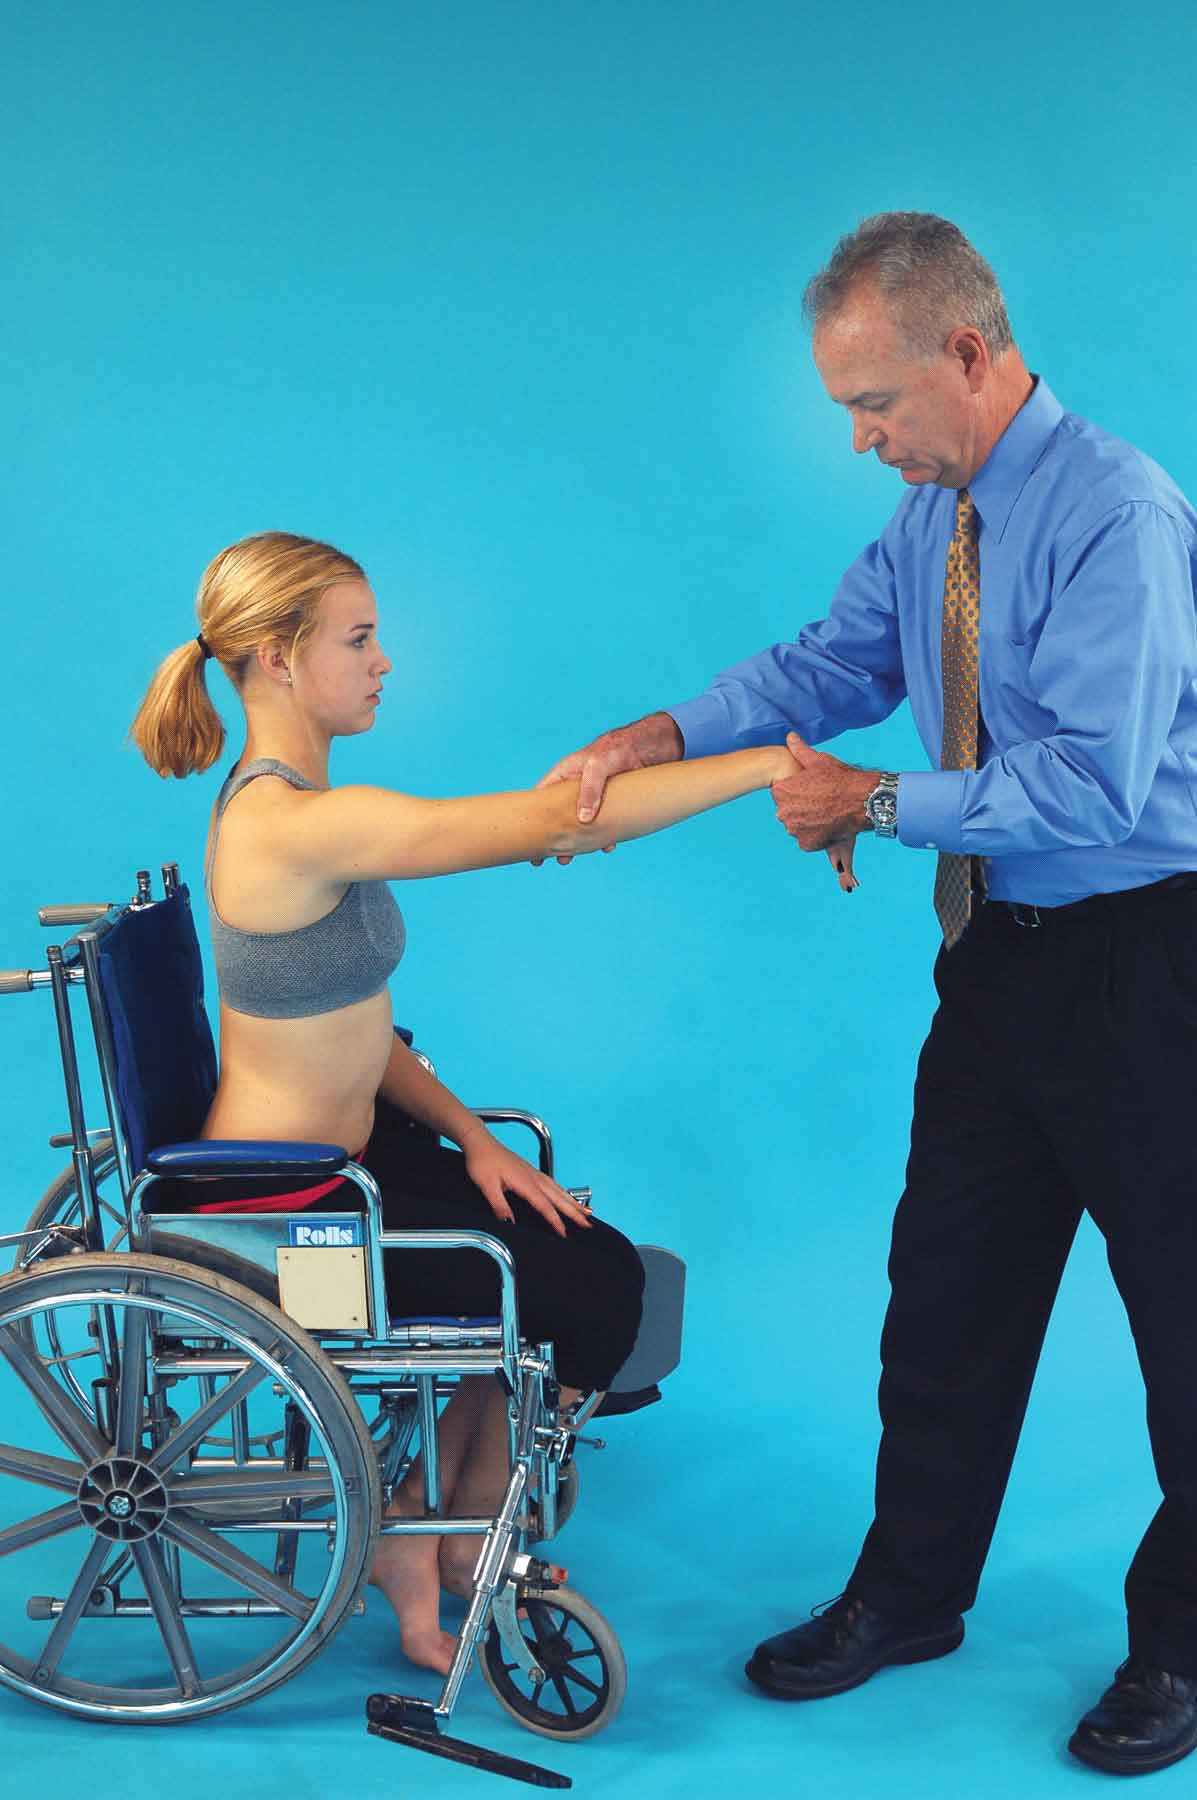
FIGURE 12-9 Gross muscle testing of the wrist flexors.
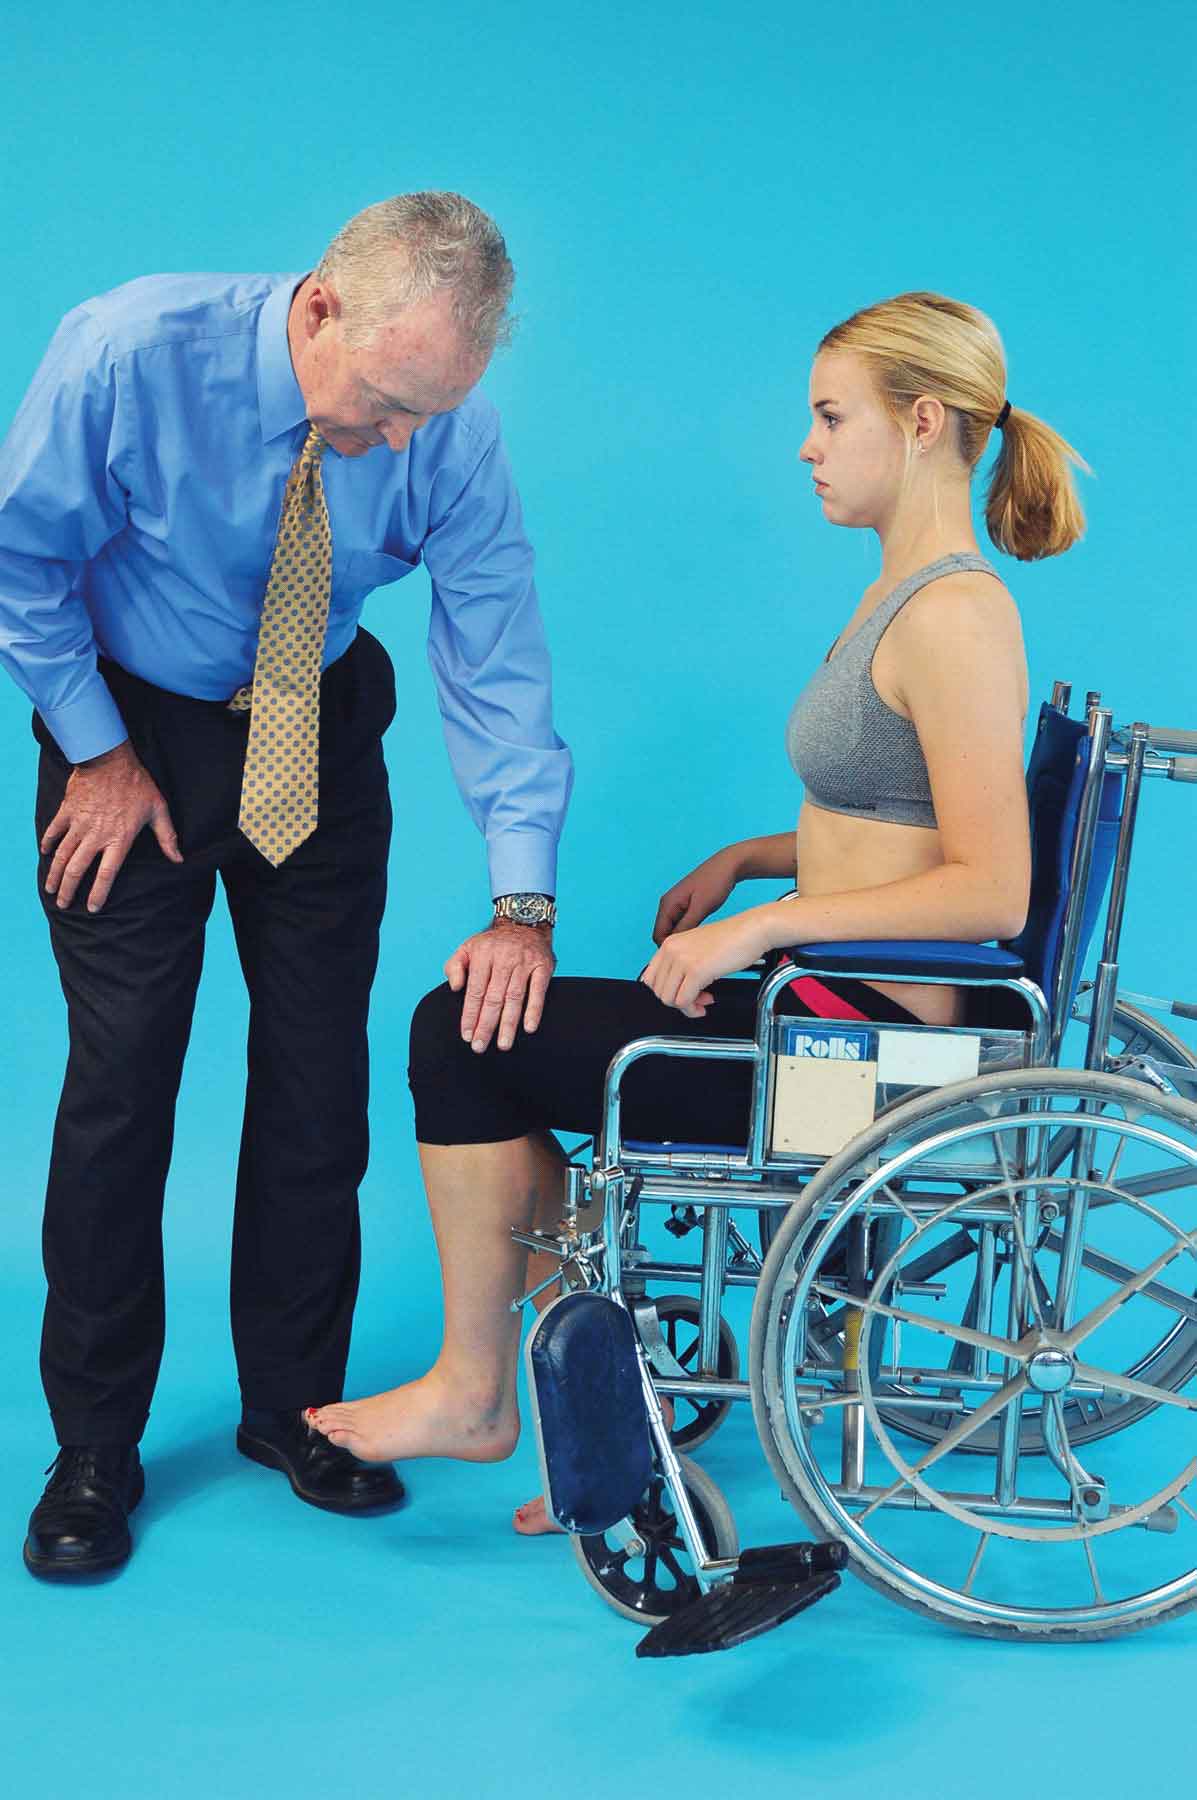
FIGURE 12-10 Gross muscle testing of the hip flexors.
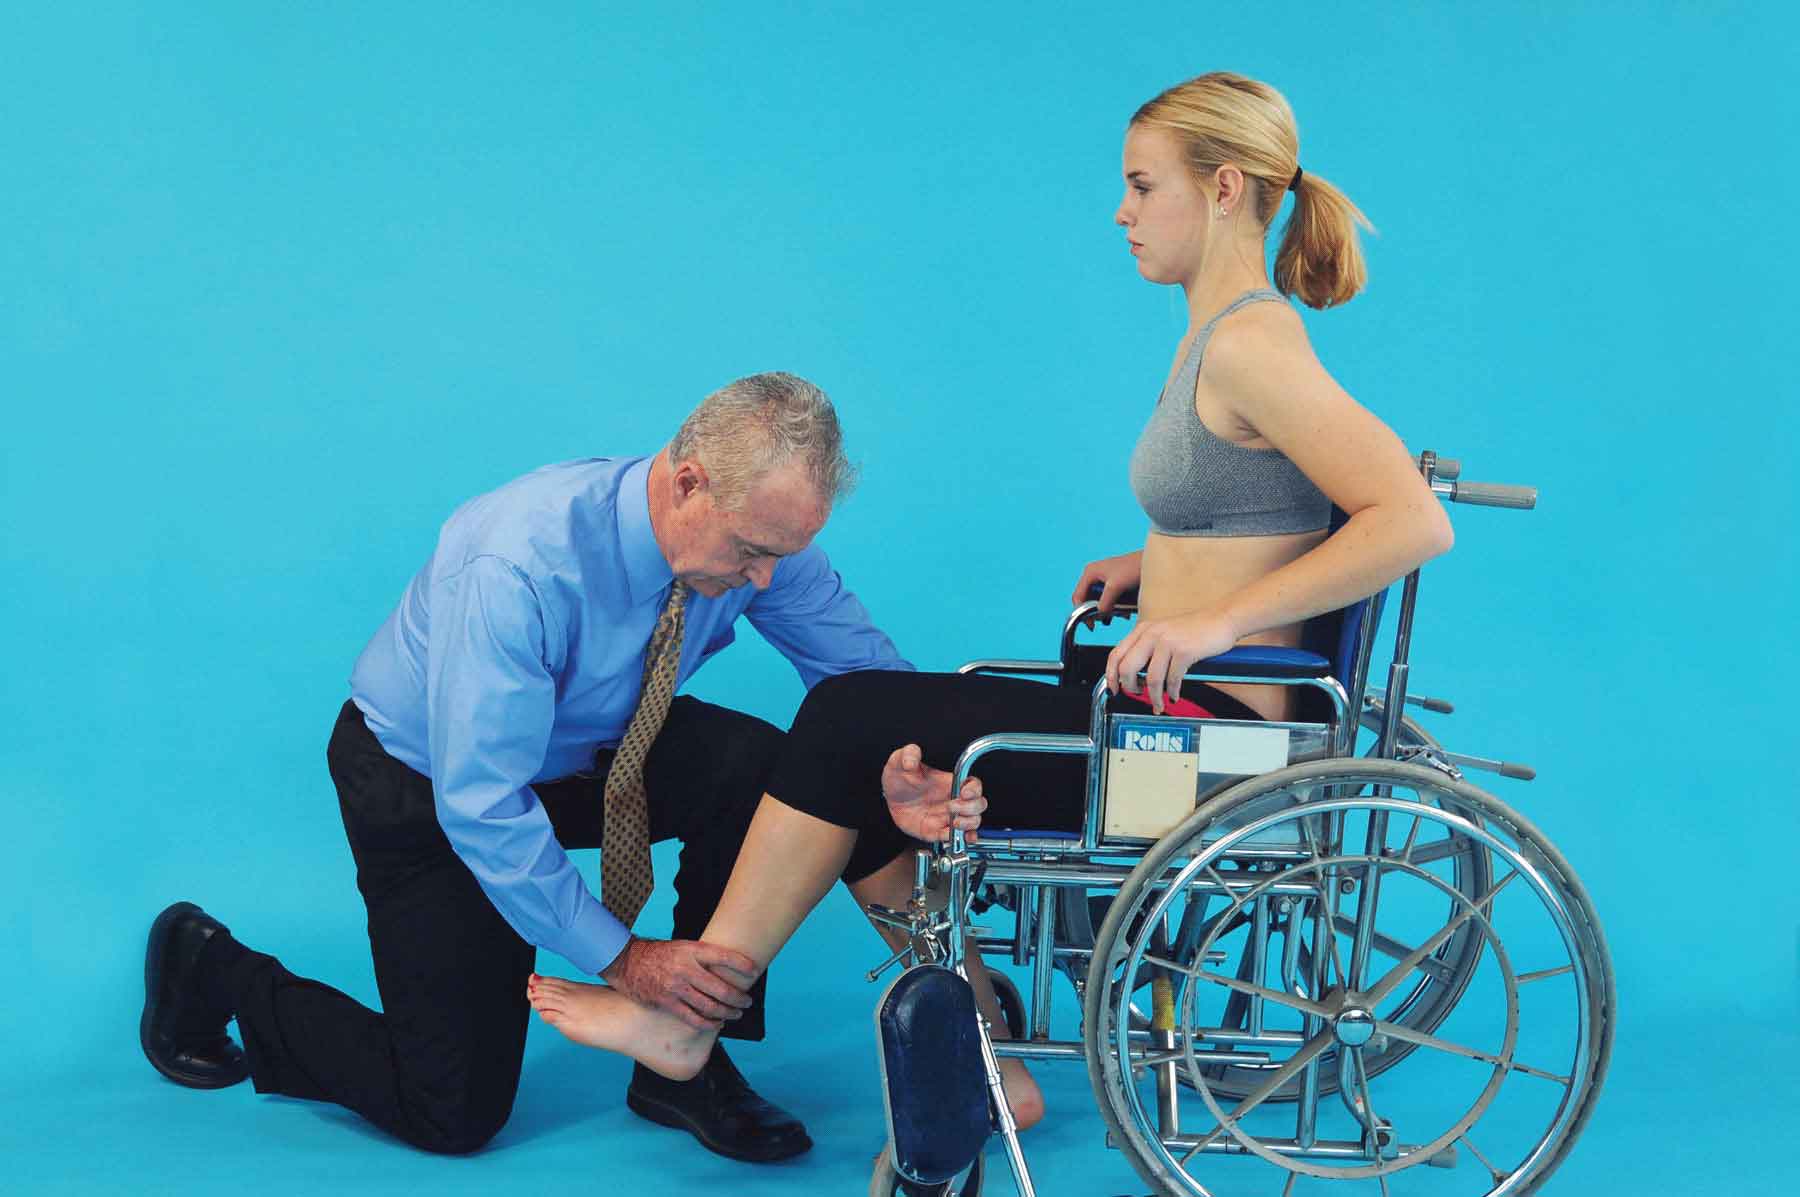
FIGURE 12-11 Gross muscle testing of the knee extensors.

FIGURE 12-12 Gross muscle testing of the knee flexors and hip extensors.
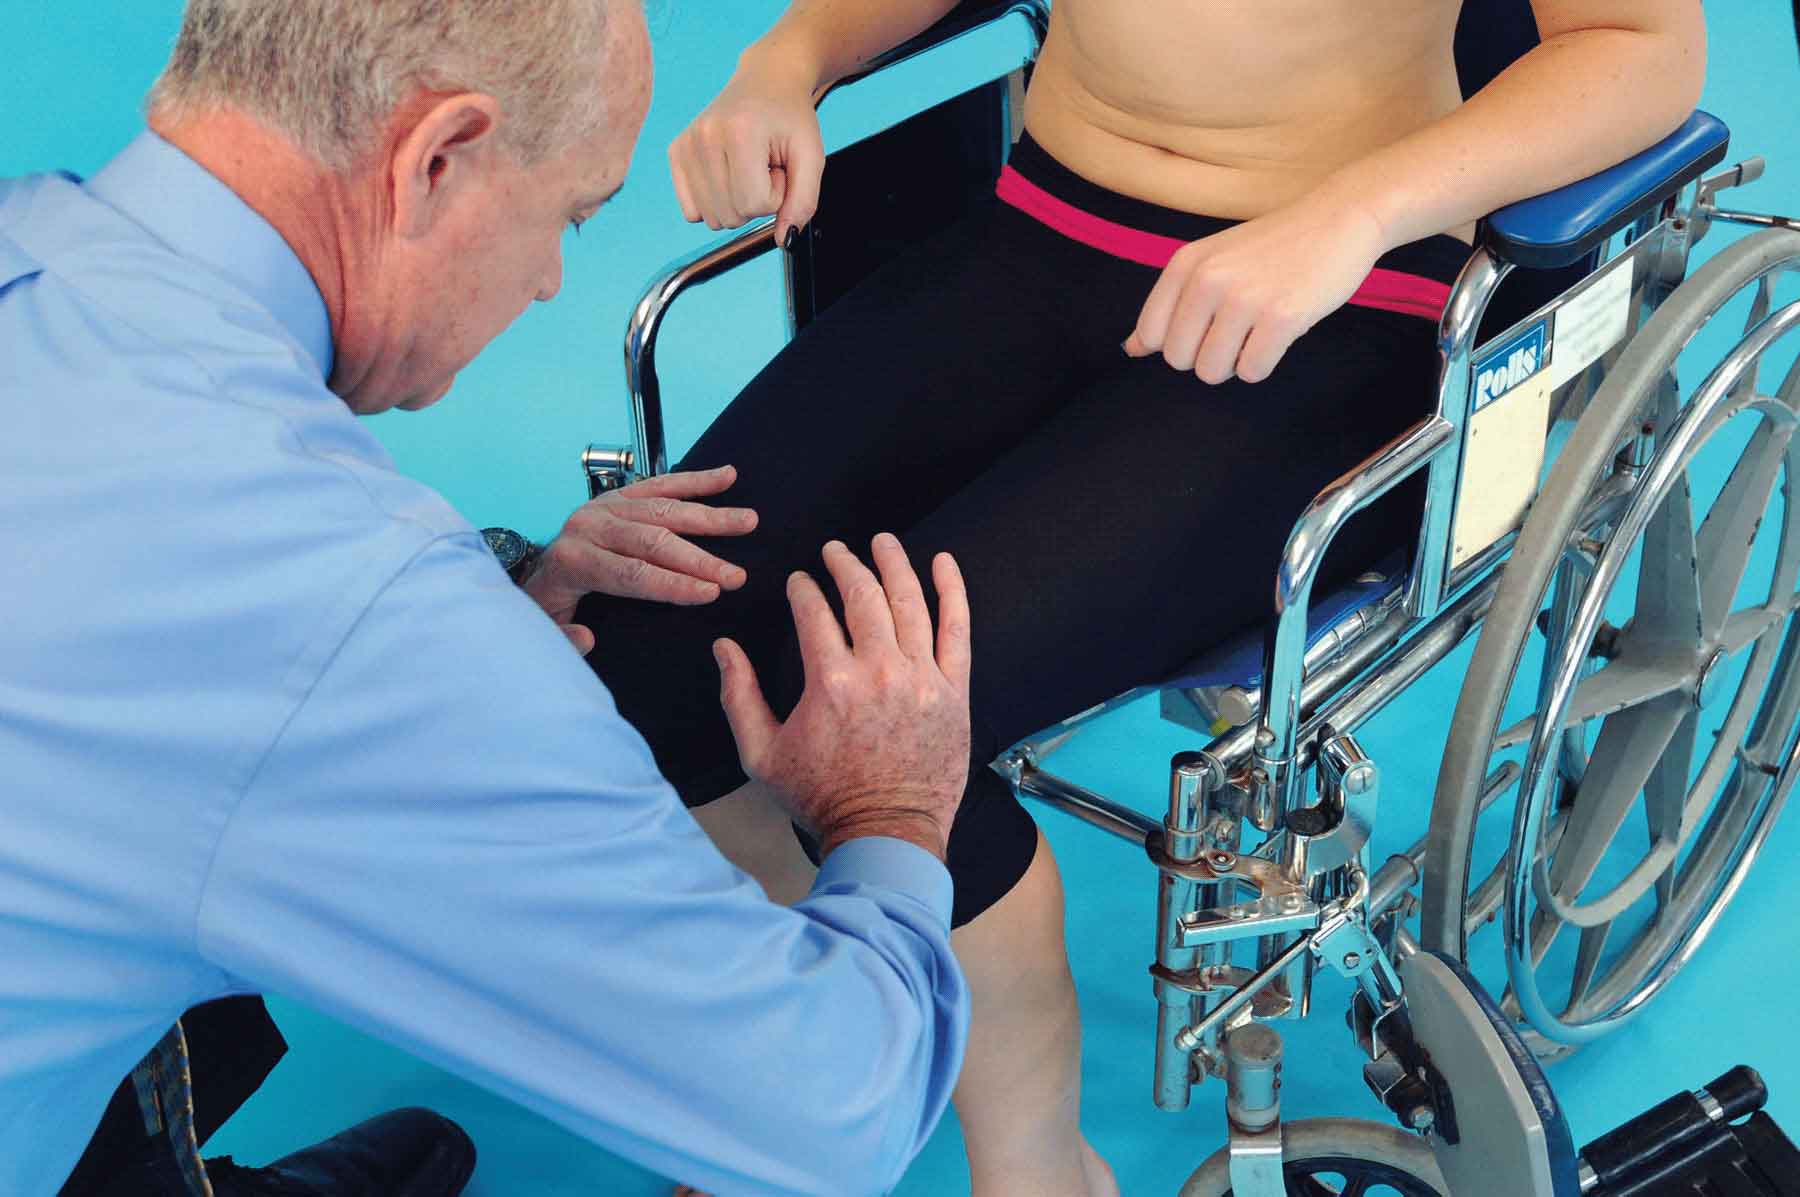
FIGURE 12-13 Gross muscle testing of the hip abductors.
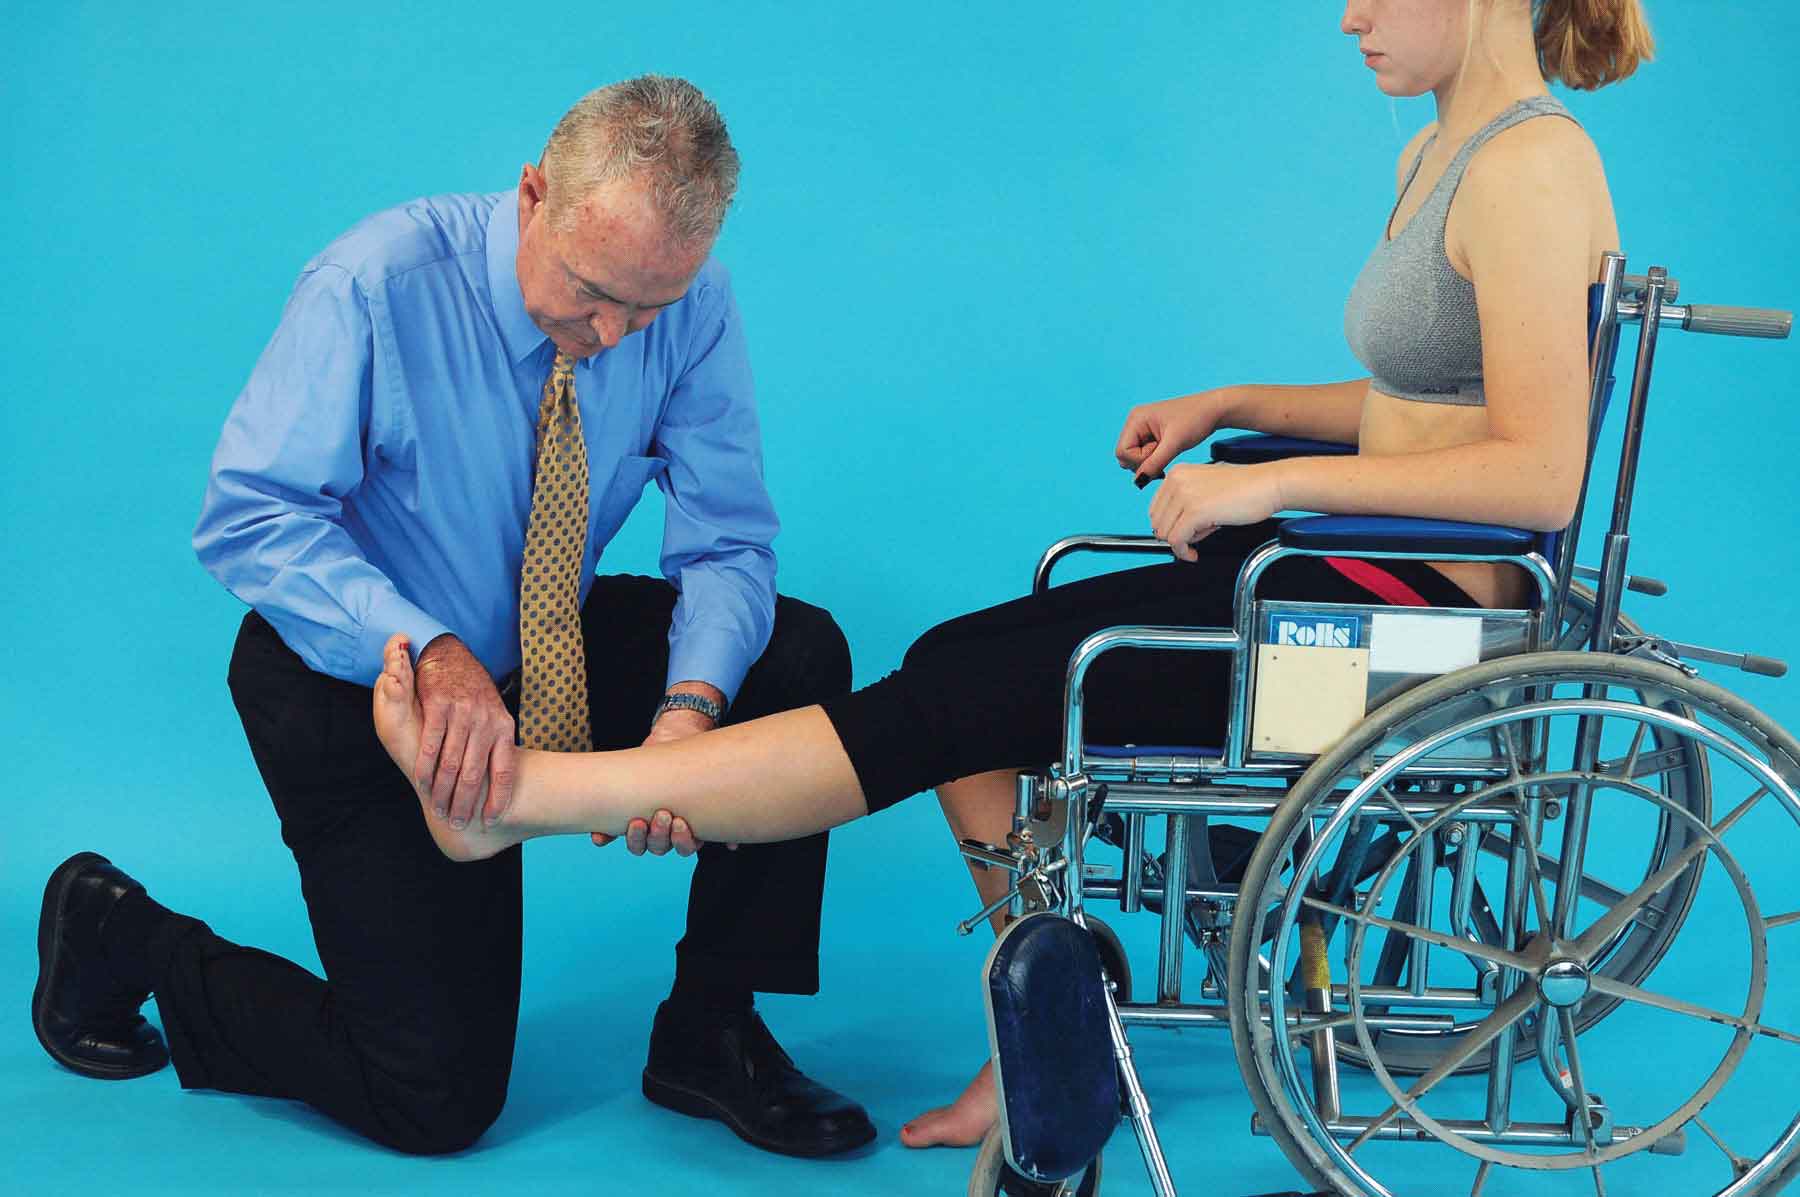
FIGURE 12-14 Gross muscle testing of the ankle dorsiflexors.
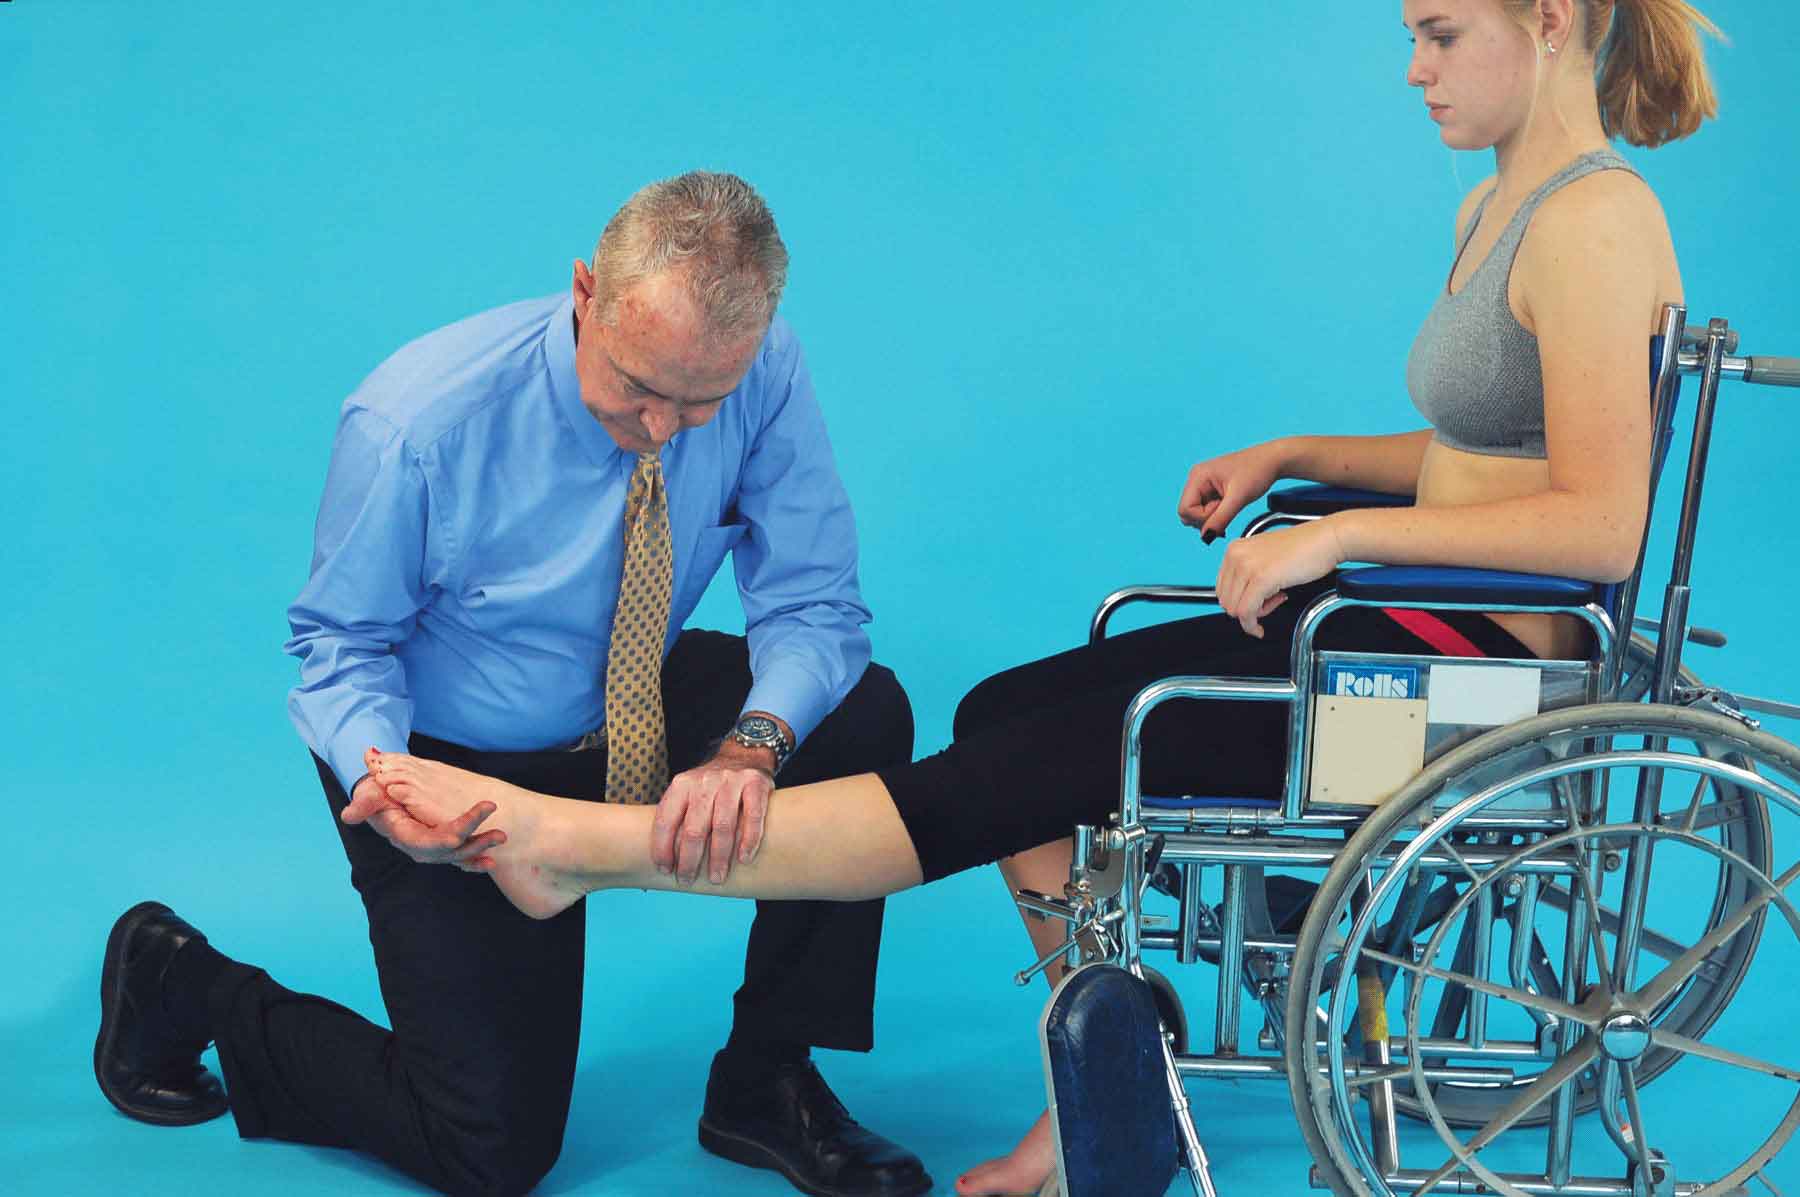
FIGURE 12-15 Gross muscle testing of the ankle plantarflexors.
Specific Muscle Testing
Specific muscle testing, also called MMT is a procedure for the evaluation of the voluntary function and strength of individual muscles and muscle groups based on effective performance of limb movement in relation to the forces of gravity and manual resistance. The theoretical concepts and grading methods of MMT are outlined in Chapter 4.
To accurately perform a specific muscle test, the clinician must have knowledge of the following:
 The origin and insertion of the muscle being tested.
 The function of the muscle being tested. Muscles rarely perform one single action; instead they form groups of actions that overlap with the functions of other muscles. For that reason, if a component of a muscle’s function is lost, other muscles that have duplicate functions can compensate for that loss.
 How to eliminate substitute or trick motions. This is best accomplished by using standardized testing positions. Where appropriate, these motions are included in each of the test procedures so that the clinician is aware of what to avoid.
 How to skillfully apply resistance. Pressure should be applied slowly, very gently, and gradually before progressing to the maximum resistance tolerable.
 The standard positions for each muscle test based on the effects of gravity. Typically the patient is positioned in either an antigravity or a gravity-eliminated position (see later).
The main purposes of specific muscle testing are as follows:
 To help determine a diagnosis. For example, specific muscle testing can aid in precisely localizing a lesion in the peripheral nervous system.
 To establish a baseline for muscle reeducation and exercise.
 To determine a patient’s need for supportive apparatus (orthosis, assistive device of ambulation, or splints).
 To help determine a patient’s progress.
The patient is positioned in an antigravity position for grades 3–5 and in a gravity-eliminated position for grades 0–2. If the muscle strength is less than grade 3, then the methods advocated in muscle testing manuals must be used. For the testing methods and positions described in this chapter, it is assumed that the patient has a grade of 3–5. Alternative, gravity eliminated/minimized positions will also be provided.
Muscle Testing of the Shoulder Complex
A number of significant muscles control motion at the shoulder and provide dynamic stabilization (see Chapter 16).
Upper Trapezius and Levator Scapulae
It is worth remembering that it is difficult to differentiate the strength of the levator scapulae from that of the upper trapezius. For this reason, the levator scapulae strength is often assessed together with the rhomboids, or with the upper trapezius. The patient is seated with the arm relaxed at the sides. The patient is asked to raise the shoulder as high as possible, and to extend and rotate the occiput toward the elevated shoulder (Fig. 12-16). The clinician stabilizes the top of the shoulders with one hand and applies resistance against the head in the direction of cervical flexion anterolaterally (see Fig. 12-16). The command given to the patient is “Don’t let me separate your head and shoulder.” Substitution or trick motions can include abduction and upward rotation of the scapula (serratus anterior), elevation and downward rotation of the scapula (rhomboid major and minor), anterior tilting of the scapula (pectoralis minor), and elevation of the first and second ribs (scalenus muscle group). The gravity minimized/eliminated position for this muscle is with the patient positioned in a supine or prone position with the upper limb and shoulder supported.
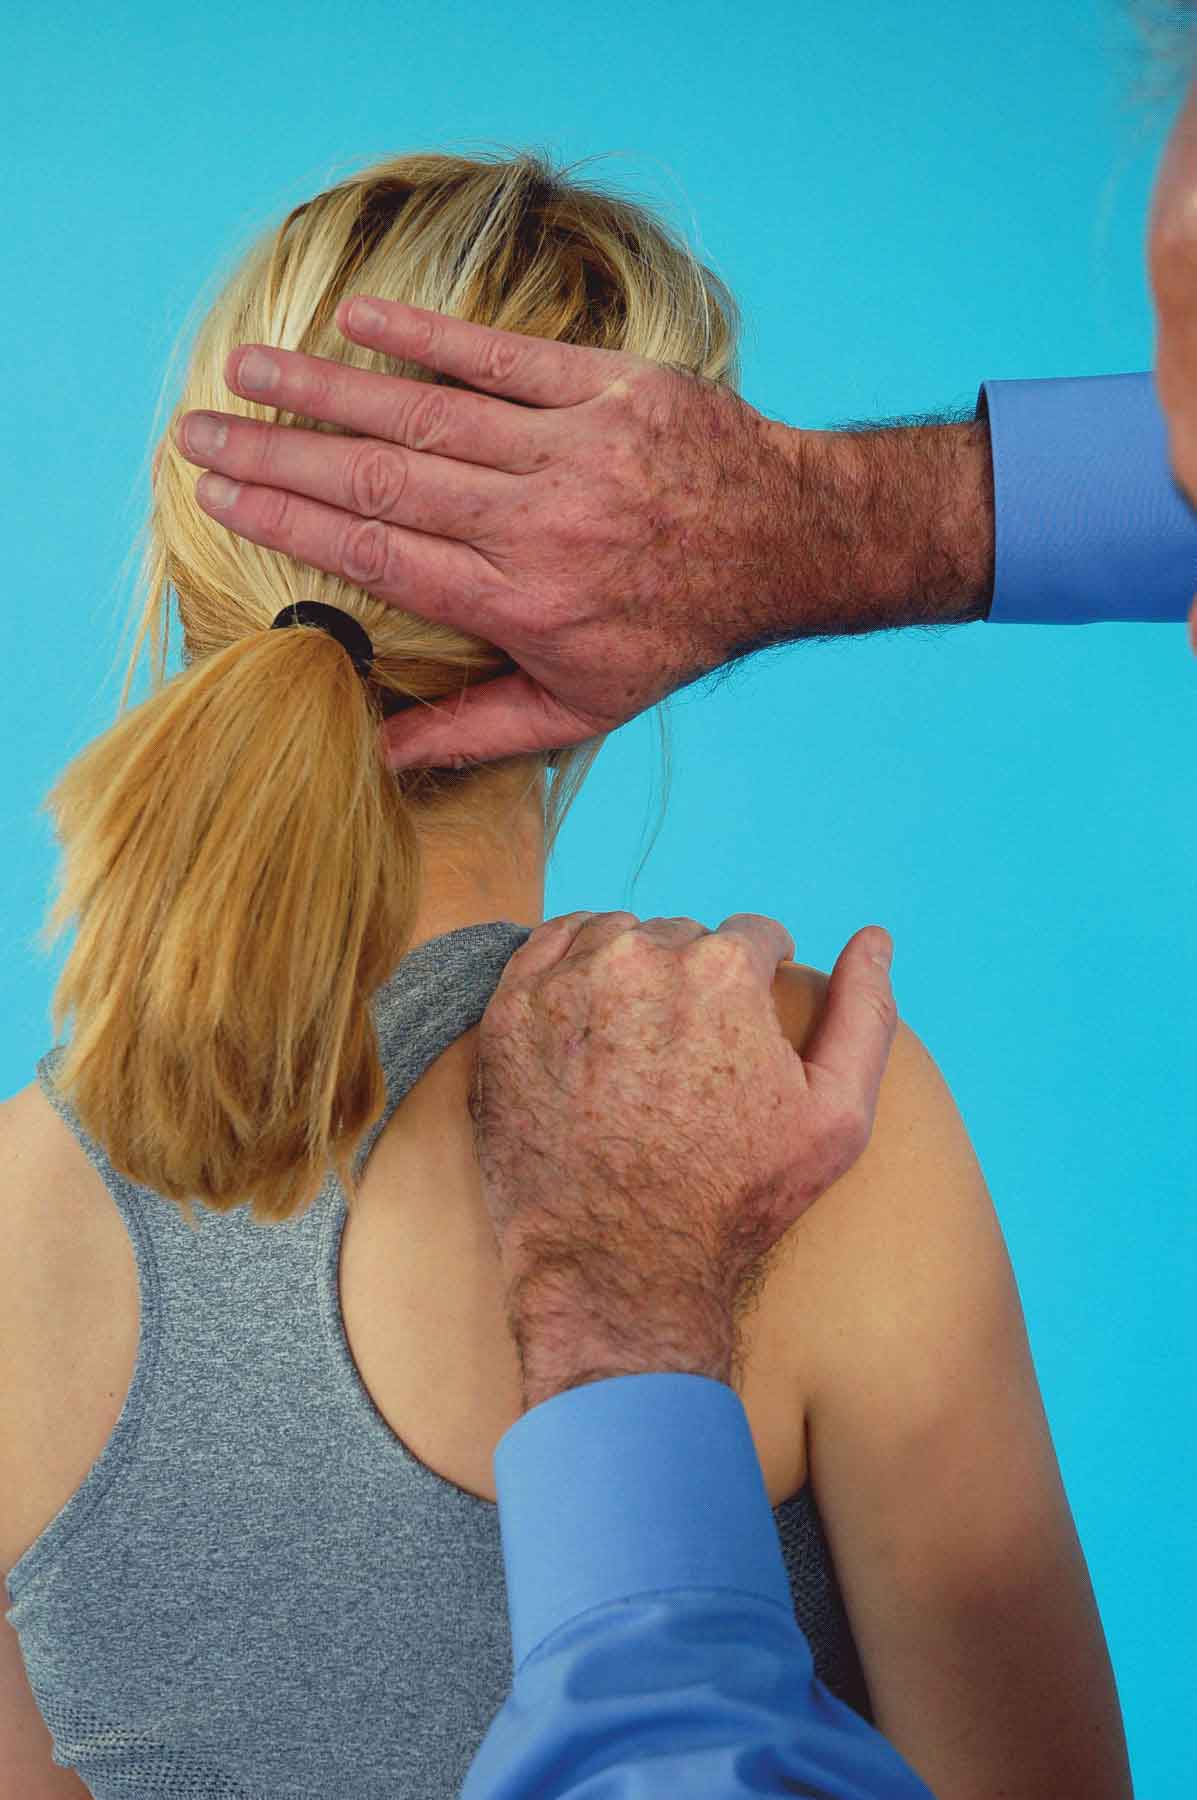
FIGURE 12-16 Test position for the upper portion of the trapezius (and levator scapulae).
Middle Trapezius
To specifically test this muscle, the patient is positioned in prone with the shoulder abducted to 90 degrees, the elbow extended, and the upper extremity externally rotated so that the thumb points toward the ceiling (Fig. 12-17). The clinician applies pressure against the forearm in a downward direction toward the table. The command given to the patient is “Don’t let me push your arm down while keeping your elbow straight and your thumb pointing upward.” Substitution or trick motions can include trunk rotation, horizontal abduction of the shoulder (posterior deltoid) elevation and downward rotation of the scapula (rhomboid major and minor), depression and downward rotation of the scapula (lower trapezius), synergistic contraction of the upper and lower fibers of the trapezius muscle, and synergistic contraction of the lower trapezius and the rhomboids. The gravity minimized/eliminated position for this muscle is with the patient positioned in sitting with the upper limb supported on a friction free surface in a position of 90 degrees of abduction and 90 degrees of elbow flexion.
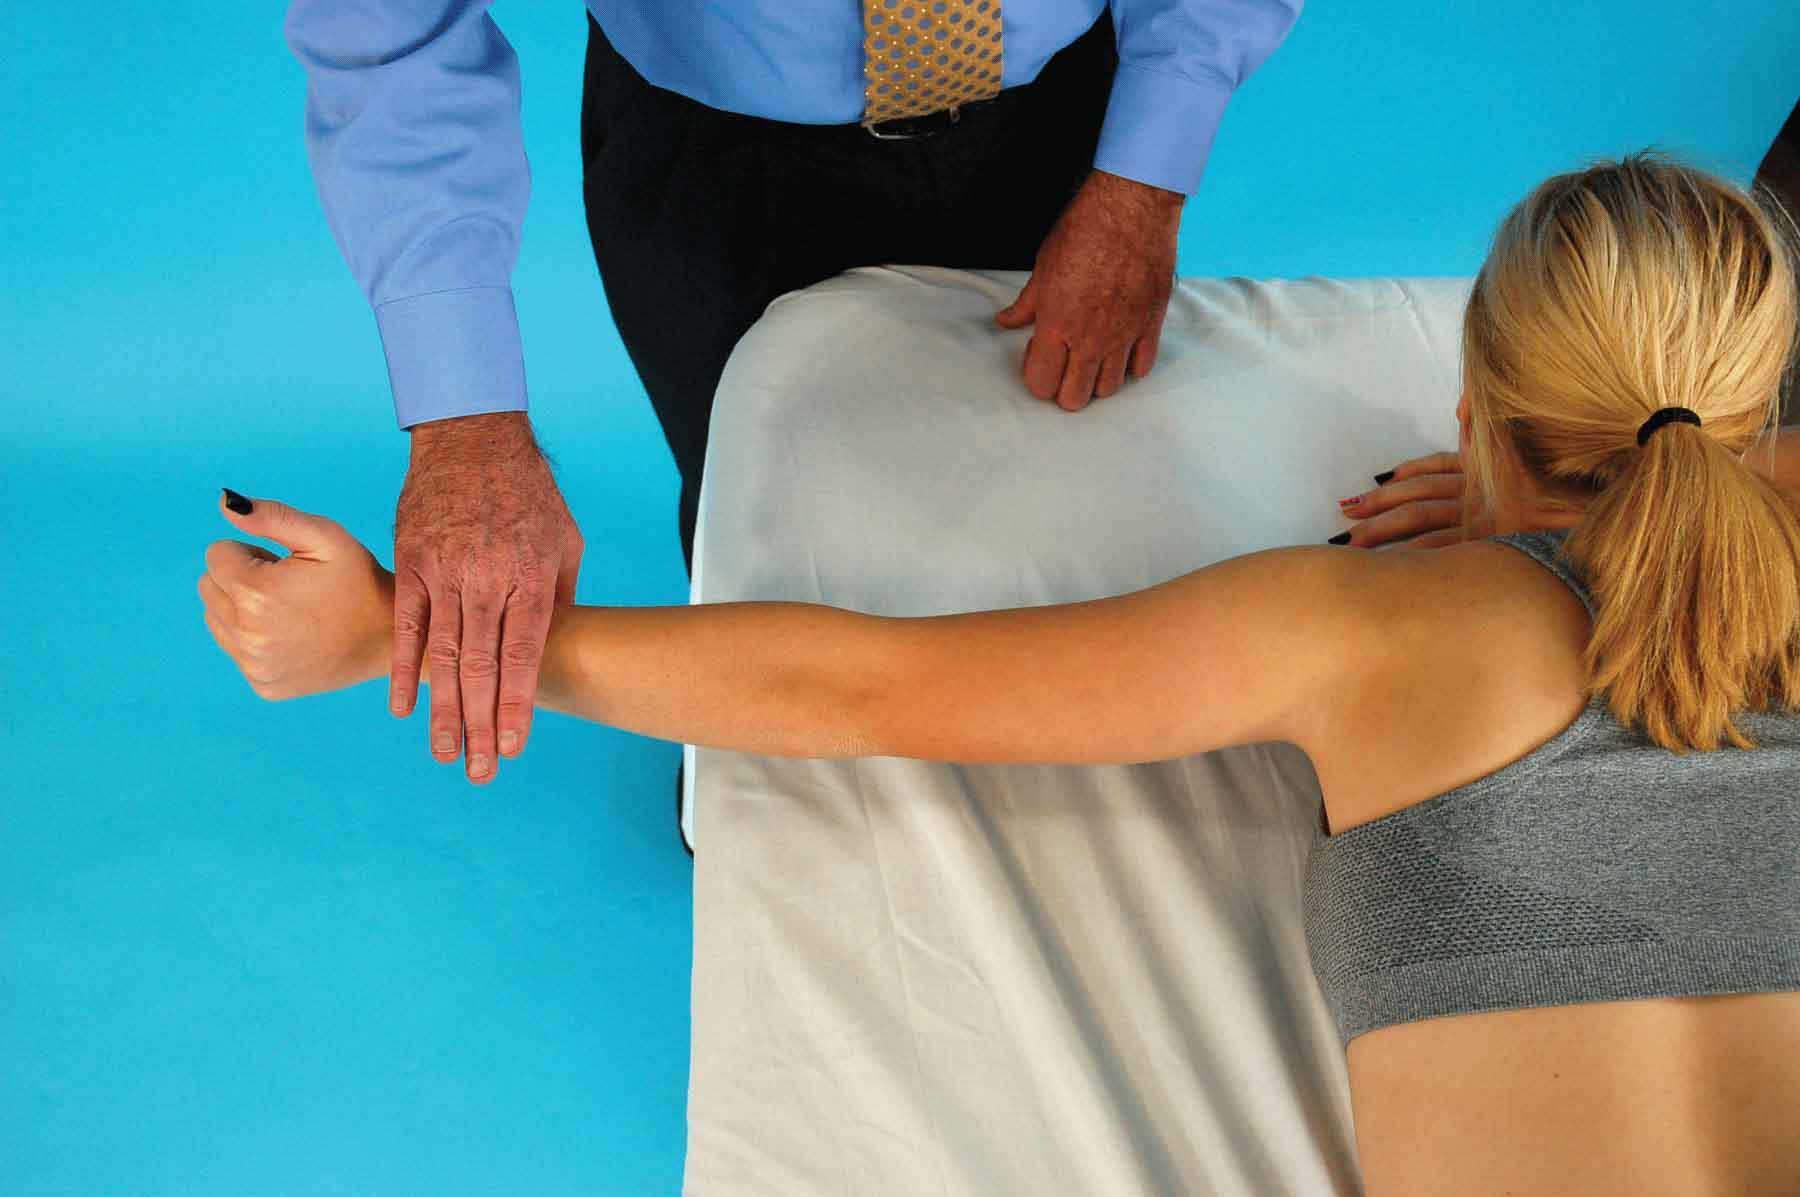
FIGURE 12-17 Test position for the middle trapezius.
Lower Trapezius
To specifically test this muscle, the patient is positioned in prone with the arm placed diagonally overhead, and the shoulder is externally rotated (Fig. 12-18). The clinician applies pressure against the forearm downward toward the table. The command given to the patient is “Don’t let me push your arm down while keeping your arm diagonally upward and your thumb facing upward.” Substitution or trick motions can include assistance from the posterior deltoid, latissimus dorsi, or pectoralis major. The gravity minimized/eliminated position for this muscle is with the patient positioned in prone with the arms by the sides and the upper extremity supported by the clinician. The patient is asked to depress and adduct the scapula through the full range of motion.

FIGURE 12-18 Test position for the lower trapezius.
Serratus Anterior
To specifically test this muscle, the patient is positioned in supine, standing, or sitting.
 Supine: the patient is asked to flex the shoulder to 90 degrees with slight abduction and with the elbow in extension. From this position, the patient moves the arm upward toward the ceiling by abducting the scapula. The clinician applies resistance by grasping around the forearm and elbow and applying a downward and inward pressure toward the table (Fig. 12-19). The command given to the patient is “Try to lift your arm higher by moving your shoulder forward while I push down on it.”
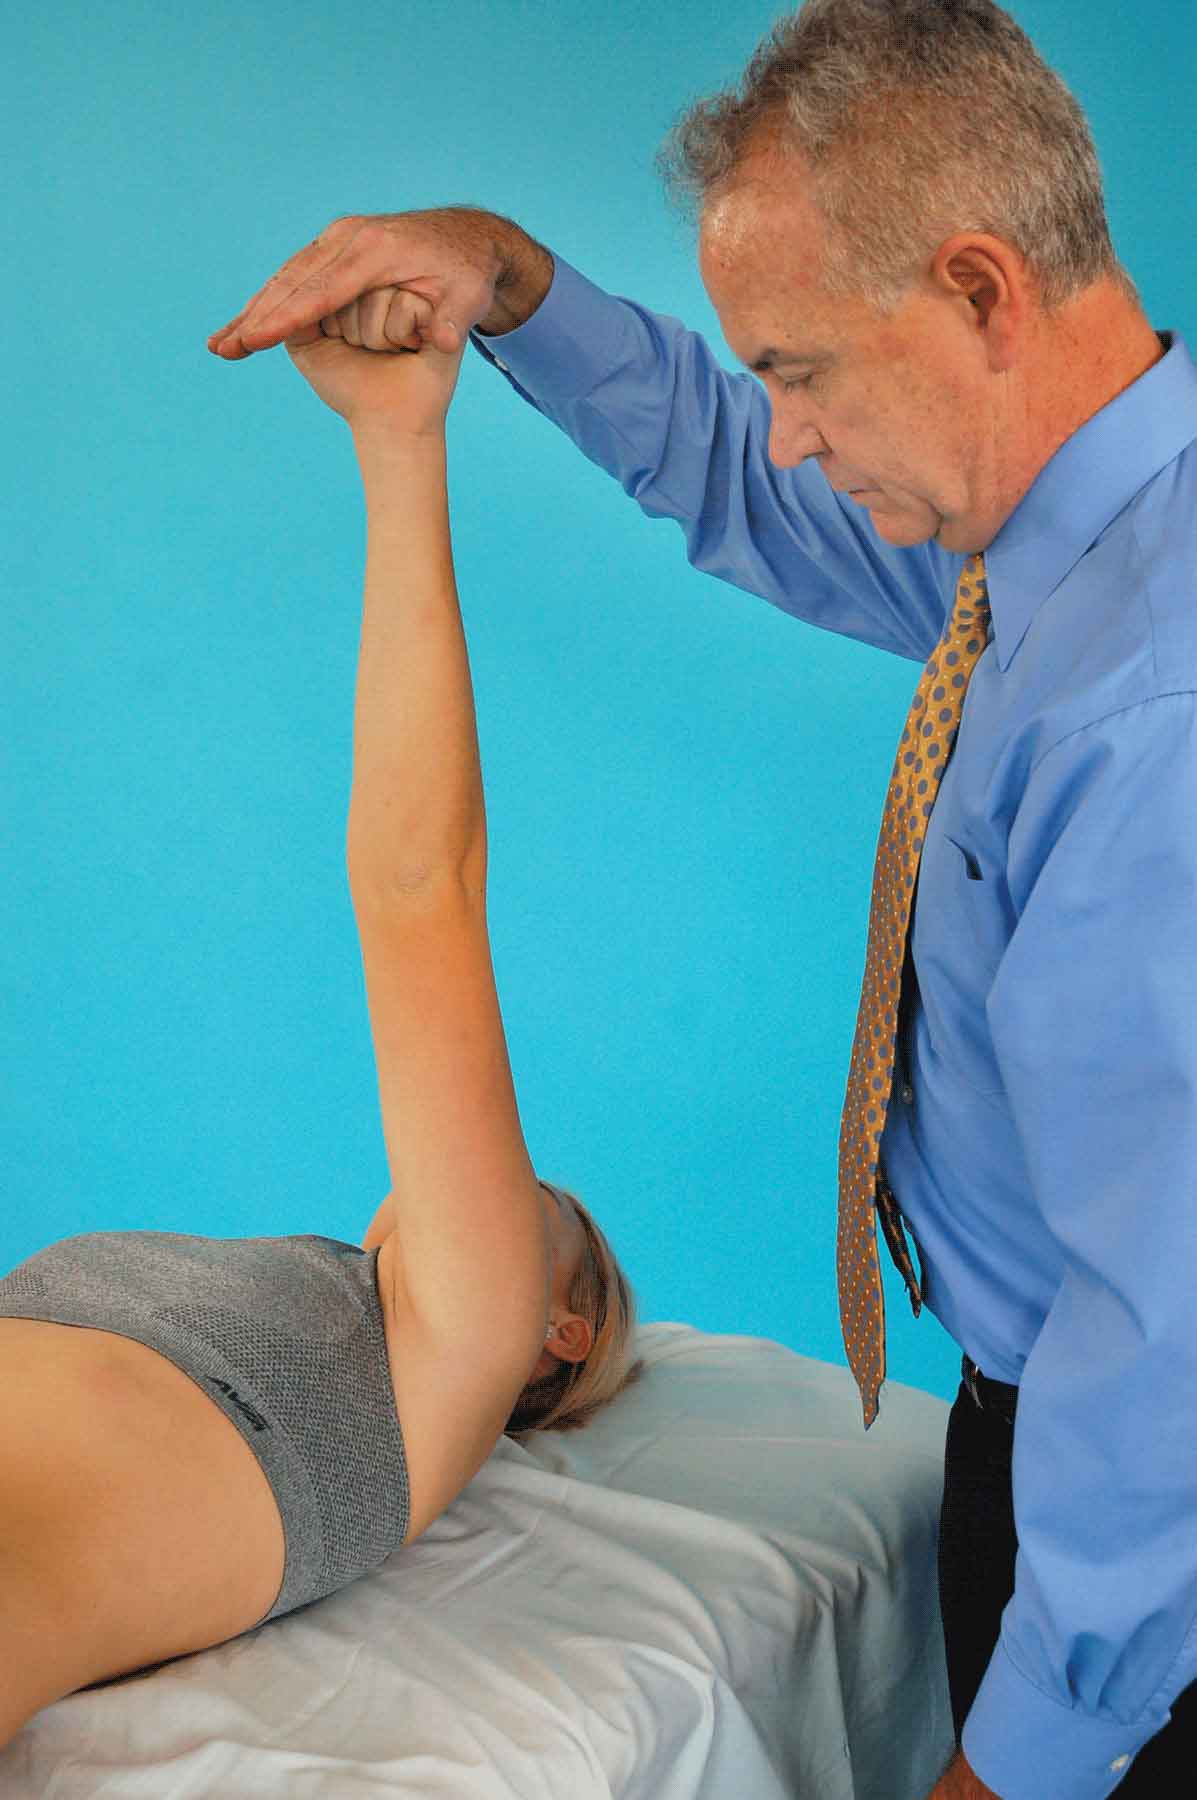
FIGURE 12-19 Test position for the serratus anterior—patient supine.
 Standing: the patient places a hand against the wall with the shoulder in forward flexion to 80–90 degrees and the elbows locked in extension. While monitoring the inferior angle of the scapula for any winging, the command given to the patient is “Push against the wall.”
 Sitting: this test focuses on the upward rotation action of the serratus in the abducted position. The patient is asked to move the humerus into approximately 120–130 degrees of flexion. Using one hand, the clinician stabilizes the inferior aspect of the scapula, and the other hand is placed on the anterior aspect of the arm (Fig. 12-20). The command given to the patient is “Keep your arm still while I try and push it down,” as the clinician pushes downwardly on the arm while applying a resistive force with the other hand into medial rotation of the inferior angle of the scapula.
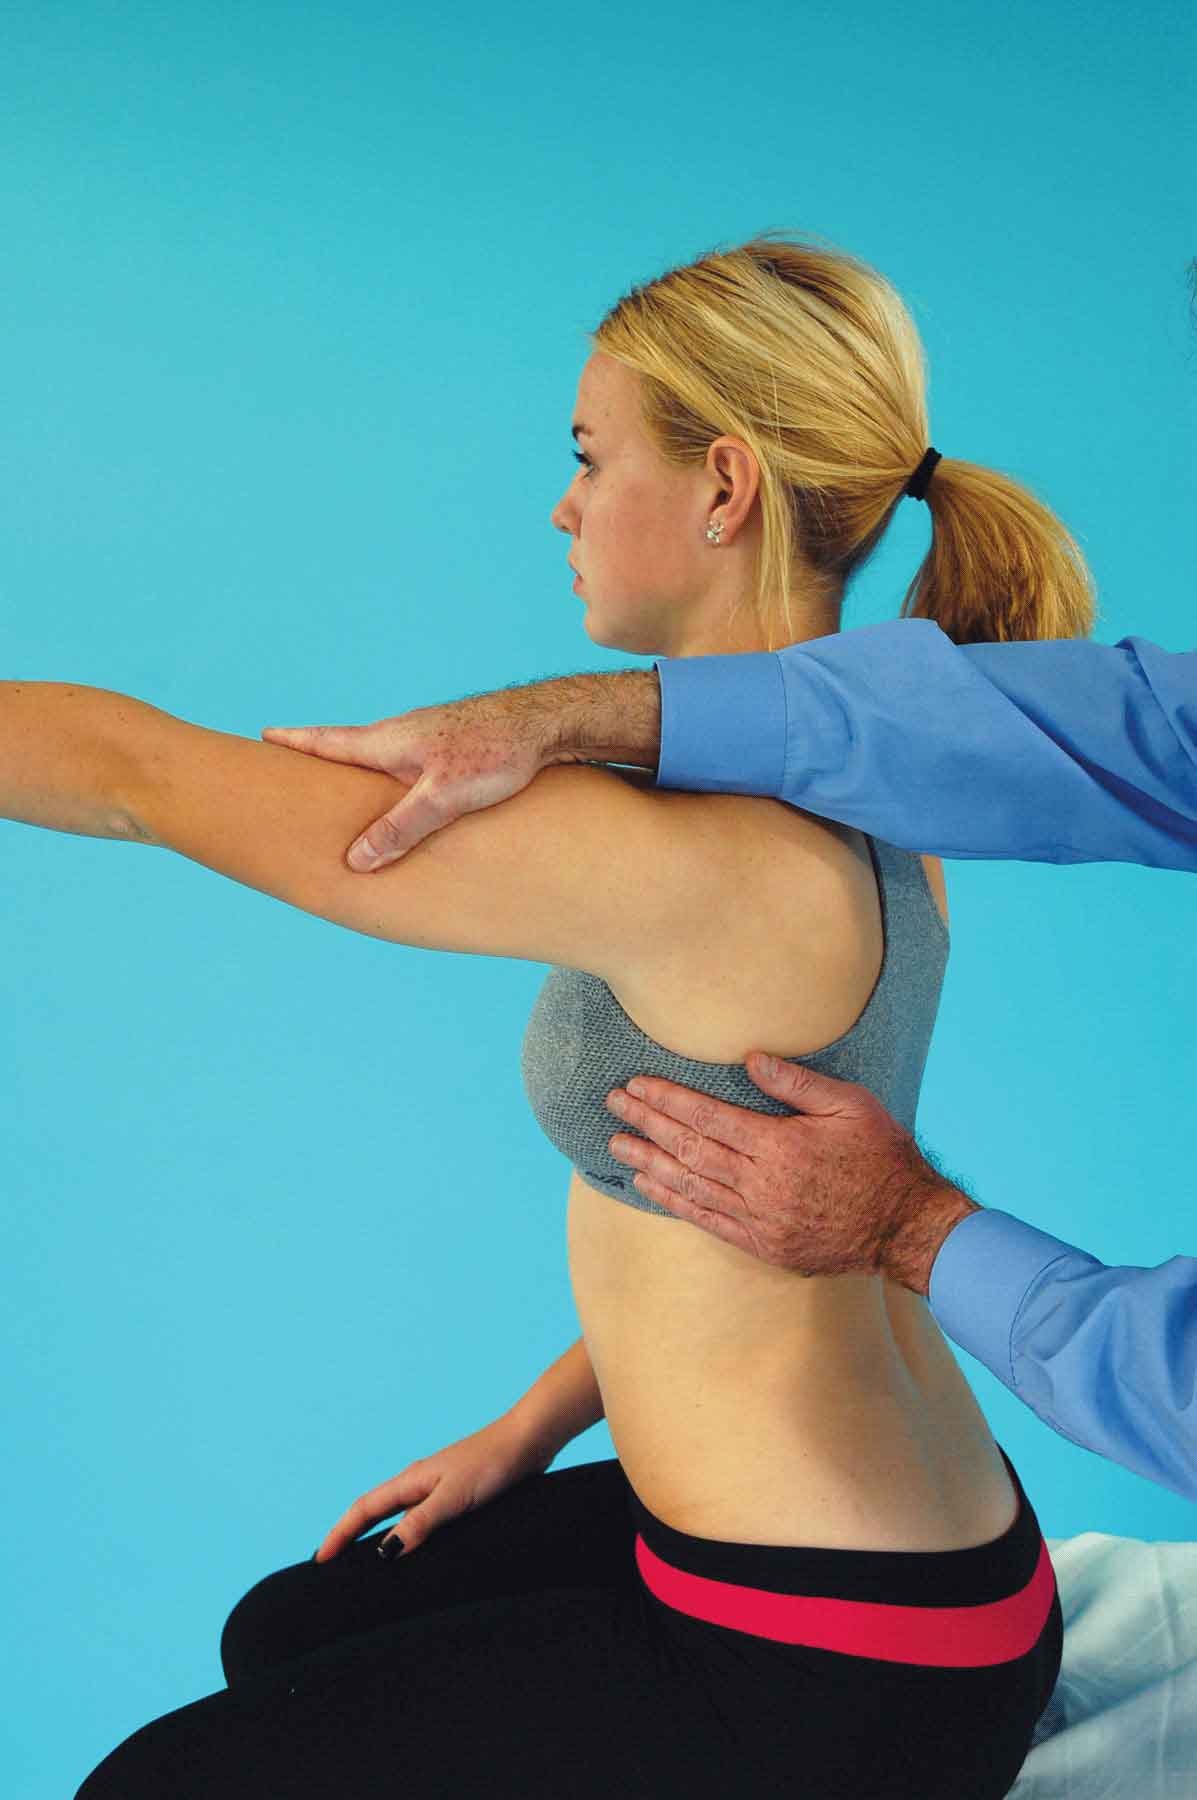
FIGURE 12-20 Test position for the serratus anterior—patient sitting.
Substitution or trick motions typically occur in sitting and can include flexion of the vertebrae, or rotation of the vertebrae.
The gravity minimized/eliminated position for this muscle is with the patient positioned in sitting with the upper limb resting on a table, with the shoulder positioned in 90 degrees of flexion, and the elbow extended.
Rhomboid Major, Minor, and Levator Scapulae
The patient is positioned in prone with the head turned toward the tested side, the elbow flexed, and the ipsilateral humerus abducted, slightly extended, and externally rotated (Fig. 12-21A). The clinician applies pressure with one hand against the patient’s arm in the direction of abducting the scapula and externally rotating the inferior angle, while the other hand is placed on the patient’s shoulder in the direction of depression (see Fig. 12-21A). The command given to the patient is “Don’t let me push your arm down.” Substitution or trick motions can include assistance from the wrist extensors, middle trapezius, posterior deltoid, latissimus dorsi, teres major, and levator scapulae. An alternative test can be performed with the patient positioned in prone with the upper extremity positioned in 90 degrees of abduction and internally rotated so that the thumb is pointing down (Fig. 12-21B). The patient is asked to raise the arm toward the ceiling and to hold the position while the clinician applies a downward force to the patient’s forearm. The gravity minimized/eliminated position for this muscle is with the patient positioned in sitting with the hand resting on the lumbar spine.
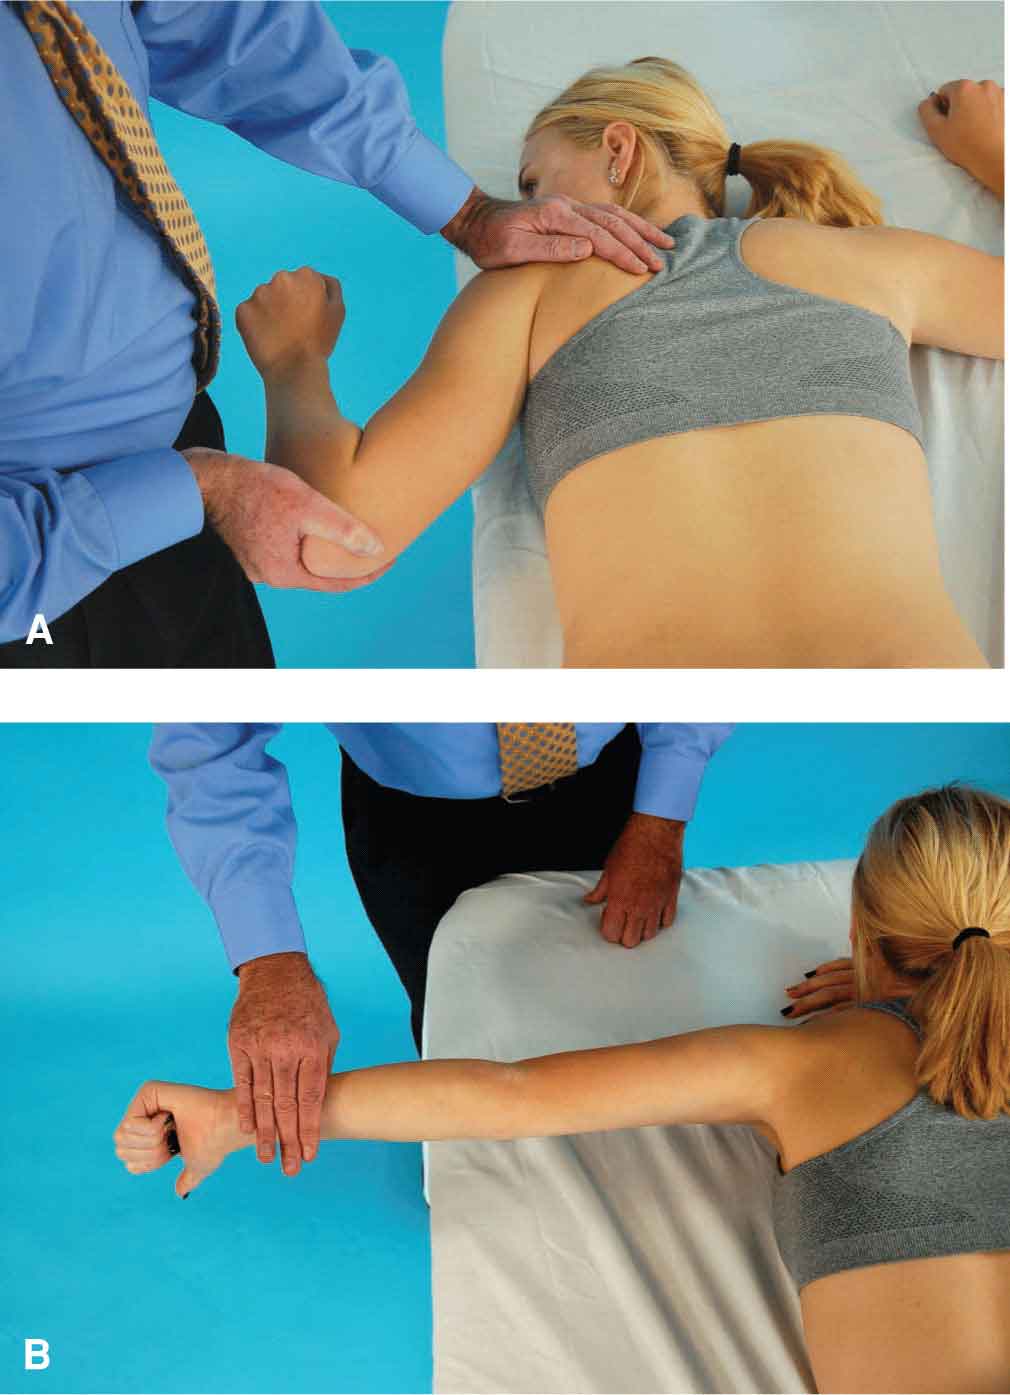
FIGURE 12-21 A: Test position for the rhomboids (and levator scapulae). B: Alternate test position for the rhomboids.
Latissimus Dorsi
To specifically test this muscle, the patient is positioned in prone with the shoulder internally rotated and adducted and the palm facing upward (Fig. 12-22). The patient is asked to extend the shoulder while keeping the elbow straight. The command given to the patient is “While keeping your palm facing the ceiling, don’t let me push your arm down.” The clinician stabilizes the thorax, and resistance is given proximal to the elbow joint using a force that is a combination of shoulder abduction and minimal flexion (see Fig. 12-22). Substitution or trick motions can include scapular adduction with no shoulder motion, anterior tipping and abduction of the scapula, assistance from the teres major, posterior deltoid, or pectoralis major (sternal head). The gravity minimized/eliminated position for this muscle is with the patient positioned in sidelying, with the upper limb supported in 90 degrees of shoulder flexion and internal rotation, and with the elbow flexed.
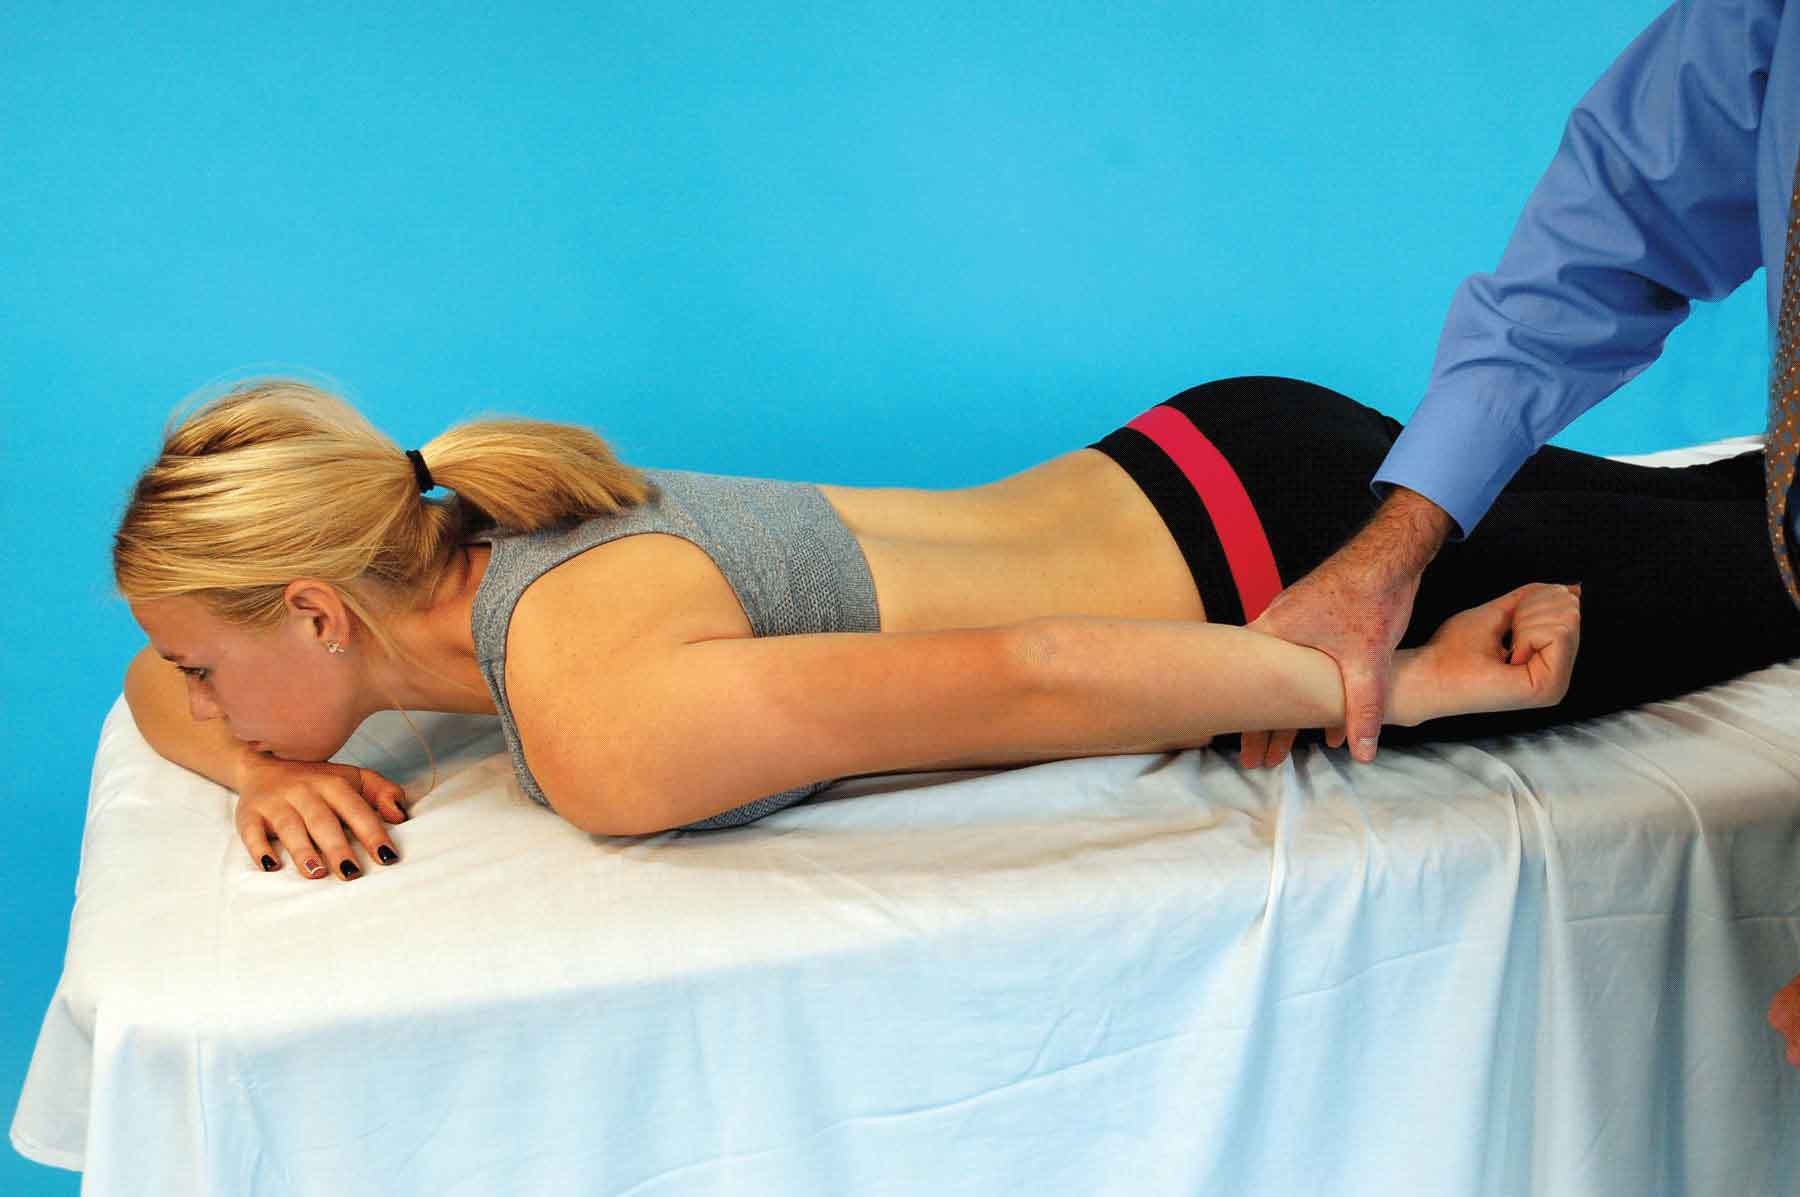
FIGURE 12-22 Test position for the latissimus dorsi.
Teres Major
To specifically test this muscle, the patient is positioned in prone with the upper extremity extended, abducted, and medially rotated and with the back of the hand resting on the small of the back. The clinician places a hand against the arm proximal to the elbow (Fig. 12-23), and the command given to the patient is “Keeping your hand on your back, don’t let me move your arm toward the table,” while the clinician generates a force into flexion and abduction of the upper extremity. Substitution or trick motions can include scapular adduction without shoulder motion, external rotation of the glenohumeral joint, and assistance from the latissimus dorsi, pectoralis major, and teres minor. In general, the teres major muscle is not tested in a gravity eliminated position, because it will only contract against resistance.
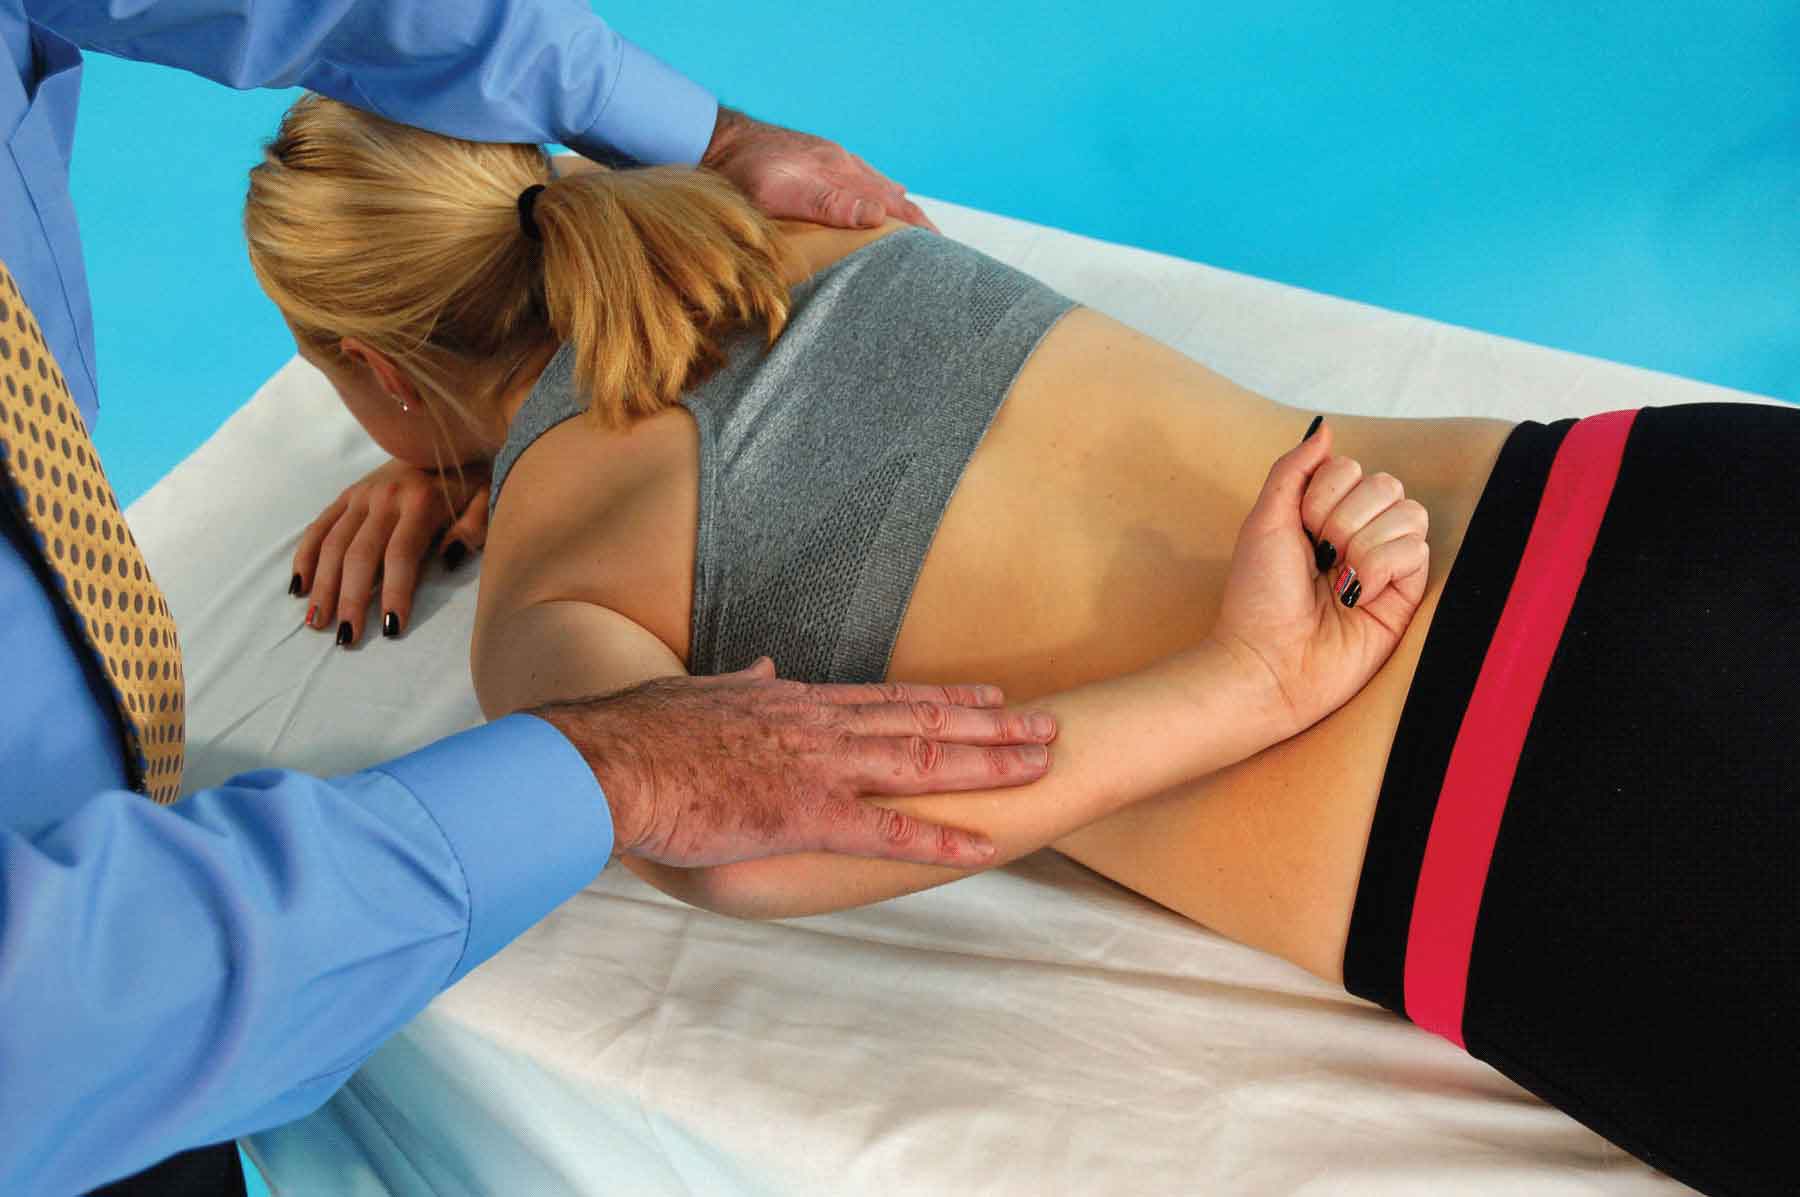
FIGURE 12-23 Test position for the teres major.
Pectoralis Major
To specifically test this muscle, the patient is positioned in supine. The patient’s arm position depends on which portion of the muscle is being tested:
 The clavicular portion (upper fibers): the patient arm is positioned in 60–90 degrees of shoulder abduction and the elbow is slightly flexed. The patient is then asked to horizontally adduct the shoulder as the clinician applies resistance proximal to the wrist (or proximal to the elbow if the elbow flexors are weak) in a downward and outward direction (Fig. 12-24A). The coracobrachialis, a synergist of the upper fibers, can also be assessed (Fig. 12-24B).
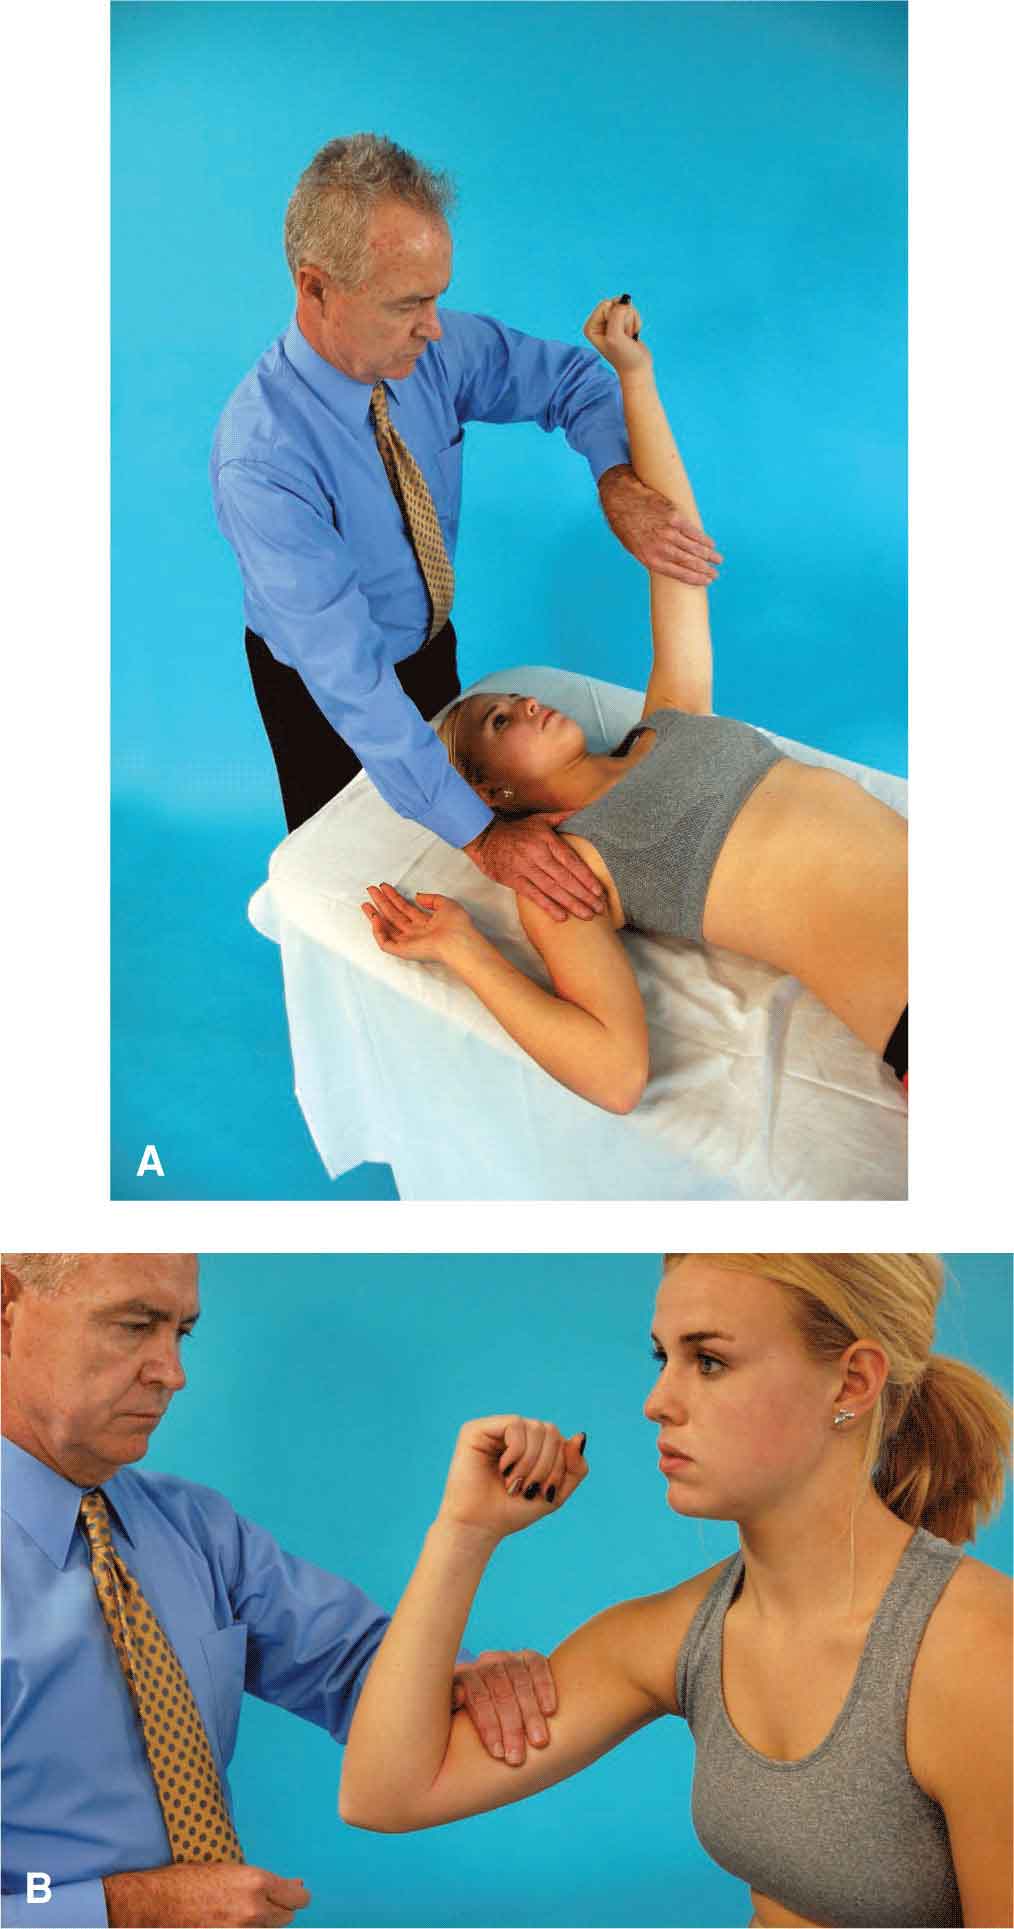
FIGURE 12-24 A: Test position for the pectoralis major—upper fibers. B: Test position for the coracobrachialis.
 The sternal portion (lower fibers): the patient arm is positioned in 120 degrees of shoulder abduction with the elbow slightly flexed. The patient is asked to move the arm down and in across the body as the clinician applies resistance proximal to the elbow in an up and outward direction (Fig. 12-25).
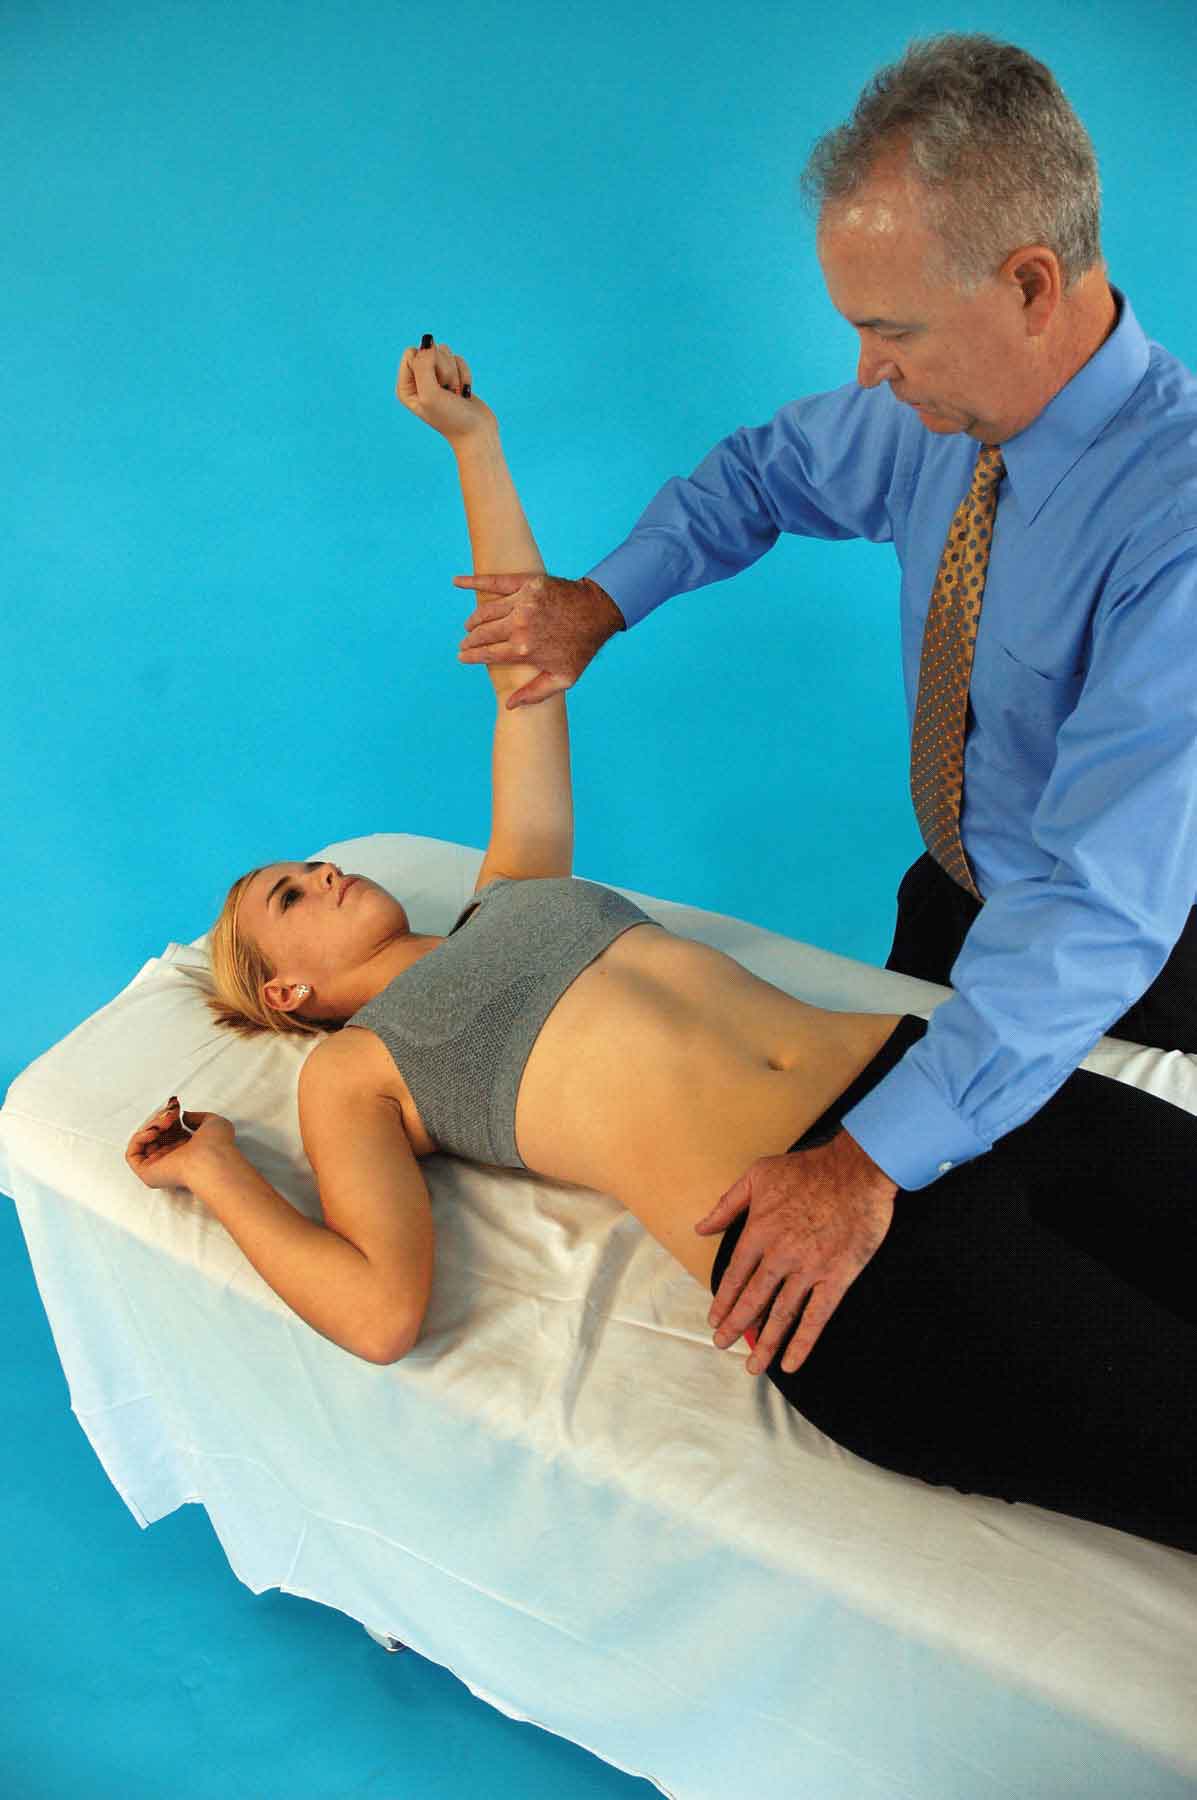
FIGURE 12-25 Test position for the pectoralis major—lower fibers.
Substitution or trick motions can include trunk rotation, assistance from the anterior deltoid, coracobrachialis, and biceps brachii. The gravity minimized/eliminated position for this muscle is with the patient positioned in sitting with the shoulder positioned in neutral rotation and in 90 degrees of abduction, the elbow flexed to 90 degrees, and the upper limb supported.
Pectoralis Minor
To specifically test this muscle, the patient is positioned in supine with the arms at the sides and the patient is asked to lift the shoulder girdle from the table (without using force from the elbow or hand) and to hold the position while the clinician applies resistance against the anterior aspect of the shoulder (Fig. 12-26) in a downward direction toward the table. Substitution or trick motions can include flexion of the wrist or fingers, which can give the appearance of anterior tipping of the scapula. The gravity minimized/eliminated position for this muscle is with the patient positioned in sitting with the hand resting on the small of the back.
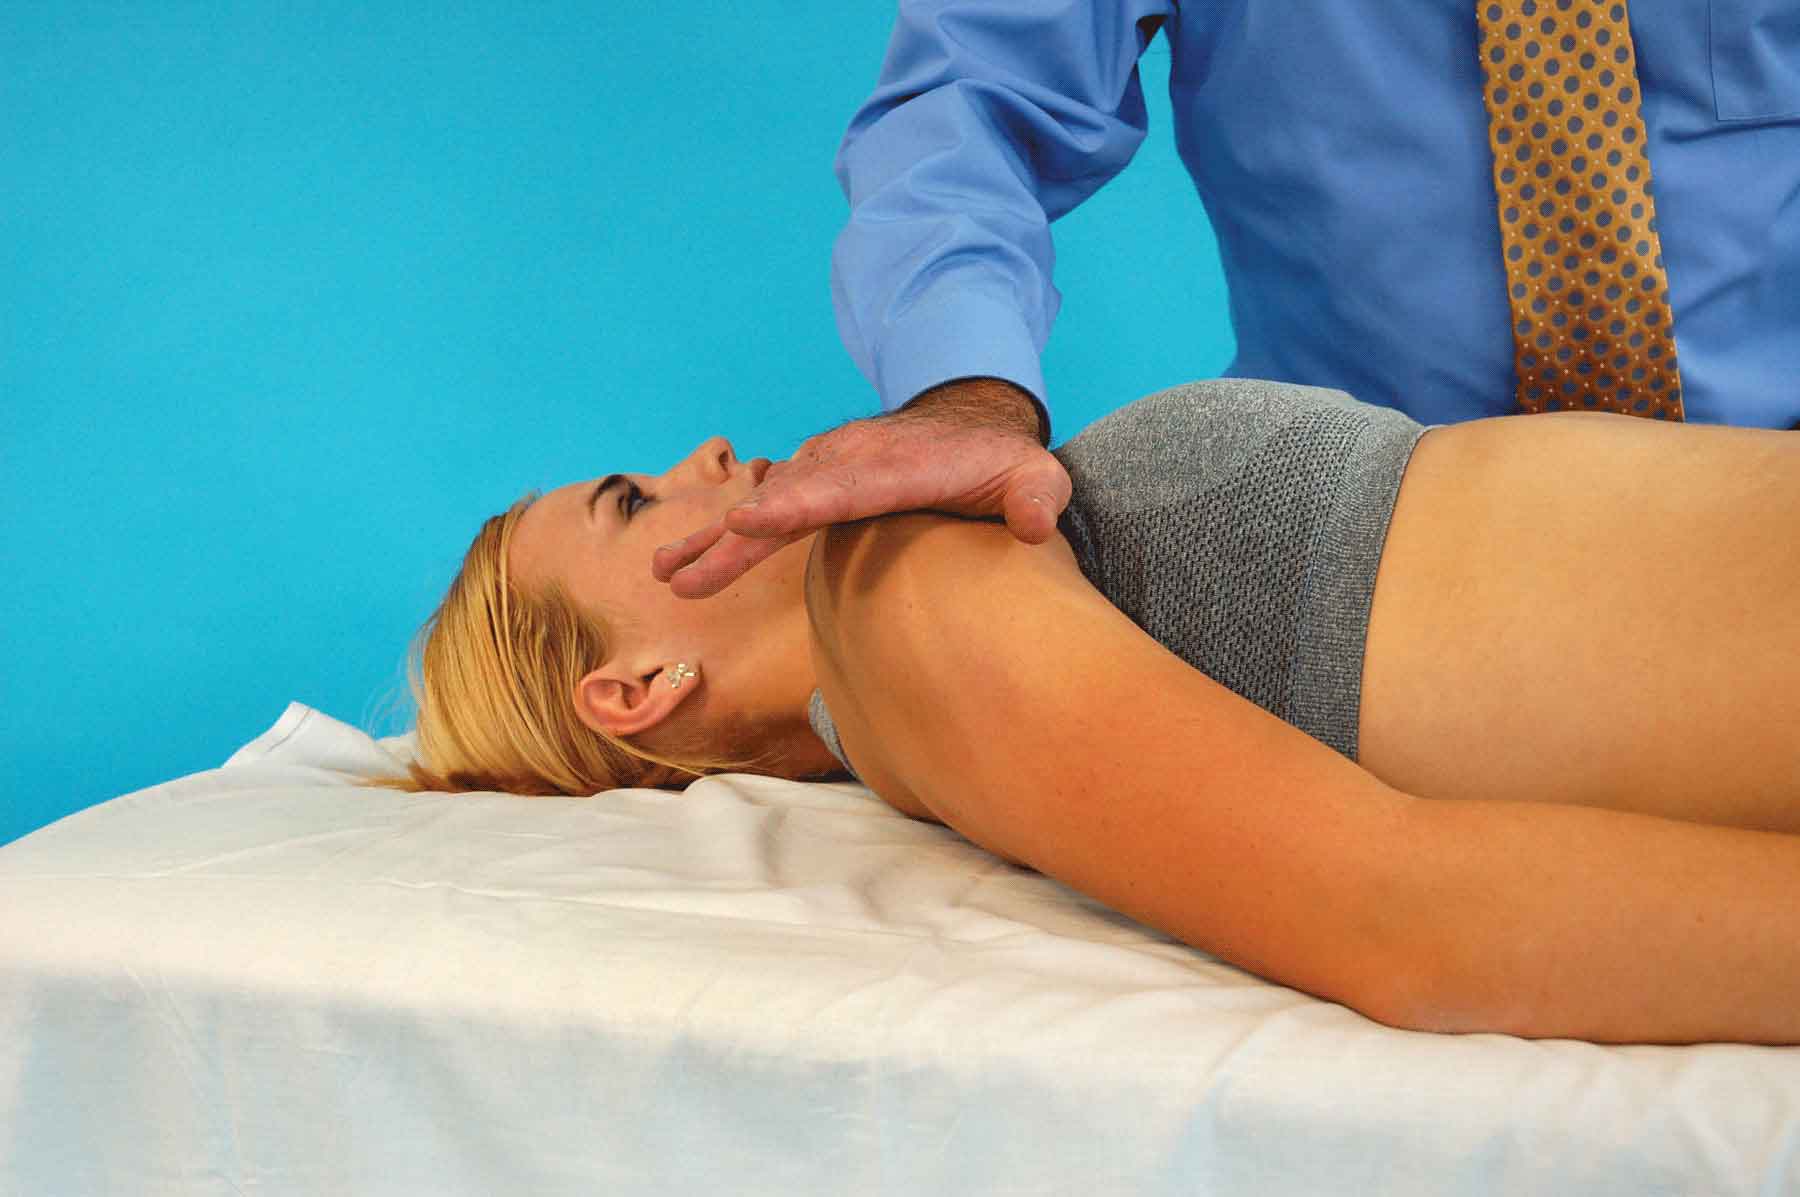
FIGURE 12-26 Test position for pectoralis minor.
Deltoid
To specifically test the various portions of this muscle, the patient’s arm position used depends on which portion of the muscle is being tested:
 Anterior deltoid. The patient is positioned in sitting or supine with the shoulder abducted in minimal flexion. The command given to the patient is “Move your arm diagonally forward and toward your body, and hold it against my resistance.” While stabilizing the patient’s shoulder with one hand, the clinician uses the other hand to apply resistance to the anterior and medial aspect of the arm proximal to the elbow in the direction of abduction and minimal extension (Fig. 12-27). Substitution or trick motions can include elevating the shoulder and leaning backward, assistance from the biceps brachii, coracobrachialis, or pectoralis major (clavicular head), or by moving the scapula. The gravity minimized/eliminated position for this muscle is with the patient positioned in sidelying with the upper extremity supported, and the shoulder positioned in neutral, and the elbow flexed.

FIGURE 12-27 Test position for the anterior deltoid.
 Middle deltoid. The patient is positioned in sitting with the arm abducted to 90 degrees and the elbow flexed to approximately 90 degrees. The patient is asked to hold this position while the clinician applies resistance just proximal to the elbow in a downward direction (Fig. 12-28). Substitution or trick motions can include trunk flexion to the same side, or assistance from the biceps brachii, supraspinatus or serratus anterior. The gravity minimized/eliminated position for this muscle is with the patient positioned in supine with the upper extremity supported and the elbow flexed to 90 degrees.
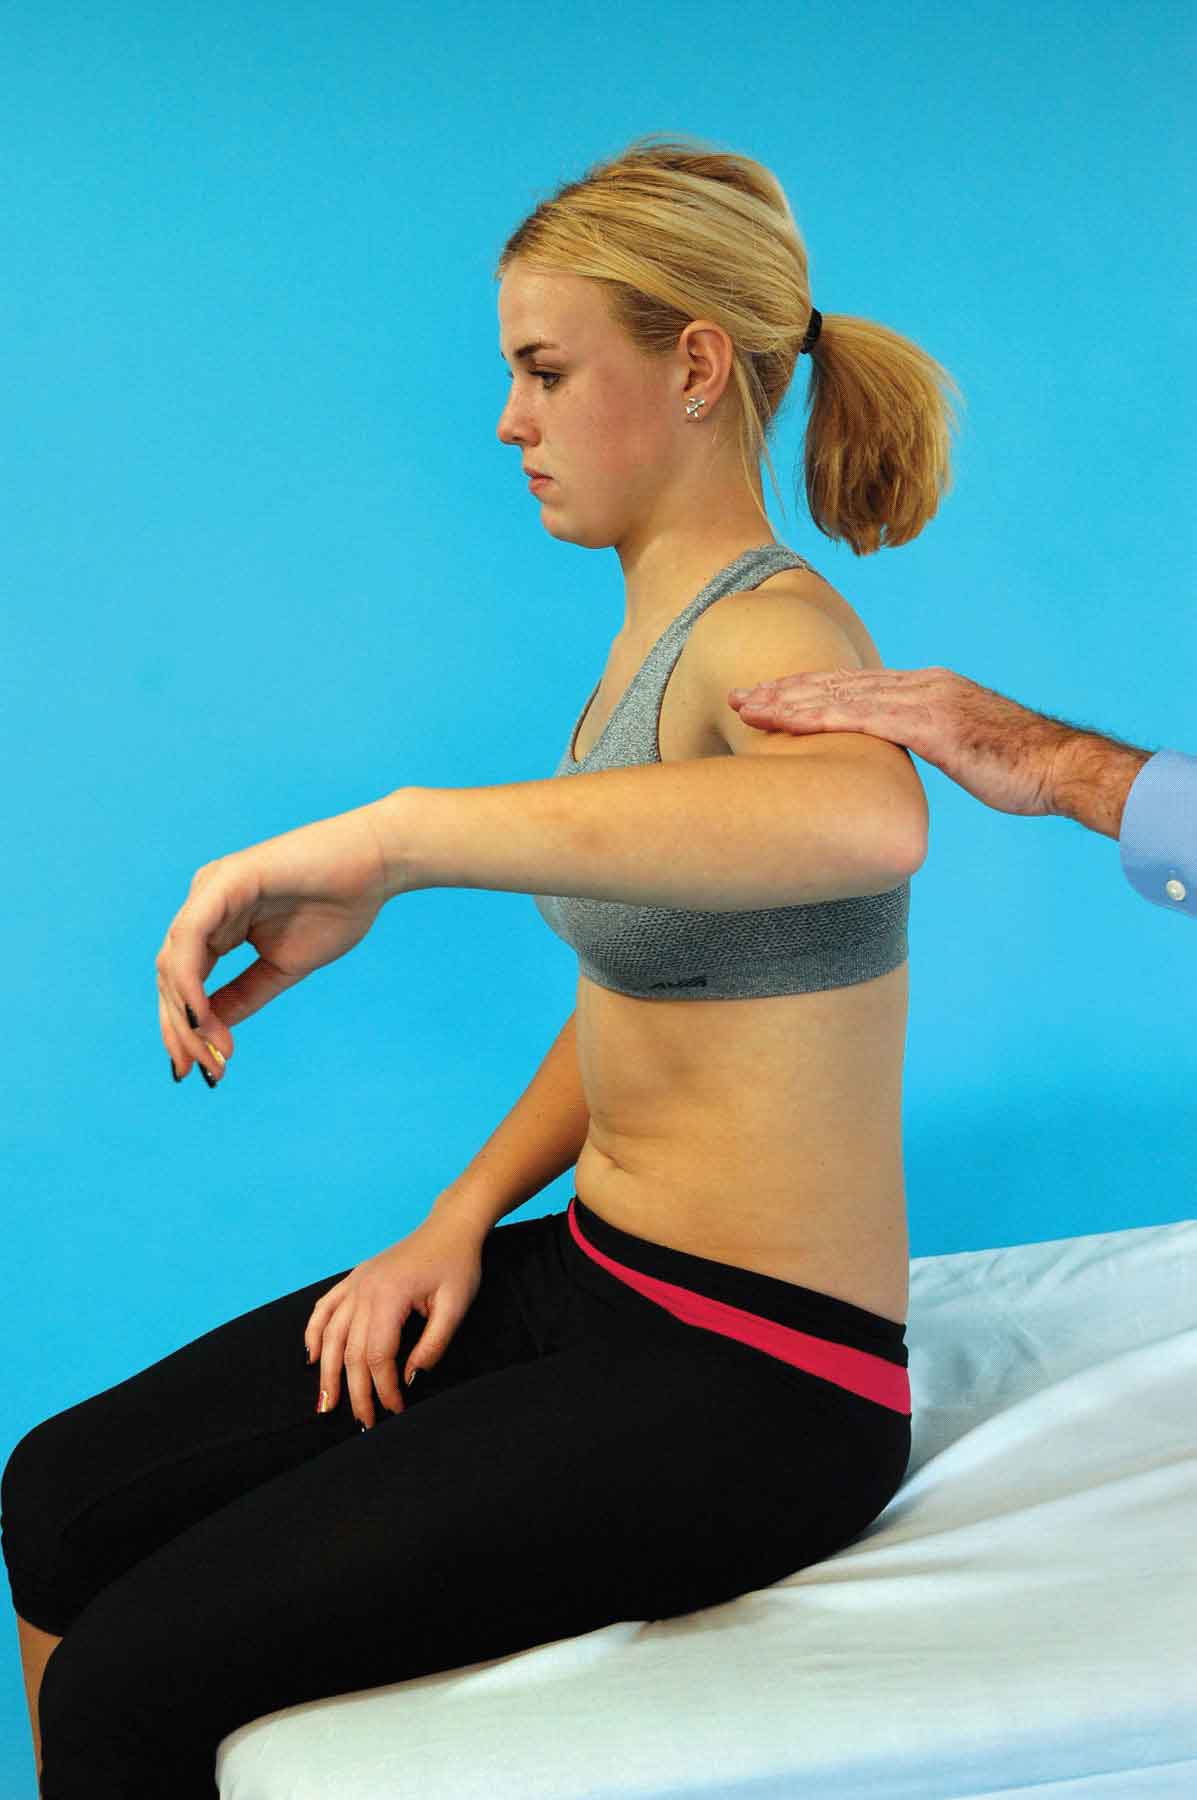
FIGURE 12-28 Test position for the middle deltoid.
 Posterior deltoid. The patient positioned in sitting with the shoulder abducted to approximately 90 degrees and positioned in minimal shoulder extension and internal rotation. The patient is asked to push the arms back toward the clinician as the clinician uses one hand to stabilize the scapula and the other hand to apply resistance to the posterolateral aspect of the arm, proximal to the elbow, in the direction of shoulder abduction and slight flexion (Fig. 12-29). Substitution or trick motions can include assistance from the long head of the triceps or adduction of the scapula without horizontally abducting the shoulder. The gravity minimized/eliminated position for this muscle is with the patient positioned in sitting with the upper extremity supported on a table, and the shoulder and elbow flexed to 90 degrees.

FIGURE 12-29 Test position for the posterior deltoid.
Related posts:

Stay updated, free articles. Join our Telegram channel

Full access? Get Clinical Tree


