Implanting the Revision Total Knee Arthroplasty
Kelly G. Vince
Martin Bedard
ORIGIN OF THE TECHNIQUE
Although there is more than one way to revise the failed total knee arthroplasty (TKA), the technique proposed here applies to most implant systems and all causes of failure. This technique has been practiced and refined since first devised in 1989 and published in 1993 (1). It is based on classic principles of balancing flexion and extension gaps.
KEYS TO REVISION TKA
Although this chapter deals specifically with the technical aspects of implanting the revision TKA, some concepts are integral to the technique. First, revision knee arthroplasty is distinctly different from primary surgery. Most attempts to render a revision as a “primary” are ill fated. Second, the simple keys to revision knee arthroplasty are:
The flexion gap is primarily a function of femoral component size and rotation (and to a lesser extent, position).
The extension gap is a function of femoral component proximal distal position. It follows that the tibial component, because it is part of both the flexion and extension gaps is not useful to selectively control either of them.
Indications
The indication for revision knee arthroplasty is in general: function sufficiently compromised by pain, instability, or stiffness that the promise of gain to the patient is worth the risk of surgery. Symptoms should be distinguished from diagnoses. Therefore, “pain” is not a diagnosis and “instability” is an incomplete diagnosis. Considering instability as an example:
Does the patient describe “buckling and instability” because the extensor mechanism is dislocating?
Is the knee collapsing into valgus because of malalignment and ligamentous instability?
Is the tibia dislocating posteriorly in flexion?
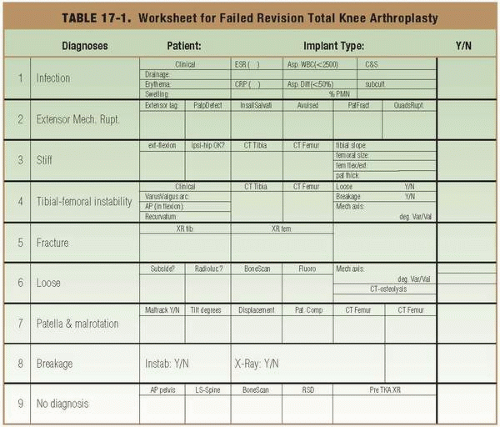
A worksheet approach (Table 17-1) is helpful to ensure that the cause of failure is understood completely, that the revision is indicated, and that the surgery is likely to succeed.
Contraindications
In general, the contraindications to revision knee arthroplasty may be described as (a) insufficient data to explain the etiology of pain or failure and establish a diagnosis, (b) very low probability of success, (c) unreconstructable extensor mechanism, (d) active infection, and (e) severe medical
impairment. Revision knee arthroplasty must not be performed until the patient’s symptoms are understood, the cause of failure identified, and a plan formulated to specifically correct that cause. Revision knee arthroplasty is contraindicated until the status of the spine and ipsilateral hip joint have been defined (and recorded in the medical record) and until the possible role of internal rotation of the tibial and/or femoral components has been considered. Surgery is contraindicated until the possibility of active infection has been eliminated.
impairment. Revision knee arthroplasty must not be performed until the patient’s symptoms are understood, the cause of failure identified, and a plan formulated to specifically correct that cause. Revision knee arthroplasty is contraindicated until the status of the spine and ipsilateral hip joint have been defined (and recorded in the medical record) and until the possible role of internal rotation of the tibial and/or femoral components has been considered. Surgery is contraindicated until the possibility of active infection has been eliminated.
 |
The ultimate contraindication to revision surgery is persistent or recurrent infection. Most other mechanical problems (bone loss, extensor rupture, etc.) can be overcome. The results of a second, two-stage reimplantation protocol for a failed two-stage reimplantation are discouraging (2). This situation may be anticipated in the patient who is a “poor host” and unable to mount the necessary resistance to infection (3). The combination of sepsis and either bone or extensor mechanism deficits are relative contraindications for even a two-stage revision because of the challenge posed by foreign material, both allograft and large implants, in an environment that was at one time dominated by microbes. Despite some success with massive structural allografts (4) (including the extensor mechanism) after infection, the predilection of microbes for avascular tissue cannot be ignored (Table 17-2).
TABLE 17-2. Relative Contraindications to Revision Total Knee Arthroplasty | |||||||||||||||
|---|---|---|---|---|---|---|---|---|---|---|---|---|---|---|---|
| |||||||||||||||
Preoperative Preparation
Although comprehensive history taking and physical examination represent the standard of care, the preoperative evaluation should be disciplined, repetitive, and focused, if not streamlined. The history should establish if the knee is the source of the pain or if symptoms have been referred from the hip or spine. Delayed wound healing, drainage, or any other experiences that raise the suspicion of infection are extremely important. Whether the arthritic symptoms were ever relieved by the original arthroplasty, or if a previously successful reconstruction has recently become problematic is important. The exact meaning of the patient’s description of instability, as discussed previously, should be probed.
Physical examination must evaluate the status of the ipsilateral hip, in particular how far it rotates internally and whether this movement produces pain. Does the knee look infected? Motion and stability of the problem knee arthroplasty must be quantified. Gait evaluation should record scoliosis, hip abductor dysfunction, antalgic features, limb alignment, and dynamic instability.
After the history and physical examination, a reliable differential diagnosis will have been established. Necessary laboratory investigations include a complete blood count, erythrocyte sedimentation rate determination, and a C-reactive protein test to evaluate sepsis. Any abnormality mandates an aspiration of the arthroplasty (with the patient off of antibiotic therapy for at least 10 days if not longer) at which time, synovial fluid must be evaluated for cell count, differential, and culture. Three radiographs of the knee joint, anteroposterior (AP), lateral, and patellofemoral, represent the minimum evaluation. The AP yields more information if performed with the patient standing on the affected leg only as the so-called single-leg weight bearing view. A lateral view will be more instructive if the patient is standing on one limb alone, when flexion contracture and recurvatum can now be quantified (Fig. 17-1).
Revision surgery for instability or loosening can be planned more easily if a full-length radiograph is obtained that shows the hip, knee, and ankle joint for evaluation of limb alignment. This study will also reveal hip pathology and extra-articular deformity. Without it, an AP radiograph of the pelvis is an important way to identify ipsilateral hip pathology, one of the contraindications to revision.
Computerized tomography (CT) can quantify rotational positioning of both the femoral and tibial components (5). This plays an important etiological role in patellar complications, instability, and stiffness. CT scans reveal bone loss from osteolysis much more accurately than plain radiography (6). Radioisotope studies are rarely helpful, except if they are “normal” in the mysterious, problem TKA, which suggests that further surgery should be avoided.
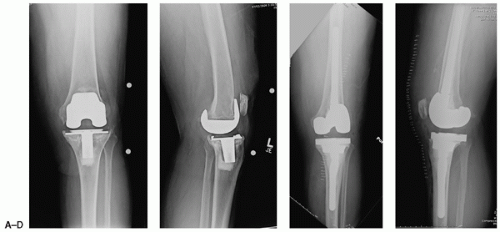 FIGURE 17-1 Radiographs. (A) Pre-revision anteroposterior and lateral view of failed Insall-Burstein II prostheses, modular posterior stabilized arthroplasty at 17 years postprimary secondary to wear, osteolysis, and loosening. (B) Postrevision with posterior stabilized articular, offset press-fit stem extensions on the tibia and femur with porous, metal cone augment on the tibia to enhance fixation. The three-step technique described later was used. |
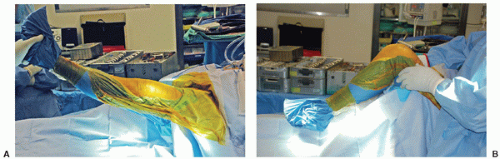 FIGURE 17-2 Intraoperative examination I. (A) A disciplined approach to revision knee arthroplasty includes examining the knee fully under anesthesia for stability and motion, with particular attention to flexion contractures and recurvatum deformities. These have implications for surgical technique. (B) Flexion is quantified by allowing the knee to fall freely. |
SURGICAL TECHNIQUE
A disciplined approach to revision knee arthroplasty includes examining the knee fully, under anesthesia for stability and motion. Particular attention is paid to flexion contractures and recurvatum deformities, which have implications for surgical technique. Flexion is quantified, by allowing the knee to fall freely (Fig. 17-2A,B). The surgical approach to the knee is methodical and performed in a routine stepwise fashion, using the principles discussed in Chapters 1 and 4. Two scalpels, attached side by side with Steri-Strips, enable the surgeon to excise preexisting scar, assuming that there is enough supple skin remaining for closure. This technique produces a superior cosmetic result, respects the principle that preexisting incisions should be used, and eliminates very narrow (millimeters wide or smaller) strips of skin that may lie between two incisions, strips that must not have very good vascularization (Fig. 17-3A,B). A straight arthrotomy, extending from the medial base of the tibial tubercle to the medial aspect of the quadriceps tendon will transect fewer longitudinal fibers than a medial parapatellar arthrotomy. No more than about 1 cm of tissue will be removed from the top of the patella (Fig. 17-4).
Careful dissection, initiated with a scalpel and completed with a periosteal elevator will preserve this layer of tissue intact. The danger of multiple, longitudinal strokes of the blade will be to convert a single essential layer into useless strips that compromise closure and invite drainage (Fig. 17-5).
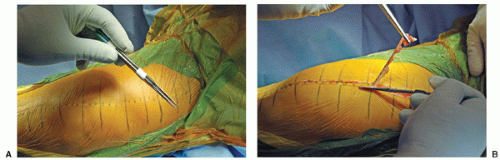 FIGURE 17-3 Scar excision. (A) Two scalpels secured with Steri-Strips enable the surgeon to excise the preexisting scar, assuming that there is enough supple skin remaining for closure. (B) This technique produces a superior cosmetic result, respects the principle that preexisting incisions should be used, and eliminates very narrow (millimeters wide or less) strips of skin that may lie between two incisions, strips that must not have very good vascularization. |
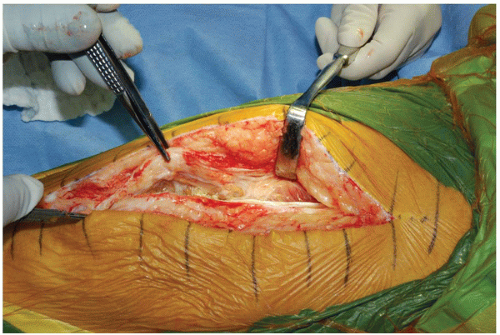 FIGURE 17-4 Arthrotomy. A straight arthrotomy, extending from the medial base of the tibial tubercle to the medial aspect of the quadriceps tendon will transect fewer longitudinal fibers than a medial parapatellar arthrotomy. No more than about 1 cm of tissue will be removed from the top of the patella. |
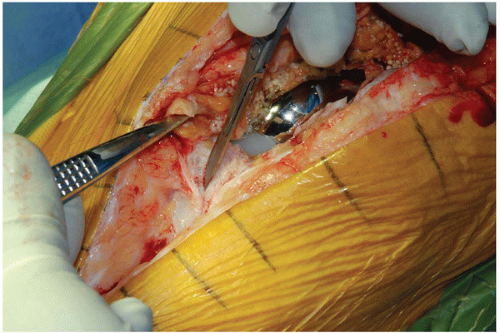 FIGURE 17-5 Elevation of the medial capsule. Careful dissection, initiated with a scalpel and completed with a periosteal elevator will preserve this layer of tissue intact. The danger of multiple, longitudinal strokes of the blade will be to convert a single essential layer into useless strips that compromise closure and invite drainage. |
The synovial layer is invariably thickened at revision surgery. This scarred layer may be grasped by several Kocher clamps without concern of crushing the tissue. By contrast, sharp clamps are applied to the patient’s own tissue, causing less damage. The interval is easily developed with cutting cautery. On the medial side, the thickened synovial layer may be separated with an index finger. A thick layer can be removed. In this case of loosening and osteolysis, the removed scar will contain a large volume of polyethylene wear debris. Removing this layer facilitates the exposure without recourse to more aggressive maneuvers such as tibial tubercle osteotomy or quadriceps turndown (Fig. 17-6). The lateral synovectomy layer is more difficult to develop. Cautery will be required and care must be taken not to impair the quadriceps tendon (Fig. 17-7). Both sides of the femur are usually scarred to the extensor mechanism. Cautery and blunt division restores this interval facilitating exposure, increasing quadriceps excursion and knee flexion (Fig. 17-8A,B). Scar around the patella should be removed. Note the wear of the patellar component (Fig. 17-9). The patellar tendon is held with sharp clamps and the scar on its deep surface with Kocher clamps. Removing this layer restores the tendon’s ability to “twist” aiding exposure and flexion. It will sometimes improve patella baja modestly (Fig. 17-10). The very long-handled Mayo scissors may be introduced, “open” into the space above the anterior femur to release scars that tether the extensor. This step should be followed by a gentle manipulation before any components are removed and will be particularly helpful in revision of the stiff knee (Fig. 17-11).
The examination continues once the arthroplasty is open. Varus and valgus stability must be evaluated, remembering that instability is more often the result of wear, loosening, or component position than it is of ligament failure. Varus and valgus stability must be evaluated not only in full extension where the effect of the posterior structures may be misleading but also with the knee flexed to 30 degrees (Fig. 17-12A). The dimension of the flexion gap is best quantified by distraction, as shown here, giving the surgeon a quantitative idea of how large the mismatch is between flexion and extension gaps (Fig. 17-12B). With the patient’s foot off the edge of the operating table, the surgeon may apply pressure with his or her thigh to flex the patient’s knee and externally rotate the tibia. External rotation moves the tibial tubercle laterally, decreases the force on the extensor mechanism, and will eventually bring the tibia forward, out from under the femoral component (Fig. 17-13A). Cautery can be used to detach the medial capsule, and if a medial release is required, to balance the knee, as the tibia is externally rotated. This step decreases the need for more aggressive exposure maneuvers (Fig. 17-13B).
After the surgical approach has been completed, every revision arthroplasty, no matter the cause of the original failure, can be performed in a sequence of three steps:
Reestablish tibial platform.
Stabilize the knee in flexion.
Extend the knee to stabilize the knee in extension.
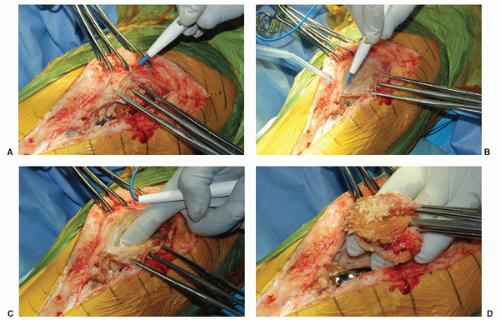 FIGURE 17-6 Medial synovectomy. (A) The synovial layer is invariably thickened at revision surgery. This scarred layer may be grasped by several Kocher clamps without concern for crushing the tissue. By contrast, sharp clamps are applied to the patient’s own tissue, causing less damage. (B) The interval is easily developed with cutting cautery. (C) On the medial side, the thickened synovial layer may be separated with an index finger. (D) A thick layer can be removed. In this case of loosening and osteolysis, the removed scar will contain a large volume of polyethylene wear debris. Removing this layer facilitates the exposure without recourse to more aggressive maneuvers such as tibial tubercle osteotomy or quadriceps turndown. |
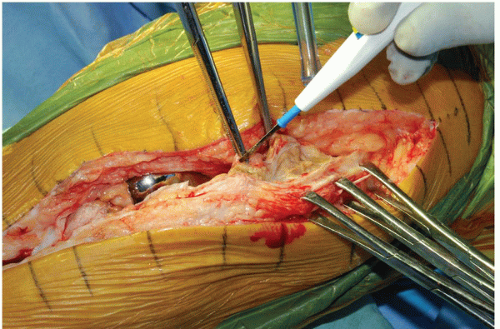 FIGURE 17-7 Lateral synovectomy. The lateral synovectomy layer is more difficult to develop. Cautery will be required and care must be taken not to impair the quadriceps tendon. |
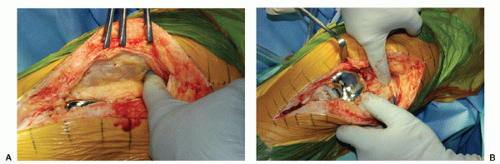 FIGURE 17-8 Reestablish “gutters.” (A,B) Both sides of the femur are usually scarred to the extensor mechanism. Cautery and blunt division restores this interval facilitating exposure, increasing quadriceps excursion, and knee flexion. |
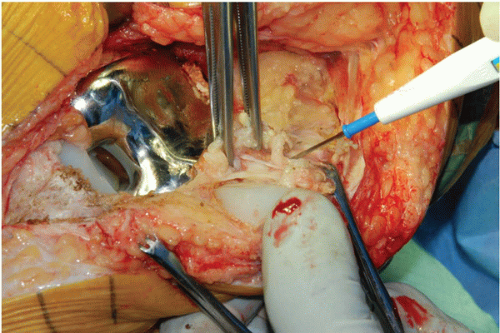 FIGURE 17-9 Peripatellar scar. Scar around the patella should be removed. Note the wear of the patellar component. |
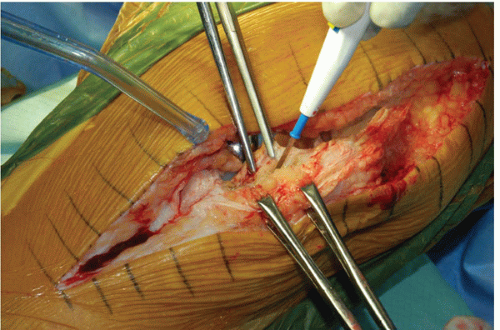 FIGURE 17-10 Scar on the deep surface of the patellar tendon: The patellar tendon is held with sharp clamps and the scar on its deep surface with Kocher clamps. Removal of this layer restores the ability of the tendon to twist, aiding exposure and flexion. It will sometimes improve patella baja modestly. |
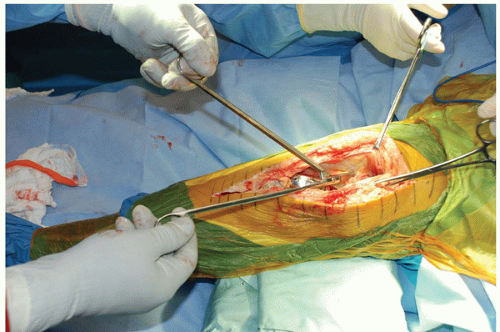 FIGURE 17-11 Liberation of quadriceps. The very long-handled Mayo scissors may be introduced, open into the space above the anterior femur to release scars that tether the extensor. This step should be followed by a gentle manipulation before any components are removed and will be particularly helpful in revision of the stiff knee. |
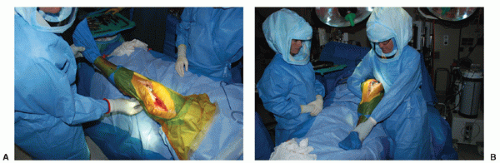 FIGURE 17-12 Intraoperative examination II. (A) The examination continues once the arthroplasty is open. Varus and valgus stability must be evaluated, remembering that instability is more often the result of wear, loosening, or component position than it is of ligament failure. Varus and valgus stability must be evaluated not only in full extension where the effect of the posterior structures may be misleading but also with the knee flexed to 30 degrees. (B) The dimension of the flexion gap is best quantified by distraction, as shown here. This gives the surgeon a quantitative idea of how large the mismatch is between the flexion and extension gaps. |
The specific problems that must be solved at each step in this sequence will vary by the cause of failure. For example, if the patella had been dislocating, then the major problem to be corrected in step 1 will be tibial component rotation and in step 2, femoral component rotation (Fig. 17-14). By contrast, if loosening and osteolysis have been the problem, then reconstruction of bone defects will be necessary in all three steps accompanied by reduction of varus mechanical alignment when placing the femoral component.
Although component removal is discussed elsewhere in this text, recognizing that there is a “budget” of time for the surgery, I prefer to saw off the components, which is the most expeditious method. A narrow reciprocating blade works well on the femoral interface and can be introduced in all interfaces except the posterior condyle where a curved 0.25-inch osteotome works well. A blow of the mallet on a large punch, held against the most proximal edge of the femoral flange and parallel to the femur, will
rapidly and safely remove the component. Ignore residual cement that is well fixed to bone unless sepsis is present (Fig. 17-15). Obsession with its removal at this stage will waste time and perhaps bone. Any femoral cement that does not belong will come off in steps 2 and 3, with saw cuts.
rapidly and safely remove the component. Ignore residual cement that is well fixed to bone unless sepsis is present (Fig. 17-15). Obsession with its removal at this stage will waste time and perhaps bone. Any femoral cement that does not belong will come off in steps 2 and 3, with saw cuts.
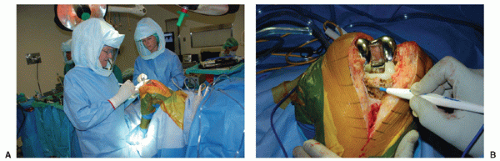 FIGURE 17-13 Exposure. Externally the rotate tibia. (A) With the patient’s foot off the edge of the operating table, the surgeon may apply pressure with his or her thigh to flex the patient’s knee and externally rotate the tibia. External rotation moves the tibial tubercle laterally, decreases the force on the extensor mechanism, and will eventually bring the tibia forward, out from under the femoral component. (B) Cautery can be used to detach the medial capsule and if a medial release is required, to balance the knee, as the tibia is externally rotated. This step decreases the need for more aggressive exposure maneuvers. |
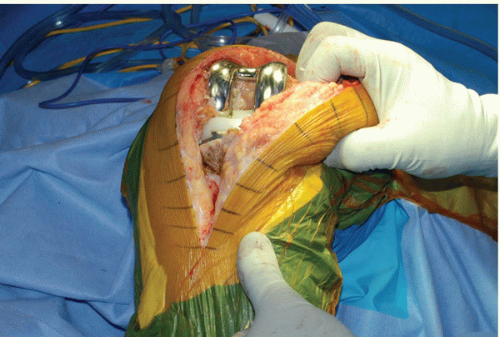 FIGURE 17-14 Intraoperative examination III. Rotational positioning of tibial and femoral components is most easily quantified by prerevision computerized tomography. The discipline of examining the knee continues, however. The tibial component should line up with the tibial tubercle, as seen here. The surgeon’s lower thumb is on the tibial crest, corresponding to the extensor attachment. The position of the femoral component on computed tomography scan should be compared with the position intraoperatively, to plan the position of the revision implant. |
Related posts:
 Traditional Medial Approaches to the Knee
Managing Patella Problems in Primary Total Knee Arthroplasty
Varus and Valgus Deformities
Simultaneous Total Knee Arthroplasty and Femoral Osteotomy
Impaction Bone Grafting for Large Bone Defects
Unicompartmental Total Knee Arthroplasty With Conventional Instrumentation
Traditional Medial Approaches to the Knee
Managing Patella Problems in Primary Total Knee Arthroplasty
Varus and Valgus Deformities
Simultaneous Total Knee Arthroplasty and Femoral Osteotomy
Impaction Bone Grafting for Large Bone Defects
Unicompartmental Total Knee Arthroplasty With Conventional Instrumentation
Stay updated, free articles. Join our Telegram channel

Full access? Get Clinical Tree


