Fig. 10.1
Relationship between tibial slope and kind and site of osteotomy
For these reasons, HTO may be indicated in patients who have posterolateral laxity and varus hyperextension thrust, ACL deficiency and varus thrust, or alignment and combined ligamentous laxity with varus or posterolateral thrust. In these patients poor results with the ligamentous reconstructive surgery alone have been reported, and soft tissue surgery should not be performed until the alignment has been corrected [34].
In general, our approach is to perform HTO first since in most of the cases with posterolateral or lateral instability, correcting the alignment will correct the instability symptoms. Normally, after 6–8 months from the realignment surgery, we evaluate the patient, and if there are still symptoms of instability, the ligamentous surgery can be performed. On the contrary, in the case of combined ACL deficiency and malalignment in a young patient, we would perform a concurrent ACL reconstruction and HTO [35].
10.3 Operative Techniques
Although different techniques are available to correct a varus alignment, the opening-wedge HTO is preferred by the majority of the surgeons. Its advantages include multiplanar correction, avoidance of the proximal tibiofibular joint and peroneal nerve, and possible intraoperative adjustment. Furthermore, if a collateral ligament laxity is present, it can be improved by distraction from the opening wedge.
Disadvantages include the possible need for a bone graft and difficult correction of severe deformity. However, in the unstable knee the correction required is often from 5° to 15°, so the opening-wedge HTO is acceptable. The lateral closing-wedge HTO decreases the tibial slope, and it can be used to correct chronic anterior instabilities. The static valgus laxities due to medial side injuries can occur in limbs with preexisting valgus deformity and medial injuries without proper treatment, but they are much rarer. To produce varus effect, either a closing-wedge medial HTO or a distal femoral osteotomy (DFO) can be used. Because of the concern of joint obliquity, the closing-wedge medial HTO is recommended by few authors [26], while most of the literature recommends a DFO, but it is not able to correct the tibial slope [36]. For these reasons and because this chapter is focused on HTO and peripheral instabilities only, the surgical technique for a medial opening-wedge HTO will be explained.
10.3.1 Preoperative Planning
For a correct preoperative planning of an HTO, plain radiographs are mandatory. Bilateral weight-bearing anteroposterior views in full extension, bilateral weight-bearing posteroanterior tunnel views at 30° of flexion, and anteroposterior, lateral, and skyline views are recommended to appreciate the lower limb alignment and the amount of arthrosis. Furthermore a single-leg weight-bearing anteroposterior view is also obtained to appreciate the severity of varus thrust [37].
Supine X-rays are important to eliminate the added varus due to deficiency of the lateral and/or posterolateral structures and to evaluate the real amount of correction to perform. Several stress radiographs have been described to evaluate translation of the tibia compared to the contralateral side [38]. Magnetic resonance imaging can be useful to assess the presence of cartilage damages or meniscal and ligamentous injuries, and specific sequences are required to better visualize the posterolateral corner [39]. We calculate the required correction using the method described by Dugdale et al. [40]. HTO is planned so to place the weight-bearing axis falling at 62.5 % across the width of the tibial plateau from medial to lateral. If there is no medial space narrowing, this line can also be positioned in the middle of the tibial plateau. In the presence of PCL deficiency, HTO should be planned to increase the posterior tibial slope in the sagittal plane reducing the posterior subluxation of the tibia relatively to the femur. In this scenario, the wedge needs to be positioned anteromedially. On the other hand, if a chronic ACL deficiency is associated with the malalignment, the wedge needs to be as far posterior as possible [41] (Fig. 10.2).

Fig. 10.2
Demonstration of the relationship between wedge position and tibial slope. (a) Medial placement of the wedge resulting in no alterations of the tibial slope. (b) Posteromedial placement of the wedge resulting in decreased tibial slope, useful in ACL-deficient knees. (c) Anteromedial placement of the wedge resulting in increased tibial slope, useful in PCL-deficient knees (© 2011 American Academy of Orthopaedic Surgeons. Reprinted from Rossi et al. [42] with permission)
10.3.2 Surgical Technique
All patients routinely receive intravenous antibiotics preoperatively; either general or spinal anesthesia is used.
10.3.2.1 Opening-Wedge Medial HTO Stabilized with a Plate and Screws
The patient is positioned supine, the lower limb is prepared and draped, and a tourniquet is positioned on the thigh. Arthroscopy should be performed in patients to confirm the indication and evaluate the intra-articular status; after this step the tourniquet is inflated. An anteromedial vertical incision is performed midway between the medial border of the tubercle and the posterior border of the tibia, just below the pes anserinus and 1 cm below the joint line. The sartorial fascia is elevated to visualize the hamstring and the superficial medial collateral ligament (MCL), and a blunt retractor is placed posteriorly to protect both these structures and the neurovascular ones. The patellar tendon is exposed and protected. Under fluoroscopic control, a guide wire is positioned from medial to lateral, at the level of the superior aspect of the tibial tubercle, anteromedially, arriving 1 cm below the joint line (Fig. 10.3a). A cortical osteotomy is performed using and oscillating saw, inferiorly to the guide wire to prevent superior migration and intra-articular fractures, and it is continued with an osteotome under fluoroscopic control. Once the osteotomy is completed, the medial opening is created using an apposite wedge placed to the planned depth (Fig. 10.3b). A wedge placed anteriorly causes an increase of the tibial slope, while, if the wedge is placed posteriorly, a slight decrease of the tibial slope is achieved [41]. Anterior and posterior gaps are then measured in order to calculate the amount of slope modification as described by Noyes et al. [30]: if the anteromedial gap is half of the posteromedial, the tibial slope will not change; otherwise for each 1 mm of increase in the anterior gap, the posterior slope will increase by 2°. Furthermore, if the anterior gap is greater than 1 cm, a tibial tubercle osteotomy is recommended in order to avoid patella infera. The lower limb alignment is checked under fluoroscopic control, and the gap is filled with either autograft, allograft, or synthetic bone. Finally, the osteotomy is stabilized using a contour lock or 4-hole plate (Arthrex, Naples, FL, USA) with 6.5 mm cancellous screws proximally and 4.5 mm cortical screws distally (Fig. 10.4). The final result is checked under fluoroscopic control, the tourniquet is deflated, and the wound is closed in a standard fashion. With small corrections, a 4-hole plate will be satisfactory, but for large corrections and biplanar correction, the contour lock plate is preferred.
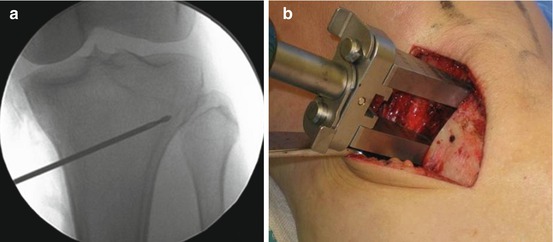
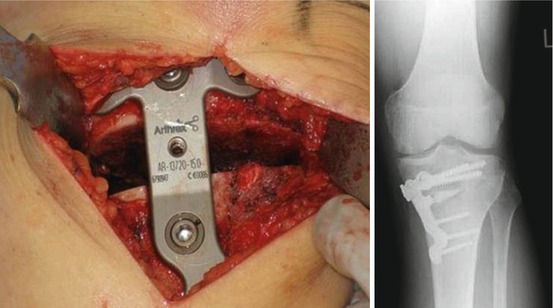
Fig. 10.3
(a) A guide wire is placed from the superior aspect of the tibial tubercle to about 1 cm below the lateral joint line. (b) Cortical osteotomy is performed with an oscillating saw and continued with osteotomes just behind the guide wire. Once the osteotomy is completed, the medial opening is created using a dedicated wedge placed to the planned depth
Fig. 10.4
The osteotomy is stabilized with the plate (Arthrex, Naples, Florida)
10.3.2.2 Opening-Wedge Medial HTO with the iBalance System
Although good long-term results are reported with opening-wedge HTO, it remains a challenging procedure with some intraoperative risks like neurovascular injury, fracture of the lateral cortical hinge or fracture into the lateral tibial plateau and resultant osteotomy instability, loss of correction, and delayed/nonunion of the osteotomy. To make the medial opening-wedge HTO a more reproducible procedure with less risk of complications, the iBalance™ HTO system (Arthrex, Naples, FL) was developed. It includes an instrumentation with a neurovascular blunt retractor, a patellar retractor, an alignment handle, and a new cutting guide. With this system the surgeon is able to reduce the risk of fracture by hinging on a predrilled hole to allow dissipation of forces laterally; besides the alignment handle allows to easily check the correction both on the sagittal and coronal plane. The novel implant is made of polyetheretherketone (PEEK), a new radiolucent and bio-inert material which is already used in different orthopedic implants [43]. In literature this system has been described to be safe and with some advantages like the protection of the neurovascular bundle, a low profile nature of the implant reducing soft tissue irritation, and the ability to maintain the alignment in both the coronal and sagittal planes [44].
The approach is the same we described in the above section. After the detachment of the medial collateral ligament and the exposition of the patellar tendon, the alignment handle with the keyhole guide is positioned with the patellar retractor, and the alignment is checked with the C-arm on both the sagittal and coronal plane. The biplanar alignment bars should be positioned on the joint line on the anteroposterior view, and the two bars should appear as a single one on the lateral view. Once the correct alignment in both planes is obtained, the keyhole guide is fixed with pins and the alignment handle is removed. At this point a keyhole reamer is used to drill two holes to allow dissipation of forces laterally and to accommodate the plate. Now the cutting guide and the neurovascular blunt retractor are assembled to the system. The cut is performed and the system is removed; now the opening jack paddles are inserted into the osteotomy, and the correction is obtained slowly opening the jack by turning the turn key handle. Once the correction is obtained, the iBalance™ PEEK implant can be positioned; the gap is filled with autologous bone graft from the drilled holes and bone substitute can be used. The PEEK plate is fixed with two cancellous anchors (screws) proximally and two cortical anchors distally. Figure 10.5 shows few steps of this technique.
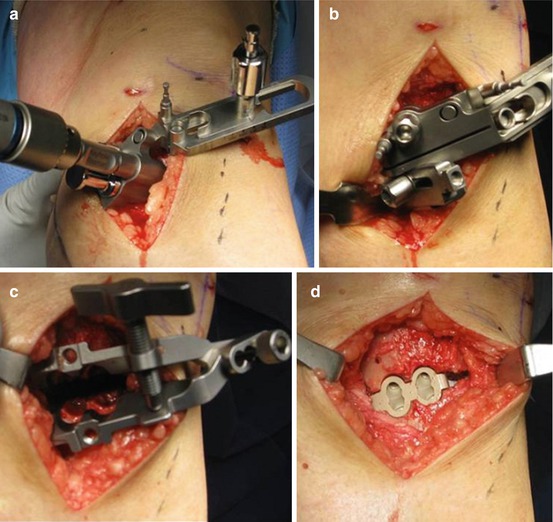
Fig. 10.5
iBalance technique. (a) The keyhole reamer drilling the two holes. (b) The cutting guide. (c) The opening jack paddles are inserted into the osteotomy; to open the osteotomy turn the key handle until the planned correction angle is noted on the correction guide. (d) The iBalance PEEK plate is positioned and stabilized with two cancellous anchors proximally and two cortical anchors distally
10.3.2.3 Opening Medial HTO Stabilized with External Fixator
We normally use a circular external fixator (Taylor Spatial Frame™, Smith and Nephew) with gradual correction only if the deformity is large, usually greater than 17.5°. In these cases, the fixator is assembled preoperatively using three rings 4 cm larger than the diameter of the leg. Preoperatively the correction is calculated in each plane and if any length needs to be adjusted, but then this is confirmed after application of the fixator postoperatively. The first ring is positioned at the level of the fibular head and the second below the tibial tubercle, and they are joined by the six correction rods. The third ring is preset approximately 5 cm distal to the second one using four tethered rods. The proximal ring is placed parallel to the tibial articular surface in both the coronal and sagittal planes. The two distal rings are aligned to the tibial shaft, and the deformity to be corrected is between the first and second ring. The apparatus is then sterilized, the lower limb is prepared, and the tourniquet is inflated. A 3-cm incision is made 10 cm below the fibular head posterolaterally, the plane between soleus and peronei is developed, and an oblique fibular osteotomy is performed. The external fixator is then applied to the leg. The first ring is secured using two wires and one half-pin across the tibia, and the second ring is then secured with one wire and one half-pin across the tibia (to avoid the peroneal branches, the pins should be placed more laterally than medially). The third ring is stabilized with two wires passing across the tibia. At this point a 1.5-cm incision is performed anteriorly just distal to the tibial tubercle, the periosteum is elevated, and a tibial osteotomy is performed (Fig. 10.6). Some correction can be performed during the surgery to ensure the osteotomy will correct, and then it can be gradually done beginning 7–10 days postoperatively (callotasis).


