Fragment Specific Fixation
Bruce M. Leslie
Evan D. Schumer
Indications and Contraindications
Unlike other methods of distal radius fracture fixation that depend on either ligamentotaxis, traction, or fixed-angle plating, fragment-specific fixation allows for the independent, individualized fixation of the five major fragments associated with a distal radius fracture (Fig. 7-1). These fragments include the radial styloid fragment, a volar lunate facet fragment, a dorsal cortical fragment, a dorsal-ulnar fragment, and a die punch intra-articular fragment. These fracture fragments can generally be identified on appropriate preoperative plain films. Sometimes, however, it is necessary to obtain computerized tomography (CT) scans to better visualize the fragment or to see whether a suspected volar lip fracture is, in reality, an isolated volar lunate facet fracture. Once the fracture fragments are identified, the surgeon will know which skin incision(s) to utilize and in which sequence the fragments should be stabilized. Fixation is achieved utilizing a combination of pin plates and wire forms. Fixation is supplemented with 0.045-inch Kirschner wires (K-wires) and low-profile, self-tapping screws. The pin plates and wire forms allow each fragment to be individually stabilized. Once each fragment is stabilized, the entire construct should be sufficiently stable to allow early wrist motion (1,2).
Once the specific components of the distal radius fracture are identified, it is easier to assess whether the fracture reduction was successful. When comparing the postreduction films to the preoperative films, look to be certain that each component was properly reduced by systematically looking at each fracture component. Then you should know whether the fracture reduction is anatomic or one component needs to be manipulated into a better position.
Fracture specific fixation is indicated for relatively simple extra-articular distal radius fractures and comminuted intra-articular fractures.
Fragment-specific fixation can also be used to augment other methods of fixation when it is noted that the desired reduction has not been achieved. If the reduction is not anatomic after the application of an external fixator or fixed-angle volar plate, fragment-specific fixation can be utilized. An external fixator does not preclude the insertion of any of the fragment-specific devices. An incomplete reduction after fixed-angle volar plating typically requires either the insertion of radial pin plate to stabilize the radial styloid or a dorsal approach to reduce a dorsal or intra-articular fragment.
Do not perform fragment-specific fixation in cases of gross open contaminated wounds. Use this technique judiciously with clean open fractures as long as adequate soft tissue coverage is available.
Fragment-specific fixation requires the use of intraoperative radiography and, consequently, should not be undertaken without ready access to a fluoroscopy unit, such as a mini C-arm. Fragment-specific fixation requires good metaphyseal bone that allows for good screw purchase. Osteoporotic bone is a relative contraindication. Fragment-specific fixation will fail if screw fixation cannot be obtained proximally.
Fragment-specific fixation is a technically demanding procedure. Simple extra-articular fractures can easily be stabilized with fragment-specific fixation, but extremely comminuted displaced fractures need an understanding of the anatomy and the ability to fix individual fragments. This ability is gained from both experience in the laboratory and the operating room.
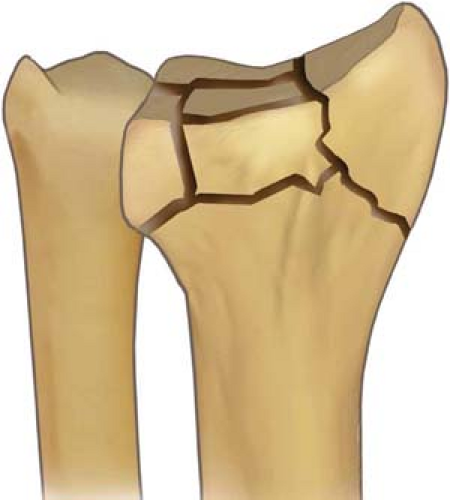 Figure 7-1 The five major fragments consist of the radial styloid, the volar lunate facet, the dorsal lunate facet, the dorsal cortical piece, and an intra-articular fragment. |
Preoperative Preparation
Once the patient is stabilized, obtain high-quality radiographs. Preferably, obtain the radiographs before any attempt at reduction and stabilization because overlying plaster and fiberglass can frequently obscure fine detail. Posteroanterior (PA), lateral, and oblique x-ray studies are frequently adequate to identify the individual components to the distal radius fracture. Sometimes, traction films will give a better perspective and should be considered if the plain films are confusing. CT or reconstructive CT films may be necessary to determine whether there is a die punch fracture involving the articular surface or to distinguish a lunate facet fracture from a volar lip fracture.
Treat typical volar lip fractures with a volar plate rather than fragment-specific fixation.
Technique
The fracture reduction and hardware application is generally done through two small incisions, either a volar–radial (Henry) incision or a trans-flexor carpi radialis (FCR) incision and a standard dorsal incision. The location of the volar incision may depend on whether there is a volar-ulnar fragment. The trans-FCR incision generally allows for easy access to the volar-ulnar corner of the radius while the standard volar-radial (Henry) incision allows for easier access to the radial styloid. The trans-FCR incision also has the benefit of avoiding the radial artery; this may be a major consideration in a very swollen forearm. When in doubt, it may be easier to use a standard volar Henry incision combined with a small volar-ulnar incision that is placed between the median nerve and the flexor carpi ulnaris (FCU). This combination of volar incisions allows for easy access to both the radial styloid and a volar lunate facet fragment.
When fragment-specific fixation is used in conjunction with fixed-volar angle plating, it is usually used to secure the radial styloid and/or stabilize or align articular bone. The radial styloid can usually be approached through the same incision utilized for the volar fixed-angle plate. If there is still an intra-articular step-off after application of the fixed-volar angle plate, then it is usually easier to make a second incision dorsally and apply the appropriate wire form or pin plate.
Radial Pin Plate
The radial pin plate is used to stabilize the radial column.
Apply it to the distal radius in the region of the first dorsal compartment. If using a Henry incision, generally continue the dissection radially to the radial artery.
Detach the pronator quadratus from its origin along the subcutaneous border of the distal radius.
Expose the volar aspect of the distal radius by subperiosteal dissection. Placing a Hohmann retractor along the volar ulnar edge of the radius will elevate the soft tissues and allow for adequate visualization of the volar cortex.
Elevating the first dorsal compartment exposes the anticipated location of the radial pin plate and the radial tuberosity. Sometimes, despite careful subperiosteal dissection, the floor of the first dorsal compartment may be violated. This will not affect the ultimate result. The most distal portion of the radial styloid should be visualized. Sometimes, the volar-radial tuberosity is mistaken for the tuberosity. Intraoperative films will clarify this situation.
With some fractures, the hand will be pronated on the forearm. The proximal ulnar edge of the distal radial fragment will be displaced posteriorly. If gentle manipulation of the fragments does not restore anatomic alignment, use a small, thin elevator to elevate the proximal edge of the distal fragment. If the reduction appears to be anatomic, drive a 0.045-inch K-wire from the radial styloid across the fracture site and into the proximal fragment.
Insert this K-wire at the most distal portion of the radial styloid. This is facilitated by the use of either a small retractor or a tissue protector.
Drill the K-wire along the coronal plane of the radius to penetrate the far cortex of the proximal fragment.
Confirm the fracture reduction and K-wire position with fluoroscopy. Frequently, the K-wire is actually more proximal to the radial styloid than suspected. If the reduction is satisfactory and the pin has good purchase, the initial K-wire does not need to be reinserted.
If the reduction is anatomic, the radial pin plate should comfortably rest along the side of the radius (Fig. 7-2). If the pin plate does not follow the contour of the radius, then the reduction is generally
inaccurate and should be reassessed. Because the plate is quite pliable, any small gaps between the plate and the bone will generally be closed once the plate is secured with the proximal screws.
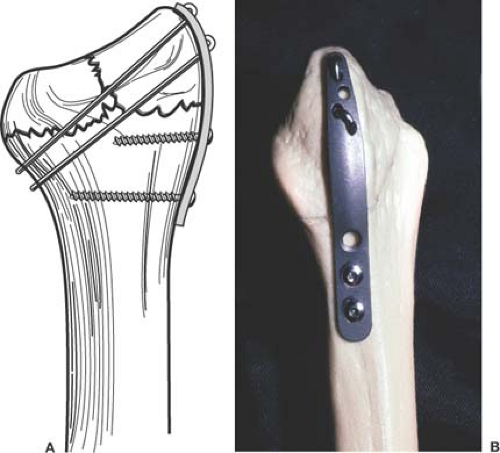
Figure 7-2 The radial pin plate follows the contour of the lateral aspect of the radial styloid. The Kirschner-wires (K-wires) should engage both cortices.
The pin plate must be sufficiently long to allow fixation proximal to the fracture line with at least two good screws.
Chose the pin plates by sliding either a radial pin plate over the protruding end of the previously placed K-wire.
If the K-wire is relatively proximal, place it through one of the more proximal pinholes. If the K-wire is relatively distal on the radial styloid, pass it through one of the more distal holes.
Confirm plate position with fluoroscopy. If the plate is too distal or too proximal, it can be repositioned using one of the more proximal or distal pinholes. For most fractures, the RPP-3 will suffice.
If the reduction and plate position are satisfactory, secure the plate to the proximal cortex with the 2.3-mm self-tapping screws. Usually only two screws are necessary.
The position of the first radial styloid pin will frequently determine the alignment of the radial pin plate. If the first radial styloid pin is proximal and volar on the tuberosity, the plate will rest obliquely with the distal edge volar and the proximal edge dorsal. If the first pin is at the distal edge of the radial styloid, the plate will rest along the lateral aspect of the radius.
After the proximal screws have been inserted, insert a second K-wire.
Determine the location of the second K-wire by the position of the first.
If the first K-wire was a bit too proximal, insert the second K-wire through one of the more distal holes in the pin plate. Conversely, if the original K-wire is distal, place the second K-wire through one of the more proximal holes. Although not necessary, it is usually better if at least one pinhole is left vacant between each K-wire.
Once the second K-wire is in place, secure the pins to the plate. This is done one K-wire at a time because it is necessary to keep a K-wire in place to maintain the reduction. The goal is to have the cut, crimped, and impacted K-wire just engaging the far proximal cortex. To do this, the K-wire needs to be withdrawn a known distance such that when it is cut, crimped, and then impacted it will again engage the far proximal cortex. This step is facilitated with either striped K-wires or by scoring the K-wire. Striped K-wires will indicate exactly how far the K-wire has been withdrawn. The K-wire can be scored by withdrawing it with a power drill, simultaneously leaning the wire into the plate. The combination of leaning and drilling causes the K-wire to be scored with circumferential rings (Fig. 7-3). The rings will allow the surgeon to determine where to cut and crimp. If the K-wire had originally just engaged the distal cortex, the ring or stripe closest to the drill should be at the level of the pinhole once the pin has been impacted.
Back the K-wire out far enough to crimp the end.
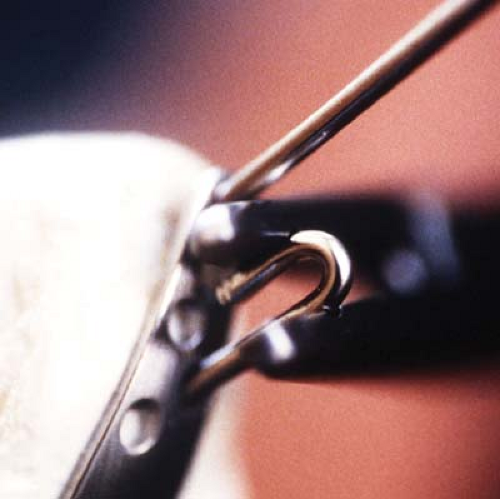
Position the bending crimping tool such that the center of the tool is just distal to the ring or stripe closest to the drill (Fig. 7-4).
After bending, cut the pin. Depending on the exposure, the pin may need to be cut a second time before crimping and bending.
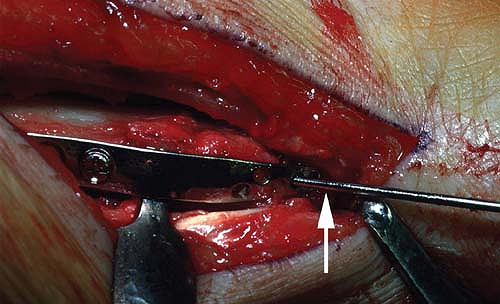
Figure 7-3 Note the circumferential rings on the Kirschner-wire (K-wire) created by leaning the K-wire against the pinhole while withdrawing the pin a short distance.
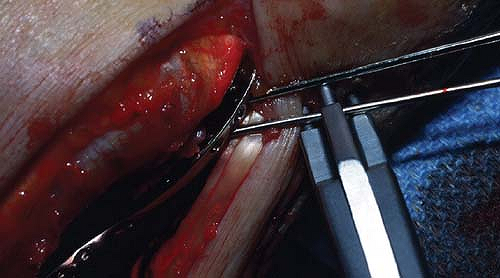
Figure 7-4 Position the crimping tool just distal to the distal circumferential ring furthest from the plate.
Related posts:

Stay updated, free articles. Join our Telegram channel

Full access? Get Clinical Tree

 Get Clinical Tree app for offline access


