Fig. 23.1
The deformity of the wrist due to fluid extravasation after 1 h of wet arthroscopy (right) as compared to the left which was operated for the same amount of time but under the dry technique (Pictures taken during a teaching course with cadavers in Strasbourg. Both were operated by students simultaneously in different working posts) [Copyright Dr. Francisco del Piñal, 2010]
Not using fluid, on the other hand, engenders a new set of problems secondary to loss of vision caused by splashes on the tip of the scope or blood and debris in the joint. This may induce the novice to give up at the first difficulty met, but the advantages of the dry technique far outweigh the difficulties encountered on the learning curve. In this work the technical tips to carry out an uneventful operation are presented in detail.
Surgical Technique
The “dry” arthroscopy technique is similar to a standard wrist arthroscopy (“wet”), except for the fact that water is not used to maintain the optic cavity. As stated, the main shortcoming comes from the fact that if one is not able to get rid of the blood and splashes that obscure vision in an expeditious manner, surgery will become a nightmare and one will give up the dry technique.
Intuitively, one would think that removing the scope and wiping off the lens with a wet sponge is a good way of having clear vision. Although effective, this maneuver is time consuming and, in a fracture or other complex procedures described in this chapter, there may be so much blood or debris that the maneuver may need to be repeated an exasperating number of times. Based on our experience with more than 1,000 dry wrist arthroscopies, but more important seeing how others in the laboratory and surgery struggle with the same difficulties over and over again, I can recommend the following tips that are critical for a smooth procedure, some of which are improvements on our previous publications [1, 2]:
The valve of the sheath of the scope should be kept open at all times to allow the air to circulate freely inside the joint. Otherwise, either the suction of the shaver will not function properly or the capsule will collapse inwards due to the power of the suction, resulting in blocked vision. This is critical and cannot be overemphasized (Fig. 23.2).
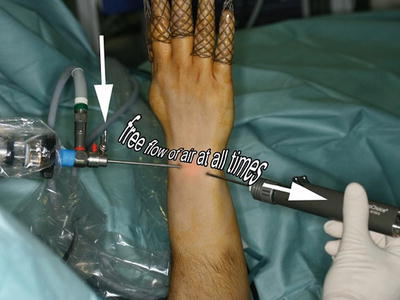
Fig. 23.2
The valve of the scope should be open at all times so as to allow air to circulate freely [Reprinted from del Piñal F. Dry arthroscopy of the wrist: its role in the management of articular distal radius fractures. Scand J Surg 2008;97:298–304. With permission from Sage Publications]
Suction is necessary to clear the field but, paradoxically, suction might also blur the vision by stirring up the contents of the joint (debris, blood, or remaining saline) that may stick to the tip of the scope. It is critical, therefore, to open the suction of the shaver or burr only when there is the need to aspirate something. Suction power should be locked when not needed. To sum up, the valve of the sheath of the scope should be open at all times, but suction power should only be working when needed.
Avoid getting too close with the tip of the scope when working with burrs or osteotomes in order to avert splashes that might block your vision. Minor splashes can be removed by gently rubbing the tip of scope on the local soft tissue (capsule, fat, etc.).
When a clear field is needed, so as to see a gap or a step-off, we used to recommend drying out the joint with neurosurgical patties [1]. However, we rarely resort to this technique now, and prefer to connect a syringe with 5–10 cc of saline to the side valve of the scope and then aspirate it with the synoviotome, in order to get rid of blood and debris. Pressure on the plunger of the syringe is unnecessary, as the negative pressure exerted by the shaver will suck the saline into the joint, thus preventing any extravasation (Fig. 23.3). Once all the water has been aspirated, the syringe is removed, and again the suction power of the shaver is enough to dry out the joint sufficiently, thus allowing the surgeon to work. This maneuver should be repeated as necessary throughout the procedure, as it is much quicker than struggling with blood in the joint, or trying to dry it out with the patties.
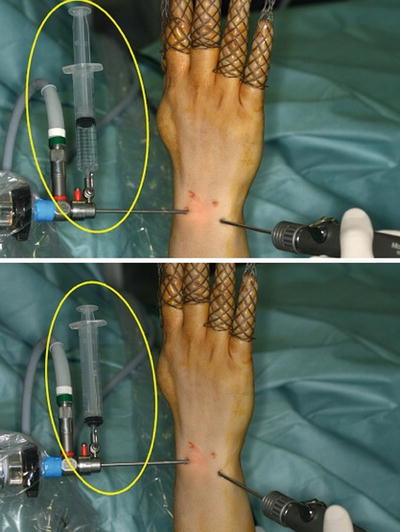
Fig. 23.3
Method used to wash out the joint and clear it of blood. Notice that the negative pressure exerted by the shaver is sufficient to aspirate the saline without extravasation of water [Reprinted from del Piñal F. Dry arthroscopy of the wrist: its role in the management of articular distal radius fractures. Scand J Surg 2008;97:298–304. With permission from Sage Publications]
An important waste of time occurs when the synoviotome, burr, or any other instruments connected to a suction machine clog because the aspirated debris dries out. When this happens the operation has to be stopped in order to dismount and irrigate the synoviotome for dislodging the debris. This is to be avoided at all costs by clearing the tubing with periodic saline aspiration from an external basin by the OR nurse, or by the surgeon through joint irrigation. Joint flushing should also be done in a systematic fashion in some procedures, such as intercarpal arthrodesis or arthroscopic proximal carpectomy, in which prolonged use of the synoviotomes and burrs may cause heating of the instrument itself causing local burns (see below).
Finally, one must understand that at most times vision will never be completely clear but still sufficient to safely accomplish the goals of the procedure. Having a completely dried field except for specific times during the procedure is unnecessary and wastes valuable time, and we rely more on the irrigation-suction just explained above.
The technique can be summarized in these three fundamental tips:
The valve of the scope should be open at all times.
The suction should be closed except when needed.
The joint should be irrigated as needed in order to remove debris and blood.
Contraindications
The dry technique is contraindicated when using vaporizers, lasers, etc., as the heat generated will not dissipate, risking widespread cartilage damage. The problem is solved easily, however, by swapping to the “wet” technique during the specific moment that kind of instruments are being used. Once the “vaporizer step” is terminated, the saline is disconnected and air allowed to flow in the joint. The remaining water is sucked out with the synoviotome and the procedure continues “dry.” In very special scenarios where running water is paramount, such as in septic arthritis, the use of the dry technique will offer no advantage and is not advised.
Risk of compartment syndrome has been considered a contraindication for arthroscopy, particularly after severe fractures, but this is not a problem when using the dry technique. Furthermore, I cannot see open wounds as a contraindication of the dry arthroscopy either, provided debridement of the portal is carried out and thorough irrigation of the joint is performed at the end of the procedure.
One concern many surgeons have about the dry arthroscopy is the possibility of burning inside the joint by the tip of the scope. This has never occurred in our experience, as the tip of the scope never warms up to that point. I should warn the reader, however, that we have experienced minor contact burns at the portals and the dorsal skin, by the synoviotome and burr. The rotating mechanism of these instruments heats up, as a result of friction, when used for very long periods of time. This is easily overcome by flushing the joint with saline that will cool down the synoviotome, and also will improve vision.
Clinical Applications
I use the dry technique in all my arthroscopic explorations, as I personally have not found it necessary to use vaporizers. There are, however, four common pathologies where not using water makes an enormous difference, namely distal radius fractures and (distal radius) malunions, arthroscopic arthrodeses and perilunate fractures and dislocations.
Distal Radius Fractures
Despite the existence in the literature of well-performed Level 1 studies [3–5] supporting the use of the arthroscope when dealing with articular distal radius fractures, there is general resistance in the Hand Surgery community to admit so. This is sometimes justified as being due to a(-n infinitesimal) risk of compartment syndrome, and more so to the massive swelling that accompanies the wet arthroscopy which makes the open part of the procedure more awkward. Although the latter reason is true, the unvoiced reason lies in the technical difficulties of the arthroscopic part itself. This is more so the more comminuted the fracture is, which, paradoxically, is the one that benefits most from having an arthroscopic assisted reduction [6]. Yet, there is no other single field in wrist arthroscopy where the dry technique can make such a huge difference and ease the procedure, as when dealing with articular fractures of the wrist. The dry arthroscopy allows an unimpeded combination between the open fixation part and the ability to watch the cartilaginous reduction and assess ligamentous and TFC injuries.
Our current technique [7–9] includes the use of volar locking plates in combination with arthroscopy, except in some specific fractures, such as radial styloid, where cannulated screws through a transverse incision in the styloid is the preferred fixation method. For the typical three- or four-part fracture, the radius is approached between the FCR and the radial artery. After a preliminary reduction by ordinary maneuvers, a volar locking plate is applied and stabilized by inserting only the screw into the elliptical hole on the stem of the plate. The articular fragments are reduced to the plate that act as a mold, and once the “best” reduction is obtained as judged by fluoroscopic views, the articular fragments are secured to the plate by inserting Kirschner wires (K-wire) through the auxiliary holes of the transverse component of the plate. It should be underscored that definitive fixation (screws or pegs) should not yet be used, as any change will not be possible later.
The hand is suspended from a bow, the fingers pointing to the ceiling, with a customized system that allows easy connection and disconnection from the bow without losing sterility, as fluoroscopic checkups are needed [10]. Traction is carried out on all fingers with counter-traction of 7–10 kg. A small transverse incision is made just distal to Lister’s tubercle and, after dilating the portal with a straight mosquito, the scope (2.7 mm; 30° angle) is introduced and directed ulnarly. In the swollen wrist, it may be very difficult to establish 6-R portal, more so because the TFC may be detached from the fovea acting as a lid blocking the entrance into the radiocarpal joint. I overcome this eventuality by establishing this portal by going blindly with a hemostat in a radial direction immediately radial to the ECU just brushing past the proximal triquetrum.
The blood and debris are aspirated by a 2.9 mm shaver inserted in 6R. Flushing and debridement is carried out until the joint is completely clean. Once the elements that need to be mobilized are identified, the scope is swapped to 6R, where it will stay until the entire fixation is done. In this position, on top of the ulnar head, the scope will have a steady point to rest upon, and will not impede reduction or displace reduced fragments (Fig. 23.4).
Fig. 23.4
If the scope is placed in 6R it will rest on top of the ulnar head providing a stable platform from which to work, thus avoiding conflict with the reduction (left). Instability of the scope and conflict of space during the reduction (yellow and red arrows) are inevitable when the scope is placed in any other portal (right) [Copyright Dr. Piñal, 2009]
In simpler cases where only a single fragment remains unreduced, the fragment is freed by backing out the specific K-wire that kept it secured to the plate. Depressed fragments are lifted by hooking them with the tip of a shoulder or knee arthroscopy probe introduced from 3-4 (Fig. 23.5).
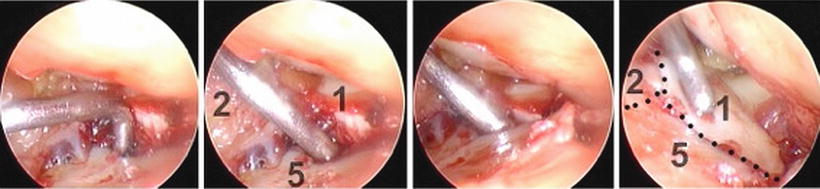
Fig. 23.5
Reduction of a depressed fragment in the scaphoid fossa. From left to right: The shoulder probe is gauging the step-off (3 mm), hooking the depressed fragment, elevating it, and leveling it to the rest of the joint (Scope in 6R, viewing radially in a right wrist. 1: volar rim of the scaphoid fossa, 2: dorsal rim; 5: scaphoid fossa) [Copyright Dr. Piñal, 2009]
Elevated fragments nearly always correspond to rim fragments that due to the effect of traction are overdistracted. They are easily repositioned by the assistant decreasing traction while the surgeon levels them with the probe or a Freer elevator. Once the fragment is reduced, it is held in position with a bone tenaculum, and stabilized by pushing the corresponding K-wire in the plate again. Free osteochondral fragments are extremely unstable, and when repositioned sink into the metaphyseal void. To avoid this we create a supporting hammock where they can lie. This is done by inserting the distal layer of pegs in the plate, while keeping these fragments slightly overreduced. Then, they are impacted by using a Freer elevator or by releasing the traction and using the corresponding carpal bone as a mold. A grasper can be useful to grab and twist a severely displaced fragment [7].
Still under arthroscopic control, locking pegs are inserted in the plate by the other surgeon in critical spots, so as to make the articular surface stable to probe palpation. This part of the operation is quite awkward as the flexor tendons are in tension blocking the vision of the plate. Retracting ulnarly the tendons with a Farabeuf, and reducing the traction to release the flexor tendons may ease the task. As soon as the major articular fragments are stabilized, the hand is put flat on the operating table, as in this position the remaining pegs and screws can be inserted expeditiously (Fig. 23.6).
Fig. 23.6
Summary of the author’s technique to reduce and stabilize the common scenario of a posterior depressed fragment that remains unreduced. Notice that the K-wire is backed out sufficiently enough to release this malpositioned fragment, whilst the rest of the reduction remains unaffected during the whole maneuver [Copyright Dr. Piñal, 2009]
Only in the most comminuted cases will several fragments continue to be displaced after the fluoroscopic part of the operation. Backing out all the K-wires, and attempting to reduce and fix all fragments at the same time, is an impossible endeavor in our hands. We recommend a step-by-step procedure beginning preferably from the ulnar part of the radius, advancing in a radial direction. The mechanics of the procedure is similar as for a single fragment: the corresponding K-wire is backed out, the fragment reduced, and the K-wire pushed in, building up the rest of the articular surface to this foundation.
Once the radius fixation is over, the hand is again placed on traction and distal radio-ulnar joint and the midcarpal joints are assessed for instability or ligament damage.
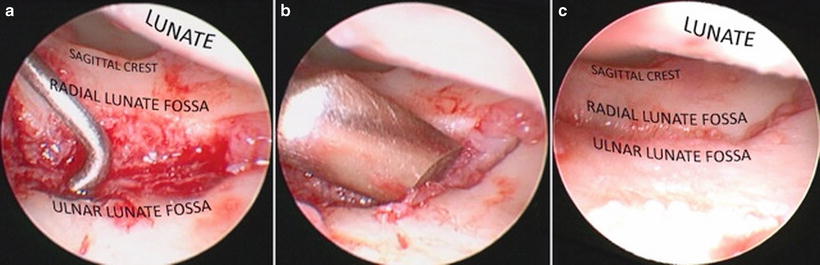
Arthroscopic Guided Osteotomy for Distal Radius Malunion
Arthroscopy can be invaluable to locate step-offs and see the personality of the malunited fragment, to cut the bone exactly at the cartilage fracture line, and to assess the reduction (Fig. 23.7). This is more so as fluoroscopy has not proved very reliable even in the setting of acute fractures [11, 12], and because a blind osteotomy can cut in an undesired spot [13].
 Arthroscopic Management of Distal Radius Fractures
Management of Ulnar Impaction
Wrist Arthritis: Arthroscopic Techniques of Synovectomy, Abrasion Chondroplasty, Radial Styloidectomy, and Proximal Row Carpectomy of the Wrist
Suture-Button Suspensionplasty for the Treatment of Thumb Carpometacarpal Joint Arthritis
Arthroscopic and Open Radial Ulnohumeral Ligament Reconstruction for Posterolateral Rotatory Instability of the Elbow
Management of Scapholunate Ligament Pathology
Arthroscopic Management of Distal Radius Fractures
Management of Ulnar Impaction
Wrist Arthritis: Arthroscopic Techniques of Synovectomy, Abrasion Chondroplasty, Radial Styloidectomy, and Proximal Row Carpectomy of the Wrist
Suture-Button Suspensionplasty for the Treatment of Thumb Carpometacarpal Joint Arthritis
Arthroscopic and Open Radial Ulnohumeral Ligament Reconstruction for Posterolateral Rotatory Instability of the Elbow
Management of Scapholunate Ligament Pathology


Related posts:
Arthroscopic Management of Distal Radius Fractures
Management of Ulnar Impaction
Wrist Arthritis: Arthroscopic Techniques of Synovectomy, Abrasion Chondroplasty, Radial Styloidectomy, and Proximal Row Carpectomy of the Wrist
Suture-Button Suspensionplasty for the Treatment of Thumb Carpometacarpal Joint Arthritis
Arthroscopic and Open Radial Ulnohumeral Ligament Reconstruction for Posterolateral Rotatory Instability of the Elbow
Management of Scapholunate Ligament Pathology
Stay updated, free articles. Join our Telegram channel
Full access? Get Clinical Tree
