Chapter 16 Diagnostic and Operative Ankle and Subtalar Joint Arthroscopy
CHAPTER CONTENTS
History of the technique
Arthroscopy has revolutionized the practice of orthopaedic surgery since the mid-1970s. After a long history of sporadic attempts at arthroscopy, technologic breakthroughs in Japan and several surgical pioneers in North America launched widespread interest in percutaneous joint surgery. Tagaki in 1939 described systematic arthroscopic assessment of the ankle joint.1 Watanabe published a series of 28 ankle arthroscopies in 1972, followed by Chen in 1976.2 In the 1980s, several publications followed.3,4 Over the last 15 years, arthroscopy of the ankle joint has become the most important diagnostic and therapeutic procedure for chronic and posttraumatic complaints of the ankle joint. Interest in ankle arthroscopy has increased steadily following successful clinical experience with arthroscopy of the knee and shoulder.5 This rapid rise in the popularity of foot and ankle arthroscopy is partly because other noninvasive techniques cannot adequately diagnose disorders in these joints. To operate in the central and posterior ankle, some type of distraction device is needed. Invasive external distraction was tried in the early 1980s. A noninvasive technique was first described by Yates and Grana in 1988.6 With the advent of better small-joint arthroscopes and instrumentation, and the production of more efficient noninvasive distraction devices, the development of tendoscopic surgery, and the introduction of a two portal technique for posterior ankle problems, ankle arthroscopy further developed to the current state. However, the dynamic nature of arthroscopy necessitates constant improvements that will continue to allow this field to grow. Ankle arthroscopy has become an integral part of modern orthopaedic surgery. Arthroscopic procedures can be used most successfully when practiced with a firm understanding of their subtle refinements, limitations, and risks.
Indications and contraindications
The key point in the assessment of ankle joint pathology is the clinical diagnosis. By means of a clinical diagnosis, an indication is set for an arthroscopic intervention. Furthermore, the clinical diagnosis is essential for preoperative planning.7 The clinical diagnosis is based on history, symptoms and signs, and radiographic examination. Anterior problems include soft-tissue or bony impingement, synovitis, loose bodies, or ossicles. More centrally located complaints can originate from an osteochondral defect or arthrosis, whereas posterior problems can be caused by intra-articular pathology, such as posterior impingement syndrome (os trigonum); posttraumatic calcifications; loose bodies or synovitis; or by periarticular posterior ankle pathology, such as peroneal tendon, posterior tibial tendon, or flexor hallucis longus (FHL) pathology. In posterior ankle disorders, especially, differentiation from subtalar pathology is sometimes difficult.
The relative contraindications for ankle arthroscopy include moderate degenerative joint disease with restricted range of motion, a significantly reduced joint space, severe edema, and tenuous vascular status.8 The absolute contraindications for ankle arthroscopy include absence of a clinical diagnosis, severe degenerative joint disease, and localized soft-tissue infection. However, if septic arthritis already is present, ankle arthroscopy is indicated, because it is a useful tool for drainage, debridement, and lavage of the joint.9
Surgical technique
Operative Setup
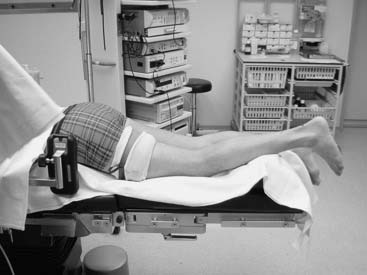
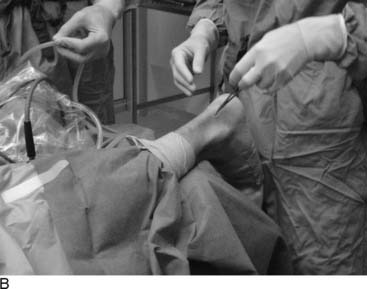
The procedure generally is carried out as outpatient surgery under general anesthesia or epidural anesthesia. Patients can be placed in various positions. Most surgeons prefer the supine position with slight elevation of the ipsilateral buttock. A tourniquet is placed around the upper thigh. The heel of the affected foot rests on the very end of the operating table, thus making it possible for the surgeon to fully dorsiflex the ankle by leaning against the sole of the patient’s foot. For the treatment of posterior ankle problems, the patient is placed in prone position (Fig. 16-1). A tourniquet is applied and a small support is placed under the lower leg, making it possible to move the ankle freely.
There are some important considerations in deciding whether to use dorsiflexion or traction for routine anterior ankle arthroscopy. When saline is introduced in the dorsiflexion position, the anterior working area “opens up” and any bony or soft-tissue impediment in front of the medial malleolus, in front of the lateral malleolus, at the talar neck, or at the distal tibia can be visualized and treated. For the treatment of anterior impingement lesions, synovitis, ossicles, and loose bodies, it therefore is beneficial to perform the procedure without distraction. In this dorsiflexed position, the talus is concealed in the joint, thereby protecting the cartilage from potential iatrogenic damage. Loose bodies usually are located in the anterior compartment of the ankle joint. Dorsiflexion creates an anterior working area and makes removal easy.10 Distracting the joint makes it possible for the loose body to “fall” into the posterior aspect of the joint, thus making removal more difficult or impossible by an anterior approach. The same is true for the removal of ossicles and bony spurs by chisel or burr. Distraction of the joint results in tightening of the anterior capsule, thus making it more difficult to identify anterior osteophytes, ossicles, loose bodies, and soft-tissue impediments. Furthermore, when portals are created and instruments are introduced in the distracted position, this may result in iatrogenic cartilage damage at the talar dome.7
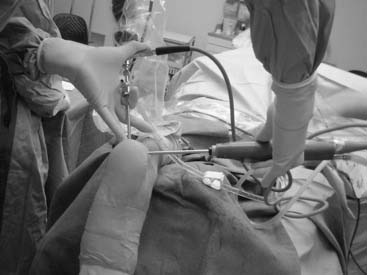
The main reason for inspection of the talar dome and tibial plafond is for treatment of an osteochondral defect. A clinical diagnosis must be established preoperatively using history, physical examination, and standard x-rays. In case of doubt about the existence or the exact location and size of a defect, a preoperative spiral computed tomography (CT) scan or magnetic resonance imaging (MRI) can be performed. Knowing the exact location of a defect makes it possible to decide preoperatively whether distraction will be necessary or whether the osteochondral defect can be approached in a forced plantarflexed position of the foot. In our experience, more than 90% of medial and lateral talar dome lesions can be treated in a hyperplantarflexed position.7 Distraction may be beneficial when an osteochondral defect is located in the posterior part of the medial or lateral talar dome or tibial plafond or when a soft-tissue impediment, ossicles, or an impregnated loose body is located in the joint space between fibula and tibia (intrinsic syndesmotic area).11,12 For posterior ankle problems, for example an osteochondral defect in the posterior quarter of the talar dome or in the posterior part of the tibial plafond, two-portal posterior ankle arthroscopy is an important alternative (Fig. 16-2).13
Portals for Anterior Ankle Arthroscopy
Portals provide an entry to visualize the structures of the ankle and foot. Proper portal placement is critical to performing good diagnostic and therapeutic arthroscopy.14 If the portals are positioned improperly, visualization can be impaired, making diagnosis and treatment more difficult. Two primary portals are used in routine ankle arthroscopy: the anteromedial and anterolateral portals. The anteromedial portal always is made first because it is easy to access. This is especially true with the ankle in hyperdorsiflexion. The exact point of entry in this position is easily reproducible, and the risk of neurovascular damage is minimal. Accessory anterior portals are located just in front of the tip of the medial or lateral malleolus. Some authors recommend routine placement of posterior portals in ankle arthroscopy. In these cases, a posterolateral portal is recommended. Because of the potential for serious complications, most authors feel that the posteromedial portal is contraindicated when performing anterior ankle arthroscopy.15
Anteromedial Portal
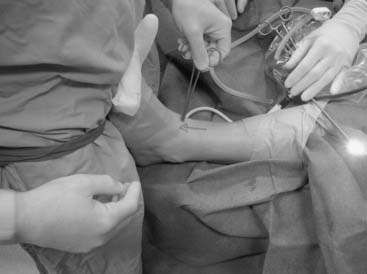
The anteromedial portal is placed just medial to the anterior tibial tendon at the joint line (Fig. 16-3). Care must be taken not to injure the saphenous vein and nerve transversing the ankle joint along the anterior edge of the medial malleolus. In the hyperdorsiflexed position, a local depression can be palpated. In the horizontal plane, this depression is located between the anterior tibial rim and the talus. The surgeon’s palpating thumb first detects the interval in the horizontal plane and subsequently locates the vertical position. In the vertical position, the anterior tibial tendon is the landmark. One should palpate the anterior tibial in the dorsiflexed position. In this dorsiflexed position the anterior tibial tendon moves ±1 cm lateral. The location of the anteromedial portal now can be marked onto the skin just medial from the anterior tibial tendon. By moving the ankle joint from the plantarflexed position to the dorsiflexed position, the talus can be felt to move in relation to the distal tibia. The surgeon’s thumb gets locked into this “soft spot” in the hyperdorsiflexed position. A small longitudinal incision is made through the skin only just medial from the anterior tibial tendon. Blunt dissection is performed with a mosquito clamp through the subcutaneous layer and through the capsule into the ankle joint. With the ankle in the forced dorsiflexed position, cartilage damage is avoided. In this forced dorsiflexed position, the arthroscope shaft with the blunt trocar is introduced. When the trocar is felt to contact the underlying bony “joint line,” the shaft with the blunt trocar is gently pushed further into the anterior working area in front of the ankle joint toward the lateral side. The anterior compartment is irrigated and inspected. The next portal to make is the anterolateral portal.
Anterolateral Portal
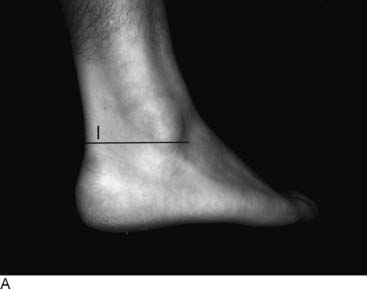
The anterolateral portal is the second standard anterior portal. It is placed just lateral to the tendon of the peroneus tertius at or slightly proximal to the joint line (Fig. 16-4). It is made under direct vision by introducing a spinal needle. In the horizontal plane, it is situated at the level of the joint line. In the vertical plane, the anterolateral portal is located lateral to the common extensor tendons and the peroneus tertius tendon. Care must be taken to avoid the superficial peroneal nerve because it runs subcutaneously. This subcutaneous nerve often can be palpated or visualized by placing the foot in forced hyperplantarflexion and supination. The lateral dorsocutaneous branch of the superficial peroneal nerve thus can be visualized. The intermediate dorsal cutaneous branch of the superficial peroneal nerve crosses the anterior aspect of the ankle joint superficial to the common extensor tendons. Damage to this branch can be avoided by staying lateral to the extensor tendons. Once the lateral branch is identified, its position can be marked with a marking pen on the skin.

Portals for Posterior and Subtalar Ankle Arthroscopy
The anatomic structures in the posterior ankle compartment are in close relation to each other. Operative treatment can use either a posterolateral or a posteromedial approach.13 Both imply the risk of damaging neurovascular structures. Posterolaterally, branches of the sural nerve and the lesser saphenous vein are at risk; posteromedially, the neurovascular bundle and its branches are at risk.14,15
Posterolateral Portal
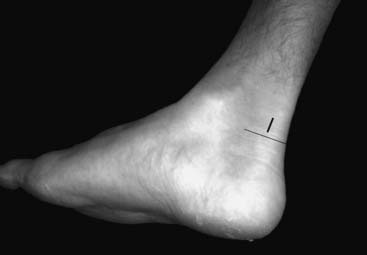
The posterolateral portal is made at the level or slightly above the tip of the lateral malleolus, just lateral to the Achilles tendon (Fig. 16-5, A). After making a vertical stab incision, the subcutaneous layer is split by a mosquito clamp. The mosquito clamp is directed anteriorly, pointing in the direction of the interdigital webspace between the first and second toe (Fig. 16-5, B). When the tip of the clamp touches the bone, it is exchanged for a 4.5-mm arthroscope shaft with a blunt trocar pointing in the same direction. By palpating the bone in the sagittal plane, the level of the ankle joint and subtalar joint most often can be distinguished because the prominent posterior talar process can be felt as a posterior prominence between both joints. It is not necessary to enter either joint capsule. The blunt trocar is situated extra-articularly at the level of the ankle joint. The blunt trocar is exchanged for a 30-degree, 4.0-mm arthroscope. The direction of view is lateral to prevent damage to the lens system.
Posteromedial Portal
This portal is made just medial to the Achilles tendon. In the horizontal plane, it is located at the same level as the posterolateral portal (Fig. 16-6). After the skin incision has been made, a mosquito clamp is introduced and directed toward the toward the arthroscope shaft, which already was introduced through the posterolateral portal. When the mosquito clamp touches the shaft of the arthroscope, the shaft is used as a guide to travel anterior in the direction of the ankle joint. All the way, the mosquito clamp must touch the arthroscope shaft until the mosquito clamp touches the bone. The arthroscope is pulled slightly backward and slides over the tip of the mosquito clamp until the tip of the mosquito clamp comes to view. The clamp is used to spread the extra-articular soft tissue in front of the tip of the camera. In situations in which scar tissue or adhesions are present, the mosquito clamp is exchanged for a 5-mm, full-radius shaver.
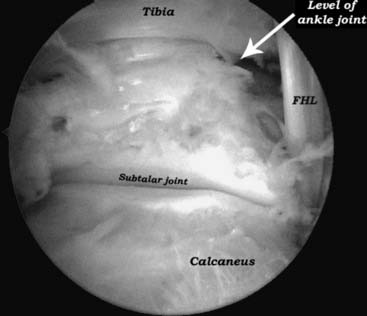
The fatty tissue overlying the joint capsule can be partially removed. At the level of the ankle joint, the posterior tibiofibular ligaments and the posterior talofibular ligament can be recognized. After removal of the very thin joint capsule of the subtalar joint, the posterior compartment of the subtalar joint can be visualized. The posterior talar process can be freed of scar tissue, and the FHL tendon can be identified. The FHL is an important landmark to prevent damage to the more medially located neurovascular bundle (Fig. 16-7).
On the medial side, the tip of the medial malleolus and the deep portion of the deltoid ligament can be visualized. By opening the joint capsule from inside out at the level of the medial malleolus, the tendon sheath of the posterior tibial tendon can be opened and the arthroscope can be introduced into the tendon sheath. The posterior tibial (PT) tendon can be inspected. The same procedure can be followed for the flexor digitorum longus (FDL) (Fig. 16-8).
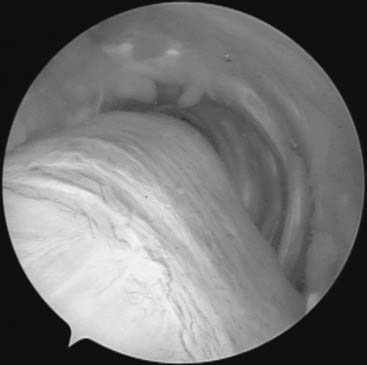
Release of the FHL involves detachment of the flexor retinaculum from the posterior talar process. Adhesions surrounding the flexor tendon can be removed. On the lateral side, the peroneal tendons can be inspected (Fig. 16-9).
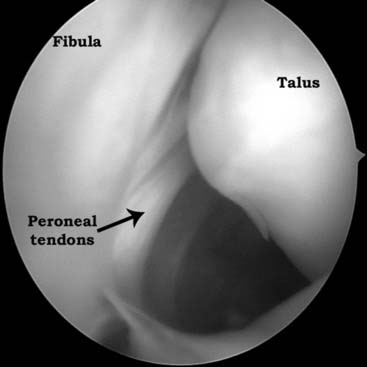
Figure 16-9 Left ankle. During posterior ankle arthroscopy, the peroneal tendons can be inspected on the lateral side.
Arthroscopic Anatomy
The ankle joint can be divided into anterior and posterior cavities, each of which can then be subdivided further into three compartments for methodologic inspection of the ankle joint. Ferkel15 developed a 21-point systematic examination (Table 16-1) of the anterior, central, and posterior ankle joint to increase the accuracy and reproducibility of the arthroscopic examination. For posterior ankle problems, Van Dijk et al.13 reported on a two-portal approach with the patient in the prone position, specifically for close visualization of the posterior compartment of the ankle and subtalar joint. He developed a 14-point systematic examination for the hindfoot and posterior ankle joint (Table 16-2).
Table 16-1 The 21-Point Arthroscopic Examination of the Ankle
| Anterior: |
| Deltoid ligament |
| Medial gutter |
| Medial talus |
| Central talus and overhang |
| Lateral talus |
| Trifurcation of the talus, tibia, and fibula |
| Lateral gutter |
| Anterior gutter |
| Central: |
| Medial tibia and talus |
| Central tibia and talus |
| Lateral tibiofibular or talofibular articulation |
| Posterior inferior tibiofibular ligament |
| Transverse ligament |
| Reflection of the flexor hallucis longus |
| Posterior: |
| Posteromedial gutter |
| Posteromedial talus |
| Posterocentral talus |
| Posterolateral talus |
| Posterior talofibular articulation |
| Posterolateral gutter |
| Posterior gutter |
From Ferkel, Fischer 199615
Table 16-2 The 14-Point Hindfoot Endoscopic Examination
| 1. Lateral talocalcaneal articulation |
| 2. Flexor hallucis longus retinaculum |
| 3. Flexor hallucis longus tendon |
| 4. Posterior talar process |
| 5. Posterior talofibular ligament |
| 6. Posterior tibiofibular ligament |
| 7. Transverse tibiofibular ligament |
| 8. Tip of the medial malleolus/medial malleolus |
| 9. Posteromedial gutter |
| 10. Posteromedial talus/tibia |
| 11. Posterocentral talus/tibia |
| 12. Posterolateral talus/tibia |
| 13. Posterolateral gutter |
| 14. Tip of lateral malleolus |
| Additional (when indicated): |
| Posterior tibial tendon |
| Flexor digitorum tendon |
| Peroneal tendons |
From Van Dijk CN, Scholten PE, Krips R: Arthroscopy 16:871, 2000.
Anterior Ankle Examination
The distal portion of the tibial lip directs slightly anteriorly in the sagittal plane. This portion of the tibia articulates within a depression in the talar surface and is called the sagittal groove. This groove lies between the medial and lateral shoulders of the talus and projects from anterior to posterior. At the area between the anterior tibial lip and the capsule is a periosteum-covered subchondral bone, the synovial recess. This extends from medial all the way to the lateral portion of the ankle. This is where tibial osteophytes develop and synovium and capsule become adherent at the margins of the osteophyte. More laterally, the trifurcation includes the distal lateral tibial plafond, the lateral dome, and the fibula and is bounded by the anterior inferior tibiofibular ligament superiorly. This relation is important in the ankle, because this is often the site of soft-tissue pathology. The syndesmotic or anterior inferior tibiofibular ligament runs at approximately a 45-degree angle from the lateral portion of the distal tibia to the fibula, just below the level of the lateral talus. The anterolateral talar dome also is the site of osteochondral lesions of the talus, and access into ankle joint usually is easy in this region. The lateral gutter is the space between the medial border of the fibular articulation and the lateral border of the talar articulation. It extends from below the anterior inferior tibiofibular ligament to the anterior talofibular ligament. This often is the site of chondromalacia and ossicles at the tip of the fibula within the ligament substance. The anterior talofibular ligament lies intracapsular and runs from the tip of the fibula to the inferior lateral portion of the talus. It can be easily reached for a shrinkage procedure in case of laxity in patients with chronic anterolateral ankle instability. The anterior gutter represents the capsular reflection anteriorly of the ankle as it inserts along the talar neck. There is a normal bare area proximal to the capsular insertion, similar to the area on the central portion of the distal tibia. A synovial recess also can be found at the anterior inferior aspect of the talar dome. In this area, anterior talar osteophytes may articulate or butt against osteophytes of the anterior tibial lip.10
Posterior Ankle Examination
Using a posterolateral and posteromedial portal with the patient in the prone position, one first approaches the fatty tissue overlying the joint capsule (Fig. 16-10). This tissue can partially be removed. At the level of the ankle joint, the posterior tibiofibular ligaments and the posterior talofibular ligament can be recognized. After removal of the very thin joint capsule of the subtalar joint, the posterior compartment of the subtalar joint can be visualized. The posterior talar process can be freed of scar tissue and the FHL tendon identified. The FHL tendon is an important landmark to prevent damage to the more medially located neurovascular bundle. When manual distraction is applied to the os calcis, the posterior compartment of the ankle joint opens up and can be visualized. The arthroscope and instruments can be introduced into the posterior ankle compartment. Procedures such as a synovectomy and/or capsulectomy of both ankle and subtalar joint can be performed. On the medial side, the tip of the medial malleolus, as well as the deep portion of the deltoid ligament, can be visualized. Opening the joint capsule from inside out at the level of the medial malleolus permits the tendon sheath of the posterior tibial tendon to be opened and the arthroscope to be introduced into the tendon sheath. The posterior tibial tendon can be inspected. The talar dome and nearly the entire surface of the complete tibial plafond can be inspected, as well. An osteochondral defect or subchondral cystic lesion can be identified, debrided, and drilled. The posterior syndesmotic ligaments are inspected and, if hypertrophic, partially resected. The intrinsic syndesmotic area and the posterior talofibular ligament can be inspected (Figs. 16-11 and 16-12). Removal of a symptomatic os trigonum or a nonunion of fracture of the posterior talar process involves partial detachment of the posterior talofibular ligament and release of the flexor retinaculum, both of which attach to the posterior talar prominence. Release of the FHL tendon involves detachment of the flexor retinaculum from the posterior talar process (Fig. 16-13). Adhesions surrounding the flexor tendon can be removed. On the lateral side, the peroneal tendons can be inspected. A tight and thickened crural fascia can hinder the free movement of instruments; it can be helpful to enlarge the defect in the fascia by means of a punch or shaver.

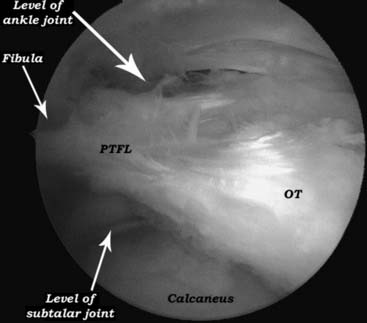
Figure 16-12 Left ankle. Removal of a symptomatic os trigonum (OT) involves partial detachment of the posterior talofibular ligament (PTFL) and release of the flexor retinaculum, both of which attach to the posterior talar prominence (see also Fig. 16-13).
Related posts:


Stay updated, free articles. Join our Telegram channel

Full access? Get Clinical Tree


