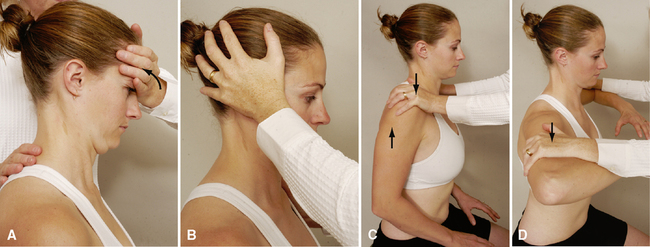
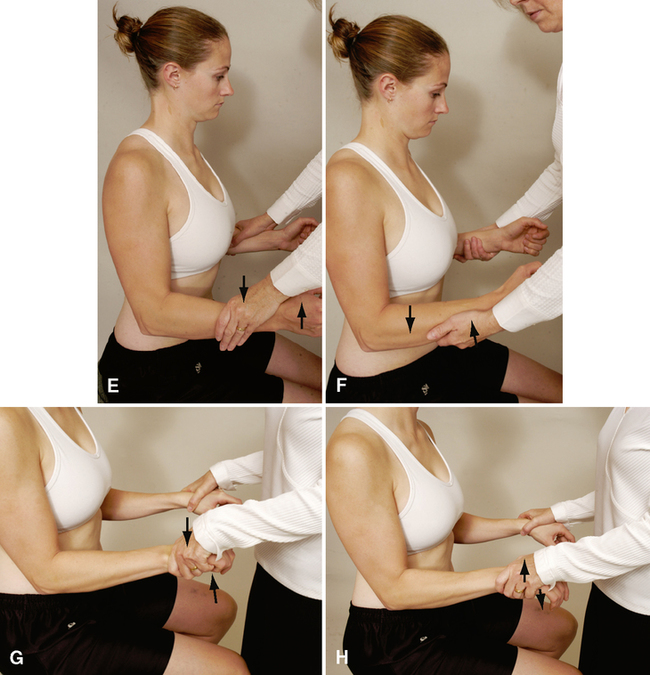
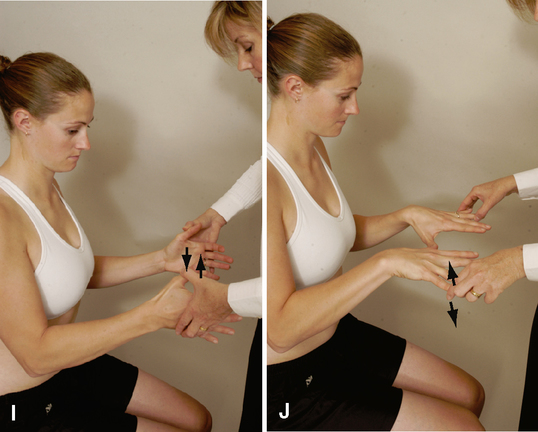
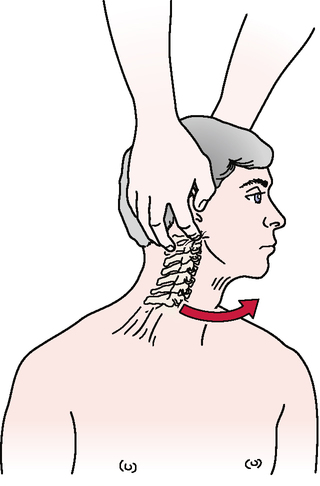
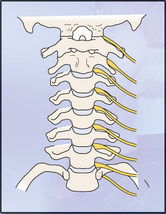
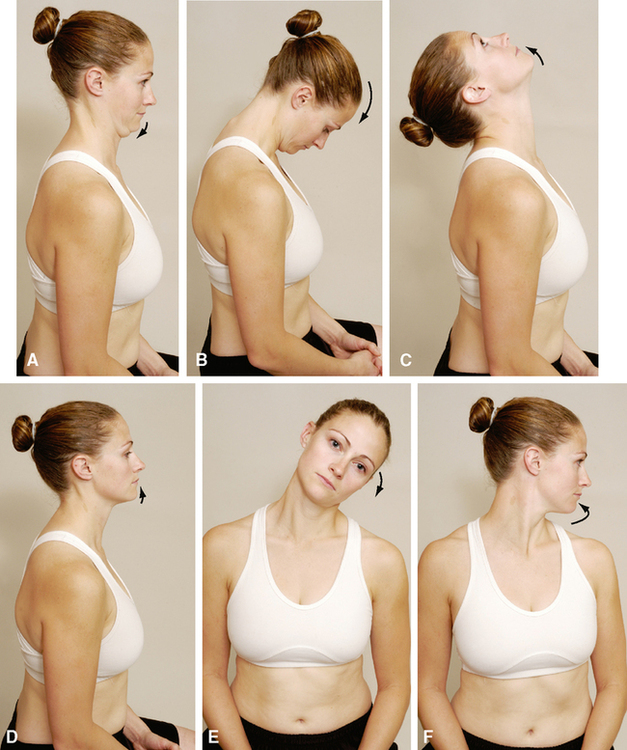
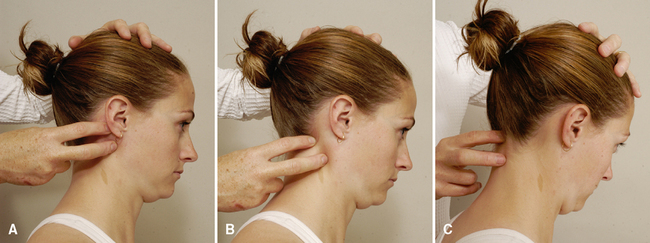
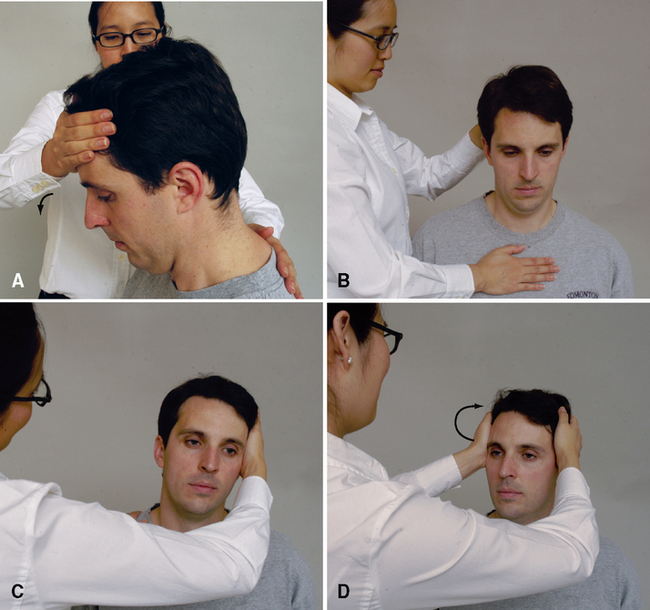
CHAPTER 2 • As the patient flexes (nods) the head, the examiner can palpate the relative movement between the mastoid and transverse process of C1 on each side, comparing the two sides for hypomobility or hypermobility between C0 and C1. The examiner also can palpate the posterior arch of C1 and the lamina of C2 during the nodding movement to compare the relative movement. • As the patient forward-flexes, the examiner should look for a posterior bulging of the spinous process of the axis (C2). This bulging may result from forward subluxation of the atlas, which allows the spinous process of the axis to become more prominent. If this sign appears, the examiner should exercise extreme caution during the remainder of the cervical assessment. To verify the subluxation, the Sharp-Purser test may be performed (see that test under Special Tests for Cervical Instability); however, it must be done with extreme care. • The mastoid process moves away from the C1 transverse process on flexion and extension. • If the deep neck flexors are weak, the sternocleidomastoid muscles will initiate the flexion movement; this causes the jaw, rather than the nose, to lead the movement, because the sternocleidomastoid muscles cause the chin to elevate before flexion occurs. • In flexion, the intervertebral disc widens posteriorly and narrows anteriorly. • The intervertebral foramen is 20% to 30% larger on flexion than on extension. • The vertebrae shift forward in flexion and backward in extension. Side Flexion/Side Bend—Lower Cervical Spine INDICATIONS OF A POSITIVE TEST Side or lateral flexion is approximately 20° to 45° to the right and left. • As the patient does the movement, the examiner can palpate adjacent transverse processes on the convex side to determine relative movement at each level. • When the patient does the movement, the examiner should make sure the ear moves toward the shoulder and not the shoulder toward the ear. • As with rotation, the examiner should look for compensations that occur with the side flexion motion. The most common deviations are flexion and rotation. These compensations should be corrected and the motion retested. The end of motion is the point where these compensations begin to occur. • Rotation and side flexion always occur together (coupled movement) but not necessarily in the same direction. This combined movement, which may or may not be visible in a given patient, occurs because of the coronally oblique shape of the articular surfaces of the facet joints. • As the patient rotates the head, the examiner should note when the person begins to physically side-bend the head instead of rotate it. Although rotation and side flexion are coupled movements, visually to the examiner patients should be able to do both movements individually. This is a normal compensation for lack of rotation. The patient should be instructed not to side-bend the head, and the motion should be retested. The end of the motion is the point where the compensation begins to occur. Side Flexion/Side Bend—Upper Cervical Spine • Very little side bend occurs in the upper cervical region. • If excessive motion occurs with this test, the examiner should suspect a pathological condition or laxity in the upper cervical region. Examiner error also may be a factor if the examiner is side-bending through the middle and lower cervical regions. • Movement at each segment during side flexion and rotation may be felt by palpating the adjacent transverse processes on each side while doing the movement. • Palpation in the area of the C1 transverse process generally is painful, so care must be taken during this technique. • With all of these movements, the end feel should be tissue stretch. INDICATIONS OF A POSITIVE TEST Weakness or pain (or both) in the cervical spine when the muscles are tested. • If the patient’s history includes a complaint that certain loaded or combined movements (i.e., movements that give resistance other than gravity) are painful, the examiner should not hesitate to carefully test these movements isometrically to better determine the problem. • The examiner should make sure these movements are done with the cervical spine in the neutral position and that painful movements are done last. Resistance to the head should be built up slowly. Temporomandibular Joints (TMJs) • The examiner should observe the patient as the person opens and closes the mouth and should watch for any deviation during the movement. • The examiner will be able to see the mandibular condyle move anteriorly (visually, it appears to move laterally) on the side of dysfunction as the patient opens the mouth. C1-C2 myotome (neck flexion). The patient’s head should be slightly flexed (a nod). The examiner applies pressure to the patient’s forehead while stabilizing the patient’s trunk with a hand between the scapulae (A). The examiner should make sure the patient’s neck does not extend when pressure is applied to the forehead. C3 myotome and cranial nerve XI (neck side flexion). The examiner places one hand above the patient’s ear and applies a side-flexion force to the head while stabilizing the patient’s trunk with the other hand on the opposite shoulder (B). Both right and left side flexion must be tested. C4 myotome and cranial nerve XI (shoulder elevation). The examiner asks the patient to elevate the shoulders to about half of full elevation. The examiner applies a downward force on both of the patient’s shoulders while the patient attempts to hold them in position (C). The examiner should make sure the patient is not “bracing” the arms against the thighs if testing is done with the patient sitting. C5 myotome (shoulder abduction). The examiner asks the patient to elevate the arms to about 75° to 80° in the scapular plane with the elbows flexed to 90° and the forearms pronated or in neutral. The examiner applies a downward force on the humeral shaft while the patient attempts to hold the arms in position (D). To prevent rotation, the examiner places his or her forearms over the patient’s forearms while applying pressure to the humerus. C6 and C7 (elbow flexion and extension). The examiner asks the patient to put the arms by the sides with the elbows flexed to 90° and the forearms in neutral. The examiner applies a downward isometric force to the forearms to test the elbow flexors (C6 myotome) (E) and an upward isometric force to test the elbow extensors (C7 myotome) (F). For testing of wrist movements (extension, flexion, and ulnar deviation), the patient has the arms by the side, the elbows at 90°, the forearms pronated, and the wrists, hands, and fingers in neutral. The examiner applies a downward force to the hands to test wrist extension (C6 myotome) (G) and an upward force to test wrist flexion (C7 myotome) (H). C8 myotome (thumb extension). The patient extends the thumb just short of full ROM. The examiner applies an isometric force to bring the thumb into flexion (I). A lateral force (radial deviation) to test ulnar deviation may also be performed to test the C8 myotome. The clinician stabilizes the patient’s forearm with one hand and applies a radial deviation force to the side of the hand. T1 myotome (finger abduction/adduction). To test hand intrinsics (T1 myotome), the examiner may have the patient squeeze a piece of paper between the fingers (usually the fourth and fifth fingers) while the examiner tries to pull it away. Alternatively, the patient may squeeze the examiner’s fingers, or the patient may abduct the fingers slightly with the examiner isometrically adducting the fingers (J).
CERVICAL SPINE
SELECTED MOVEMENTS
PERIPHERAL JOINT SCANNING EXAMINATION