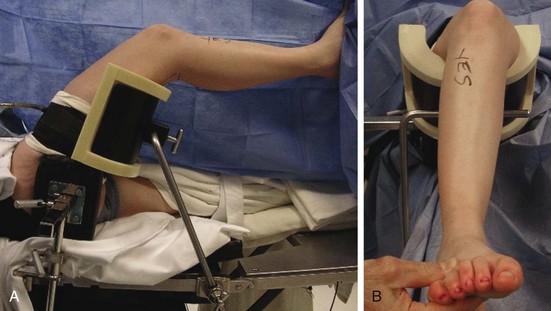
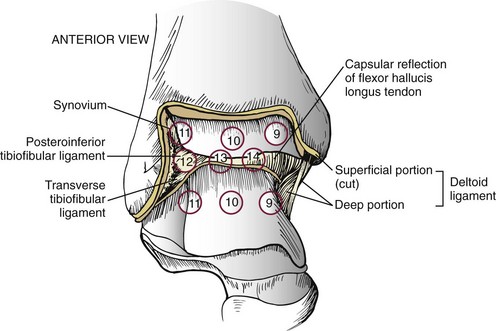
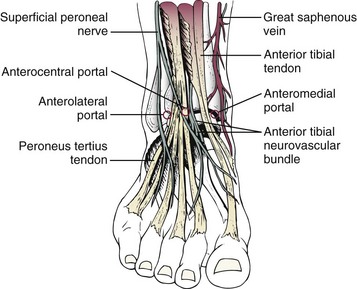
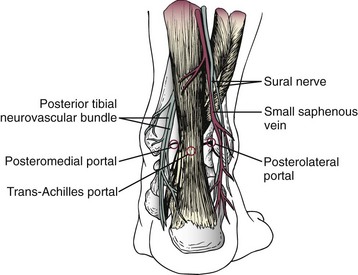
Chapter 32 ARTHROSCOPY OF THE ANKLE AND FOOT IN THE SUPINE POSITION OSTEOCHONDRAL LESIONS OF THE TALUS OSTEOCHONDRAL LESIONS OF THE TIBIAL PLAFOND LOOSE BODIES, OSSICLES, AND OSTEOPHYTES TRAUMATIC AND DEGENERATIVE ARTHRITIS ARTHROSCOPIC ANKLE ARTHRODESIS Arthroscopy of the Subtalar Joint Indications and Contraindications Preoperative Evaluation and Planning Normal Subtalar Arthroscopic Anatomy Thirteen-Point Examination of the Subtalar Joint ( Pathology of the Subtalar Joint (Video Clip 38 Subtalar Arthrodesis in the Supine Position GREAT AND LESSER TOE ARTHROSCOPY Examination of the Metatarsophalangeal Joint Indications and Contraindications Anatomy of the Metatarsophalangeal Joint Preoperative Evaluation and Planning Flexor Hallucis Longus Tendon Tendoscopy Posterior Tibial Tendon Tendoscopy HINDFOOT ARTHROSCOPY AND ENDOSCOPY IN THE PRONE POSITION Retrocalcaneal Bursitis and the Haglund Deformity Posterior Ankle Impingement and Flexor Hallucis Longus Tenosynovitis Indications and Contraindications Preoperative Evaluation and Planning Surgical Treatment ( Posterior Arthroscopic Subtalar Arthrodesis (PASTA) ARTHROSCOPIC HINDFOOT ARTHRODESIS IN THE PRONE POSITION EXCISION OF TALOCALCANEAL COALITION USING POSTERIOR HINDFOOT ENDOSCOPY ENDOSCOPIC PERONEAL GROOVE DEEPENING FUTURE TRENDS IN FOOT ARTHROSCOPY Great Toe Metatarsophalangeal Joint Arthritis Talonavicular and Calcaneocuboid Arthroscopy Intermetatarsal Neuroma Endoscopy COMPLICATIONS OF ANKLE AND FOOT ARTHROSCOPY Arthroscopy was first performed in 1918 by Takagi in Tokyo when he inspected a cadaver knee with a cystoscope.326 This eventually led to the development of a 7.3-mm arthroscope in 1920 and a 3.5-mm arthroscope in 1931. Kreuscher became the first American to report the use of an arthroscope in the knee joint in 1925.232 In 1931, Burman66 reported his experience of arthroscopic examination of multiple joints in a cadaver. At that time, the ankle was not believed suitable for arthroscopic examination because the joint space was too narrow. In 1939, Takagi422 developed a standard method of arthroscopic examination of the ankle that was published in the Journal of the Japanese Orthopedic Association. In 1972, Watanabe471 reported on 28 ankle arthroscopies performed with the newly developed fiberoptic arthroscope. In this report, the anteromedial, anterolateral, and posterior approaches to the ankle during arthroscopic examination were described in detail. In 1976, Chen82 reported his experience with ankle arthroscopy in 67 clinical and 17 cadaver cases. In this report, Chen offered an extensive description and discussion of the compartments within the ankle and their surgical anatomy. More recently, Andrews, Boynton, Drez, Guhl, Ferkel, Jerosch, Ogilvie-Harris, van Dijk, and Parisien have described their techniques and approaches for arthroscopy of the ankle joint.* Ankle arthroscopy has numerous indications (Table 32-1). The relative contraindications for ankle and foot arthroscopy include moderate degenerative joint disease with restricted range of motion, a significantly reduced joint space, severe edema, tenuous vascular status, and complex regional pain syndrome. Table 32-1 Indications for Ankle Arthroscopy The absolute contraindications include localized soft tissue infection, severe degenerative joint disease not amenable to arthroscopic arthrodesis, and other generalized medical conditions precluding surgical intervention. In degenerative joint disease, it is often difficult to achieve successful joint distraction and adequate range of motion for arthroscopic visualization of the joint. In the case of localized soft tissue infection, there is a potential for intraarticular dissemination and thus septic arthritis. Arthroscopy may be an excellent diagnostic and treatment option in the setting of septic arthritis without extension into the soft tissue envelope.418,467 The 1.9- and 2.7-mm video arthroscopes are used for ankle arthroscopy (Fig. 32-1). Rarely, the 4.0-mm arthroscope is used; however, the authors do not routinely recommend its use because its larger size prevents safe maneuverability within the joint. In general, the 4.0-mm arthroscope provides a large, clear picture and is more resistant to bending or breakage. Although the 2.7- and 1.9-mm short video arthroscopes are more delicate, they provide an excellent picture and a wide-angle field of vision. They are also preferred because the shorter lever arm reduces iatrogenic cartilage injury or instrument breakage. Arthroscopes provide excellent visualization throughout the ankle, particularly in the tighter spots, such as the medial and lateral gutters and posterior aspect of the ankle. The 1.9- and 2.7-mm arthroscopes have a 30-degree obliquity for improved field of vision. The 2.7- and 4.0-mm 70-degree arthroscopes are particularly helpful in seeing over the medial or lateral domes of the talus and looking into the gutters as well as evaluating certain osteochondral lesions of the talus. Surgeons must be cautious with use of 70-degree arthroscopes because they are not commonly used. The 70-degree arthroscopes have a central blind spot, making it more challenging to safely navigate the joint without causing iatrogenic cartilage injury.123 Regardless of the arthroscope used, it is important to have an interchangeable cannula system that allows the arthroscope and equipment to be switched from portal to portal without constant reinstrumentation of the portals (see Fig. 32-1). This minimizes the potential for nerve and wound damage. The cannula size for the 2.7-mm arthroscope is 2.9 mm, and for the 1.9-mm arthroscope, it is 2.1 mm. Although standard-size instruments can be used for ankle arthroscopy, small-joint instruments are preferred. These instruments are easier to maneuver within the tight joint spaces and are much more efficient to use than larger ones. Instruments typically used include the 2.0-, 2.9-, and 3.5-mm shavers and burrs; 3.5- and 4.5-mm ring and cup curettes; 1.5-mm probes; 2.9- and 3.5-mm graspers and baskets; 2.9-mm osteotomes; and pituitary rongeurs, microfracture picks, and banana blades (Fig. 32-2 and Table 32-2). Table 32-2 Instrumentation Used in Ankle and Foot Arthroscopy 30- and 70-degree 2.7-mm arthroscopes and a 30-degree 1.9-mm arthroscope 3 three-chip cameras with cords High-definition monitor with digital image-capture system Disposable soft tissue distractor strap Adjustable intravenous (IV) poles for gravity fluid management 2.9-mm full-radius disposable blade, 2.9-mm barrel abrader, 3.5-mm incisor blade, and 3.5-mm abrader No. 11 scalpel and mosquito clamp 10-mL syringe with IV extension tubing Small-joint instrumentation set with tray Power reamer with Jacobs chuck and key 0.045- and 0.062-inch Kirschner wires (smooth with trochar tips) 2.7- and 1.9-mm cannulas and trochars Micro Vector drill guide system Distraction methods applied to the ankle may be either noninvasive or invasive (Fig. 32-3).* Noninvasive techniques include manual distraction and gravity distraction, which are uncontrolled methods. Other types of noninvasive methods, such as the modified clove-hitch knot around the ankle, are semicontrolled. Several controlled devices allow the ankle to be distracted noninvasively while also permitting the amount of pressure and force to be monitored and maintained mechanically (Fig. 32-4A). To minimize the potential for nerve injury, Dowdy et al104 have recommended limiting the distraction force to less than 30 pounds for less than 1 hour when using noninvasive distraction.Invasive distractors are also available that use pins in the tibia and talus or calcaneus to provide mechanical distraction (Fig. 32-4B). Some of these devices have a strain gauge to measure the amount of force and permit some degree of freedom within the ankle joint. These have fallen out of favor in recent years because of risks of neurovascular injury, infection, fractures, scarring, and wound issues. In addition, the amount of distraction obtained is very similar with the noninvasive and invasive distractors. Contraindications for noninvasive and invasive distraction include complex regional pain syndrome and open tibial epiphysis. Invasive distraction should also be avoided in patients with pyarthrosis or chronic infection and in high-performance athletes who need to return to their sport quickly.179 Pins should be inserted unicortically to reduce the risk of fracture. Over the last 15 years, the authors have used noninvasive distraction (see Fig. 32-4A) without significant complications and have not had to use invasive pins for any cases in the supine position. Several positions are described in the literature.187 The three most common include supine, lateral decubitus on a bean bag,347 and prone.404,458 Some surgeons prefer the supine position, with the thigh secured by a nonsterile thigh holder as is commonly used with knee arthroscopy, to flex the knee 90 degrees over the end of the table.15 An alternative method is to use a urology leg holder positioned in the popliteal fossa; however, the surgeon must be very careful to keep the pressure in this area to a minimum. The chapter authors prefer the supine position with a special nonsterile thigh support (Fig. 32-5). The supine position is preferred for several reasons, including: A thorough understanding of the extraarticular anatomy of the ankle is essential for placing the arthroscopic portals. The greatest concern is injury to neurovascular structures; however, the surgeon must also be aware of potential injury to the tendons traversing the ankle joint (Table 32-3).121 The chapter authors think it is imperative to mark out all structures at risk before portal placement. Table 32-3 Arthroscopic Portal Landmarks and Structures at Risk The three most commonly used anterior portals are the anteromedial, anterolateral, and anterocentral (Fig. 32-6). The anteromedial portal is placed just medial to the anterior tibial tendon at the joint line. Care must be taken to not injure the saphenous vein and nerve traversing the ankle joint along the anterior edge of the medial malleolus. Figure 32-6 Three anterior portals used for ankle arthroscopy. The anterocentral portal is rarely used. The anterolateral portal is placed just lateral to the peroneus tertius tendon. This is at a level at or slightly proximal to the joint line. Care must be taken to avoid injury to the superficial peroneal nerve, which is the most commonly injured nerve during ankle arthroscopy. The superficial peroneal nerve divides approximately 6.5 cm proximal to the tip of the fibula into the intermediate and medial dorsal cutaneous branches.5 The intermediate dorsal cutaneous nerve passes over the inferior extensor retinaculum, crosses the common extensor tendons of the fourth and fifth digits, and then runs in the direction of the third metatarsal space before dividing into dorsal digital branches. The medial terminal branch of the superficial peroneal nerve—the medial dorsal cutaneous nerve—passes over the anterior aspect of the ankle overlying the common extensor tendons. It runs parallel to the extensor hallucis longus (EHL) tendon and divides distal to the inferior extensor retinaculum into the three dorsal digital branches. Between these portals, an anterocentral portal may be established between the tendons of the extensor digitorum communis (EDC). This portal is placed between tendons of the EDC to avoid possible injury to the nearby neurovascular structures, including the dorsalis pedis artery and the deep branch of the peroneal nerve. The dorsalis pedis artery and the deep branch of the peroneal nerve lie deep in the interval between the EHL and the medial border of the EDC tendons. Medial branches of the superficial peroneal nerve must also be avoided when using this portal. Use of this portal is uncommon and rarely necessary, and the authors strongly discourage its routine use because of the increased potential for complications, including trauma to the dorsalis pedis artery.123,282,328,379 A medial midline portal has been described between the tendons of the EHL and anterior tibialis tendon.62 A study found this portal to be farther from the superficial peroneal nerve branches and the dorsalis pedis artery than the anterocentral portal. The chapter authors advocate the use of the anteromedial and anterolateral portals because they afford the most visualization and utility in ankle arthroscopy while minimizing potential complications. Posterior portals are also useful during arthroscopy of the ankle (Fig. 32-7). These portals are commonly placed directly medial to, lateral to, or traversing the Achilles tendon, just distal to or at the joint line. The posterolateral portal is established in the soft spot just lateral to the Achilles tendon, 1.2 cm (0.5 inch) above the tip of the fibula.135,215,216,293 Branches of the sural nerve and the small saphenous vein must be avoided with the posterolateral approach.2,119,404 It is the most commonly used and safest of the posterior portals. Figure 32-7 Three posterior portals used for ankle arthroscopy. The posterolateral portal is the most often used. Several authors have discussed the merits of the posteromedial portal, which is made just medial to the Achilles tendon at the joint line.2,252,404 With the posteromedial portal, the tendons of the FHL and flexor digitorum longus (FDL) must also be protected. In addition, the posterior tibial artery and the tibial nerve with its branches must be avoided. The calcaneal nerve branches from the tibial nerve proximal to the ankle joint and traverses the interval between the tibial nerve and the medial border of the Achilles tendon.287 Because of the potential for serious complications and difficulty in maneuvering the arthroscope, the trans-Achilles and posteromedial portals are rarely used during supine arthroscopy but are routinely used during prone arthroscopy, which will be discussed in detail later in this chapter. On occasion, accessory posteromedial or posterolateral portals are used to facilitate treatment, especially for posterior osteochondral lesions of the talus (OLT). During surgery, the anterolateral, anteromedial, and posterolateral portals are routinely used. On occasion, the accessory posteromedial portal is used between the posterior tibial tendon and flexor digitorum longus to treat very posteromedial osteochondral lesions. The transmalleolar portals155 are also occasionally used for operative techniques, particularly for drilling of Kirschner wires under fluoroscopic and endoscopic control through either the tibia or fibula into the talar dome, for the purpose of establishing new vascularity into an osteochondral lesion. Transtalar portals can also be used for drilling and possibly bone grafting osteochondral lesions of the talus.123 Prone portals will be discussed later in the Hindfoot Arthroscopy and Endoscopy in the Prone Position section. There are several reports of neurovascular injury secondary to portal placement.* Ferkel et al128 reported that neurologic injuries made up nearly half (49%) of all ankle arthroscopy complications, with the superficial peroneal most commonly injured, followed by the sural, saphenous, and deep peroneal nerves. All injuries were attributed to portal or distractor pin placement. The anterocentral and posteromedial portals place the superficial and deep peroneal nerves and dorsalis pedis artery at increased risk.128,282,328,379,424 Because of the challenges in achieving adequate direct visualization of the posterior anatomy in the supine position, the posterior tibial nerve, posterior tibial artery, and calcaneal nerve may be at risk when a posteromedial portal is placed.119,465 Amendola et al11 proposed placing the patient prone when using posteromedial and posterolateral portals to reduce the risk of neurovascular injury. Acevedo et al2 have recommended coaxial posterior portals. The posterolateral portal is placed first, posterior to the peroneal tendons, followed by the posteromedial portal. This latter portal is placed using an inside-out technique behind the medial malleolus and adjacent to the posterior tibial tendon. Injury to the ligaments and tendons can be prevented by using meticulous placement of the portals and avoiding overdistraction. The posterior portals are discussed later in the prone arthroscopy section. The intraarticular ankle anatomy during the arthroscopic examination has been described extensively by Chen.82 Drez et al105 have divided the ankle joint into an anterior and a posterior cavity, each of which is subdivided further into three compartments for a methodical inspection of the joint. The chapter authors have devised a 21-point systematic examination (Table 32-4) of the anterior and posterior ankle joint that increases accuracy and reproducibility of the arthroscopic examination.133,410,411 The eight-point anterior examination (Fig. 32-8) includes the deltoid ligament, medial gutter, medial talus, central talus, lateral talus, talofibular articulation (trifurcation of the talus, tibia, and fibula), lateral gutter, and anterior gutter. The six-point central examination (Fig. 32-9) is performed by maneuvering the arthroscope through the notch of Harty. The notch of Harty is an anatomic elevation of the anteromedial distal tibia. The central examination includes the medial central tibiotalus, middle tibiotalus, lateral tibiotalus, capsular reflection of the FHL tendon, transverse tibiofibular ligament, and posterior inferior tibiofibular ligament.
Arthroscopy of the Foot and Ankle
 Video Clip 38)
 )
)
 Video Clip 42)
Arthroscopy of the Ankle and Foot in the Supine Position
History
Indications and Contraindications
Equipment
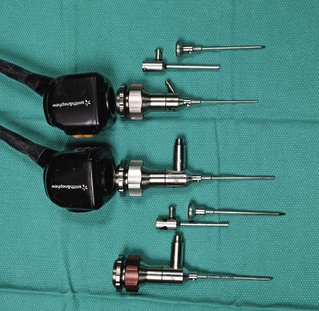
Arthroscope
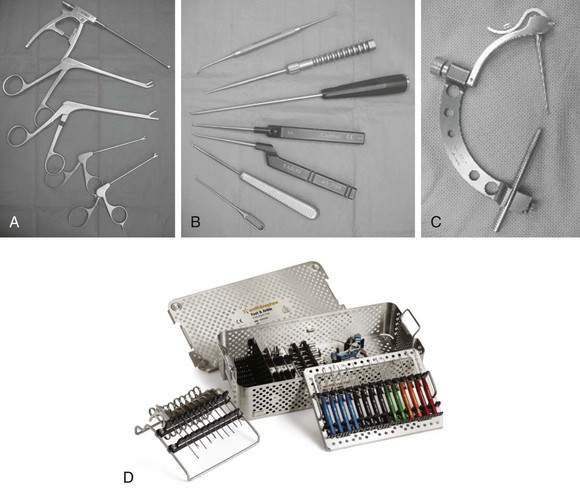
Instruments
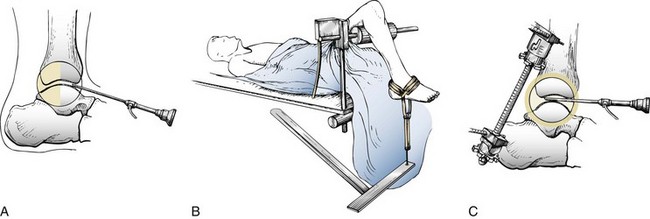
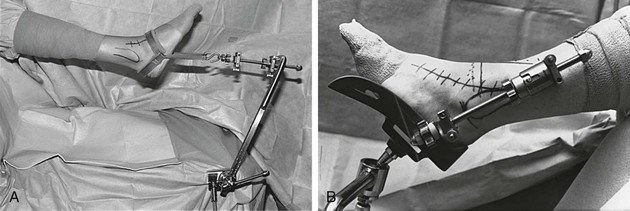
Ankle Distractors
Positioning and Preparation
 Almost all procedures can be performed in a supine position
 Ease of access to anterior and posterior portals
 Adequate posterior access may still be achieved
Arthroscopic Portals
Portal Site
Landmarks
Structures at Risk
Anteromedial
Medial to anterior tibialis tendon
Saphenous vein and nerve
Anterior tibialis tendon
EHL
Anterolateral
Lateral to peroneus tertius tendon
Superficial peroneal nerve
EDC
Peroneus tertius
Anterocentral
Between tendons of EDC
Dorsalis pedis artery
Deep branches of peroneal nerve
Medial branches of superficial peroneal nerve
EDC
Medial midline
Between EHL and anterior tibialis tendon
Superficial peroneal nerve
Deep peroneal nerve
Dorsalis pedis artery
EHL
Anterior tibialis tendon
Posterolateral
Lateral to Achilles tendon
Branches of sural nerve
Small saphenous vein
Posterocentral (trans-Achilles)
Through center of Achilles tendon
Achilles tendon
Posteromedial
Medial to Achilles tendon
Posterior tibial artery
Tibial nerve
Calcaneal branches of tibial nerve
FHL tendon
FDL tendon
Transmalleolar
Medially:
Saphenous vein and nerve
Tarsal tunnel contents (if posteromedial, see above)
Laterally:
Peroneal tendons
Peroneus tertius
Superficial peroneal nerve
Sural nerve
Transtalar
Medially:
Saphenous vein and nerve
Laterally:
Extensor tendons
Superficial peroneal nerve
Tarsal tunnel contents
Saphenous vein
Anterior Portals
Posterior Portals
Preferred Portals
Portal Complications
Surgical Technique
Normal Ankle Arthroscopic Anatomy
Examination of the Ankle (Video Clip 37
 )
)
![]()
Stay updated, free articles. Join our Telegram channel

Full access? Get Clinical Tree


Arthroscopy of the Foot and Ankle
 )
)  Video Clip 40)
  )
)  Video Clip 42)
  Video Clip 41)