Fig. 1.1
Different traction systems. Vertical traction tower designed by Whipple (Linvatec®, Largo, FL, USA). Wrist positions can be adjusted through a ball-and-socket joint. The central rod position hinders intraoperative X-ray views (a). Traction tower designed by Borelli (Micai®, Genova, Italy), allowing free dorsal and volar approach to the wrist, rotation of the wrist and easy image intensifier access with the eccentric rod position. Vertical and horizontal position of the wrist is possible (b). Wrist tower designed by Geissler (Acumed®, Hillsboro, Oregon, USA) that can be modified allowing different angles in wrist position and vertical or horizontal traction positioning without interference with intraoperative X-ray (c)
Vertical traction is then applied by suspending the fingers with sterile finger traps and applying counter-traction through a gearing mechanism at the tower that allows precise modulation. To visualize the radiocarpal joint, the finger traps are preferably placed on the index- and middle-finger or the index-, middle- and ring finger. Other traction devises allowing traction to all fingers are also used (Fig. 1.2). The applied traction varies between 3.5 and 7 kg in patients. For visualization of the STT joint traction can be applied by suspending only the thumb.
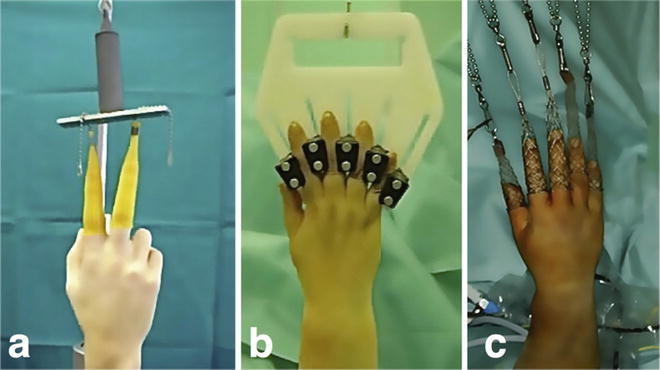
Fig. 1.2
Vertical traction is applied using Chinese finger traps at the index- and middle finger (a). Traction on all fingers, the thumb included if needed, can be applied by special traction hands (e.g., Arthrex®, Naples, FL, USA) (b) and standard suspension systems (c) [Modified from Atzei A, Luchetti R, Sgarbossa A, Carità E, Llusà M. Set-up, portals and normal exploration in wrist arthroscopy. Chir Main. 2006;25 Suppl 1:S131-44. French. With permission from Elsevier]
Advantages of traction towers as the Whipple-, Borelli- or Geissler traction tower are that they provide good stability that can be crucial for certain interventions as arthroscopic assisted reduction of distal radius fractures. Further they can be sterilized. For some interventions, however, we need a free pronosupination as for arthroscopic stabilization of TFCC lesions and the stability provided by the tower can hinder. Also the central bar of some towers can interfere with the intraoperative use of an image intensifier. The fact that traction towers need to be sterilized can be a hassle if there is only one available and more wrist arthroscopies are performed within the same operating session.
If a traction tower is not available a simple traction method can be used: a shoulder traction holder can provide overhead suspension with a counter traction band around the arm proximal to the elbow. The tension can be adjusted by adding weights (Fig. 1.3). Those systems are easy to set up and allow undisturbed intra-operative X-ray access as well as more freedom of motion than a traction tower while providing less stability (Fig. 1.4).
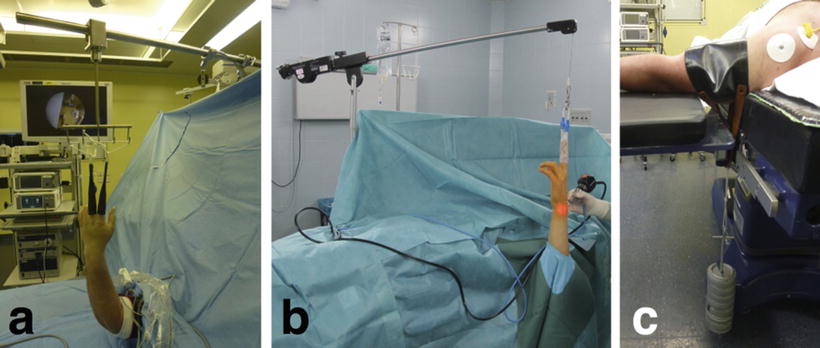
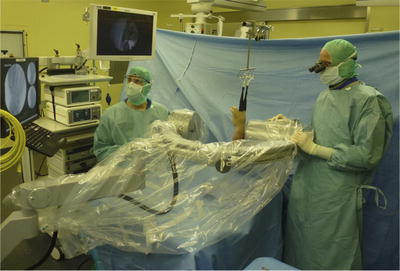
Fig. 1.3
Unconventional vertical overhead traction systems allowing rotation of the wrist and 360° access (a and b). A counter-traction band is placed around the arm proximal to the elbow. The tension can be adjusted by adding weights (c)
Fig. 1.4
Undisturbed intra-operative X-rays access is possible by simple overhead suspension of the wrist while providing less stability
Anesthesia is positioned on the side of the uninvolved extremity or at the patient’s head, the surgeon on the side that is awaiting surgery, at the patient’s head. The arthroscopy tower and video monitor are placed at the patient’s feet, usually on the opposite side of the patient. An image intensifier is positioned in the operating theater so that it is not in the way of the surgeon and rolled into the operating field as needed. The assistant and scrub nurse can position themselves depending on the intervention and the surgeon’s needs which may differ in diagnostic and interventional wrist arthroscopies (Fig. 1.5).
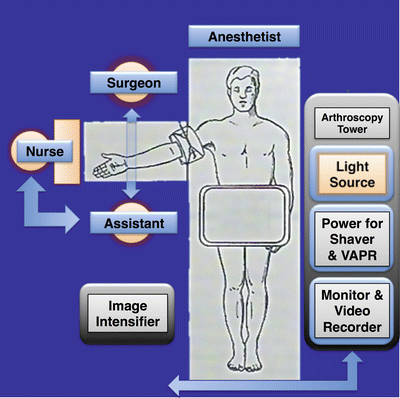
Fig. 1.5
Positioning of the patient, the surgical and anesthetic staff and the arthroscopic equipment
Equipment
The most important instrument is the arthroscope (Fig. 1.6). Because of the size of the joint, arthroscopes for wrist arthroscopy are smaller in diameter than traditional arthroscopes. Different diameters of the optic are used in wrist arthroscopy, ranging from 1.9 to 2.7 mm, with either a 30-degree- or less common a 70-degree-viewing-angle to meet the needs of the different articulations in the wrist. The light source cable is also smaller in diameter. The smaller the diameter of the arthroscope, the higher is the risk of bending and damaging the fiber-optic in the cannula. Short cannulas (5–8 cm) and scopes (lever arm of 100 mm) are long enough and allow easier handling and control [24]. The 2.7 or 2.4 mm optic is ideal for the exploration of the radiocarpal- and midcarpal joint as the arthroscopic vision field is bigger, but too bulky for exploration of the distal radioulnar joint (DRUJ), the scaphotrapeziotrapezoid (STT) joint and in patients with a small wrist. In those cases the use of an arthroscope with a diameter of 1.9 mm or smaller is more appropriate.
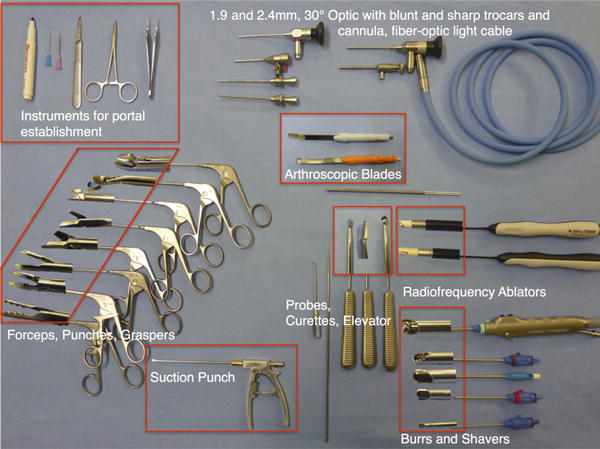
Fig. 1.6
Wrist arthroscopy equipment
A blunt trocar with a trocar sleeve is important to establish the viewing and working portals of the joints to be inspected without damaging the articular cartilage.
Numerous instruments, appropriate to meet the criteria of diagnosing and treating wrist pathologies have been developed. The probe is probably the simplest but most useful diagnostic tool in wrist arthroscopy, serving as an extension of the surgeon’s finger [1]. For some interventions the use of a stronger probe as used in shoulder arthroscopy that does not bend is beneficial [16]. A variety of differently angled punches, baskets with or without the option of incorporating a suction mechanism and grasping forceps in various sizes are useful in removing loose bodies and excising pieces of soft tissue. Small arthroscopy knives with differently shaped and retrograde blades aid in excising unstable chondral portions of the carpal bones. A freer elevator, pins and a variety of small differently shaped osteotomes are useful tools in arthroscopically assisted correction of mal-united distal radius fractures [17].
Differently aggressive and sized motorized shavers and differently sized burrs ranging from 2.0 to 4.5 mm with integrated finger-controlled suction mechanism are powered instruments for debriding synovium or resecting bone, e.g., when performing a resection of the distal pole of the scaphoid for STT arthritis or a radial styloidectomy for beginning radiocarpal arthritis as in stage 1 of scaphoid nonunion advanced collapse (SNAC I). Shavers and burrs can be operated with a foot pedal or by finger control and allow continuous or oscillating cutting.
Radiofrequency probes allow efficient soft tissue debridement and ligament- or capsular shrinkage [25], but because of the risk of thermal injury adequate fluid control must be carefully managed [26].
Traditionally wrist arthroscopy has been carried out with constant joint irrigation for distension and improvement of intra-articular vision [27]. Lactated Ringer’s solution is used for irrigation because it is rapidly reabsorbed from the soft tissues [8]. Electric fluid pumps that regulate fluid volume to avoid extravasation and decrease intraoperative bleeding may be used but pure gravitational force is generally sufficient for the irrigation of the wrist joint. Outflow is provided via the port of the cannula with the camera or a separate needle placed into the ulnar side of the wrist or the successively established portals. While the classic (wet) wrist arthroscopy bears the disadvantage of cumbersome extra-articular water leakage into the soft tissue and the risk of serious complications as development of compartment syndrome [7, 8, 28, 29], the wrist joint can easily be inspected without the use of water, referred to as “dry arthroscopy” [30]. Synovial villi or ruptured ligament parts do not interfere with the intra-articular vision as they do not float into the field of vision and remain at their origins. In the usual joint there is mucous fluid that does not impede vision. However, depending on the procedure to be performed, an initial washout of the joint may be useful, e.g., evacuation of hematoma in acute intra-articular distal radius fractures. Debris can be cleared by injecting 10–20 ml of saline through the side valve of the scope followed by aspirating with the shaver. The wrist joint can also be dried with small neurosurgical patties inserted with a grasper. Other helpful maneuvers to keep a clear vision in dry arthroscopy are to immerse the tip of the scope into warm water to prevent condensation (fog effect) due to temperature differences outside and inside the wrist and to avoid closeness of the scope and motorized instruments, thus preventing splashing. The arthroscope can be cleaned by rubbing its tip carefully at the local soft tissue [30].
However, dry arthroscopy also has its limits. For example when radiofrequency ablators are used, water is necessary as milieu conductor and to prevent temperature peaks and possible joint damage. Also when using a burr the aspiration may be blocked by small cartilage and bone fragments and water facilitates the aspiration.
Surgical Technique
Certain rules need to be respected in order to obtain a good intra-articular vision and to avoid complications. It is very important that all external anatomic landmarks and portals must be marked after the traction to the wrist is applied but before starting the arthroscopic procedure so that the relationship of surface landmarks are not altered [28]. The following landmarks can be palpated if the wrist is not too swollen (Fig. 1.7):
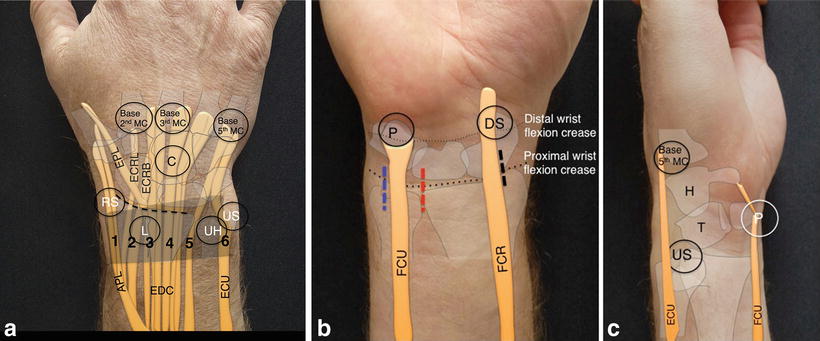
Fig. 1.7
Osseous and tendinous landmarks of the wrist from dorsal (a), volar (b) and ulnar (c). RS radial styloid, L Lister’s tubercle, UH ulnar head, US ulnar styloid, P pisiform, DS distal pole of the scaphoid, APL abductor pollicis longus, ECRL extensor carpi radialis longus, ECRB extensor carpi radialis brevis, EPL extensor pollicis longus, EDC extensor digitorum communis, ECU extensor carpi ulnaris, FCU flexor carpi ulnaris, FCR flexor carpi radialis. The numbers 1–6 represent the extensor compartments. Volar incisions for the establishment of the VR and VM joint (black line), for the VU and V-DRUJ (red line) and for the 6-U and DF portal (blue line)
Osseous landmarks:
Dorsal: Lister’s tubercle, distal radial edge, dorsal ulnar head, index-, middle-, (ring-) and small metacarpals.
Radial: radial styloid process, trapezium, base of the first metacarpal.
Ulnar: ulnar styloid, triquetrum, base of the fifth metacarpal.
Volar: pisiform and distal pole of the scaphoid.
Tendinous landmarks:
Dorsal: extensor carpi radialis longus (ECRL) tendon, extensor pollicis longus (EPL) tendon, extensor digitorum communis (EDC) tendon, extensor carpi ulnaris (ECU) tendon.
Radial: abductor pollicis longus (APL) tendon.
Ulnar: extensor carpi ulnaris (ECU) tendon.
Volar: flexor carpi radialis (FCR) tendon, flexor carpi ulnaris (FCU) tendon.
Not all palpable surface landmarks need to be drawn onto the skin as orientation for establishing the portals, we mark the key structures as needed for each intervention (Fig. 1.8). Standard wrist arthroscopy includes the assessment of the radiocarpal- and ulnocarpal joint, the midcarpal- and STT joint and the distal radioulnar joint (DRUJ). Numerous arthroscopic dorsal and palmar approaches have been described and are routinely used. The most commonly used dorsal radiocarpal portals are named relative to the extensor compartments between which they are located.
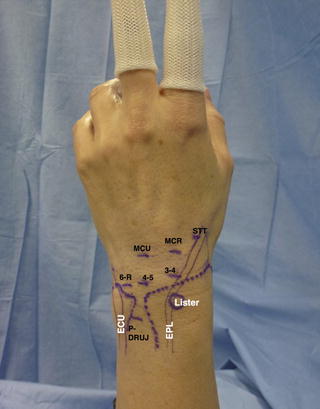
Fig. 1.8
Preoperative marking of the landmarks and dorsal portals for performing a standard wrist arthroscopy. Abbreviations are according to the previous figure
The first portal to be established in almost every wrist arthroscopy is the 3-4 radiocarpal portal. It can be identified by simple palpation of the “soft spot” just distal of the dorsal rim of the radius in a vertical line with Lister’s tubercle. Two methods of localizing the entry point for the 3-4 portal are used. The first method is called the “3 circle method” (Fig. 1.9). A circle is drawn around Lister’s tubercle. Two other circles of the same dimension are drawn just distal to the first one in a vertical line with Lister’s tubercle. The third circle is located directly over the soft spot that is the entry point of the 3-4 portal [33]. The second method is called the “rolling thumb method” (Fig. 1.10). The thumb pulp is placed on Lister’s tubercle and is then rolled over the tubercle distally. The tip of the thumb is now exactly centered on the soft spot corresponding to the 3-4 portal. An 18- or 22-G needle is inserted at the soft depression into the radiocarpal joint, minding the normal inclination of the distal radius. Therefore the needle is pointing 20–30° proximally to parallel the articular curve of the distal radius to verify correct intra-articular placement (Fig. 1.11).
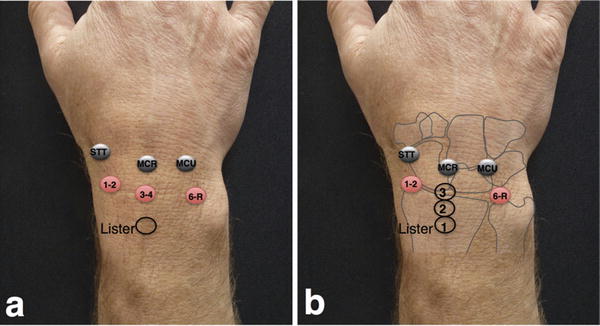
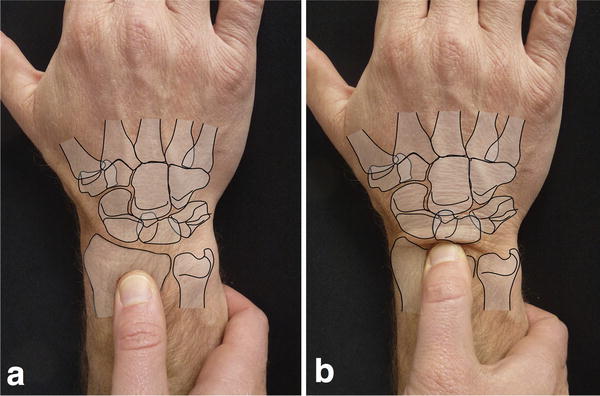
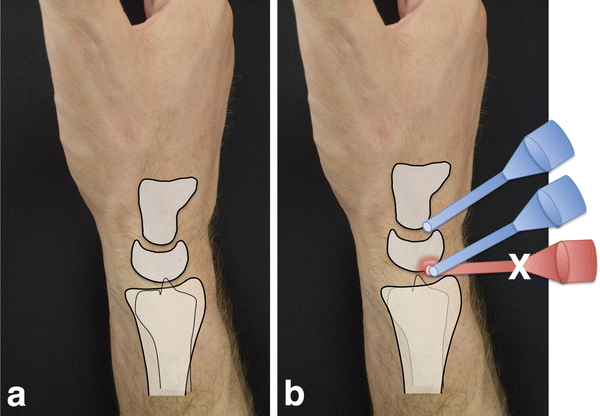
Fig. 1.9
Establishment of the 3-4 portal using the “three circles technique”: a circle is drawn around the palpable Lister’s tubercle (a). Two circles of the same size are then drawn distally to the first circle. The third and most distal circle lies at the level of the 3-4 portal (b)
Fig. 1.10
Establishment of the 3-4 portal using the “rolling thumb technique”: the thumb is placed on the palpable Lister’s tubercle (a). The thumb is then rolled distally over the tubercle until the pulp of the surgeon’s thumb feels the soft spot corresponding to the 3-4 portal (b)
Fig. 1.11
Schematic lateral view of the wrist (a). External traction allows widening of the articular spaces. The arthroscope should be inserted into the radiocarpal- and midcarpal joint respectively, paralleling the dorsal articular slope of the joints. Horizontal introduction of the arthroscope may damage the articular cartilage of the carpal bones (b).
Injection of a saline solution through this needle to distend the radiocarpal joint has been described. A normal uninjured wrist can contain 2–5 ml of fluid, but in the case of TFCC lesions, or lesions of the intracarpal ligaments of the proximal carpal row, up to 10–15 ml can be injected and the adjacent joints (distal radioulnar- and midcarpal joint) are indirectly filled. As stated above our preferred method for wrist arthroscopy is the so-called dry technique. The traction often is sufficient for obtaining a quiet good intra-articular vision. After the needle has been placed correctly the skin is incised with a number 15 blade instead of using a number 11 blade as common for arthroscopy in other joints. Care must be taken to incise only the skin to prevent damage to superficial vessels, tendons, and cutaneous nerves. Depending on the portal to be established the nerves can be found in very close proximity to the portals and are at risk [34–36]. Longitudinal incisions are possible and favorable if the incision needs to be enlarged in a proximal-distal direction, for example if conversion to an open intervention needs to be performed. However, we generally prefer horizontal skin incisions on the dorsal aspect of the wrist, in line with the skin lines, thus improving the esthetic appearance of the scar. A blunt hemostat is advanced through the subcutaneous tissue by carefully spreading the branches until there is contact with the joint capsule. The capsule is then pierced with the tip of the closed hemostat (Fig. 1.12). A blunt trocar is introduced through a cannula into the joint directed volar and proximal at an approximately 30° angle, aligning the cannula with the volar inclination of the distal radius. The trocar is removed and the arthroscope is introduced through the cannula. The radial midcarpal portal can be established following the same technique, following the 10° obliquity of the first carpal row (Fig. 1.11). For establishment of the other portals we recommend to insert the needle arthroscopically controlled.
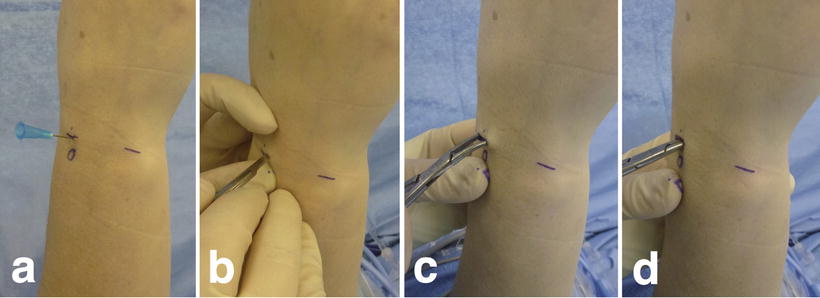
Fig. 1.12
Standard procedure for establishment of an arthroscopic wrist portal (3-4 portal), right wrist. Localization of the radiocarpal joint space with a 22-G needle (a). Horizontal skin incision (b). Spreading of the subcutaneous tissues with a blunt hemostat to the capsule (c). Piercing of the capsule with the closed tip of the hemostat (d)
Despite the revolutionary advances in wrist arthroscopy we have to remember that all indications to perform an arthroscopy should be based on a thorough clinical examination, aiming at detecting the origin of the intra-articular pathology and consequently avoiding inappropriate indications that would not address the true nature of the pathology [37].
The diagnostic evaluation always starts with the exploration of the radiocarpal joint, but the evaluation of the midcarpal joint should never be neglected and is considered a part of wrist arthroscopy. Arthroscopy of the DRUJ has only recently gained interest [38, 39]. It is performed in special indications and not conducted in every wrist arthroscopy.
A standardized, systematic arthroscopic examination with a routine circuit helps in visualizing all structures and not forgetting anything [4]. A few simple rules that should be followed are:
Examination of the radial side before the ulnar side.
Examination of the distal part of the articulation before the proximal part.
Examination of the volar aspect before the dorsal aspect.
Examination of the ligaments before the articular surfaces.
Simple inspection before using a probe.
Rotation of the 30-degree-angle arthroscope allows the exploration of different regions of the articulation and switching the arthroscope and the instrument within the different portals can be limited. It is crucial to stabilize the arthroscope and control the small movements of the optic within the joint in order to prevent damage to the articular cartilage. Therefore the arthroscope should be held in a manner that allows constant contact to the skin of the wrist. The small optic is short enough to be grasped in a way that provides contact of the surgeon’s index finger to the patient’s wrist while larger arthroscopes need to be stabilized with the middle- and ring finger (Fig. 1.13).
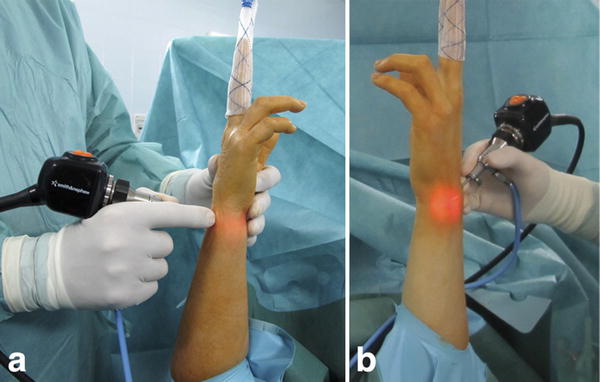
Fig. 1.13
Handling of the arthroscope. Control of minimal movements within the joint is achieved by constant finger contact to the patient’s wrist with the index finger (a) or the middle- to small finger (b)
Arthroscopic Portals: Approaches and Anatomy
Meticulous knowledge of the anatomy is essential for performing wrist arthroscopy (Fig. 1.14) [40]. The entry portals are numerous (Fig. 1.15) and need to be adapted to the pathology and the particular anatomy in this region [1, 28, 41]. The standard arthroscopic portals have been developed on the dorsal side of the wrist and their localizations and names are in direct relation to the six extensor compartments. In the space between two extensor compartments the arthroscopic portals can be established and instruments introduced without the risk of damaging the extensor tendons. On the dorsal side of the wrist there are not many neurovascular structures that could be damaged (Fig. 1.16a–c). Volar portals have been previously reported [42, 43] but lacked popularity for a long period because they seemed to jeopardize important neurovascular structures on the volar side of the wrist (Fig. 1.16d, e). Only recently the safety of volar portals to the wrist could be shown [44–48], and it is possible to have viewing and working portals that encircle the whole wrist joint. This is called the “box concept” (Fig. 1.17) [24].
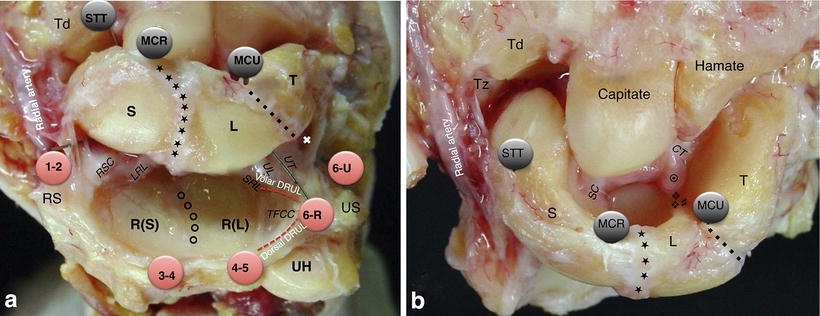
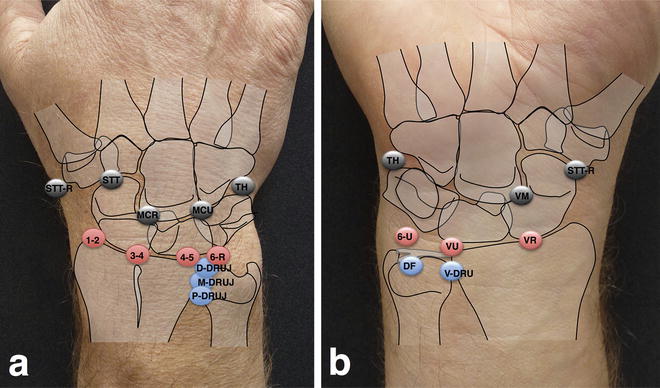
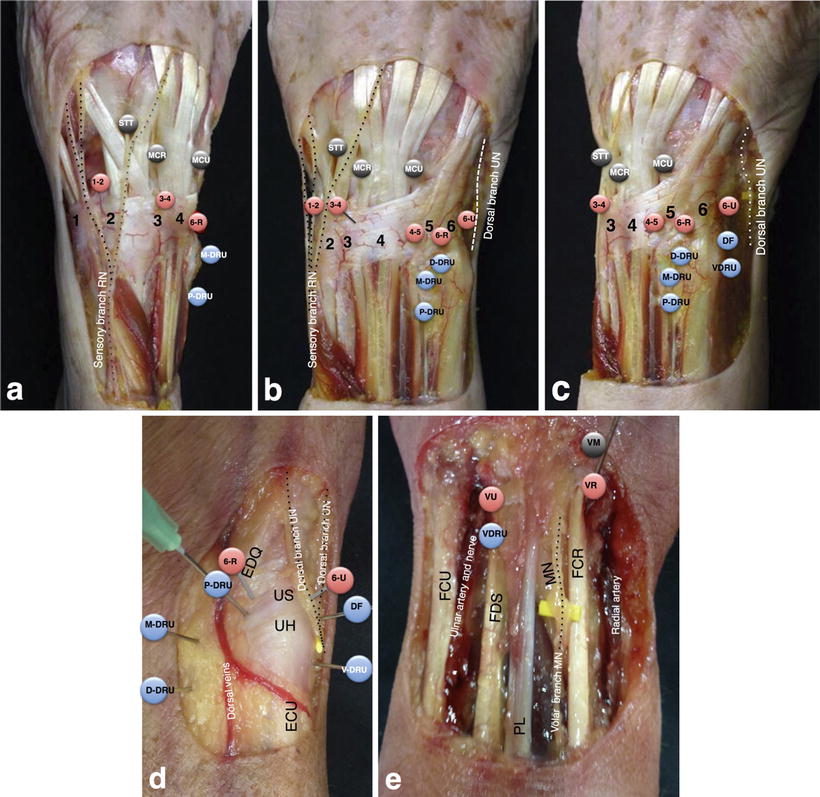
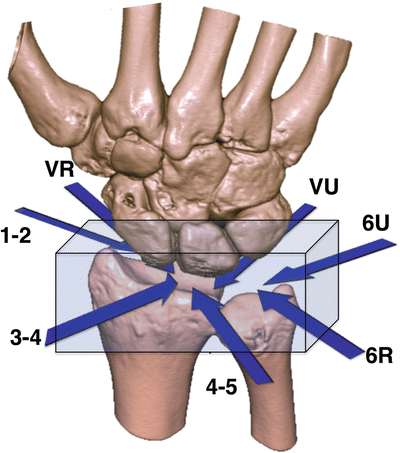
Fig. 1.14
Anatomic dissection of the radiocarpal- (a) and midcarpal joint (b). The radiocarpal portals are indicated with red circles and the midcarpal portals with black circles. The proximal articular part of the radiocarpal joint is comprised by the scaphoid- and lunate fossa of the radius (R(S) and R(L)), separated by the interfosseal ridge (š) and the TFCC with its volar- and dorsal distal radioulnar ligaments (DRUL). The volar radiocarpal ligaments are from radial to ulnar the radioscaphocapitate (RSC) ligament, the long radiolunate (LRL) ligament and the short radiolunate (SRL) ligament. The volar ulnocarpal ligaments are the ulnolunate (UL) and the ulnotriquetral (UT) ligament. Ulnar and distal to the UT ligament we find the entry to the pisotriquetral joint (˚). The distal part of the radiocarpal joint is formed by the proximal articular surfaces of the scaphoid (S), the lunate (L) and the triquetrum (T). The scapholunate ligament (★) and the lunotriquetral ligament (♦) separate the carpal bones of the first carpal row, respectively. The proximal part of the midcarpal joint is formed by the distal articular surfaces of the scaphoid, lunate and triquetrum. The distal pole of the scaphoid and the proximal articular surfaces of the trapezium (Tz) and the trapezoid (Td) form the scaphotrapeziotrapezoid (STT) joint as a part of the midcarpal joint. The scaphoid body articulates with the capitate. The lunate, triquetrum, capitate and hamate form the 4-bone-corner. The lunate may have two distal articular facets, a major one for the capitate and a smaller one for the hamate (♯), which are separated by a longitudinal crest (❖). The volar midcarpal ligaments are radially the scaphocapitate (SC) ligament as the distal portion of the RSC ligament and ulnarly the capitotriquetral (CT) ligament, that is usually covered by a fibroadipose structure (◉). UH ulnar head, US ulnar styloid. [Modified from Atzei A, Luchetti R, Sgarbossa A, Carità E, Llusà M. Set-up, portals and normal exploration in wrist arthroscopy. Chir Main. 2006;25 Suppl 1:S131-44. French. With permission from Elsevier]
Fig. 1.15
Overview of the dorsal (a) and volar (b) portals used in wrist arthroscopy. Portals to the radiocarpal joint are marked in red, portals to the midcarpal joint are marked in black and portals to the DRUJ are marked in blue
Fig. 1.16
Anatomic dissection of the wrist from dorso-radial (a), dorsal (b), dorso-ulnar (c), ulnar (d) and volar (e). (1) First compartment: containing the abductor pollicis longus (APL) tendon and the extensor pollicis brevis (EPB) tendon. (2) Second compartment: containing the extensor carpi radialis longus and -brevis (ECRL and ECRB) tendons. (3) Third compartment: containing the extensor pollicis longus (EPL) tendon. (4) Fourth compartment: containing the extensor digitorum communis (EDC) tendons and the extensor indicis proprius (EIP) tendon. (5) Fifth extensor compartment: containing the extensor digiti quinti (EDQ) tendon. (6) Sixth extensor compartment: containing the extensor carpi ulnaris (ECU) tendon. On the radial side of the wrist the sensitive branches of the superficial radial nerve can be visualized and on the ulnar side the terminal branches of the sensitive dorsal branch of the ulnar nerve. Entry portals to the radiocarpal joint and the midcarpal joint are marked in red or black, respectively. Entry portals to the DRUJ joint are marked in blue [a–c: Modified from Atzei A, Luchetti R, Sgarbossa A, Carità E, Llusà M. Set-up, portals and normal exploration in wrist arthroscopy. Chir Main. 2006;25 Suppl 1:S131-44. French. With permission from Elsevier]
Fig. 1.17
“Box concept” of the wrist. The wrist can be thought of as a box, which can be visualized from almost every perspective. Through a combination of arthroscopic portals it is possible to have viewing and working portals that encircle the wrist. This enables the arthroscopic surgeon to see and instrument from all directions [Modified from Bain GI, Munt J, Turner PC. New advances in wrist arthroscopy. Arthroscopy. 2008;24:355-67. With permission from Elsevier]
The arthroscopic exploration of the wrist is divided into three parts: proximal, volar (dorsal when using a volar portal), and distal. Then the arthroscope can be rotated to the radial and the ulnar side. We generally proceed with the arthroscopic overview from proximal to distal and from radial to ulnar (Fig. 1.18).
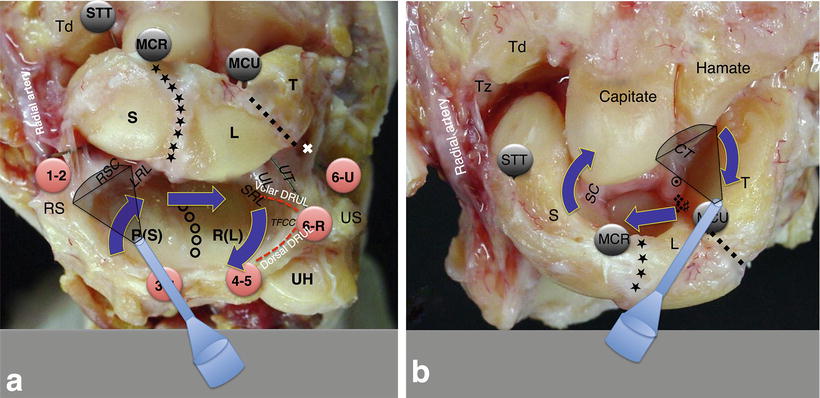
Fig. 1.18
Arthroscopic tour of the radiocarpal and midcarpal joint. For the radiocarpal joint the primary viewing portal is the 3-4 portal and we proceed from radial to ulnar, proximal to distal (a). For the midcarpal joint the MCU portal is the main viewing portal and we proceed with the arthroscopic tour from ulnar to radial (b). Abbreviations are according to Fig. 1.14
Dorsal Portals of the Radiocarpal Joint
Five standard dorsal portals of the radiocarpal joint are routinely used [35].
1-2 Portal
The 1-2 portal is situated between the first extensor compartment, containing the abductor pollicis longus (APL) tendon and the extensor pollicis brevis (EPB) tendon, and the second extensor compartment, containing the extensor carpi radialis longus and -brevis (ECRL and ECRB) tendons. Proximally it is bordered by the distal, radial end of the radius, the radial styloid, and distally by the scaphoid. Several important structures can be found in this interval and may be endangered when establishing the 1-2 portal (Fig. 1.19). Two branches of the sensory branch of the radial nerve (SBRN) were shown in proximity with a mean of 3 mm radial and 5 mm ulnar to the portal. The radial artery was located on average 3 mm radial to the portal [34]. In a different study the mean distance of the SBRN was only 1.8 mm [36]. Partial or complete overlap of the lateral antebrachial cutaneous nerve (LABCN) with the SBRN is reported in up to 75 % [49].

Fig. 1.19
Particular anatomy of the radial (a) and ulnar (b) aspect of the wrist. Branches of the sensitive branch of the radial nerve (SBRN) are moved radially by a retractor and the close relation of the dorsal branch of the radial artery to the 1-2 portal becomes evident. On the ulnar side the close relation of the two dorsal branches of the ulnar nerve (UN) to the 6-U portal and the direct foveal (DF) portal is demonstrated. The terminal branching of the dorsal branch of the ulnar nerve (DBUN) is variable and a transverse branch of the DBUN (TBDBUN) can be found in some cases [a: Modified from Atzei A, Luchetti R, Sgarbossa A, Carità E, Llusà M. Set-up, portals and normal exploration in wrist arthroscopy. Chir Main. 2006;25 Suppl 1:S131-44. French. With permission from Elsevier]
We recommend to carefully entry the joint capsule close to the tendons of the first extensor compartment and just distal to the radial styloid to avoid damage to the dorsal branch of the radial artery. Inserting the optic through this portal allows exploration of the entire dorsal capsule of the radiocarpal joint and the major part of the anterior capsule with the extrinsic ligaments. Further the proximal pole and the body of the scaphoid, the proximal pole of the lunate, the articular surface of the radius, and the dorsal rim of the radius can be visualized. This portal is mainly used as portal for instrument placement in special surgical procedures as arthroscopic arthrolysis, resection of volar or dorsal ganglion cysts, or styloidectomy just to mention a few.
Proximal: we can observe the radial styloid and the scaphoid fossa of the radius.
Volar: we identify the radioscaphocapitate (RSC) ligament and the long radiolunate (LRL) ligament that originate from the anterior margin of the radius.
Distal: the most proximal 2/3 of the scaphoid and the proximal surface of the lunate can be visualized.
Radial: rotating the arthroscope to the radial side one is very close to the radial part of the radiolunate articulation and the vision is limited.
Ulnar: pivoting to the ulnar side the anterior margin of the radius and the radioscapholunate (RSL) ligament (ligament of Testut) can be appreciated.
Dorsal: rotating to the dorsal side we can see the entire dorsal part of the radiocarpal capsule with an oblique view of the dorsal radiocarpal ligament (DRCL).
3-4 Portal
The 3-4 portal is situated between the third extensor compartment, containing the extensor pollicis longus (EPL) tendon and the fourth extensor compartment with the common finger extensor (EDC) tendons and the extensor indicis proprius (EIP) tendon (Fig. 1.20, Video 1.1). Proximally it is boarded by the distal radius and distally by the scapholunate ligament. The entry is 1 cm proximal to Lister’s tubercle. The portal is considered safe with a low risk of damaging neurovascular structures. The mean distance of the SBRN is reported between 4.85 mm [36] and 16 mm radial to the portal [34]. The main risk is damaging the EPL tendon itself. We recommend to routinely establish this portal as the first portal for placement of the arthroscope. It is the main radiocarpal viewing portal as almost the complete radiocarpal articulation can be visualized through this portal:
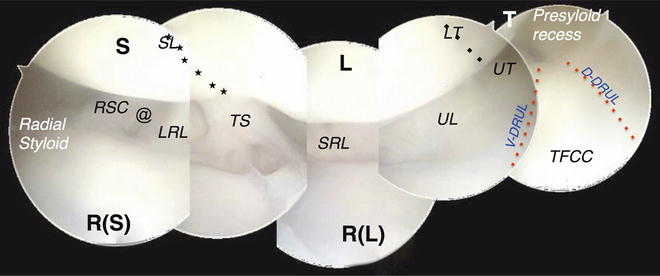
Fig. 1.20
Complete arthroscopic view of the radiocarpal joint through the 3-4 portal, from the radial styloid to the ulnar insertion of the TFCC in a right wrist. S scaphoid, R(S) scaphoid fossa of the radius, L lunate, R(L) lunate fossa of the radius, T triquetrum, SL (★-line) scapholunate ligament, RSC radioscaphocapitate ligament, LRL long radiolunate ligament, TS Testut (radioscapholunate) ligament, SRL short radiolunate ligament, LT (♦-line) lunotriquetral ligament, UL ulnolunate ligament, UT ulnotriquetral ligament, V-DRUL volar distal radioulnar ligament, D-DRUL dorsal distal radioulnar ligament, @ gap between RSC and LRL ligament [Modified from Atzei A, Luchetti R, Sgarbossa A, Carità E, Llusà M. Set-up, portals and normal exploration in wrist arthroscopy. Chir Main. 2006;25 Suppl 1:S131-44. French. With permission from Elsevier]
Proximal: we can observe the distal radial epiphysis with the interfosseal ridge that separates the scaphoid fossa and the lunate fossa in a sagittal direction.
Volar: in the center of the field of vision we see the RSL ligament that has the aspect of a fibro-fatty villus. It is considered to be more of a neurovascular connective tissue than a true ligament [50]. De facto it is the reference point for the exploration of the radiocarpal articulation. The volar radiocarpal ligaments are examined next. From radial to ulnar we find the stout radioscaphocapitate (RSC) ligament, arising from the radial styloid, then inserting on the waist of the scaphoid and reaching the palmar part of the capitate. Ulnar to the RSC ligament we find the long radiolunate (LRL) ligament that is wider and its fibers are orientated more obliquely. Its insertion is mainly at the lunate while some fibers proceed to the triquetrum. The short radiolunate (SRL) ligament is the most ulnar ligament. The RSC and the LRL ligaments are separated by an interligamentous gap where volar wrist ganglions usually originate. The LRL ligament forms together with the SRL ligament a reversed V that comprises the radioscapholunate ligament. At the apex of the V one will find the anterior part of the scapholunate ligament.
Distal: The articular surfaces of the scaphoid and the lunate and the scapholunate interosseous ligament (SLIL) between the two bones are visualized. It appears as an “indentation” and has a cartilage-like look [22]. The SLIL can be divided into a weak anterior part, a thin membranous proximal part and a strong dorsal part [51]. By slightly flexing and extending the wrist, the articular surfaces of the scaphoid and the lunate can be inspected more volarly and dorsally.
Radial: rotating the arthroscope radially one can explore the radial compartment of the radiocarpal articulation. We can visualize the proximal pole and the body of the scaphoid, the radiocarpal ligament, the radial styloid, and the scaphoid fossa of the radius very nicely.
Ulnar: rotating the optic to the ulnar side we can appreciate the lunate fossa of the radius and the triangular fibrocartilage complex (TFCC). Sometimes it can be difficult to see the separation between the radial margin of the TFCC and the articular surface of the lunate fossa of the radius. A probe will help in distinguishing between articular surface and TFCC. The TFCC is arranged in a three-dimensional manner into three components: the proximal triangular ligament, the distal hammock structure, and the ulnar collateral ligament (UCL) [52]. The volar and dorsal distal radioulnar ligaments (v-DRUL and d-DRUL) are thickenings of the periphery of the TFCC. They originate from the ulnar margin of the radius and insert as the proximal component of the TFCC at the ulna fovea (pc-TFCC) while the distal hammock structure and the UCL represent the distal component of the TFCC (dc-TFCC), attaching at the ulnar styloid and the ulnocarpal capsule. If the TFCC is intact only the superficial part of the ulnar attachment of the radioulnar ligaments can be seen. In traumatic or degenerative central TFCC lesions we can see onto the exposed ulnar head and the pc-TFCC at the fovea can be visualized. The ulnocarpal ligaments consist of the ulnolunate ligament (UL), the ulnocapitate (UC) and the ulnotriquetral ligament (UT) and originate at the anterior edge of the TFCC, the v-DRUL and the ulnar styloid and insert on the lunate and the triquetrum, respectively. It is also possible to visualize the prestyloid recess, a synovial pouch that is located volar to the ulnar styloid. The meniscus homologue, a synovial tissue distal to the prestyloid recess that physiologically covers the tip of the ulnar styloid, can sometimes present as an indurated structure that can lead to impingement between the ulnar styloid and the triquetrum [53]. Next we analyze the complete articular surface of the lunate and the triquetrum as well as the lunotriquetral ligament.Related posts:
 Arthroscopic Management of Distal Radius Fractures
Management of Ulnar Impaction
Wrist Arthritis: Arthroscopic Techniques of Synovectomy, Abrasion Chondroplasty, Radial Styloidectomy, and Proximal Row Carpectomy of the Wrist
Suture-Button Suspensionplasty for the Treatment of Thumb Carpometacarpal Joint Arthritis
Arthroscopic and Open Radial Ulnohumeral Ligament Reconstruction for Posterolateral Rotatory Instability of the Elbow
Management of Scapholunate Ligament Pathology
Arthroscopic Management of Distal Radius Fractures
Management of Ulnar Impaction
Wrist Arthritis: Arthroscopic Techniques of Synovectomy, Abrasion Chondroplasty, Radial Styloidectomy, and Proximal Row Carpectomy of the Wrist
Suture-Button Suspensionplasty for the Treatment of Thumb Carpometacarpal Joint Arthritis
Arthroscopic and Open Radial Ulnohumeral Ligament Reconstruction for Posterolateral Rotatory Instability of the Elbow
Management of Scapholunate Ligament Pathology

Stay updated, free articles. Join our Telegram channel

Full access? Get Clinical Tree


