Fig. 35.1
Our preferred patient positioning for elbow arthroscopy: supine with a McConnell arm positioner. (a) Position for access to the posterior compartment. (b) Position for anterior elbow access. (c) Alternative lateral decubitus position demonstrating access to the anterior compartment
Instrumentation
Generally, a 4.0 mm arthroscope with a 30° offset is used. This typically provides excellent visualization for all procedures. Occasionally a 70° arthroscope is useful for viewing the coronoid base or the capitellum and anterior surface of the humerus from the distal posterolateral portal. A smaller 2.7 mm scope can be used for smaller spaces or pediatric patients younger than 5–7 years.
Flow management is vital to the success of elbow arthroscopy, thus special trocars and cannulae without fenestrations should be used to avoid the extravasation of fluid into the subcutaneous layer [1]. Therefore, we also recommend liberal use of switching sticks and cannulae once the portals are established (Fig. 35.2). This also serves to decrease the risk of neurovascular injury by minimizing the number of passes through tissues.
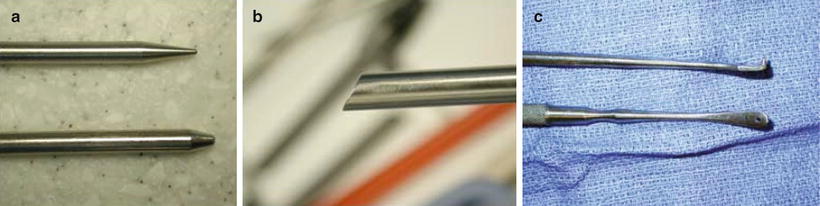
Fig. 35.2
(a, b) Trocars and nonfenestrated cannulae used for elbow arthroscopy. The use of switching sticks over which a cannula can be threaded is preferable to the customary trocar/cannula combination because there is less soft-tissue drag and, thus, it is easier to enter the joint. (c) a hook retractor that has been ground and modified to fit through a small cannula and a Freer elevator with a hole drilled through the end for passing sutures
We also find it useful to have special instruments available such as cannulated screws, a small Freer elevator with a hole drilled in the end for passing sutures, modified skin hooks, and 28-gauge stainless steel wire to help in reducing, holding fragments and passing sutures (Fig. 35.2). A variety of graspers, forceps, shavers, and burrs should be available.
Portal Placement
Precautions
Because the elbow is highly constrained, it is necessary to place multiple portals to access and see all parts of the joint [7]. Anatomic studies have demonstrated that flexion of the elbow to 90° minimizes the proximity of the critical neurovascular structures [8–11]. Therefore, all portals should be established from this position. Distention of the capsule further displaces these structures away from arthroscopic instruments. Portals should be made close of the capsular insertion on the supracondylar ridge, to prevent entrapping capsular tissue between the portal and the humerus. Doing so would decrease the joint volume and compromise exposure [12, 13]. Lastly, observing standard technique, a small incision should be used to incise the skin only (no stab incisions). Next, blunt dissection should be performed through the subcutaneous tissue and down to the level of the capsule. This helps to minimize the risk to the surrounding structures by displacing them out of the proposed path prior to trocar insertion. All trocars should use blunt tips.
Standard Anteromedial Portal
This portal is located 2 cm distal and 2 cm anterior to the medial epicondyle (Fig. 35.3). The arthroscope should be aimed towards the coronoid fossa (not anteriorly), passing through the common flexor origin, posterior to the median nerve and brachial artery, which are protected by the brachialis muscle [3, 9, 10]. This portal allows an excellent view of the entire anterior compartment of the joint, in particular the radiocapitellar joint, coronoid, and trochlea. Pronation and supination will allow a full 260° arc of visibility of the radial head [8]. From this portal, the coronoid process may obstruct the proximal radioulnar joint articulation. Furthermore, the medial ulnohumeral articulation is difficult to see. This portal affords access to the anteromedial coronoid and may be useful, in conjunction with the proximal anteromedial portal, for coronoid reduction and fixation.
Fig. 35.3
Commonly used (a) lateral and (b) medial portals. Lateral portals include the proximal anterolateral portal, 2 cm proximal and 1 cm anterior to the lateral epicondyle; anterior radiocapitellar portal directly anterior to the radiocapitellar joint (and closest to the radial nerve) and the posterior radiocapitellar or soft spot portal. Medially, the proximal anterolateral portal is most widely used, 2 cm proximal and anterior to the lateral epicondyle. An additional anteromedial portal can be placed 1 cm distal to the proximal anteromedial portal, but insertion is more difficult because of the more fibrous common flexor origin tendon in the more distal position. (c) Posteriorly, the transtriceps portal is supplemented with proximal and distal posterolateral portals for retractors and working instruments. Additional portals can be safely placed along the posterior radioulnar interval
The structure at greatest risk is the medial antebrachial cutaneous nerve; it is an average 1 mm away from the trocar and demonstrates considerable variability [8]. The median nerve is an average 7–14 mm away.
Proximal Anteromedial Portal
This portal is often used as the starting point in elbow arthroscopy and offers an optimal view of the entire anterior compartment. It is made 2 cm proximal and 1 cm anterior to the medial epicondyle to avoid injury to ulnar nerve (Fig. 35.3) [11, 14, 15]. When making the portal, a blunt trocar should be used to pierce the flexor pronator mass. The trocar should be slid along the anterior surface of the humerus, aimed toward the radial head [11, 15]. During this approach, the structure most at risk with this portal is the medial antebrachial cutaneous nerve.
Standard Anterolateral Portal
Proximal Anterolateral Portal
Located 2 cm proximal and 1–2 cm anterior to the lateral epidondyle, this portal permits a consistent view of the radiocapitellar joint and the medial side of the joint (Fig. 35.3) [16, 17]. To access this portal, the trocar should be directed towards the center of the joint while in contact with the anterior humerus. Because the posterior branch of the lateral antebrachial cutaneous nerve and radial nerve are a safe distance away, this portal has been advocated as a good starting point in elbow arthroscopy [10, 17].
Posterior Radiocapitellar “Soft Spot” Portal
This portal is commonly referred to as the “soft spot” and is located in the center of the triangle created by the lateral epicondyle, olecranon, and radial head (Fig. 35.3). It can be used for visualization of the posterior radiocapitellar and ulnohumeral joints and for distention [18]. The risk of this portal is that the minimal distance between the capsule and the skin increases the risk of fluid extravasation into surrounding soft tissues. Therefore, it is recommended to delay placement of this portal until the procedure has begun via another portal [10]. The only structures relatively at risk from this approach are the lateral antebrachial cutaneous nerve and posterior antebrachial cutaneous nerve [11, 18].
Straight Posterior (Trans-triceps) Portal
The workhorse of the posterior compartment, this portal is located 3 cm proximal to the olecranon tip in the midline of the humerus between the epicondyles (Fig. 35.3) [19]. A #11 scalpel to make a sharp stab incision into the tendon down to bone. This is safe because the ulnar nerve is palpated and the portal is made well lateral to the course of the nerve. The trocar passes through the triceps tendon and into the olecranon fossa. Complete visualization of the entire posterior compartment and gutters is easily achievable.
Proximal Posterolateral Portal
This portal is usually placed 3–4 cm proximal to the olecranon tip and just lateral to the palpable edge of the triceps tendon (Fig. 35.3) [18]. The trocar is placed through the posterolateral capsule, just lateral to the tendon and towards the olecranon fossa. It is quite safe with the ulnar nerve, medial and posterior antebrachial cutaneous. We typically use this portal as a working portal in conjunction with the straight posterior portal.
Accessory Distal Posterolateral Portal and Anterior Radiocapitellar Portal
The distal posterolateral portal (Fig. 35.3) is used to view the posterior compartment, lateral gutter, posterior radiocapitellar joint, proximal radioulnar joint, and medial gutter while allowing the transtriceps portal to be used for a shaver or resecting forceps. A useful accessory portal is the anterior radiocapitellar portal just anterior and proximal to the joint. It should only be made under direct localization and visualization from the medial portal as it lies closest to the radial nerve. Extreme caution should be used when inserting the trocar as anterior deflection along the capsule will place the radial nerve at risk [6].
Surface Landmarks
Prior to starting, it is our practice to always mark the major topographic landmarks on the skin. We routinely mark the medial and lateral epicondyles, olecranon and proximal ulnar, radial head, radiocapitellar joint, and the path of the ulnar nerve (Fig. 35.4). We also ensure there is no ulnar subluxation present. Lastly, we mark out our proposed portals, because joint distention will distort the anatomy later in the procedure.
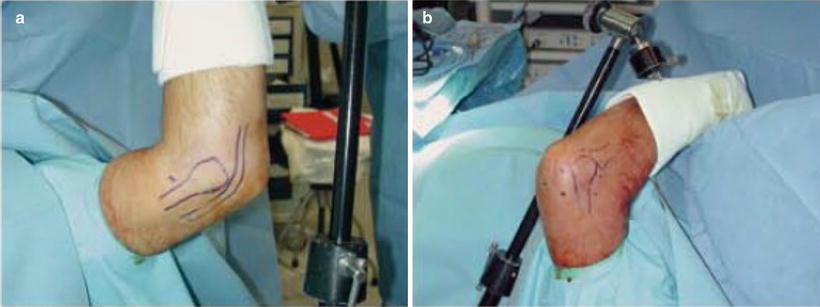
Fig. 35.4
Surface landmarks (a) and mapping (b) of all common portals prior to commencement of the surgery
Order of Portal Placement
Portal placement is determined by the procedure to be done. In general, for fracture work, a proximal anteromedial portal is first established and the lateral portals can be located with a 25 guage needle to ensure safe, accurate placement. A posterior portal is useful for checking the posterior wall of the lateral column and the distal reduction of capitellar fractures. Coronoid fractures are fixed through anteromedial and anterolateral portals.
Surgical Tips for Fracture Arthroscopy
1.
Do not overdistend the joint. Capsular rupture has been shown to occur with a little as 20 mL [20].
2.
Wait 24–36 h for clot to form (if not contraindicated)
3.
Enter the joint and lavage with a 3.5 mm shaver directed posteriorly toward the humerus until the hematoma is cleared and an adequate view is established. This takes time and patience, but it is impossible to see anything until this step is completed, so be patient.
4.
Leave the ulnar nerve in situ to avoid trauma and additional scarring. Furthermore it preserves the option of later arthroscopic arthrolysis should subsequent elbow release be necessary.
Capitellum and Anterior Coronal Shear Fractures
Due to the difficulty of obtaining adequate exposure and the risks of screw placement in a hemisphere (similar to a subcapital hip fracture or slipped femoral capital epiphysis), capitellar fractures are well suited for arthroscopic treatment. These injuries frequently involve the lateral aspect of the trochlea in addition to the lateral column (Fig. 35.5) [21, 22]. Thus, the entire anterior articular surface as well as the posterior cortex of the lateral column should be inspected. This would require extensive exposure and dissection for complete visualization. However, such exposure can be accomplished arthroscopically with minimal trauma. Additionally, direct visualization of the reduction is invaluable in ensuring adequate fixation and the joint surface can be visually monitored to insure correct screw length and placement. We outline our preferred technique below, but various other techniques have been described (Fig. 35.5) [23–25].
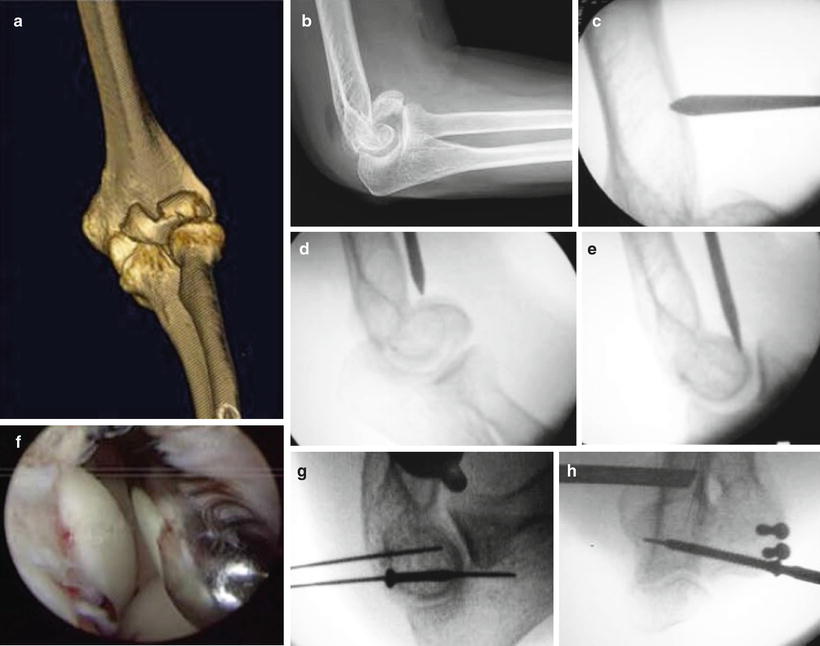
Fig. 35.5
(a) CT and (b) X-ray demonstrate an anterior coronal shear fracture involving the entire capitellum and lateral trochlea. (c) A “high” proximal anterolateral portal is marked out under radiologic guidance and created proximal to the fracture. (d, e) Extension frequently will reduce the fracture, but in this case a complete reduction does not occur. Therefore, the trocar is used to push the fragment into an anatomic reduction. (f) This is confirmed with the arthroscopic view from the anterolateral portal. (g) Fixation is achieved with cannulated screws, again using the arthroscope to confirm optimal placement and length. (h) Note the use of a transcondylar screw to reinforce the fixation, permitting early use and therapy
As previously described, the proximal anteromedial portal should be established and the hematoma evacuated from the joint. The fracture can frequently be reduced in elbow extension, but because of contact with the radial head, the fracture can redisplace when the elbow is flexed. If this occurs, then we place a trocar in the radiocapitellar joint to help the radial head “ride over” the capitellum as the elbow is flexed (much like a shoehorn is used). A trocar is then placed in a proximal anterolateral portal and is used to push and reduce the anterior coronal shear fragment. This trocar is then interposed in the radiocapitellar joint, to act as a shoehorn to prevent displacement as the elbow is flexed and allow the radial head to “ride over” the capitellum without displacing it. Once flexion more than 90° is obtained, the radial head will then help to maintain the reduction. Fluoroscopic examination will ensure that the capitellar fragment is captured by the radial head and not redisplaced.
Once reduction is achieved, the elbow should be kept flexed, maintaining the reduction. The reduction should be thoroughly visualized, both the anterior aspect of the joint and the distal humerus where there can be comminuted fragments or plastic deformation of the posterior fragment of the distal humerus that prevents a perfect reduction. We utilize a transtriceps or distal posterior lateral portal to visualize the distal humerus. When using a distal posterior lateral portal, we, pass down into the lateral gutter, obtaining a view of the posterior column. It may sometimes be necessary to use the posterior radiocapitellar portal for a 3.5 mm shaver to remove debris in this area, improving visualization. The reduction of the lateral trochlear ridge can also be assessed from the posterior side, advancing the arthroscope down the lateral gutter and directing the optics proximally along the anterior humerus. Occasionally, a 70° arthroscope is helpful for this purpose.
Once an accurate reduction is achieved and confirmed, we prepare the area for fixation. Small posterior incisions are made to insert guide wires for at least two cannulated screws. If necessary, we use an anterior portal or a view from the lateral gutter with a 70° scope to observe the guide wires, thereby confirming the trajectory of the screws and assuring the proper length and position. The guide wires are advanced until just barely visible through the cartilage and a screw 2–4 mm shorter than the measured length is selected. This process ensures that the longest possible screw is being used, instead of undersizing, which may occur when judging the screw length in a sphere on a two-dimensional radiograph. If possible, a lateral to medial transcondylar screw (2.5 or 2.7 mm) will substantially increase the strength of the fixation. Care should be taken to assess the trochlear ridge reduction if the fracture extends medially.
We prefer to start early motion. However if there is comminution or any question about stability, then the elbow should be immobilized. We prioritize healing of the fracture over early motion, as any residual contracture can be treated with a staged arthroscopic contracture release, if necessary.
Unicondylar Fractures (AO Type B) of the Distal Humerus
A unicondylar, intra-articular distal humerus fracture is anatomically similar to a capitellar fracture or pediatric lateral condyle fracture. Triceps sparing or reflecting approaches have been advocated to avoid olecranon osteotomy. However, visualization of the articular surface is severely compromised unless a more extensive soft tissue release performed, thereby contravening the hypothetical advantage of the more limited approach. We prefer a hybrid operation. Our preference is to combine the arthroscopic view of the articular surface (the “exposure”) with a combined, extracapsular medial or lateral approach to apply a plate (Fig. 35.6). Arthroscopy may then be used to confirm that articular penetration has not occurred.
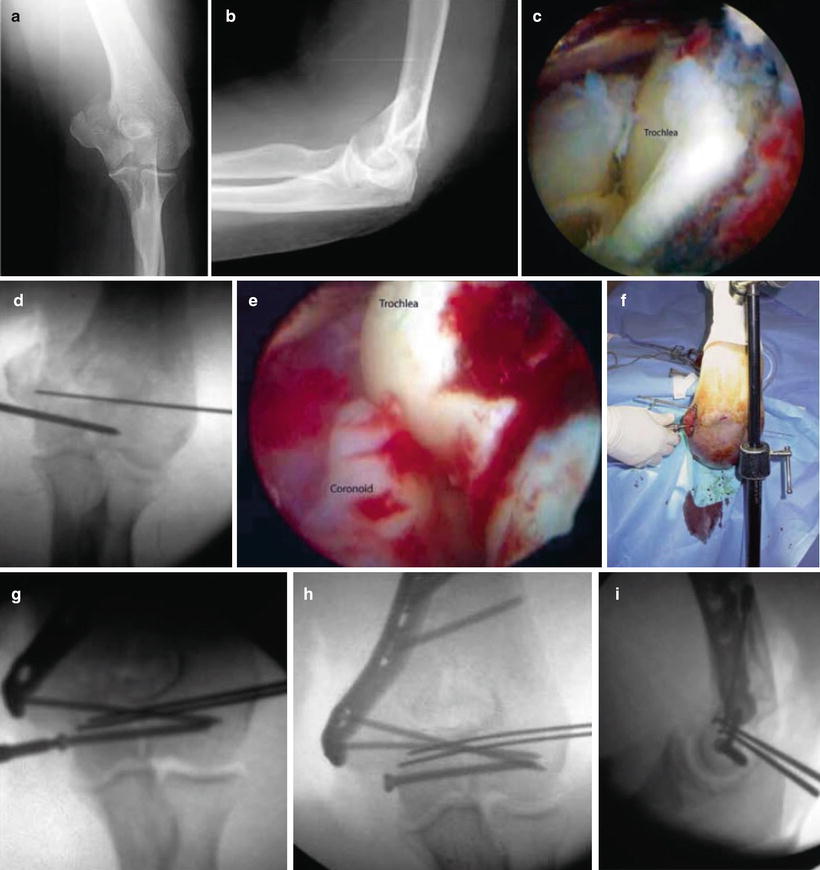
Fig. 35.6
(a, b) A comminuted medial condyle fracture as seen on X-ray. (c) Arthroscopically, the trochlear articular fragment is seen. (d, e) A limited medial approach is made to protect the ulnar nerve so that a heavy Steinmann pin can be inserted as a joystick to manipulate the fragment into a reduction. K-wires placed from lateral to medial temporarily stabilize the reduction while a transcondylar screw is inserted (in a lag fashion, if necessary) to achieve an anatomic reduction. (f, g) A medial plate is applied without disturbing the flexor pronator origin. The intact lateral condyle allows an exemption from the usual “4–5” distal screw rule since the intact lateral column acts as a plate, thus achieving four distal screws that secure the articular surface to the shaft. (h, i) Reduction of a lateral column fracture involves similar steps from the lateral side
Critical to the success of this operation is accurate articular reduction and reassociation of the distal articular surface to the shaft by means of a plate. Established principles of fixation should be observed [26].
Visualization and assessment of the reduction are similar to the capitellum fracture and lateral condyle fracture described above and below. However, a thicker pin (4.5 mm Steinmann pin or even biplanar pins) will be required to manipulate the larger fragment with the attached muscle origins. Once the reduction is evaluated both arthroscopically and radiographically, the fracture is temporarily fixed with the transcondylar wires or pin (our preference is a 3 mm Steinmann pin). Then, a medial or lateral midaxial incision is made for application of the plate. Because of arthroscopic assisted reduction, no additional arthrotomy or musculotendinous dissection is required.
For a medial column fracture, the incision should be made prior to pin placement because of the proximity of the ulnar nerve, which should be identified, retracted, if necessary, and protected as the pin is inserted. When reducing a lateral column fracture, take care not to advance the pin too far medially to protect the ulnar nerve.
The plate is then applied over the K-wires or Steinmann pin in the correct position. The plate is then provisionally fixed and a second distal transcondylar screw is placed though the plate. The initial pin can then be removed and replaced with a transcondylar screw through the plate, thus conforming to O’Driscoll’s principles of distal humerus fracture fixation [26]. The remaining proximal and distal screws are then placed.
Postoperatively, we recommend that the onset of range of motion exercises should be determined by the surgeon’s confidence in the strength and stability of the fixation, again prioritizing union over early motion. Restoration of lost motion is much more reliable than the treatment of avascular necrosis of the trochlea or lateral condyle.
Related posts:
 Arthroscopic Management of Distal Radius Fractures
Management of Ulnar Impaction
Wrist Arthritis: Arthroscopic Techniques of Synovectomy, Abrasion Chondroplasty, Radial Styloidectomy, and Proximal Row Carpectomy of the Wrist
Suture-Button Suspensionplasty for the Treatment of Thumb Carpometacarpal Joint Arthritis
Endoscopic Carpal Tunnel Release
Arthroscopic Arthrolysis
Arthroscopic Management of Distal Radius Fractures
Management of Ulnar Impaction
Wrist Arthritis: Arthroscopic Techniques of Synovectomy, Abrasion Chondroplasty, Radial Styloidectomy, and Proximal Row Carpectomy of the Wrist
Suture-Button Suspensionplasty for the Treatment of Thumb Carpometacarpal Joint Arthritis
Endoscopic Carpal Tunnel Release
Arthroscopic Arthrolysis
Stay updated, free articles. Join our Telegram channel

Full access? Get Clinical Tree


