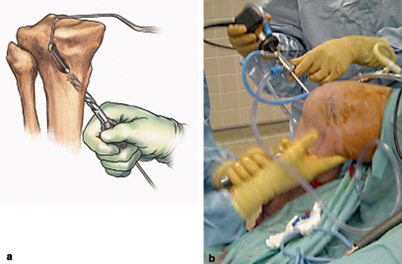
Fig. 9.1
Patient positioning. a The patient is positioned on the fully extended operating room table with a lateral post used for control of the surgical extremity. b The surgeon stands during the basic arthroscopic portion of the procedure. c The surgeon is seated during the PCL, ACL, and lateral-side reconstruction. PCL posterior cruciate ligament, ACL anterior cruciate ligament. (From Fanelli 2013 [9]. Reprinted with permission)
The arthroscopic instruments are inserted with the inflow through the superolateral patellar portal. Instrumentation and visualization are positioned through inferomedial and inferolateral patellar portals, and can be interchanged as necessary. Additional portals are established as necessary. Exploration of the joint consists of evaluation of the patellofemoral joint, the medial and lateral compartments, medial and lateral menisci, and the intercondylar notch. The residual stumps of the PCLs are debrided; however, the posterior (and ACL when applicable) anatomic insertion sites are preserved to serve as tunnel reference points. The notchplasty for the ACL portion of the procedure in combined PCL –ACL reconstruction cases is performed at this time.
An extracapsular extra-articular posteromedial safety incision is made by creating an incision approximately 1.5–2-cm long starting at the posteromedial border of the tibia approximately 1 in. below the level of the joint line and extending distally (Fig. 9.2). Dissection is carried down to the crural fascia, which is incised longitudinally. An interval is developed between the medial head of the gastrocnemius muscle and the nerves and vessels posterior to the surgeon’s finger, and the capsule of the knee joint anterior to the surgeon’s finger (Fig. 9.3). The posteromedial safety incision enables the surgeon to protect the neurovascular structures, confirm the accuracy of the PCL tibial tunnel, and to facilitate the flow of the surgical procedure. The neurovascular structures of the popliteal fossa are in close proximity to the posterior capsule of the knee joint, and are at risk during the transtibial PCL reconstruction. The posteromedial safety incision is very important for the protection of these structures.
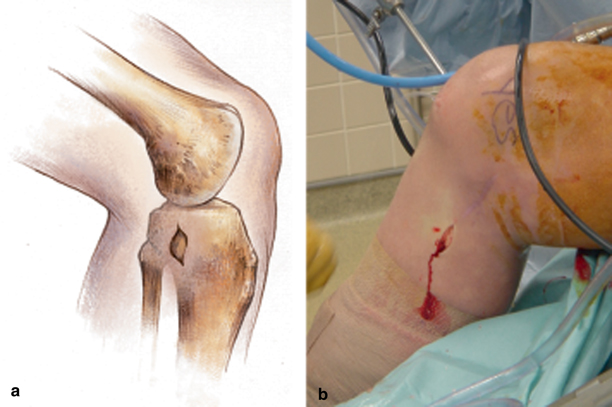
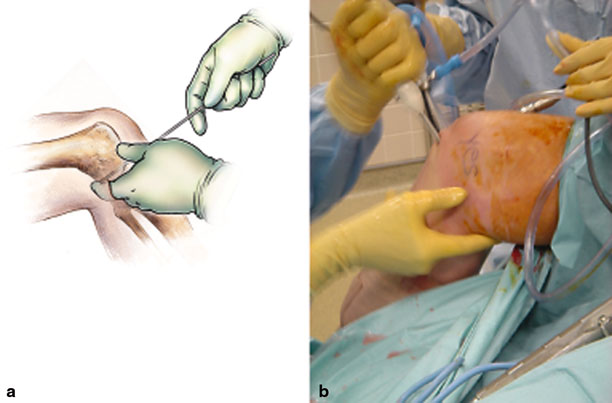
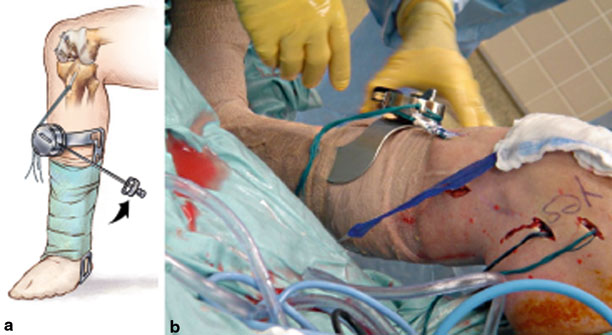
Fig. 9.3
a The surgeon is able to palpate the posterior aspect of the tibia through the extracapsular extra-articular posteromedial safety incision. This enables the surgeon to accurately position guide wires, create the tibial tunnel, and protect the neurovascular structures. (From Fanelli 2012 [10]). b Intraoperative photograph of posterior instrumentation with the surgeon’s finger in the posteromedial safety incision. (From Fanelli 2013 [9]. Reprinted with permission)
The curved over-the-top PCL instruments (Biomet Sports Medicine, Warsaw, Indiana) are used to sequentially lyse adhesions in the posterior aspect of the knee and elevate the capsule from the posterior tibial ridge. This will allow accurate placement of the PCL/ACL drill guide and correct placement of the tibial tunnel (Fig. 9.4).
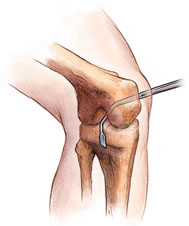
The arm of the PCL /ACL guide (Biomet Sports Medicine, Warsaw, Indiana) is inserted through the inferior medial patellar portal. The tip of the guide is positioned at the inferior lateral aspect of the PCL anatomic insertion site. This is below the tibial ridge posterior and in the lateral aspect of the PCL anatomic insertion site. The bullet portion of the guide contacts the anteromedial surface of the proximal tibia at a point midway between the posteromedial border of the tibia and the tibial crest anterior at or just below the level of the tibial tubercle (Fig. 9.5). This will provide an angle of graft orientation such that the graft will turn two very smooth 45° angles on the posterior aspect of the tibia (Fig. 9.6). The tip of the guide, in the posterior aspect of the tibia, is confirmed with the surgeon’s finger through the extracapsular extra-articular posteromedial safety incision. Intraoperative AP and lateral X-ray may also be used; however, I do not routinely use intraoperative X-ray. When the PCL/ACL guide is positioned in the desired area, a blunt spade-tipped guide wire is drilled from anterior to posterior. The surgeon’s finger confirms the position of the guide wire through the posteromedial safety incision.

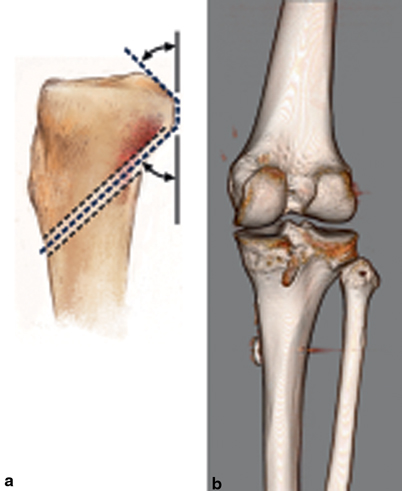
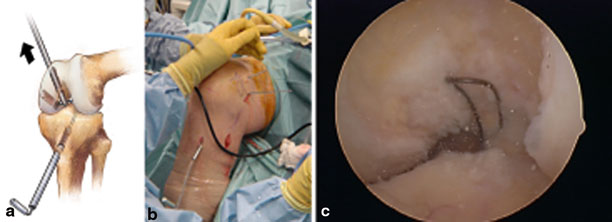
Fig. 9.5
a PCL–ACL drill guide positioned to place guide wire in preparation for creation of the transtibial PCL tibial tunnel. (From Fanelli 2012 [10]). b Intraoperative photograph of the drill guide positioned to create the PCL tibial tunnel. PCL posterior cruciate ligament, ACL anterior cruciate ligament. (From Fanelli 2013 [9]. Reprinted with permission)
Fig. 9.6
a Drawing demonstrating the desired turning angles the PCL graft will make after the creation of the tibial tunnel. (From Fanelli 2012 [10]). b Three-dimensional CT scan demonstrating the position of a well placed PCL tibial tunnel. Note the smooth turning angles the PCL graft will take. PCL posterior cruciate ligament, CT computerized tomography. (From Fanelli 2013 [9]. Reprinted with permission)
The appropriately sized standard cannulated reamer is used to create the tibial tunnel. The surgeon’s finger through the extracapsular extra-articular posteromedial incision is monitoring the position of the guide wire. When the drill is engaged in bone, the guide wire is reversed, blunt end pointing posterior, for additional patient safety. The drill is advanced until it comes to the posterior cortex of the tibia. The chuck is disengaged from the drill, and completion of the tibial tunnel is performed by hand (Fig. 9.7).
The PCL single- or double-bundle femoral tunnels are made from inside out using the double-bundle aimers or an endoscopic reamer can be used as an aiming device (Biomet Sports Medicine, Warsaw, Indiana). The appropriately sized double-bundle aimer or endoscopic reamer is inserted through a low anterolateral patellar arthroscopic portal to create the PCL anterolateral bundle femoral tunnel with the surgical knee in 90–110° of knee flexion . The double-bundle aimer or endoscopic reamer is positioned directly on the footprint of the femoral anterolateral bundle PCL insertion site (Fig. 9.8). The appropriately sized guide wire is drilled through the aimer or endoscopic reamer, through the bone, and out a small skin incision. Care is taken to prevent any compromise of the articular surface. The double-bundle aimer is removed, and the endoscopic reamer is used to drill the anterolateral PCL femoral tunnel from inside to outside (Fig. 9.9). When the surgeon chooses to perform a double-bundle double-femoral tunnel PCL reconstruction , the same process is repeated for the posteromedial bundle of the PCL (Fig. 9.10). Care must be taken to ensure that there will be an adequate bone bridge (approximately 5 mm) between the two femoral tunnels prior to drilling. This is accomplished using the calibrated probe, and direct arthroscopic visualization of the PCL femoral anatomic insertion sites (Fig. 9.11).
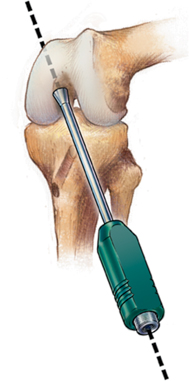
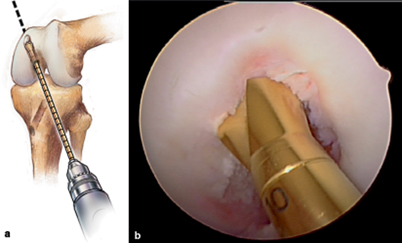
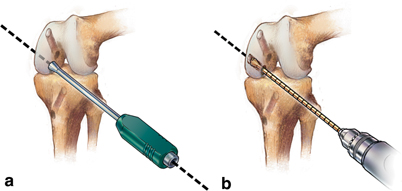

Fig. 9.8
Double-bundle aimer positioned to drill a guide wire for creation of the PCL anterolateral bundle tunnel. PCL posterior cruciate ligament. (From Fanelli 2012 [10])
Fig. 9.9
a Endoscopic acorn reamer is used to create the PCL anterolateral bundle femoral tunnel through the low anterolateral patellar portal. (From Fanelli 2012 [10]). b Intraoperative view of an endoscopic acorn reamer is positioned to create the PCL anterolateral bundle femoral tunnel. PCL posterior cruciate ligament. (From Fanelli 2013 [9]. Reprinted with permission)
Fig. 9.10
a Double-bundle aimer positioned to drill a guide wire for creation of the PCL posteromedial bundle femoral tunnel through the low anterolateral patellar portal. (From Fanelli 2013 [9]. Reprinted with permission). b Endoscopic acorn reamer is used to create the PCL posteromedial bundle femoral tunnel. A 5-mm bone bridge is maintained between tunnels. PCL posterior cruciate ligament. (From Fanelli 2012 [10])
Fig. 9.11
Completed PCL anterolateral and posteromedial bundle tunnels fill the anatomic footprint of the PCL. A 5-mm bone bridge is maintained between the tunnels. PCL posterior cruciate ligament. (From Fanelli 2013 [9]. Reprinted with permission)
My preferred surgical technique of PCL femoral tunnel creation from inside to outside is for two reasons. There is a greater distance and margin of safety between the PCL femoral tunnels and the medial femoral condyle articular surface using the inside-to-outside method (Fig. 9.12). Additionally, a more accurate placement of the PCL femoral tunnels is possible, in my opinion, because I can place the double-bundle aimer or endoscopic reamer on the anatomic footprint of the anterolateral or posteromedial PCL insertion site under direct visualization (Fig. 9.13).
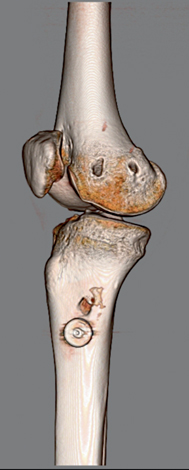
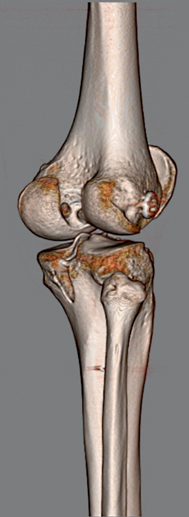
Fig. 9.12
Three-dimensional CT scan showing properly positioned PCL femoral tunnel exit points after inside-to-outside PCL femoral tunnel creation. Note the distance between the femoral tunnel exit points and the distal medial femoral condyle articular surface. CT computerized tomography, PCL posterior cruciate ligament. (From Fanelli 2013 [9]. Reprinted with permission)
Fig. 9.13
Three-dimensional CT scan showing properly positioned intra-articular PCL femoral tunnel position after inside-to-outside PCL femoral tunnel creation. A more accurate placement of the PCL femoral tunnels is possible because I can place the double-bundle aimer or endoscopic reamer on the anatomic footprint of the anterolateral or posteromedial PCL insertion site under direct visualization. CT computerized tomography, PCL posterior cruciate ligament. (From Fanelli 2013 [9]. Reprinted with permission)
A Magellan suture retriever (Biomet Sports Medicine, Warsaw, Indiana) is introduced through the tibial tunnel into the joint, and retrieved through the femoral tunnel (Fig. 9.14). The traction sutures of the graft material are attached to the loop of the Magellan suture retriever, and the graft is pulled into position. The graft material is secured on the femoral side using a bioabsorbable interference screw for primary aperture opening fixation, and a polyethylene ligament fixation button for backup fixation.
The cyclic dynamic method of graft tensioning using the Biomet graft-tensioning boot is used to tension the PCL and ACL grafts [11]. This tensioning method is discussed in Chap. 21 of this book. Tension is placed on the PCL graft distally using the Biomet graft-tensioning boot (Biomet Sports Medicine, Warsaw, Indiana) (Fig. 9.15). Tension is gradually applied with the knee in 0° of flexion (full extension) reducing the tibia on the femur. This restores the anatomic tibial step off. The knee is cycled through a full range of motion multiple times to allow pretensioning and settling of the graft. The process is repeated until there is no further change in the torque setting on the graft tensioner. The knee is placed in 70–90° of flexion and fixation is achieved on the tibial side of the PCL graft with a bioabsorbable interference screw and backup fixation with a bicortical screw and spiked ligament washer or polyethylene ligament fixation button (Fig. 9.16).
 Results of Treatment of Posterior Cruciate Ligament Surgery
 Anatomy and Biomechanics of the Posterior Cruciate Ligament and Their Surgical Implications
 Combined Posterior Cruciate Ligament and Posteromedial Reconstruction
 The All-Inside Technique: Surgical Technique and Outcomes
 Clinical and Arthroscopic Evaluation of the Posterior-Cruciate-Ligament- Injured Knee
 Combined PCL, Posteromedial Corner, and Posterolateral Corner Reconstruction


Related posts:
Results of Treatment of Posterior Cruciate Ligament Surgery
Anatomy and Biomechanics of the Posterior Cruciate Ligament and Their Surgical Implications
Combined Posterior Cruciate Ligament and Posteromedial Reconstruction
The All-Inside Technique: Surgical Technique and Outcomes
Clinical and Arthroscopic Evaluation of the Posterior-Cruciate-Ligament- Injured Knee
Combined PCL, Posteromedial Corner, and Posterolateral Corner Reconstruction
Stay updated, free articles. Join our Telegram channel
Full access? Get Clinical Tree
