Arthroscopic Knot Tying
Michell Ruiz-Suárez
Knot tying is an essential skill that every surgeon should master before actually participating in a surgery, whatever this may be. Arthroscopic surgery, especially shoulder arthroscopy, represents a challenge for a good knot tying technique. The challenges are because of the limited surgical space and the distance that a knot has to travel in order to be delivered before fulfilling its purpose. Therefore, an adequate arthroscopic knot tying technique is a sine qua non requirement for a successful arthroscopic shoulder reconstruction procedure.
Most surgical knots have their roots in fishing and sailing activities. More than 1,400 different knots are known, but only a few are suitable for arthroscopic surgery. A knot must meet the following criteria in order to be considered surgically adequate: (1) its technique has to be feasible and compatible with an arthroscopic OR setting, (2) it has to be as simple as possible, (3) it must adequately approximate two tissues, and (4) it must lock with no or minimal slippage. The ideal surgeon’s knot is a square knot. As stated before, shoulder arthroscopy provides a limited surgical space. Owing to this characteristic, tying square knots is not possible. Therefore, all the arthroscopic techniques try to approximate the clinical and biomechanical characteristics of the square knot.
The arthroscopic setting presents several challenges to good knot tying technique. First, it is a fluid environment that modifies the “dry” characteristics of the suture and makes suture handling considerably more difficult in comparison with conventional open surgery. Second, most of the knots must pass through a cannula. This increases the fluid flow in the space in which the knot has to be developed. There is the significant potential for soft tissue entanglement if suture management is not adequate, suture twisting (that may be overlooked), and the loss of suture tension that may jeopardize the efficacy of the knot. Third, not all surgeons are familiar with the use of a knot pusher. This instrument, although extremely helpful, requires specialized training in order to be proficiently used.
It is important to mention some alternatives to arthroscopic knot tying. Suture welding of monofilament suture has been described. Although there are some studies that claim clinical results similar to that of knots, welding is very seldom performed. Another option is the use of knotless suture anchors to approximate the tissues. Although, knotless anchors may offer the benefit of technique simplicity, they are not exempt from complications. At the end of the day, we have to remember that we are surgeons. A surgeon must master all surgical techniques in order to consider himself a professional.
TERMINOLOGY
When a suture passes through a tissue or an implant (most frequently a suture anchor), there are two free ends. These ends are termed suture limbs. As previously stated, it is not possible to create square knots arthroscopically. Therefore, most of the knots consist of half-hitch knots. In half-hitch knots, one of the limbs is called the post. This is the limb around which the knot is going to be tied. The other limb is called the loop. This is the limb that is tied around the post limb. Tension is maintained on the post limb during the construction of the knot.
A complex knot can be created by alternating the post limb or the loop limb during the knot construction. The surgeon arbitrarily chooses the post and loop limbs. As a general rule, the post limb is the farthest from the center of the joint. It is possible to alternate post limbs during the construction of the knot. The loop limb may be tied over or under the post limb. The direction of the loop limb determines the knot configuration. Releasing the tension on the suture limb that is functioning as a post and pulling up the loop limb can do this. Once this is done, traction can be placed on the former loop limb and the former post limb is then advanced as a half hitch. Once the post is switched, the direction of the half hitch is also reversed.
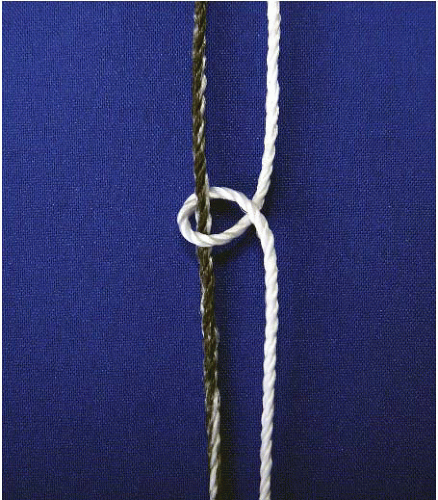
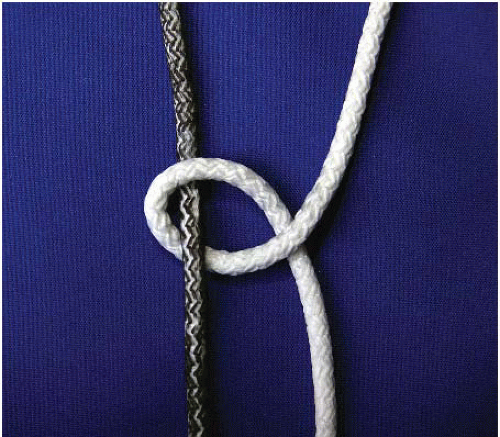
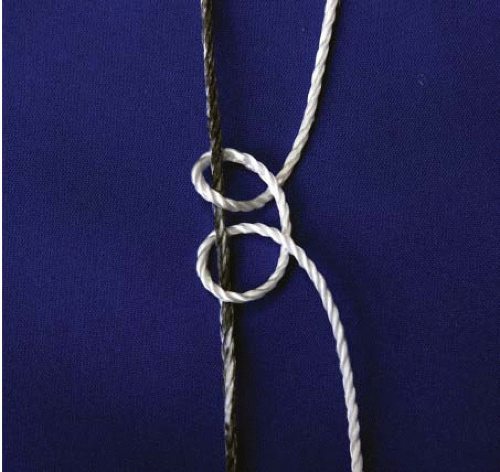
In a knot diagram, a half hitch is represented with the symbol “S.” This half hitch can be created by moving the loop limb under and then over the post limb (Fig. 30.1), or as an alternate in an over and then under direction (Fig. 30.2). No matter which is the case, the symbol is the same. In the case of identical half hitches around the same post, the symbol is S=S (Fig. 30.3). This symbol represents passing two half hitches in the same direction around the post limb.
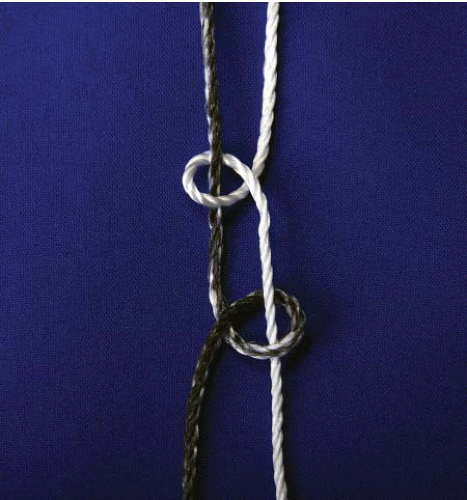
When two sequential half hitches go in opposite directions around the post limb, this is represented with the symbol S×S (Fig. 30.4) and defined as reversed half hitches on the same post. Finally, when two sequential half hitches are passed in opposite directions around opposite posts, this is represented with the symbol S//S (Fig. 30.5). This is referred to as reversed half hitches on alternating posts and is commonly abbreviated as RHAP. This knot configuration has been considered the gold standard for backing up an arthroscopic knot.
 FIGURE 30.1. A half hitch can be created by moving the loop limb (white) under and then over the post limb (black). |
 FIGURE 30.2. An alternate half hitch can be created by moving the loop limb (white) over and then under the post (black). |
There are other knot tying terms that should also be clarified. The term “turn” refers to the several twists in a given throw. The term “throw” refers to the specific step
in tying a particular knot. The term “slack” refers to the loose configuration of the loop limb around the post.
in tying a particular knot. The term “slack” refers to the loose configuration of the loop limb around the post.
 FIGURE 30.4. When two sequential half hitches go in opposite directions around the post limb, they are defined as reversed half hitches on the same post. |
KNOT TYING PRINCIPLES
There are principles that should be followed in order to have a successful result. Instrumentation plays a vital role in knot tying. The suture itself is vital, but the cannula through which it is tied and delivered, the knot pusher that carries the suture to the surgical site, and the surgeon are also vital. The principles can be summarized as follows:
1. There should only be one pair of limbs through an arthroscopic cannula. These limbs are the post and the loop limb of the same suture. If for some reason, there are two pairs of sutures exiting through the same portal, each pair must be handled independently. In other words, one of the pairs should run inside the cannula, and the other pair should be taken through the portal, outside the cannula. Another possibility is retrieving the nonworking pair of sutures through another portal. By doing this, the possibility of suture entanglement, especially in the cases of suture anchors loaded with multiple sutures, is reduced.
2. The tip of the cannula should be as close to the fixation point as possible. The purpose is two-fold. First, it reduces the possibility of soft tissue interposition. Second, this reduces the possibility of suture entanglement.
3. Always maintain tension in the first loop. This is particularly crucial in stacked half-hitch knots, or while constructing nonlocking sliding knots. Some sliding knots are self-locking; therefore, the chance of knot slippage is diminished. If slack is observed after the first half hitch, one method to eliminate it is to deliver a second throw with a reverse half hitch without switching posts.
4. Pass the knot pusher down the post limb to the fixation point, in-line with the cannula, to “clear” the limb before starting to construct the knot. This double-checks for soft tissue interposition and suture entanglement.
5. To prevent suture twisting outside the cannula, the post limb should be tagged with a hemostat while constructing the knot. The suture limbs are not to be crossed with subsequent throws. Always keep the suture limbs apart as they exit the cannula. Unplanned, additional suture twisting may lead to knot failure or premature knot locking.
6. It is not adequate to tie a knot by placing all its throws around the same post. Several studies have demonstrated that the best method of preventing suture slippage and of having good knot and loop security is to back up all knots with at least three reversed half hitches using alternating posts. This is applicable to all knots and all suture materials.
7. Use a sliding knot (locking or nonlocking) whenever possible. Before constructing and delivering the knot, the surgeon should check the suture anchor eyelet orientation and the depth of the eyelet with respect to the bone surface. Although the newest suture eyelets decrease suture friction, suture rubbing against a bone ridge because of over sinking the suture anchor into the bone should be avoided.
INSTRUMENTATION
The instrumentation for arthroscopic knots consists of three basic elements: suture material, arthroscopic cannulas, and knot pushers.
Suture Material
The purpose of the suture is to hold soft tissue to bone or to keep in close contact two soft tissue edges during its healing period. Once the healing process has concluded, the goal of the suture has been achieved. We are experiencing an evolution of suture materials. This evolution is reflected in increased biomechanical strength, resistance to breakage, as well as diminished elongation during the healing process. The optimal suture material must have excellent handling properties (optimal knot sliding, minimal surgeon finger discomfort, and good griping ability), optimal suture strength, and optimal knot strength without slippage.
Stay updated, free articles. Join our Telegram channel

Full access? Get Clinical Tree


