Anterior Cruciate Ligament Reconstruction
Douglas W. Jackson
Peter R. Kurzweil
INDICATIONS
The treatment for a patient with an acutely torn anterior cruciate ligament (ACL) is individualized by factors such as age, occupation, level of sports participation, and associated intra-articular and ligament injuries. An important consideration in the discussion with the patient is the patient’s willingness to modify high-risk activities in the future. We usually recommend anterior ligament reconstruction in the more physically active individuals of all ages who want to pursue activities that involve lateral movement, sudden stopping, and change of direction. We also suggest reconstruction of the ruptured ACL when there are significant associated meniscus tear(s) and/or a concomitant ligament injury. The decision to perform reconstructive surgery in someone with symptomatic knee instability due to chronic ACL deficiency is less controversial. Patients with an anterior cruciate deficient knee have had a chance to experience the limitations it imposes on their lifestyle. Usually the reason they have made the appointment with the surgeon is because they no longer want to live with the limitations if something can be done to correct the knee.
CONTRAINDICATIONS
The contraindications to ACL reconstruction have diminished over the past decade. The procedure is now done on an outpatient basis, with an increasing number of surgeons doing it technically well. The time taken from everyday activities for recovery following an acute ACL rupture can take a few weeks up to 2 months. The recovery time from the surgery to return to light work and/or school is about the same. There are several considerations that should be discussed with the patient who is considering a reconstruction:
Not every ACL rupture needs to be reconstructed. Many individuals live with an ACL-deficient knee quite successfully.
There is no urgency to reconstruct an ACL immediately after the injury. The patient can recover from the acute phase and determine if he or she wants to live with the deficient knee or have it reconstructed at a later date.
The results from delayed reconstructions (>6 weeks or even months and years later) appear to be almost equivalent to those reconstructions done shortly after the acute injury. This is true as long as the patient does not sustain repeated subluxations with effusions, additional meniscal tears, additional bone contusions, and associated articular cartilage damage.
PREOPERATIVE PREPARATION
The first step in assessing the pathology of the injured knee with an ACL rupture is to perform a thorough history and physical examination. The history is often diagnostic in most acute ACL ruptures. The patient often describes hearing or feeling a pop within the knee which was associated with a cutting motion or sudden change in direction. The individual may report that the injury occurred as the result of a noncontact or contact injury. In many instances, the patient was unable to continue participating in that particular activity. The injured knee usually develops an effusion within a few hours following the injury.
Imaging of the knee includes routine radiographs to rule out fractures, evaluate pre-existing degenerative changes, and assess the overall alignment of the lower extremity. A magnetic resonance imaging (MRI) scan is not always necessary, but is an excellent independent method to confirm a torn ACL. In addition, it is helpful in documenting meniscal tears, the extent of bone contusions (Fig. 12-1), and other ligament injuries. However, other than bone contusions, the MRI may not offer much more information than an experienced clinician will find with a thorough preoperative evaluation, examination under anesthesia, and arthroscopic assessment at the time of reconstruction. If a decision is made to treat the knee operatively, the associated intra-articular pathology can be evaluated, documented, and treated during the surgical procedure.
When the patient with an acute injury arrives for evaluation, the knee is usually swollen (hemarthrosis) with restricted range of motion. If surgery is recommended, we prefer waiting for the acute inflammatory phase, with its associated pain and swelling, to subside. Waiting for the motion to improve has been associated with less difficulty re-establishing the range of motion of the knee after surgery. Patients typically take 2 or 3 weeks to re-establish their knee motion following an ACL tear. A displaced bucket handle tear causing a locked knee may be a consideration for shortening the waiting period for surgical reconstruction.
The planned incisions and graft options are discussed with each patient. During the 1990s, we prefered to use a patellar tendon autograft almost exclusively; and although it is still one of our primary choices, hamstrings and allografts are now used more commonly. This is particularly true if the patient has a pre-existing patellofemoral disorder, a history of anterior knee pain, or is particularly concerned about the cosmetics of an incision. We prefer to avoid incisions around the patellar tendon in workers who kneel and crawl as part of their occupation. With improved soft tissue graft aperture fixation and reported results, our use of hamstring grafts has increased significantly. We have used allografts in ACL reconstructions in a larger number of cases over a 20-year period and prefer them in certain revisions, older and less active patients, and those patients in whom the knee requires multiligament reconstruction.
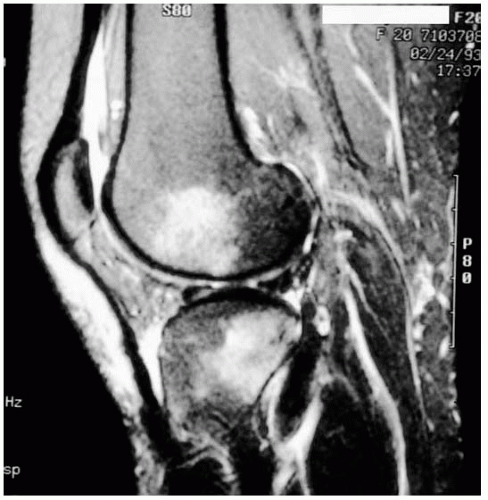 FIGURE 12-1 If the patient has had an MRI before surgery, we have the important films on the view box at the time of surgery. The MRI following an acute ACL rupture confirms the disrupted ACL, and quite accurately demonstrates associated torn menisci. The typical anterolateral femoral and posterolateral tibial kissing bone contusions are demonstrated in this figure. |
SURGERY
The patient is placed in the supine position with both legs resting straight on the operating table. Our patients and anesthesiologists usually elect general anesthesia, although some choose an epidural block. A tourniquet is placed on the proximal thigh but is infrequently inflated during the procedure. A lateral thigh post clamped to the table allows a valgus stress to be applied to the knee, enhancing visualization and access to the medial meniscus.
Most of our patients receive a single-injection femoral nerve block. We believe this has signficantly reduced the level of pain and need for narcotic analgesics in the immediate postoperative period. Most patients who have the block go home with very little discomfort. The femoral nerve block does shut down the quadriceps muscle temporarily, so all weight bearing on the operated knee is delayed for at least 1 day. Prophylactic antiobiotics—typically 1 g of a first-generation cephalosporin (Cefazolin)—are given 30 to 60 minutes prior to surgey.
After adequate anesthesia, we perform a ligament examination and document the preoperative arthrometric evaluation of both knees with the KT-1000. We look at the manual maximum displacement numbers and do not use the test at 20 and 30 pounds of force. A KT-1000 evaluation is also performed immediately following surgery, while the patient is still under anesthesia. These values are used to help confirm that the graft tensioning and fixation are satisfactory. The vast majority (98%) of the knees we reconstruct have a preoperative side-to-side difference of 5 mm or more under anesthesia and a positive pivot shift. If it is obvious that the ACL is nonfunctional, the autograft is routinely harvested before the arthroscopic portion of the procedure. When an allograft is used, it is not opened until we are certain that we will proceed with the ACL reconstruction. The graft is then prepared at a side table during the arthroscopy. However, when there is an equivocal pivot shift or a side-to-side difference of less than 5 mm with the KT-1000, the knee is first evaluated arthroscopically.
We make a concerted effort not to inflate a tourniquet during the procedure. Three techniques help control hemostasis and maintain our visual field. First, the pressure of the irrigation solution from gravity is maintained by the height of the irrigation bags. We have chosen not to use a pressurized inflow system (a pump) and prefer gravity irrigation. Second, the joint is injected with 25 mL of 0.50% Marcaine with 1:200,000 epinephrine immediately after draping the knee. Third, we selectively use intra-articular hemostasis with an insulated electrocuatery tip to control localized bleeding.
If the patellar tendon is being used as the graft, the skin over the patellar tendon is injected with 10 mL of the same anesthetic solution before harvesting the autograft. We believe this also helps reduce postoperative pain.
The surgery is performed in a stepwise fashion as follows: (a) evaluation under anesthesia, (b) graft harvesting and preparation, (c) notch preparation, (d) positioning and preparing the osseous tunnels, (e) graft implantation and fixation, (f) closure and postoperative assessment of stability, and (g) postoperative management and rehabilitation.
Technique
While under direct observation of the nurses in the preoperative area before sedation is given, the patient writes a “yes” on the ACL deficient knee. Once in the operating room, a “time out” is called to confirm the correct patient, procedure, and site. This “time out” requires the agreement of the circulator, scrub assistant, surgeon, and anesthesiologist. Our method of harvesting the patellar tendon is described later in this chapter when we elect to use it as our graft. Chapter 15 demonstrates another technique for patellar tendon bone-bone harvesting. When a patella tendon autograft is chosen, we prefer a vertical incision along the medial border of the patellar tendon. The incision starts at the level of the inferior pole of the patella and extends to the level of the tibial tubercle (Fig. 12-2). The peritenon is carefully dissected away from the tendon. We do not harvest more than one third of the total width of the tendon. If the width is at least 30 mm, a double-bladed scalpel (Fig. 12-3) with the blades set 10 mm apart is used to cut a central strip of tendon. In smaller individuals, a 9-mm strip of tendon is harvested.
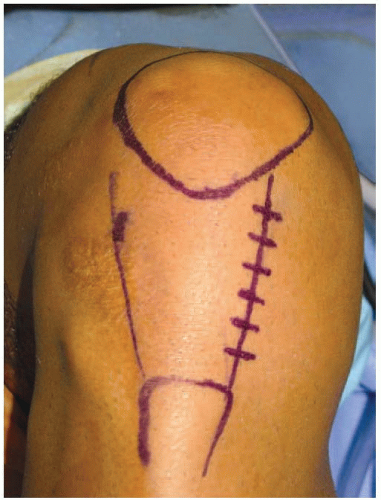 FIGURE 12-2 The skin incision to harvest the patella tendon autograft is vertical as depicted in this right knee. It extends from the inferior pole of the patella to a point approximately 1 cm medial to the tibial tubercle. Through this incision the anteromedial arthroscopy portal is placed as is the accessory anteromedial portal for the passage of the femoral interference screw. This incision allows the medially located tibial tunnel to be drilled with less skin retraction. |
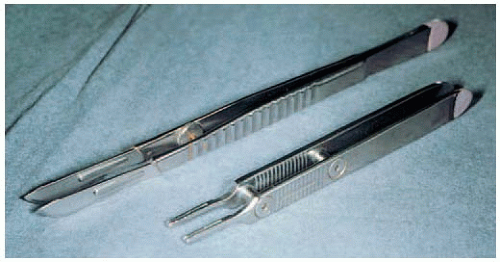 FIGURE 12-3 A double-handle scalpel (either 9 or 10 mm between the blades) ensures a parallel cut when harvesting the central third of the patellar tendon. |
The tendon’s bony attachments are outlined with electrocautery (Fig. 12-4A). The dimension of the patellar bone plug is typically 10 × 25 mm. The bone plug from the tibial side usually measures 10 × 25 mm. We use circular oscillating saws (Stryker, Kalamazoo, MI) with diameters of 9, 10, or 11 mm to harvest the bone plugs (Fig. 12-4B). Leaving a smooth, semicylindrical defect in the patella reduces stress risers and the potential for patella fracture postoperatively. This technique also allows for simple bone grafting of the created defects by using the cylindrical core of bone obtained from creating the the tibial tunnel. When split in half, the semicylindrical pieces of bone sit perfectly in the defects in the patella and tibial.
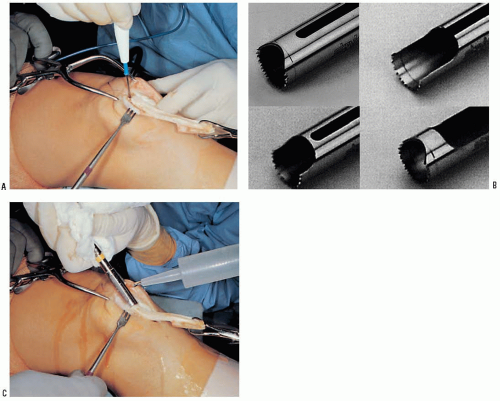 FIGURE 12-4 A: The tendon’s bony attachments are outlined with electrocautery. B: The circular oscillating (Stryker, Kalamazoo, Ml) saw used to harvest the bone plugs is smooth and recessed on top to prevent soft-tissue laceration when harvesting the bone plug. C: By pulling the mobile extensor mechanism distally and retracting the skin proximally, the incision can be shortened by 2 or 3 cm. The saw cuts better when the bone is kept moist, which also helps minimize thermal necrosis. |
 FIGURE 12-5 The tibial bone plug was harvested with a 10-mm circular saw and slides through an 11-mm spacer with minimal trimming. The patellar end of the graft was taken with a 10-mm harvester and easily slides through a 10-mm spacer. The spacers represent the diameter of the bone tunnels to be drilled. |
The tibial plug is harvested first, typically with a 10-mm circular saw blade. Once the tibial bone plug is harvested, a towel clip is attached and used to pull the extensor mechanism distally, drawing the patella into the wound. Retracting the loose tissue over the patella proximally permits a shorter skin incision to be used. The patellar bone plug is then harvested with the same blade (Fig. 12-4C). To avoid burning the bone, saline drops are added to help dissipate the heat generated by the oscillating harvesting blade.
The graft is taken to a side table and prepared for implantation by the assistant surgeon. With minimal trimming, each bone plug should easily slide through a spacer matching the diameter of the osseous tunnel through which it will eventually pass (Fig. 12-5). The tibial plug, intended for the femoral side, is trimmed to slide through a 9-mm tunnel spacer (Fig. 12-6). The patellar plug, which will be fixed in an 10-mm diameter tibial tunnel, usually requires only minimal trimming. Three drill holes (using a 3/32-inch bit) are made in the patella bone plug and threaded with No. 5 Tevdek or Ticron sutures. The holes are oriented at right angles to each other to minimize the chance of suture laceration by the interference screw, and hence loosing tension on the graft during tibial screw insertion. A single drill hole is made in the tibial bone plug, which is threaded with a 30-inch No. 2 nylon suture. The graft is mounted on a tension board (8-lb load), which also facilitates final soft-tissue trimming. The bone-tendon junction is marked with a sterile pen. A line is drawn longitudinally
along the center of the femoral plug to help orient its rotation as it is pulled into the femoral tunnel (Fig. 12-7). Once preparation of the graft is complete, it is left under tension and covered with an antibiotic-soaked sponge (Fig. 12-8). Using an assistant to prepare the graft while the surgeon works on the knee can save 15 to 30 minutes per case and can keep the surgical time for an isolated ACL reconstruction to less than 1 hour.
along the center of the femoral plug to help orient its rotation as it is pulled into the femoral tunnel (Fig. 12-7). Once preparation of the graft is complete, it is left under tension and covered with an antibiotic-soaked sponge (Fig. 12-8). Using an assistant to prepare the graft while the surgeon works on the knee can save 15 to 30 minutes per case and can keep the surgical time for an isolated ACL reconstruction to less than 1 hour.
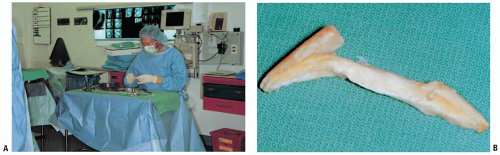 FIGURE 12-6 A: One surgeon shapes, sizes, and prepares the graft at a side table for passage through the knee and into the desired positions in the bone tunnels. Two surgeons working simultaneously shorten the operative time. B: A typical harvested graft before shaping, sizing, and preparation for passage. Note the different collagen insertions into the tibia and patella bone plugs. These different orientations to the collagen insertions can be used to position the collagen in the desired portion of the osseous tunnels. |
Regardless of graft choice, the intra-articular portion of the procedure begins by introducing the arthroscope into the anterolateral portal. When a patellar tendon autograft is harvested, the anteromedial portal is made by retracting the incision to expose the medial border of the patellar tendon (Fig. 12-9). A thorough diagnostic arthroscopy is performed through a separate anterolateral portal to confirm the torn ACL (Fig. 12-10) and determine the status of the menisci and articular cartilage. We prefer to debride the soft tissue from the lateral wall of the notch with a full-radius resector. Our goal is to visualize the “over-the-top” position. The center of the femoral tunnel is selected after preparing the notch. An endoscopic “over-the-top” guide is used to mark a point that will leave a thin shell of cortical bone posteriorly after the femoral tunnel is drilled. Guides are available for creating tunnel diameters from 6 to 11 mm (Fig. 12-11). When a 10-mm tunnel is planned with the typical patellar tendon autograft, we use a guide (Stryker, Kalamazoo, MI) that is designed to mark a point 6 to 7.0 mm anterior to the over-the-top position (Fig. 12-12). A 10-mm tunnel (5-mm radius) with 7-mm placement will leave a 2.0-mm posterior rim. The guide is inserted through an accessory anteromedial portal made just over the joint line and along the medial border of the patellar tendon. The desired site in the notch is drilled through the cannulated guide. The location of the femoral tunnel has changed slightly to avoid a more vertical graft. We prefer placing the center of the femoral tunnel at the 10:00 AM or 2:00 PM site. (See Chapter 14 for more in-depth discussion on tunnel placement.)
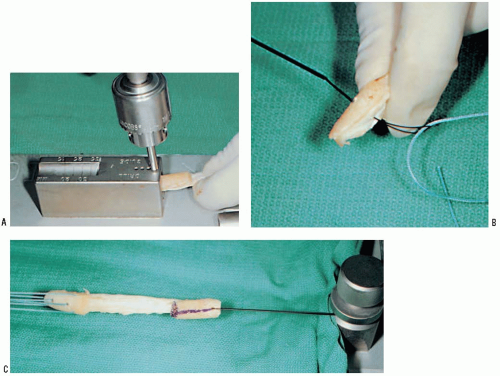 FIGURE 12-7 A: Three drill holes (using a 3/32-inch bit) are made in the harvested patella bone plug and threaded with No. 5 Tevdek sutures. The holes are oriented at right angles to each other to minimize the chance of suture laceration by the interference screw. We pass the sutures through the bone plugs with a Hewson suture passer (B). There are no needles on the back table. This eliminates the possibility of a needle puncture wound to the surgeon preparing the graft. A single drill hole is made in the harvested tibial plug, which is threaded with a 30-inch No. 2 nylon suture. The graft is mounted on a tension board (8-lb load), which also facilitates final soft-tissue trimming (C). The bone-tendon junction is marked with a sterile pen. A line is drawn longitudinally along the center of the femoral plug to help orient its rotation as it is pulled into the femoral tunnel. The prepared graft is mounted on a tensioning board, which facilitates final trimming. |
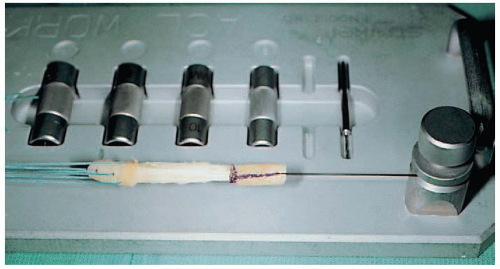 FIGURE 12-8 The larger bone plug has three No. 5 Tevdek sutures oriented at right angles, while the smaller bone plug has a single long (30 inches) suture passed through the cortical surface. The bone-tendon junction is marked with a sterile pen for orientation during passage. |
Related posts:

Stay updated, free articles. Join our Telegram channel

Full access? Get Clinical Tree


