Ankle Arthroscopy: Setup and Complications
James P. Tasto
Amar Arora
John H. Brady
The indications for ankle arthroscopy have broadened considerably over the past few decades as technologic advances have made the surgery safer and the results more predictable. Many ankle procedures that once required an extensive open approach followed by a prolonged recovery can now be effectively done arthroscopically. In many cases, this has resulted in decreased morbidity, preservation of soft-tissue structures, and generally a quicker return to function. However, ankle arthroscopy can still be fraught with minor as well as major complications. This chapter is dedicated to the proper setup for anterior ankle arthroscopy and the potential complications related to it. Hopefully, by thoroughly understanding the potential pitfalls, one can learn to avoid them.
ANTERIOR ARTHROSCOPY SETUP
Anterior ankle arthroscopy is considered the workhorse for most arthroscopic procedures of the foot and ankle. It is certainly the most common and many consider it the most routine. Still, the success of this procedure relies on careful preoperative planning, patient positioning, portal placement, and equipment management. The most common indications for anterior ankle arthroscopy include osteochondral lesions of the talus, soft-tissue impingement lesions, bony anterior impinging osteophytes, loose body removal, and arthroscopic ankle fusion. Specific details of these conditions and their treatments are not discussed in this chapter but are covered elsewhere.
Ankle arthroscopy is frequently performed under general anesthesia. This is both for patient comfort, as well for the added benefit of soft-tissue relaxation during distraction of the ankle. The patient is placed supine, and a thigh or calf tourniquet is placed onto the operative extremity. It should be noted that the use of a tourniquet is optional. The operative leg is then placed in a well-leg holder or on a bolster. The thigh should be secured in a slightly flexed position, with the end of the table flexed and the knee extended distally enough to prevent the table from interfering with possible posterior instrumentation if necessary (Fig. 86.1). The opposite leg must also be well padded and flexed at the hip to prevent femoral nerve injury. Next, the distraction device is secured according to the manufacture’s specifications. Currently, there are multiple noninvasive ankle joint distraction devices available that securely attach to the foot of the operating table and use a foot strap and lever arm to provide gentle ankle distraction. This also affords the surgeon greater access to the ankle with minimal obstruction (Fig. 86.2). Noninvasive traction of up to 25 lb (11.3 kg) can be safely applied.
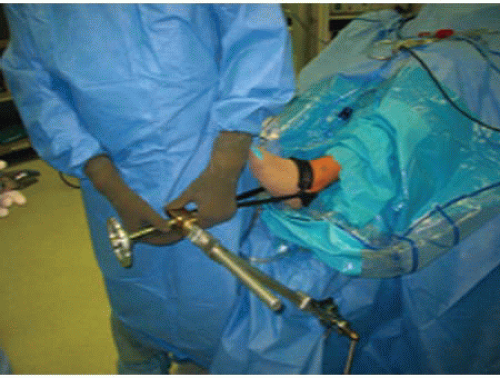 FIGURE 86.1. Demonstration of the correct patient position for anterior ankle arthroscopy. Note that both the hip and knee are placed in slight flexion. |
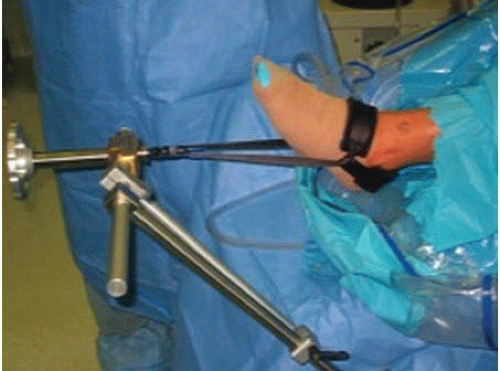 FIGURE 86.2. A distraction device secured to the end of the table will improve joint visibility during anterior ankle arthroscopy. |
Special attention to inflow pressure and flow is also a crucial aspect of the ankle arthroscopy setup. Modern flow-regulated arthroscopic pumps enable the surgeon to carefully monitor soft-tissue fluctuations clinically, correlate this with pump pressure settings, and adjust them accordingly. Outflow can be managed through judicious use of a shaver and suction, or the use of a cannula. In addition, some authors routinely use the posterolateral portal to manage their outflow. Whichever technique the surgeon chooses, he or she must closely monitor flow dynamics and adjust them based on clinical observation to ensure safe soft-tissue management during ankle arthroscopy.
Planning ahead with the proper arthroscopic instruments will also help to make this procedure more routine. A 30°, 2.7-mm scope with the accompanying set of hand instruments including graspers, curettes, and baskets is necessary (Fig. 86.3). Smaller 2.0 mm scope sets are often too small and delicate for use in the ankle joint. They may bend or brake, and often do not provide the necessary inflow. However, they should be available for backup use in case the joint is excessively tight. Conversely, larger instruments often reserved for the shoulder or knee may be too large and may inadvertently cause iatrogenic damage to the articular surfaces. Either 3.5 or 2.0 mm arthroscopic shavers can be used according to surgeon preference, and joint tightness.
Prior to starting surgery, the extremity should be carefully examined. Outline the bony landmarks including the medial and lateral malleolar tips and the joint line. Next, carefully outline the neurovascular and tendinous structures anteriorly and posteriorly. Finally, mark the anticipated portals, anteromedial, anterolateral, and posterolateral if needed (Fig. 86.4).
The anteromedial portal is established just medial to the anterior tibialis tendon at the level of the joint line. An 18G spinal needle is introduced and directed toward the center of the joint and 10 mL of normal saline is injected. Proper placement of the spinal needle in the joint is confirmed by distention of the joint capsule medially and laterally and by return of fluid through the spinal needle (Fig. 86.5). Although this area is free from major neurovascular structures, this portal must be placed as medial to the tendon as possible. Placement of this portal too medial will limit access and visualization of the medial gutter. Once the appropriate location is identified, use a no. 11 blade scalpel to make a vertical 5-mm incision through the skin only. Use a hemostat to spread soft tissues down to the joint capsule using the “nick and spread” technique. This is followed by placement of the blunt trochar and cannula, thus establishing the anteromedial portal through which the scope is introduced.
The anterolateral portal is established after inserting the scope medially. Injury to the superficial peroneal nerve or its branches is one of the primary risks of anterior ankle arthroscopy (Fig. 86.6). This risk can be reduced by marking the path of the nerve preoperatively, and by transilluminating the joint through the medial portal to attempt to visualize the nerve and its branches. With the foot slightly plantarflexed and adducted, the nerve can often be located coursing toward the fourth toe. The portal is then established lateral to the peroneus tertius carefully using a similar “nick and spread” technique.
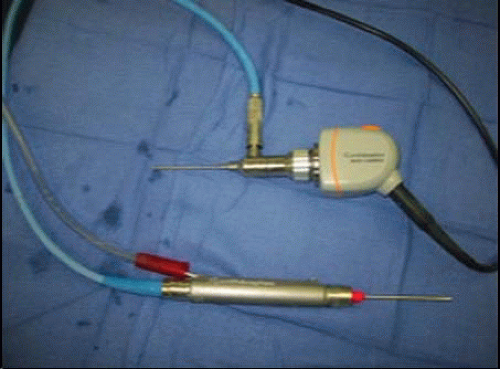 FIGURE 86.3. A 2.7-mm arthroscope accompanied by a 2.0-mm shaver will help decrease the risk of iatrogenic injury to the articular surface during ankle arthroscopy. |
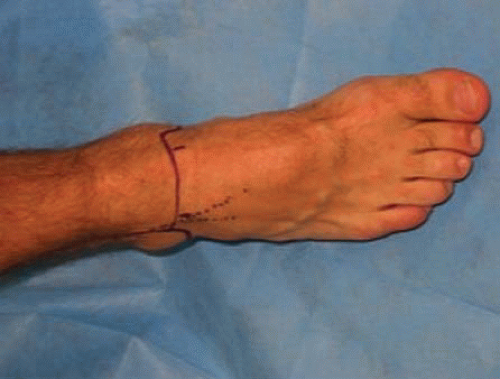 FIGURE 86.4. After carefully marking out the important anatomy of the ankle, the medial portal is placed just medial to the Tibialis anterior tendon, and the lateral portal is adjacent to the Peroneus tertius tendon. |
POSTERIOR ARTHROSCOPY SETUP
Posterior ankle arthroscopy is a useful tool for evaluating and treating pathologic conditions of the posterior ankle joint and its related structures. The most common indications include posterior impingement often associated with the os trigonum and the flexor hallucis, Haguland deformity correction and subtalar arthrodesis. It is best preformed with the patient in the prone position, with a bump under the distal tibia to elevate the foot. Distraction may or may not be necessary depending on how
much visualization is needed. When working outside the joint capsule, a large bore arthroscope is helpful because it provides the flow necessary for using a larger 4.5 mm shaver. As with anterior ankle arthroscopy, pump pressures should be kept as low as clinically possible (40 to 50 mm Hg) to prevent excessive extravasation.
much visualization is needed. When working outside the joint capsule, a large bore arthroscope is helpful because it provides the flow necessary for using a larger 4.5 mm shaver. As with anterior ankle arthroscopy, pump pressures should be kept as low as clinically possible (40 to 50 mm Hg) to prevent excessive extravasation.
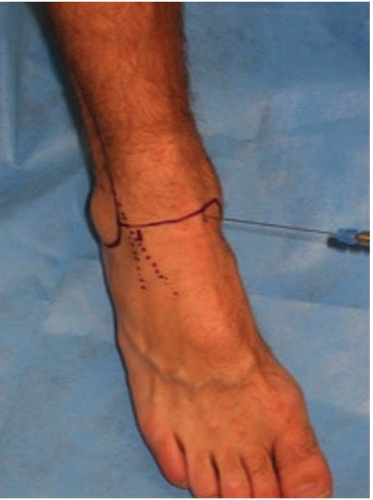 FIGURE 86.5. After identifying the appropriate landmarks, an 18G spinal needle is introduced through the medial portal site and the ankle joint is distended. |
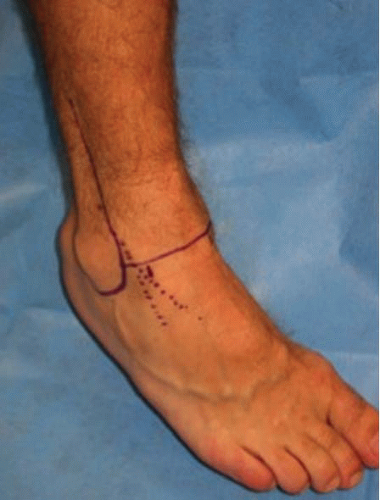 FIGURE 86.6. The anterolateral portal should be placed 2 to 4 mm lateral to the peroneus tertious tendon. This will decrease the risk of iatrogenic injury to the superficial peroneal nerve. |
The medial and lateral borders of Achilles tendon are the primary landmarks for portal placement during posterior ankle arthroscopy. The portals are usually placed approximately 1 cm proximal to the level of the distal tip of the fibula, immediately adjacent to the Achilles tendon using the “nick and spread” technique. Anatomic studies have demonstrated that precise portal placement will be 6 to 7 mm from the tibial nerve and 3 to 4 mm from the sural nerve (1). Great care, therefore, should always be used when considering posterior ankle arthroscopy.
ANKLE ARTHROSCOPY COMPLICATIONS
A thorough understanding of the surface anatomy of the foot and ankle is mandatory for the prevention of the myriad of potential complications associated with ankle arthroscopy. The overall complication rate with ankle arthroscopy has been reported to be anywhere between 9% and 17% (2, 3, 4, 5 and 6, 15). Broadly, complications of ankle arthroscopy can be divided into surgical and postoperative complications (Table 86.1). One of the most preventable complications is an improper diagnosis prior to undertaking ankle arthroscopy. If ankle arthroscopy is being considered one must understand that there are both intraarticular as well as extraarticular causes. Isolated lateral ankle pain without instability, subtalar pathology, occult talar process fractures, tendinopathies, and tendon tears may be playing a role in the patient’s symptoms. Isolated ankle arthroscopy in these settings may not be the best treatment option. A careful physical examination, appropriate imaging studies, differential injections, and a detailed history will help differentiate between diagnoses that may be helped with ankle arthroscopy. Arthroscopy should not supercede the role of a careful history and physical examination.
Related posts:
 Acromioclavicular Separations: Arthroscopic Reconstruction of The Acromioclavicular Joint
Multidirectional and Posterior Shoulder Instability
The Stiff Shoulder: Planning and Treatment Options
Arthroscopic Suprascapular Nerve Release
Arthroscopic Management of Lateral Epicondylitis
Clinical Approach to Articular Cartilage Pathology
Acromioclavicular Separations: Arthroscopic Reconstruction of The Acromioclavicular Joint
Multidirectional and Posterior Shoulder Instability
The Stiff Shoulder: Planning and Treatment Options
Arthroscopic Suprascapular Nerve Release
Arthroscopic Management of Lateral Epicondylitis
Clinical Approach to Articular Cartilage Pathology
Stay updated, free articles. Join our Telegram channel

Full access? Get Clinical Tree


