Advanced Shoulder Arthroscopy Essentials
Advice is handy only before trouble comes.
As in all surgical procedures, the operating room setup for shoulder arthroscopy is an essential component of the procedure. Visualization is affected by patient positioning and adequate fluid management. Portal placement dictates the angle of approach and determines access to the shoulder. The details of the above have been fully outlined in A Cowboy’s Guide to Advanced Shoulder Arthroscopy. The following is a brief review of patient positioning and setup, fluid management, and our most commonly used portals.
POSITIONING AND SETUP
We perform all shoulder arthroscopy in the lateral decubitus position. We have performed shoulder arthroscopy in both the lateral decubitus and the beach-chair positions, and there is no doubt in our minds that the lateral decubitus provides the best view of the shoulder. The beach-chair position developed at a time when surgeons were transitioning from open to arthroscopic procedures. Ironically, the inferior visualization the beach-chair position provides has slowed the transition to all-arthroscopic procedures. While this position is familiar, we recommend that for the surgeon to become an advanced shoulder arthroscopist, he or she use the lateral decubitus position exclusively. Shoulder arthroscopy relies on access to the anatomy and this should not be compromised.
To position the patient in the lateral decubitus position, an axillary roll is placed under the nonoperative arm, the legs are padded, a warming blanket is applied, and the patient is secured with a vacuum beanbag. The operative arm is placed in a Star Sleeve Balanced Suspension System (Arthrex, Inc., Naples, FL). Five to ten lbs of balanced suspension is used with the arm in 20° to 30° of abduction and 20° of forward flexion.
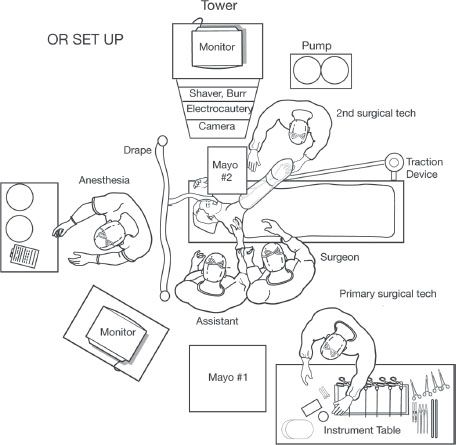
The surgical team consists of the surgeon, a first assistant, and two surgical technicians. The surgeon stands behind the patient’s shoulder. The first assistant stands behind the patient’s head. The primary surgical technician stands behind the surgeon, working from a Mayo stand and the instrument table. The second surgical technician stands in front of the patient’s torso and manipulates the operative arm and manages the shaver, burr, and electrocautery that are positioned on a second Mayo stand (Fig. 1.1).
FLUID MANAGEMENT
Maintaining visualization relies upon limiting bleeding by balancing the patient’s blood pressure and the arthroscopic pump pressure, as well as controlling turbulence within the shoulder. Assuming no medical contraindications, we prefer that the patient’s systolic blood pressure be kept below 100 mm Hg. An arthroscopic pump infuses normal saline at 60 mm Hg. Turbulence must be minimized. Turbulence promotes bleeding according to the Bernoulli effect whereby fluid flow creates a negative pressure gradient (at right angles to the flow) that literally sucks blood from exposed vessels. This is particularly noticeable while working in the subacromial space where uncannulated portals allow fluid to flow from a high-pressure system (inside the shoulder) to a low-pressure system (outside the shoulder), causing bleeding by virtue of the Bernoulli effect. In this scenario, it is important to resist the temptation to immediately increase the pump pressure as this will only increase the pressure gradient. Rather, the solution is to simply have an assistant plug the hole to eliminate turbulence. It is only after eliminating turbulence that we sometimes increase the arthroscopic pump pressure for a brief period of time. Using this rationale, we advise avoiding dedicated fluid outflow portals because these only exacerbate the Bernoulli effect. A final trick for maintaining fluid control for optimal visualization is to have a separate fluid inflow portal. A dedicated large-diameter inflow portal can improve fluid mechanics and is particularly useful for maintaining pressure when the arthroscope is frequently being moved between portals.

Figure 1.1 Overhead perspective of the operating room setup used by the authors for shoulder arthroscopy.
PORTAL PLACEMENT
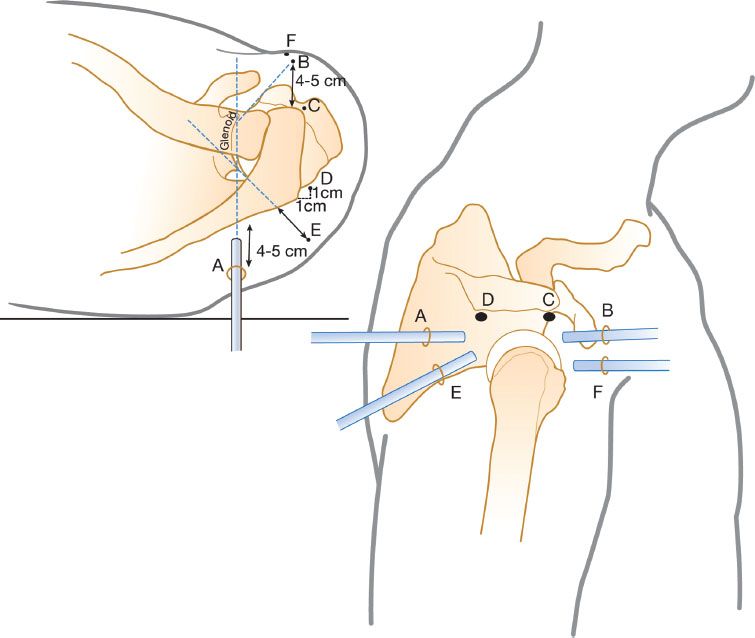
One of the great advantages of shoulder arthroscopy over open surgery is the ability to access all areas of the shoulder from multiple angles. Accurate portal placement is vital to achieving the proper angle of approach. For this reason, with the exception of the initial posterior viewing portal, we create all portals with an outside-in approach under direct visualization. An 18-gauge spinal needle is first used to identify the location for the skin incision. Then, a switching stick or working instrument is walked down the spinal needle to enter the joint exactly as planned. In general, we use cannulas for work in the glenohumeral joint and uncannulated portals for most of our work in the subacromial space. In our experience, cannulas in the subacromial space are only necessary for performing knot tying and for antegrade suture passage. We use several portals as described below to maximize access to the shoulder but do not hesitate to make accessory portals to obtain visualization or achieve the proper angle of approach (e.g., percutaneous placement of anchors for the proper deadman angle) (Figs. 1.2 and 1.3).
Posterior Portal
The skin incision for the posterior portal is used to enter both the glenohumeral joint and the subacromial space. We have found that the often-used (by others) posterior portal 1 to 2 cm distal and 1 to 2 cm medial to the posterolateral corner of the acromion enters the shoulder too superior and too lateral. The posterior skin incision will tend to move superior as soft tissue swelling increases. A posterior portal placed only 1 to 2 cm distal to the acromion will therefore become problematic as the case progresses because the arthroscope will abut the posterior acromion and provide a poor angle of approach to the subacromial space. This is avoided by placing the skin incision more inferior. We palpate the “soft spot” created by the glenoid medially, the humeral head laterally, and the rotator cuff superiorly and insert the arthroscope below the equator of the glenohumeral joint at about 7 o’clock. Because of this location, our skin incision is usually 4 to 5 cm distal and 3 to 4 cm medial to the posterolateral corner of the acromion (Fig. 1.4).

Figure 1.2 Schematic diagram demonstrating the relative positions of the most common glenohumeral portals (A) posterior portal; (B) anterior portal; (C) anterosuperolateral portal; (D) Port of Wilmington portal; (E) low posterolateral portal; (F) 5 o’clock portal.
Stay updated, free articles. Join our Telegram channel

Full access? Get Clinical Tree


