Fig. 21.1
Small child with femoral shaft fracture in Bardenheuer traction
Both legs are undressed. The skin is cleaned and degreased with disinfectant or ether.
Adhesive tape, in which a small wooden plate is integrated into the pull cord, is trimmed to size laterally and medially and then the protective foil is removed. The adhesive tape is placed laterally and medially in a way that the wooden plate lies 2–3 cm away from the heel. The skin of the distal part of the femur and the whole lower leg should be covered, leaving strips of skin uncovered at the front and back.
The same procedure is then applied symmetrically onto the contralateral side.
The adhesive tapes are covered with elastic bandages from the ankle upwards.
Afterwards, the pull cords (which are integrated into the heel plate and attached to rollers that are suspended over the bed on crossbeams) are weighted symmetrically with traction weights of 1–3 kg, depending on the weight of the child. The position is correct if the child’s buttocks are raised from the bed so that an adult’s flat hand can slide in between the sheet and the child’s bottom (most children are still in diapers).
One hour after applying the adhesive tapes, an X-ray control in two planes should be performed; necessary adjustments of the traction weight are made.
Two or three days after the traction apparatus has been applied, the children are free of pain and have lost all shyness. They start to turn around the axis of their suspended legs. As their toys and books are usually placed on the bedside table, they tend to move into this direction. Additionally, the child’s parent or another caregiver normally stands on the same side because it is easier to pass on the toys. At least on the second of the weekly X-ray controls a varus or valgus malposition in the direction of the bedside table can be observed. By changing the bedside table to the other side, an axis correction can be achieved automatically.
The traction weights are adjusted according to the X-ray controls. Distraction of the fragments should be strictly avoided.
The duration of the traction treatment depends on age and size. It ends after 3–6 weeks when radiographic images show bridging callous.
Should the adhesive tapes loosen, they must be exchanged immediately. If this is not possible due to skin intolerance, a K-wire should be applied through the distal tibia, which is equipped with a Beck’s spring clip, in order to continue the traction treatment. This intervention is rare.
After expiration of the traction treatment period, the adhesive tapes are removed and skin care is carried out if necessary.
An active mobilization is not required as children start sitting and standing up in bed within 2–3 days.
For pathological fractures referring to osteogenesis imperfect, the traction treatment period should be extended by one-third.
In a few rare cases it is necessary to apply a plaster cast after removing the adhesive tapes, for example, if the X-rays verify a secondary deflection due to the insufficient maturity of the callus.
Following these guidelines, the rate of bone healing is almost 100 %.
The only disadvantages of applying Buck’s traction treatment in young children are the length of time and the fact that special equipment is needed. In our department, the treatment is performed on an inpatient basis, whereas in some parts of the Netherlands the children are sent home after 2–3 days. A bed is borrowed from the hospital and controls are carried out by local doctors. Though might be suspected that this treatment is not up-to-date and that the child is impeded causing retardation, the presence and attention of the parents and of other relatives as well as the permanent preoccupation with the child during the treatment result in a phenomenal development boost. Furthermore, psychological damage in terms of hospital trauma has not been detected. If these children are compared to ones who underwent surgery (who are discharged from hospital after a shorter time period and therefore are not attended in such a meticulous way), they do not suffer from anxiety and psychological damage.
Skeletal Traction
Greater traction weights, which are necessary for axis or length corrections, must be applied directly on the bone and not on the soft tissue. In order to manipulate the broken bone, local “fracture gap” anesthesia or general anesthesia is needed [6]. The local anesthesia into the fracture gap is performed under sterile precautions after surgical disinfection of the assumed fracture area. After placing a cutaneous depot, 10–15 ml of a 1 % procain solution or equivalent is injected into the fracture gap. By aspirating fracture hematoma it is proven that the tip of the needle is in the fracture gap. One minute later, pain-free manipulation is possible for 60–90 min. The traction apparatus is also mounted under local anesthesia. The area of the proximal tibia or distal femur is disinfected and the planned entry and exit point of the Kirschner wire or the Steinmann pin are injected with a 1 % solution of local anesthetic. After placing a cutaneous wheal, periosteum and bone can be approached while constantly injecting the anesthetic. Particular attention should be paid to the periosteum; pain is avoided by setting a medial and a lateral periosteum depot. The necessary amount of local anesthetic for the proximal tibia is approximately 10 (2 × 5) ml and for the distal femur 20 (2 × 10) ml at most. Prior to disinfection and local anesthesia, the pain-free leg (due to the fracture gap anesthesia) is positioned and manipulated in a way that the assembly of the traction apparatus is possible without any interference. Basically, there are two different types of traction assemblies, the Kirschner wire traction and the Steinmann pin traction.
Kirschner Wire Traction
After disinfection and draping, a sterile drilling machine is used to insert a 1.6-mm Kirschner wire into the bone in a horizontal direction and perpendicular to the axis of the extremity. When the wire has been removed from the drilling machine, it is fixed to a spring clip using a tensioning chuck in order to condition the wire in a way that it can take greater loads and traction weights. Before the frame is installed, the wire entry and exit points are equipped with sterile felt patches and pelottes. The purpose of this measure is immediate wound care and infection prevention on the one hand and, on the other hand (which is more important), protection of sideways displacement and prevention of wire sliding, which – due to its connection to the frame – loosens in the bone with each rotational movement. We use the Kirschner wire traction temporarily for a short duration in adults preoperatively and routinely in children. The frames have a number of holes, where the pull cord for the traction can be anchored. They differ by size depending on the aspired localization (calcaneus, tibia, supracondylar).
Steinmann Pin Traction
The length and the diameter of the pins as well as the size of the frames are determined according to the affected area. The specific diameters can take up weight of up to one-seventh of the body weight without bending inside or outside of the bone. After disinfection, local anesthesia and surgical draping, the chosen pin should be driven into the bone under sterile conditions using a mallet of 0.5 kg weight from the medial to the lateral side, parallel to the frontal plane and perpendicular to the axis of the extremity, achieving central placement. As a result of “material displacement,” the pin sticks in the bone. The corresponding frame is built in a way that it has a mobile connection to the pin through a connecting wheel. As a consequence, the nail does not move when the position of the leg is changed. This construction feature is crucial for preventing loosening and local infection. Furthermore, it is appropriate for traction assemblies that are prescribed for several months. Because of the risk of injury caused by the very sharp nail tip, it has to be covered with a protective cap on the lateral side after the nail has been connected to the frame. In the case of porous bone structure, it is further recommended to use felt padding and metal pelottes, which can also be applied subsequently in the course of traction treatment.
Tibial Head Traction
The Kirschner wire or Steinmann pin is inserted 2 –3 cm dorsally (on the same level) of the tuberositas tibiae. Afterwards, the frame is mounted. The leg is placed on a Böhler-Braun splint; it has an angle of 60° at the level of the knee joint. The pull cord is attached to rollers, which are mounted onto the bed crossbeams at whatever height is needed, in a way that the direction of traction can be adjusted into the position in which the proximal shaft fragment points. To relieve the knee joint, the traction weight is restricted to a maximum of 5 kg. The tibial head traction should be chosen in the preoperative phase as provisional treatment of a femur fracture, especially to correct shortening or to prevent it. On the one hand, this traction serves to relieve pain; on the other hand, the canal of the Steinmann pin or of the Kirschner wire should be regarded as potentially infected after a few days. In case of a secondary osteosynthesis of the femur, it is advantageous to avoid such a possible source of infection. If the definite conservative treatment method is intended (after 5–10 days the length proportions have been largely restored), it can be changed to a supracondylar traction in order to be able to attach traction weights of one-tenth of the body weight. Additionally, this change serves to relieve the knee joint and should prevent painful joint stiffening.
A capsule-ligament-lesion of the knee joint can be concomitant to a femoral shaft fracture. In such cases, it is better to refrain from tibial head traction, especially if there is instability in varus or valgus direction.
Supracondylar Femoral Traction [6]
In adults, the Kirschner wire or the Steinmann pin is placed in the distal metaphysis to enable a better manipulation of the fragments. The optimal position is 5 cm dorsally from the upper patella pole. If the Steinmann pin is placed too proximally, longitudinal fissures can result along the femoral diaphysis and, in the worst case, an iatrogenic supracondylar fracture can occur. Additionally, if the pin is placed too dorsally or if it is guided obliquely it could hit the adductor canal. Therefore, the assembly of a correct supracondylar traction (which can provoke significant complications) is an important task. Compared with the insertion of a Steinmann pin, the potential danger of placing a Kirschner wire is negligible. Surgeons who are not sufficiently experienced in this technique should absolutely use auxiliary devices to choose the correct point. One possibility is to place a K-wire or a pin on the upper patella pole and to take an X-ray. If the X-ray shadow of the object is in the correct position in the a.p. view, the next step is to determine the correct entry point in the lateral view. Applying this technique, a too proximal or too dorsal positioning is not possible. Furthermore, the use of an image intensifier is recommended, especially when using a Steinmann pin. The advantages of this traction type have already been mentioned.
Primary, supracondylar traction is applied if the femoral shaft fracture is accompanied by ligamentous knee injuries or if the use of traction is planned as a definitive treatment of an undisplaced fracture without shortening. Should there be obvious shortening of the soft tissue, the K-wire is placed higher in the region of the soft tissue than in the bone. As a consequence, after the traction is mounted, the soft tissues (skin, subcutis, fascia) are pulled very slowly, millimeter by millimeter (sometimes up to a few centimeters) distally, causing the moving K-wire to cut through them until their corresponding position to the bone is reached. Inevitably, this leads to secretion and infection of the soft tissue, which can spread to the bone and can quickly lead to a loosening of the hardware in the bone. This can be prevented if the initial shortening is primarily neutralized with the help of tibial head traction; when the length has adjusted, one can change to supracondylar traction.
The leg is placed onto a Böhler-Braun splint. Afterwards, by the respective frame, the distal fragment is pulled, in the same manner as described above, into the direction in which the proximal fragment is pointing. The foot as well as the head of the bed must be raised considerably in order to avoid low positioning of the patient’s head. The healthy leg should be supported on a footboard. Only under these circumstances can it be guaranteed that the body weight acts as a counter balance, with the result that the patient is not pulled off the bed by the traction weights. The traction equipment, the position of the splint, the leg, the rotational setting, the function of the guide pulley, and the position of the traction weights have to be controlled at least once or twice daily. The position of the fracture has to be documented by X-ray images in two planes after the first and the second day and then once a week. Any necessary changes (direction of traction, reduction of the traction weights) can be evaluated from the X-ray images. After changes have been made, even after insertion of a pillow onto the splint, X-rays always should be performed 24 h later. Distraction of the fragments should be avoided under any circumstances.
The duration of the traction treatment in adults is 12 weeks until the femur fracture has healed. With the respective care, callous fracture healing without axis deviation can be obtained in up to 97 % of patients. The traction assembly should be kept in place during the whole healing process. If the time is shortened to a 6- to 8-week duration of traction treatment followed by plaster cast immobilization, the pelvis-leg plaster cast is not in the position to prevent any secondary distortions of the bone (which is still soft) due to the thickness of the thigh musculature. This type of change in the treatment modality should only be performed if the traction treatment has to be abandoned [6]. Of course, irreparable loosening of the supracondylar Steinman pin is not necessarily such an indication. In these cases, depending on the remaining duration of the traction period, the pin should be removed and re-positioned into the tibial head for a short time period until the wound has healed. Afterwards, the position can be changed again, applying new supracondylar traction.
The following points are essential over the entire treatment period:
Active decubitus prophylaxis
Respiratory exercises
Exercises for all uninjured extremities, especially for the healthy leg (exercises against resistance on the oblique surface)
Thrombosis prophylaxis with low molecular heparin or, in case of additional risk factors, coumarin therapy
The conservative therapy is time-consuming and work-intensive. Generally, mistakes are possible that are not always correctable after time has elapsed. Special splints and suspension modalities may be needed for special cases, such as the 90–90° traction, in which the hip and the knee joint must be held in a 90° flexed position and the lower leg is balanced separately by a pulley. This assembly is necessary in cases of subtrochanteric fractures or open fractures, where a complication wound is located in the area of the buttocks or on the flexion side of the femur. Having nursed the wound carefully, it is possible to return to the standard traction treatment to keep the position of the joint as close as possible to the so-called “middle position.”
21.5.2 Surgical Treatment
The treatment of choice or standard therapy for subtrochanteric femur shaft fractures and supracondylar fractures is surgical treatment (osteosynthesis). The surgical assembly of the pieces of bone can be carried out in an open, semi-open, or covered procedure.
21.5.2.1 Open Reduction
The standard approach to the femur starting at the trochanter down to the condylar area is the posterior-lateral approach. As an alternative, the lateral approach between m. vastus lateralis and intermedius can be used. The incision is made in the middle of the lateral contour of the femur in the connection line between the tip of the trochanter and the middle of the lateral aspect of the lateral femoral condyle. After splitting of the subcutis, the fascia lata becomes visible. It is incised and split with a pair of scissors in the direction of the fibers. The m. vastus lateralis is now exposed. On the dorsal edge of the muscle, the septum intermusculare laterale can be reached. The musculature on the septum is mobilized and pushed aside with a raspatory, whereby the pairs of vessels (arteria and vena) that perforate the septum are dissected and clipped on each side and subsequently ligated. The stumps lying towards the septum should be handled especially carefully and kept a little bit longer. If the vessel stumps are not ligated and slip behind the septum, this can lead to profuse bleeding. After performing the ligatures, the muscle can easily be detached from the septum and the femur. If necessary, for example, in subtrochanteric fractures, the origin of the muscle can be taken off diagonally after attaching retention stitches, so that the whole lateral aspect of the femur can be portrayed. After the fracture has been reduced and stabilized, the muscle can slip back into its normal position. If necessary, a drain can be placed in the muscle compartment followed by the closure of the fascia using single knotted stitches and absorbable suture material. A subcutaneous drain may be placed and the skin is closed. As part of the dressing change after 48 h, the drain is also removed. We do not cover the wounds after the fifth postoperative day, if healing is regular. Finally, the stitches are removed on the 12th postoperative day.
21.5.2.2 Closed Reduction
As long as femur fractures can be classified as “recent,” they can be regularly reduced into a correct axis on the traction table by supporting the pubic bone and applying a longitudinal traction. Fractures, in which the musculature is interposed in the fragments and therefore hinder sthe union of the fracture surfaces, cannot be included under this rule. These interpositions must be removed by opening the fracture site. Depending on the individual case, it must be decided whether to continue with an open approach or, after removal of the interposition, to continue with an exactly performed reduction according to the minimally invasive technique so as to finish the surgery appropriately using the chosen method and implant. The patient can be placed in a supine or lateral decubitus position on the traction table. In general, the rotational conditions between the proximal and the distal fragment can be better evaluated when the patient is in a supine position. To achieve accurate closed reduction, the Müller distractor can be used as well. Its threaded pins should be placed proximally and distally close to the dorsal corticalis, where they find a good hold and neither impede the pathway of the intramedullary nor of the juxtacortical implant. With the distractor’s threaded bar and the possibility to tilt one of the main fragments, an accurate reduction can be achieved after distraction of the fracture. If a Müller distractor is not available, it can be imitated by a regular external fixator.
According to fracture location and type, various implants which are adapted to the relevant part of the femur and able to bear the equivalent load, are used for stabilization while the bone is healing.
21.5.2.3 Intramedullary Osteosynthesis
Intramedullary Nailing (Küntscher [13–15])
Principle: This is based on elastic deadlock of a slotted load-bearing carrier with a cloverleaf profile by a longitudinal deformation in the medullary cavity. The nail should splint the fracture both proximally and distally at a minimum of 3 cm or even better of 5 cm length in order to achieve a tube-in-tube stabilization. The bony tube on both sites of the fracture has to be intact. Rotational stability is achieved by interlocking of the fracture surfaces. Weight transfer is possible through the implant and the restored bone. Closed reduction, without opening of the fracture site, has the advantage of lower infection rate, earlier weight bearing, and a reduced risk of scarring of the muscle with the bone due to the small wound.
Indication: Transverse and short oblique fractures, pseudarthrosis (nonunions) in the middle third of the shaft
Necessary Instruments, Tools, and Implants:
Traction table or Müller distractor
One to two image intensifiers
Medullary cavity reamer, mechanically or manually driven
Guide wire for the reamer and the intramedullary nail
Instruments for insertion and removal of the nail
A complete set of nails (diameter: 10–20 mm, length: 34–48 cm, length difference: 1 cm)
Technique: The patient is placed on the traction table in a supine or lateral position. Closed reduction of the fracture is performed. Alternatively, the Müller distractor is applied to reduce the fracture. Skin incision is made at the palpable tip of the trochanter major in a caudo-cranial direction. The fascia and the gluteal muscles are split in fiber direction in a length of 5 cm. The medullary cavity is opened with the curved pointed awl. A guide wire is inserted into the medullary cavity of both main fragments. The medullary canal is reamed through the guide wire with the cannulated medullary cavity reamer, starting with the 9 mm drill. Afterwards, the medullary cavity is reamed step-by-step, using drill bits with increasing diameter (0.5 mm) until the drill grips in both of the main fragments. These steps should be performed with the highest possible revolution speed of the reamer and by passing the medullary cavity as slowly as possible, in order to produce the lowest possible pressure increase in the medullary cavity and the lowest possible heat generation [1]. The reamer guide is changed for the guide wire of the nail, which is pushed into the center of the medullary cavity. The peripheral end of the guide wire should be placed in the middle of the distal femur metaphysis 1 cm proximal of the joint surface (proximal of the incisura intercondyloidea) to offer optimal axis guidance for the intramedullary nail. The length of the chosen nail results from the difference of the length of the guide wire, positioned in the medullary cavity, and the one that protrudes from the trochanter major. The chosen diameter should be 1 mm smaller than the diameter of the reamer head that was used at the end. (As a Central European benchmark for adults, the following factors for a body height of 170–175 cm can be expected: reaming of the medullary cavity 15 mm, measurements of the nail most frequently used: length 40 cm with a diameter of 14 mm. Of course, the length and diameter vary according to the body height and race.) The nail is inserted into the medullary cavity through the guide wire using light hammer blows. If the chosen length is correct, the proximal end of the nail will be even with the tip of the trochanter major, and the tip of the nail will lie 1 cm proximal to the joint surface in order to prevent fissures of the cartilage surface in the intercondylar area. If the distal distance is too small, the development of a postoperative hemarthros and, in the longer run, of a femoropatellar arthrosis can be the consequence. Therefore, properly performed X-rays in two planes should be taken before the surgery is finished. The soft tissue wound is closed with absorbable stitches. It is advisable to insert one drain to the proximal tip of the nail and one subcutaneously.
Postoperative treatment: The dressing is changed after 48 h and the drains are removed at the same time. The stitches are removed after 12 days postoperatively. Weight bearing of the affected leg is allowed as tolerated due to pain. If the indication for intramedullary nailing was appropriate and if the surgery was performed accurately, all mechanical requirements for full-weight bearing are met immediately after surgery. One week postoperatively and then after 4, 8, 12, and 24 weeks, X-rays are taken to document the healing progress. Finally, the nail can be removed 18–24 months postoperatively.
Advantages: Intramedullary nailing according to Küntscher is a closed reduction osteosynthesis procedure without opening the fracture site. As a consequence, a low rate of infection (2 %) with low morbidity and a high rate of bony healing can be expected [10]. A further advantage is the fact that early full-weight bearing of the treated leg is possible.
Disadvantages and complications: If the fracture surfaces do not interlock, distinct reaming of the medullary cavity provokes increasing rotational instability. Therefore, distraction at the fracture site should be strictly avoided. Reaming of the medullary cavity causes an intramedullary pressure increase, which provokes an inflow of medullary contents and fat into the venous outlet system and can lead to embolization in the pulmonary circulatory system (fat embolism syndrome) [18]. Nutritive vascular canals in the endosteum can be occluded. A further consequence is the devascularization of the endosteum and a blood circulation disorder of the bone. Through the periostal blood supply there is a centripetal compensation of the perfusion. After reaming, the periostal blood supply is raised manifold. Six to eight weeks are needed to restore the endostal blood supply, depending on the damaged length. This process can be delayed or stopped because of excessive heat development during the reaming procedure (heat necrosis), resulting in sequestration. Resorption processes, especially in combination with infection (with typical clinical signs like fever, chills, reddening, and fistulas) can spread to the entire medullary cavity and can cause loosening of the nail. This complication is called medullary phlegmona and can provoke a life-threatening septic reaction. First, the complex context must first be recognized. Only experience and consultation enable an adequate reaction, which should result in a treatment plan (delayed healing of the fracture, pseudarthrosis, sepsis, septic pseudarthrosis, segmental defect, and defect nonunion).
If the medullary cavity is not accurately prepared by reaming or if the diameter of the nail is too large, the nail can get stuck. Driving the nail into the bone using excessive force can lead to further fragmentation and to avulsion of the femoral neck. As a consequence, the nail has to be removed. The medullary cavity must be re-prepared properly or the diameter of the nail has to be reduced. Only in rare cases does the nail break; in general, this problem can be solved by re-nailing after further reaming and by the use of a nail with a larger diameter.
If the nail is inserted too medially, for example, in the fossa piriformis, the branches of the a. circumflexa femoris lateralis, which are responsible for the blood supply of the femoral head, can be interrupted. After a certain time period a consecutive avascular femoral head necrosis (AVN) can develop.
Surgery is performed with the help of image intensifiers. Although the radiation exposure of the patient is negligible, the level of radioactive contamination of the surgical team must be controlled.
The classical indication for intramedullary nailing combined with reaming is restricted to transverse and short oblique fractures, which are located in the middle part of the shaft and is therefore very narrow.
These principles can also be realized with a slotted, clover-leaf profile nail using a basic set for interlocking nails. Solid nails and nails without a slot are not suitable for classical intramedullary nailing. They can only be used for “pinning” of the fracture. With these implants it is not possible to achieve a diagonal deadlock in combination with a longitudinal deformation.
Healing rate: 96 %.
21.5.2.4 Interlocking Nailing
Principle [12, 15]: The logical extension of intramedullary nailing in the terms of length, axis, and rotational control is an implant bone compound, transfixing the nail in the bone cylinder with the help of interlocking screws. To prevent a tilting motion of the implant (in case the nail is smaller than the diameter of the medullary cavity), a traversing bolt (screw) should be inserted at an oblique angle to the nail axis. However, if interlocking is performed perpendicular to the nail, double interlocking (two screws, double transfixation) is necessary to prevent a tilting motion, as mentioned above. Interlocking enables use of nails with smaller diameters compared to the medullary cavity because intimate contact between the inner surface of the medullary cavity and the surface of the nail (tube-in-tube stabilization) is no longer crucial for stable intramedullary osteosynthesis. Therefore, strictly speaking, the term “interlocking nailing” can only be used under specific circumstances. Actually, the term “interlocking splinting” according to Küntscher would be more appropriate.
Dynamic interlocking nailing: This is an adequate technique if the length of one of the main bony fragments is long enough that, after reaming, the nail becomes jammed transversally in this fragment. The second main fragment is too short and the width of its medullary cavity is too large. Therefore, to avoid any unwanted, disturbing rotational or tilting movements, this fragment is connected to the nail with an interlocking screw/bolt. Because the interlocking was only performed on one side, the weight that is put on the affected leg leads to an impaction of the fracture or to pseudarthrosis. As a consequence, the necessary local compression for bone healing will be generated. Dynamic interlocking nailing is therefore “real” medullary nailing combined with interlocking and it is used in fractures and pseudarthrosis, which are located proximal or distal of the narrowest part of the hourglass-shaped medullary cavity of the femur. Comminuted fractures (with several fracture fragments) or fractures that tend to shorten or are at risk of twisting are not suitable for treatment with the dynamic interlocking nailing method. Therefore, the best indications are pseudarthrosis and simple transverse or short oblique fractures. The nail-bone-union takes up the load, but the bone cylinder plays a decisive role as a load carrier as well.
Static interlocking nailing: If interlocking bolts are applied proximally and distally to the nail, the length and axis control is taken over by the statically interlocked nail (assuming that both bone fragments have an adequate length to be able to place the interlocking bolts). The load carrier is almost solely the nail, which transfers the load from the bolt proximally to the bone distally. Therefore, a nail is needed that offers the adequate load transmission capacity and possesses drill holes proximally and distally to incorporate the interlocking bolts. The bending capacity of a slotted medullary nail increases fourfold with every millimeter of increasing diameter. Further reinforcement results from the increase of the metal wall thickness in nails with large diameter. Another measure would be to eliminate the slot in the nail or ultimately the nail cavity as well. The result is a so-called solid nail. The increase in the nail’s mechanical attributes leads to a relative weakening of the bolts. Thin and weak bolts break before the nail breaks. Strengthening of the bolts and the nail leads to a cutting through mechanism and loosening of the bolts in mechanically weak bones (e.g., osteoporosis). Furthermore, the solid nail cannot be inserted with the help of a guide wire, which can lead to manipulation problems intraoperatively with regard to the optimal positioning of the nail. As a consequence, an axis deviation may occur.
These considerations are the reason for a discussion about implants of different manufacturers and about pros and cons of reaming. The optimal implant is cannulated, is only inserted temporarily, is not too stiff, has an antecurvature, and features a left and right version.
Proximal interlocking is performed percutaneously with the help of precisely working targeting devices, while distal interlocking is carried out in an orthograde radiation direction with the help of an image intensifier in the so-called “freehand technique.” From a mechanical point of view, the area of the femoral shaft, which lies between the two bolts, is an unburdened area. The first adopters of the interlocking nailing technique according to Küntscher feared that this zone would be revoked from the remodeling process (because it is mechanically neutralized) and will result in a too-weak bony structure that could be responsible for spontaneous fractures after implant removal. Therefore, they incorporated a dynamization into the treatment concept.
Dynamization means removing the interlocking bolt from the longer bone fragment after the first signs of callous consolidation have been detected at the fracture site by X–ray. The authors initially postulated that this step had to be performed 8 weeks postoperatively. In the course of time, it could be shown that this measure is unnecessary in the majority of the cases. After having removed the implant correctly, no re-fracture was observed after 1 1/2–2 years. Therefore, the theory of high stress protection can be dismissed. At present, dynamization is reserved for cases with delayed fracture healing verified by X-ray after a static interlocked procedure was performed. Furthermore, it is only expedient if the nail’s dimensions are adequate to protect the axis and length of the femur and if a dynamic load can be placed onto the fracture zone. Dynamization can lead to healing, but it can also be the cause of complications (if performed improperly), which are shortening, axis deviation, and nonunion (especially if the bolt has been removed at the wrong time point and from the shorter fragment).
Indication for Interlocking Nailing:
All types of fractures situated between the second and fourth fifth of the femur diaphysis (Fig. 21.2). In open fractures, bone and nail have to be covered with vital muscles.
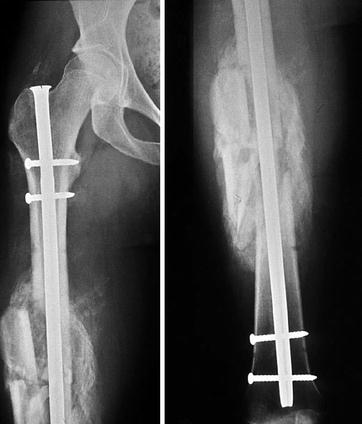
Fig. 21.2
Multifragmented femoral shaft fracture with locking nail and good callus sleeve
Delayed fracture healing with manifest or impending implant failure in the area of the femur diaphysis.
Impending or evident pathological femoral shaft fracture in the case of multiple metastases and short life expectation
Necessary Instruments, Tools, and Implants
Traction table or Müller distractor
One or two image intensifiers
Instruments for the insertion and removal of the nail
A complete set of nails (diameter: 10–18 mm, length: 36–46 cm, in 2 cm intervals)
Set of interlocking screws/bolts
Proximal targeting device
Distal targeting sleeve for interlocking, or alternatively a radiolucent drill attachment for the freehand technique
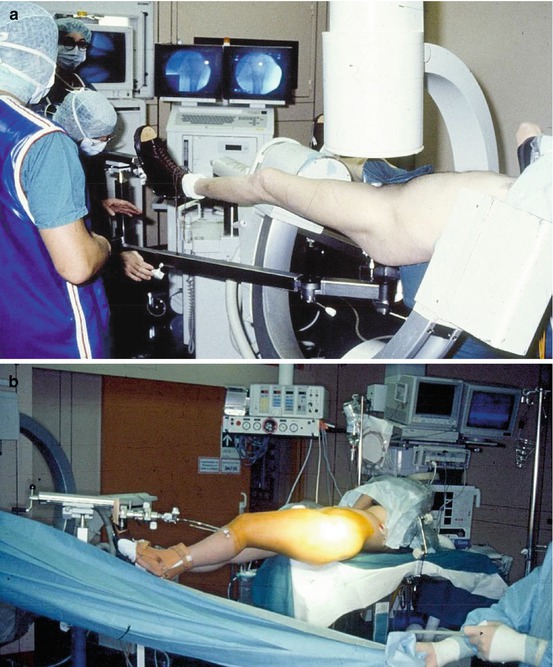
Technique: The patient is placed on the traction table (Fig. 21.3), preferably in a supine position. The healthy leg can be positioned lower or on a gynecological support, in a way that it does not impair the X-ray examination and the assessment of the affected thigh. A synchronized X-ray view of the fracture in two planes is of great advantage. Anatomical reduction of the fracture is performed. The skin incision is made at the palpable tip of the trochanter major. The fascia and the gluteal muscles are split in the direction of the fibers for a length of 5 cm. The medullary cavity is then opened with a pointed curved awl at the medial border of the trochanter in the direction of the basis of the femoral neck, as medial as possible but not through the fossa piriformis. The guide wire for the reamer is inserted into the medullary cavity of the main fragments of the fractured femur. After reaming the medullary canal with the help of the guide wire (if the fracture is more fragmented, the reamer must cross the fracture zone by pushing it forward or retracting it without revolution), a nail of 1–2 mm smaller diameter than the last reamer head, already equipped with the proximal targeting device, is inserted through the guide wire in its definitive position. The length of the nail is judged by the length of the healthy femur, in case the length of the injured extremity cannot be determined exactly. If both femurs are broken, nails of the same length are implanted on both sides. Proximal interlocking is performed with the help of the targeting device as follows: incision of the skin and fascia, blunt separation of the muscle fibers onto the femur, insertion of the target sleeve onto the bone using the targeting device, drilling, and insertion of a screw of the chosen length in a way that the medial and lateral corticalis are grasped. The targeting device can then be removed. The distal interlocking requires the exact circular presentation of the interlocking holes at the distal end of the nail using a precise lateral projection perpendicular to the holes with the help of the image intensifier. In this setting, the shadow of the scalpel is used to determine the height of the holes. As soon as the correct position is located, the skin and fascia are opened with a stab incision. The musculature is separated using a raspatory until contact is made with the bone. Under X-ray control, a targeting sleeve is brought in contact with the bone until the nail holes become visible through the sleeve on the X-ray image. The three holes (sleeve, lateral hole in the nail, and medial hole in the nail) have to be superposed and have to be seen as only one. With this maneuver, the correct location and the direction of the necessary drilling can be decided. After drilling through the target sleeve is completed, the length of the screw can be determined followed by the insertion of the first distal interlocking screw.