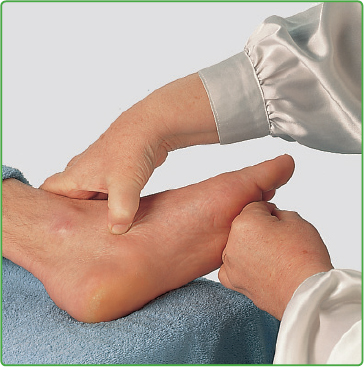
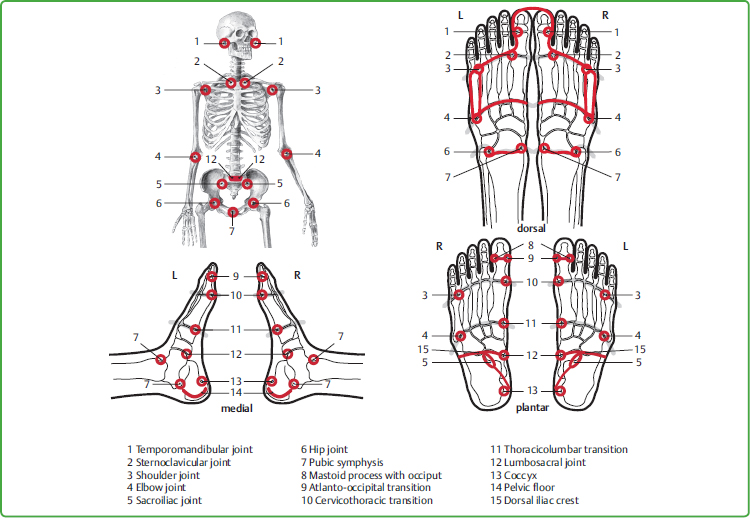
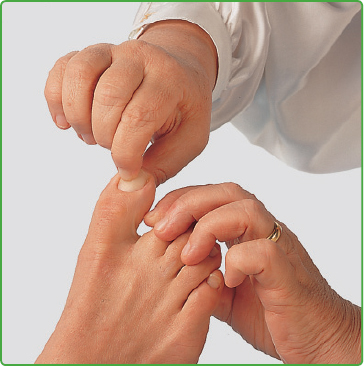
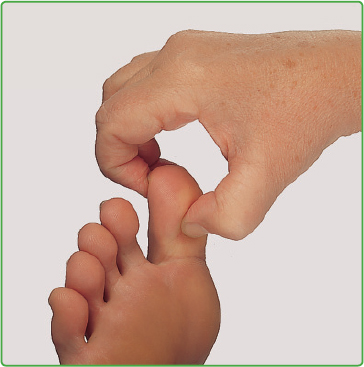
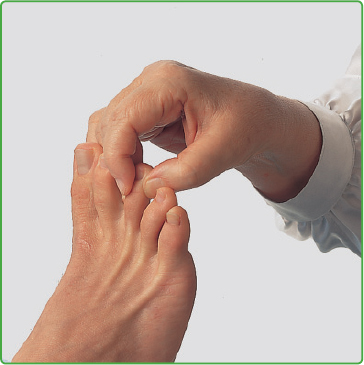
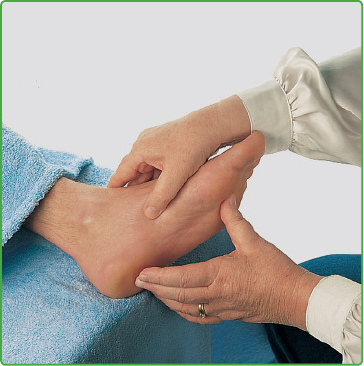
10 The Individual Groups of Zones A complete overview of the reflex zones from plantar, dorsal, medial, and lateral sides can be seen in Chapter 9 (Figs. 9.1–9.4). Each of the following descriptions of individual groups of zones is divided as follows: • General information on the individual zones • Illustration of the group • Description of the anatomical position of the zones • Description of the treatment technique in the individual zones The illustrations are color-coded as follows: • Green: bones and tissue • Blue: respiratory organs • Red: urinary tract • Yellow: solar plexus, sensory organs, and endocrine glands • Brown: digestive tract • Orange: brain, heart, and lymphatic system. The approved direction of work is shown by arrows marked on the illustrations of the groups. The basic rule for localizing the zones is as follows: • Ventral side of a person = dorsal side of the feet • Dorsal side of a person = plantar side of the feet. While working in the zones it is of great benefit if one is aware of the fact that “feet” mirrror the entire person. Mentally uniting the microsystem and macrosystem of the person thereby increases the quality of the treatment as a whole. Note: In Fig. 10.1 I should like to point out the astonishing accuracy and therapeutic significance of the similarity in shape between the person in situ and their feet: 15 important joints and bony transitions on a large scale can also be recognized in proportion as joints and transitions in the feet. Fig. 10.1 Similarities in shape between joints and skeletal transitions in macro- and micro-systems. The pubic symphysis zone on the medial transition from the heel to the ankle bone is also included. Although it is not shown here, it can be seen in Fig. 9.3. In some zone descriptions, there are overlaps with groups to be discussed later. Thus, for example, the lymphatic region of the head and neck is not explained with illustrations and text until group 7, the lymphatic system, although it also belongs to the head and neck zones; the pancreas is discussed in group 4, the endocrine glands, but is also part of group 6, which contains the digestive organs. Since projections have been treated on the foot, a phenomenon has been observed for the toes as zones of the head and neck that eludes linear logic but is confirmed in daily practice; namely, on the one hand, the zones of the head and neck can be found concentrated in the two big toes, on the other hand, they are reflected in greater detail in all the toes. Both options are shown in the following illustrations. The zones of the head and neck are supplemented by the zones of the teeth and jaw. (Figs. 10.2, 10.3) Unlike the other toes, the big toes contain only two bones on which the zones of the head and neck are located in the same way as in situ. On the dorsal side we find the zones of ventral (frontal) organs and tissue of the head and neck, for example, the forehead, nasopharynx, and mandibular joint. (This joint is discussed in more detail in Chapter 28.) The zones of the head region are seen from the dorsal side on the plantar side of the big toe, for example, the brain, lower occiput with mastoid process, and neck. Organs and tissue situated on the median line of the head and neck are represented on the medial sides of both big toes; the outer areas laterally. From the plantar side of the foot, the similarity in shape between the two big toes and the head and neck is easy to comprehend, thus the rounded shape of the two closely arranged distal phalanges of the big toes corresponds to the head, the end joints of the toes to the atlanto-occipital joint. The somewhat narrower shape of the two proximal phalanxes resembles the shape of the neck as it narrows from the head. The four toes, consisting of the distal, middle and proximal phalanges, are limited on their medial and lateral sides by interdigital skin folds, while from their plantar and dorsal sides they can each be treated as far as their anatomical beginning in the toe joints. The zones of the eyes, ears, frontal and maxillary sinuses, and teeth are displayed in detail on the toes. Figs. 10.2 and 10.3 can only show the ventral and dorsal aspects of the toes. However, there are also zones on the medial and lateral sides of the toes, above all those of the tooth–jaw region. The zones of the teeth and jaw cover the whole functional unit of the tooth, the tissue of the tooth with its root, the bony structure, the adjacent gingiva (mucosa), and the nerve supply of the maxilla and mandible. They are therefore relatively extensive and cover dorsal, medial, lateral, and plantar areas of the middle and proximal phalanges. The zones of the teeth often extend to the distal and middle phalanx; how far depends on the size of the roots. Usually the places shown in Fig. 10.2 are the most sensitive, however. We distinguish between • the maxilla (upper jaw): located in the middle of the middle phalanges of the second to fifth toes; • the mandible (lower jaw): located around the distal parts of the second to fifth proximal phalanges. However, on the big toe, the zones of the first incisors (tooth 1) are found more in the dorsal area, directly distal and proximal to the joint between the distal and proximal phalanx. Medially and laterally, each of the toes 2, 3, and 4 has a zone in the distal and proximal areas; the fifth toe corresponds to the wisdom teeth (tooth 8) distally and proximally from all four sides. As aforementioned, it is only possible to touch upon the medial and lateral parts in the illustrations of the zones of the teeth (Figs. 10.2, 10.3). However, the sides of the toes are often effective in terms of treatment. Unless the therapist has a very long trunk, the treatment should almost always be performed with the index finger on the dorsal surface of the big toe and the thumb on the plantar side. The nails of the big toes (corresponding to the zones of the forehead) are treated with the thumbnail or index finger nail, the strength of the therapist’s own nails permitting (Fig. 10.4). They often prove more sensitive than expected. On the plantar side of the distal phalanx (lower occiput), we work with the vertically positioned thumb in a horizontal direction toward the heel well into the joint between the proximal and distal phalanges (Fig. 10.5). It is rather more difficult to treat the entire length of the lateral side of the big toes as the interdigital tissue covers part of the proximal phalanx and has to be pushed aside by the working finger to a certain extent in order to be able to reach the zones of the transverse processes of the lower cervical spine with the tip of the index finger. Fig. 10.4 Zone of the forehead. Mobilization of the big toe joints should be performed as follows: As a saddle joint, the distal joint of the big toe is moved into plantar flexion under slight extension. Important Note about Dosing: Delicate, cautious, minimal movements should be used initially for patients with skull fractures or brain trauma in order to avoid aggravating the symptoms. When treating the metatarsophalangeal joint, several variations present themselves, all of which must be performed using cautious extension: • Gentle up and down movements using good stabilization of the base of the proximal phalanx of the big toe and the head of the first metatarsal bone, or • Circular movements, both in a medial to lateral direction and vice versa, beginning with small, gradually increasing movements, or • Semicircular rotation in plantar and dorsal directions. Beware of overdosing patients suffering from trauma in the neck region and/or from other chronic or acute problems in the region of the thyroid and heart (segmental correspondence with the seventh cervical vertebra). When mobilizing the big toe, it is advisable to begin slowly and carefully in order to be able to evaluate the patient’s current reactions correctly. Usually four to six movements in each direction suffice; now and then, however, more are indicated, above all, to release severe muscular tension in the head and neck. Fig. 10.5 Zone of the lower occiput. The thumb is used to work on the plantar side of the toes, usually with the index finger on the dorsal side. The lateral borders can also be treated with the index fingers. Like the big toe, the toenails are treated specifically with the therapist’ own fingernail, emphasizing in particular their proximal parts (zones of the frontal sinuses). During treatment, toes should remain in their normal position and not be bent too much. The free hand therefore holds and supports the toes being treated at the metatarsophalangeal joints. The second to fifth toes can also be brought into slight extension. Even with gentle stretching, a surprising “cracking” sound can sometimes be heard, mainly in the metatarsophalangeal joints. This usually provides relief not only in the joint itself, but also in the corresponding zones of the head, neck, and shoulder girdle. Extension should never be performed too vehemently in order to prevent injuries involving the tissue and joint itself. Stretching the individual toes not only brings relief to the bones of the feet, but also releases overtension throughout the body, as evidenced by deeper breathing. Recent experience shows that in addition to the big toe joints, the joints of the four smaller toes can also sometimes be treated more effectively with grips from Ortho-Bionomy. Fig. 10.6 Zone of the teeth (thumb or index finger is active). The zones of the teeth and jaws are always included in a nonspecific manner in the aforementioned treatment of the toes. For targeted treatment of the zones of the teeth and jaws, we work in half-circles from the plantar surface over the side of the toe to its dorsal aspect, and vice versa. As with all zones, here too the strain within the overall area of the zones of the teeth is often uneven. The basis of the proximal phalanges of the toes is inadvertently presumed to be too distal usually; exact anatomical orientation will help to correct the miscalculation of the position, above all, in a plantar direction. For treatment indications pertaining to the head and neck group of zones, see Chapter 21.2. These zones form an “axis of coordinates” in the feet. Placed side by side, the two longitudinal arches touch in the median line, and as the zone of the spine they form the vertical bars, while as the shoulder girdle the two horizontal bars form the horizontal part. Although the spine is usually considered to be part of the skeletal structure, it can also be understood as a central “organ” because of its direct connection with all the tissues and organs within the body through the nervous system, not only in situ but also in the zones of the feet. (Figs. 10.7, 10.8) The appearance of these zones emphasizes particularly clearly the similarity in shape between the bends of the longitudinal arch and the lordosis of the spine. Representing an area in the center of the body, they can be found on the right and left foot in longitudinal body zone 1. The more the entire width of the plantar longitudinal body zone 1 is included, the more the vertebrae are included in their entirety, as far as the transverse processes. The bony part of the longitudinal arch, seen from the medial side, above all, serves to distinguish the individual sections of the vertebrae precisely. It is worth palpating them carefully to be certain in differentiating their various sections (see Fig. 10.1). • Cervical vertebrae 1 to 7: Their spinous processes are arranged on the medial-plantar side of the proximal phalanx of the big toes, the transverse processes on their lateral side. The distal phalanx of the big toe corresponds to the lower occiput at the transition to the cervical spine. The metatarsophalangeal joint of the big toe characterizes the transition from the neck to the thoracic spine. • Thoracic vertebrae 1 to 12: The spinous processes are located in the medial-plantar tissue along the entire length of the first metatarsal bone. The transverse processes can be detected on the plantar side at the lateral limit of the entire first metatarsal bone. • The transition from the base of the first metatarsal bone to the first cuneiform bone represents the start of the so-called Lisfranc’s line which in situ roughly corresponds to the waistline. At the same time, it is also the transition to the lumbar spine. This point requires particularly keen and precise palpation and at the same time is one of the most important orientation guides for locating the zones of the central abdominal region. • Lumbar vertebrae 1 to 5: The spinous processes pass from the medial-plantar tissue of the first cuneiform bone to the proximal end of the navicular bone, the transverse processes must be treated on the plantar side at the lateral limit of the first cuneiform bone and the longitudinal half of the navicular bone. • The medial navicular bone, which protrudes somewhat in many patients, marks the transition to the sacrum with its proximal limit and corresponds to the promontory, a well-known weak point not only in the longitudinal arch, but also in situ. • Sacrum: Its upper limit begins on the plantar side at the point of contact of the navicular bone and talus and extends horizontally into the Fitzgerald longitudinal body zone 2 or 3. The diagonal limit runs from the lateral to the medial side. The sacroiliac joint, which occupies approximately a third of this section, begins at the point at which its horizontal plane passes into the diagonal plane. As organs and tissue often overlap in situ, here too it is only possible to distinguish from the disease pattern of the patient whether primarily the sacroiliac joint or the small intestine are treated. • Coccyx: The diagonal end of the sacrum, now in the longitudinal body zone 1 again, marks the start of the short section of the coccyx, likewise on both feet. The zones of the thorax are located on the plantar and dorsal sides of the metatarsal bones, roughly along the first metatarsal bone to the medial limit of the fifth metatarsal bone. According to the shape of the thorax in situ, the external lower edge extends to the third cuneiform bone and the cuboid bone, while the medial edge leads to the lower third of the first metatarsal bone where it connects with the zone of the sternum. The metatarsophalangeal joints represent the zones of the shoulder girdle, connected segmentally to the liver and gall bladder on the right and to the heart on the left side. The shoulder joints with the head of the humerus as the outer limit of the shoulder girdle can, as in the body, also be recognized as a joint area on the foot: this is the site where the medial part of the head of the fifth metatarsal bone touches the lateral part of the head of the fourth metatarsal bone. Although the foot essentially resembles the zones of the head, neck, and trunk, starting from the zone of the shoulder joint, the upper arm as far as the elbow can be treated along the entire surface of the fifth metatarsal bone. The similarity in shape between the upper arm and the fifth metatarsal bone is particularly noticeable. The sternum, located on the median line in the body, is found on both feet on the dorsum of the first metatarsal bone. This zone comprises approximately two thirds of its length; the lateral limit of the first metatarsal bone corresponds to the sternocostal joints. According to the indication, the spine can be treated with the thumb in both distal to proximal direction and vice versa. With neutral treatment of the spine, we do not work directly on the bony surface of the longitudinal arch, but in the muscle and connective tissue on the medial-plantar side. For specific strains, however, we include it. In order to be able to target treatment of the promontory (Fig. 10.10) as a zone, we place the thumb on the transition between the navicular bone, talus, and calcaneus and continue on the plantar plane between the navicular bone and talus. These zones can be treated with the thumb on the plantar side from distal to proximal in adjacent lines. As a result of this treatment direction, the slack tissue around the metatarsophalangeal joints (zone of the shoulder girdle) is strengthened, at least passively. If the foot is positioned in outward rotation, the metatarsal area can also be treated from proximal to distal with the same effect. Fig. 10.9 Zones of the spine from cranial to caudal. In the dorsal region of the metatarsal bones only the inter-metatarsal spaces are treated to avoid too strong and direct stimulation of the periosteum. These zones can be treated with ease using the index finger, while the thumb of the free hand holds and supports the plantar side of the forefoot in the center of the metatarsophalangeal joints. The zones of the upper arm (Fig. 10.11) are treated on the dorsal, lateral, and plantar sides of the fifth metatarsal. The shoulder joints can easily be reached on the dorsal side using the index finger, while the thumb is more appropriate on the plantar side. The sternum (Fig. 10.12) can be treated both from distal to proximal or from medial to lateral in several adjacent lines. Usually, the index finger is the most suitable. For treatment indications pertaining to the group of zones of the spine and shoulder girdle, see Chapter 21.3. To provide an overview, this extensive area is divided into two main groups. The zones of the urinary tract comprise both of the kidneys, the ureter, bladder, and urethra.
10.1 Introduction
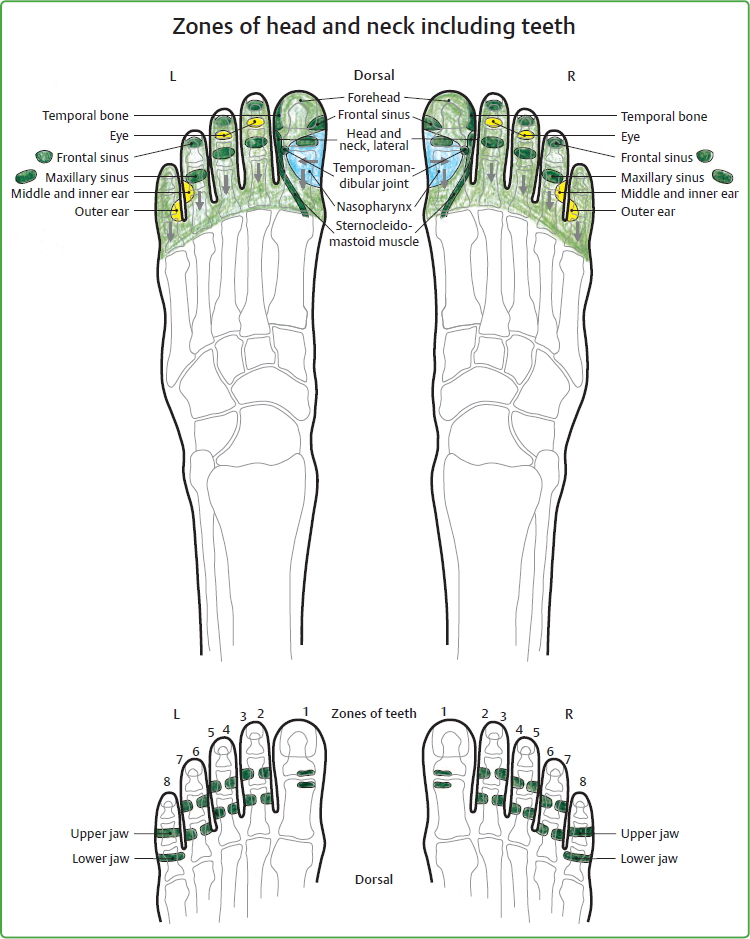
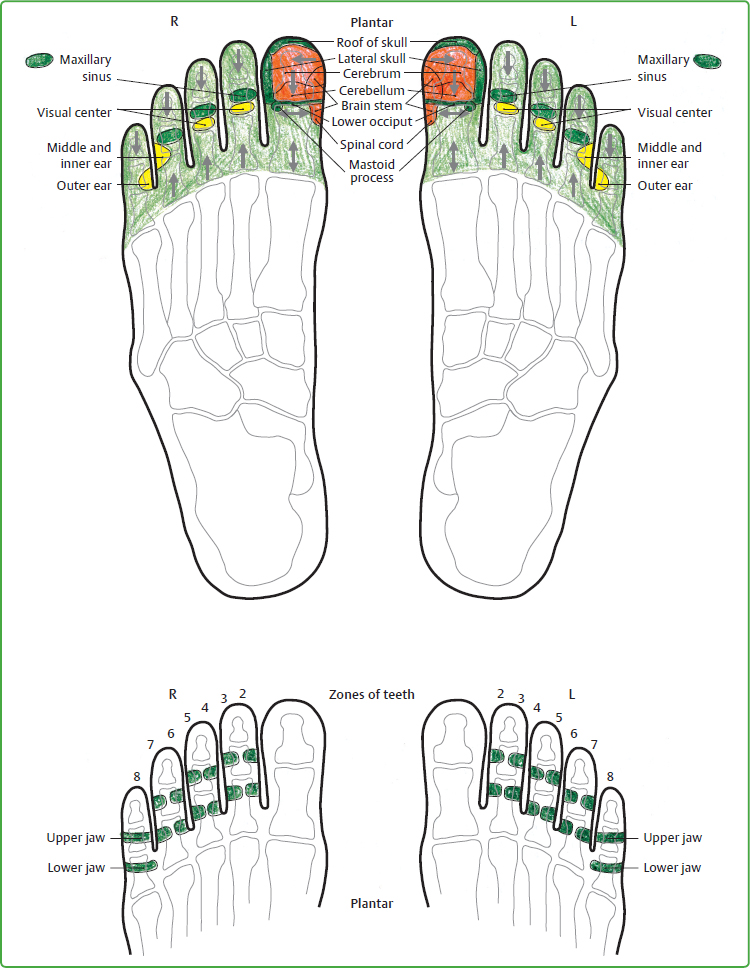
10.2 Zones of the Head and Neck
10.2.1 General Information
10.2.2 Illustration of the Zones
10.2.3 Anatomical Location of the Zones
In the Two Big Toes
In the Second to Fifth Toes on the Right and Left
The Tooth–Jaw Region
10.2.4 Treatment Technique
Treatment of the Big Toes
Technique for the Second to Fifth Toes, Right and Left
Technique for the Zones of the Teeth and Jaws
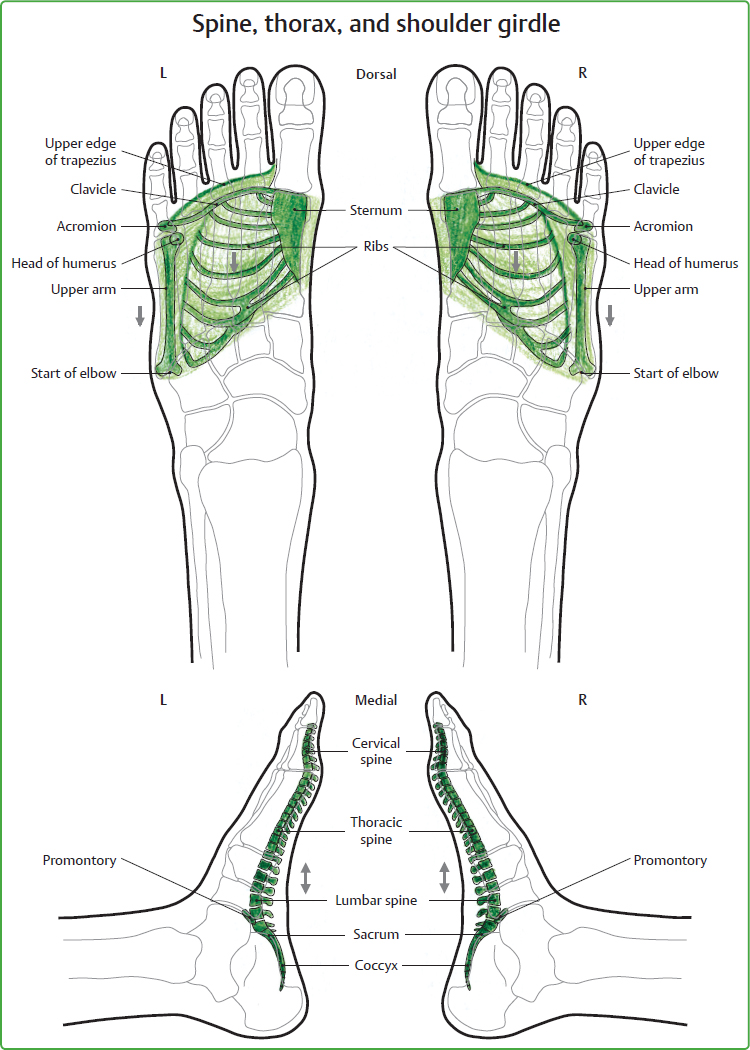
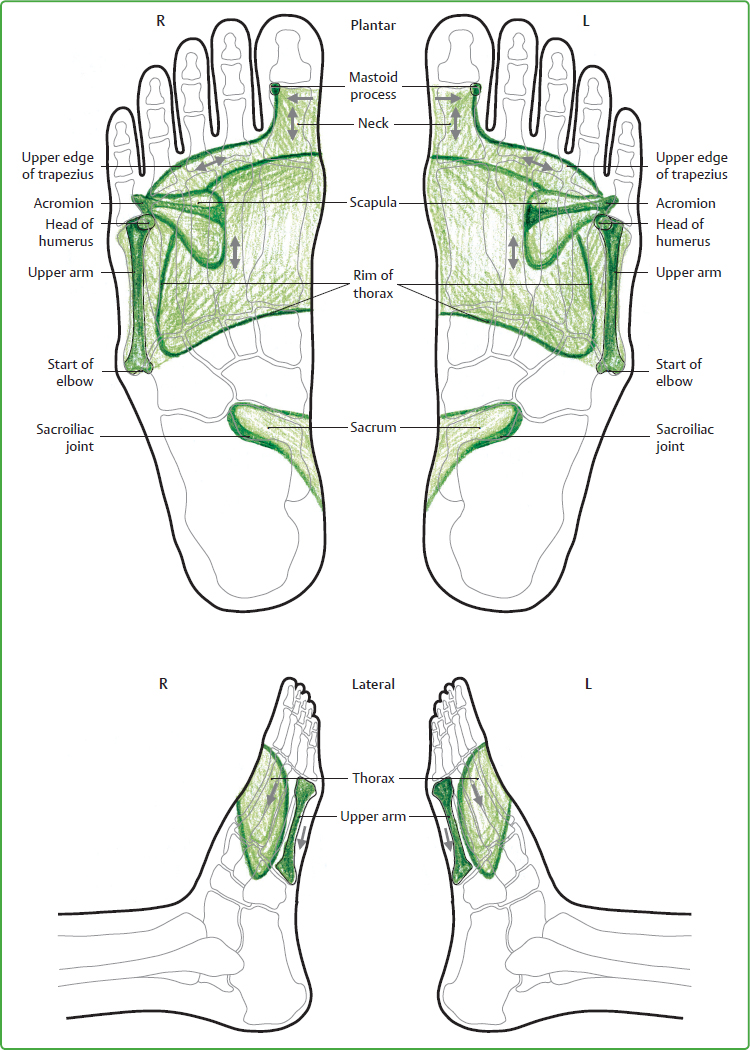
10.3 Zones of the Spine, Thorax, and Shoulder Girdle
10.3.1 General Information
10.3.2 Illustration of the Zones
10.3.3 Anatomical Location of the Zones
Zones of the Spine
The Individual Sections of the Spine
Zones of the Thorax and Shoulder Girdle
10.3.4 Treatment Technique
Zones of the Spine
Zones of the Thorax and Shoulder Girdle
10.4 Zones of the Urinary Tract, Bones and Tissue of the Pelvis to the Knee
10.4.1 General Information
Musculoskeletal Key
Fastest Musculoskeletal Insight Engine