13. Taping for sports injuries
Dr. Kristjan Oddsson
Introduction
Taping is used to treat and prevent different musculoskeletal conditions, for example ankle sprains (Thacker et al. 1999), patellofemoral pain (Gigante et al. 2001), and wrist sprains (Rettig et al. 1997). It can prevent injuries in sports where the risk of certain acute injuries is greater, for example ankle distortions in basketball and football, or protect and stabilize a body part during rehabilitation after an injury. The purpose of athletic taping is to support joints and ligaments by preventing unwanted movements.
There are multiple mechanisms that may explain the effects of athletic taping, and different variables have been studied scientifically: range of motion, kinesthesia, neuromuscular response, joint velocity, ground reaction forces, and postural control. Of these variables, the most common mechanism proposed for effective taping and bracing is limitation of joint motion (Arnold et al. 2004).
Athletic taping works best on areas of the athlete’s body where the skin cannot move too freely around the joint, i.e. where there is less soft tissue between the tape and the treated joint (Brukner, 2001 and Peterson, 2001). Ankle and hand or finger joints are examples where taping works well. Taping the knee and groin areas can be more difficult, and these areas are often treated with a combination of nonelastic tape, elastic tape, and elastic bandaging for more lasting support, particularly for use during sports activity. Athletic taping should be applied with common sense; it should not replace injury rehabilitation (which contains ROM, strength, balance, and coordination training), but instead support the rehabilitation process.
Tape for general use, sometimes called “coach tape” or “zinc oxide tape,” does not stretch, and should therefore never be used on acute injuries due to the risk of serious circulatory impairment. Nonelastic tape is normally 1.5in (38mm) wide and is designed to stabilize and prevent undesired joint movement. It works well for hand and ankle taping. For finger and toe taping, half the width is used. It is important that the injured ligament is kept in a shortened position while the tape is applied (Brukner et al. 2001).
Basic rules of taping
There are a few basic rules for sports taping:
1. The therapist should have clean, dry hands.
2. Either the treated area should be shaved or a specific underwrap should be used in combination with glue spray. The tape adhesive can cause allergic skin reactions and the underwrap helps prevent this.
3. All folds or creases should be smoothed out, and the tape must cover the entire treated area to ensure that no spaces or gaps are present. It often helps to use the other hand to closely follow the applied tape to smooth out any potential wrinkles during application.
4. Athletic taping normally starts from the uninjured part, spans over the injured or weak portion, and finishes on an uninjured part. It is crucial to preplan which movement needs to be restricted to achieve effective structural support from athletic taping.
5. The therapist should use as little tape as possible, and not make the application unnecessarily complex: simple but stable is best.
6. The sports therapist should never tape an acute injury due to the high risk of circulatory impairment. If taping of an acute injury is required, it is best to have a sports doctor carry it out.
7. The tape must be removed carefully, often with a pair of taping scissors, so as not to damage the athlete’s skin. If hair is present, the tape should be removed along the direction of hair growth to avoid unnecessary pain.
8. The taped athlete is always right. If the applied taping does not feel good, it should be reapplied.
Injury to the lateral ligaments, i.e. talofibular ligaments—“standard” taping technique
One of the most common injuries where athletic taping can have positive effects is ankle distortion. It is mostly one or more of the lateral ligaments of the foot that requires additional support.
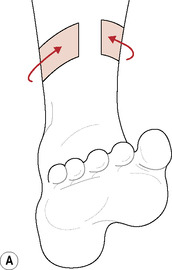
1. The ankle is kept at 90 degrees. One anchor is applied around the lower leg, just below the muscle belly of the triceps surae muscle (Fig. 13.1A).
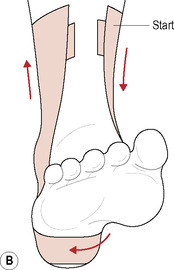
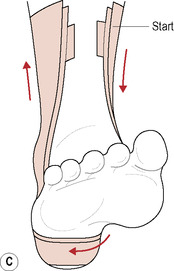
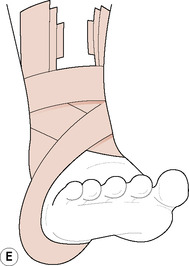
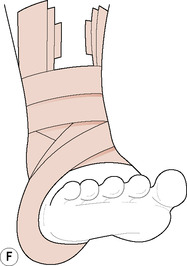
2. Stirrups are applied, starting on the medial side of the upper anchor. The first one (middle), covers the medial malleolus, goes right under the heel and up to cover the lateral malleolus. The second stirrup starts from the same place but 2cm in front of the first one, goes under the heel over the first one, and then ends 2cm behind the first one. The third stirrup starts 2cm behind the first one, goes over the two others under the heel, and ends 2cm in front of the first one. Now you have three stirrups covering both malleoli (Fig. 13.1B&C).
< div class='tao-gold-member'>
Only gold members can continue reading. Log In or Register to continue
Related posts:
 An introduction to sports massage
 Sports massage applications for different sports
 Soft tissue stretching in sports massage
 Work postures, hand placements, and basic massage strokes
 Soft tissue treatment techniques for maintenance and remedial sports massage
 Examples of event-based sports massage treatments
Stay updated, free articles. Join our Telegram channel

Full access? Get Clinical Tree


