and Peter J. Millett2
(1)
Steadman Philippon Research Institute, Vail, CO, USA
(2)
The Steadman Clinic, Steadman Philippon Research Institute, Vail, CO, USA
Keywords
ShoulderStrengthRotator cuffScapulaMusclesPhysical examClinical exam3.1 Introduction
The evaluation of strength is an important aspect of the shoulder examination that, when conducted properly, can provide substantial evidence for or against a suspected pathology within the differential diagnosis. To perform an adequate strength assessment, the clinician must have a basic working knowledge of anatomy and function of the skeletal muscles around the shoulder. In addition, it is important to understand the current state of research regarding shoulder strength testing to aid in the interpretation and treatment of various shoulder conditions.
3.2 General Concepts
3.2.1 Length–Force Relationship
The length–force relationship of the sarcomere was originally described by Blix in the late 1800s—a concept that was expanded upon by numerous other investigators [1–5]. In his original experiments, muscle tension during contraction was found to vary as a function of its overall length. After plotting his results, he found that this relationship took the form of a bell curve, the peak of which represented the active tension (i.e., contraction force) produced by a muscle at its resting length. As the length of the muscle was varied, the strength of contraction decreased, even if the muscle was passively stretched prior to initiating contraction (Fig. 3.1). Therefore, suboptimal limb positioning can have a profound effect on muscular contraction strength and, as a result, may lead to inaccurate measurements during the strength evaluation. In other words, maximum contraction strength cannot be achieved when a muscle is placed in a position outside of its native resting length.
Fig. 3.1
(a) Skeletal muscle structure hierarchy including a scanning electron micrograph (SEM) of a typical sarcomere. (b) Length-tension curve of skeletal muscle (Blix curve). Note that active and passive tension are additive as the muscle length increases.
Therefore, the reliability of muscular strength testing depends on the clinician’s knowledge of correct testing positions that are designed to optimize the length–force relationship of the particular muscle being tested. A few important clinical examples include strength testing of the infraspinatus, subscapularis, and deltoid muscles as described by Hertel et al. [6, 7]. In these maneuvers, the extremity is passively placed such that the muscle to be tested is in a relatively shortened position and the opposing muscle is in a relatively lengthened position (i.e. increased tension). The patient is then asked to hold the position. If the muscle being tested is weak, its contraction strength cannot overcome the passive tensile force that is applied to the opposing muscle when the arm is released by the examiner. For example, when testing for infraspinatus weakness, the humerus is passively positioned in approximately 20–30° of external rotation (also with the elbow flexed to 90°). This position decreases the passive tension across the infraspinatus muscle since its overall length has been shortened relative to its resting length. On the other hand, this position also increases the passive tension across the opposing subscapularis muscle. When the clinician releases the arm, the patient will attempt to hold the position by contracting the infraspinatus muscle. When this force of contraction cannot overcome the passive tensile force that is applied to the opposing subscapularis, the arm will internally rotate despite the patient’s best efforts (Fig. 3.2). This finding is referred to as a positive external rotation lag sign and the degrees of internal rotation lag (or the amount of internal rotation that occurs after the arm is released) is typically documented as a measure of infraspinatus weakness. The internal rotation lag sign [6], the deltoid lag sign [7], and the teres minor lag sign (also referred to as “Hornblower’s sign” [8] or “drop sign” [6]) use the same length–force relationship concepts and are discussed both later in this chapter and in Chap. 4.

Fig. 3.2
Clinical photograph demonstrating the external rotation lag sign. When the humerus is released from a position of approximately 20–30° of external rotation, patients with infraspinatus cuff pathology may be incapable of holding the position. As a result, the humerus undergoes compensatory internal rotation by the resting tension and tone generated by the stretched subscapularis muscle. (From Hertel et al. [6]; with permission).
3.2.2 Muscle Isolation
There are numerous muscles that cross or act upon the glenohumeral joint; however, several of these muscles produce similar force vectors which can complicate the assessment of muscular strength. As a result, shoulder motion within any plane likely involves contributions from several different muscles to produce the observed movement. While it would be ideal to isolate and test each individual muscle around the shoulder girdle, complete isolation of a single muscle for the purpose of strength testing is a nearly impossible task. In addition, weakness of one muscle can be substituted by another similarly positioned muscle, masking the underlying weakness during physical examination. This is especially true in cases where subtle weakness is present, such as in small rotator cuff tears where, in many cases, the overlying deltoid may substitute for the deficient cuff. In fact, the ability of the deltoid to substitute for a deficient rotator cuff is the underlying principle of reverse total shoulder arthroplasty in patients with massive, irreparable rotator cuff tears with associated superior migration of the humeral head. Another example includes the levator scapulae and the superior fibers of the trapezius which have similar functions; however, the neural supply to each muscle is different. Thus, a patient with an isolated injury to the dorsal scapular nerve may still demonstrate relatively normal scapulothoracic kinematics despite levator scapulae weakness.
It is typically more advantageous to isolate the overall function of specific groups of muscles rather than attempting to isolate each muscle individually. Alternatively, the clinician can also perform tests that conceptually and theoretically isolate specific muscles with the understanding that complete isolation is probably not attainable. Regardless of the method used, it is necessary to develop a consistent, repeatable examination protocol which can improve individual diagnostic efficiency and accuracy.
3.3 Quantifying Muscle Strength
3.3.1 Manual Muscle Testing
Manual muscle testing (MMT) is the most common method by which clinicians evaluate muscle strength. MMT utilizes a standardized grading system that is determined by the ability of the tested muscle act against gravity or against resistance applied by the examiner. In 1916, Lovett and Martin [9] first described the method of manual muscle testing in newborns with infantile paralysis. Since then, abundant research has been conducted regarding its various applications, including modifications of the original grading scale used to describe muscular strength. Despite these modifications, the scale that is most widely accepted is very similar to the original proposal by Lovett and Martin [9] and was devised by the Medical Research Council (MRC) [10] in 1943. The scale has six levels (0–5) and is presented in Table 3.1.
Table 3.1
Manual muscle testing grading system (levels 0–5)
0 | No visible or palpable contraction |
1 | Visible or palpable contraction without motion |
2 | Full range of motion, gravity eliminated |
3 | Full range of motion against gravity |
4 | Full range of motion against gravity, moderate resistance |
5 | Full range of motion against gravity, maximal resistance |
The inter- and intra-observer reliabilities of MMT in the evaluation of various pathologies resulting in muscle weakness range from 0.82 to 0.97 and 0.96 to 0.98, respectively, according to reports dating back to 1954 [11–22]. However, only a few studies have specifically examined the reliability of manual muscle testing for the evaluation of patients with various shoulder pathologies [23–25].
Although the MMT scale is still widely used in clinical practice due to its low cost and rapidity, there are several limitations that must be noted. The first limitation is that the MMT scale is subjective in nature and the score depends on the clinician’s judgment [26–28]. The second limitation of MMT is the inability of the scale to detect small, between-level differences in strength. This is largely due to the stepwise design of the scale and has spurred the development of other scales that have more diagnostic levels [10]. Third, the MMT scale has been criticized for not being capable of detecting clinically relevant differences in muscle strength. MMT was originally developed to measure strength improvements in patients treated with paralytic disorders and muscular dystrophies [29, 30]. Thus, the application of MMT to a variety of clinical settings is probably due to tradition rather than sound scientific rationale. As a result of the subjectivity and reported inaccuracy of MMT, many clinicians (and insurers) prefer to measure strength with more objective means that are more sensitive, such as with handheld dynamometers [31].
3.3.2 Dynamometry
A dynamometer is a device used to determine the mechanical force generated by a contracting muscle. While these measurements of force are generally given in Newtons or kilograms, torque can be calculated by simply multiplying Newtons or kilograms by the distance (in meters) between the dynamometer and the center of rotation of the involved joint.
Dynamometers first appeared in 1763 [32] and, since then, numerous modifications have been made. Currently, dynamometers come in a large variety of shapes, sizes, and functional mechanisms that produce the desired force measurements. Isokinetic dynamometers are large machines capable of generating numerous values including peak muscular force, power, and endurance among numerous other measurements (Fig. 3.3) [33]. Isokinetic testing has been used as a standard method of muscle strength measurement over the past 40 years since it has been found to be reliable, reproducible, and valid on numerous occasions [34–38]. As a result, isokinetic devices have also been used as reference standards for the evaluation of newer devices that test muscle strength [39–42].
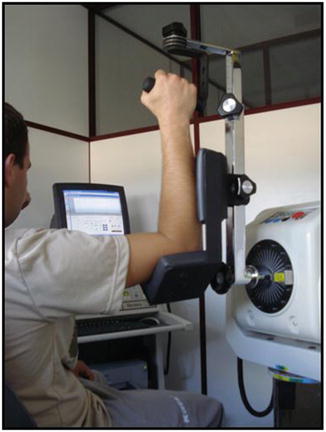
Fig. 3.3
Example of an isokinetic dynamometer which has been set up to measure shoulder internal and external rotation strength at 90° of abduction. (From Ribeiro and Oliveira [161]).
A large number of studies have evaluated the inter- and intra-rater reliability using handheld dynamometers to assess muscular strength. A systematic review by Stark et al. [43] identified 19 studies in which the authors compared handheld dynamometry to isokinetic muscle strength testing. In that review, all but two studies demonstrated either good to excellent correlation with isokinetic testing or good to excellent intra-class correlation coefficient (ICCs). The study by Burnham et al. [39] found a low correlation of handheld dynamometry with isokinetic testing when measuring shoulder abduction strength in a series of football players (r = 0.28–0.43); however, the scapulae of the tested athletes in that study were not stabilized by the examiner, introducing potential confounding factors in their measurements. Reinking et al. [44] also found a poor correlation between handheld dynamometry and isokinetic testing when measuring knee extension (r = 0.43–0.45); however, testing this group of muscles requires a sufficiently strong examiner to prevent movement of the dynamometer while the subject is tested.
In general, clinical dynamometry is performed with handheld devices due to their portability, simplicity, low cost, and reported excellent reliability and validity when compared to isokinetic dynamometry [27, 43]. Although there are numerous such devices that have been reported as both accurate and reliable for the measurement of muscular force, most handheld dynamometers fall into one of two categories depending on the mechanism of measurement. These include spring scale and strain gauge dynamometers. Spring scale dynamometers work simply by measuring the deformation (lengthening) of a spring as a force is applied—this deformation distance is converted to kilograms and is based on the stiffness (spring constant) of the inserted spring. Strain gauge dynamometers are more complex and work by detecting changes in electrical signals caused by the deformation of an electrical insulator by an outside force (e.g., the force of muscle contraction) (Fig. 3.4).
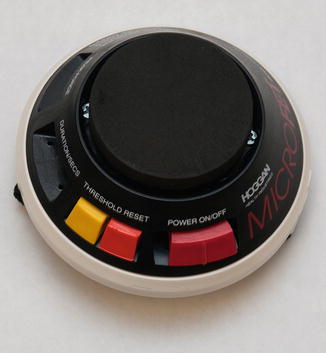
Fig. 3.4
Example of a typical strain gauge dynamometer.
In 1989, Bohannon and Andrews [45] studied the accuracy of two handheld spring scale and two strain gauge dynamometers using a series of certified weights ranging from 5 to 55 pounds. The dynamometers were tested by gradually increasing the applied weight by 5-pound increments and comparing the readout measurement generated by each device to the actual weight applied. In their study, the spring scale dynamometers measured forces significantly different from the force that was actually applied. The authors also noted that the accuracy of the spring scale dynamometers diminished after extensive use, suggesting that spring fatigue or permanent deformation have been responsible for inaccurate measurements. In contrast, the strain gauge dynamometers measured forces that were much closer to the actual applied force.
Hayes and Zehr [46] evaluated the reliability of MMT, a manual spring scale dynamometer and a digital strain gauge dynamometer to measure rotator cuff strength using a random effects statistical model. In this group of patients with symptomatic rotator cuff disease, they found that the digital strain gauge dynamometer was the most reliable method of measuring rotator cuff strength. Hosking et al. [47] examined the test-retest reliability of handheld dynamometers in children with and without muscular disease and found that repeated testing did not cause measurement variability of more than 15 %. However, another study by Bohannon [28] found the test-retest reliability to be much higher in healthy patients compared to those who had muscle weakness, potentially suggesting that muscle fatigue may play a role in the ability to obtain an accurate measurement of peak muscle force after multiple testing sessions.
There are several other potential limitations of digital handheld dynamometry. The first is that these handheld devices are of minimal use when testing large muscle groups that can produce a much larger force than the examiner can resist. This is particularly true for large, high-output lower extremity muscles that may overcome the strength of the examiner’s upper extremity [28, 48–51]. A second limitation is that an inability to adequately stabilize the device while the subject applies maximal force is quite difficult to achieve. As a result, handheld dynamometers placed in a fixed apparatus have gained popularity to eliminate the effect of examiner strength and stabilization on the reliability of strength measurements [52–55].
3.3.3 Electromyography
Electromyography (EMG) has been used extensively over the past century to evaluate the utility of various manual muscle tests. An electromyogram is obtained by placing an electrode on the skin over the muscle being tested (i.e., surface EMG) or, alternatively, a thin wire can be placed directly into the muscle of interest (i.e., intramuscular EMG) (Fig. 3.5). When the muscle is stimulated, the electrical potential that is produced by the muscle travels through the electrode and towards the connected electromyograph which interprets and displays the signal through an oscilloscope. It is important to remember that EMG readouts with higher amplitude do not necessarily indicate that the muscle is generating greater force. As an example, an eccentrically contracting muscle produces similar amplitude as a concentrically contracting muscle; however, the force produced by the eccentric contraction may be much less than that produced by the concentric contraction.
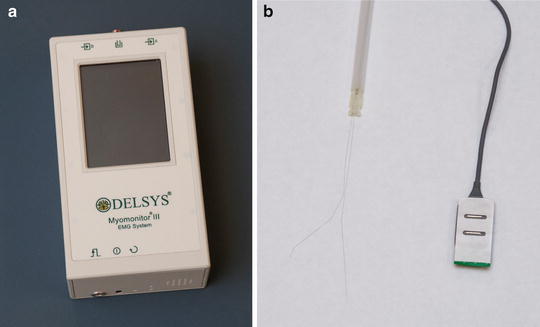
Fig. 3.5
(a) Typical electromyograph to which (b) thin wire (left) or surface electrodes (right) can be attached.
EMG is an important tool for the evaluation of skeletal muscle activity; however, its interpretation can be influenced by several factors that must be taken into account. Features of the surface electrode such as width, diameter, and electrical properties can influence the signal output. In the case of surface EMG, increased distance or increased soft-tissue interposition between the surface electrode and the muscle being tested can also significantly influence signal interpretation [56, 57]. The primary drawback of thin-wire EMG is that the sample size is limited to the surface area of the small electrode whereas surface EMG can obtain measurements over an expanded area of muscle tissue and is also easier to implement; however, this can also introduce unwanted noise due to soft-tissue interposition and contributions from surrounding musculature. In addition, the amplitude or morphology of the EMG readout may be affected by the type of muscle being tested (fast-twitch versus slow-twitch).
Many studies have utilized a normalization technique to study muscle activity—that is, the electrical measurements are compared to a reference standard generated from a maximal voluntary contraction (MVC) of the muscle in question. The ratio of the two measurements is recorded and compared between different subjects [58]. Other methods of obtaining EMGs involve submaximal voluntary contractions and isometric measurements; however, these methods have been less reliable to date [57, 59].
3.4 Strength Screening of Specific Muscles
Anatomic characteristics of the scapular musculature are presented in Table 3.2 [60] to help guide the reader through this section.
Muscle | Origin | Insertion | Nerve supply | Vascular supply | Action |
|---|---|---|---|---|---|
Supraspinatus | Supraspinous fossa | Superior facet of greater tuberosity | Suprascapular nerve | Suprascapular artery | Abduction of the humerus |
Infraspinatus | Infraspinous fossa | Posterior facet of greater tuberosity | Suprascapular nerve | Suprascapular artery | External rotation of the humerus |
Teres minor | Inferolateral aspect of posterior scapular body | Inferior facet of greater tuberosity | Axillary nerve | Posterior circumflex humeral artery, circumflex scapular artery | External rotation of humerus in abduction |
Subscapularis | Subscapular fossa | Lesser tuberosity | Upper and lower subscapular nerves | Transverse cervical artery, subscapular artery | Internal rotation of humerus |
Trapezius | Spinous processes of C7-T12 | Superior aspect of scapular spine | Spinal accessory nerve | Superficial branch of transverse cervical artery | Scapular rotation and elevation |
Serratus Anterior | Upper nine ribs | Anterior aspect of medial scapular border | Long thoracic nerve | Thoracodorsal artery, lateral thoracic artery | Scapular protraction and upward rotation |
Levator Scapulae | Transverse processes of C1-C4 | Medial border of scapula superior to medial base of the scapular spine | Dorsal scapular nerve | Dorsal scapular artery | Scapular elevation |
Rhomboid Minor | Spinous processes of C7-T1 | Medial border of scapula at the level of the medial base of the scapular spine | Dorsal scapular nerve | Dorsal scapular artery | Scapular retraction and rotation |
Rhomboid Major | Spinous processes of T2-T5 | Medial border of scapula inferior to medial base of scapular spine | Dorsal scapular nerve | Dorsal scapular artery | Scapular retraction and rotation |
3.4.1 Periscapular Muscles
3.4.1.1 Trapezius
Innervated by the spinal accessory nerve, the trapezius muscle is a large, flat, triangular muscle that makes up the majority of the superficial posterior cervical and thoracic musculature. The muscle is thought to have three anatomic regions—namely, the superior, middle, and inferior regions—that are thought to have specific functional attributes (Fig. 3.6). The superior fibers originate medially between the occiput and the C7 spinous processes and extend laterally to insert upon the posterior aspect of the distal clavicle, the superomedial acromion and the most distal portion of the scapular spine. The middle fibers arise medially between the C7 and T3 spinous processes and extend laterally to insert primarily along the scapular spine. The inferior fibers originate between the T4 and T12 spinous processes and extend superolaterally to insert as an aponeurosis on the medial confluence of the scapular spine.
Fig. 3.6
Illustration depicting the superior, middle, and lower fibers of the trapezius muscle.
In the early 1990s, Lindman et al. [61, 62] performed immunohistochemical analysis on human trapezius muscles and found significant differences in mitochondrial ATPase activity in various portions of the muscle. Specifically, the lower third of the superior region, the middle region, and the inferior region all had low concentrations of mitochondrial ATPase activity. On the other hand, the uppermost aspect of the superior region had the highest mitochondrial ATPase activity. With this information, the authors suggested that the upper aspect of the superior region was best suited for high-demand, short duration functionality (e.g., heavy lifting) whereas the rest of the muscle was best suited for low-demand, long duration functionality (e.g., posture and dynamic scapular stability). The authors concluded that the differences in ATPase activity and fiber type are likely due to both genetic factors and functional demands.
The functions of the superior, middle, and inferior fibers of the trapezius were first described by Inman et al. [63] in 1944. However, the exact function of each muscle division has been debated for many years. Based on fiber orientation, Johnson et al. [64] suggested that the trapezius largely functions as a scapular stabilizer. More specifically, it was proposed that the upper fibers draw the scapula superomedially while the middle and lower fibers antagonize the function of the serratus anterior, preventing lateral excursion of the scapula. Although others have confirmed the functions of the middle and lower trapezius with various motions (including scapular internal and external rotation [87]) [66–69], the precise role of the upper trapezius remains controversial. A study by Ruwe et al. [70] found a decrease in upper trapezius muscle activity in a series of swimmers with shoulder pain. Another study [69] found increased muscle activity of the middle and lower fibers in a series of patients with signs and symptoms of impingement. Although we understand that contraction of the upper trapezius causes upward rotation of the scapula, its precise role in the development of shoulder discomfort has not been clearly defined. However, it is widely reported that unbalanced periscapular strength and altered muscle firing patterns lead to scapular malposition and dyskinesis, both of which can cause and exacerbate subacromial impingement (scapular dyskinesis is discussed in further detail in Chap. 9).
Clinically, atrophy of the trapezius muscle with alteration in scapular resting position can be quite subtle and thus requires close examination (the scapular resting position is discussed in Chap. 2). Patients with trapezius muscle atrophy, most commonly due to spinal accessory nerve palsy, generally present with “scalloping” of the ipsilateral neck (due to loss of trapezius muscle mass) and superomedial displacement of the inferomedial border of the scapula (so-called “lateral” scapular winging; Fig. 3.7). Patients with trapezius weakness may also have difficulty elevating the humerus above the horizontal plane due to the inability to initiate upward rotation of the scapula [71]. This pattern of winging must be discerned from that which is produced by serratus anterior weakness as a result of long thoracic nerve palsy, which most commonly results in elevation of the medial scapular border away from the chest wall with superolateral displacement of the inferomedial angle.
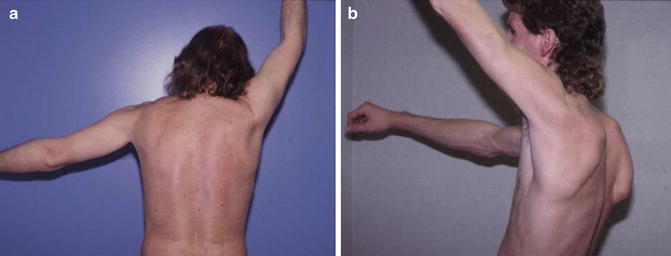
Fig. 3.7
(a) Subtle left-sided scapular winging due to trapezius muscle weakness. (b) Right-sided scapular winging due to serratus anterior muscle weakness. (Courtesy of J.P. Warner, MD).
The upper fibers of the trapezius muscle are tested by simply asking the patient to shrug their shoulders against resistance (Fig. 3.8). At least one study has confirmed this test as being effective for activating the uppermost fibers of the trapezius muscle using surface EMGs [72, 73]. A study by Moseley et al. [74] found that rowing exercises maximally activate the upper trapezius muscle; however, this type of movement also recruits ancillary muscles and is difficult to perform in the clinic setting.
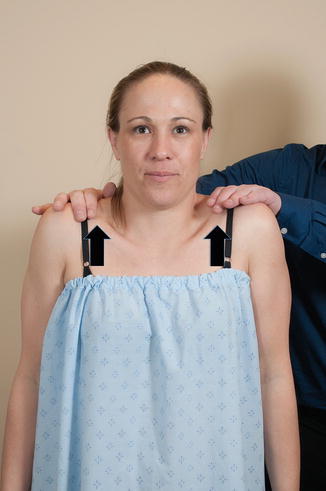
Fig. 3.8
Strength of superior trapezius. The examiner asks the patient to shrug their shoulders against resistance.
The middle trapezius is most easily tested with the patient in the prone position with the arm hanging over the side of the table in 90° of forward flexion. The examiner then places their hand distally and applies a moderate downward force while the patient resists (Fig. 3.9). While this test is effective at testing the middle fibers of the trapezius, care must be taken to rule out anterior instability before performing this test in order to avoid glenohumeral dislocation.
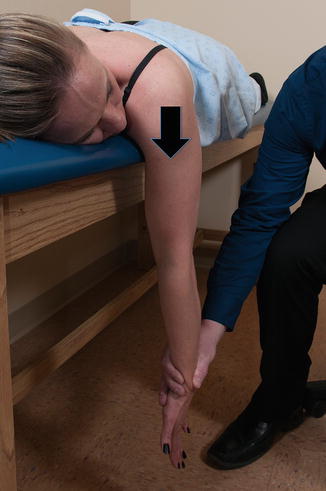
Fig. 3.9
Strength of middle trapezius. With the patient prone and the arm hanging over the edge of the table, the examiner grasps the distal arm and applies a downward force while the patient resists.
To test the lower fibers of the trapezius, the patient is placed in the prone position with the arm abducted to approximately 120° within the scapular plane. This position aligns the upper extremity with the superolaterally directed fibers of the lower trapezius. From this position, the subject then attempts to extend the arm upward while the examiner both applies resistance and simultaneously examines the scapula for any evidence of winging (Fig. 3.10).
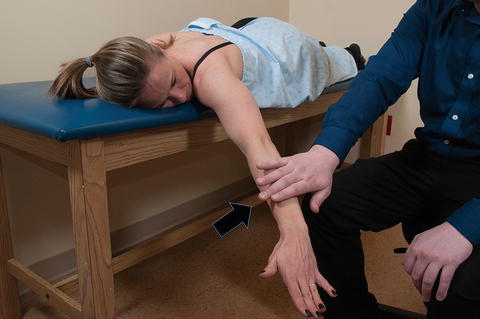
Fig. 3.10
Strength of lower trapezius. With the patient prone, the humerus is abducted to approximately 120° within the scapular plane. The patient then attempts to extend the humerus upward while resistance is applied by the examiner.
Rhomboids
The rhomboid musculature consists of both the rhomboid major and minor which, on some occasions, exist as a single muscle-tendon unit [75]. The rhomboid major originates from the spinous processes between T2 and T5 and inserts along the posterior aspect of the medial border of the scapula just inferior to the medial confluence of the scapular spine and spans inferiorly towards the inferomedial angle. The rhomboid minor originates between the C7 and T1 spinous processes and inserts just superiorly to the rhomboid major at the level of the scapular spine on the posterior aspect of the medial scapular border. The dorsal scapular nerve is derived from the C5 nerve root and provides the motor innervation for both of these muscles (Fig. 3.11).
Fig. 3.11
Illustration highlighting the anatomy of the rhomboid musculature.
The primary functions of the rhomboid musculature are to induce superomedial migration and downward rotation of the scapula such that the glenoid surface is angled inferiorly and posteriorly (i.e., scapular retraction). To test the rhomboids, the patient is asked to place the hands on the iliac crests with the thumbs pointed posteriorly and with the elbows in neutral position. The patient is then asked to resist an anteriorly directed force applied to the medial epicondyles such that the elbows are pushed anteriorly into a flared position. It is advised to observe and/or palpate the medial scapular border while the test is being performed (Fig. 3.12).
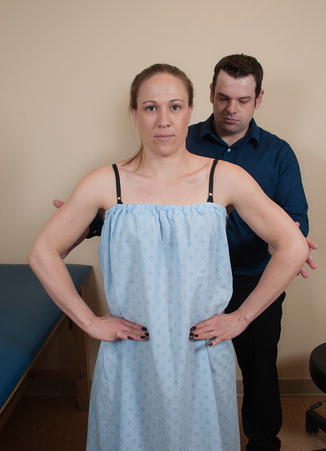
Fig. 3.12
Strength of rhomboids (modified Kendall). The patient is asked to place their hands on the “hips” or iliac crests with the elbows in a neutral position. An anteriorly directed force is applied to the medial epicondyle while the patient attempts to resist. The medial scapular border is simultaneously palpated, if possible.
Smith et al. [76] suggested that the above maneuver (sometimes referred to as the modified Kendall test) does not separately activate the rhomboid muscles from synergistic muscles such as the levator scapulae, middle trapezius, and latissimus dorsi muscles. The authors found that manual testing of the posterior deltoid elicited greater electromyographic activity of the rhomboids compared to that of any of the other MMT maneuvers that were tested (e.g., the Hislop–Montgomery test for rhomboid strength). According to Smith et al. [76], the posterior deltoid test (which is used to test rhomboid strength) is performed with the patient in a sitting position, facing away from the examiner. The humerus is slightly internally rotated and abducted within the plane of the body to approximately 90°. The examiner then places one hand on the posterolateral aspect of the upper arm and applies an anteromedially directed force while the patient resists (Fig. 3.13).
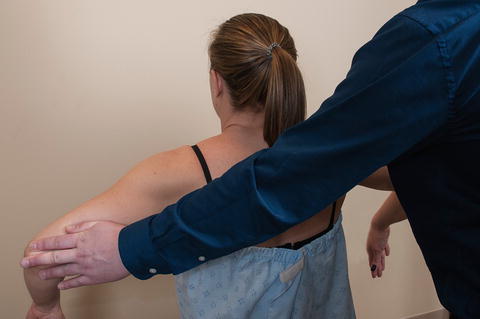
Fig. 3.13
Strength of rhomboids (posterior deltoid test). With the patient sitting facing away from the examiner, the humerus is slightly internally rotated and abducted to approximately 90° of elevation. The examiner places one hand on the posterolateral aspect of the upper arm and applies an anteromedially directed force while the patient provides resistance.
There are no clinical studies that have specifically evaluated the effects of isolated rhomboid or levator scapulae weakness on shoulder function. However, a case report by Hayes and Zehr [46] in 1981 described a patient with interscapular pain and scapular winging who was ultimately found to have a rhomboid muscle avulsion fracture after a traumatic injury. The patient was successfully treated by surgically reattaching the avulsed segment. More recently, Kibler et al. [66] evaluated 64 patients with traumatic medial scapular muscle detachments. All patients that were included in that study demonstrated abnormal resting scapular positions (i.e., winging) and scapular dyskinesis with arm motion.
Serratus Anterior
The serratus anterior muscle is anatomically divided into three divisions. The first division, arising from ribs 1 and 2, inserts along the anterior aspect of the superomedial scapular angle. The second division arises from ribs 2 through 4 and inserts along the anterior surface of the medial border of the scapula. The third division originates from ribs 5 through 9 and inserts on the anterior aspect of the inferomedial scapular angle. Although these distinct divisions are anatomically convenient, the muscle generally functions as a single unit. The muscle is innervated by the long thoracic nerve which is derived from the C5, C6, and C7 nerve roots (Fig. 3.14).
Fig. 3.14
(a) Illustration highlighting the three divisions of the serratus anterior muscle and the associated long thoracic nerve (lateral view). (b) Orientation of the serratus anterior relative to the scapulae in both a normal shoulder and a shoulder with scapular winging (axial view).
Contraction of the serratus anterior muscle results in upward rotation and protraction of the scapula. Weakness of this muscle is most commonly due to long thoracic nerve palsy and results in scapular winging with an increased distance between the medial scapular border and the posterior chest wall. This form of scapular winging must be differentiated from the scapular winging produced by spinal accessory nerve palsy with subsequent weakness of the trapezius muscle (see Fig. 3.7).
Scapular winging due to global weakness of the serratus anterior can be elicited by simply having the patient actively forward flex both arms to 90° of elevation while simultaneously observing the dynamic motion of both scapulae. The examiner can also provide resistance to forward flexion; however, using this method places the examiner in an awkward position to visualize the scapula during arm motion. We prefer to have the patient perform a wall push-up as this maneuver is more sensitive for the detection of both mild and severe serratus anterior weakness in a busy clinic setting. To perform the wall push-up, the patient’s hands are placed flat on a nearby wall at approximately shoulder height and shoulder width apart. The patient then performs a normal push-up as if they were in the prone position while the clinician simultaneously observes both scapulae (Fig. 3.15). Of note, this method of strength testing activates the entire serratus anterior muscle and does not differentiate between the three divisions [77].
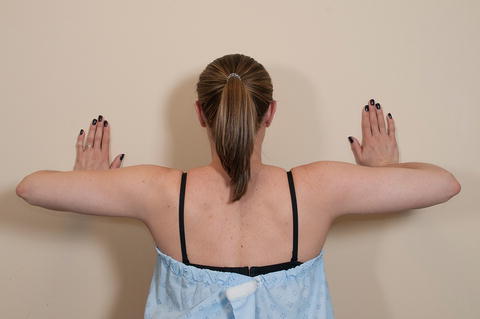
Fig. 3.15
Wall push-up for the assessment of serratus anterior strength. Weakness of the serratus anterior would induce scapular winging during this maneuver.
A study by Celik et al. [78] found that several periscapular muscles, including the serratus anterior, were markedly weaker in shoulders with signs of subacromial impingement compared to healthy shoulders. This finding suggests that evaluation of periscapular musculature is necessary even in patients without perceived scapular dyskinesis. Periscapular muscle weakness can also result from fatigue, especially in those who participate in repetitive overhead activities [79–82]. Glousman [83] found that throwing athletes with shoulder pain had significantly decreased serratus anterior activity via EMG when compared to throwing athletes without shoulder pain. As many others have suggested, the authors concluded that scapular malposition and dyskinesis was a significant contributor to the development of shoulder pain in overhead athletes. Burkhart et al. [84] later described a series of pathologic findings related to scapular motion in overhead athletes for which the term “SICK scapula syndrome” was coined.
Latissimus Dorsi
The latissimus dorsi, which receives its motor innervation from the thoracodorsal nerve, originates from the iliac crest, sacrum, and T7 through L5 spinous processes as an aponeurotic attachment. The fibers of this large, flat muscle travel superolaterally over the teres major muscle and insert just inferior to the lesser tuberosity of the humerus on the medial aspect of the bicipital groove (Fig. 3.16). This orientation has led some to infer its potential role as a humeral head stabilizer acting in synergy with the rotator cuff, especially in the rare situation of humeral avulsion of the glenohumeral ligament (HAGL) lesions [85]. The muscle also variably attaches to the inferomedial angle of the scapula as it travels over the teres major with or without an intervening bursa [86]. The primary functions of the latissimus dorsi muscle are to adduct, extend, and internally rotate the humerus. A classic EMG study by Scheving and Pauly [87] determined that the latissimus dorsi is a more important internal rotator of the humerus than the pectoralis major in several planes.
Fig. 3.16
Illustration depicting the normal anatomy and functional orientation of the latissimus dorsi muscle.
Clinically, the latissimus dorsi is tested with the patient in the prone position and the arms at the side. The patient is then asked to simultaneously extend and internally rotate the humerus while the examiner applies resistance (Fig. 3.17). It is important to note the position of the scapulae during this movement since latissimus dorsi dysfunction has been associated with scapular dyskinesis [88]. The efficacy of this test has been confirmed in a study by Park and Yoo [89] who compared latissimus dorsi activation between six different isometric exercises using surface EMG. The authors found that extension of the humerus in the prone position activated the muscle with greater intensity than any other tested exercise, including the common “lat pull-down” exercise in the seated position.
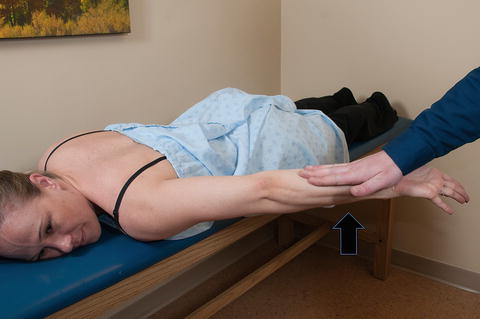
Fig. 3.17
Strength testing of latissimus dorsi. With the patient prone and the arm at the side, the patient is asked to extend and internally rotate the humerus against resistance applied by the examiner.
Several authors have documented potential pathologic processes involving the latissimus dorsi muscle as it relates to the throwing shoulder [65, 90–92]. Nobuhara [91] described a “latissimus dorsi syndrome” in overhead athletes which is characterized by insertional tenderness or muscle tightness. The syndrome is thought to result from repetitive throwing as the latissimus dorsi tendon counteracts the significant external rotation torque produced by overhead athletes resulting in a type of insertional tendinitis. Although uncommon, tears of the latissimus dorsi and/or teres major have also been reported in throwing athletes [90, 93].
3.4.1.2 Rotator Cuff
Supraspinatus
Innervated by the suprascapular nerve, the supraspinatus takes origin from the supraspinous fossa of the scapula and its fibers travel laterally to insert on the greater tuberosity (Fig. 3.18). At approximately the level of the glenohumeral joint, its tendon fibers become confluent with those of the infraspinatus to form a thick, wide tendinous insertion that envelops the humeral head (Fig. 3.19). Due to the intermingling of fibers from each tendon, data regarding the individual insertional dimensions of the supraspinatus tendon footprint have been inconsistent to date (Table 3.3) [94–100]. Further biomechanical and anatomical considerations as they relate to supraspinatus pathology are discussed in Chap. 4.

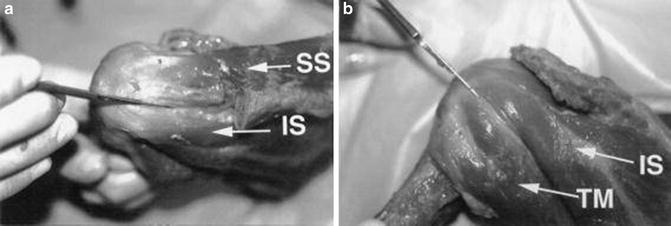
Fig. 3.18
Illustration of the rotator cuff musculature viewing from both posteriorly and anteriorly.
Fig. 3.19
Cadaveric photograph showing the confluence of (a) the supraspinatus and infraspinatus tendons and their insertion sites and (b) the confluence of the infraspinatus and teres minor tendons and their insertion sites. (From Dugas et al. [95]; with permission).
Table 3.3
Reported dimensions of the posterosuperior cuff insertion
References | Footprint dimensions Mean M-L × A-P Length in mm) | |
|---|---|---|
Supraspinatus | Infraspinatus | |
Minagawa et al. [96] | NR × 22.5 | NR × 14.1 |
Roh et al. [98] | NR × 21.2 | NR |
Volk and Vangsness Jr [100] | 27.9 × NR | NR |
Dugas et al. [95] | 12.7 × 16.3 | 13.4 × 16.4 |
Ruotolo et al. [99] | NR × 25 | NR |
Curtis et al. [94] | 23 × 16 | 29 × 19 |
Mochizuki et al. [97] | 6.9 × 12.6 | 10.2 × 32.7 |
The isolated primary functions of the supraspinatus muscle are to abduct the humerus and to act as a physical barrier to prevent superior migration of the humeral head. There are numerous methods by which supraspinatus strength can be tested. Perhaps the most popular methods were proposed by Jobe [101]. According to the results of previous EMG studies [97], he recommended testing the supraspinatus with the humerus in 90° of abduction within the scapular plane and in maximal internal rotation such that the thumb pointed towards the floor (the “empty can” position). The patient then attempted to abduct the humerus further against resistance applied by the examiner (Fig. 3.20). Weakness in this position was thought to be the result of isolated supraspinatus weakness with minimal contributions from other muscles.
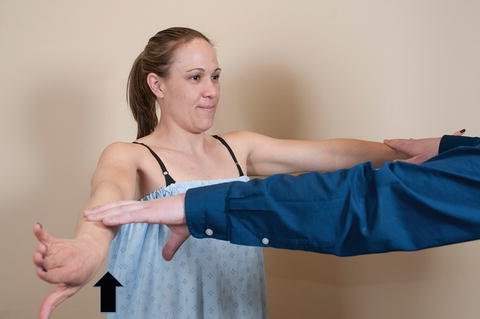
Fig. 3.20
Jobe’s “empty can” position for supraspinatus strength. With both arms at approximately 90° of abduction in the scapular plane and the thumbs pointed downward, the patient attempts to further abduct the humerus against resistance applied by the examiner. The relative strength of each arm is compared.
The assumption that the supraspinatus is isolated using the “empty can” test has been challenged on several occasions. Of note, Blackburn et al. [102] studied the electrical activation of the supraspinatus muscle in various arm positions with and without the application of resistance using surface EMG. Although the investigators did find relative isolation of the supraspinatus with the arm abducted to 90° within the scapular plane in neutral rotation, their EMG results suggested that the “empty can” position did not maximally activate the supraspinatus. Rather, maximal electrical activity occurred with the patient prone and the humerus abducted to approximately 100° in maximal external rotation; however, they also found EMG activity within the teres minor and infraspinatus muscles in this position. A later EMG study found that neither the “empty can” position nor the Blackburn position fully isolated the supraspinatus muscle and that other muscles, particularly the anterior and middle portions of the deltoid muscle, contribute significantly to strength in these positions [103].
The fact that the deltoid and the supraspinatus work synergistically to abduct the humerus has also been suggested by others [104, 105]. Colachis Jr and Strohm [105] selectively injected the suprascapular nerve with local anesthetic, thus paralyzing the supraspinatus and infraspinatus muscles. Although subjects were mildly weak with abduction, they were still able to achieve full humeral abduction. The investigators found a similar result after selective injection into the axillary nerve (paralyzing the deltoid muscle)—patients were still able to fully abduct the humerus despite mild weakness [104]. These studies suggested that patients with a full-thickness supraspinatus tear or deltoid dysfunction may still be able to achieve full active humeral abduction, especially when the supraspinatus tear does not extend anteriorly or posteriorly resulting in a derangement of dynamic rotator cuff force couples (see Chap. 4 for more details on rotator cuff force couples [106]). Patients with massive rotator cuff tears involving more than one tendon often display a positive “drop arm sign” in which they are unable to hold the humerus in an abducted position against gravity. In these cases, the arm “drops” back to the patient’s side (Fig. 3.21).
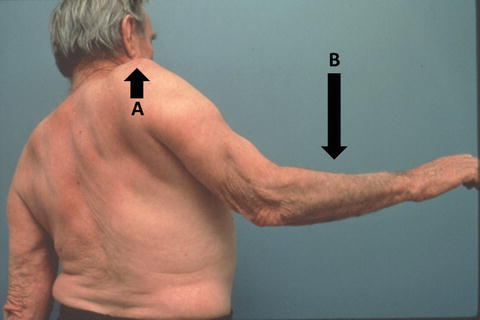
Fig. 3.21


Drop arm sign. The examiner passively places the humerus in 90° of abduction and asks the patient to hold the position. The drop arm sign occurs when (a) the shoulder appears to “shrug” as the humerus is displaced superiorly and (b) the arm falls back towards the side of the body despite the patient’s best efforts. (Courtesy of Christian Gerber, MD).
Related posts:

Stay updated, free articles. Join our Telegram channel
Full access? Get Clinical Tree
